10 Installing JVM Diagnostics
This chapter describes how you can install Java Virtual Machine Diagnostics (JVMD) in the Enterprise Manager Cloud Control environment.
In particular, this chapter covers the following:
10.1 Overview of Java Virtual Machine Diagnostics
Java Virtual Machine Diagnostics (JVMD) is one of the critical functionalities in Enterprise Manager Cloud Control that enables administrators to diagnose performance problems in Java applications in the production environment. By eliminating the need to reproduce problems, it reduces the time required to resolve these problems, thus improving application availability and performance.
Therefore, to manage applications effectively and identify the root cause of performance problems in the production environment without having to reproduce them in the test or development environment, you must deploy JVMD Engine. The JVMD Engine runs as an Enterprise JavaBeans (EJB) Technology on a WebLogic Server.
The JVMD Agent is deployed on the targeted JVM (the one running a production WebLogic Server). It collects real-time data and transmits it to the JVM Diagnostics Engine. This data is stored in the Management Repository, and the collected information is displayed on Enterprise Manager Cloud Control console for monitoring purposes. The communication between the JVMD Engine and the JVMD Agent can be a secure (SSL) or non-secure connection.
To install JVMD, use the Application Performance Management page that is accessible from within the Enterprise Manager Cloud Control console. To access this page, from the Setup menu, select Middleware Management, then select Application Performance Management.
Figure 10-1 displays the Application Performance Management page.
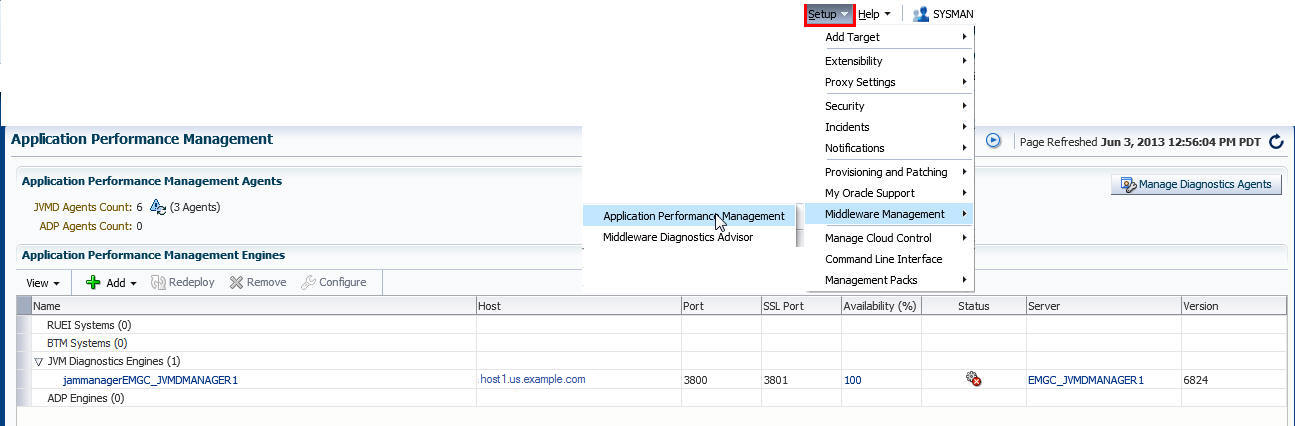
The Application Performance Management page enables you to deploy, upgrade, and remove JVMD Engine and JVMD Agents, and monitor the health of the JVMD Engine application in a reliable and efficient manner.
You can use the Application Performance Management page for the following:
-
Deploy, upgrade, and remove JVM Diagnostics Engines.
-
Monitor the availability of all JVMD Engines.
-
Access information about JVMD Engines such as the hosts to which the JVMD Engines are deployed, their current status, the port on which they are running, their version, and so on.
-
Deploy, upgrade, and remove JVMD Agents.
-
Know the number of reporting JVMD Agents, and whether they must be upgraded or not.
10.2 Before you Begin Installing JVM Diagnostics
Before you install JVM Diagnostics, keep these points in mind.
For JVMD Engine:
-
The Weblogic Server on which you want to deploy JVMD Engine must be up and running.
-
Oracle recommends that you do not deploy other applications to the managed server on which the JVMD Engine is deployed.
-
If you plan to use JVMD in a multi-OMS setup, you can do either of the following:
-
Deploy JVMD Engine on an OMS host first, clone the OMS, and then deploy JVMD Engine on the additional OMS host.
-
Clone the OMS first, and then deploy JVMD Engine on the original and additional OMS hosts.
-
For JVMD Agents:
-
To deploy a JVMD Agent, the target application server must be up and running.
-
Ensure that at least one JVMD Engine is up and running, and is in the active state, to deploy a JVMD Agent.
10.3 Prerequisites for Installing JVM Diagnostics
Ensure that you meet the following prerequisites:
-
For information about JVMD Engine hardware requirements, refer to Section 2.1.
-
One JVM target is created per WebLogic managed server. Considering 2 active threads on an average per JVM, for better performance it is recommended that 3 JVMD engines would be required to support 2000-3000 targets.
-
The JDK version required to deploy JVMD Agent is JDK 1.5 or higher.
-
The Cloud Control user has the
AD4J_ADMINISTRATORprivilege. -
Supported operating systems for JVMD Agents are:
-
Linux x86
-
Linux x86-64
-
Windows x86
-
Windows x86-64
-
Solaris x86
-
Solaris x86-64
-
Solaris SPARC
-
Solaris SPARC (64 bit)
-
AIX PowerPC (32 bit)
-
AIX PowerPC (64 bit)
-
JRVE
-
HP IA-64(32 bit)
-
HP IA-64(64 bit)
-
HP PA-RISC(32 bit)
-
10.4 Installing JVM Diagnostics
This section describes how to deploy JVMD Engine on an OMS host and JVMD Agents on monitored WebLogic domains. It consists of the following:
10.4.1 Deploying JVMD Engine on an OMS Host
To deploy JVMD Engine on an Oracle Management Service (OMS) host, follow these steps:
-
From the Setup menu, select Middleware Management, then select Application Performance Management.
-
On the Application Performance Management page, from the Add menu, select JVM Diagnostics Engine.
-
On the Deploy JVM Diagnostics Engine page, for Host, select the OMS host on which you want to create a Managed Server.
Note:
While deploying JVMD Engine on an OMS host, the application creates a Managed Server on the host, then deploys JVMD Engine on the created Managed Server. The created Managed Server is part of the Enterprise Manager WebLogic domain. -
For Managed Server Name, enter a unique name for the Managed Server you want to create.
For example,
EMGC_JVMDMANAGER1,EMGC_JVMDMANAGER2,and so on.Note:
It is recommended that you enter a name in theEMGC_JVMDMANAGER*pattern. -
For Managed Server Listen Port and Managed Server SSL Listen Port, enter the port values you want to use. Ensure that the port values you enter are not already in use. By default, these fields are assigned the values 3800 and 3801 respectively.
-
Specify values for Oracle Management Server Host Credentials and Oracle WebLogic Domain Credentials.
Oracle Management Server Host Credentials are the host credentials that were used to deploy a Management Agent on the OMS host you selected. Oracle WebLogic Domain Credentials are the credentials for the Administration Server of the Enterprise Manager WebLogic domain.
-
Click Deploy to submit a deployment job to the Enterprise Manager job system.
Note:
When you click Deploy, you may receive a warning mentioning that the WebLogic domain is already in edit mode, and mentioning the number of unsaved changes and non active changes. If there are no unsaved or non active changes, or if you are sure that the changes will not affect the JVMD Engine deployment, ignore this warning and proceed. The mentioned changes can be viewed from the WebLogic Administration console.The JVMD Engine Deployment Status page appears with a link to the job status. Click the link to view the status of the job that you submitted.
If you encounter any errors during the deployment, see Oracle Enterprise Manager Cloud Control Advanced Installation Guide.
10.4.2 Deploying JVMD Agents on Monitored WebLogic Domains
This section describes how to deploy JVMD Agents on monitored WebLogic domains. For information on how to deploy JVMD Agents on application servers other than WebLogic Server, see Oracle Enterprise Manager Cloud Control Advanced Installation and Configuration Guide.
To deploy JVMD Agents on monitored WebLogic domains using the Application Performance Management page, follow these steps:
-
From the Setup menu, select Middleware Management, then select Application Performance Management.
-
On the Application Performance Management page, under the Application Performance Management Agents section, click Manage Diagnostics Agents.
Note:
If no active JVMD or ADP Engines are present, and no JVMD or ADP Agents are deployed, the Manage Diagnostics Agents button is disabled. -
For Operation, ensure that Deploy is selected.
If you select Expand All from the View menu, you can view the target name, target type, target host, target status, platform, and so on of all the discovered WebLogic Administration Servers and Managed Servers (part of all discovered WebLogic domains).
Select the WebLogic Managed Servers on which you want to deploy JVMD Agents. Click Next.
-
On the Target Credentials page, for each WebLogic domain, specify a value for Oracle WebLogic Administration Server Host Credentials and Oracle WebLogic Domain Credentials, then click Apply.
Oracle WebLogic Administration Server Host Credentials are the host credentials for the host on which the Management Agent that is monitoring the selected WebLogic domain is running. Oracle WebLogic Domain Credentials are the credentials for the Administration Server of the selected WebLogic domain.
Click Next.
-
On the JVMD Agents Configurations page, for each WebLogic domain, select a JVMD Engine for Available JVMD Engines, then click Apply. All the JVMD Agents deployed on Managed Servers of the selected WebLogic domain will report to this JVMD Engine. Alternatively, you can select Other to connect to a load balancer in case of multiple engines.
If the WebLogic Home and Middleware Home fields are displayed under the Additional Configuration section, specify values for them. The WebLogic Home and Middleware Home fields are displayed if their values could not be obtained internally.
Also, sometimes when the WebLogic Administration Server is behind a firewall or on a virtual host, the application may not be able to connect to it, using the default host value. In this case, you may need to provide some additional information in the Additional Configuration section. For example, if the WebLogic Administration Server is on a virtual host, and the application cannot connect to it using the default host value, you may have to provide the virtual host IP address in the Additional Configuration section.
Click Next.
-
On the Review page, review all the information, then click Deploy.
A job is created for JVMD Agent deployment. Click the links to view the job progress. Once the JVMD Agent deployment job is successful, you can verify the deployment by navigating to the Application Performance Management page, and viewing the Application Performance Management Agents section.
Note:
While deploying a JVMD Agent, if the Deploy HTTPDeployer On Target job step fails due to an SSL handshake failure, or if you encounter any other error, refer Oracle Enterprise Manager Cloud Control Advanced Installation Guide.
10.5 After You Install JVM Diagnostics
This section describes the verification tasks you can perform after installing JVMD Engines and JVMD Agents. It consists of the following:
10.5.1 Verifying JVMD Engine Installation
After deploying JVMD Engine, to verify if JVMD Engine has been installed successfully on the Managed Server, from the Setup menu, select Middleware Management, then select Application Performance Management. On the Application Performance Management page, the newly deployed JVMD Engine must appear and it must be up and running.
10.5.2 Verifying JVMD Agent Installation
After deploying JVMD Agents, you can perform the following sanity checks to verify if the JVMD Agents were installed on the Managed Servers successfully:
-
In Cloud Control, from the Targets menu, select Middleware. On the Middleware home page, select the domain where the JVMD agents were deployed. On the left hand pane, from the Target Navigation section, click Java Virtual Machine Pools to expand the menu. The JVMD targets must appear.
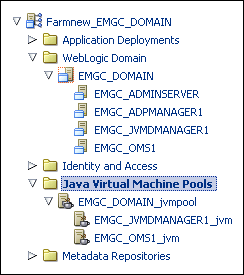
Each of the targets corresponds to one of the Managed Servers chosen for JVMD Agent deployment. All these targets must be up and running.
-
Log in to the WebLogic Administration console of the domain where the JVMD Agents were deployed. The target Managed Servers should have a new application having the name
javadiagnosticagent, and this application should be up and running.