Performing Setup Steps for On-Premises Oracle Fusion Applications Sources

These procedures apply to on-premises Oracle Fusion Applications sources.

Creating a User for ETL

The ETL process must be run by a user with appropriate data security privileges granted on the Oracle Fusion Applications tables from which data is extracted into Oracle Business Analytics Warehouse. For this purpose, the enterprise role named FUSION_APPS_OBIA_BIEE_APPID is provisioned during the installation of Oracle Fusion Applications with the appropriate ETL security privileges.

This procedure applies only to on-premises Oracle Fusion Applications sources.

Work with your security administrator for Oracle Fusion Applications to complete these steps.
  1. In the Oracle Fusion Applications LDAP system, create a new user.

    For example, you might create a new user named OBIA_ETL_USER.

  2. Make the user a member of the Enterprise Role FUSION_APPS_OBIA_BIEE_APPID.
  3. Make a note of the user credentials.
  4. When using the embedded LDAP for Oracle BI Applications, create a user with exactly the same credentials as the ETL user created in Oracle Fusion Applications LDAP.

    Grant this OBIA_ETL_USER the BIAdministrator Duty Role.

Configuring the Oracle BI Repository for ETL

This procedure applies only to on-premises Oracle Fusion Applications sources.

To configure the repository for ETL against on-premises Oracle Fusion Applications sources:
  1. Log into Oracle BI Administration Tool.
  2. Open the Oracle BI Repository for Oracle BI Applications in offline mode.
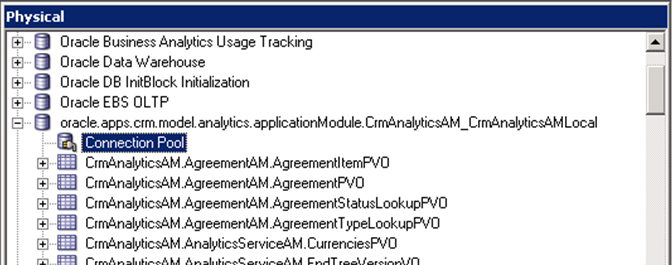
  3. In the Physical layer, configure a connection to the BIEE broker for each of the Oracle Fusion Applications pillar domains. Set the connection for each of these Physical layer objects:
    Pillar Physical Layer Object

    CRM

    oracle.apps.crm.model.analytics.applicationModule.CrmAnalyticsAM_CrmAnalyticsAMLocal

    FSCM

    oracle.apps.fscm.model.analytics.applicationModule.FscmTopModelAM_FscmTopModelAMLocal

    HCM

    oracle.apps.hcm.model.analytics.applicationModule.HcmTopModelAnalyticsGlobalAM_HcmTopModelGlobalAMLocal

    1. Right-click one of the pillar objects, and select Properties.
    2. In the General tab of the Database dialog, select Allow direct database requests by default.
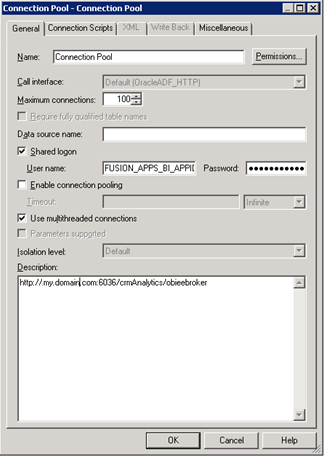
    3. Expand the pillar object, and double-click Connection Pool.
      This graphic is described in the surrounding text.

      The Connection Pool dialog opens.

    4. In the General tab, enter FUSION_APPS_BI_APPID as the data source user name, and enter the password for this user.

      You can obtain the password for the FUSION_APPS_BI_APPID user from your Oracle Fusion Applications administrator.

      This graphic is described in the surrounding text.
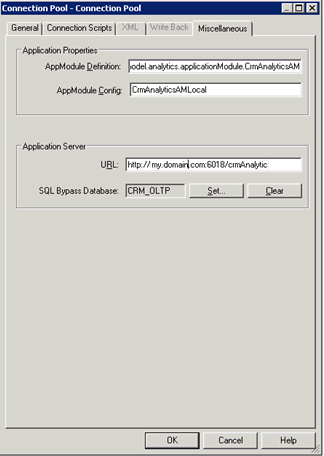
    5. In the Miscellaneous tab, in the Application Server URL field, enter the URL for the BIEE broker for the appropriate pillar, in the format:
      Http://<host>.<domain>:<port>/<pillar>Analytics/obieebroker
      

      For example:

      Http://hostName.myDomain.com:30615/crmAnalytics/obieebroker
      
    6. In the SQL Bypass Database field, enter <PILLAR>_OLTP.

      For example: CRM_OLTP.

      This graphic is described in the surrounding text.
    7. Repeat steps 3a through 3e for each of the three pillars.
  4. Set the value for these DSN variables.

    These variables specify the connection to the Fusion Applications transactional database.

    • CRM_OLTP_DSN

    • FSCM_OLTP_DSN

    • FBI_OLTP_DSN

    • HCM_OLTP_DSN

    • OLTP_DSN (used by the Marketing OLTP data source)

    1. In the menu bar, select Manage, then Variables.
    2. In the Variable Manager dialog, scroll down to locate the <PILLAR>_OLTP_DSN variable.
    3. Double-click the <PILLAR>_OLTP_DSN variable.

      The Static Repository Variable dialog opens.

    4. In the Default Initializer text box, enter the connection information to the Fusion Applications transactional database in the tnsnames.ora format.

      For example:

      '(DESCRIPTION=(ADDRESS=(PROTOCOL=TCP)
       (HOST=db_host_name.domain.com)
       (PORT=<port>))(CONNECT_DATA =
       (SERVICE_NAME=<service_name>)))'
      
    5. Repeat steps 4a through 4e for each DSN.
  5. Set the value for these user variables.

    These variables specify the Oracle Fusion Applications transactional database user.

    • CRM_OLTP_USER

    • FSCM_OLTP_USER

    • FBI_OLTP_USER

    • HCM_OLTP_USER

    • OLTP_USER (used by the Marketing OLTP data source)

    1. Obtain the user name for the users listed above from the repository for Oracle Transactional Business Intelligence.
    2. Obtain the password for the users from the Oracle Fusion Applications administrator.

      You will need this password in a later step.

    3. In the menu bar, select Manage, Variables.
    4. In the menu bar of the Variable Manager dialog, select Action, New, Repository, then Variable.
    5. In the Variable Manager dialog, scroll down to locate the <PILLAR>_OLTP_USER and OLTP_USER variables.
    6. Double-click the variable.

      The Static Repository Variable dialog opens.

    7. In the Default Initializer text box, enter the user name.
    8. Repeat steps 4a through 4e for each user.
  6. Configure the connection pool for each of the OLTP objects listed in the Physical layer:
    • CRM_OLTP

    • FSCM_OLTP

    • FBI_OLTP

    • HCM_OLTP

    • Marketing OLTP

    1. Expand the object.
    2. Double-click Connection Pool.

      For Marketing OLTP, double-click Fusion OLTP Connection Pool.

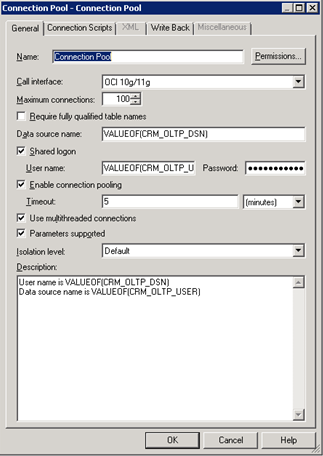
      The Connection Pool dialog opens.
    3. In the Data source name field, enter VALUEOF(<PILLAR>_OLTP_DSN).

      For example: VALUEOF(CRM_OLTP_DSN).

      For Marketing OLTP, enter VALUEOF(OLTP_DSN)

    4. In the User name field, enter VALUEOF(<PILLAR>_OLTP_USER).

      For example: VALUEOF(CRM_OLTP_USER).

      For Marketing OLTP enter VALUEOF(OLTP_USER).

      The user for CRM_OLTP, FSCM_OLTP, FBI_OLTP, and HCM_OLTP is the same. The user for Marketing OLTP is the value of OLTP_USER, which is different from the user for the other pillars.

    5. In the Password field, enter the password for the user.

      Obtain this password from the Oracle Fusion Applications administrator.

      This graphic is described in the surrounding text.
    6. Repeat steps 6a through 6e for each of the OLTP objects.