Release 1.1
Part Number A75154-04
Home |
Book List |
Contents |
Index | Master Index | Feedback |
| Internet File System User's Guide Release 1.1 Part Number A75154-04 |
|
![]()
![]()
This chapter covers Oracle iFS's content management functions. Topics include:
Oracle iFS gives you the ability to manage your data in two significant ways:
Locking is useful when you are the sole content manager of a folder and it's ready to publish. By locking the folder, no further changes may be made to it.
Versioning also adds value when you are the sole author of your files, because it allows you to retain data that you might need again in the future. But it is especially useful when you are working collaboratively with other content contributors on one or more files.
Versioning allows you to retain the original and any subsequent copies of a file in the database, while you make revisions to the file on your local drive.
Versioned files must be checked in and out of the database. Checking out a file means that no one will be able to edit that file while you work on it. Checking the file in again frees it for editing by individuals with the appropriate permissions.
Whenever you check in a versioned file, Oracle iFS automatically keeps a copy of the older file as well as the new version, and, over time, builds a version history for the file. For example, if you check out a memo, change it, and save your changes, then decide that you made a mistake, you can retrieve the previous version, or an even older version, instead of trying to reconstruct it from memory.
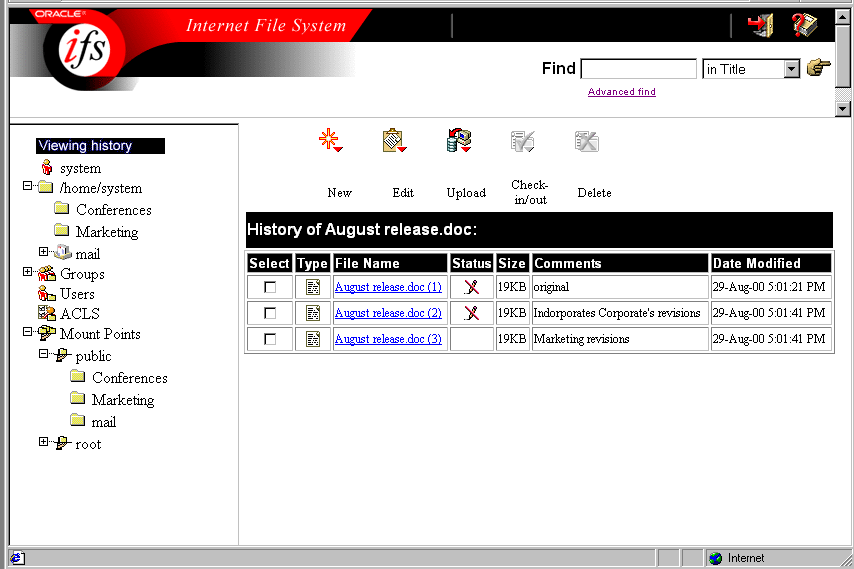
Here is an example of a Version History:

The versions shown in the Version History may be viewed only; they cannot be changed. Users with appropriate permissions can download a previous version to their local drive and edit it. When the file is uploaded, it becomes the current version but cannot be edited until you check the file in again.
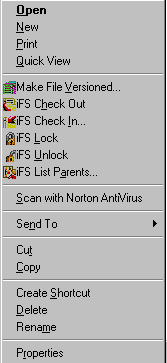
You make a file versioned using a single command ("Make File Versioned" on the Windows interface, "Make Versioned" on the Web interface). A versioned file is automatically given additional attributes that store information about the file family (all versions of the file) and each version of the file as it is created.
To protect the file from being overwritten, if you save a new copy of a versioned file, that act itself creates a new version of the file. If you check out the file and save new versions of the file, Oracle iFS stores the new copies but doesn't create a new version until you check the file back in.
You can use the iFS Versions tab on the Properties window of the Windows interface, or the History command on the Edit menu of the Web interface, to view and access previous versions of the file. You can even restrict access to the older versions for a particular type of user. In this way, a published website may be an older version than the version the content developers are currently working on.
Because Oracle iFS adds special attributes to versioned files, to retain these attributes you must check the file out and copy it to your local drive to edit it. The next time you check in the file (not necessarily the next time you save the file), a new version is created.
For example, if you were to check out a file, you could then edit the checked-out version. You could make several changes, saving after each one. When you were done editing, you could then check in the file. At that point, a new version would be created, and would be the version directly after the one you checked out. Alternatively, if you don't check out the file, but make changes to it and save them, each time you save the file a new version is created.
Let's say you have written a report, a presentation, and a flowchart that must be reviewed by three people: a content editor, a subject matter expert, and the head of your department. Assume that all three people have the correct permissions to edit each file.
At this point your reviewers are able to check out each file and download it to a local drive to make their edits. If a file is already checked out by another reviewer, they will not be able to edit it until it is checked in again. This approach results in multiple versions of the file, each modified by a different reviewer.
Whenever you check out a versioned file, the best practice is to copy it to your local hard drive. In many cases, especially with Microsoft Office documents, it's a good idea to work on a local copy of the file, then upload the final version. The reason for this is that some applications cause Oracle iFS metadata about the file to be lost, along with previous versions, when the file is saved.
|
Note: To prevent others from editing the originals while you work with them, versioned files that you copy to your local drive for editing must be checked out before you copy them. |
The first time you upload a file into Oracle iFS, the file is nonversioned. Whether that original is retained in the database as changes are made to it depends on whether it becomes a versioned file, or remains nonversioned. The following subsections explain what you can do with versioned versus nonversioned files.
Here's what you can do with a nonversioned file:
The unique characteristic of a versioned file is that a version history is saved for it. You can access the history of changes, and view older versions, although older versions are available as read-only files. Only the most recent version is editable. Here's what you can do with a versioned file:
All file versions can be viewed and managed from the iFS Versions tab of the Windows Properties window. To make a file versioned:
A confirmation message is displayed.
To view the version information for a file in the Windows interface:
The iFS Versions tab is broken into three sections, described in the table below.
To access a specific version of a file, other than the most current version, you must make a copy of the version you want to work with:
The version you selected is now copied to the chosen location. You can rename the file, modify it, and either replace the current version or maintain it as a separate file.
To remove one or more versions of a file from the database:
Only versions prior to the latest version can be deleted. You cannot delete all versions. One must remain after your delete.
To make a file versioned:

You can tell a file has been versioned, because the file name is displayed in the File List in boldface type. Oracle iFS handles the versioning tasks for you automatically.
To access a previous version of a file, use the History function:
In the Status column, you may notice a pencil with a red line through it, denoting that the history files are read-only.

|
Note: If you want to edit the earlier version, click the Select checkbox to the left of the file you want to edit. Click the Edit icon, and select Copy from the drop-down menu. Paste the file to a local directory. By editing an earlier version and uploading it to a directory where the file currently appears, you can make an earlier version the latest version. This involves deliberately overwriting the current version with a previous version. No data is lost; what was the current version is saved. For information on uploading files to Oracle iFS, see Chapter 3, "Managing Files and Folders". |
On the History Of... Web page, there is a Select checkbox beside each version that allows you, if you have the appropriate permissions, to perform the following functions with a given version.
The Check In/Check Out feature lets you collaborate with others working on the same files, while making sure that no one inadvertently writes over a file that you are working on.
In order to use the Check In/Check Out feature, the file must be a versioned file.
Checking in or checking out a file is similar to locking and unlocking a file, except that a new version of the file is created whenever the file is checked in. This preserves a version history of the file. Locked files are similarly protected, but cannot be modified until they are unlocked, and do not preserve a version history. Any saved changes in a locked file overwrite the previous (and only) version of the file. For more information, see "Overview of Oracle iFS Content Management".
When several people have access to the same files at the same time, two users may try to change and save the same file at the same time. Here is what may happen if you don't use a check in/check out system:
To avoid this problem, the Check in/Check out function prevents other users from saving changes to a file that is already checked out. When you know you are working collaboratively and want to protect the changes you make from being inadvertently overwritten, you can protect your work by following the check in/check out process:
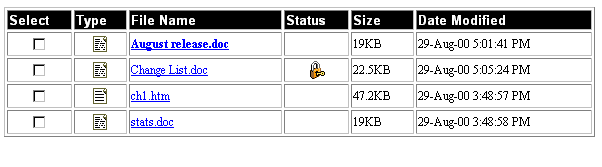
When a file is checked out, the person who has the file checked out is allowed the permissions granted to their ACE. Other users see a lock icon in the file Status column on the Web interface, and have read permission only. They will not see the new version of the file until it is checked in.
After changes to a file have been made and the file has been saved, the person who checked out the file checks it back in. Once the file is checked in:
Of course, this list assumes that the other users have the required security privileges to access the file.
To check out a file:
The system displays a confirmation message.
Checking in a file creates a new version of the file. If you plan to make incremental changes to a file and want to keep each version, then you must check the file out and back in each time you make changes to it. Otherwise, if you just keep updating the file, only the version you check in is kept. Alternatively, if you don't check out the file, each time you update it, a new version is automatically created. You do, however, run the risk that someone else will work on the same file you are working on and overwrite your work.
To check in a file:
To check out a file using the Web interface:
You now have full read/write access to the file, if you have the appropriate permissions. Other users have read-only access to what was the latest version until you check in the file.
To check in a file or files using the Web interface.
Other users now have full read/write access to the file, if they have the proper permissions.
If you have checked out a file, but decide not to check in changes, you can cancel the check out rather than checking in the file. This releases the file to other users without creating a new version of the file.
To cancel a check out using the Web interface:
When you cancel the check out, the file reverts to the version at check out. If you have made changes to the checked-out file, and want to save those changes, copy the file to another location before cancelling the check out.
If your files are not versioned, you can prevent them from being overwritten by using the Oracle iFS locking feature. Both files and folders can be locked and unlocked. Locking is useful when you want to retain a file in the database, but don't want to allow changes to it, and, therefore, don't require a change history.
Locking a file or folder prevents it from being deleted, moved, or modified until the person who locked the file unlocks it. When a file or folder is locked, no one, including the person who locked it, can accidentally change or delete it. The person who locked the file can open it and edit it, but those edits will not be saved.
Locking overrides the write and delete permissions of users other than the individual who locked the file. Those users can still open the file and download it to their own directories, if they have the appropriate permissions. However, the only person who can unlock it is the person who locked it.
You cannot delete a locked file or folder. If you attempt to delete an unlocked folder that has one or more locked files in it, you will not be allowed to do so.
|
Note: You cannot lock versioned files. Versioned files are protected automatically by the check-in/check-out process. |
You can lock and unlock files and folders in the Windows interface by setting their Read-only property.
To lock files or folders:
You can verify that your file has been locked by right-clicking the file name and choosing Properties from the context menu. On the General tab, the Read-only checkbox will be checked. Or, you can look at the iFS Attributes tab. The LockState indicator will be set to "1."
To unlock files or folders, reverse the process:
Again, you can verify that the lock has been removed by looking at the Read-only checkbox on the General tab or the LockState indicator on the iFS Attributes tab of the Properties menu.
To lock a file or folder:
A lock icon appears in the Status column of the file(s) you locked.
When the lock icon has a key in it, as in the example above, you are authorized to unlock the file and work with it. When there is no key in the lock, you cannot unlock the file.
To unlock file(s) or folder(s):
The lock icon will be removed from the Status column, and the file or folder can now be opened.
|
|
 Copyright © 1996-2001, Oracle Corporation. All Rights Reserved. |
|