Oracle9i Application Server Installation Guide
Release 1.0.2 for Sun SPARC Solaris

Part Number A86239-01

Library

Contents

Index

Go to previous page Go to next page

5
Enterprise Edition

This chapter guides you through the installation steps for the Enterprise Edition of Oracle9i Application Server. It lists basic steps for a quick installation and provides detailed information for reference. This is followed by basic post-installation tasks.

Contents

Installation

The following instructions guide you through the Enterprise Edition installation option of Oracle9i Application Server.
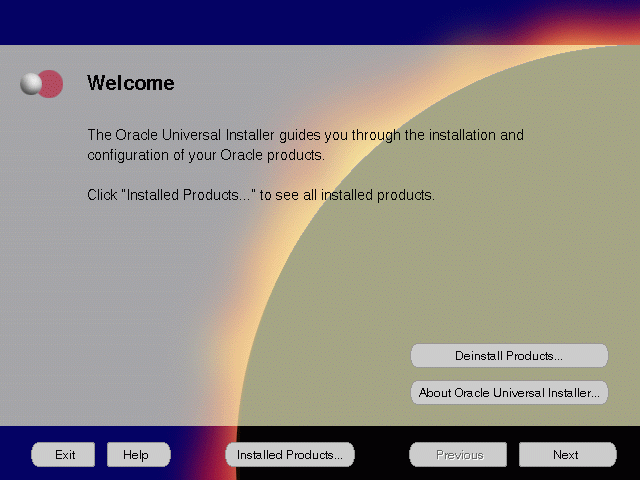
  1. Review the Oracle Universal Installer Welcome screen and click Next.

    Figure 5-1 Welcome Screen


    Text description of wel.gif follows.
    Text description of the illustration wel.gif

    The Welcome screen provides information about the Oracle Universal Installer.

    The following function buttons appear on the installation screens.
    • Deinstall Products: To de-install individual components or the entire product. This button appears only on the Welcome screen.

    • About Oracle Universal Installer: To view the version number of the installer in use.

    • Exit: To quit the installation process and exit the installer.

    • Help: To access detailed information about the functionality of each screen.

    • Installed Products: To view currently installed products or to de-install the entire product or components.

    • Previous: To return to the previous screen.

    • Next: To move to the next screen.

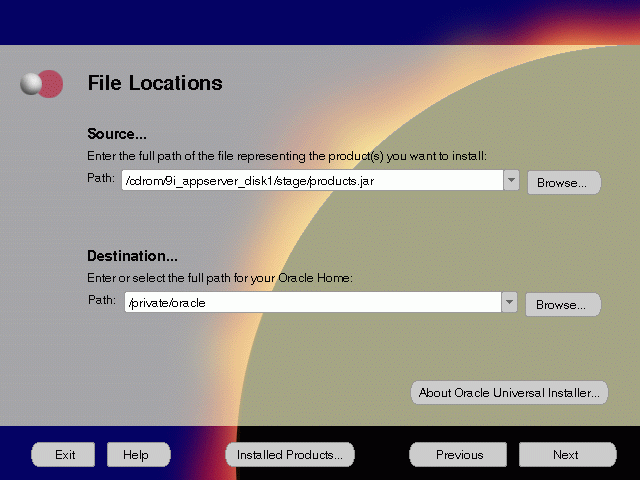
  2. Verify the source and destination paths and click Next.

    Figure 5-2 File Locations Screen


    Text description of filloc.gif follows.
    Text description of the illustration filloc.gif

    The File Locations screen allows you to enter the full path for the source and destination locations of Oracle9i Application Server.

    • Source: This is the full path to the products.jar file from which the product will be installed. The installer detects and uses the default values of the products.jar file of the installation program. Do not change the path.

    • Destination: This is the full path to the ORACLE_HOME where the product will be installed. The installer defaults to the ORACLE_HOME set in the pre-installation chapter.

      For more information regarding ORACLE_HOME, refer to "ORACLE_HOME".
    • Browse: To navigate through the file system to find source and destination locations.

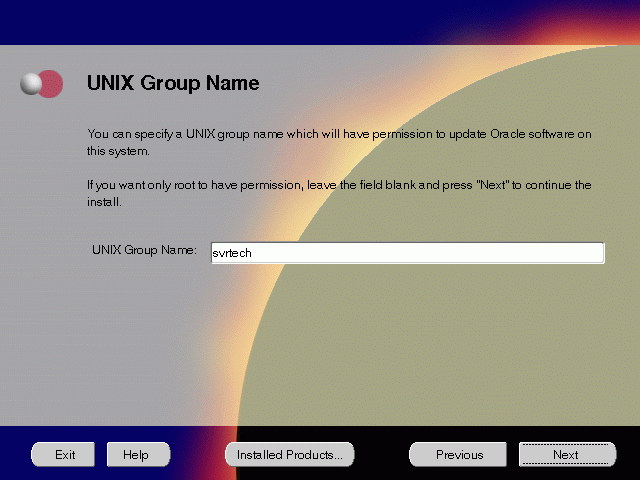
  3. Enter a UNIX group name and click Next. This screen appears only the first time you run Oracle Universal Installer on your machine.

    Figure 5-3 UNIX Group Name Screen


    Text description of grpnm.gif follows.
    Text description of the illustration grpnm.gif

    The UNIX Group Name screen grants permission for the oraInventory directory to the group specified. For more information, refer to "UNIX Group Name for the Oracle Universal Installer Inventory" .

    UNIX Group Name:

    • Enter a UNIX group name for those who have permission to configure all the functionality of Oracle9i Application Server. Verify your group name by entering this command from the UNIX prompt the installer was launched from:

      prompt> id
      
      
    • Run the orainstRoot.sh script from your ORACLE_HOME to grant permissions to the root user only. You must have root privileges to run this script. The script creates pointers to the components as the installer installs them in the system so that they can be identified later in the installation procedure. It produces the /var/opt/oracle/oraInst.loc file, which provides a pointer to the oraInventory directory.

      After you have run the script, click Retry to continue.
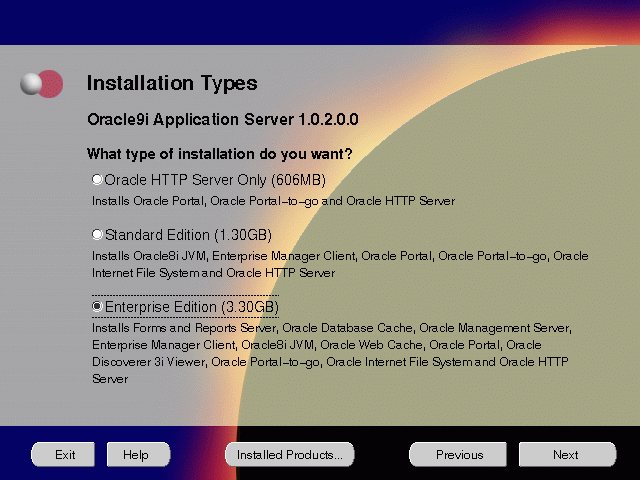
  4. Select Enterprise Edition and click Next.

    Figure 5-4 Installation Types Screen


    Text description of e_instyp.gif follows.
    Text description of the illustration e_instyp.gif

    The Installation Types screen allows you to select the Oracle9i Application Server installation option that you are licensed to use. For a complete list of components installed through each installation option, refer to Table 2-1, "Oracle9i Application Server Components" .

    The following are the installation options:

    • Oracle HTTP Server Only: Installs Oracle Portal, Oracle Portal-to-Go, and Oracle HTTP Server.

    • Standard Edition: Installs Oracle 8i JVM, Oracle Enterprise Manager Client, Oracle Portal, Oracle Portal-to-Go, Oracle Internet File System, and Oracle HTTP Server.

    • Enterprise Edition: Installs Oracle Forms Services, Oracle Reports Services, Oracle Database Cache, Oracle Management Server, Oracle Enterprise Manager Client, Oracle 8i JVM, Oracle Web Cache, Oracle Portal, Oracle Discoverer 3i Viewer, Oracle Portal-to-Go, Oracle Internet File System, and Oracle HTTP Server.

  5. If needed, verify and change the locations of the components displayed on the screen, and click Next.

    This screen appears only under the following condition(s):
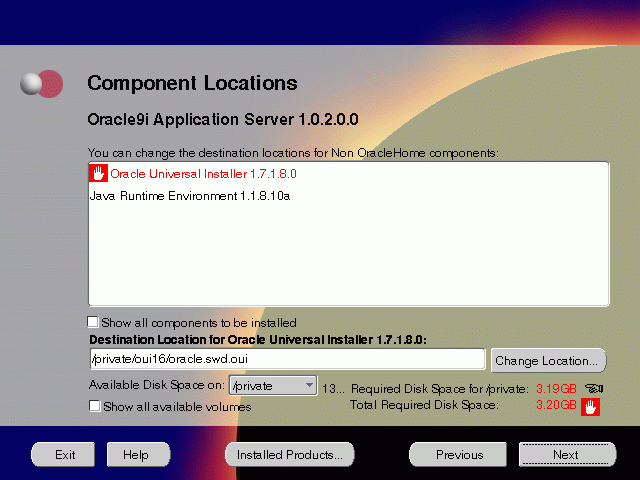
    • Oracle Universal Installer is being run on your machine for the first time.

    • Oracle Universal Installer has detected insufficient disk space in the ORACLE_HOME directory.

    Figure 5-5 Component Locations Screen


    Text description of entcploc.gif follows.
    Text description of the illustration entcploc.gif

    The Component Locations screen allows you to select alternative locations for some components.

    • Show all components to be installed: To view the complete list of components chosen for installation. Select check box to display component list.

    Click individual components to view and change destination location path. The installer enables you to change the destination location of the components displayed on the screen.
    • Destination Location: To view the full path of the selected component.

    • Change Location: To browse for alternate locations for the selected component.

    • Available Disk Space: To view available disk space in the current directory. The installer also provides information about the total disk space required for the installation of additional components.

    • Required Disk Space for directory_name: To view the total disk space required for installation in the selected directory.

    • Total Required Disk Space: To view the total disk space required for the product to be installed.

    • Show all available volumes: To browse through file system for available disk space. Select check box to display the file system.

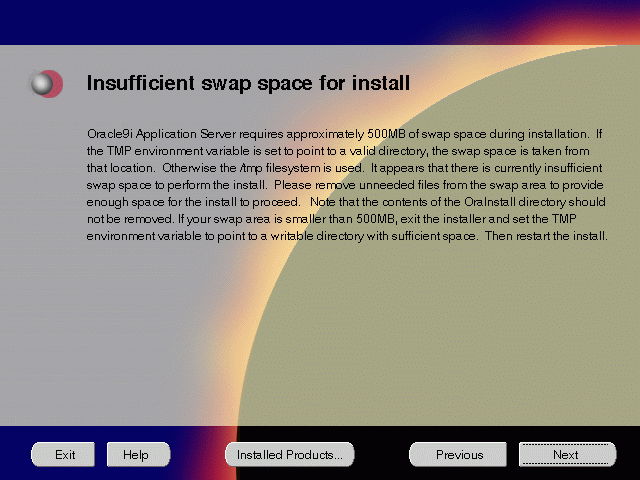
  6. Remove unneeded files from the swap directory to provide sufficient space for installation and click Next. If your swap space is smaller than 500 MB, click Exit and correct the problem.

    Figure 5-6 Insufficient Swap Space for Install Screen


    Text description of tmpwarn.gif follows.
    Text description of the illustration tmpwarn.gif

    Insufficient Swap Space for Install screen indicated inadequate space in the swap directory. You have two options:

    • If you have more than 500 MB swap space, then remove unneeded files from your swap space to create room for installation and click Next to proceed.

    • If you have less than 500 MB swap space, then Exit the installer and set TMP environment variable to point to a writable directory with sufficient space.

    For detailed information on TMP directory, refer "TMP".
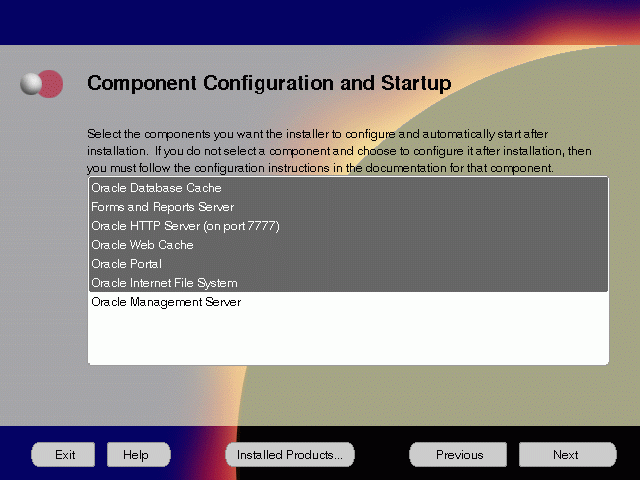
  7. Select the components for automatic configuration and startup after installation and click Next.

    Figure 5-7 Component Configuration and Startup Screen


    Text description of startup.gif follows.
    Text description of the illustration startup.gif

    The Component Configuration and Startup screen allows you to select the components that you want the installer to configure and automatically start after installation. This screen offers two configuration options:

    • If you select a component here, then the installer prompts you for any or all configuration information required by that component. After installation, the installer automatically starts that component.

    • If you de-select a component here, then the installer installs it, but does not configure or automatically start it. After installation, if you decide to use that component, then refer to Appendix A, "Configuration Tools" for instructions on manually launching the configuration assistant to configure that component.

    You can select or de-select multiple components by holding down the Control key while clicking on the component name.
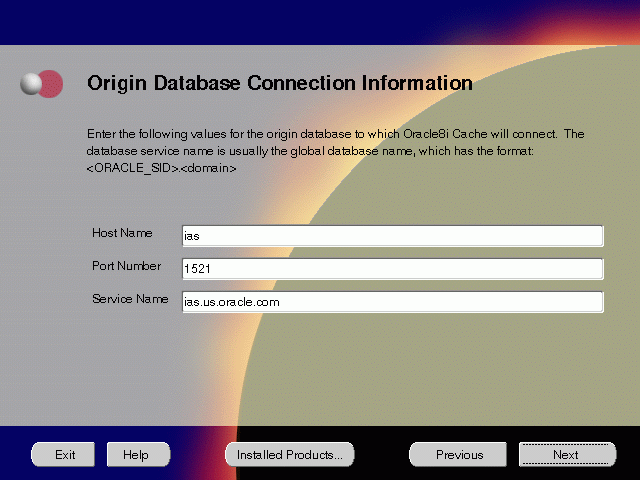
  8. Enter the host name, port number, and service name of the origin database and click Next. This screen will appear only if you selected Oracle Database Cache in the Component Configuration and Startup screen.

    Figure 5-8 Origin Database Connection Information


    Text description of dbconn.gif follows.
    Text description of the illustration dbconn.gif

    The Origin Database Connection Information screen enables you to identify the origin database for the middle-tier cache.

    • Host Name: The name of the machine where the origin database is located.

    • Port Number: The port number of the listener for the origin database. The default port number is 1521.

    • Service Name: The database service name is the global database name. The global database name uniquely distinguishes the database from other databases in your network domain. The installation procedure uses this name to create an entry in the tnsnames.ora file on the local cache node.

      For example, if ias is the database name and us.oracle.com is the network domain in which the database is located, then the service name is ias.us.oracle.com.
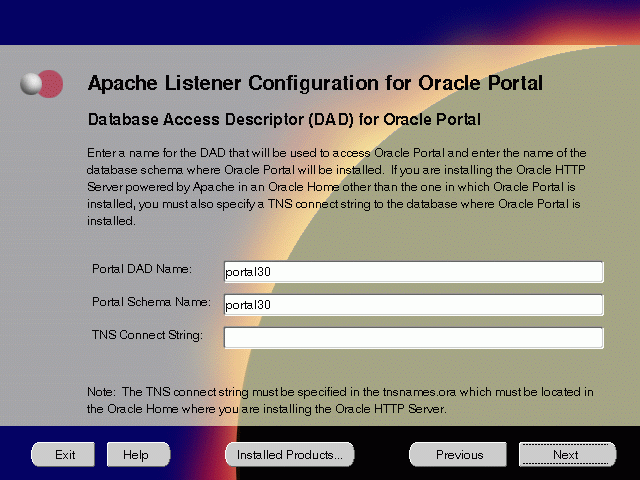
  9. Enter or accept the default Portal DAD and Schema names. Also, enter the TNS Connect String, if necessary. Click Next. This screen will appear only if you selected Oracle Portal in the Component Configuration and Startup screen.

    Figure 5-9 Apache Listener Configuration for Oracle Portal (DAD and Schema name) Screen


    Text description of portdad.gif follows.
    Text description of the illustration portdad.gif

    The Apache Listener Configuration for Oracle Portal DAD screen allows you to enter the name of the Database Access Descriptor (DAD) that will be used to access Oracle Portal, and the name of the database schema where Oracle Portal will be installed. It also enables you to enter the TNS connect string if Oracle Portal and Oracle HTTP Server are installed in different Oracle homes. The information you enter here is used to create the PL/SQL Gateway settings which you can access upon installation from the following location: http://<machine_name>:<port>/pls/admin_/gateway.htm
    • Portal DAD Name: Enter the name of the DAD for each instance you installed in the database. A Database Access Descriptor (DAD) is a set of values that specify how the Apache Listener connects to your Oracle database server to fulfill an HTTP request. Based on this DAD name, the installation automatically sets other DAD-related and default settings such as the name and location of the document table. The default DAD name is portal30.

    • Portal Schema Name: Enter the name of the database schema that will contain Oracle Portal. A schema is a collection of components and database objects under the control of a given database user. Each Oracle Portal application maps to an Oracle database schema. The default schema name is portal30.

    • TNS Connect String: Enter the TNS connect string or TNS alias that you have defined for the remote Oracle database. It enables you to install the Portal database objects into a remote database. Since you are installing in a new Oracle home, you will need to enter a TNS connect string before it is actually created. The Net8 Assistant will appear later in the installation process to guide you in the configuration of a new TNS alias. Be sure to note the name of the TNS connect string you enter here, so that you will use the same name when the Net8 Assistant appears later.

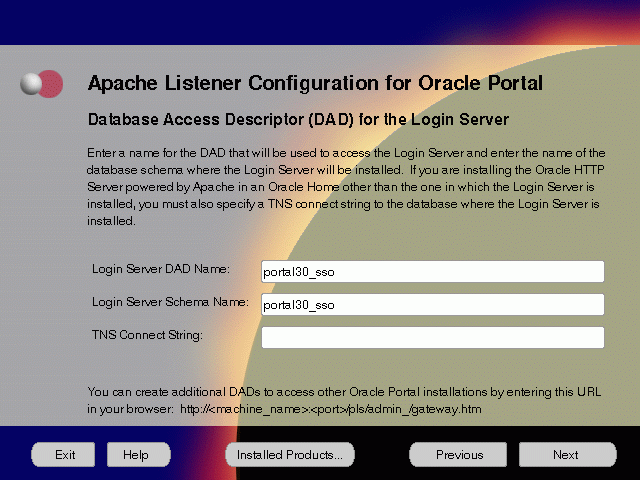
  10. Enter or accept the default Login Server DAD and Schema names. Also, enter the TNS Connect String, if necessary. Click Next. This screen will appear only if you selected Oracle Portal in the Component Configuration and Startup screen.

    Figure 5-10 Apache Listener Configuration for Oracle Portal (Login Server) Screen


    Text description of portls.gif follows.
    Text description of the illustration portls.gif

    The Apache Listener Configuration for Oracle Portal screen allows you to enter the Login Server DAD and Schema Name, with a _sso extension for easy recognition. The Login Server provides an enterprise-wide Single Sign-On (SSO) mechanism that enables an Oracle Portal user to log in securely to Oracle Portal and any partner and external applications using a single user name and password. It also enables you to enter the TNS Connect String if Oracle Portal and Oracle HTTP Server are installed in different Oracle homes.

    • Login Server DAD Name: Enter the name of the DAD for each instance you installed in the database.The default DAD name is portal30_sso.

    • Login Server Schema Name: Enter the name of the database schema that will contain Oracle Portal.The default schema name is portal30_sso.

    • TNS Connect String: Enter the TNS connect string or TNS alias that you have defined for the remote Oracle database.

      For more information on these fields, refer to the previous screen.
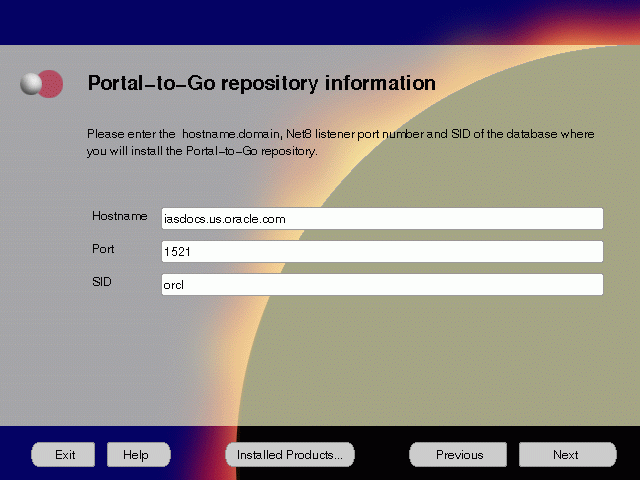
  11. Enter the hostname, port number, and SID of the origin database, and click Next.

    Figure 5-11 Portal-to-Go Repository Information Screen


    Text description of portrif.gif follows.
    Text description of the illustration portrif.gif

    The Portal-to-Go Repository Information screen allows you to enter the hostname, Net8 Listener port number, and SID of the database where you will install the Portal-to-Go repository.
    • Hostname: Enter the hostname.domain of the origin database.

    • Port: Enter the Net8 Listener port number.

    • SID: Enter the System Identifier (SID) of the origin database.

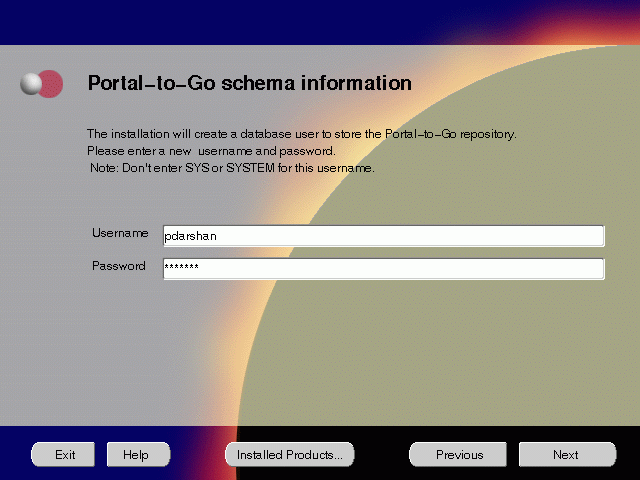
  12. Enter the new username and password for the database user to store the Portal-to-Go repository.

    Figure 5-12 Portal-to-Go Schema Information Screen


    Text description of portsc.gif follows.
    Text description of the illustration portsc.gif

    Portal-to-Go Schema Information screen allows you to create a database user to store the Portal-to-Go repository.
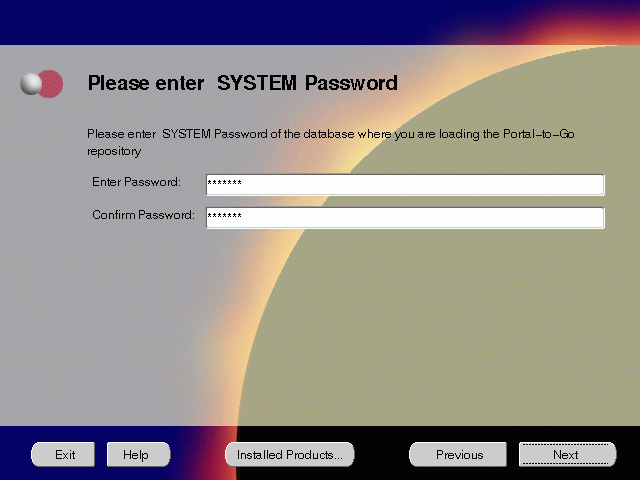
  13. Enter and confirm the SYSTEM password of the database, and click Next.

    Figure 5-13 System Password Screen


    Text description of portsys.gif follows.
    Text description of the illustration portsys.gif

    System Password screen allows you to enter and confirm the SYSTEM password of the database where you are loading the Portal-to-Go repository.
    • Enter Password: Enter the SYSTEM password of the origin database.

    • Confirm Password: Re-enter the SYSTEM password as entered above for verification.

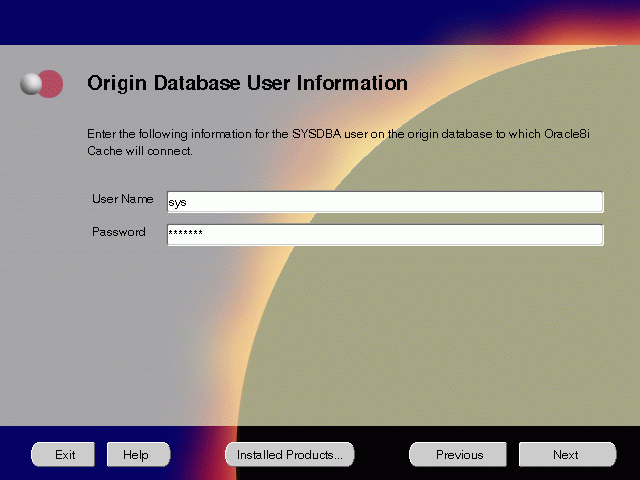
  14. Enter the SYSDBA name and password and click Next. This screen will appear only if you have selected Oracle Database Cache in the Component Configuration and Startup screen.

    Figure 5-14 Origin Database User Information Screen


    Text description of dbinf.gif follows.
    Text description of the illustration dbinf.gif

    The Origin Database User Information screen allows you to enter the SYSDBA information created for the origin database.
    • User Name: The SYSDBA user name for the origin database that the installer detects and defaults. You can change the name or accept the default.

    • Password: The password for the SYSDBA user.

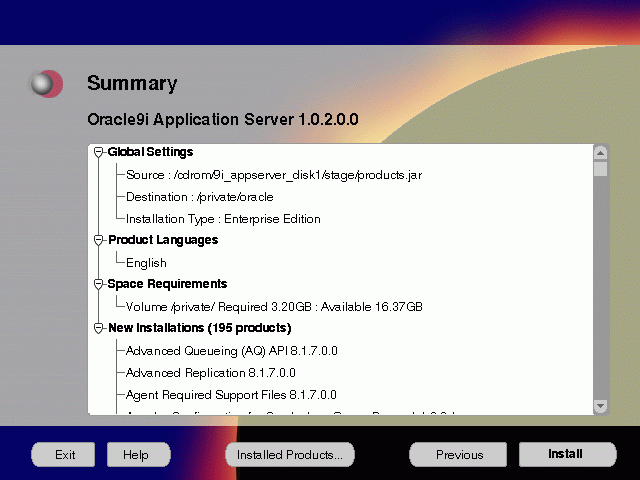
  15. Review the summary and click Install to begin the installation process.

    Figure 5-15 Summary Screen


    Text description of e_summ.gif follows.
    Text description of the illustration e_summ.gif

    The Summary screen allows you to review all the settings before the actual installation process. These settings include source, destination, installation type, product language, space requirements, and a list of components.

    When you click Install, the installation process begins.
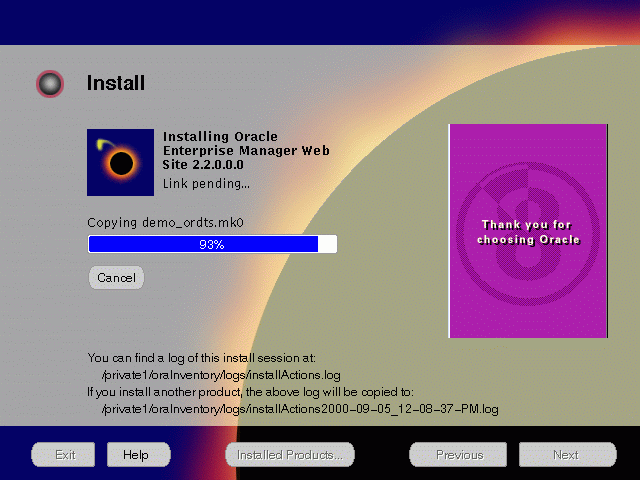
  16. Monitor the installation process and after the installer finishes, click Next.

    Figure 5-16 Install Screen


    Text description of inst.gif follows.
    Text description of the illustration inst.gif

    The Install screen appears while the product is installing. Installation operations include executing actions such as file copy and linking, and executing decision points and calculations. It also displays the full path of the installation log.

    • Cancel: To discontinue the installation process. You can then choose to stop the installation of an individual component or the entire product.

    For more information about installation log, refer to "oraInventory Directory".

    Oracle Discoverer 3i Viewer Installation

    After the installer finishes installing the files, the Oracle Installer appears and installs Oracle Discoverer 3i Viewer. Oracle Discoverer 3i Viewer installation does not require any user input.

    You will get the following screen indicating that Oracle Discoverer 3i Viewer is being installed:
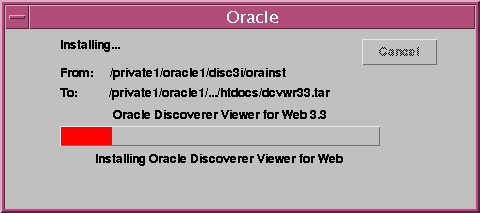
    Figure 5-17 Oracle Discoverer 3i Viewer Installation Screen


    Text description of orca.gif follows.
    Text description of the illustration orca.gif

    Changing Disks

    During installation, the installer prompts you to switch between Disks 1, 2 and 3. Use these steps to change disks and continue the installation process.
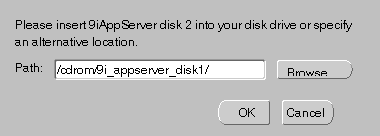
    Figure 5-18 Changing Disks Dialog


    Text description of disk2.gif follows.
    Text description of the illustration disk2.gif
    1. Eject and unmount the current disk.

      If you are using Solaris Volume Management software and Disk1 was automatically mounted, then this can be done with the following command:

      prompt> eject cdrom


      If you are not using Solaris Volume Management software, then you must manually eject and unmount the disk. For further instructions, refer to your operating system documentation

    2. Insert the nest disk into the CD-ROM drive and mount it.

      If you are using the Solaris Volume Management software, then the next disk will be automatically mounted.

      If you are not using Solaris Volume Management software, then you must manually mount the disk. For further instructions, refer to "Starting Oracle Universal Installer".
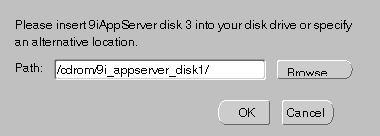
    3. Click the Browse button on the changing disks dialog, and navigate to /cdrom/9i_appserver_diskx. This directory may be different depending on where the original disk was mounted.

      Figure 5-19 Updated Changing Disks Dialog


      Text description of disk3.gif follows.
      Text description of the illustration disk3.gif
    4. Click OK to continue the installation process.

    Running root.sh

    After installation is completed, the installer prompts you to run root.sh script. Use these steps to run the root.sh script.

    1. Log on as the root user.

    2. Go to the ORACLE_HOME directory.

      prompt> cd $ORACLE_HOME
      
      
    3. Run the root.sh script.

      prompt> ./root.sh
      
      
    4. Exit root user.

    Once you see "Finished running generic part of the root.sh script" and "Now product-specific root actions will be performed," exit root user and return to the Install screen.

    The root.sh script detects:
    • Settings of ORACLE_OWNER, ORACLE_HOME and ORACLE_SID environment variables.

    • Full path of local bin directory. You can accept the default or change to a different local bin directory.

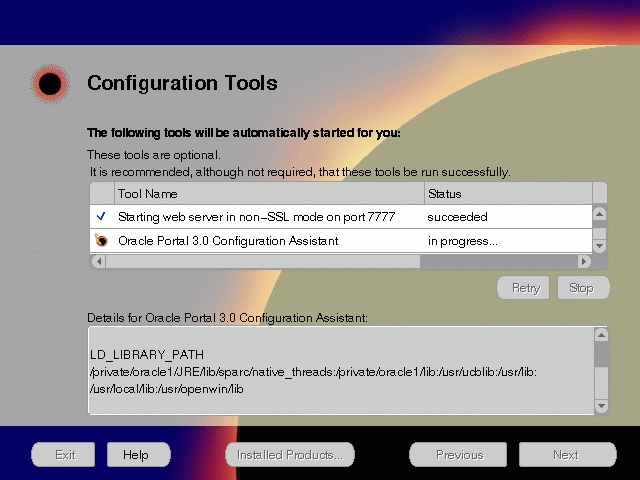
  17. Verify the list of configuration tools and click Next. This screen appears only if you select components to configure and start automatically in the Components Configuration and Startup screen.

    Figure 5-20 Configuration Tools Screen


    Text description of e_cft.gif follows.
    Text description of the illustration e_cft.gif

    The Configuration Tools screen lists the configuration tools for all installed components.

    Scroll down the list to review the configuration status of each tool. The status changes as each component is configured.

    The installer performs the following functions in this screen:

    • Executes a configuration tool for each component selected previously in the Available Product Component screen.

    • Displays all the configuration settings in the display window below as it executes a configuration tool for each component.

    • Enables you to view configuration settings after all configuration tools are executed. Click on each component to review all the changes made.

    • Allows you to view data for failed executions in the display window. You can either fix the error and click Retry to execute the configuration tool again, or ignore the error and click Next to proceed to the next screen.

    • Automatically starts the components.

    • Retry: To re-execute the configuration script if the configuration of a component fails.

    • Stop: To quit the configuration process.

    Configuration Tools

    Depending on the components you select in the Configuration and Startup screen, the following configuration tools launch:

    Oracle Web Cache Configuration Assistant - This launches the service to start Oracle Web Cache. Oracle Web Cache service starts up automatically by default. If you choose not to use Oracle Web Cache, you will need to stop the service manually. For more information, refer to "Starting and Stopping Components".

    Oracle Database Cache Configuration Assistant - It enables you to configure your middle-tier caches. For instructions on running the Oracle Database Cache Configuration Assistant, refer to "Oracle Database Cache".


    Note:

    If you are installing Oracle Database Cache on the same machine as the origin database, then be sure to follow the instructions as listed in "Installation and Post-installation Tasks"


    Starting Web Server in Non-SSL mode on port 7777 - This starts Oracle HTTP Server.

    Starting Forms Server - This starts Oracle Forms Services.

    Starting Reports Server - This starts Oracle Reports Services.

    Starting Oracle Discoverer 3i Viewer Server - This starts Oracle Discoverer 3i Viewer

    Oracle Portal Configuration Assistant - It loads necessary database objects for Oracle Portal to run. For instructions on running the Oracle Portal Configuration Assistant, refer to "Oracle Portal".
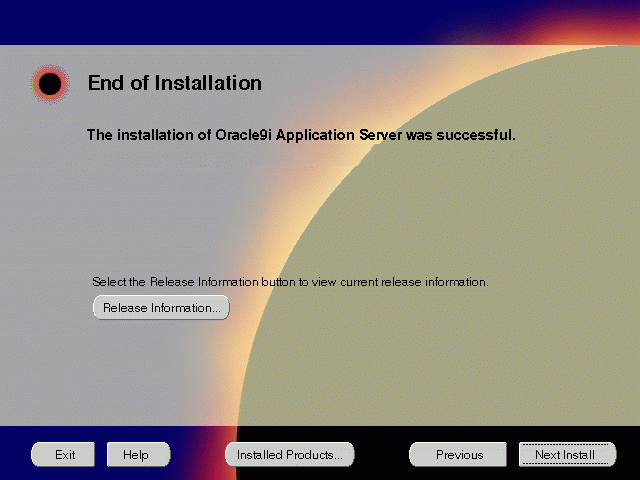
  18. Ensure that the installation was successful. Click Exit to quit the installer.

    Figure 5-21 End of Installation Screen


    Text description of einst.gif follows.
    Text description of the illustration einst.gif

    The End of Installation screen appears at the end of the installation process. It notifies you whether the installation was successful or unsuccessful.

    • Release Information: To view the latest release information.

You have successfully installed the Enterprise Edition installation option of the Oracle9i Application Server. Proceed to Post-installation to complete the installation process.

Post-installation

The following instructions guide you through the basic post-installation tasks for Oracle9i Application Server. Before performing these tasks, be sure to install Oracle Portal-to-Go client from the Oracle9i Application Server Administrative and Development Client CD included in the Oracle9i Application Server CD pack. For installation instructions, refer to Appendix B, "Installing Oracle Portal-to-Go Client".

The post-installation contains the following sections:

Environment Variables

Table 5-1 lists the environment variables that must be set for Enterprise Edition installation option:

Table 5-1 Environment Variables
Environment Variable  Must Be or Include 

ORACLE_
HOME 

The ORACLE_HOME used for installing Oracle9i Application Server. 

PATH 

<ORACLE_HOME>/bin
<ORACLE_HOME>/Apache/Apache/bin
<ORACLE_HOME>/6iserver
<ORACLE_HOME>/ifs1.1/bin
<ORACLE_HOME>/6iserver/discwb33/util
<ORACLE_HOME>/calypso/bin 

LD_LIBRARY_PATH 

<ORACLE_HOME>/lib
<ORACLE_HOME>/Apache/Apache/libexec
<ORACLE_HOME>/icache/lib
<ORACLE_HOME>/6iserver/reports60/lib
<ORACLE_HOME>/6iserver/forms60/lib
<ORACLE_HOME>/6iserver/network/jre11/lib/sparc/native_threads
<ORACLE_HOME>/ifs1.1/lib
<ORACLE_HOME>/6iserver/discwb33/lib
<ORACLE_HOME>/panama/lib 

ORACLE_SID 

The same as the system identifier of the origin database. It should be set to the same value as entered during installation. 

Starting and Stopping Components

Table 5-2 lists the commands needed to start and stop the components.

Table 5-2 Starting and Stopping Components
Component  Function  Command 

Oracle HTTP Server 

Start 

prompt> ./apachectl start 

Stop 

prompt> ./apachectl stop 

Oracle HTTP Server (SSL-enabled) 

Start 

prompt> ./apachectl startssl 

Stop 

prompt> ./apachectl stop 

Oracle Database Cache 

Start 

prompt> ./cachstrt 

Stop 

prompt> ./cachshut 

Oracle Forms Services 

Start 

prompt> ./forms60_server start  

Stop 

prompt> ./forms60_server stop 

Oracle Reports Services 

Start 

prompt> ./reports60_server start 

Stop 

prompt> ./reports60_server stop 

Oracle Internet File System 

Start 

prompt> ./ifsstart 

Stop 

prompt> ./ifsstop 

Oracle Discoverer 3i Viewer 

Start 

prompt> ./startlocator.sh

prompt> ./startoad.sh

prompt> ./startosagent.sh 

Stop 

prompt> ./stoplocator.sh

prompt> ./stopoad.sh

prompt> ./stoposagent.sh 

Oracle Management Server 

Start 

prompt> ./oemctrl start oms & 

Stop 

prompt> ./oemctrl stop oms & 

Oracle Web Cache 

Start 

prompt> ./webcachectl start 

Stop 

prompt> ./webcachectl stop 


Note:

To start or stop SSL-enabled Oracle HTTP Server, you must log in as the root user. 


Component Port Numbers

Table 5-3 lists the default port numbers on which requests are received for each component.

Table 5-3 Port Numbers
Components  Port Number 

Oracle Web Cache

Oracle Web Cache Administration Port

Oracle Web Cache Invalidation Port

Oracle Web Cache Statistics Port 

1100

4000

4001

4002 

Oracle HTTP Server

Oracle HTTP Server (SSL-enabled) 

7777

80, 443 

Oracle Database Cache 

51719 

Oracle Forms Services

Load Balancer Client

Load Balancer Server 

9001

9011

9021 

Oracle Reports Services 

1950 

Oracle Discoverer 3i Viewer 

Oracle Discoverer 3i Viewer uses the same port number as Oracle HTTP Server 

Oracle Internet File System 

80 

Oracle Portal 

Oracle Portal uses the same port number as Oracle HTTP Server 

Oracle Portal-to-Go 

Oracle Portal-to-Go uses the same port number as Oracle HTTP Server 

Component-specific Tasks

This section contains post-installation tasks for the following components:

Oracle Internet File System

You must run the Oracle Internet File System Configuration Assistant to configure Oracle Internet File System. For configuration instruction, refer to "Oracle Internet File System".

Oracle Management Server

You must run the Oracle Enterprise Manager Configuration Assistant to configure Oracle Management Server. For configuration instruction, refer to "Oracle Management Server".

Oracle Database Cache

Be sure to perform the following post-installation steps to configure Oracle Database Cache:

Setting Up the Oracle Database Cache Environment for Your Applications

When you install Oracle Database Cache, the installation procedure installs files that are specific to Oracle Database Cache and files that are updates to Oracle8i Server or Client release 8.1.6.1. These files contain the Oracle Database Cache functionality, as well as bug fixes to files usually installed with the Oracle8i Server or Client.

To use Oracle Database Cache, you must make sure that your applications are using the files and libraries installed for Oracle Database Cache. You can do this in the following ways:

Using the Oracle Database Cache Home

To run your application from the Oracle home in which you installed Oracle Database Cache, you must take the following steps:

  1. From the process in which you will run your application, set the following environment variables:

    • Set ORACLE_HOME to the Oracle home in which you have installed Oracle Database Cache.

    • Set LD_LIBRARY_PATH so that the Oracle Database Cache library directory (ORACLE_HOME/lib) precedes library directories from other Oracle homes.

    • Set ORA_OCI_CACHE to "1" so that all applications started from the process will use the cache. (Alternatively, you can use parameters within OCI applications to control which applications or statements use the cache. See the Oracle Database Cache Concepts and Administration Guide for more information.)

    • If you use the environment variable TNS_ADMIN, make sure that it is set to the ORACLE_HOME/network/admin directory in the Oracle home for Oracle Database Cache.

  2. If your application was running previously on the node on which you installed Oracle Database Cache and the application connected to the origin database by using an entry in an existing tnsnames.ora file, you must copy that entry to the tnsnames.ora file used by Oracle Database Cache.

    The tnsnames.ora file is located in the ORACLE_HOME/network/admin directory. Copy the entry from the file in the previously existing Oracle home to the tnsnames.ora file in the Oracle home in which you installed Oracle Database Cache.

    Note that the Oracle Database Cache installation creates an entry for the origin database in the tnsnames.ora file on the local cache node. It assigns the alias ora_icache_ origin. Do not modify or delete the ora_icache_origin entry. To assign a different alias for another purpose, edit the tnsnames.ora file and add another entry. The Oracle Database Cache installation also creates an entry, ora_icache, for the cache. Do not modify or delete this entry.

Using a Previous Oracle8i Release 8.1.6 Oracle Home

If you previously ran your application from the Oracle home for Oracle8i Server or Client release 8.1.6 or 8.1.6.1 and you continue to need to run your application from that Oracle home, you must take the following steps:


Note:

Use this method only if you cannot use the Oracle home for Oracle Database Cache. Do not use this method if your application ran from a release later than 8.1.6.1. Instead, refer to "Using the Oracle Database Cache Home" for the recommended method. 


  1. Copy the following library files from the Oracle home in which you installed Oracle Database Cache to the Oracle home for the Oracle8i server or client that your application uses:

    • <ORACLE_HOME>/lib/libclient8.a

    • <ORACLE_HOME>/lib/libgeneric8.a (not required for 8.1.6.1)

    • <ORACLE_HOME>/lib/libwtc8.so

    • <ORACLE_HOME>/lib/libwtc8.a

  2. Set the following environment variables to the Oracle home for the Oracle8i server or client that your applications uses:

    • Set ORACLE_HOME to the Oracle home.

    • Set LD_LIBRARY_PATH to ORACLE_HOME/lib.

    • Set PATH to include ORACLE_HOME/bin.

  3. From the Oracle home for the Oracle8i server or client that your application uses, run the executable file genclntsh, which is located in the ORACLE_HOME/bin directory.

  4. Copy the SQL*Plus executable file from the Oracle home in which you installed Oracle Database Cache to the Oracle home for the Oracle8i server or client that your application uses.

  5. Set the value of the environment variable ORA_OCI_CACHE to "1" so that all applications started from the process will use the cache. (Alternatively, you can use parameters within OCI applications to control which applications or statements use the cache.)

  6. If you use the environment variable or registry parameter TNS_ADMIN, make sure it points to the Oracle home that your application uses.

  7. Copy the entries in the tnsnames.ora file from the Oracle home in which you installed Oracle Database Cache to the tnsnames.ora file in the Oracle home for the Oracle8i server or client that your application uses.

Relinking Applications That Use Releases Previous to Release 8.1.6

If your application was compiled and linked using a release prior to Oracle8i Server or Client release 8.1.6, you must relink your application using the OCI libraries that are installed by Oracle8i Cache.

For information about relinking applications, see Oracle Call Interface Programmers Guide and Oracle8i Administrator s Reference in the database documentation.

Then, you must take the steps described in "Using the Oracle Database Cache Home" .

Modify the initicache.ora File

The Oracle Database Cache installation creates a cache using the same database character set as the origin database. However, it does not set other National Language Support (NLS) features, such as date format or currency symbols.

If the initialization file (initSID.ora) of your origin database specifies NLS parameters, you must copy those parameters to the initialization file (initicache.ora) of the cache. (NLS parameters begin with "NLS_".)

For example, if the initialization file of your origin database contains the following parameters, copy them to initicache.ora:

NLS_LANGUAGE = JAPANESE
NLS_CALENDAR = "Japanese Imperial"
NLS_DATE_FORMAT = "E YY-MM-DD"

The file initicache.ora is located in the following directory:

ORACLE_HOME/admin/icache/pfile

For information about setting up your caches and additional information about configuring your application environment, see the Oracle Database Cache Concepts and Administration Guide.

SSL Authentication Method Configuration

This section guides you through configuring Oracle Database Cache to use SSL and Oracle 8i JVM.

These steps guide you through the SSL configuration for the following:

Oracle Database Cache

To configure Oracle Database Cache to use SSL, remove the comment characters (#) from the following entry in the listener.ora file:

For secure connections over SSL, uncomment the following lines:

#  (DESCRIPTION = # Secure TCP connections
#      (ADDRESS =
#         (PROTOCOL = TCPS) (HOST = <host_name>) (PORT = 2484)
#      )
#  )


The listener will listen for all SSL requests.

Oracle Servlets Engine for Java

To configure Oracle Servlets for Java to use SSL, (in addition to removing the comment characters from the appropriate line in the initialization file) you must remove the comment characters (#) from the following entry in the tnsnames.ora file:

# Support for mod_ose over TCP with SSL connections.
# inst1_https =
#   (DESCRIPTION =
#      (ADDRESS =
#         (PROTOCOL=TCPS)
#         (HOST=<host_name>)
#         (PORT=2484)
#      )
#      (CONNECT_DATA=
#         (SERVICE_NAME=MODOSE)
#         (SERVER=shared)
#         (PRESENTATION=http://admin)
#      )
#   )


Distributed CORBA Applications and Enterprise Java Beans

To configure distributed CORBA application and Enterprise Java Beans to use SSL, (in addition to removing the comment characters from the appropriate line in the initialization file) you must remove the comment characters (#) from the following entry in the listener.ora file:

#For secure IIOP connections over SSL, uncomment the following lines:

# (DESCRIPTION = # Secure IIOP Connections
#    (PROTOCOL_STACK =
#       (PRESENTATION=GIOP)
#       (SESSION=RAW)
#     )
#    (ADDRESS=(PROTOCOL=TCPS)(HOST=% s_host_name%)(PORT=2482))
#  )


Multi-threaded Server Configuration

These steps guide you through configuring Oracle Database Cache as a Multi-threaded server for the following applications:

Oracle Servlets Engine for Java

To configure Oracle Database Cache as a multi-threaded server (MTS) for Oracle Servlets Engine for Java, you must make one or both of the following changes to your initialization file (inst<SID>.ora):

Distributed CORBA Applications and Enterprise Java Beans

To configure Oracle Database Cache as a multi-threaded server (MTS) for distributed CORBA applications and Enterprise Java Beans, you must make the following changes in your initialization file (init<SID>.ora):

Oracle Portal-to-Go

The following section describes post-installation configuration instructions for Oracle Portal-to-Go:

Oracle Portal-to-Go Web Integration Server Configuration

Oracle Portal-to-Go Web Integration Server hosts services that applications can use to exchange data and information sources via the Web. The Web Integration Server is installed with the Oracle Portal-to-Go components.


Note:

The Web Integration Developer, the development environment for creating and testing Web Integration services written in Web Interface Definition Language (WIDL), is installed as part of the Oracle Portal-to-Go client. For more information, refer to Appendix B, "Installing Oracle Portal-to-Go Client"


The following steps guide you through the configuration process of the Web Integration Server:

  1. Run the Web Integration Server.

    From the ORACLE_HOME/panama/WebIntergration/Server/bin directory, type:

    prompt> ./server.sh &
    
    
  2. From a browser, go to the Web Integration Server URL:

    http://host_name.domain:5555

  3. Log in to the Web Integration Server with the user name Administrator, and password manage, which is the default password.

  4. Select Settings. The server settings appear. Click Edit.

  5. Enter the Proxy (HTTP) and Secure Proxy (HTTPS) settings for your environment.

  6. Click Submit.

  7. Click Logout.

Oracle Portal-to-Go Configuration Parameters

  1. Configure the httpd.conf file.

    The httpd.conf file is in the ORACLE_HOME/Apache/Apache/conf directory.

    Create a Personalization Portal (papz) alias. This is needed so that the application server can find the http://hostname/papz/login.jsp URL. Add a line at the end of the Alias section:

    # PTG Start
    Alias /papz/ "<ORACLE_HOME>/panama/server/papz/"
    # PTG End
    
    
  2. Configure the jserv.conf file.

    The jserv.conf file is in the ORACLE_HOME/Apache/Jserv/etc directory.

    In the ApJServMount section, add the Oracle Portal-to-Go specific mount point:

    # PTG Start
    ApJServMount /ptg /root
    # PTG End
    
    
  3. Configure the jserv.properties file.

    The jserv.properties file is in the ORACLE_HOME/Apache/Jserv/etc directory.

    Next to the other "wrapper.classpath" entries, add all the required Oracle Portal-to-Go files to the classpath.

    # PTG Start
    wrapper.classpath=<ORACLE_HOME>/panama/server/classes
    wrapper.classpath=<ORACLE_HOME>/panama/lib/panama_core.zip
    wrapper.classpath=<ORACLE_HOME>/panama/lib/panama_papz.zip
    wrapper.classpath=<ORACLE_HOME>/panama/lib/client.zip
    wrapper.classpath=<ORACLE_HOME>/panama/lib/server.zip
    # PTG End
    
    
  4. Configure the zone.properties file.

    The zone.properties file is in the ORACLE_HOME/Apache/Jserv/etc directory.

    1. In the List of Repositories section, add the Oracle Portal-to-Go specific repository to the existing repository line with a comma (,) separator:

      # PTG Start
      repositories=<ORACLE_HOME>/Apache/Jserv/servlets,<ORACLE_HOME>/panama/se
      rver/papz
      # PTG End
      
      
    2. In the Startup Servlets section, add the Oracle Portal-to-Go specific servlets:

      # PTG Start
      servlets.startup=oracle.panama.ParmImpl
      # PTG End
      
      
    3. In the Servlet Aliases section, add the Oracle Portal-to-Go specific servlets:

      # PTG Start
      servlet.rm.code=oracle.panama.ParmImpl
      # PTG End
      
      
Oracle Portal-to-Go Configuration Verification

After installation, you can verify that individual Oracle Portal-to-Go components are properly configured:

  1. Test the sample Java Servlet at the following URL:

    http://host_name.domain:7777/papz/test.jsp

    "Hello World" should appear on the screen.

  2. Test whether the Personalization Portal is working properly by accessing the following URL:

    http://host_name.domain:7777/papz/login.jsp

    The login page should appear. The Personalization Portal prompts you to enter a user name and a password. You can log in using "Administrator" as the user name and "manager" as the password.

  3. Run the Oracle Portal-to-Go Request Manager by accessing the following URL:

    http://host_name.domain:7777/ptg/rm

Additional Documentation

For more information regarding the post-installation tasks and configuration, refer to component-specific documentation in "Documentation Library Titles" .

For additional Oracle Web Cache configuration instructions, you can access Oracle Web Cache Administration and Deployment Guide through the following URL:

http://otn.oracle.com/products/ias


Go to previous page Go to next page
Oracle
Copyright © 2000 Oracle Corporation.

All Rights Reserved.

Library

Contents

Index