Version 9.0.2
Part Number A90879-02
Home | Solution Area | Contents |
Index |
| Oracle9iAS Discoverer Plus User's Guide Version 9.0.2 Part Number A90879-02 |
|
This section explains how to format worksheets, and contains the following topics:
You can display worksheet data in four different styles:
A table worksheet lists data in rows and columns , and is probably the most familiar layout for data. The figure below shows an example table worksheet.
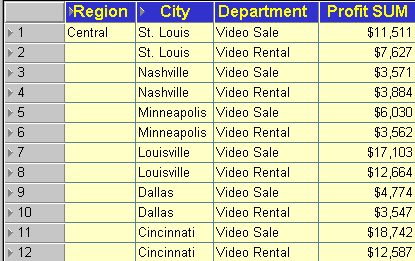
The table worksheet shows a list of profit values for departments in cities within the Central region.
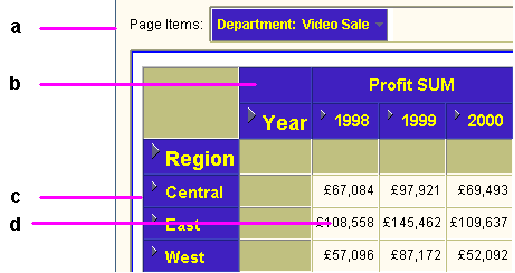
A table worksheet with page detail is a table worksheet with an additional axis for displaying data for one item value at a time. For example, one year at a time.
The figure below shows an example table worksheet with page detail, where Year is displayed in the Page Items area. The data displayed relates to the year 1998.
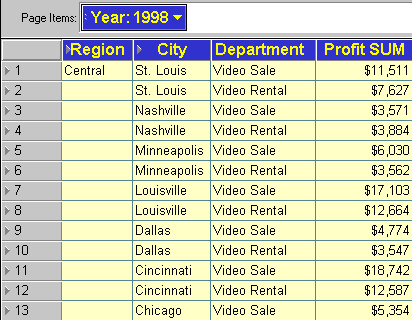
The worksheet shows the Year item in the Page Items area, which enables you to display data for one year at a time.
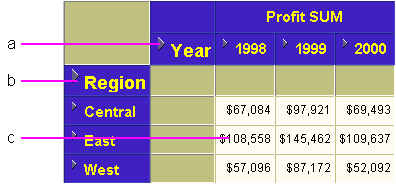
A crosstab worksheet (short for cross-tabulated worksheet) relates two different sets of data and summarizes their interrelationship in terms of a third set of data (see figure below).
Key to figure:
The region and year are displayed as rows and columns on the crosstab. Each row and column intersection shows a data point, which in this case is the profit for a particular region in a particular year.
One of the most powerful features of crosstabs is that you can use them to uncover subtleties in the data that are not readily apparent from a table of data. For example, by relating one group of data to another you might find that:
A crosstab worksheet with page detail is a crosstab worksheet with an additional axis for displaying data for one item value at a time. For example, one department at a time.
The figure below shows an example table worksheet with page detail, where Department is displayed in the Page Items area. The data displayed relates to the Video Sale department.
Key to figure:
Discoverer's powerful layout dialogs enable you to format worksheets so that they are arranged and formatted exactly how you want them. For example, you might want to:
Note: When you create a new report, a default format is applied (e.g. colors, fonts). To change the default format that is applied to worksheets, see "How to change the default worksheet format".
Hint: If you want to change a worksheet but keep a copy of the original worksheet, use the duplicate worksheet facility. Here, you make an exact copy of a worksheet that you can work on (for more information, see "How to duplicate a worksheet"). Alternatively, save the whole workbook under a different name and work with this copy (for more information, see "How to save workbooks").
You edit a worksheet to change the way that the worksheet looks or behaves. For example, you might want to change the color of worksheet data, or to add calculations, percentages, or totals.
To edit a worksheet:
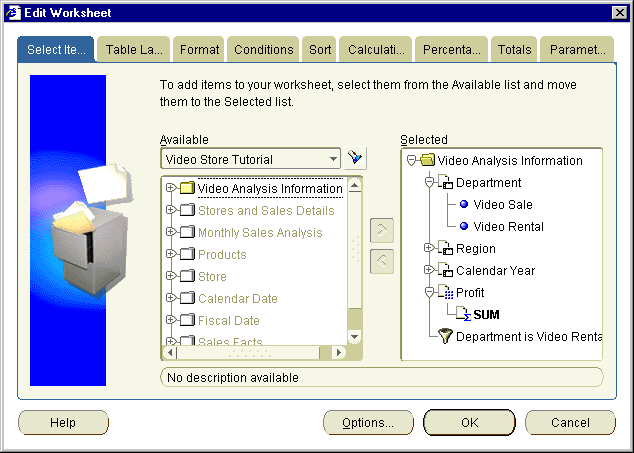
The tabs on the Edit Worksheet dialog are used to edit the properties of the current worksheet (e.g. table layout, format, conditions).
Note: The layout tab is labelled Table Layout on table worksheets, and Crosstab Layout on crosstab worksheets.
Hint: Click the torch icon (
 ) above the Available box to display the "Find dialog (in Item Navigator)", where you search the EUL for items that you want to add to the worksheet.
Discoverer updates the worksheet as you specified.
You add items to a worksheet when you want to analyze new areas of data. For example, you might want to add a Year item so that you can look at trends over time.
To add an item to a worksheet:
Hint: Click the plus (+) sign next to folders and items to see items within them.
Hint: Click the torch icon (
) above the Available box to display the "Find dialog (in Item Navigator)", where you search the EUL for items that you want to add to the worksheet.
Discoverer updates the worksheet as you specified.
You remove an item from a worksheet when you no longer need to analyze the item. For example, you might want to remove a year item to change the format of a printed report.
To remove items from worksheets:
You duplicate a worksheet when you want to quickly create a copy of a worksheet based on the style of an existing worksheet. You can then edit the new worksheet as required.
Duplicating a worksheet also enables you to work on a copy of a worksheet, leaving the original worksheet intact. For example, you might want to work on a temporary worksheet that you discard later.
To duplicate a worksheet:
Discoverer displays the Duplicate as Table dialog or Duplicate as Crosstab dialog, which enables you to change the default layout of the new worksheet.
For example, you might use the Select Items tab to add items to the duplicated worksheet, or you might use the Format tab to change the default display style of worksheet items.
The new worksheet is now displayed ready for you to analyze. You might want to change the default name of the new worksheet (for more information, see "How to rename workbooks and worksheets").
Hint: Use the tabs at the bottom of worksheets to navigate between worksheets.
You change the format of worksheet data when you want to change how existing worksheet data is displayed. For example, you might want to:
Hint: You can also change the item heading (for more information, see "How to change item headings") and change the format of item headings (for more information, see "How to change the format of item headings").
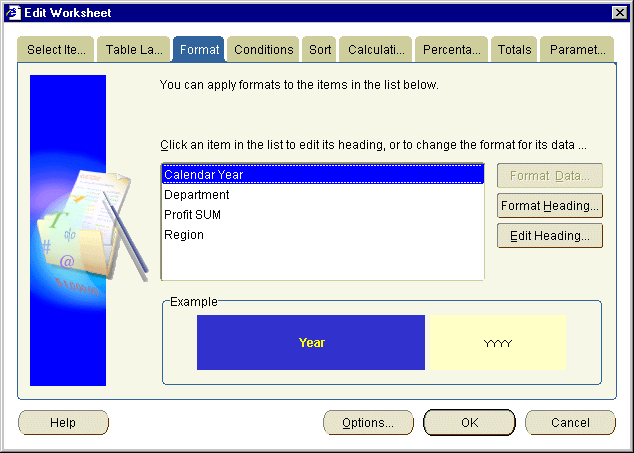
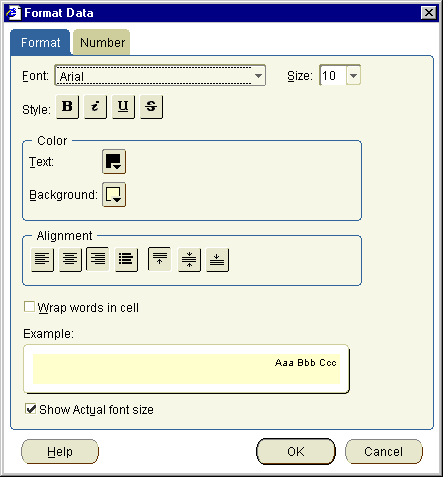
To change the format of worksheet data:
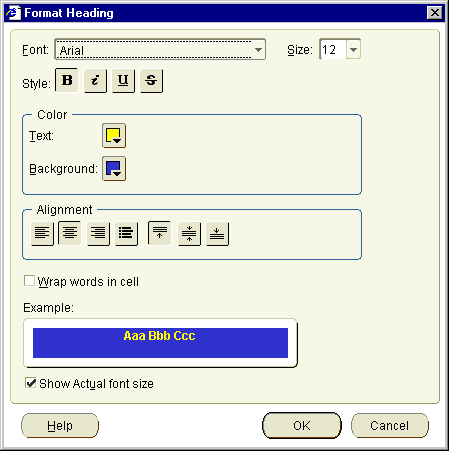
Text description of the illustration ed5.gif
The "Edit Worksheet dialog: Format tab" displays a list of items currently displayed on the worksheet.
You can select more than item by pressing the Ctrl key and clicking another item.
Hint: The Example box displays the heading format of the current item.
For example, you might want to change the font size, color, and alignment of numbers.
Hint: The Example field shows the effect of the changes that you make.
Hint: On each tab, the Example field shows the affect of the changes on your items.
Discoverer updates the worksheet as you specified.
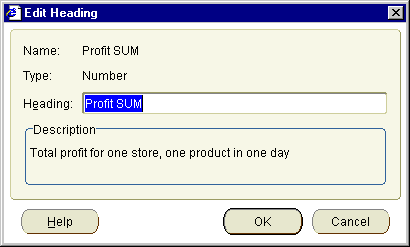
You change item headings when you want to change the column or row headings that are displayed on worksheets. For example, you might want to change 'Year' to 'Financial Year' so that 'Financial Year' is displayed on reports.
To change an item heading:
Hint: The Example box displays the heading format of the current item.
Text description of the illustration edhd.gif
Discoverer updates the worksheet as you specified.
You change the format of item headings when you want to display different row or column headings on a worksheet. For example, you might want to change a column heading to use a larger font or different color.
To change the format of an item heading:
You can select more than item by pressing the Ctrl key and clicking another item.
Hint: The Example box displays the heading format of the current item.
Hint: The Example field shows the effect of the changes that you make.
Discoverer updates the worksheet as you specified.
You change the default worksheet format when you want to change how new worksheets are formatted. For example, you might want to display all new worksheet items in blue text with a yellow background.
Note: Changing the default worksheet format does not affect the format of existing worksheet items - only items that you add to the worksheet have the default format.
To change the default worksheet format:
For example, the "Data Format dialog (Default format)", the "Heading Format dialog (Default format)", or the "Total Format dialog (Default format)".
Hint: The Example field shows the effect of the changes that you make.
The default formats that you specified are used for new worksheets that you create. For example, if you set the default data format style to a blue font with a yellow background, any new items that you add to worksheets will have this format.
|
|
 Copyright © 2002 Oracle Corporation. All Rights Reserved. |
|