6
Enabling Infrastructure
This chapter describes the enabling infrastructure tasks in iStudio. This chapter discusses the following topics:
Enabling Infrastructure
The following topics discuss concepts related to the Enabling Infrastructure branch of the Design Navigation tree.
Content-Based Routing
Messages routed to specific applications based on business rules or message content.
Cross Reference Tables
Creating a cross reference table correlates a unique key in one application with a corresponding key in the common view. In this process, three separate events are addressed:
- Inserting a record.
- Updating a record.
- Deleting a record.
Domain Value Maps
Creating a domain value map correlates a value in one application to a value in a second application. In this process, two separate events are addressed:
- Inserting a record.
- Updating a record.
Working with Content-Based Routing
Messages are routed to specific applications based on business rules or message content. For example, a procurement system can route fulfillment requests to different fulfillment centers based on originating location or item requested.
Modifying Content-Based Routing
To modify content based routing for an event or procedure:
- Right-click the event or procedure under the Content-Based Routing node in the Design Navigation tree, then click Edit. The Content Based Routing Rules dialog displays.
- Click New to display the Content Based Routing Wizard. This wizard provides a series of pages to follow for editing content based routing.

Text description of the illustration is24.gif
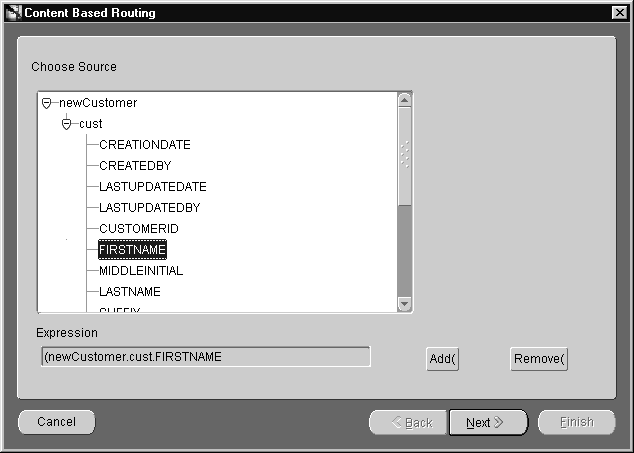
- Choose Source Page
When the Content Based Routing Wizard starts, the Choose Source page displays:
Text description of the illustration is25.gif
Choose the source event attribute and click Next.
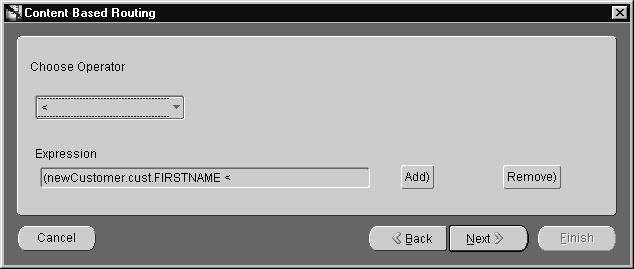
- Choose Operator Page
After the source event is selected, the Choose Operator page displays:
Text description of the illustration is26.gif
Select an operator from the drop-down list and click Next.
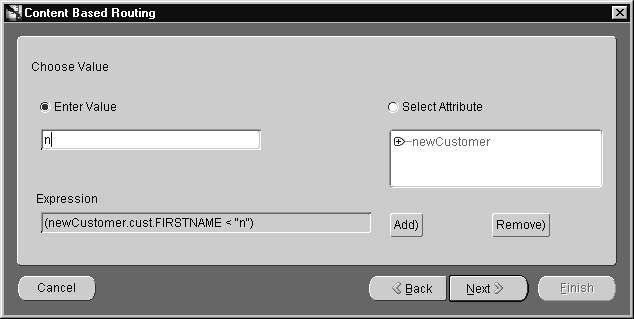
- Choose Value Page
After selecting an operator, the Choose Value page displays:
Text description of the illustration is27.gif
- Use the Enter Value field to compare a value in an attribute to a literal. Enter a value in the text field.
Use Select Attribute to compare one value in an attribute to another. Select an attribute from the navigation tree.
- Click Next.
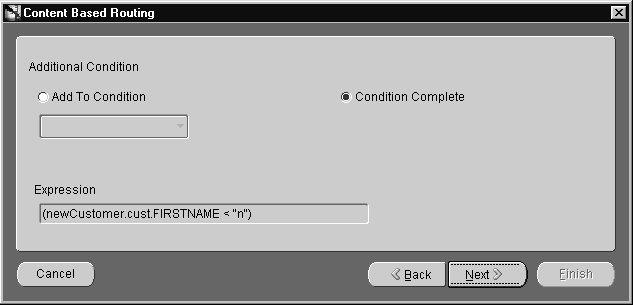
- Additional Condition Page
After entering a value or selecting an attribute, the Additional Condition page displays:
Text description of the illustration is28.gif
- Select Add to Condition to have complex evaluations, such as
Age > 30, Salary <= 2,000 and State = CA.
Select Condition Complete to continue to the next page.
- Click Next.
Depending on which radio button is selected, the Choose Source page or Select Destination Application page displays.
- Select Destination Application Page
In this example, the Select Destination page is used:

Text description of the illustration is29.gif
Select an application from the Select Destination Application box and click Finish.
The Content Based Routing Rule is created and displays on the Content Based Routing dialog.
- Click OK.
Working with Cross Reference Tables
Keys for corresponding entities created in different applications can be correlated through cross referencing in iStudio. For example, a purchase order created in a procurement system has a native id PurchaseOrder. It is then routed to a fulfillment system. The purchase order is created in the fulfillment system with native id Order_ID. PurchaseOrder and Order_ID must be cross referenced so Oracle9iAS InterConnect can correlate communication about this same logical entity in two different systems without each system knowing the native ids of the other.
Creating Cross-Reference Tables
Creating a cross reference in iStudio creates a table in the repository schema. To create a cross reference table:
- From the File menu, click New, then select Cross Reference Tables. The Create Cross Reference Table dialog displays.
- Enter a name for the cross reference table in the Table Name field and click OK.
Adding Applications to Cross Reference Tables
To add applications to the cross reference table:
- In the Design Navigation tree, select the appropriate cross reference table and right-click to display the context menu.
- From the context menu, select Add App. The Add Application to Cross Reference Table dialog displays.
- From the drop down list, select an application name.
- Click OK.
Removing Applications From Cross Reference Tables
To remove applications from a cross reference table:
- In the Design Navigation tree, select the appropriate cross reference table and right-click to display the context menu.
- From the context menu, select Remove App. The Remove Application from Cross Reference Table dialog displays.
- From the drop down list, select an application name.
- Click OK.
Populating Cross Reference Tables
To populate the cross reference tables, returned arguments must first be defined. Returned arguments are the arguments returned by the subscribe or implement code for populating the cross reference table.
Use the Subscribe Wizard to access the correct page for populating cross reference tables.
To populate cross reference tables:
- Click Cross Reference... on the Define Application View page on the appropriate wizard. The XRef dialog displays:
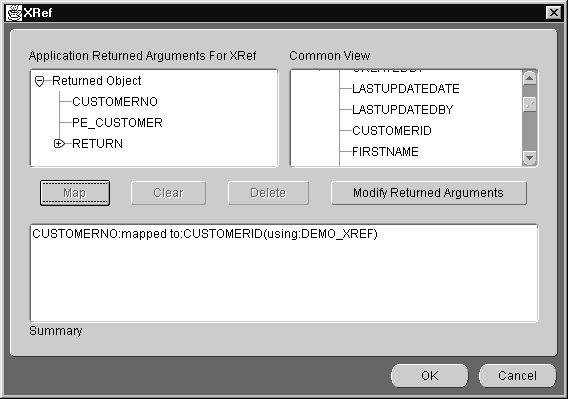
Text description of the illustration is08.gif
The Application Returned Arguments box displays the returned arguments. This information is initially populated with any OUT arguments from the application view.
- Click Modify Return Arguments to modify the returned arguments list.
- Select the corresponding attributes in the Application Returned Arguments For XRef and Common View windows, then click Map.
- Specify the Cross Reference Table name to be populated using these attributes' values and click OK.
Working with Domain Value Mappings
Code tables can be mapped across systems using domain value mapping in iStudio. For example, a purchase order in a procurement system has a purchase order status field with possible domain values of Booked and Shipped. The corresponding field in a fulfillment system has the domain value set of 1 and 2. Oracle9iAS InterConnect creates mappings such as booked=1 and shipped=2 so these values can be correlated at runtime without each system knowing the domain value set of the other.
Creating a Domain Value Mapping Table
To create a domain value mappings table:
- Select File menu from the menu bar, select New, then select Domain Value Mapping. The Create Domain Value Mapping dialog displays.
- Enter a name for the domain value map in the Map Name field and click OK.
Adding Applications to Domain Value Mappings
To add applications to domain value mappings:
- In the Design Navigation tree, select a domain value mapping and right-click to display the context menu.
- From the context menu, select Add App. The Add Application to Domain Value Map dialog displays.
- Select an application name from the drop down list and click OK.
Removing Applications From Domain Value Mappings
To remove applications from the domain value mappings:
- In the Design Navigation tree, select a domain value mapping and right-click to display the context menu.
- From the context menu, select Remove App. The Remove Application from Domain Value Mapping dialog displays.
- Select the Application Name to remove from the drop down list and click OK.
Modifying Domain Value Mappings
To modify data domain value mappings:
- In the Design Navigation tree, select a domain value mapping and right-click to display the context menu.
- From the context menu, select Edit Domain Value Map. The Edit Domain Value Map dialog displays.
- Click Add to add mappings or Import to import mappings.
- Click OK.
Deleting Domain Value Mappings
To delete a selected domain value mapping:
- Select the domain value mapping to delete and click Delete.
Deleting Domain Value Mapping Tables
To delete the domain value mapping table:
- Select the domain value mapping table to be deleted and right-click to display the context menu.
- From the context menu, select Delete.
- In the Confirm Delete dialog, click Yes.
Modifying Attribute Mappings
To modify a selected attribute mapping, use the Define Mapping page on the Publish Wizard:
- Select a mapping and click Edit.
- Edit the appropriate fields and click OK.
Removing Attribute Mappings
In the Publish Wizard, use the Define Mapping page to remove attribute mappings.
- To remove a mapping, delete the attribute and click Remove.
- To remove all mappings, click Clear.
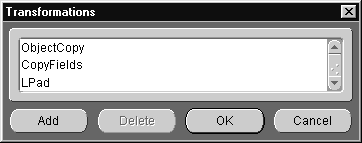
Adding Custom Transformations
Use the Define Mapping page of the Publish Wizard to create custom transformations.
To create custom transformations:
- Click Custom Transformations on the Mapping dialog. The Transformations dialog displays:
Text description of the illustration is36.gif
- To add user-defined transformations, click Add.
- Click OK.
Deleting Custom Transformations
Using the Transformation dialog, you can delete custom transformations. To delete a selected transformation:
- Select the transformation to delete and click Delete.
- Click OK on the Transformation dialog.
Adding Mapping Variables
To add mapping variables, use the Mapping dialog.
- On the Mapping dialog, click Variables. The Variables dialog displays.
- Click Add to add a variable. The New Variable dialog displays:
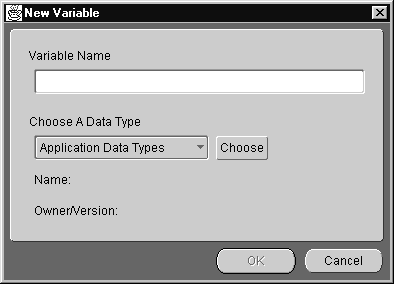
Text description of the illustration is38.gif
- Enter a name for the variable in the Variable Name field.
- Select a data type from the drop down list and click Choose. The data type for the variable must be previously defined.
- Click OK to return to the New Variable dialog.
- Click OK on the New Variable dialog.
Deleting a Mapping Variable
To delete a mapping variable, use the Mapping dialog:
- Select the mapping variable to delete and click Delete.
- Click OK.
Cross Reference Table Walk-Through
The following set of steps is a walk-through involving cross-reference tables.
- Create a cross reference table using iStudio. Creating a cross reference node creates a table in the repository schema.
- Add applications to the cross reference table. This defines the cross reference.
- Create a cross reference in the mapping in the subscribing application. This step involves the Subscribe Wizard.
- Define the return argument(s) for the key using the XRef dialog. The code must return the new key from the subscribing application. This key and the publishing application key will then be inserted into the cross reference table.
- Map the common view key to the application key using a transformation in the subscribing application.
- Set the table name and options after the mapping is applied.
- Define syntax for the mapping.
- Define a stored procedure.
- Map the common view key to the application key using a transformation in the subscribing application.
- Set the table name after the mapping is applied.
Domain Value Mappings Walk-Through
The following set of steps is a walk-through involving domain value mappings.
- Create the domain value mapping.
- Add applications and values to the mapping.
- Create a mapping using a transformation in the subscribing application.
- Set the table name and options after the mapping is applied.
- Define syntax for the mapping.
