Release 2 (9.0.2)
Part Number A90852-02
Home |
Solution Area |
Contents |
Index |
| Oracle9iAS Portal Configuration Guide Release 2 (9.0.2) Part Number A90852-02 |
|
In the previous chapter we discussed various Oracle9iAS Portal configurations, ranging from a single machine configuration to a full scale enterprise deployment scenario, using Load Balancing routers, as well as multiple middle-tier servers and Oracle9iAS Web Cache clusters.
This chapter discusses the configuration that needs to be performed to accommodate some of these more advanced configurations. Specific topics include:
The Oracle9i Application Server HTTP server supports the configuration of virtual hosts. This allows a single machine and port to represent a number of virtual hosts. To configure virtual hosts, you must set this up on both Oracle9iAS Portal as well as on the Oracle HTTP Server.
In our example, let's assume that we want to access Oracle9iAS Portal as http://www.abc.com as well as http://www.xyz.com. Also, let's assume that the Oracle9iAS Single Sign-On Server's URL is http://www.login.com.
To configure virtual hosts, open and edit the Oracle HTTP Server configuration file, httpd.conf located in ORACLE_HOME/Apache/Apache/conf. Verify that the contents of the file includes the similar information in the Virtual Hosts section:
### Section 3: Virtual Hosts
NameVirtualHost 127.0.0.1

<VirtualHost 127.0.0.1>
    ServerName www.abc.com
</VirtualHost>

<VirtualHost 127.0.0.1>
    ServerName www.xyz.com
</VirtualHost>

<VirtualHost 127.0.0.1>
    ServerName www.login.com
</VirtualHost>
This example uses the IP address 127.0.0.1, which represents the local machine. This can be any valid IP address.
The domain names specified in the ServerName entries need to be valid domain names. If you are setting up Oracle9iAS Portal on a local laptop, make the appropriate entries in your local hosts file.
# Copyright (c) 1993-1995 Microsoft Corp.
#
# This is a sample HOSTS file used by Microsoft TCP/IP
# for Windows NT/2000.
#
127.0.0.1 localhost
127.0.0.1 www.abc.com
127.0.0.1 www.xyz.com
127.0.0.1 www.login.com
For Single Sign-On on the Oracle9iAS Single Sign-On Server to work properly, it must always be referenced by any Partner Application with the same hostname in the URL. This is because cookies are sent back only to the host that generated them. So, in the preceding example, the Oracle9iAS Single Sign-On Server must always be referenced as http://www.login.com. Thus, you must register www.abc.com, www.xyz.com, and www.login.com as Partner Applications:
Section 3.2.4, "SSOPARTNERCONFIG OPCA Mode" for SSOPARTNERCONFIG mode usage information.
See also:
The Oracle9iAS Portal architecture is designed around a three-tier architecture that allows any browser to connect to it. This flexible architecture allows each component (browser, Oracle HTTP Server listener, Oracle9i database, and Oracle9iAS Portal) to be upgraded individually as required.
When a page is requested from Oracle9iAS Portal, the request is made from the browser to the Oracle HTTP Server listener. The returned page is comprised of many types of portlets. A portlet is an area on a portal page that contains data from a particular data source.
The Parallel Page Engine obtains the page metadata from the Oracle9iAS Portal Repository and is responsible for assembling the portlets on the page.
With the release of Oracle9i Application Server version 9.0.2 and above, all of the servlets are installed under OC4J, based upon the application deployment. All of the configuration parameters for PPE are entered in the web.xml file related to the PPE Deployment. In the default installation, this file can be found at the following location:
$IASHOME/j2ee/home/applications/portal/portal/WEB_INF/
The following table describes each of the different configuration parameters available for use with the Parallel Page Engine (PPE). Each parameter affects the operation of the PPE in a different manner. Some are simply for logging, while others can affect the performance of the engine, or Oracle9iAS Portal itself. In most cases, the default values should be sufficient for use, however there may be configurations where this is not the case. Each parameter is described with it's syntax, description, and default
| PPE Setting | Syntax | Description | Default value |
|---|---|---|---|
|
logmode |
<init-param> <param-name>logmode</param-name> <param-value>debug</param-value> </init-param> |
Enables the Parallel Page Engine to run in debug mode. This mode will write debug information to the Parallel Page Engine log file. This mode does cause some degradation in performance, because large amounts of information are being written to disk. The Parallel Page Engine log file by default is located at:
Possible values are debug, all, and perf (for performance logging). |
|
|
poolSize |
<init-param> <param-name>poolSize</param-name> <param-value>25</param-value> </init-param> |
This represents the number of connections that the Parallel Page Engine is capable of making at any one time. This value can be raised or lowered based upon performance needs. By setting the number higher, there will be more threads, and connections available for use, however this will use more resources. |
|
|
requesttime |
<init-param> <param-name>requesttime</param-name> <param-value>30</param-value> </init-param> |
This is the default time out assigned to portlet requests which do not have there own time out value specified. It is applied as the amount of time (in seconds) allowed before response headers are returned by the server. Time outs are weighted by where they originate. If the portlet sets it's own time out value, then that is the time out which will be used. If no portlet time out is available, then the provider registration time out is used. If neither of these are present, then the requesttime is used. |
|
|
minTimeout |
<init-param> <param-name>minTimeout</param-name> <param-value>5</param-value> </init-param> |
This is the minimum timeout allowed to be used by a Portlet. Thus if the minTimeout is set to 5, and a portlet sends a timeout of 2, the minTimeout value of 5 would be applied to that portlet. |
|
|
stall |
<init-param> <param-name>stall</param-name> <param-value>120</param-value> </init-param> |
If the response headers are returned, but the data itself lags behind, then a stall comes into affect. This value keeps the Parallel Page Engine from holding onto connections forever. Once the response headers are received, the PPE makes every effort to wait as long as is feasible to retrieve all of the data. Set this value appropriately if the portlets being requested are large, or running over a slow network. |
|
|
httpsports |
<init-param> <param-name>httpsports</param-name> <param-value>433:444</param-value> </init-param> |
This is a colon (':') separated list of ports on which the PPE should use SSL to communicate with the Portlet Repository. |
|
|
prefix |
<init-param> <param-name>prefix</param-name> <param-value>/pls</param-value> </init-param> |
The string used to indicate to Oracle HTTP Server where modplsql is located. The default matches the default Oracle9i Application Server installation configuration, but it must be changed if the Oracle9i Application Server configuration has changed. |
|
|
proxyPort |
<init-param> <param-name>proxyHost</param-name> <param-value>ph.comp.com</param-value> </init-param> <init-param> <param-name>proxyPort</param-name> <param-value>8888</param-value> </init-param> |
This is the host name and port number of a proxy server that may be required to request data from the Oracle9i Application Server. These parameters are only required if a proxy server is in use between PPE and the iAS listener. |
|
|
offlinePathMxml |
<init-param> <param-name>offlinePath</param-name> <param-value>/path/offline.html</param-val ue> </init-param> <init-param> <param-name>offlinePathMxml</param-name> <param-value>/path/offline.xml</param-valu e> </init-param> |
By setting either of these, the PPE will be set to display the desired off-line message. There are two available messages: one for an HTML browser, and one for a mobile enabled device. |
|
|
showError |
<init-param> <param-name>showError</param-name> <param-value>true</param-value> </init-param> |
When a portlet times out, or something within the Parallel Page engine goes wrong with a particular portlet request, an error is displayed to the user. The messages tend to be generic, but do give the user some information and an indication that the page did not display as expected. By setting this to false, the user will not see these messages. |
|
|
cacheBuffer |
<init-param> <param-name>cacheBuffer</param-name> <param-value>32768</param-value> </init-param> |
The number of bytes to use for buffering when reading a completed page from the cache is set by using this parameter. By determining the size of pages generally used in a portal, this value can be adjusted to fit the portal configuration. By setting the value higher, a larger page can be read quickly, but more resources are needed. If the value is set low, then reading the cache file is slower. |
|
|
cacheEncryptionKey |
<init-param> <param-name>cacheEncryptionKey</param-name > <param-value>KEY</param-value> </init-param> |
This key is used to obfuscate the headers used for caching using Oracle9iAS Web Cache. This allows for a more secure cache key, and makes retrieving a cached object more difficult for unwanted requests. |
|
|
showPageDebug |
<init-param> <param-name>showPageDebug</param-name> <param-value>false</param-value> </init-param> |
By setting showPageDebug to true, the Page timing information will be shown on every request. Refer to Section B.9, "Timing and Caching Statistics" for a description of the timing and caching statistics. |
|
|
dmsLogging |
<init-param> <param-name>dmsLogging</param-name> <param-value>false</param-value> </init-param> |
By setting dmsLogging to true, the PPE will output data for DMS Logging. |
|
|
queueTimeout |
<init-param> <param-name>queueTimeout</param-name> <param-value>10</param-value> </init-param> |
The amount of time a request should stay in the queue before being timed out. This parameter can be used if requests for portlets are timing out, but the requests are never being sent. Although this points to other performance problems which could be solved by alternative configurations, this option is available to allow items to stay in the queue for longer or shorter periods of time. |
|
|
cacheDir |
<init-param> <param-name>cacheDir</param-name> <param-value>/PATH/</param-value> </init-param> |
The cacheDir parameter value points to a directory in the file system where cache files are stored and retrieved. The PPE caches portlet contents and fully assembled page contents into this directory. There are no defaults for this parameter. Note that if it is not specified, the PPE will not use caching and the overall system performance will be greatly affected by it. |
|
|
jspRoot |
<init-param> <param-name>jspRoot</param-name> <param-value>/JSP PATH/</param-value> </init-param> |
The relative path where JSP files for JSP Pages can be found. |
|
|
jspSrcAlias |
<init-param> <param-name>jspSrcAlias</param-name> <param-value></param-value> </init-param> |
The Alias for the jsp engine, like /portal/jsp or some other path. |
|
A reverse proxy server is a host process which is used as part of a firewall architecture to isolate the internal hosts from the externally accessible host(s) by providing a proxy through which external requests must pass to access internal services. Typically, such a proxy server takes the form of a dual-homed host. This means that it is a host with two network interface cards. One interface connects to the external network, and the other interface connects to the internal network, or demilitarized zone (DMZ) of the firewall.
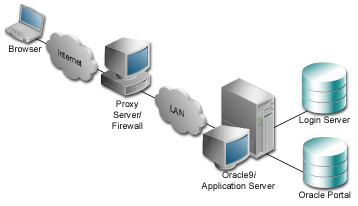
In this architecture, the browser accesses the server through a hostname which is published by the proxy server. The proxy server then forwards the request to the actual host within the firewall, which could be some other host name.
For this example, let's assume the following:
www.myportal.com
server.company.com.
server.company.com is listening on port 7777.
Complete these steps to configure Oracle9iAS Portal for this architecture:
VirtualHost entries that accept the internal host name, but then assert the externally visible host name, using the ServerName directive, so that self-referential URLs rendered on the Oracle9iAS Portal pages are valid for the browser.
ServerNames asserted above, so that they can resolve the hostnames that are generated by Oracle9iAS Portal, for HTTP calls looping back to fetch portlet content.
-host reverse_proxy_hostname
-port reverse_proxy_port
-chost web_cache_host
-cport_i web_cache_invalidation_port
Oracle9iAS Web Cache invalidation messages will now be sent to the Oracle9iAS Web Cache invalidation port. Note that the use of Oracle9iAS Web Cache is not depicted in the graphic that accompanies this example.
|
See also:
Section 3.2.2, "MIDTIER OPCA Mode" for more information on the OPCA MIDTIER mode. |
www.myportal.com domain name on a domain name server on the Internet, with IP address 196.12.67.8.
The IP addresses used in this example are for illustration purposes only and may not be valid IP addresses.
Note:
The following figure shows the server names and ports used in the preceding example:
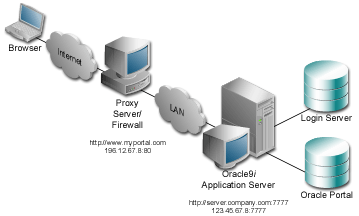
|
See also:
For more information on how to set up proxy servers, refer to the white paper A Primer on Proxy Servers, available on: |
You provide directives in the Oracle HTTP Server configuration file, httpd.conf, which specify the behavior described in the points above. The reverse proxy server contacts the internal middle-tier server as server.company.com over port 7777.
When the Oracle HTTP Server invokes the mod_plsql, and mod_jserv, it then passes www.myportal.com as the ServerName and port 80. URLs that are generated by Oracle9iAS Portal code use www.myportal.com and port 80.
The directive "useCanonicalName on" instructs Oracle HTTP Server to use the ServerName specified. Otherwise, it passes the name used in the Host field of the request.
The relevant sections in the httpd.conf file for the server.company.com Oracle9i Application Server configuration are shown in the following.
### Section 2: 'Main' server configuration...Port 80Listen 7777Listen 80ServerName www.myportal.com...UseCanonicalName On...### Section 3: Virtual Hosts## VirtualHost: If you want to maintain multiple domains/hostnames on# your machine you can setup VirtualHost containers for them.## If you want to use name-based virtual hosts you need to define at# least one IP address (and port number) for them.## This section is mandatory for URLs that are generated by# the PL/SQL packages of the Oracle Portal# These entries dictate that the server should listen on port# 7777, but will assert that it is using port 80, so that# self-referential URLs generated specify www.myportal.com:80# This will create URLs that are valid for the browser since# the browser does not directly see the host server.company.com.NameVirtualHost 123.45.67.8:7777<VirtualHost server.company.com:7777>ServerName www.myportal.comPort 80</VirtualHost># Since the previous virtual host entry will cause all links# generated by the Oracle Portal to use port 80, the server.company.com# server needs to listen on 80 as well since the Parallel Page# Engine will make connection requests to Port 80 to request the# portlets.NameVirtualHost 123.45.67.8:80<VirtualHost server.company.com:80>ServerName www.myportal.comPort 80</VirtualHost>
If you need to support multiple aliases for the published address www.myportal.com, then some additional directives are needed. For example, if the server also needs to be accessible as www.portal.com, then you need to define additional virtual host entries on the internal server. This is so the reverse proxy directs requests from each corresponding published hostname to a related internal host alias which can assert the correct published name.
In this example, the VirtualHost sections appear as follows:
NameVirtualHost 123.45.67.8:7777<VirtualHost server.company.com:7777>ServerName www.myportal.comPort 80</VirtualHost><VirtualHost server2.company.com:7777>ServerName www.portal.comPort 80</VirtualHost>NameVirtualHost 123.45.67.8:80<VirtualHost server.company.com:80>ServerName www.myportal.comPort 80</VirtualHost><VirtualHost server2.company.com:80>ServerName www.portal.comPort 80</VirtualHost>
A local HOSTS file can help resolve domain names that are not normally visible to the internal network. For example, the Oracle9i Application Server host for server.company.com makes requests to itself, but the URLs that it is requesting are referring to www.myportal.com. You must create host entries in the local HOSTS file on that machine allowing it to resolve this name, within the firewall. The hosts entry for this example should include the following lines:
# This is a sample HOSTS file used by Microsoft TCP/IP
# for Windows NT/2000.
#
127.0.0.1    localhost
123.45.67.8  www.myportal.com
If you do not provide these entries in the local HOSTS file, then you need to set the Oracle9i Application Server host to recognize a proxy server that would take the request out to the Internet and back in through the reverse proxy (www.myportal.com). Avoid this setup as this may result in poor performance.
The purpose of a Load Balancing Router (LBR) is to provide a single published address to the client browsers, and provide a "farm" of Web servers which actually service the requests, based on the distribution of the requests done by the LBR. The LBR itself is a very fast network device which can distribute Web requests to a large number of physical servers.
If you want to install multiple Oracle9i Application Server middle-tier servers to handle a large load, you could configure Oracle9iAS Portal as illustrated in the following diagram:

This example shows that the Load Balancing Router (LBR) balances the load between all three instances of the Oracle9iAS Web Cache cluster. each one of the Oracle9iAS Web Cache clusters can in turn load balance any of the middle-tier servers which communicate with Oracle9iAS Single Sign-On Server and Oracle9iAS Portal. In this example, let's call the three Oracle9iAS Web Cache instances wc1, wc2, and wc3, and let's call the Oracle9i Application Server middle-tier servers svr1, svr2, and svr3. So in the above example wc1 can load balance svr1, svr2, as well a svr3. Additionally wc2 and wc3 can do the same.
All the Oracle9i Application Server middle-tier servers must have DAD entries for each of the databases. A good way to accomplish this is to have the middle-tier servers share a file system that contains the configuration information for the DADs, and allows them to share cache files.
The important points to consider with this configuration include:
www.myportal.com to the external IP address on the LBR.
www.myportal.com to svr1.company.com, svr2.company.com, and svr3.company.com, addressing the request to their IP addresses, but still containing www.myportal.com in the Host: field of the HTTP request.
www.myportal.com, and their httpd.conf files assert that name as the ServerName. Hence the names svr1, svr2, and so on are irrelevant.
Some additional configuration is needed, because invalidation requests need to be returned properly to Oracle9iAS Web Cache and not to the LBR.
|
See also:
Oracle9iAS Web Cache Administration and Deployment Guide in the Oracle9i Application Server documentation library. |
If the LBR that is in use can listen on multiple ports and if it also has the ability to route the invalidation messages back to Oracle9iAS Web Cache, then OPCA needs to be run in the MIDTIER mode, specifying the following settings:
If the LBR is not able to listen on multiple ports, or if it does not have the ability to route the invalidation messages back to Oracle9iAS Web Cache, another LBR, which we will call the invalidation request handling LBR, needs to be set up to handle the routing of the invalidation messages. In this case, OPCA needs to be run in the MIDTIER mode, specifying the following settings:
-host LBR host name
-port LBR port name
-chost invalidation request handling LBR host name
-cport_i invalidation request handling LBR port name
Instead of using another LBR as an invalidation request handling LBR, you could also use one of the Oracle9iAS Web Cache instances, in the Oracle9iAS Web Cache cluster to handle the invalidation (for example wc1). This instance must be part of the Oracle9iAS Web Cache cluster, but it is recommended that you do not cache anything, or handle HTTP requests with this designated Oracle9iAS Web Cache instance, in order to increase availability. In this case, OPCA needs to be run in the MIDTIER mode, specifying the following specific settings:
-host LBR host name
-port LBR port name
-chost hostname of the designated Oracle9iAS Web Cache cluster instance.
-cport_i invalidation port of the designated Oracle9iAS Web Cache cluster instance
Once one of the above options is configured correctly, the invalidation messages will be routed correctly back to Oracle9iAS Web Cache and the benefits from using the LBR, as well as Oracle9iAS Web Cache can be enjoyed.
If you want to configure two sites to use the same Portal repository, some additional Oracle9iAS Web Cache configuration is required.
Assuming that you would want to add another site called www.myportal2.com to the configuration shown in Figure 6-3, "Load balancing router configuration". www.myportal2.com needs to be mapped to the same LBR.
Assuming that you have already defined www.myportal.com as a site in Oracle9iAS Web Cache, the additional configuration consists of creating a site alias in Oracle9iAS Web Cache.
It is important that www.myportal.com is set up as a site, while www.myportal2.com has to be defined as a site alias. This way, the invalidation messages sent to Oracle9iAS Web Cache invalidate content that is cached against both sites. This configuration makes the multiple site definitions transparent to the Portal repository.
|
See also:
Oracle9iAS Web Cache Administration and Deployment Guide for information on how to configure a site and a site alias. |
Multiple Oracle9iAS Portal middle-tier installations associated to a single Oracle9i Application Server infrastructure do not work properly in a default Oracle9i Application Server installation. There are a number of integration points that need to be addressed in case you try to use such a configuration:
Detailed steps for setting up Oracle9iAS Web Cache in a multiple middle-tier environment are described in Section 6.8.8, "Associating Multiple Middle-Tiers to a Single Infrastructure".
Every Oracle9iAS Portal middle-tier installation drops and recreates the Portal users in OID. This means that the Oracle9i Application Server instance password of the last run middle-tier installation should be used for Portal runtime access.
After all the middle-tier installations are performed, the users can change the Portal user password in OID. This does not require any other changes in the Portal repository.
If Oracle9iAS Wireless is configured with Oracle9iAS Portal during the middle-tier installation, the middle-tier install registers the Portal on the Oracle9iAS Wireless service. In case of multiple midtier installs, the last configured Oracle9iAS Wireless service URL is stored in the Oracle9iAS Portal instance. You can change this to your choice of Oracle9iAS Wireless service by running the following scripts in the Oracle9i Application Server middle-tier selected for the Oracle9iAS Wireless service:
ORACLE_HOME/wireless/sample/portalRegistrar.sh
ORACLE_HOME/wireless/sample/portalRegistrar.bat
Multiple Portal middle-tier installations will overwrite the existing Default JPDK Instance URL which is used for creating the Providers. The users can change this to their choice of JPDK Instance URL using the following steps :
However you choose to configure the Oracle HTTP Server listener, you can optimize performance by setting an approximate number of simultaneous requests that can be handled by the Oracle HTTP Server listener.
On UNIX, in particular, since the Oracle HTTP Server is process-based, each process needs to open a database connection for each DAD that has requested it. As a result, the number of requests can be quite high, which may result in clients being "locked out" if the number of sessions allowable has been exceeded. However, setting too high of a value unnecessarily consumes resources.
The scenario is described below:
The first session is for "portal" and the second is for "portal_public".
In this case, the first session is for "orasso" and the second session is for "ora_sso_public".
MaxClients. It defaults to 150.
If each user were logging in and working in Oracle9iAS Portal, then scenario (1) and (2) above would result in four sessions per process. The total number of sessions for such a scenario is calculated as follows:
150 * 4 = 600
600 sessions and approximately 300 database connections (2 sessions per connection)
Since login frequency is generally lower than Oracle9iAS Portal access frequency, it makes sense to configure the Oracle9iAS Single Sign-On Server on a separate Oracle HTTP Server listener. The objective is to tune down the MaxClient setting to a value that is reasonable without affecting the needs of the portal system.
Oracle9iAS Portal makes extensive use of mod_plsql which maintains a pool of connections to the database. The MaxClient parameter tunes the number of processes which directly relates to the number of database connections pooled by mod_plsql.
|
See also:
Oracle9i Application Server mod_plsql User's Guide, which is provided as part of the Oracle9i Application Server documentation library. |
Follow these steps to configure the MaxClient setting:
MaxClients parameter, edit this accordingly in the configuration file, httpd.conf, which is located in:
ORACLE_HOME/Apache/Apache/conf/
Tune down the MaxClients setting to control the number of requests that Oracle HTTP Server services on the Oracle HTTP Server listener. This ultimately controls the maximum number of sessions that could be established.
MaxClients parameter according to the needs of the Oracle9iAS Single Sign-On Server and the needs of Oracle9iAS Portal, without affecting each other. This parameter directly corresponds to the number of sessions established and to the maximum workload that the Oracle HTTP Server listener can handle on the Portal listener.
The MaxClients section in the httpd.conf file is shown below:
# Limit on total number of servers running, i.e., limit on the number
# of clients who can simultaneously connect --- if this limit is ever
# reached, clients will be LOCKED OUT, so it should NOT BE SET TOO LOW.
# It is intended mainly as a brake to keep a runaway server from taking
# the system with it as it spirals down...
#
MaxClients 150
This section will discuss how to configure Oracle9iAS Portal to work with Oracle9iAS Web Cache. This section includes the following subsections:
Oracle9iAS Web Cache Administration and Deployment Guide in the Oracle9i Application Server documentation library.
See also:
Log files for Oracle9iAS Web Cache are typically stored in ORACLE_HOME/webcache/logs on UNIX and ORACLE_HOME\webcache\logs on Windows.
There are two log files:
Oracle9iAS Web Cache Administration and Deployment Guide in the Oracle9i Application Server documentation library.
See also:
You can configure Oracle9iAS Portal to work with Oracle9iAS Web Cache in a variety of ways, but some scripts are supplied to facilitate this. These scripts are covered in more detail in Section B.2, "Oracle9iAS Web Cache configuration scripts".
The scripts covered in Appendix B are:
cachseed.sql, which allows you to modify all the Oracle9iAS Web Cache configuration parameters.
cachset.sql, which allows you to turn the use of Oracle9iAS Web Cache on or off. Information on how to disable Oracle9iAS Web Cache completely is covered as well.
cachjsub.sql, which allows you to manage the invalidation message processing job.
|
See also:
Troubleshooting information is covered in Section 8.1, "Oracle9iAS Web Cache related issues". |
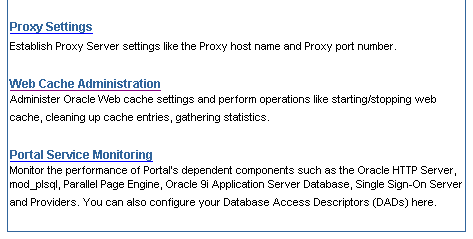
You can access the Oracle9iAS Web Cache administration portlet directly from Oracle9iAS Portal. In the Services portlet, go to the Proxy Settings page. By default, the Services portlet is located on the Oracle9iAS Portal home page's Administer tab as shown in the following image.
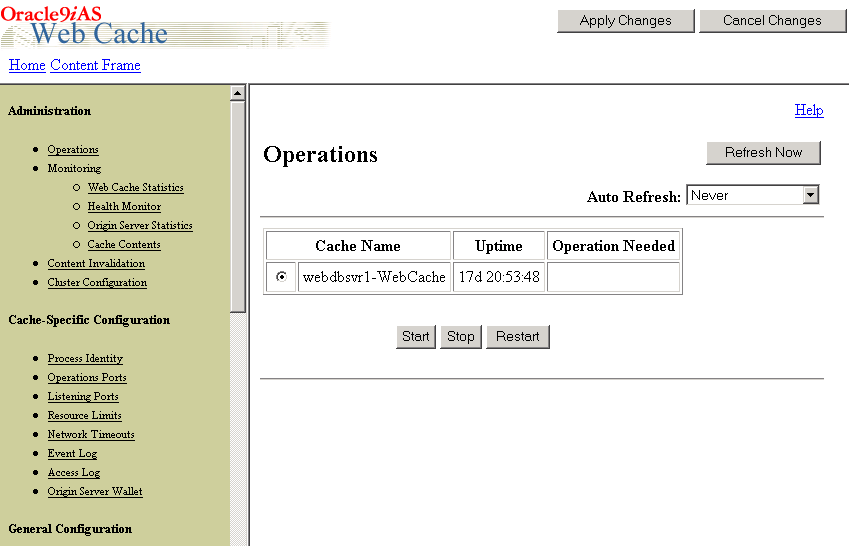
After entering the Oracle9iAS Web Cache administrator username and password, you will be able to use the web-based Oracle9iAS Web Cache administration tool, as shown in the image below.
|
See also:
Oracle9iAS Web Cache Administration and Deployment Guide in the Oracle9i Application Server documentation library. |
Follow these steps if you want to disable the use of Oracle9iAS Web Cache:
By doing this, you effectively stop using Oracle9iAS Web Cache in Oracle9iAS Portal. However, requests to and from the middle-tier will still pass through Oracle9iAS Web Cache.
If you are concerned about the performance loss that is caused by this extra step, you can also shut down Oracle9iAS Web Cache completely as shown in Section 6.8.7, "Shutting down Oracle9iAS Web Cache completely".
Note:
If you want to shut down Oracle9iAS Web Cache completely, you must perform the following steps:
Oracle9iAS Web Cache Administration and Deployment Guide in the Oracle9i Application Server documentation library for information about shutting down Oracle9iAS Web Cache.
See also:
httpd.conf file and change the Listen directive to the port on which Oracle9iAS Web Cache was listening. this file is located in:
ORACLE_HOME/Apache/Apache/conf/
Oracle9i Application Server Administrator's Guide in the Oracle9i Application Server documentation library for information about shutting down the Oracle HTTP Server.
See also:
Multiple Oracle9iAS Portal middle-tier installations associated to a single Oracle9i Application Server infrastructure do not work properly in a default Oracle9i Application Server installation. The reason for this is that Oracle9iAS Portal sends invalidation messages to a single Oracle9iAS Web Cache instance. Entries for the location of the Oracle9iAS Web Cache host, the invalidation and administrator port are stored within the Oracle9iAS Portal instance. Every Portal middle-tier installation (performed with the Oracle9iAS Portal Configuration Assistant (OPCA) in MIDTIER mode) overwrites these entries. This means that only the last installed portal middle-tier will work properly, because invalidation messages for the previous installation are now sent to the wrong Oracle9iAS Web Cache. This can result in stale content, as the content in the previously installed middle-tier will never get invalidated properly.
The following image shows this scenario:
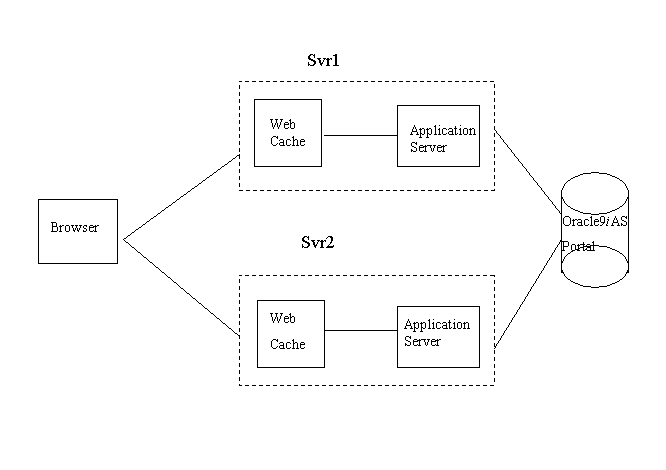
When the OPCA is run in MIDTIER mode on Svr2, everything is set up to work fine. If after that, however, the OPCA is run in MIDTIER mode for Svr1, the settings that were previously stored for Svr2 in Oracle9iAS Portal are overwritten.
There are two ways to address this issue:
You can disable Oracle9iAS Web Cache from within Oracle9iAS Portal by following the steps explained in Section 6.8.6, "Disabling Oracle9iAS Web Cache".
Alternatively, if you are unable to login through Svr2 into the Portal due to this misconfiguration, you can run cachset.sql script to disable the use of Oracle9iAS Web Cache in the Portal, as described in Section B.2.2, "Using cachset.sql".
|
Note: Do not forget to clear the File System Cache after disabling the use of Oracle9iAS Web Cache, in order to make sure that the served content is up-to-date. |
Choosing this option will allow you to still use Oracle9iAS Web Cache on one of the middle-tiers, taking at least partial advantage of the benefits that Oracle9iAS Web Cache has to offer.
In the example shown, you could, for example, shut down Oracle9iAS Web Cache on Svr2. This is better than disabling the use of Oracle9iAS Web Cache, because it allows invalidation messages to still be sent to Svr1. Follow the instructions in Section 6.8.7, "Shutting down Oracle9iAS Web Cache completely" to shut down one of the Oracle9iAS Web Cache instances.
|
|
 Copyright © 2002 Oracle Corporation. All Rights Reserved. |
|