Release 2 (9.0.2)
Part Number A95881-01
Home |
Solution Area |
Contents |
Index |
| Oracle9iAS Containers for J2EE Enterprise JavaBeans Developer's Guide and Reference Release 2 (9.0.2) Part Number A95881-01 |
|
After you have installed OC4J and configured the base server and default Web site, you can start developing J2EE applications. This chapter assumes that you have a working familiarity with simple J2EE concepts and a basic understanding for EJB development.
This chapter demonstrates simple EJB development with a basic OC4J-specific configuration and deployment. Download the stateless session bean example (stateless.jar) from the OC4J sample code page on the OTN site.
Developing and deploying EJB applications with OC4J includes the following:
The development of EJB components for the OC4J environment is identical to development in any other standard J2EE environment. The steps for developing EJBs are as follows:
You can develop your application in any manner. We encourage you to use consistent naming for locating your application easily. One method would be to implement your enterprise Java application under a single parent directory structure, separating each module of the application into their own sub-directories.
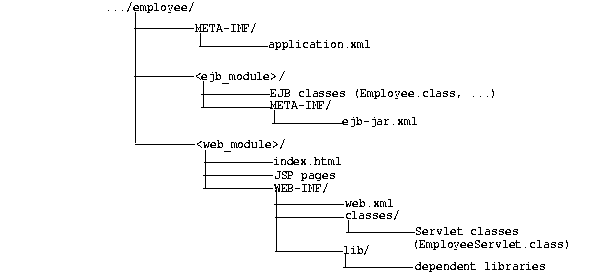
Our employee example was developed using the directory structure mentioned in the OC4J User's Guide. Notice in Figure 2-1 that the EJB and Web modules exist under the employee application parent directory and are developed separately in their own directory.
When you implement an EJB, create the following:
javax.ejb.EJBHome. It defines the create method for your bean. If the bean is an entity bean, it also defines the finder method(s) for that bean.
javax.ejb.EJBObject.
javax.ejb.SessionBean or javax.ejb.EntityBean interfaces
ejbCreate method with parameters matching those of the create method as defined in the home interface
The home interface is used to create and destroy the bean instance; thus, it defines the create method for your bean. Each type of EJB can define the create method in the following ways:
For each create method, a corresponding ejbCreate method is defined in the bean implementation. The client invokes the create method that is declared within the home interface. The container turns around and calls the ejbCreate method--with the appropriate parameter signature--within your bean implementation. You can use the parameter arguments to initialize the state of the new EJB object.
javax.ejb.EJBHome interface.
create methods must throw the following exceptions:
The following code sample shows a home interface for a session bean called EmployeeHome.
package employee;

import javax.ejb.*;
import java.rmi.*;

public interface EmployeeHome extends EJBHome
{
  public Employee create()
    throws CreateException, RemoteException;
}
The remote interface defines the business methods of the bean that the client can invoke.
javax.ejb.EJBObject interface and its methods must throw the java.rmi.RemoteException exception.
public, because clients that invoke these methods are remote.
EJBException and RemoteException, are transferred back to the client as remote runtime exceptions.
The following code sample shows a remote interface called Employee with its defined methods, each of which will be implemented in the stateless session bean.
package employee;

import javax.ejb.*;
import java.rmi.*;
import java.util.*;

public interface Employee extends EJBObject
{
  public Collection getEmployees()
    throws RemoteException;

  public EmpRecord getEmployee(Integer empNo)
    throws RemoteException;

  public void setEmployee(Integer empNo, String empName, Float salary)
    throws RemoteException;

  public EmpRecord addEmployee(Integer empNo, String empName,

	Float salary)
    throws RemoteException;

  public void removeEmployee(Integer empNo)
    throws RemoteException;
}
The bean contains the business logic for your application. It implements the following methods:
The bean in the example application consists of one class, EmployeeBean, that retrieves an employee's information.
SessionBean or EntityBean interface. The container uses these methods for controlling the life cycle of the bean. These include the ejb<Action> methods, such as ejbActivate, ejbPassivate, and so on.
ejbCreate methods that correspond to the create method(s) that are declared in the home interface. The container invokes the appropriate ejbCreate method when the client invokes the corresponding create method.
All EJB clients--including standalone clients, servlets, JSPs, and JavaBeans--perform the following steps to instantiate a bean, invoke its methods, and destroy the bean:
PortableRemoteObject.narrow method.
create method on the home interface causes a new bean to be instantiated. This returns a bean reference to the remote interface.
remove method. This either will remove the bean instance or return it to a pool. The container controls how to act on the remove method.
The following example is executed from a servlet, which can also be executed from a JSP or JavaBean, that is co-located in the same container with the stateless session bean. Thus, the JNDI lookup does not require JNDI properties, such as the factory, location, or security parameters.
This code should be executed within a TRY block for catching errors, but the TRY block was removed to show the logic clearly. See the downloadable example for the full exception coverage.
public class EmployeeServlet extends HttpServlet { EmployeeHome home; Employee empBean; public void init() throws ServletException { //Retrieve the initial context for JNDIContext context = new InitialContext();//Retrieve the home interface using a JNDI lookup using // the java:comp/env bean environment variable specified in web.xmlObject homeObject =context.lookup("java:comp/env/EmployeeBean");//Narrow the returned object to be an EmployeeHome objecthome =(EmployeeHome) PortableRemoteObject.narrow(homeObject,EmployeeHome.class);// Create the remote Employee bean instance and return a reference // to the remote interface to this bean.empBean =(Employee) PortableRemoteObject.narrow(home.create(), Employee.class);} public void doGet(HttpServletRequest request, HttpServletResponse response) throws ServletException, IOException { response.setContentType("text/html"); ServletOutputStream out = response.getOutputStream(); //Invoke a method on the remote interface reference.Collection emps = empBean.getEmployees();out.println("<html>"); out.println( "<head><title>Employee Bean</title></head>"); out.println( "<body>"); out.println( "<table border='2'>"); out.println( "<tr><td>" + "<b>EmployeeNo</b>" + "</td><td>" + "<b>EmployeeName</b>" + "</td><td>" + "<b>Salary</b>" + "</td></tr>"); Iterator iterator = emps.iterator(); while(iterator.hasNext()) { EmpRecord emp = (EmpRecord)iterator.next(); out.println( "<tr><td>" + emp.getEmpNo() + "</td><td>" + emp.getEmpName() + "</td><td>" + emp.getSalary() + "</td></tr>"); } out.println( "</table>"); out.println( "</body>"); out.println("</html>"); out.close(); } }
After implementing and compiling your classes, you must create the standard J2EE EJB deployment descriptor for all beans in the module. The XML deployment descriptor (defined in the ejb-jar.xml file) describes the application components and provides additional information to enable the container to manage the application. The structure for this file is mandated in the DTD file, which is provided at http://java.sun.com/j2ee/dtds/ejb-jar_1_1.dtd.
The following example shows the sections that are necessary for the Employee example.
<?xml version="1.0"?>
<!DOCTYPE ejb-jar PUBLIC "-//Sun Microsystems, Inc.//DTD Enterprise
JavaBeans 1.1//EN" "http://java.sun.com/j2ee/dtds/ejb-jar_1_1.dtd">

<ejb-jar>
   <enterprise-beans>
      <session>
         <description>Session Bean Employee Example</description>
         <ejb-name>EmployeeBean</ejb-name>
         <home>employee.EmployeeHome</home>
         <remote>employee.Employee</remote>
         <ejb-class>employee.EmployeeBean</ejb-class>
         <session-type>Stateless</session-type>
         <transaction-type>Bean</transaction-type>
      </session>
   </enterprise-beans>
</ejb-jar>
Once you have finalized your implementation and have created the deployment descriptors, archive your EJB application into a JAR file. The JAR file should include all EJB application files and the deployment descriptor.
|
Note:
If you have included a Web application as part of this enterprise Java application, follow the instructions for building the Web application in the Oracle9iAS Containers for J2EE User's Guide. Then, modify the |
For example, to archive your compiled EJB class files and XML files for the Employee example into a JAR file, perform the following in the ../employee/ejb_module directory:
% jar cvf Employee-ejb.jar .
This archives all files contained within the ejb_module subdirectory within the JAR file.
Before deploying, perform the following:
application.xml file with the modules of the enterprise Java application.
The application.xml file acts as the manifest file for the application and contains a list of the modules that are included within your enterprise application. You use each <module> element defined in the application.xml file to designate what comprises your enterprise application. Each module describes one of three things: EJB JAR, Web WAR, and any client files. Respectively, modify the <ejb>, the <web>, and the <java> elements in separate <module> elements.
<ejb> element specifies the EJB JAR filename.
<web> element specifies the Web WAR filename in the <web-uri> element and its context in the <context> element.
<java> element specifies the client JAR filename, if any.
As indicated in Figure 2-2, the application.xml file is located under a META-INF directory under the parent directory for the application. The JAR, WAR, and client JAR files should be contained within this directory. Because of this proximity, the application.xml file only refers to the JAR and WAR files by name and relative path--and not by full directory path. If these files were located in subdirectories under the parent directory, then these subdirectories must be specified in addition to the filename.

For example, the following example modifies the <ejb> and <web> module elements within application.xml for the Employee EJB application that also contains a servlet that interacts with the EJB.
<?xml version="1.0"?>
<!DOCTYPE application PUBLIC "-//Sun Microsystems, Inc.//DTD J2EE
Application 1.2//EN" "http://java.sun.com/j2ee/dtds/application_1_
2.dtd">
<application>
 <module>
  <ejb>Employee-ejb.jar</ejb>
 </module>
 <module>
  <web>
    <web-uri>Employee-web.war</web-uri>
    <context-root>/employee</context-root>
  </web>
 </module>
</application>
Create the EAR file that contains the JAR, WAR, and XML files for the application. Note that the application.xml file serves as the EAR manifest file.
To create the Employee.EAR file, execute the following in the employee directory that is shown in Figure 2-2:
% jar cvfM Employee.EAR .
This archives the application.xml, the Employee-ejb.jar, and the Employee-web.war files into the Employee.ear file.
OC4J is aware of and deploys your application when it is configured within the server.xml file. There are three methods to provide application information within the server.xml file:
admin.jar to modify the server.xml file
server.xml file manually
Oracle recommends the following:
admin.jar or update the XML file manually only if you are executing in standalone mode. If you do update the XML files through either of these methods and your OC4J instance is part of the OEM managed environment, you must notify DCM of the XML changes through the following command:
dcmctl updateConfig -ct oc4j
The sections below describe the OC4J methods. See Oracle9i Application Server Administrator's Guide and Oracle Enterprise Manager Administrator's Guide for information on OEM.
OC4J contains a command-line deployment tool for deploying J2EE applications--the admin.jar command. The options for this command are listed in the Oracle9iAS Containers for J2EE User's Guide.
To deploy a J2EE application with the EAR file to a remote node, execute admin.jar, as follows:
java -jar admin.jar ormi://<host><:port>
	<username> <password> -deploy -file <path/filename>
	-deploymentName <appname> -targetpath <path/destination>
where
<host><:port> is the host and port of the OC4J server.
<username><password> is the administration username and password for the OC4J server.
-file <path/filename> indicates the local directory and filename for the EAR file.
-deploymentName <appname> variable is the name of the application.
-targetpath <path/destination> indicates what path on the server node to deploy the EAR file into. The default path is the applications/ directory. Oracle recommends that you provide a target path.
In server.xml, add a new or modify the existing <application name=... path=... auto-start="true" /> entry for each J2EE application. The path should be the full directory path and EAR filename. For our employee example, add the following to the server.xml file:
<application name="employee"
	path="/private/applications/Employee.EAR"
	auto-start="true" />
If you included a Web application portion, you must do the following to bind the Web application to the Web server. In *-web-site.xml, add a <web-app ...> entry for each Web application. The <application> variable should be the same value as provided in the server.xml file. The <name> should be the WAR file, without the WAR extension, for the Web application.
For Web application binding for the employee Web application, add the following:
<web-app application="employee" name="Employee-web"

	root="/employee" />
OC4J detects the addition of your application to server.xml. The OC4J server displays a message that your application has been deployed. This is the extent of installation in OC4J.
If the server does not notice your application in a timely manner, simply start (or restart) OC4J, and it will locate your application immediately.
If you modified server.xml using admin.jar or manual edit, and you are not executing OC4J in standalone mode, notify the DCM component within OEM of your XML file changes by executing the following:
dcmctl updateConfig -ct oc4j
For more information on DCM, see the DCM Appendix in the Oracle9i Application Server Administrator's Guide.
|
|
 Copyright © 2002 Oracle Corporation. All Rights Reserved. |
|