Oracle9iAS Portal Configuration Guide
Release 3.0.9

Part Number A90096-01

Library

Solution Area

Contents

Index

Go to previous page Go to next page

2
Post-installation and Configuration Tasks

This chapter provides information about Oracle Portal after installation and the configuration tasks that you can perform.


See:

For information about installing Oracle Portal with Oracle9i Application Server, see the Oracle9i Application Server Installation Guide


Specific topics covered include:

2.1 Oracle Portal Default Schemas

Oracle Portal is installed primarily in the Oracle8i database, with some supporting components installed on the middle-tier in Oracle9i Application Server.

If you install Oracle Portal in the default mode, six schemas are created. The default base schema name is portal30 which you can change at installation time.


Important:

For security reasons, it is highly recommended that the default passwords for the portal30, portal30_sso, and portal30_sso_ps schemas be changed immediately. These passwords should be changed by the database administrator using the "alter user <schema> identified by <password>" command.

When you change the password for portal30 or portal30_sso, you also need to update the password accordingly in the respective DADs. When you change the portal30_sso_ps password, and your login server is on a database instance which is separate from your portal instance, you need to rerun ssodatax, specifying the new password so that the database link information is updated.  


Table 2-1 Default Oracle Portal schemas created
Schema  Description 

portal30 

The product schema for Oracle Portal and contains the installed portal database objects. 

portal30_public 

The schema that the portal users map to when executing procedures in the Oracle Portal product schema. The schema name is constructed from the base schema with "_public" appended to it. 

portal30_sso 

The product schema for the Login Server. This schema can be renamed in the installer. If not specified, it defaults to the base schema name with "_sso" appended to it. 

portal30_sso_ps 

The schema on the Login Server database instance used to access the password store for external applications. This schema is named by appending "_ps" to the Login Server schema name. The Portal accesses the Login Server's password store for external applications through this schema, either directly, if it resides on the same database instance, or over a dblink, if the Login Server and Portal are on different database instances. 

portal30_sso_public 

The schema that the portal users map to when executing procedures in the Login Server product schema. This name is constructed from the Login Server schema name with "_public" appended to it. 

portal30_demo 

The schema which is installed with the Oracle Portal demonstration code. The name of this schema is the base schema name with "_demo" appended to it. 

2.2 Oracle Portal Default Accounts

With each Oracle Portal installation, a default set of login accounts is created. If the product is installed in a schema named portal30, the following default accounts are created:

Table 2-2 Default Oracle Portal accounts created
Account  Description 

portal30 

This account is created for the Database Administrator (DBA) with the highest privileges in Oracle Portal.  

portal30_admin  

This is the account created for the portal administrator. This account is similar to the DBA account, however, it does not have privileges that provide access to database administration features, such as creating and managing schemas and other database objects. 

public 

This account is created for public users for unauthenticated sessions. This is the account that all sessions are associated with prior to authentication. 

portal30_SSO 

This account is created for the Login Server application. Since the Login Server is implemented with significant reuse of Oracle Portal infrastructure code, this user account is created as a result of this reuse. 

portal30_sso_admin 

This account is an administrative account which is created in conjunction with the Login Server installation. It has Login Server "Full Administrator" privileges, but it does not have any Portal administrative privileges.  


Note:

For security reasons, change all the passwords for these accounts after initial login. By default, the password is set to the user name. Change the password by logging on to the Login Server and editing the appropriate user accounts and changing their passwords. 


See also:

Oracle Portal Online Help topics in the Working with Users folder. 


2.3 Oracle Portal Default Groups

The following groups are created at installation time:

Table 2-3 Default Oracle Portal groups created
Group  Description 

DBA 

This group has the maximum privilege levels in the system. All global privileges are granted to this group. When this group is installed, it has only one member, the user with the name of the product schema, for example, portal30. 

PORTAL_ADMINISTRATORS 

This group has most of the global privileges, except for the database-related privileges: ANY_SCHEMA/MANAGE and ANY_SHARED_COMPONENT/MANAGE. This group is comprised of the admin user, portal30_admin, and includes the dba group. 

PORTAL_DEVELOPERS 

This group has privileges to build and manage Oracle Portal components and applications.  

PORTLET_PUBLISHERS 

This group has the privilege of publishing portlets. Members of this group can create components in the system such as folders, charts, calendars, and so on. This group is initially composed of the portal_administrators group who can then decide which users or groups should be added to this group. 

AUTHENTICATED_USERS 

All users that log on to Oracle Portal are added to this group. This is a convenient mechanism to allow logged on users to perform privileged actions. Specified privileges are granted to this group and group membership cannot be changed. 

RW_ADMINISTRATOR 

This group can CREATE, UPDATE, and DELETE registered report definition files, servers, and printer objects. 

RW_BASIC_USER 

This group can only run a report if they have been given the privilege to run it. 

RW_DEVELOPER 

In addition to the privileges of the RW_POWER_USER and RW_BASIC_USER groups, this group can run commands which show the system environment. This group might be assigned to a developer who needs to perform testing and to retrieve detailed error messages. 

RW_POWER_USER 

In addition to the privileges of the RW_BASIC_USER group, this group can see more detailed error messages. 


See also:

Oracle Portal Online Help topics in the Working With Users folder. 


2.4 Accessing Oracle Portal in Your Browser

After Oracle Portal is installed, access it by entering the following URL in your browser:

http://<hostname>:<portnumber>/pls/<dad>

Table 2-4 defines the URL to enter in the browser to access Oracle Portal.

Table 2-4 URL to enter in browser to access Oracle Portal
Parameter  Description 

hostname 

Defines the machine on which you installed Oracle Portal.

  • Enter both the hostname and the fully-qualified domain name. For example, enter host.domain.com.

  • This name must also match the ServerName parameter in the Apache configuration file, httpd.conf, located in:

   <ORACLE_HOME>/Apache/Apache/conf 

portnumber 

Defines the port number you specified earlier to access Oracle Portal.  

pls 

Defines the virtual path and indicates that the request is for a PL/SQL procedure which alerts the Oracle HTTP Server powered by Apache to reroute the request to the PL/SQL Gateway. 

dad 

Defines the Database Access Descriptor (DAD) you specified earlier for your Oracle Portal installation. The DAD contains information on how to connect to the database.  


See also:


2.4.1 Simplifying the Full URL of an Oracle Portal Installation

You can simplify the full URL created by the Oracle Portal installation to a more memorable or meaningful URL using the Apache Redirect directive. In this way, end users can access Oracle Portal by entering a simple URL.

By default, the URL for a new Oracle Portal installation requires you to enter:

http://<hostname>:<portnumber>/pls/<dad>

You can simplify this URL to:

http://<hostname>/<redirectpath>

  1. Open the Oracle HTTP Server configuration file, http.conf. By default this file is located in the following directory:

    <ORACLE_HOME>/Apache/Apache/conf/

  2. Enter the redirect path as follows:

    Redirect /<DADnamepath> http://<hostname>:<portnumber>/pls/<dad>


    For example:

    Redirect /portalhome http://mysite.oracle.com/pls/portal30


    In this example, end users can enter the following:

    http://mysite.oracle.com/portalhome 


    to access the full URL which is as follows:

    http://mysite.oracle.com:80/pls/portal30


This technique also works with any valid path that is appended to the URL. For example, if you want to display the Oracle Portal Online Help Content Area, enter:

http://mysite.us.oracle.com/portalhome/url/folder/ONLINE_HELP


See also:

Oracle Portal Online Help topic: What are direct access URLs


2.5 Manually Starting JServ

If you use manually started JServ processes in Oracle9i Application Server, then you need to add the Oracle Portal classpaths to the CLASSPATH variable. Manually started JServ processes do not read wrapper.classpath entries in the jserv.properties file.

2.6 Installing Language Support in Oracle Portal

You can choose to install and display the Oracle Portal user interface in any of the 24 supported languages from your browser. To install support for a given language, run the wwvseedus.sql and langinst.csh scripts. Once the language is installed you use the Set Language portlet to choose which language Oracle Portal should use.

Table 2-5 lists the supported languages and their abbreviations.

Table 2-5 Supported languages and abbreviations
Language   Abbreviation    Language  Abbreviation 

Arabic 

ar 


Dutch 

nl 

Czech 

cs 


Polish  

pl 

German  


Portuguese  

pt 

Danish  

dk 


Brazilian Portuguese  

ptb 

Spanish  


Romanian  

ro 

Greek  

el 


Russian  

ru 

French  


Swedish  

Hungarian  

hu 


Finnish  

sf 

Italian  


Slovak  

sk 

Hebrew 

iw 


Thai 

th 

Japanese  

ja 


Turkish 

tr 

Korean  

ko 


Chinese (Simplified) 

zhs 

Norwegian  


Chinese (Traditional) 

zht 

2.6.1 Installing Support for a Language

To install support for a given language in Oracle Portal:

  1. Start a command line prompt.

  2. Change to the <ORACLE_HOME>/portal30/admin/plsql/nlsres/ctl/us directory.

  3. Start SQL*Plus and log in to the database where Oracle Portal is installed.

  4. From SQL*Plus, run the wwvseedus.sql script against the portal30 schema.

  5. Change to the <ORACLE_HOME>/portal30/admin/plsql directory.

  6. Enter one of the following commands, depending upon your operating system:

UNIX

langinst.csh <-s portal_schema> <-p portal_password> <-o sso_schema> <-d sso_
password> <-c portal_connect_string> -l <language> -available 
Windows NT/2000

langinst.cmd <-s portal_schema> <-p portal_password> <-o sso_schema> <-d sso_
password> <-c portal_connect_string> -l <language> -available 
Example

langinst.csh -s portal30 -p portal30 -o portal30_sso -d portal30_sso -c orcl -l 
cs -available 

Table 2-6 lists the language script parameters for langinst.

Table 2-6 Language script parameters (langinst)
Parameter  Description 

-s portal_schema 

The database schema for the Oracle Portal database objects. The default is PORTAL30

-p portal_password 

The Oracle database password for the Oracle Portal schema. The default is <portal_schema> 

-o sso_schema 

The Oracle database schema for Login Server objects. The default is <portal_schema>_SSO

-d sso_password  

The Oracle database password for Login Server schema. The default is <sso_schema>

-c connect_string 

The connect string for the database in which the Oracle Portal schema is installed. Provide the connect string only if the schema is located on a remote database. 

-l language 

The abbreviation for the language you want to install. See Table 2-5, "Supported languages and abbreviations"

-available 

Ensures that the tabs are translated. This is required. 

  1. Repeat Step 6 for each language desired in Oracle Portal.

  2. To enable users to choose their desired language, add the Set Language portlet to a portal page. This portlet displays all of the languages currently installed. Users can then select the language of their choice when logging on.

    Typically, the Set Language portlet is added to your content area home page, but you can add it to any page. See the Oracle Portal Online Help for instructions on how to add portlets to pages.


    Notes:

    • In previous releases, Oracle Portal's language support used the setting of your browser's language preference. With the Set Language portlet, this is no longer the case.

    • The Login Server's language is set separately from that of Oracle Portal. The Login Server automatically displays a list of installed languages on its login page, which determines the language used for the Login Server regardless of what you set in the Set Language portlet.


    2.6.2 Installing Graphic Support for BiDi Languages

    Arabic and Hebrew are languages which are displayed from right to left on the screen, rather than left to right. These are also known as BiDi (bidirectional) languages. If using these languages, you need to run a script which updates certain Oracle Portal metadata to provide proper graphics support for some of the required images. To install the graphic support for BiDi languages:

    1. Locate the following directory:

      <ORACLE_HOME>/portal30/admin/plsql/nlsres
      
      
    2. On the database where Oracle Portal is installed, log on to SQL*Plus with the appropriate user name and password for that schema. For example:

      sqlplus portal30/portal30
      
      
    3. Enter the following command to install proper graphic support for BiDi languages:

      @imginst.sql
      

    2.7 Deinstalling Oracle Portal

    This section describes how to use Oracle Universal Installer to deinstall Oracle products (which deinstalls them from the Oracle Universal Installer inventory) instead of removing them manually.


    See also:

    Oracle9i Application Server Installation Guide for your operating system. 


    To deinstall Oracle Portal, follow these steps:

    1. Launch the Oracle Universal Installer.

      • On UNIX, enter ./runInstaller

      • On Windows NT/2000, choose Start -> Programs -> Oracle Installation Products -> Universal Installer.

      The Welcome window for Oracle Universal Installer appears.

    2. Click Deinstall Products.

      The Inventory dialog box appears.

    3. Expand the tree of installed products until you find the products to deinstall. In this case, choose Oracle Portal.

    4. Check the boxes of products to deinstall.

    5. Click Remove.

      The Inventory Confirmation window appears.

    6. Click Yes to deinstall the selected products.

      The products are deinstalled from your computer. The Inventory dialog box appears without the deinstalled products.

    7. Click Close to close the Inventory dialog box.

    8. Click Exit to exit Oracle Universal Installer.

    2.7.1 Deinstalling a Single Oracle Portal Schema or the Login Server

    Deleting a single Oracle Portal schema and/or the Login Server is performed from the Oracle Portal Configuration Assistant.

    To deinstall an Oracle Portal schema or the Login Server:

    1. Launch the Oracle Portal Configuration Assistant:

    Windows NT/2000

    Choose Start -> Programs -> Oracle Home -> Oracle Portal Configuration Assistant

    UNIX

    Go to the $OH/assistants/opca directory and run the launch.sh script

    1. The Step 1 of 6: Installation Options window appears.

      Click the option to Deinstall Oracle Portal or the Login Server.

    2. Follow the instructions on the remaining screens to complete this task.

    2.8 Configuring Self-registration

    If you want to allow users to create new accounts for themselves through a link on the Login Portlet, you do so by installing the self-registration feature as follows:

    1. Start SQL*Plus and log in to the database in which the Login Server is installed.

    2. Create a schema. This schema is used for accessing user administration objects on the Login Server. In this task this is referred to as the user administration access schema.

    3. In the user administration access schema, create a synonym for the Login Server SSO schema package wwsso_api_user_admin. This synonym must be called wwsso_api_user_admin.

    4. Grant Execute privileges on the wwsso_api_user_admin package in the Login Server SSO schema to the user administration access schema.

    5. If Oracle Portal and the Login Server are installed in different databases:

      1. In the user administration access schema, create a synonym for the Login Server SSO schema package wwctx_api_vpd package. This synonym must be called wwctx_api_vpd.

      2. Grant Execute privileges on the wwctx_api_vpd package in the Login Server SSO schema to the user administration access schema.

      3. In the schema in which Oracle Portal is installed, create a database link to connect to the user administration access schema.

    6. Start a command line prompt.

    7. Change to the <ORACLE_HOME>/portal30/admin/plsql directory of the directory in which Oracle Portal is installed.

    8. Enter the following command:

    UNIX
    selfreg.csh -s <portal_schema> -p <portal_password> -ua <sso_uadmin_schema> -c 
    <portal_connect_string> -dblink <sso_uadmin_dblink>
    
    Windows NT/2000
    selfreg.cmd -s <portal_schema> -p <portal_password> -ua <sso_uadmin_schema> -c 
    <portal_connect_string> -dblink <sso_uadmin_dblink>
    
    
    Table 2-7 Self-registration parameter descriptions
    Parameter  Description 

    portal_schema 

    The database schema in which Oracle Portal is installed. The default is PORTAL30. 

    portal_password 

    The password for the above schema. The default is <portal_schema>. 

    sso_uadmin_schema 

    The user administration access database schema you created in step 1. The default is <portal_schema>_SSO_UA.

    Note: You do not need to provide a value for this parameter if you specify a database link for the dblink parameter. 

    portal_connect_string 

    The connect string for the database in which Oracle Portal is installed.

    Note: You need to provide the connect string only if you are running the script on a different database. 

    sso_uadmin_dblink 

    The name of the database link created in Step 5c.

    Note: You need to provide the database link only if the Login Server is installed in a different database instance from the Oracle Portal installation. If you do not provide a value for this parameter, it is assumed that the user administration access schema is in the same database instance as Oracle Portal. 

    Example
    selfreg.csh -s myportal -p myportal -ua myportal_sso_ua -c orcl -dblink uadmin_
    link
    
    
  3. Press the Enter or Return key.

  4. In the Services portlet, click Global Settings. By default, the Services portlet is located on the Oracle Portal home page's Administer tab.

  5. In the Self-Registration Options section, select Enable Users To Log On Immediately if you want users to be able to log on to Oracle Portal immediately after they create their own user account using the self-registration feature.


    Note:

    If you do not select this check box, you need to assign the user as an authorized user before he or she is able to log on. 


  6. To expose the self-registration feature to users, customize the Login portlet to include a self-registration link.


    See:

    Oracle Portal Online Help topic: Customizing the Login Portlet


2.9 Enabling Oracle Portal Beta Features

You can switch on and off Beta features from the Oracle Portal Global Settings page, in the following way:

  1. In the Services portlet, click Global Settings. By default, the Services portlet is located on the Oracle Portal home page's Administer tab.

  2. In the Beta Features section:

    1. Select Image Charts From Query Wizard to enable Oracle Portal application developers to create Java-based image charts using a wizard. The wizard to create these charts is accessible from the Application Navigator.

    2. Select Data Component to enable Oracle Portal application developers to create spreadsheets and other data entry tables. After the developer creates an application, one of the components available to add to the application is Data.

2.10 What are Certificates?

Certificates are encrypted files which allow a client and server to pass sensitive data securely. Oracle Portal supports the x.509 certificate standard. This is the type of certificate supplied by most major certificate authorities.

Certificates can be either 40 bit or 128 bit encryption strengths. The greater the number of bits, the more secure the certificates.

Table 2-8 lists the major types of certificates.

Table 2-8 Certificate types
Certificate Type  Description 

Global Secure Site ID 

This certificate is an extension in a certificate proposed by Verisign. The certificate is used for SSL Server authentication. Using Global Secure Site IDs (formerly called Global Server IDs), companies located anywhere in the world can communicate with 128-bit SSL encryption with their customers. For more information about this technology, visit:

http://digitalid.verisign.com/server/global/help/globalFAQ.htm 

Secure Site ID 

This is a 128-bit certificate which causes the browser to operate at the best encryption level used by the client browser. Thus, if the browser is operating at 40-bit encryption, the server does the same. If the client is at 128-bit, then so is the server. In general this is not a problem since most browsers today operate using 128-bit encryption, however, this is not as secure as the Global Secure Site ID.  

40 bit Certificate 

This is the least secure type of certificate. In this case, the server and all connected clients operate at a 40-bit encryption level.

Note: If you receive a trial certificate from a certificate authority, it is probably this certificate type. 

These certificates can be purchased from many different authorities. Oracle Portal currently supports Thawte, Verisign, and Netscape certificate providers.


Note:

The Oracle HTTP Server may not understand some v3 extensions that some certificates include. The Oracle HTTP Server should function properly by ignoring those extensions. 


2.10.1 What are Signature and Chain Files?

In addition to the certificate, you also need specific signature, and/or chain files from the provider of your certificate. These files are available from your provider's Web site or customer service.

2.10.1.1 Certificate Authority File (CA)

The Certificate Authority (CA) file is the base signature file for the certificate file you have purchased. This file validates the certificate you are using. It informs clients that they can trust the certificate they have received. You require a CA file for any type of certificate you use.

2.10.1.2 Certificate Chain File

The certificate chain file links your certificate to the CA file. You require one of these files if you are using a Global Site ID or if you are using other types of certificates from another provider.

2.10.1.3 Configuration Files

There are several files involved with the certificates. Put these files in the appropriate directory. You can set up the configuration differently, however, this is the standard configuration.

Table 2-9 lists the certificate files and locations.

Table 2-9 Certificate files and locations
File  Directory location 

Certificate File 

<ORACLE_HOME>/Apache/Apache/conf/ssl.crt/ 

Certificate Authority (CA) Certificate File 

<ORACLE_HOME>/Apache/Apache/conf/ssl.crt/ 

Certificate Chain File (if available) 

<ORACLE_HOME>/Apache/Apache/conf/ssl.crt/ 

Key File 

<ORACLE_HOME>/Apache/Apache/conf/ssl.key 

2.10.2 Securing Ports to Use Certificates and HTTPS

With HTTPS, you use certificates for ports to increase security. To set this up, edit the zone.properties file.

Table 2-10 lists the locations of the zone.properties files.

Table 2-10 zone.properties file location
Operating System  Location 

Windows NT/2000 

<ORACLE_HOME>\Apache\Jserv\servlets\zone.properties  

UNIX 

<ORACLE_HOME>/Apache/Jserv/etc/zone.properties 

Then select a configuration method. You can configure Oracle Portal so that ports use HTTPS when needed, or at all times.

Ports Use HTTPS When Needed

You can set up HTTPS so that the browser and middle tier use HTTPS only when needed. HTTP is used for communication within the middle tier. This saves the overhead of HTTPS when it is not needed.

First, add the following line to the zone.properties file:

servlet.page.initArgs=useScheme=http

This specifies that the Parallel Page Engine should use HTTP for all requests to the middle tier on which it is running. The Parallel Page Engine uses HTTP for all requests to the portal.

Next, add the following line to the zone.properties file:

servlet.page.initArgs=usePort=80 (or any other valid port)

This specifies that the Parallel Page Engine should use port 80 for all requests to the middle tier on which it is running. If a request is made on port 433, the Parallel Page Engine ignores the port and uses port 80 instead.

Finally, in the wdbsvr.app file, in the DAD configuration add the following to the cgi_env_list parameter:

cgi_env_list=REQUEST_PROTOCOL=HTTPS,SERVER_PORT=(https port)

This provides the security of HTTPS, without the overhead of parallel connections over the secure protocol.

Ports Use HTTPS At All Times

You can set up HTTPS so that it is used by the ports at all times. The Parallel Servlet must be aware of which port(s) are operating under HTTPS.

Add the following line to the zone.properties file:

servlet.page.initArgs=httpsports=<port1>:<port2>:. . . :<portn> 

Each port in this list operates using the HTTPS protocol, and must have a certificate created on the Oracle HTTP Server on that port.


See also:


2.10.3 Configuring Oracle Portal to Use HTTPS

This section addresses how to configure Oracle Portal for HTTPS. It is possible to configure the system so that only the Login Server is configured for HTTPS, or configure it such that both Oracle Portal and the Login Server use HTTPS.

The Apache mod_ssl documentation describes how to configure the server to support HTTPS ports. After configuring the server to support HTTPS ports, run the ssodatan or ssodatax script(s), specifying the appropriate protocol and ports. For example, if you wanted to configure the Login Server to use HTTPS, but have Oracle Portal on HTTP, then run the ssodatan script as follows:

ssodatan -w http://portal.acme.com/pls/portal30/ -l 
https://login.acme.com/pls/portal30_sso/ -s portal30 -o portal30_sso


See also:

Section B.4, "Configuring a New Oracle Portal Instance and Login Server with the ssodatan Script" 


The following sections address the particular requirements for configuring Oracle Portal for HTTPS.

2.10.4 Adding Certificate Entries in httpd.conf

The Oracle HTTP Server configuration file, httpd.conf, contains all of the configuration information for the Oracle HTTP Server powered by Apache, including the certificate configuration. Enter the path locations for the following configuration lines. These configuration lines should already exist in comment form (#).

Table 2-11 lists the certificate entries in the Oracle HTTP Server configuration files.

Table 2-11 Certificate Entries in the Oracle HTTP Server configuration file
File  Description 

SSLCertificateFile 

Enter the path location for the certificate file, either the Trial or the purchased certificate. 

SSLCertificateKeyFile 

Enter the path location for the Key file which contains the key to decrypt your certificate.  

SSLCertificateChainFile 

Enter the path location for the Certificate Chain File you received from your provider. 

SSLCACertificateFile 

Enter the path location for the CA Certificate File you received from your provider.  


Note:

Do not use the environment variables such as your <Oracle Home> to specify the path location of these configuration files. Use the fully-qualified path location. 


The following subsections indicate the configuration entries required in the httpd.conf file, corresponding to each type of certificate. These configuration entries have been used successfully to set up Verisign certificates.

The usage varies slightly depending upon the certificate type you are installing. For example, if the certificate you are using has a chain file, then follow the Global Site ID configuration described in the following. If your certificate only uses a CA certificate file, then use the Secure Site ID configuration.

2.10.4.1 Global Site ID

SSLCertificateFile 

<ORACLE_HOME>/Apache/Apache/conf/ssl.crt/<certificate file> 

SSLCertificateKeyFile 

<ORACLE_HOME>/Apache/Apache/conf/ssl.key/<key file>  

SSLCACertificateFile 

<ORACLE_HOME>/Apache/Apache/conf/ssl.crt/<certificate chain file>  

SSLCertificateChainFile 

<ORACLE_HOME>/Apache/Apache/conf/ssl.crt/<CA Certificate file> 

2.10.4.2 Secure Site ID

SSLCertificateFile  

<ORACLE_HOME>/Apache/Apache/conf/ssl.crt/<certificate file>  

SSLCertificateKeyFile  

<ORACLE_HOME>/Apache/Apache/conf/ssl.key/<key file>  

SSLCACertificateFile  

<ORACLE_HOME>/Apache/Apache/conf/ssl.crt/<CA Certificate file> 

2.10.4.3 40 bit Site ID

SSLCertificateFile  

<ORACLE_HOME>/Apache/Apache/conf/ssl.crt/<certificate file>  

SSLCertificateKeyFile  

<ORACLE_HOME>/Apache/Apache/conf/ssl.key/<key file>  

SSLCACertificateFile  

<ORACLE_HOME>/Apache/Apache/conf/ssl.crt/<CA Certificate file> 


Note:

The Chain file and CA Certificate file appear to be inverted with their configuration entries. This is intentional, and necessary for Oracle Portal to work properly. 


See also:

Section A.1.1, "Oracle HTTP Server Configuration File (httpd.conf)" 


2.11 Enabling Secure Socket Layer (SSL)

Oracle Portal and the Login Server can be configured to run in HTTPS mode if your portal requires increased security. For optimal performance, you can also choose to have a mixed configuration where Oracle Portal is run in HTTP mode and the Login Server is run in HTTPS mode.

Secure Socket Layer (SSL) is responsible for securing Web HTTP communication between a browser and a Web server in plain HTTP over SSL (named HTTPS). Enabling SSL to work with the Oracle HTTP Server is handled by the mod_ssl package which is provided with the Apache Web server. It uses the URL scheme HTTPS rather than HTTP and a different server port.


Notes:

  • You must be the portal administrator to enable or disable Secure Socket Layer (SSL) in Oracle Portal and on the Login Server.

  • For more information on enabling SSL on the server, see the Oracle9i Application Server Installation Guide.

  • For more information about enabling and disabling SSL, see the Apache interface to mod_SSL at the following location:

       http://www.modssl.org 


2.11.1 Configuring SSL on Oracle Portal and the Login Server

Follow these steps to configure SSL on both Oracle Portal and the Login Server:

  1. Obtain a valid server certificate. The certificate that ships with Oracle9i Application Server will not work for Oracle Portal.

  2. Generate the certificate request from the following location:

    cd <ORACLE_HOME>\Apache\open_ssl\bin


    where <ORACLE_HOME> is the location of your Oracle9i Application Server product.

  3. Edit the openssl.cnf file and find the following line:

    RANDFILE = $ENV::HOME/.rnd
    
    
  4. Add HOME = . before this line so that it appears as follows:

    HOME = . 
    RANDFILE = $ENV::HOME/.rnd
    
    
  5. Run the following commands:

    openssl md5 * > rand.dat
    openssl genrsa -rand rand.dat -des3 1024 > key.pem
    openssl req -new -key key.pem -out csr.pem -config openssl.cnf=
    
    
  6. In the last command, which generates the certificate request, provide the name of your server, including the domain, when prompted for Common Name. For example: abc.oracle.com.

    This action produces a key.pem and csr.pem file. Send the csr.pem file to the certificate authority to obtain the certificate. For example, in the case of a Verisign trial certificate, you would do the following:

    1. Go to http://www.verisign.com and request a trial certificate by clicking "Secure Your Website."

    2. In the form fields, locate the CSR field. Copy and paste the contents of the csr.pem file that was generated earlier in this step.

    3. Verisign sends you an e-mail with the trial certificate attachment (let's name it portalcert.crt) with further instructions. One of the steps describes how to obtain the Root Trial CA from Verisign. Import this certificate into your browser according to these instructions.

    4. Export the certificate from your browser into a file that you can later install onto the Oracle HTTP Server Apache listener.

    5. Save the certificate as a "Base-64 encoded X.509" certificate. Let's call this file trialcacert.crt.

      Exporting from Internet Explorer

      Go to Tools, Internet Options, Content, Certificates, Trusted Root, Certification Authorities, and then Export.

      Exporting from Netscape

      Refer to Netscape documentation on exporting certificates.

      On Windows NT

      Remove the password from key.pem as follows:

      copy key.pem key.pem-orig

      openssl rsa -in key.pem-orig -out key.pem

  7. Copy the certificates to the appropriate locations:

    copy portalcert.crt to Apache\Apache\conf\ssl.crt
    copy trialcacert.crt to Apache\Apache\conf\ssl.crt
    copy key.pem to Apache\Apache\conf\ssl.key
    copy key.pem-orig to Apache\Apache\conf\ssl.key
    

2.11.2 Setting Login Server Query Path URL

Oracle Portal maintains the URL prefix of the Login Server which accesses certain information through HTTP calls from the database, using the UTL_HTTP package. These calls must be done through HTTP rather than HTTPS.

Thus, if Oracle Portal and the Login Server are configured to use HTTPS, access to an HTTP port on the Login Server is still required to support these interfaces. The calls made across this interface are required for the following reasons:

To set this URL prefix, which is called the Login Server Query Path URL, complete these steps:

  1. Log on to Oracle Portal as the portal administrator.

  2. Click the Administer tab.

  3. Click Global Settings in the Services Portlet.

  4. Scroll down to the section on Login Server, and edit the Query Path URL. Set this field to an HTTP URL for the Login Server.

Figure 2-1 Login Server Query Path URL Prefix field


Text description of logssl.gif follows.
Text description of the illustration logssl.gif

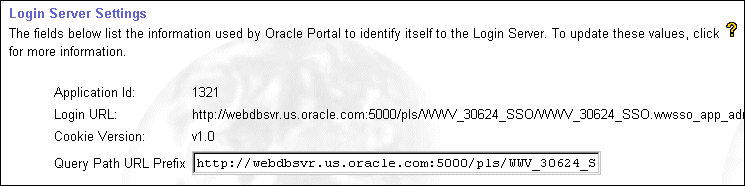
By default, it is the same prefix as specified for the Login Server when running the ssodatan or ssodatax scripts. However, if these scripts specify an HTTPS protocol, then manually update this parameter to use an HTTP protocol.


See also:


2.11.3 Adding SSO Enabler Configuration Entries for HTTPS Mode

If you are using SSL, the default port is 443. With Oracle Portal versions prior to 3.0.8, you need to create two enabler configuration entries, and two corresponding partner configuration entries on the Login Server. Specify the :443 port for one entry, and exclude it for the additional entry.

To add the additional entry, follow the basic procedure of adding the partner entry on the Login Server using the Login Server Administration user interface, and then add the configuration entry on the Oracle Portal side by using the ssodatax script.

If using Oracle Portal version 3.0.8 or later, you only need a single entry, one which excludes the :443 from the URL.


Note:

This step is only required to support Netscape browsers. Microsoft Internet Explorer does not require this step. 


2.11.4 Configuring HTTPS with Microsoft Internet Explorer

In the Oracle HTTP Server configuration file, httpd.conf, comment out the following line to permit Microsoft Internet Explorer browsers to work in HTTPS mode:

SetEnvIf User-Agent ".*MSIE.*" nokeepalive ssl-unclean-shutdown

2.11.5 Configuring HTTPS with Virtual Hosts

If you want to setup a virtual host, it can be done in one of two ways:

When the IP name is used, several aliases use the same IP address. In this case, Apache (or any browser supporting virtual name addresses) looks at the Host field in the HTTP request and determines which of the virtual addresses should be emulated.

However, when SSL is used, the IP name is encrypted. This causes the problem, because the software does not know which decryption key to use since the keys differ by virtual name. If there were 1000 separate virtual addresses supported, then on average the software would try 500 different keys to determine which key to use to decode the message. This is not practical, at least for performance reasons.


Notes:

  • It is more difficult to configure virtual hosts to use HTTPS since the SSL encryption prevents virtual hosts from being resolved in the way that it is done in non-SSL mode.

  • There are some workarounds from which to choose. One is to only use virtual names on the home page and other pages where you do not need protection.


2.11.5.1 SSL Protection Pages

2.12 Configuring the Reports Security Portlet

The Reports Security Portlet is installed as part of the Oracle Portal installation. Depending on the edition of the Oracle9i Application Server installed, the Reports Security Portlet may be hidden. To show the Reports Security Portlet:

  1. Log on to Oracle Portal as the portal administrator.

  2. Click the Administer tab.

  3. Click Edit Page.

  4. Select Oracle Reports Security.

  5. Click Show.

  6. Click Close.

The Reports Security Portlet displays in the Administer tab.


Go to previous page Go to next page
Oracle
Copyright © 2001 Oracle Corporation.

All Rights Reserved.

Library

Solution Area

Contents

Index