| Oracle Email Migration Tool Guide Release 9.0.3 Part Number B10104-01 |
|


| View PDF |
| Oracle Email Migration Tool Guide Release 9.0.3 Part Number B10104-01 |
|
| View PDF |
This chapter provides migration planning information.
This chapter contains these topics:
Before starting a migration, at least one instance of Oracle Collaboration Suite and Oracle Internet Directory must be installed on the target system.
The Migration Tool can be run on either the source system, an intermediate system, or the target system. This section describes the following system requirements for the machine on which the Migration Tool is running:
The minimum memory requirement is 512 megabytes (MB) of random access memory (RAM).
The disk space requirement is:
| See Also:
"Using Statistics Task to Estimate Disk Space Requirements (Optional)" for information about using the Statistics Task feature |
The Migration Tool network bandwidth requirements are the same as those for IMAP4 clients, although, for high speed migrations, more bandwidth is required. Oracle Corporation recommends 100 megabits per second (Mbps).
Microsoft Outlook 97, Microsoft Outlook 98, or Microsoft Outlook 2000, and Microsoft Exchange Administrator must be installed on the machine where you want to generate the various files (such as user list, MBOX, and shared folders) if migrating from Microsoft Exchange to Oracle Email.
The following Microsoft Exchange Server Services must be configured and set up properly:
During an MBOX based data migration, sufficient disk space must be available for intermediate storage to hold all of the e-mail of all the users being migrated together.
Configuration planning involves the following:
Choose one of the following options for data migration:
For each of these types of migrations, you can choose to retain your source system user names, or to have the Migration Tool generate new target user names on rules you create.
The mail system is always available to a user. Prior to migrating a user's data, the Migration Tool routes all of the user's new mail to Oracle Email. The user can still access old mail on the source account until data migration for the user is complete.
Once data migration is complete for a user, an e-mail notification is sent to the user's new account stating that migration is complete and that old and new e-mail can be accessed in the new Oracle Email account.
If you receive an Unable to start directory services error message from the Microsoft Exchange plug-in, the error is logged in the ..\log\msplugin_username@source_domain.log file.
If an error occurs during data migration, the user's e-mail continues to be routed to the user's new account. If the Migration Tool fails to route the user, the migration fails.
See the Oracle Collaboration Suite Administrator's Guide for information about configuring the Oracle Email database to support different character sets.
The Migration Tool has various menu bar selections and methods for viewing information about users, source domains, batches, and migration status.
Initially, all menu selections except Tools > Migration Setup are disabled. You must run the Migration Setup Wizard at least once for the directory tree on the left side of the screen to be populated and the menu selections to be available.
The Migration Setup Wizard stores migration parameters in the database every time you run the wizard. The Migration Setup Wizard picks up the prior settings from the database each time it is run.
| See Also:
"Task 3: Setting Up a Migration Session" for information about the Migration Setup Wizard |
This section contains the following topics:
This section contains an overview of the Migration Tool screen.
This section contains the following topics:
Figure 2-1 shows the menu selections on the Migration Tool screen.

Text description of the illustration image4vt.gif
files directory (except where noted):
users.xml file
|
Note:
|
public_aliases.ldif filedistribution_lists.ldif fileshared_folders.ldif fileuser_profiles.ldif file| See Also:
"Task 6: Batching" for more information about creating batches |
| See Also:
"Performing a Two-Phase Migration" for more information about pre-migrating user data |
|
Note: You can also select a user from the directory tree. Select the user and select Tools > Modify User Details to proceed with modifying the user's details. |
| See Also:
"Verifying Migration" for more information about verification |
Figure 2-2 shows the right side of the Migration Tool screen when the Migration View node is selected.
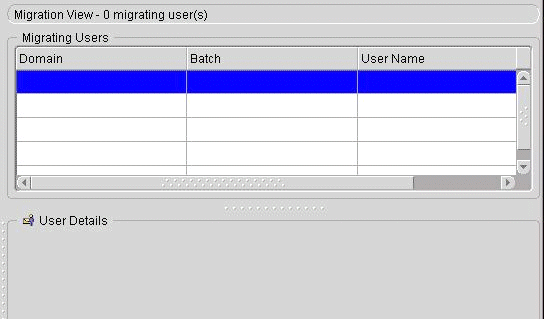
Text description of the illustration image4va.gif
You can display user, domain, batch, and migration status information using the Migration Tool screen. You can also edit the scheduled start time for migrating a batch using the Migration Tool screen.
This section contains the following topics:
You can expand the various nodes of the directory tree on the left side of the Migration Tool screen to display specific information.
All the domains on the source system you want to migrate are listed under MigrationView in the directory tree on the left side of the Migration Tool screen. To view the information and migration status for a particular source domain, as shown in Figure 2-3, select the source domain.
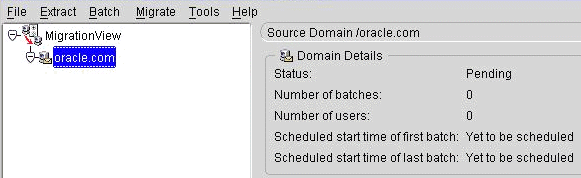
Text description of the illustration imageo9c.gif
The following information displays:
To monitor batch information, expand a domain to view the batches in the domain. Select a batch name to view information and migration status, as shown in Figure 2-4.
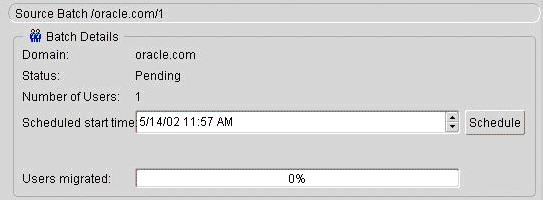
Text description of the illustration imageq9d.gif
When you select a batch from the directory tree on the left side of the Migration Tool screen, the details for the selected batch display on the right side, showing the following information:
|
Note: If a single user in a batch fails to migrate, the entire batch is marked as Failed and must be rescheduled for migration. Users that migrated successfully are not migrated a second time. |
| See Also:
"Task 6: Batching" for more information about batches |
To view all the users belonging to a particular batch, expand the batch. To view a specific user's information and migration status, as shown in Figure 2-5, click their user name.
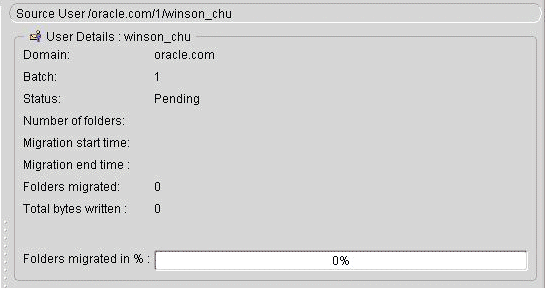
Text description of the illustration imagem7a.gif
When you select a user from the directory tree on the left side of the Migration Tool screen, the details for the selected user display, showing the following information:
A user is assigned one of the states shown in Table 2-1 during the data migration process.
| See Also:
"Displaying User, Domain, Batch, and Migration Status Information" for information about viewing user states in the Migration Tool screen |
The read and write speeds are displayed at the bottom of the main Migration Tool screen. They indicate the performance of the Migration Tool.
You can increase or decrease the number of users migrating concurrently to optimize performance.
If you have two batches scheduled to migrate at times that overlap each other, the migration speed does not increase. The number of users that are migrated concurrently is a fixed number specified by an administrator in the Migration Setup Wizard.
| See Also:
"Step 2: Specifying Migration Options" to change the number of concurrently migrating users |
Log files are generated in the log directory of the Migration Tool. Every run of the Migration Tool generates a new log file that an administrator can open in any text editor to view the contents. Log files should be viewed frequently throughout the migration process.
The logs should be viewed after each of the following tasks to ensure successful migration:
Migration_default.log)
|
 Copyright © 1996, 2002 Oracle Corporation. All Rights Reserved. |
|

