| Oracle® Web Conferencing Administrator's Guide Release 2 (2.0.4.3) Part Number B10877-03 |
|
|
View PDF |
| Oracle® Web Conferencing Administrator's Guide Release 2 (2.0.4.3) Part Number B10877-03 |
|
|
View PDF |
This chapter discusses some sample deployment scenarios, ranging from a basic deployment to a sophisticated one spanning multiple geographical regions. It also explains what an administrator should do to set them up. The best way to review this chapter is to go through each example, because each example builds on the previous.
|
Note: In Chapter 4, "Post-Installation" Oracle Web Conferencing properties are set using .imt files. You can also set properties using thesetProperty command in imtctl, as shown in some examples in this chapter. It is important to remember that when you use the option -system true, the setting of the property has a global scope and affects not just the instance on which imtctl is being invoked. However, if the -system true option is not used in the command, the command applies only to that instance. |
See Chapter 4, "Post-Installation" for basic information about configuration Oracle Web Conferencing.
For all examples in this chapter: I
One Oracle9iAS instance is on the machine with the Real-Time Collaboration Core Components and only one Real-Time Collaboration instance is on this machine.
It is assumed that Oracle9iAS Web Cache is disabled on the middle tier.
This example shows the simplest deployment and is generally used to create a pilot deployment. In this deployment, users can access Oracle Web Conferencing from the Internet, through their proxy across the Internet, and through the intranet.
In Figure 6-1, "Web Conferencing Basic Deployment", Host 1 and Host 2 are deployed in the same DMZ, while Host 3 and Host 4 are deployed in the corporate intranet.
These are the mandatory associations that must be made for the various parts of Oracle Web Conferencing to work:
Real-Time Collaboration Core Components to Real-Time Collaboration Repository. This association is made during installation.
Real-Time Collaboration Core Components to Oracle9iAS Infrastructure. This association is made during installation.
Document and Voice Conversion Servers to Real-Time Collaboration Repository. This association is made during installation.
|
Note: For these examples, the Voice Conversion Server and the Document Conversion Server are on the same machine. |
Document and Voice Conversion Servers to Real-Time Collaboration Core Components. This is a mandatory post-installation step.
Additional configuration issues are discussed in the rest of the chapter.
Install all prerequisites on all the computers.
Install the Real-Time Collaboration Core Components on Host 1.
Perform post-installation steps on Host 1.
Perform verification tests on Host 1.
Install Document and Voice Conversion Servers on Host 2.
Follow the post-installation steps on Host 2.
Perform verification tests on Host 2.
Perform verification tests on Host 1 to confirm proper connection to Host 2.
Host 1: Oracle9iAS plus Real-Time Collaboration Core Components set up and configured to use the Oracle9iAS Infrastructure on Host 4.
Host 4: Oracle9iAS Infrastructure needs to be set up on this machine.
Host 2: A Windows NT computer with specialized telephony hardware and software.
Host 3: Oracle9i Database (9.2.0.1) for the Real-Time Collaboration Repository.
|
See Also: Oracle Collaboration Suite Installation Guide for Solaris for additional information on the prerequisites |
Configure Oracle Web Conferencing to leverage existing enterprise e-mail and proxy servers. Assume that the settings are as follows:
| Setting Name | Value | Comments | Web Conferencing Property |
|---|---|---|---|
| Existing e-mail server host name (one for the enterprise) | "mail-net.company.com" | Post-installation step | SmtpHost |
| E-mail server listening port | 25 | Default | SmtpPort |
| Existing proxy server host name for HTTP (one for the enterprise) | "www-proxy.company.com" | Post-installation step | UserAgentProxyHost |
| Proxy server host name for HTTPS (one for the enterprise) | "www-proxy.company.com" | Post-installation step | UserAgentProxySSLHost |
| Proxy port for HTTP | 80 | Default | UserAgentProxyPort |
| Proxy port for HTTPS | 443 | Default | UserAgentProxySSLPort |
| Proxy domains to exclude | ".company.com" | Post-installation step | UserAgentProxyExclusions |
Table 6-2 Instance on Host 1
| Setting Name | Value | Comments | Web Conferencing Property |
|---|---|---|---|
| Number of mx | 1 | Default | SrvNumProcs |
| Listening port for the single mx | 2400 | Set during installation | MxListenPort |
| Actual host name of Host 1 | "host1.company.com" | N/A | |
| Alias for Host 1 | "imeeting1.company.com" | Post-installation step | ApacheWebHost |
| Instance name | "instance1.company.com" | Set automatically during installation | N/A |
| Oracle HTTP Server listening port for HTTP on Host 1 | 7777 | Default. Set during installation. | ApacheWebPort |
| Oracle HTTP Server listening port for HTTPS on Host 1 | 443 | Default | ApacheWebSecurePort |
You must configure the settings in Table 6-1 and Table 6-2 every time you install Web Conferencing.
In addition, you must configure Host 2 as follows:
On Host 1, install the Real-Time Collaboration Core Components, and provide the required port numbers. On Host 2, install the Document and Voice Conversion Servers, and provide the required port numbers.
The commands in this section are based on the data in the Settings tables in "Settings".
Step 1 Integrate Web Conferencing with existing e-mail.
imtctl> setProperty -system true -pname SmtpHost -pvalue "mail-net.company.com"
Because the port is 25 (which is default), there is no need to set the port.
Step 2 Integrate Web Conferencing to use existing proxy servers.
imtctl> setProperty -system true -pname UserAgentProxyHost -pvalue "www-proxy.company.com"
imtctl> setProperty -system true -pname UserAgentProxySSLHost -pvalue "www-proxy.company.com"
imtctl> setProperty -system true -pname UserAgentProxyExclusions -pvalue  "[\".company.com\"]"
|
Note: Because the default proxy port for HTTP is 80 and HTTPS is 443, there is no need to set these ports. |
Step 3 Integrate Web Conferencing with Oracle HTTP Server on this Real-Time Collaboration Core Components machine.
Enable the mod_imeeting.
Make the necessary configuration changes to the Oracle HTTP Server in which mod_imeeting is configured. mod_imeeting is included through the $ORACLE_HOME/imeeting/conf/mod_imeeting.conf file, which in turn is included in $ORACLE_HOME/Apache/Apache/conf/oracle_apache.conf file for Oracle HTTP Server.
Add the following include line for mod_imeeting.conf in oracle_apache.conf:
Include "$ORACLE_HOME/imeeting/conf/mod_imeeting.conf"
Replace $ORACLE_HOME with the actual Oracle home.
Update the Oracle HTTP Server configuration using DCM.
$ORACLE_HOME/dcm/bin/dcmctl updateConfig -ct ohs -v
Restart Oracle HTTP Server through DCM.
$ORACLE_HOME/dcm/bin/dcmctl restart -ct ohs -v
Set up mod_imeeting/mx redirect.
For one mx process (installer default), invoke:
imtctl> setProperty -ct mxcomm -pname MxRedirectPort -pvalue "[\"2420\"]"
Make Web Conferencing aware of basic Oracle HTTP Server settings by invoking:
imtctl> setProperty -pname ApacheWebHost -pvalue "imeeting1.company.com"
Because 80 and 443 are defaults, no additional steps are required for setting the ports.
|
Note: imeeting1.company.com is the URL users will use to access Web conferences. |
Step 4 Set up reports.
Web Conferencing reports can be generated and sent via e-mail using the imtreport script. The script is located at $ORACLE_HOME/imeeting/bin and is invoked as "imtreport" on all platforms. The actual script file is "imtreport" for UNIX and Linux and "imtreport.cmd" for Microsoft Windows. Mandatory report options such as the recipient list are set by editing variables at the top of the report script. The script contains comments on the options provided. Be sure to edit the proper script for the platform you are using. You may want to send out automated weekly reports by using some operating system provided mechanism for invoking the script on a weekly basis (for example, cron job on UNIX or the Task Scheduler on Windows).
Step 5 Set up for periodic monitoring.
Set up your monitoring infrastructure to periodically ping the following URLs:
For conference service availability monitoring:
http://imeeting1.company.com/imtapp/servlet/ImtTestServlet?mtgtest=true
For Voice Conversion Server availability monitoring:
http://imeeting1.company.com/imtapp/servlet/ImtTestServlet?voiceconvtest=true
For Document Conversion Server availability monitoring:
http://imeeting1.company.com/imtapp/servlet/ImtTestServlet?docconvtest=true
See "Real-Time Collaboration Interfaces" for more information.
Host 2
No post-installation configuration is required.
Host 1
Invoke imtctl> runTests. This runs the full verification test.
Typically, all tests succeed. However, if this command is run before Host 2 is set up, the Voice Conversion Server test and the Document Conversion Server test will fail.
Run this test as described in "Sequence of Steps".
Host 2
Invoke imtctl> getState to verify that the processes are up, but the real test needs to be invoked on Host 1 (imtctl> runTests) to make sure that the document and voice conversion services provided by Host 2 are available.
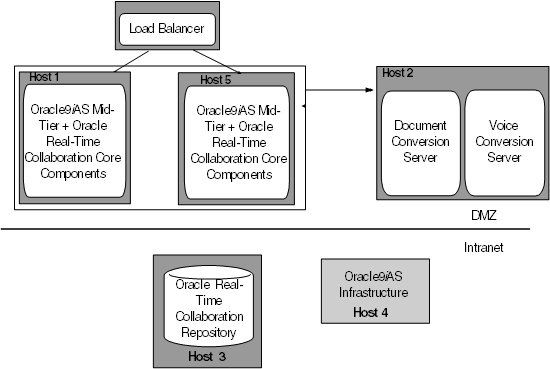
In this deployment, Host 1, Host 2, and Host 5 are deployed in the DMZ, while Host 3 and Host 4 are deployed in the corporate intranet.
Figure 6-2 Deployment with Multiple Core Components and an LBR
Install all prerequisites on all the computers, including the load balancer (LBR).
Install Real-Time Collaboration Core Components on Host 1.
Perform post-installation steps on Host 1.
Perform verification tests on Host 1.
Install Document Conversion Server and Voice Conversion Server on Host 2.
Perform post-installation steps on Host 2.
Perform verification tests on Host 2.
Perform verification tests on Host 1 to confirm proper connection to Host 2.
Install Real-Time Collaboration Core Components on Host 5.
Perform post-installation steps on Host 5.
Perform verification tests on Host 5.
Host 1: Oracle9iAS mid-tier set up and configured to use the Oracle9iAS Infrastructure on Host 4
Host 5: Oracle9iAS mid-tier set up and configured to use the Oracle9iAS Infrastructure on Host 4
Host 4: Oracle9iAS Infrastructure needs to be set up on this machine.
Host 2: A Windows NT computer with specialized hardware and software
Host 3: Oracle9i Database for the Real-Time Collaboration Repository
Using the instructions in the Advanced Configuration document at http://otn.oracle.com/products/webconferencing/, configure the LBR/Oracle9iAS Single Sign-On for multiple sets of Real-Time Collaboration Core Components. The URL used to access Oracle Web Conferencing will now be "imeeting.company.com," and "imeeting1.company.com" and "imeeting2.company.com" will be behind the LBR. Users will access "imeeting.company.com" and the request will automatically be routed to either imeeting1.company.com or imeeting2.company.com.
Configure Web Conferencing to leverage existing enterprise e-mail and proxy servers. Assume that the settings are as follows:
Table 6-4 System Settings
| Setting Name | Value | Comments | Web Conferencing Property |
|---|---|---|---|
| Existing e-mail server host name (one for the enterprise) | "mail-net.company.com" | Post-installation step | SmtpHost |
| E-mail server listening port | 25 | Default | SmtpPort |
| Existing proxy server host name for HTTP (one for the enterprise) | "www-proxy.company.com" | Post-installation step | UserAgentProxyHost |
| Proxy server host name for HTTPS (one for the enterprise) | "www-proxy.company.com" | Post-installation step | UserAgentProxySSLHost |
| Proxy port for HTTP | 80 | Default | UserAgentProxyPort |
| Proxy port for HTTPS | 443 | Default | UserAgentProxySSLPort |
| Proxy domains to exclude | ".company.com" | Post-installation step | UserAgentProxyExclusions |
| Web Conferencing access URL | "imeeting.company.com" | Post-installation step. Requests to imeeting.company.com will be redirected to imeeting1.company.com and imeeting2.company.com. | GlobalWebHost |
Host 1 settings are the same as described as in Table 6-2, "Instance on Host 1".
Host 5 settings are as follows:
Table 6-5 Host 5 Settings
| Name of Setting | Value | Comments | Web Conferencing Property |
|---|---|---|---|
| Number of mx | 1 | Default | SrvNumProcs |
| Listening port for the single mx | 2400 | Set during installation. Keep it the same as Host 1. | MxListenPort |
| Actual host name of Host 5 | "host5.company.com" | N/A | |
| Alias for Host 5 | "imeeting2.company.com" | Post-installation step | ApacheWebHost |
| Apache listening port for HTTP on Host 5 | 7777 | Default. Set during installation. | ApacheWebPort |
| Apache listening port for HTTPS on Host 5 | 443 | Default | ApacheWebSecurePort |
On Host 1 and Host 5, install the Real-Time Collaboration Core Components, and provide the required port numbers.
The commands in this section are based on the data in the Settings tables in "Settings".
Host 1
Step 1 Set up GlobalWebHost.
imtctl> setProperty -system true -pname GlobalWebHost -pvalue "imeeting.company.com"
Follow steps 2-7 as defined in "Post-Installation".
Step 2 Set up e-mail.
Integrate Web Conferencing with e-mail, as before.
Step 3 Set up proxy.
Set up for existing proxy servers, as before.
Step 4 Integrate Web Conferencing with Oracle HTTP Server.
Integrate with the HTTP Server on this Real-Time Collaboration Core Components machine.
Step 5 Set up for monitoring.
Set up for monitoring, as before.
Step 6 Set up reports.
Set up Web Conferencing reports, as before.
Host 5
It is not necessary to set up e-mail, proxy, or global Web host, because they are global settings and will apply to this instance, as well.
Step 1 Integrate Web Conferencing with Oracle HTTP Server on this Real-Time Collaboration Core Components machine.
Follow the step as defined in "Post-Installation".
Step 2 Set up for monitoring.
Follow the step as defined in "Post-Installation".
Host 2
No post-installation steps are required.
Host 1
Invoke imtctl> runTests. This runs the full verification test.
Typically, all tests succeed. However, if you run this command before setting up Host 2, the Voice Conversion Server test and the Document Conversion Server test will fail.
Run this as described in the "Sequence of Steps".
Host 5
Invoke imtctl> runTests. This runs the full verification test.
Typically, all tests succeed. However, if you run this command before setting up Host 2, the Voice Conversion Server test and the Document Conversion Server test will fail.
Run this as described in "Sequence of Steps".
Host 2
Invoke imtctl> getState to verify that the processes are up, but the real test needs to be invoked on Host 1 and Host 5 (imtctl> runTests) to make sure that the services provided by Host 2 are available.
Figure 6-3 Deployment with Multiple Geographical Locations and a LBR
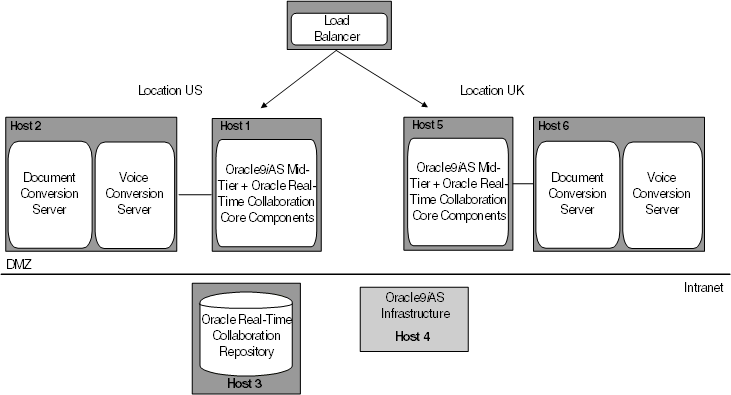
In this deployment, Host 1, Host 2, Host 5, and Host 6 are deployed in the DMZ. Host 3 and Host 4 are deployed in the corporate intranet.
This is almost identical to the previous example ("Multiple Real-Time Collaboration Core Components and Load Balancer") with the following key differences:
LBR configuration: Host 1 and Host 5 are in different geographical locations, the United States and the United Kingdom. Furthermore, the LBR is configured to direct URL requests from users in the UK to the Real-Time Collaboration Core Components in the UK (Host 5), and URL requests from users in the US to the Real-Time Collaboration Core Components in the US. When users in the UK access imeeting.company.com, requests are redirected to imeeting1.company.com on Host 5. Similarly, when users in the US access imeeting.company.com, requests are redirected to imeeting2.company.com.
Separate sets of Document and Voice Conversion Servers: The Real-Time Collaboration Core Components in Host 1 can use the Document and Voice Conversion Servers in Host 2 (location US) only, and the Real-Time Collaboration Core Components in Host 5 can use the Document and Voice Conversion Servers in Host 6 only.
Refer to Table 6-5 and Table 6-5 in the previous section for all the values for Host 1 through Host 5 and system settings. The changes are as follows:
Table 6-6 Host 5 Setting Changes from the Previous Section
| Setting Name | Value | Comments | Web Conferencing Property |
|---|---|---|---|
| Location of Host 5 | "UK" | Post-installation step. | InstanceLocation |
Table 6-7 Host 6 Settings
| Setting Name | Value | Comments | Web Conferencing Property |
|---|---|---|---|
| HTTP listening port for the Voice Conversion Server | 2460 | Set during installation. | |
| Location | "UK" | Post-installation step. Keep it the same as Host 5. | InstanceLocation |
Table 6-8 Host 1 Setting Changes from the Previous Section
| Setting Name | Value | Comments | Web Conferencing Property |
|---|---|---|---|
| Location | "US" | Post-installation step. | InstanceLocation |
Table 6-9 Host 2 Settings
| Setting Name | Value | Comments | Web Conferencing Property |
|---|---|---|---|
| HTTP listening port for the Voice Conversion Server | 2460 | Set during installation. | |
| Location | "US" | Post-installation step. Keep it the same as Host 1. | InstanceLocation |
Follow all installation, prerequisite, and post-installation instructions from "Multiple Real-Time Collaboration Core Components and Load Balancer" in addition to the following:
Host 1
Step 1 Set up the location.
imtctl> setProperty -pname InstanceLocation -pvalue "US"
Host 2
Set this up to serve the Real-Time Collaboration Core Components on Host 1.
imtctl> setProperty -pname InstanceLocation -pvalue "[\"US\"]"
Host 5
Step 1 Set up the location.
imtctl> setProperty -pname InstanceLocation -pvalue "UK"
Host 6
Set this up to serve the Real-Time Collaboration Core Components on Host 5.
imtctl> setProperty -pname InstanceLocation -pvalue "[\"UK\"]"
Figure 6-4 Existing Web Conferencing Deployment with Additional Core Components
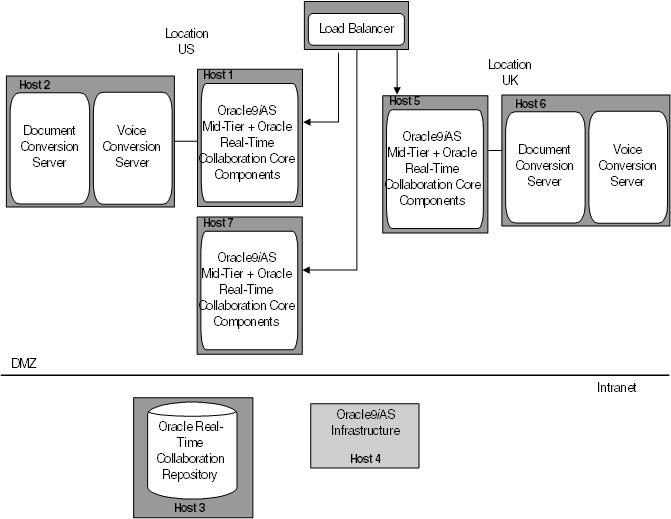
This example shows the addition of a machine, Host 7, to the configuration shown in the previous example. The changes are as follows:
Host 7 has been added in location "US"
Host 2 will provide document and voice conversion services to the Real-Time Collaboration Core Components on Host 7.
The LBR needs to be configured to direct all requests from the US to either Host 1 or Host 7 and to continue to direct all UK requests to Host 5.
Install prerequisites on Host 7.
Install Real-Time Collaboration Core Components on Host 7.
Perform post-installation steps on Host 7.
Perform verification tests on Host 7.
Restart the Document and Voice Conversion Servers on Host 2.
Perform verification tests on Host 7.
Host 7: Oracle9iAS mid-tier set up and configured to use the Oracle9iAS Infrastructure on Host 4.
Configure Host 7 as follows:
Table 6-10 Host 7 Settings
| Name of setting | Value | Comments | Web Conferencing Property |
|---|---|---|---|
| Number of mx | 1 | Default | SrvNumProcs |
| Listening port for the single mx | 2400 | Set during installation. Keep it the same as Host 1. | MxListenPort |
| Actual host name of Host 7 | "host7.company.com" | N/A | |
| Alias for Host 5 | "imeeting3.company.com" | Post-installation step | ApacheWebHost |
| Apache listen port for HTTP on Host 5 | 7777 | Default. Set during installation. | ApacheWebPort |
| Apache listen port for HTTPS on Host 5 | 443 | Default | ApacheWebSecurePort |
| Location of Host 5 | "US" | Post-installation step. Keep it the same as Host 1. | InstanceLocation |
On Host 1 and Host 5, install the Real-Time Collaboration Core Components, and provide the required port numbers.
Invoke the imtctl commands in this section, while setting Web Conferencing properties. The commands in this section are based on the data in the Settings tables in "Settings".
Host 7
It is not necessary to set up e-mail, proxy, or global Web host, because they are global settings and will apply to this instance, as well.
Step 1 Integrate Web Conferencing with Oracle HTTP Server on this Real-Time Collaboration Core Components machine.
Follow the step as defined in "Post-Installation".
Step 2 Set up location.
imtctl> setProperty -pname InstanceLocation -pvalue "US"
Step 3 Set up for monitoring.
Follow the step as defined in "Post-Installation".
Step 4 Restart Host 2.
Restart Host 2 so that it recognizes the Real-Time Collaboration Core Components on Host 7.
Figure 6-5 Existing Deployment with Additional Document and Voice Conversion Servers
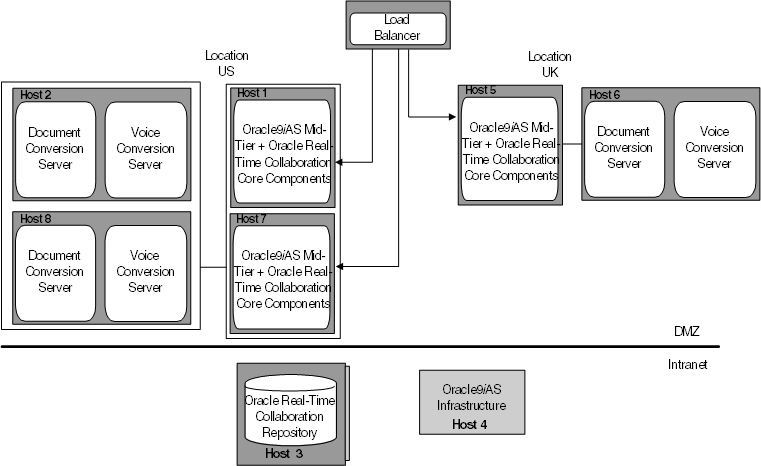
Another machine with Document and Voice Conversion Servers is added (Host 8).
Install prerequisites on Host 8.
Install the Document and Voice Conversion Servers on Host 8.
Perform post-installation steps on Host 8.
Perform verification tests on Host 8.
Bring down the Document and Voice Conversion Servers on Host 2, so that Host 8 is the only one available.
Perform verification tests on Host 7 or Host 1.
Restart the Document and Voice Conversion Servers on Host 2.
See the Oracle Collaboration Suite Installation and Configuration Guide for Solaris for additional information on the prerequisites.
On Host 8, install the Document and Voice Conversion Servers, and provide the required port numbers.
Host 8
Set this up to serve the Real-Time Collaboration Core Components in location "US" by invoking:
imtctl> setProperty -pname InstanceLocation -pvalue "[\"US\"]"
Restart the Document and Voice Conversion Servers by invoking imtctl> stop and then imtctl> start.
Host 8
Invoke imtctl> getState to verify that the processes are up, but the real test needs to be invoked on Host 1 (imtctl> runTests) to make sure that the services provided by Host 8 are available.
Host 2
Shut down Host 2.
Host 1
Invokeimtctl> runTests. This runs the full verification test.
All tests succeed.
The topology is identical to the basic deployment, but the Document and Voice Conversion Servers are deployed in a different DMZ.
Figure 6-6 Deployment with Core Components in a Different DMZ
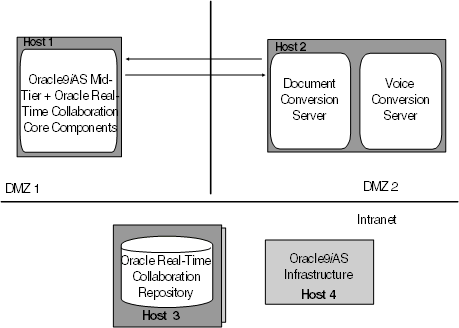
The following additional configuration is required:
From DMZ 1 to DMZ 2, enable HTTP requests on port 2450.
From DMZ 2 to DMZ 1, enable TCP/IP requests on port 2400.