| Oracle9iAS Wireless Administrator's Guide Release 2 (9.0.4) Part Number B10685-01 |
|
|
View PDF |
| Oracle9iAS Wireless Administrator's Guide Release 2 (9.0.4) Part Number B10685-01 |
|
|
View PDF |
This chapter discusses contact rule management, which enables users to tailor how they receive notifications for any given situation. This chapter includes the following:
The continuing diversification of devices not only offers mobile employees more options for keeping in touch with their fellow employees and associates, but more confusion as to which would be the best way to contact others and be contacted themselves. While on the road, they juggle a number of devices and technologies; they use a laptop and phone line to check email, store and carry needed documents in a local file system, and dial in to a work phone each time they want to access their voice mail.
Often, a mobile employee can only guess as to how would be the best and most appropriate way to reach a colleague directly. Likewise, anyone trying to contact a mobile employee faces the same predicament; one method of communication may be better than another, depending on the mobile employee's current circumstances. For example, during a meeting, a mobile employee may prefer to receive a notification on a cell phone about receiving a fax rather than receiving a disruptive phone call. The Oracle Collaboration Suite enables users to select how they wish to be contacted at any moment. A user can set preferences for both the means of contact (for example, cell phone, PDA, or regular phone) appropriate to any context (such as in a meeting or out of the office).
Not only does the Oracle Collaboration Suite alert users to receipt of important faxes, emails, voicemails, but it also simplifies the sending of an email, fax, message, or voicemail. Users no longer have to shuffle separate device addresses. Instead, a user needs only enter the name of the recipient. The Presence Server, a component integrated into Oracle9iAS Wireless, stores both an Oracle Collaboration Suite user's ID and contact profile information, which includes device addresses and current contact rules. The contact rules are defined prefences describing how a user wishes to receive calls and messages.
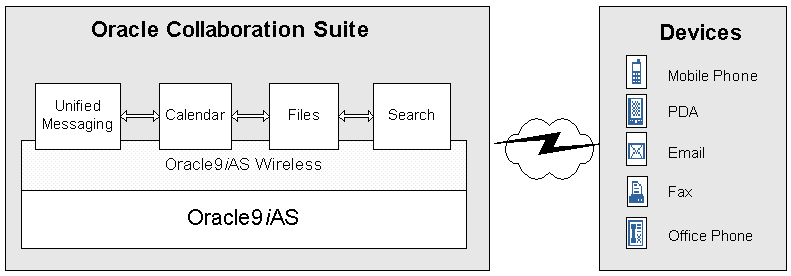
The Oracle Collaboration Suite uses Oracle9iAS Wireless to enable mobile employees to access their corporate information using any device with wireless or voice access. In addition, the Oracle Collaboration Suite keeps employees abreast of the latest information, such as receiving notifications for meetings, or important emails, by providing users with continuous access to email, voice-mail, calendar, address book, tasks, files, corporate directories, and instant messaging.
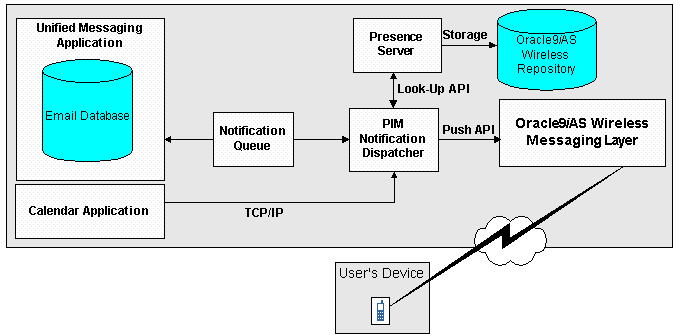
The Unified Messaging, and Calendar applications generate notifications, which are delivered to the user by the PIM Notification Dispatcher. The Unified Messaging application enters the notifications into the Notification Queue in the database, which is managed by Advanced Queuing (AQ). The PIM Notification Dispatcher reads the notifications from the Notification Queue and then processes them. In addition, the PIM Notification Dispatcher listens on a TCP/IP port for notifications sent by the Calendar application. Each notification must contain an Oracle Global User ID as the destination. To find the user's current device address, the PIM Notification Dispatcher then contacts the Presence Server, which stores the user's Global User ID and contact rules. The Presence Server is an integrated part of Oracle9iAS Wireless. The PIM Notification Dispatcher then pushes the notification to the Oracle9iAS Wireless Messaging Layer, which delivers the notification to the user's device.
You use the Wireless system management for such administrative functions as starting, stopping, creating, and configuring the PIM notification dispatcher processes.
You can start, stop, or add aPIM notification dispatcher process through Wireless system management. You access the management functions by drilling down from the PIM notification dispatcher hyperlink in Wireless management's Server tab.
The PIM notification dispatcher processes screen enables you to create or delete a PIM notification dispatcher process.
To create a PIM notification dispatcher process on the Wireless Server:
|
Note: You must configure the TCP/IP port number for the calendar listener after you create a PIM notification dispatcher process. For more information, see Section 3.2.2. |
To delete a PIM notification dispatcher process:
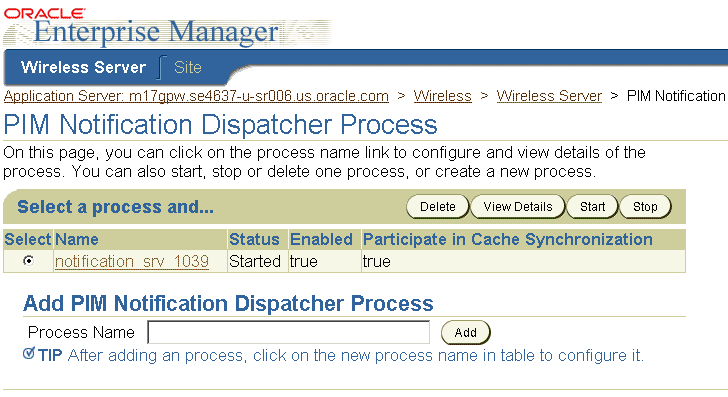
Wireless management designates the status of each process as started (running), stopped (suspended), or uninitialized (the process has never been run). You can start or stop a PIM notification dispatcher process by using the Start or Stop buttons in either the process or the detail screens for the PIM notification dispatcher processes. In addition, you can start all of the PIM Notification processes at once using the Start All and Stop All buttons on the Wireless Management's Server tab.
From the processes screen, you can start or stop a process by first selecting it and then by clicking Start or Stop.
From a process detail screen, you can also start or stop a process by clicking Stop or Start. When a process is stopped, the Start button appears; likewise, when a process is running, the Stop button appears.
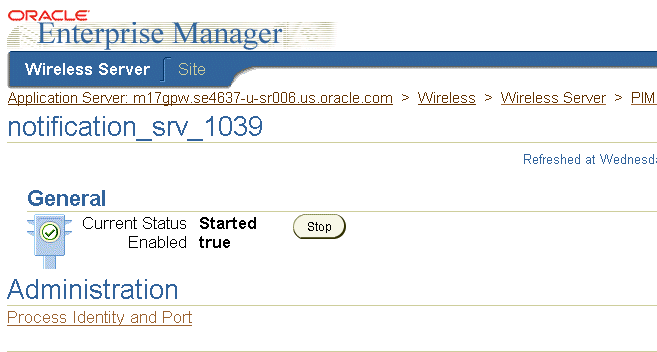
A PIM notification dispatcher listens on a TCP/IP socket for notifications sent by the calendar application. The calendar then connects, sends the notification, and then disconnects. To enable the calendar to connect to the PIM Notification Dispatcher (which in turn pushes the message to the Oracle9iAS Wireless transport layer) you must configure the TCP/IP port number for the calendar listener.
Upon installation, a PIM notification process is created with a pre-defined port number.
|
Note: You must also configure the calendar application to use the same port. For more information, see the calendar documentation for the Oracle Collaboration Suite. |
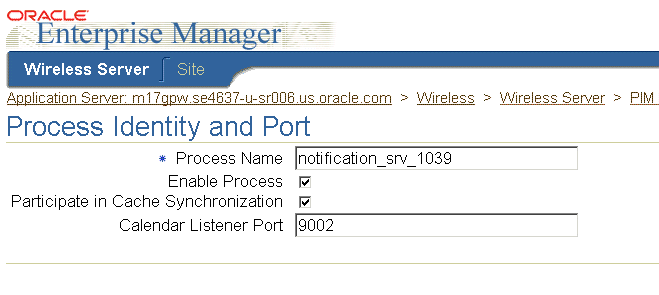
You use the server-level Wireless management to configure the calendar listener port number, identity, and caching participation of a PIM notification dispatcher process. For information on accessing the Wireless management functions, see Chapter 10, "System Management Overview".
To configure a PIM Notification Dispatcher process:
|
Note: If you change the port number for a running PIM notification dispatcher process, you must stop the process and then start it again for the port number change to take effect. For more information on starting and stopping PIM notification dispatcher processes, see Section 3.2.1.3. |
The voice and wireless settings enable you to create, manage, and select contact rules.
A contact rule describes how you wish to receive calls and messages. For example,you can set a contact rule for meetings, wherein you receive all notifications on a cell phone. The Presence Server keeps track of your current circumstances, such as in a meeting or out of the office, the devices available to you at any time, and the way in which you wish to be notified.
Using the voice and wireless settings screens (accessed through Oracle Collaboration Suite), you create a contact rule by first naming it (for example, At Field Office) and then by adding the communication devices that are appropriate to that contact rule. When creating a communication device, you enter the number or address for the device, along with a nickname for the device, such as My Mobile Phone. You can choose devices from the following communication methods:
For example, when creating the At Field Office contact rule, you may want to receive calls at a device called Field Office Phone, email at Corporate Office Email, and faxes at Field Office Fax. When creating a contact rule, you specify the preferred method for receiving notifications. For the At Field Office contact rule, you could choose to receive notifications as email messages, which are sent to Corporate Office Email.
The Oracle Collaboration Suite provides you with three pre-defined contact rules, At My Desk, At Meeting, and At Home. You can edit these contact rules and rename them. However, each contact rule name must be unique; you cannot have two contact rules with the same name. In addition, you cannot share a contact rule with another user.
You access functions to create and manage contact rules by by clicking the Voice and Wireless button on Home page of the Oracle Collaboration Suite. If you are a new user, you must create an account in the Voice Access and Alert Settings page (see Section 3.3.2 for more information).

Complete the following fields as detailed.
Click Cancel to discard all input information.
Click Finish to save your changes and go back to the Portal page.
Click Advanced to save your changes and go to the Advanced Voice & Wireless Settings page.
See Section 3.3.6 for information on creating a communications device.
This page enables you to manage your contact rules and contact points. Two tables on this page (My Contact Rules, and Contact Points) organize these items for your use.
Click Back to return to the Voice and Wireless Settings page.
Click Finish to return to the Portal home page.
To add a Contact Rule, click the Add button in the How to Reach Me table. Complete the fields as detailed.
Ensure that the appropriate communication device is selected for the way you want to be notified, otherwise you will not be able to receive notification. For example, if you want to be notified through a telephone call, make sure that Call me at has a communication device selected.
Click Finish after entering your information.
To edit a Contact Rule, click the radio button of the contact rule you want to modify. Complete the fields as detailed.
Ensure that the appropriate communication device is selected for the way you want to be notified, otherwise you will not be able to receive notification. For example, if you want to be notified through a telephone call, make sure that Call me at has a communication device selected.
To delete a contact rule, select the contact rule radio button in the Contact Rule table, then click Delete.
Communications devices are identified devices on which you can receive notifications. To create a communications device, click the Add button in the Communications Devices table. You can add email addresses, faxes, mobile telephones, pagers, PDAs, and telephones.
To add a communications device, select the type of contact point you want to add, then click the Add button. The appropriate Add page appears.
To add an email address, complete the fields as detailed.
To add a fax number, complete the fields as detailed.
To add a mobile telephone, complete the fields as detailed.
To add a pager, complete the fields as detailed.
To add a PDA, complete the fields as detailed.
To add a telephone number, complete the fields as detailed.
Edit communications devices by clicking the radio button of the communications point you want to edit. Then, click the Edit button. The Edit Communications Device (name depends on the type of contact point you select) page appears.
To edit an email address, complete the fields as detailed.
To edit a fax number, complete the fields as detailed.
To edit a mobile telephone number, complete the fields as detailed.
To edit a pager, complete the fields as detailed.
To edit a PDA, complete the fields as detailed.
To edit a telephone number, complete the fields as detailed.
To delete a communications device, click the radio button next to the communications device you want to delete, then click the Delete button.
You can select a contact rule from a Web-based interface, such as the home page of the Oracle Collaboration Suite or from a registered communications device.
You can change your contact rules from the Home page of the Oracle Collaboration Suite by selecting a contact rule from the Contact me drop-down list and then by clicking Change, or from the Advanced page by selecting a contact rule followed by clicking Set Current. For more information, see Section 3.3.2.2.

You can also select contact rules from a variety of devices, because Wireless XML enables the conversion of XML from any Oracle9iAS Wireless application into several device-specific markup languages. As a result, you can select contact rules from a WAP-enabled device or from a regular phone. In addition, asynchronous-enabled applications enable you to select contact rules from devices having such asynchronous messaging applications as SMS or email, but lacking Internet access. To change contact rules from these devices, you send a message to the ASK SMS or email address set by the system administrator.
From a device, such as a WAP-enabled mobile phone, you select a contact rule from a displayed list. When you change a contact rule, Wireless switches from one rule's settings (which controls how you are contacted) to those of another contact rule.
The following section describe the following:
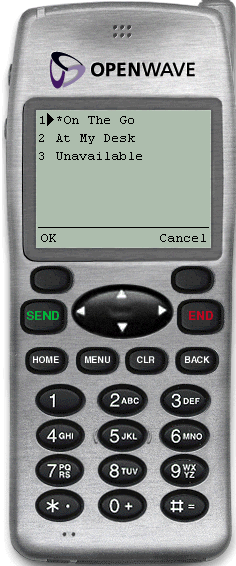
A mobile device, such as a mobile phone, displays your contact rules as a list and notes your current contact rule with an asterisk (*). You select a new contact rule by using the device's navigation keys and then by selecting OK.
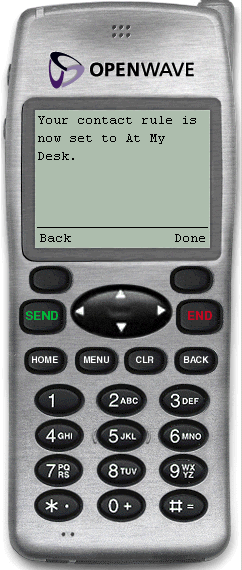
The confirmation screen appears, noting the new contact rule. Clicking OK returns you to the main menu.
From devices using asynchronous applications, you can set your contact rules by sending commands as messages to the ASK SMS or email address. You can use messages to set your contact rules as follows:
For this method, you change your contact rules by sending three separate messages as follows:
Message 1: Enter cr in the message subject line or body of the message. You then receive a message which prompts you for your mobile phone number and PIN number (For more information, see Section 3.3.2.1.)
Message 2: Enter your mobile phone number and PIN number in the subject line or body of the message. If you send this information in the body of an email, then you must enter it on the same line. You then receive a message with a numbered list of contact rules.
Message 3: Enter the number of the new contact rule in the subject line or body of the message. For example, enter 2 if you wish to select 2. At My Desk from the numbered list. You then receive a message confirming the contact rule change. You can then return to the main menu.
Using this method, you can change your contact rule by sending two separate messages by combining the cr command with the exact name of the contact rule as follows:
Message 1: Enter cr followed by the name of the contact rule in the subject line or body of the message. For example, enter cr "At My Desk". If there are spaces in the name of the contact rule, then you must enclose the entire name in quotation marks ("). The contact rule name is also case-sensitive. After you send this message, you then receive a message that prompts you to reply with your username and password.
Message 2: Enter your mobile phone number and PIN number in the subject line or body of the message. If you send this information in the body of an email, then you must enter it on the same line. After you send this message, you receive a reply confirming the contact rule change. You can then return to the main menu.
You can also change your contact rule by sending a single message that combines the cr command, the name of the contact rule, and your username and password together in the subject line or body of your message. For example, you can select a new contact rule by entering all of the information in the subject line or body of a message as follows:
cr "At My Desk"; 16505555000 12345
|
Note: Use a semi-colon (;) to separate the cr and contact rule name command from the username and password. |
After you send this message, you receive a reply confirming the contact rule change. You can then return to the main menu.
|
Note: If the name of your contact rule contains spaces, then you must use enclose the entire name of the contact rule in quotation marks ("). The contact rule name is also case-sensitive. |
After you dial in, do the following: