|
Oracle® Business Intelligence Discoverer Publishing Workbooks in Oracle Application Server Portal
10g Release 2 (10.1.2.1) B14465-02 |
|
 Previous |
 Next |
|
Oracle® Business Intelligence Discoverer Publishing Workbooks in Oracle Application Server Portal
10g Release 2 (10.1.2.1) B14465-02 |
|
 Previous |
 Next |
This chapter explains how to set up Discoverer Portlet Provider in OracleAS Portal, and contains the following topics:
"An overview of registering Discoverer Portlet Provider with OracleAS Portal"
"How to register Discoverer Portlet Provider with OracleAS Portal"
"How to edit Discoverer Portlet Provider after it has been registered with OracleAS Portal"
"Notes about changing the default performance settings for Discoverer"
"About copying Discoverer portlets from one Oracle Business Intelligence installation to another"
The prerequisite tasks for publishing Discoverer portlets in OracleAS Portal are listed below along with the roles that carry out each task:
Install Oracle Application Server Infrastructure.
Oracle Application Server Infrastructure is installed by the OracleAS administrator.
For more information, see Oracle Application Server Installation Guide.
Install Oracle Application Server Portal.
Oracle Application Server Portal is installed by the OracleAS administrator.
Note: To use Discoverer with OracleAS Portal, make sure that the OssoIPCheck parameter value in the mod_osso.conf file is set to FALSE.
For more information, see Oracle Business Intelligence Discoverer Configuration Guide.
Install Oracle Business Intelligence.
Oracle Business Intelligence is installed by the OracleAS administrator.
For more information, see Oracle Business Intelligence Installation Guide.
Associate a standalone Oracle Business Intelligence installation with an Oracle Application Server Infrastructure.
Association is carried out in Oracle Application Server Control by an Oracle Application Server administrator, a middle tier administrator, or the Discoverer manager.
For more information, see Oracle Application Server Installation Guide and Oracle Business Intelligence Discoverer Configuration Guide.
Register Discoverer Portlet Provider.
Discoverer Portlet Provider is registered in Oracle AS Portal by the Oracle Application Server administrator.
For more information, see Chapter 2, "Setting up Discoverer Portlet Provider in OracleAS Portal" (this guide).
Create a Discoverer worksheet.
Discoverer worksheets are created by Discoverer Plus or Discoverer Desktop end users.
For more information, see Oracle Application Server Installation Guide and Oracle Business Intelligence Discoverer Configuration Guide.
Note: Before you can create a Discoverer worksheet the following tasks must have been completed:
Create Metadata (EUL or Discoverer Catalog).
EUL Metadata is created in Oracle Discoverer Administrator by the Discoverer manager. The Discoverer Catalog Metadata is installed in Oracle Application Server Control by the Oracle Application Server administrator.
For more information, see Oracle Application Server Installation Guide and Oracle Business Intelligence Discoverer Configuration Guide.
Create a public/private connection.
Public connections are created in Oracle Application Server Control by the Discoverer manager. Private connections are created in Discoverer Plus and Discoverer Viewer by end users. For more information, see:
Oracle Business Intelligence Discoverer Configuration Guide
Oracle Business Intelligence Discoverer Plus User's Guide
Oracle Business Intelligence Discoverer Viewer User's Guide
Add Discoverer portlets.
Discoverer portlets are added in OracleAS Portal, typically by Discoverer Plus and Discoverer Viewer end users.
For more information, see Chapter 3, "Authoring OracleAS Portal Pages with Discoverer Portlets" (this guide)
Note: Many of the initial tasks listed above are likely to have already been completed during or after installation.
To publish Discoverer portlets in OracleAS Portal, do the following:
(Optional) Make sure that Discoverer Portlet Provider is installed correctly by entering the following URL in an Internet browser:
http://<host.domain>:<port>/discoverer/portletprovider/
If Discoverer Portlet Provider is installed correctly, you will see the PDK-Java test page, displaying the message 'Congratulations! You have successfully reached your Provider's Test Page'. The test page also lists the Discoverer portlet types available.
Register Discoverer Portlet Provider with OracleAS Portal (for more information, see "How to register Discoverer Portlet Provider with OracleAS Portal").
This step only needs to be performed once (after installation). Typically, Oracle Application Server administrators register the Discoverer Portlet Provider.
Use OracleAS Portal to add Discoverer portlets to portal pages (for more information, see Chapter 3, "Authoring OracleAS Portal Pages with Discoverer Portlets").
Typically, a portal page designer would add Discoverer portlets to portal pages.
You must register Discoverer Portlet Provider with OracleAS Portal before you can publish Discoverer worksheets in OracleAS Portal pages. You can only register Discoverer Portlet Provider with OracleAS Portal once.
When you have registered Discoverer Portlet Provider with OracleAS Portal you can then publish Discoverer portlets in OracleAS Portal pages (for more information, see Chapter 3, "Authoring OracleAS Portal Pages with Discoverer Portlets").
You register Discoverer Portlet Provider to enable OracleAS Portal end users to add Discoverer business intelligence portlets to their portal pages.
To register Discoverer Portlet Provider with OracleAS Portal:
Start a Web browser and enter the URL for OracleAS Portal.
For example:
http://<host.domain>:<port>/pls/portal
For more information about displaying the OracleAS Portal main page, contact the OracleAS Portal administrator.
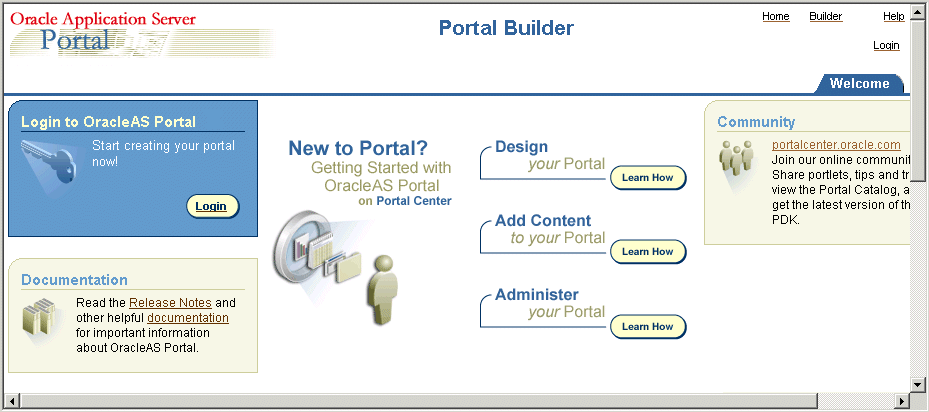
Click Login and connect as a Portal administrator.
Display the Administer tab.
Display the Portlets sub-tab.
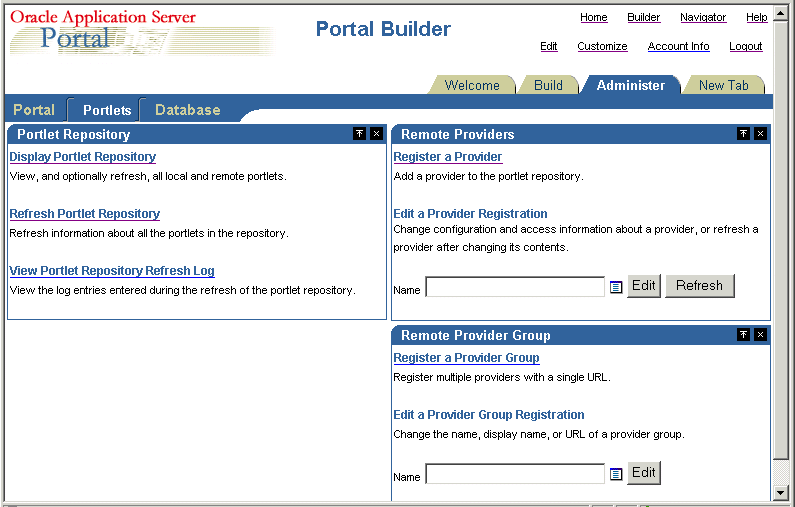
Select the Register a Provider link to display the Provider Information page.
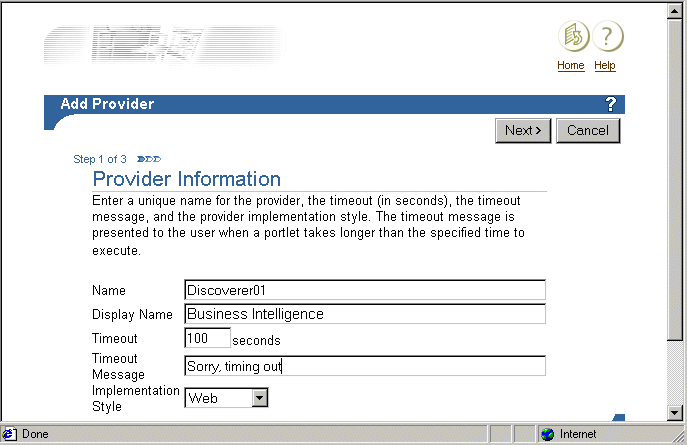
Enter the Discoverer Portlet Provider details.
You can enter any name and display name for the Discoverer Portlet Provider. The name and display name can be different.
Hint: Give the Portlet Provider a useful display name because users will see this name when they add a Discoverer portlet to a portal page.
Choose Web from the Implementation Style drop down list.
Click Next to display the Define Connection page.
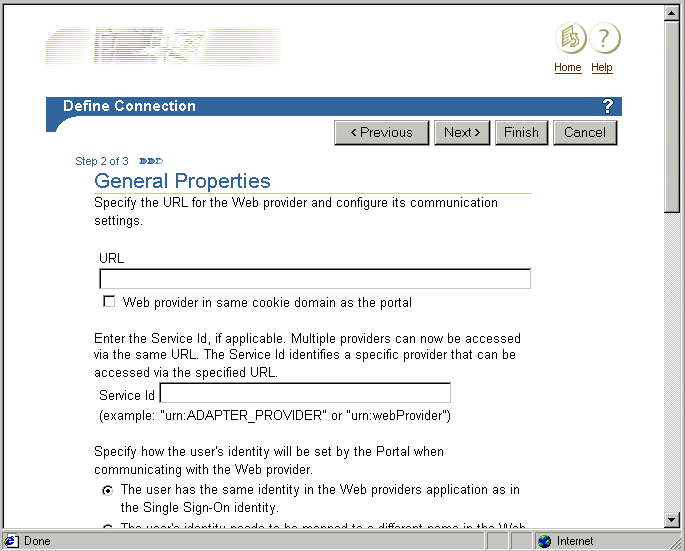
Enter the Portlet Provider general properties as follows:
Enter the URL of the Discoverer Portlet Provider in the URL field, in the form:
http://<host.domain>:<port>/discoverer/portletprovider (e.g. http://myserver:80/discoverer/portletprovider)
Clear the Web Provider in same cookie domain as the portal check box.
Select the The user has the same identity in the Web providers application as in the Single Sign-On identity radio button.
In the User/Session Information area, select the User radio button, and select the Once Per User Session option from the Login Frequency field.
Note: Do not change the default value of other fields.
Click Next to display the Control Access page.
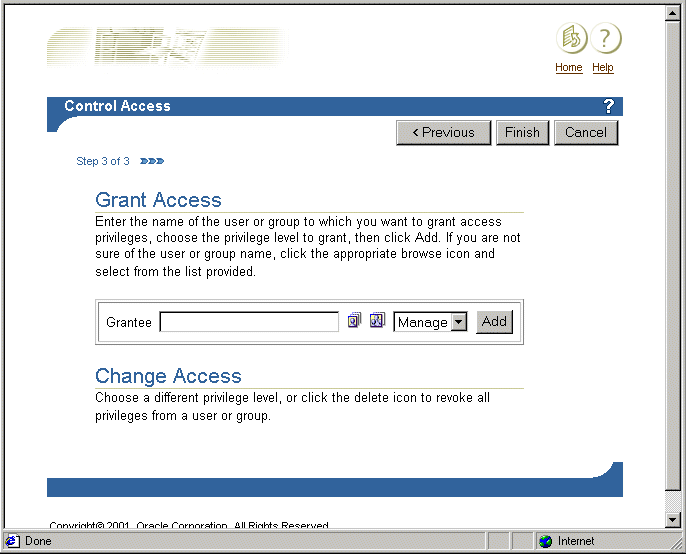
(optional) Change the default access control settings if necessary.
Click Finish.
End users can now use the Discoverer Portlet Provider to add portlets to an OracleAS Portal page.
Notes
If you want Discoverer end users to publish workbooks and worksheets using a public connection, use Oracle Application Server Control to create the public connection (for more information about creating public connections, see the Oracle Business Intelligence Discoverer Configuration Guide).
You edit the Discoverer Portlet Provider when you want to change the way that it works. For example, you might want to change the Discoverer Portlet Provider Display Name, or change its Control Access settings.
To edit the Discoverer Portlet Provider:
Start a Web browser and enter the URL for the OracleAS Portal main page main page.
For example:
http://<host.domain>:<port>/pls/portal
For more information about displaying the OracleAS Portal main page, contact the OracleAS Portal administrator.
Display the Administer tab.
Display the Portlets sub-tab.

In the Remote Providers area, enter the name of the Discoverer Portlet Provider (i.e. its display name) in the Name field, and click Edit to display the Provider Information page.
Hint: If you are not sure of the display name of the Discoverer Portlet Provider, do the following:
Click the Browse Providers icon to the right of the Name field.
Choose the Discoverer Portlet Provider name from the list of Portlet Providers displayed.
Hint: The name that you choose is the display name that was specified when you registered the Discoverer Portlet Provider (for more information, see "How to register Discoverer Portlet Provider with OracleAS Portal").
Click Edit to display the Edit Portlet Provider page.
Make the necessary changes, as follows:
use the Main tab to change provider information (e.g. the display name of the Discoverer Portlet Provider)
use the Connection tab to change general properties (e.g. the URL of the Discoverer Portlet Provider)
use the Access tab to change the access privileges (e.g. the control access settings of the Discoverer Portlet Provider)
Click OK to save the changes you have made.
The Discoverer Portlet Provider is updated according to changes you have made.
You might want to change the default performance settings for Discoverer to improve Discoverer performance.
For more information about changing the default performance settings for Discoverer, see the Oracle Business Intelligence Discoverer Configuration Guide.
OracleBI Discoverer Portlet Provider 10.1.2 can be used with either OracleAS Portal 10.1.2 or OracleAS Portal 9.0.4. To use OracleBI Discoverer Portlet Provider with OracleAS Portal 10.1.2, see Chapter 2 and Chapter 11 in the Oracle Business Intelligence Discoverer Configuration Guide.
This section provides instructions on how to use OracleBI Discoverer Portlet Provider 10.1.2 with OracleAS Portal 9.0.4.
If you want to use OracleBI Discoverer Portlet Provider 10.1.2. with OracleAS Portal 9.0.4, you must upgrade only the OracleBI Discoverer part of the 9.0.4 OracleAS Metadata Repository (MR) using the upgradeMR script as described in this section.
Using the upgradeMR script to upgrade just the OracleBI Discoverer part of the MR will allow OracleAS Portal to continue to work against the MR. In other words, you will not have to upgrade your OracleAS Portal instance to 10.1.2.
If you use the OracleAS Metadata Repository Upgrade Assistant 10.1.2 to update an OracleAS Metadata Repository from 9.0.4 to 10.1.2, you also upgrade the OracleAS Portal 9.0.4 schema to 10.1.2. As a result, OracleAS Portal 9.0.4. will no longer work against the MR. Do not use the OracleAS Metadata Repository Upgrade Assistant 10.1.2 to upgrade the OracleAS Metadata Repository if you want to continue to use OracleAS Portal 9.0.4.
To use OracleBI Discoverer Portlet Provider 10.1.2 with OracleAS Portal 9.0.4:
Associate Oracle Business Intelligence with the Oracle Application Server Infrastructure that is associated with the OracleAS Portal that you want to use
For more information, see Chapter 2 (Section 2.2 How to associate and reassociate an OracleBI installation with an OracleAS infrastructure) in the Oracle Business Intelligence Discoverer Configuration Guide.
Upgrade the OracleBI Discoverer part of the OracleAS Metadata Repository (for more information, see Chapter2, "How to upgrade just the OracleBI Discoverer part of a Metadata Repository".
Do one of the following to register OracleBI Discoverer Portlet Provider 10.1.2 with OracleAS Portal 9.0.4:
If you have an existing OracleBI Discoverer Portlet Provider 9.0.4 registered with OracleAS Portal, then change the registration of the OracleBI Discoverer Portlet Provider to use the URL of the OracleBI Discoverer Portlet Provider 10.1.2.
You need to change the registration of OracleBI Discoverer Portlet Provider to OracleBI Discoverer Portlet Provider 10.1.2. because the OracleBI Discoverer Portlet Provider 9.0.4 will no longer work once the Discoverer part of the MR is upgraded to 10.1.2.
If you do not have an existing OracleBI Discoverer Portlet Provider registered with OracleAS Portal, register OracleBI Discoverer Portlet Provider 10.1.2 with OracleAS Portal.
For more information, see Chapter 11 of the Oracle Business Intelligence Discoverer Configuration Guide.
Notes
If you use OracleBI Discoverer Portlet Provider 10.1.2 with OracleAS Portal 9.0.4, then note that:
The color picker is not available. As a result you can only create gauges with the default colors.
The date picker is not available. As a result, when you specify refresh schedules for portlets using the Set Refresh Options page, you must enter the date as text in the 'First Refresh Date' field (e.g. 25-JAN-2005).
You upgrade just the OracleBI Discoverer part of the OracleAS Metadata Repository 9.0.4 to work with OracleBI Discoverer Portlet Provider 10.1.2 using a script that is located in the following place in the OracleBI Discoverer installation:
ORACLE_HOME\discoverer\util\upgradeMR.bat (for Windows) ORACLE_HOME/discoverer/util/upgradeMR.sh (for Solaris)
To upgrade an OracleAS Metadata Repository 9.0.4 to work with OracleBI Discoverer Portlet Provider 10.1.2, complete the following steps:
Before running the script, ensure that the ORACLE_HOME environment variable is set to the OracleBI Discoverer home directory.
On the Oracle Business Intelligence machine, open a command prompt and run the upgradeMR script.
For example, on a Unix machine, enter the following command:
upgradeMR.sh
You are prompted to confirm that you want to upgrade the OracleBI Discoverer schema in the OracleAS Metadata Repository to 10.1.2.
Enter 'y' in response to the prompt.
You are prompted to enter a user name and password.
Enter the user name and password of the SYSTEM user on the database that has the OracleAS Metadata Repository.
Output from the script is displayed on the console and is also logged in the MRUpgrade.log file in the util directory. For example, on Solaris the log file is located in: ORACLE_HOME/discoverer/util/MRUpgrade.log.
Note: Once you upgrade the OracleBI Discoverer part of the OracleAS Metadata Repository, you will be able to use only OracleBI Discoverer Portlet Provider 10.1.2. You will no longer be able to use OracleBI Discoverer Portlet Provider 9.0.4 with this OracleAS Portal and OracleAS Infrastructure.
After you have installed Oracle Business Intelligence, you might want to deploy existing Discoverer portlets created on a different OracleAS Portal installation. To deploy existing Discoverer portlets, you copy the portal pages and portlets to the new Oracle Business Intelligence installation.
You copy Discoverer portlets using OracleAS Portal's export and import facilities for transport sets. A transport set is a collection of portal objects for export.
Note: Before you copy Discoverer portlets, you must first copy any Discoverer connections used by the portlets. For more information, see "How to copy Discoverer connections from one Oracle Business Intelligence installation to another".
The figure below shows the high level steps to copy Discoverer portlets.
Figure 2-1 Copying Discoverer portlets from one Oracle Business Intelligence installation to another
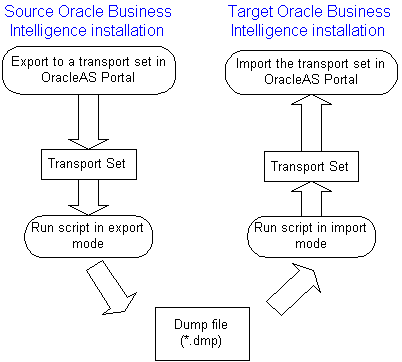
Note: The source and target Oracle Business Intelligence installations can be on the same machine, or on different machines.
To copy Discoverer portlets from one Oracle Business Intelligence installation to another:
Copy any Discoverer connections used by the Discoverer portlets to the target Oracle Business Intelligence installation (for more information, see "How to copy Discoverer connections from one Oracle Business Intelligence installation to another").
If the source and target Oracle Business Intelligence installations do not share the same infrastructure, you must register the new Discoverer Portlet Provider on the target installation with the same name as that used on the source installation.
For example, if the Discoverer Portlet Provider is registered with the name 'Discoverer01' on the source installation, you must register the new Discoverer Portlet Provider on the target installation with the name 'Discoverer01'.
For more information about registering Discoverer Portlet Provider, see "How to register Discoverer Portlet Provider with OracleAS Portal".
On the source Oracle Business Intelligence installation, connect to OracleAS Portal and export a page or page group to a transport set (for more information, see "How to export Discoverer portlets to a transport set").
When you export a transport set, OracleAS Portal generates a UNIX script and a Windows script that you can run:
in export mode to copy a transport set to a dump (*.dmp) file
in import mode to extract a transport set from a dump (*.dmp) file
On the source Oracle Business Intelligence installation, run the script generated by OracleAS Portal in export mode to create a dump (*.dmp) file containing the transport set (for more information, see "How to create a dump (*.dmp) file to copy the Discoverer portlets").
If the source installation and target installation are on different machines, copy the dump (*.dmp) file and the script from the source machine to the target machine.
On the target Oracle Business Intelligence installation, run the script generated by OracleAS Portal in import mode to extract the transport set from the dump (*.dmp) file (for more information, see "How to extract a transport set from a dump (*.dmp) file").
On the target Oracle Business Intelligence installation, connect to OracleAS Portal and import the exported page or page group as a transport set (for more information, see "How to import a transport set into OracleAS Portal").
You log in to OracleAS Portal to enable you to view and edit OracleAS Portal content, and perform administrative tasks. For example, you might want to add new portlets to a portal page.
To log in to OracleAS Portal:
Launch a Web browser.
Display the OracleAS Portal main page.
Hint: The web address of the OracleAS Portal might be:
the default web page that you access when you start a browser
an internet address (URL) that you enter in the address field in a browser (e.g. a typical URL might be http://machinename.myorganization.com:7777/pls/portal)
a link from a portal or other internet or intranet site that you are using
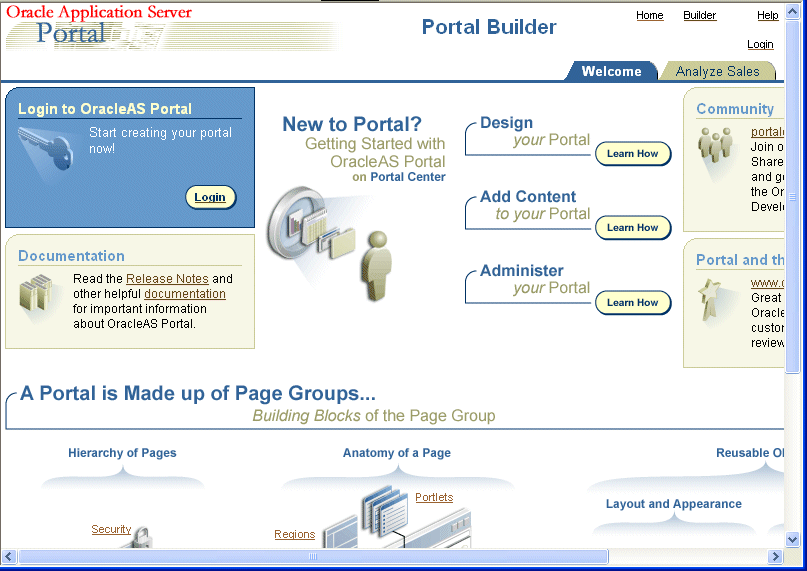
Click Login to display the Sign In page.
Enter the user name and password of a Single Sign-On user with administrator privileges.
For example, to log in as the OracleAS Portal administrator, you might log in using the username 'orcladmin'.
You can now view and edit OracleAS Portal content, and perform administrative tasks.
You export Discoverer portlets to a transport set in OracleAS Portal to enable you to copy them from one Oracle Business Intelligence installation to a different installation.
To export Discoverer portlets to a transport set:
On the source installation, log in to OracleAS Portal as a user with administrator privileges (for more information, see "How to log in to OracleAS Portal").
Select the Navigator link to display the Portal Navigator page.
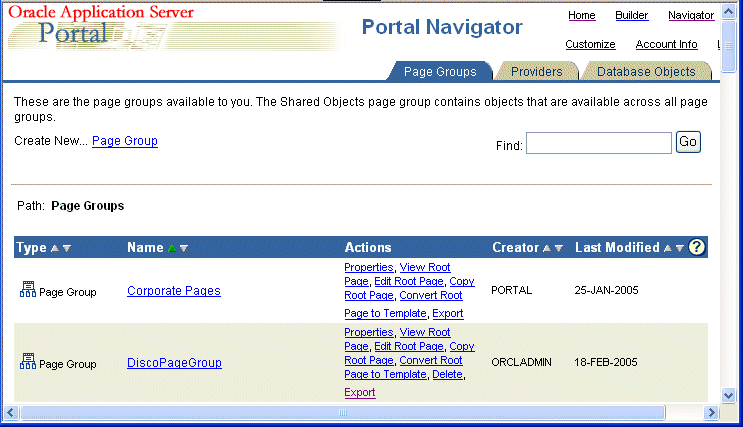
Select the Export link in the Actions column next to the name of Page or Page Group that you want to copy, to display the Export Objects page.
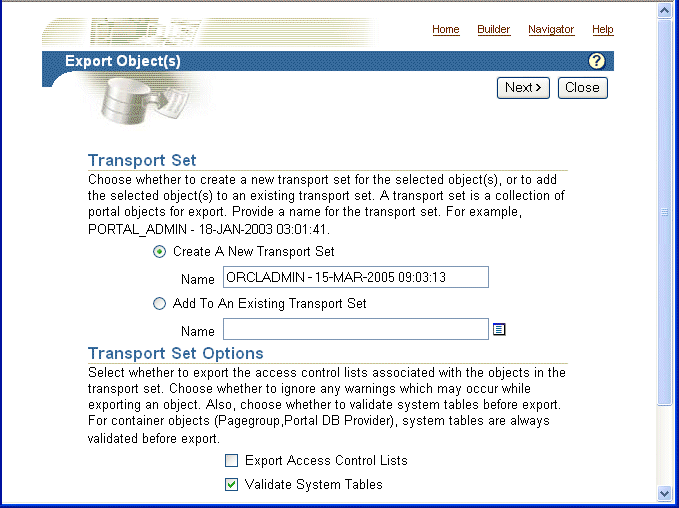
Do not change the default values of the other fields on this page.
Select the Create A New Transport Set radio button.
If you want to change the default transport set name, edit the default name in the Name field.
The transport set name that you specify is used to identify the transport set in OracleAS Portal (e.g. if you import or delete it).
Click Next to display the Transport Set Objects page.
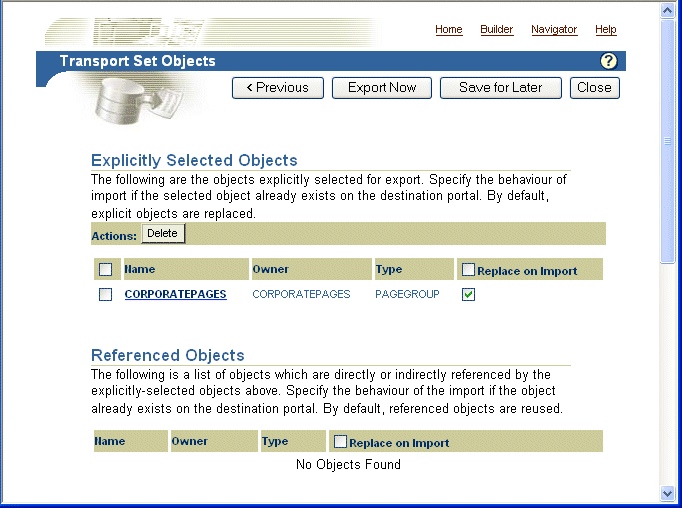
In the Explicitly Selected Objects table, do one of the following:
if the source and target Oracle Business Intelligence installations do not share the same infrastructure, clear the check box in the Replace on Import column
if the source and target Oracle Business Intelligence installations do share the same infrastructure, select the check box in the Replace on Import column
Click Export Now to display the Download Scripts And View Log page.
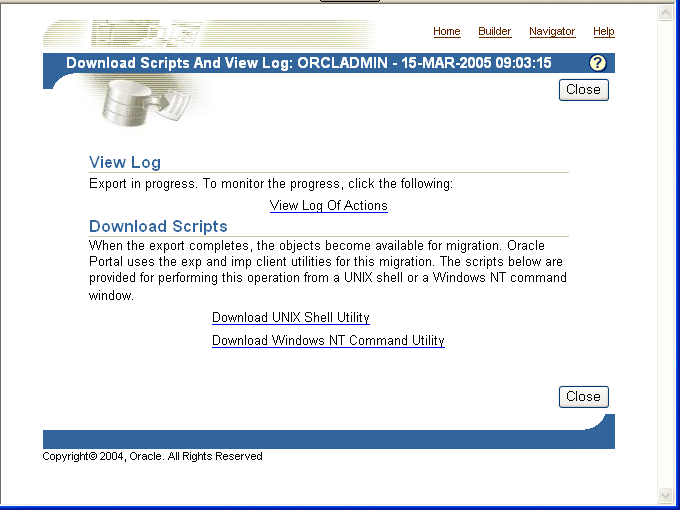
Select the View Log of Actions link to monitor the status of the export.
Refresh the browser window until the export is complete. When the export is complete, the log entry 'Completed On: <date and time>' is displayed. OracleAS Portal does not display a pop-up message informing you that the export has been completed.
Click Close to return to the Download Scripts And View Log page.
In the Download Scripts area, select the link for the platform you are using to display the script in the browser window.
For example, select the Download UNIX Shell Utility link for UNIX platforms.
Save the script in the browser (e.g. in Internet Explorer, choose File | Save As, and select a file name and location).
Click the Back button in the browser to return to the Download Scripts And View Log page
Click Close.
You have now exported the Discoverer portlets to a transport set. The next step is to create a dump (*.dmp) file. For more information, see "How to create a dump (*.dmp) file to copy the Discoverer portlets".
To run scripts generated by OracleAS Portal you need the PORTAL login password for the OracleAS infrastructure database. If you do not know the PORTAL login password, use the ldapsearch command to obtain the PORTAL login password.
To obtain the PORTAL login password:
At a command prompt, enter the ldapsearch command using the following syntax:
ldapsearch -h directory_host_name -p directory_port -D directory_bind_dn -w directory_bind_dn_password -b "orclReferenceName=infrastructure_database" "orclresourcename=PORTAL" orclpasswordattribute
For more information about the ldapsearch command, see Oracle Internet Directory Administrator's Guide.
Having exported Discoverer portlets to a transport set, you now run the script generated by OracleAS Portal in export mode to create a dump (*.dmp) file.
To create a dump (*.dmp) file to copy the Discoverer portlets:
On the source Oracle Business Intelligence installation, run the script generated by OracleAS Portal by entering the following command at the command prompt:
<script name> -mode export -s portal -p <PORTAL login password> -c <database connect string> -d <*.dmp file>
Where:
<script name> is the name of the script file generated by OracleAS Portal (e.g. my_script.sh). You specify the script name when you export the transport set.
<PORTAL login password> is the PORTAL login password for the OracleAS infrastructure database. For more information about obtaining the PORTAL login password, see "How to obtain the PORTAL login password".
<database connect string> is the login details for the infrastructure database.
<*.dmp file> is the name you want to give dump file.
For example, if the script is called my_script.sh, you might type:
my_script.sh -mode export -s portal -p mypassword -c db1 -d exp.dmp
If the source Oracle Business Intelligence installation and target installation are on different machines, copy the dump (*.dmp) file and the generated script to the target machine (e.g. using FTP).
You have now created a dump (*.dmp) file containing the transport set. The next step is to extract the transport set from the dump (*.dmp) file on the Oracle Business Intelligence installation (for more information, see "How to extract a transport set from a dump (*.dmp) file").
Having created a dump (*.dmp) file, you now run the script generated by OracleAS Portal in import mode to extract the transport set from the dump (*.dmp) file on the target Oracle Business Intelligence installation.
To extract a Transport Area from a dump (*.dmp) file:
On the target Oracle Business Intelligence installation, run the script generated by OracleAS Portal by entering the following command at the command prompt:
<script name> -mode import -s portal -p <PORTAL login password> -pu <target portal username> -pp <password of target portal user> -company none -c <database connect string> -d <*.dmp file>
Where:
<script name> is the name of the script file generated by OracleAS Portal (e.g. my_script.sh). You specify the script name when you export the transport set.
<PORTAL login password> is the PORTAL login password for the OracleAS infrastructure database. For more information about obtaining the PORTAL login password, see "How to obtain the PORTAL login password".
<database connect string> is the login details for the infrastructure database.
<*.dmp file> is the name of the dump file containing the transport set.
For example, if the export file is called my_script.sh, you might type:
my_script.sh -mode import -s portal -p mypassword -pu orcladmin -pp adminpassword -company none -c db1 -d exp.dmp
You have now extracted the transport set from the dump (*.dmp) file. The next step is to import the transport set into OracleAS Portal (for more information, see "How to import a transport set into OracleAS Portal").
Having extracted a transport set from a dump (*.dmp) file, the next step is to import the Discoverer portlets in OracleAS Portal.
To import a transport set into OracleAS Portal:
On the target Oracle Business Intelligence installation, log in to OracleAS Portal as a user with administrator privileges (for more information, see "How to log in to OracleAS Portal").
Display the Administer tab.
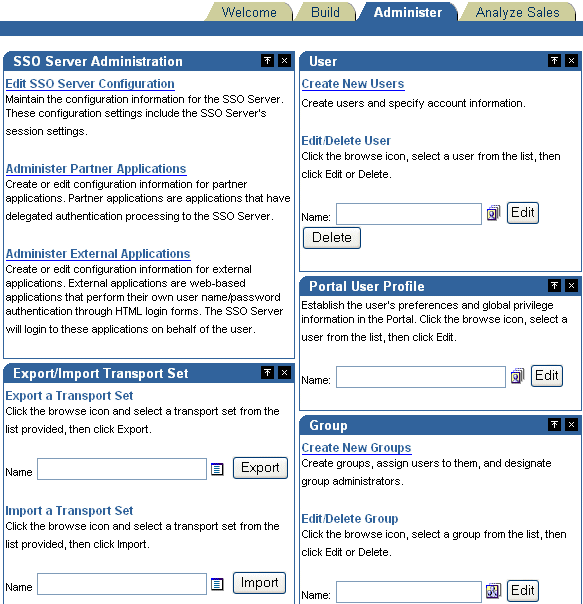
In the Import A Transport Set area, click the Browse button next to the Name field and select the transport set to import.
The name of the selected transport set is displayed in the Name field.
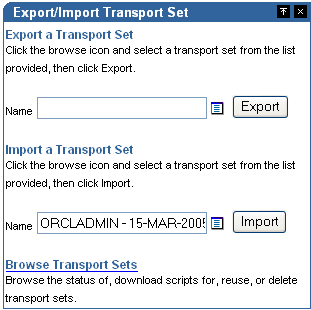
Click Import to start the import process.
OracleAS Portal displays the Import transport set page.
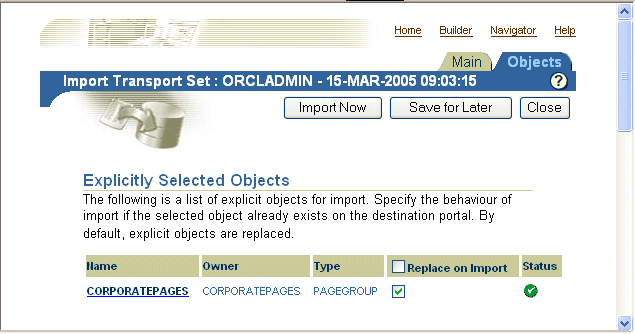
In the Explicitly Selected Objects table, make sure that the check box in the Replace on Import column is selected.
Click Import Now to start the import.
The View Log page is displayed.
Select the View Log of Actions link to monitor the status of the export.
Refresh the browser window until the import is complete. When the import is complete, the log entry 'Completed On: <date and time>' is displayed.
Click Close to return to the View Log page.
Click Close to return to the Administer tab.
You have now imported the Discoverer portets into OracleAS Portal. OracleAS Portal users can now use their existing Discoverer portlets on the new Oracle Business Intelligence installation.
You copy Discoverer connections from one Oracle Business Intelligence installation to another using the ssomig script.
To copy Discoverer connections from one Oracle Business Intelligence installation to another:
On the source Oracle Business Intelligence installation, export the ORASSO schema using the ssomig script (for more information, see "How to export Discoverer connections".
On the target Oracle Business Intelligence installation, import the ORASSO schema using the ssomig script (for more information, see "How to import Discoverer connections".
Notes
For more information about the ssomig script, see Oracle Application Server Single Sign-On Administrator's Guide.
To run ssomig commands you need the ORASSO login password. If you do not know the ORASSO login password, use the ldapsearch command to obtain the ORASSO login password.
To obtain the ORASSO login password:
At a command prompt, enter the ldapsearch command for obtaining the ORASSO login password using the following syntax:
ldapsearch -h directory_host_name -p directory_port -D directory_bind_dn -w directory_bind_dn_password -b "orclReferenceName=infrastructure_database" "orclresourcename=ORASSO" orclpasswordattribute
For more information about the ldapsearch command, see Oracle Internet Directory Administrator's Guide.
You export Discoverer connections to enable you to copy them from one Oracle Business Intelligence installation to another.
To export Discoverer connections:
On the target Oracle Business Intelligence installation, run the following command at the command prompt:
<ORACLE_HOME>/sso/bin/ssomig -s ORASSO -p <orasso_password> -c <src_tns_alias> -export
Where:
<orasso_ password> is the ORASSO login password. For more information about obtaining the ORASSO login password, see "How to obtain the ORASSO login password".
<src_tns_alias> is the net service name for the OracleAS Single Sign-On database.
For example:
<ORACLE_HOME>/sso/bin/ssomig -s ORASSO -p Ov0aR19T -c portalsrc -export
You have now exported the Discoverer connections from the source Oracle Business Intelligence installation. The next step is to import the Discoverer connections into the target Oracle Business Intelligence installation (for more information, see "How to import Discoverer connections").
You import Discoverer connections to enable you to copy them from one Oracle Business Intelligence installation to another.
To export Discoverer connections:
On the target Oracle Business Intelligence installation, run the following command at the command prompt:
<ORACLE_HOME>/sso/bin/ssomig -s ORASSO -p <orasso_password> -c <dst_tns_alias> -import -merge -discoforce
Where:
<orasso_ password> is the ORASSO login password. For more information about obtaining the ORASSO login password, see "How to obtain the ORASSO login password".
For example:
<ORACLE_HOME>/sso/bin/ssomig -s ORASSO -p F9qX233h -c portalsrc -import -merge -discoforce
You have now imported the Discoverer connections into the target Oracle Business Intelligence installation. You can now copy Discoverer portlets to the target Oracle Business Intelligence installation (for more information, see "How to copy Discoverer portlets from one Oracle Business Intelligence installation to another").