| Oracle® Application Server Administrator's Guide 10g Release 2 (10.1.2) B13995-08 |
|
 Previous |
 Next |
| Oracle® Application Server Administrator's Guide 10g Release 2 (10.1.2) B13995-08 |
|
 Previous |
 Next |
This chapter describes the Oracle Application Server backup strategy and procedures.
It contains the following topics:
This section describes the recommended backup strategy for Oracle Application Server. Using this strategy ensures that you can perform the recovery procedures described in this book.
The backup strategy is as follows:
Task 1: Perform a Complete Cold Backup of Your Oracle Application Server Environment
Task 3: Perform a New Complete Environment Backup After a Major Change
Task 4: Perform Instance Backups on a Regular Basis (Return to Task 2)
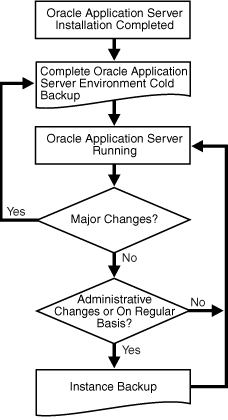
The flow chart in Figure 21-1 provides an overview of how to decide which type of backup is appropriate for a given circumstance.
Figure 21-1 Decision Flow Chart for Type of Backup
Task 1: Perform a Complete Cold Backup of Your Oracle Application Server Environment
The first backup you perform should be an image backup, which includes all of the files in your environment. Before you perform your first backup, make sure ARCHIVELOG mode is enabled in the Metadata Repository. You should also create a record of your environment.
Enable ARCHIVELOG mode in the Metadata Repository.
By default, the Metadata Repository does not have ARCHIVELOG mode enabled. You should enable it immediately so your online redo logs are archived. You should enable ARCHIVELOG mode before you perform your first image backup. Otherwise, your backup control files will contain the NOARCHIVELOG mode setting. You cannot use the Backup and Recovery Tool in the NOARCHIVELOG mode.
Perform a complete Oracle Application Server environment backup.
This will serve as the baseline for all subsequent instance backups.
Refer to Section 21.2.6, "Performing a Complete Oracle Application Server Environment Backup".
Create a record of your Oracle Application Server environment.
In the event you need to reconstruct your environment, you can refer to this record.
Refer to Section 21.2.3, "Creating a Record of Your Oracle Application Server Configuration".
Task 2: Perform Instance Backups on a Regular Basis
After every administrative change, or, if this is not possible, on a regular basis, perform an instance backup of your Oracle Application Server environment.
|
See Also: Appendix G, "Examples of Administrative Changes" to learn more about administrative changes |
Refer to Section 21.2.4, "Performing an Instance Backup of Oracle Application Server Using Application Server Control Console" or Section 21.2.5, "Performing an Oracle Application Server Instance Backup from the Command Line".
Task 3: Perform a New Complete Environment Backup After a Major Change
If you make a major change to your Oracle Application Server environment, you must perform a new image backup of your Oracle Application Server environment. This backup will serve as the basis for subsequent instance backups. You should also update the record of your environment with the new configuration information.
Perform a new image backup after:
An operating system software upgrade
An Oracle Application Server software upgrade or patch application
To do so:
Update the record of your Oracle Application Server environment.
Refer to Section 21.2.3, "Creating a Record of Your Oracle Application Server Configuration".
Perform a complete Oracle Application Server environment backup.
Refer to Section 21.2.6, "Performing a Complete Oracle Application Server Environment Backup".
Task 4: Perform Instance Backups on a Regular Basis (Return to Task 2)
After you establish a new complete Oracle Application Server environment backup, return to Task 2 and continue to perform instance backups on a regular basis.
Additional Tips:
Create a backup of the JRE/JDK on your system. This is not an Oracle product, but it is utilized by Oracle Application Server and, if accidentally lost or corrupted, would need to be restored in order for Oracle Application Server to function. This issue only applies to HP-UX, HP Tru64, and IBM AIX systems.
Ensure that your backups are valid by routinely verifying that they can be restored.
This section describes the backup procedures in detail. There is some data interdependency between the configuration files in your Oracle Application Server middle-tier installations, the Distributed Management Repository, the Identity Management metadata, and the Oracle Application Server Metadata Repository in the Infrastructure. In order to maintain configuration data consistency, you should take a backup of each of your Oracle Application Server instances (middle-tier and Infrastructure) at the same time. While taking a backup of one Oracle Application Server instance, ensure that no configuration changes are made in any of the other instances.
This section contains the following topics:
Creating a Record of Your Oracle Application Server Configuration
Performing an Instance Backup of Oracle Application Server Using Application Server Control Console
Performing an Oracle Application Server Instance Backup from the Command Line
Performing a Complete Oracle Application Server Environment Backup
To increase performance on incremental database backups, enable block change tracking using the following command:
alter database enable block change tracking using file file_name;
If the db_create_file_dest parameter is set in the spfile or init.ora file of the database, the following command can be used:
alter database enable block change tracking;
Once you enable block change tracking, incremental database backup will use block change tracking.
For more information on block change tracking, refer to "Backup and Recovery Basics" in the "Oracle Database 10g Release 1 (10.1) Documentation Library".
By default, the Metadata Repository does not have ARCHIVELOG mode enabled. You must enable ARCHIVELOG mode, which enables the archiving of online redo logs. This will allow you to perform the recovery strategies in this book.
|
See Also: You can find more detailed information on the parameters in this section, and setting up archive logging in general, in "Oracle Database Administrator's Guide 10g Release 1 (10.1)". |
To enable ARCHIVELOG mode:
Run the following sql query to check if the flashback_recovery_area is setup:
SQL> show parameters db_recovery
If the flashback_recovery_area is setup, the query returns:
Name                         Type        Value
db_recovery_file_dest        string      /private2/AS1012Installs/AS1012Infra/
                                          flash_recovery_area
db_recovery_file_dest_size   big integer  2G
If the flashback_recovery_area is setup, then the destination specified by the db_recovery_file_dest parameter is used as the archivelog destination, and you do not need to specify the destination directory for your archives in the following step.
Specify the destination directory for your archives by including the initialization parameter LOG_ARCHIVE_DEST_n in the initialization file. If spfile is used, then the following command can be issued:
alter system set log_archive_dest_n="LOCATION=<backup directory>" scope=spfile;
In the log_archive_dest_n parameter, n is a number of 1 through 10.
If pfile is used, the following initialization file must be edited:
For UNIX systems:
INFRA_ORACLE_HOME/dbs/initSID.ora
For Windows systems:
INFRA_ORACLE_HOME\database\initSID.ora
Change the LOG_ARCHIVE_DEST_n parameter to:
LOG_ARCHIVE_DEST_n="LOCATION=<backup directory>"
(Optional) The default filename format for archive logs is:
For UNIX systems:
%t_%s_%r.dbf
For Windows systems:
ARC%S_%R.%T
If you would like to use a different format, include the initialization parameter LOG_ARCHIVE_FORMAT in the initialization file, for example:
LOG_ARCHIVE_FORMAT = 'log%t_%r_%s.arc'
In the preceding example, t represents the thread number, r represents the reset log ID, and s represents the log sequence number.
Make sure that the ORACLE_HOME and ORACLE_SID (the default is orcl) environment variables are properly set.
Make sure that no one is using the database.
Perform a clean, normal shutdown of the database instance.
INFRA_ORACLE_HOME/bin/sqlplus /nolog
SQL> connect sys/password as sysdba
SQL> shutdown
Start up the instance and mount, but do not open the database.
SQL> startup mount;
Enable database ARCHIVELOG mode.
SQL> alter database archivelog;
Shut down and restart the database instance.
SQL> shutdown
SQL> startup
Verify the database is now in ARCHIVELOG mode.
Execute the following command and verify that Database log mode is Archive Mode and Automatic archival is Enabled.
SQL> archive log list;
Database log mode             Archive Mode
Automatic archival            Enabled
Archive destination           /disk1/oraHome/archive
Oldest on-line log sequence   997
Next log sequence to archive  999
Current log sequence          999
In the event you need to restore and recover your Oracle Application Server environment, it is important to have all the necessary information at your disposal. This is especially true in the event of a hardware loss that requires you to reconstruct all or part of your Oracle Application Server environment on a new disk or host.
You should maintain an up-to-date record of your Oracle Application Server environment that includes the information listed in this section. You should keep this information both in hardcopy and electronic form. The electronic form should be stored on a host or e-mail system that is completely separate from your Oracle Application Server environment.
Your Oracle Application Server hardware and software configuration record should include:
The following information for each host in your environment:
Hostname
Virtual hostname (if any)
Domain name
IP address
Hardware platform
Operating system release level and patch information
The following information for each Oracle Application Server installation in your environment:
Installation type (For example: Infrastructure or J2EE and Web Cache)
Host on which the installation resides
User name, userid number, group name, groupid number, environment profile, and type of shell for the operating system user that owns the Oracle home (/etc/passwd and /etc/group entries)
Directory structure, mount points, and full path for ORACLE_HOME
Amount of disk space used by the installation
Port numbers used by the installation
|
Note: ORACLE_HOME/install/portlist.ini contains the port numbers assigned during installation. However, this file is not updated if you change port numbers after installation, so you need to keep track of those changes manually. |
The following information for the Metadata Repository:
Database version and patch level
Base language
Character set
Global database name
SID
You can use the Oracle Enterprise Manager 10g Application Server Control Console to manage backup and recovery of an Oracle Application Server instance. Once you have performed a complete Oracle Application Server environment backup, you should perform subsequent instance backups after every administrative change, or, if this is not possible, on a regular basis. Perform the following steps to take a backup:
From the Home page for an application server instance, click Backup/Recovery to display the Backup/Recovery page.
Click Perform Backup. Depending on the install type, the middle tier backup screen or the Infrastructure backup screen displays:
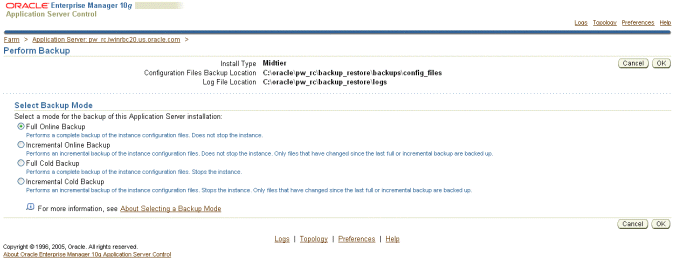
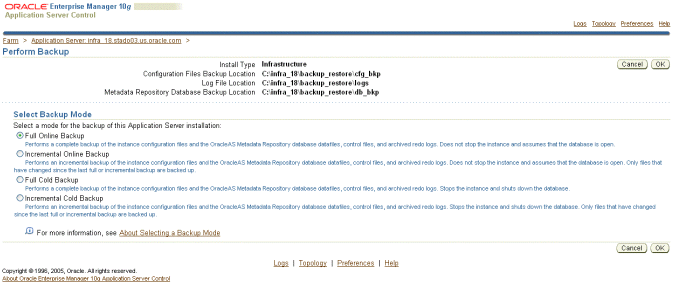
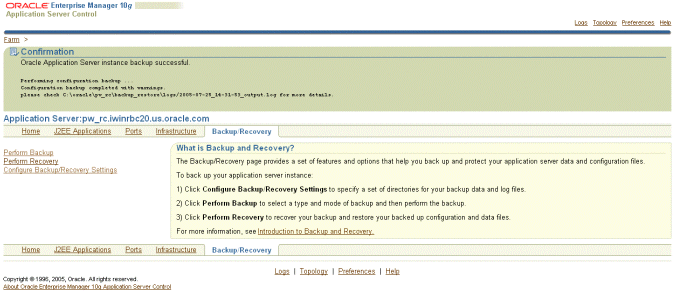
Select the type of backup you want performed by clicking the radio button next to the type of backup. After the backup completes, a confirmation screen displays the results of the backup:
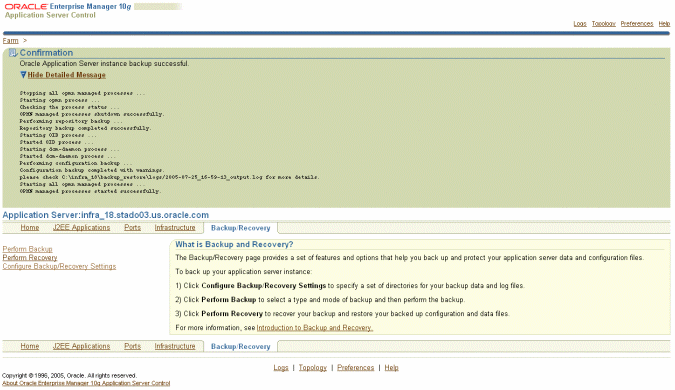
This section describes how to perform various Oracle Application Server instance backups from the command line. An instance level backup backs up all the required components in an application server instance: configuration files, repositories (database or file-based) for the infrastructure and mid-tier.
Once you have performed a complete Oracle Application Server environment backup, you should perform subsequent instance backups after every administrative change, or, if this is not possible, on a regular basis.
Performing a Cold Backup of an Oracle Application Server Instance
Use the following command to perform a cold backup of an Oracle Application Server instance:
bkp_restore.sh -m backup_instance_cold
bkp_restore.bat -m backup_instance_cold
Performing an Incremental Cold Backup of an Oracle Application Server Instance
Use the following command to perform an incremental cold backup of an Oracle Application Server instance:
bkp_restore.sh -m backup_instance_cold_incr -l <level>
bkp_restore.bat -m backup_instance_cold_incr -l <level>
Performing an Online Backup of an Oracle Application Server Instance
Use the following command to perform an online backup of an Oracle Application Server instance:
bkp_restore.sh -m backup_instance_online
bkp_restore.bat -m backup_instance_online
Performing an Incremental Online Backup of an Oracle Application Server Instance
Use the following command to perform an incremental online backup of an Oracle Application Server instance:
bkp_restore.sh -m backup_instance_online_incr -l <level>
bkp_restore.bat -m backup_instance_online_incr -l <level>
This section describes how to perform a complete Oracle Application Server environment backup. A complete Oracle Application Server environment backup includes Identity Management metadata and Oracle Application Server Metadata Repository, which can be stored in the same database or different databases. You should backup the node after installation or after an upgrade. Perform the following tasks for each instance on the host:
Configuration Backup of the Node
Run the following command to create a backup of the node configuration:
On UNIX:
bkp_restore.sh -m configure
On Windows:
bkp_restore.bat -m configure
Node Backup Preparation
Run the following command to prepare a node for backup:
On UNIX:
bkp_restore.sh -m node_backup -o prepare
On Windows:
bkp_restore.bat -m node_backup -o prepare
Creating an Image Backup of the Instance
This task creates an archive of an instance that includes the Oracle home, oratab, central inventory, Windows registries and so forth. On UNIX, the command must be run from root. If you are performing a metadata repository or Infrastructure image backup, the database listener must be running. Run the following command to create an image backup of the instance:
On UNIX:
bkp_restore.sh -m node_backup -o image_backup -P <archive path>
On Windows:
bkp_restore.bat -m node_backup -o image_backup -P <archive path>
After the command completes, the backup is placed in the directory specified in <archive path>.
Oracle Application Server Backup and Recovery Tool provides an automated procedure to take a full backup of the instances on one host and restore them to a new host after loosing the original operating environment.
Loss of Host Automation (LOHA) automates the tasks necessary for the Oracle Application Server user to migrate Oracle Application Server instances from one host to another. The new host can be a different host running the same operating system or the same host after system re-imaging. LOHA provides a solution for a loss of host when you want to restore the original instances to a new environment without having to reinstall the instances and preserve the application data.
LOHA supports all middle-tier installations, and the new host's name can be the same or different from the original host. For metadata repositories and Infrastructure installations, only the target host name must be the same as the original host. For an Oracle Identity Management installation, full automation is supported if the new host name is the same as the original. For different host names, some manual work is required. LOHA does not support the Toplink standalone install type.
LOHA can move all the Oracle Application Server instances from one host to a new host provided that the new host does not have any other Oracle Application Server instances already running. You can restore a subset of the instances to the new host if the subset does not have any dependencies on the instances remaining on the old host. You cannot restore instances from multiple hosts to a single host.
LOHA can also be used to recover a corrupted instance on a host without affecting other instances on the same host.
This section contains the following topics:
The Loss of Host Automation service is installed as part of the Backup and Recovery Tool. It is installed into the following directory:
On UNIX:
ORACLE_HOME/backup_restore/loha
On Windows:
ORACLE_HOME\backup_restore\loha
To use the Loss of Host Automation service, you must install and configure the Backup and Recovery Tool as described in Chapter 20, "Oracle Application Server Backup and Recovery Tool". You must set ORACLE_HOME. If the installation is an Infrastructure, you must also set ORACLE_SID.
The Loss of Host service has the following prerequisites:
The new host must have the same version of operating system and the same level of patches as required by Oracle Application Server.
In the config.inp file, the orainst_loc_path field must be changed only if the instance is installed with the –invPtrLoc option installer command line option. It must be changed to reflect the nonstandard location of oraInst.loc.
For Windows platforms, Windows Support Files (WSF) must be installed. You can obtain WSF from the Oracle Application Server installation cd.
For Windows platforms, the Microsoft service utility sc.exe must be installed on both the original host and the new host. According to Microsoft, it is part of the NT ResourceKit. For Windows XP, the utility is part of the installation. For Windows 2000 platforms, it must be installed. Ensure that it is in the execution path.
On the new host, jar (Windows) or tar (Unix) must be available to unpack the node archive. If your system has its own tar program, use it instead of GNU tar.
The user must have administrative privileges on the system such that system or root level tasks can be performed.
There should not be any other Oracle products installed on the new host. For example, if there are some Oracle Application Server instances on this new host, they must be shutdown and uninstalled cleanly.
The user/group id on the new host must match that on the original host.
Check port usage on the new host. Make sure there are not any processes using the same ports as any of the Oracle Application Server instances you are restoring. If any processes are using the same ports, reconfigure the processes to use different ports before restoring any Oracle Application Server instance.
After completing the restore, the same mount point and full path, as the original middle-tier Oracle home, are preserved. Ensure that the Oracle home parent directory is on a file system with enough space to hold the middle-tier installation, and that the directory is owned by the same user and group as on the original host.
For a host with Oracle Identity Management and the new host has a different name, see "Restoring a Host with Identity Management to a Host with a Different Name" for instructions on restoring the host.
The following tasks must be performed, for each instance on the original host, to enable the Loss of Host Automation service:
Configuration Backup of the Node
You should backup the node after installation or after an upgrade. Run the following command to create a backup of the node configuration:
On UNIX:
bkp_restore.sh -m configure
On Windows:
bkp_restore.bat -m configure
Node Backup Preparation
During node backup preparation, the Loss of Host Automation service determines the following information about the current host:
operating system
host name
ip address
user/group id
install type
central inventory location
Oracle home locations
Windows registry and all Windows services created for all Oracle homes
The service also creates an instance backup with this operation.
Run the following command to prepare a node for backup:
On UNIX:
bkp_restore.sh -m node_backup -o prepare
On Windows:
bkp_restore.bat -m node_backup -o prepare
Creating an Image Backup of the Original Host
This task creates an archive of an instance that includes the original Oracle home, oratab, central inventory, Windows registries and so forth. On UNIX, the command must be run from root. If you are performing a metadata repository or Infrastructure image backup, the database listener must be running. Run the following command to create an image backup of the original instance:
On UNIX:
bkp_restore.sh -m node_backup -o image_backup -P <archive path>
On Windows:
bkp_restore.bat -m node_backup -o image_backup -P <archive path>
After the command completes, the backup is placed in the directory specified in <archive path>.
The commands in this section restore a node on a new host after a loss of host. Before performing the following steps, ensure that all the prerequisites in Section 21.3.1, "Preparing to Use Loss of Host Automation" are fulfilled.
After unpacking the archive, ensure that the database flashback_recovery_area is the same as the original if it is located outside the ORACLE_HOME for the instance.
For an instance with a file-based repository, the dcm-daemon process should be up on the member nodes while restoring to the new host. After restoring the instance, for all member nodes edit the following line in ORACLE_HOME/dcm/config/dcmCache.xml:
<discoverer ip="host-name" discovery-port="repository-id"original="false" xmlns=""/>
In the preceding example, host-name is the name of the new host and repository-id is the id of the new host.
The following commands must be run in order.
Unpack the backup archive of the old node:
On UNIX, login as root:
cd /
tar -xvpf <archive_name>
On Windows:
jar -xvf <archive_name>
The following command restores Oracle Universal Installer related metadata such as oratab (UNIX), Windows registries, and central inventory on the new host. If multiple instances are to be restored, this operation should be performed only for the first instance. The command must be run as root on UNIX.
On UNIX:
bkp_restore.sh -m node_restore -o sys_init
On Windows:
bkp_restore.bat -m node_restore -o sys_init
The following command registers the instance with oratab and the central inventory, it also sets up daemon start/stop script by running root.sh on UNIX, or, on Windows, Windows services are created. The command must be run as root on UNIX.
On UNIX:
bkp_restore.sh -m node_restore -o inst_register
On Windows:
bkp_restore.bat -m node_restore -o inst_register
This command reconfigures the instance on the new host. This includes IP changing, database restore, database tempfile setup, config backup restore and so forth depending on the install type. Prior to running the command, run opmnctl shutdown and emctl stop iasconsole to ensure that opmn and Enterprise Manager processes are not using ports required by the reconfigure process. The command must be run as the owner of the instance. The path to the instance backups must be valid. If database RMAN logs error RMAN-06054 in the restore_repos log file, it should be treated as innocuous.
On UNIX:
bkp_restore.sh -m node_restore -o inst_reconfigure -t config_bkp_timestamp
On Windows:
bkp_restore.bat -m node_restore -o inst_reconfigure -t config_bkp_timestamp
Without a timestamp argument, this command shows all the available instance backups. For a successful completion of this operation, ensure that all the other required services are up and running if they do not belong to this instance. Those required services can include Oracle Identity Management, Oracle Application Server Metadata Repository and Infrastructure. If these services must be restored, they must be done in the proper order.
LOHA will not detect port conflicts on the new host. It is recommended that you do not run other applications using the same TCP ports that are to be used by the restored instance. Any port conflict will cause this operation to fail.
Business Intelligence Forms Installations
For Oracle Business Intelligence Forms installations, after the instance is restored to the new host, perform the following steps:
In the backup archive directory, find the archive config_bkp_<timestamp>.jar, where <timestamp> is the timestamp used in LOHA inst_reconfigure operation.
Unpack the archive into a temporary directory.
Copy temp_dir/j2ee/OC4J_BI_Forms/config/oc4j.properties to $ORACLE_HOME/j2ee/OC4J_BI_Forms/config/oc4j.properties .
Remove the temporary directory and restart the instance.
To restore a host with Identity Management to a new host with a different name, perform the following procedures:
Perform the steps in "Preparing to Use Loss of Host Automation".
Perform the steps in "Enabling Loss of Host Automation".
Perform steps 1 through 3 in "Restoring a Node on a New Host".
Create a backup copy of the configtool.xml.tmpl file. The file directory is ORACLE_HOME/chgip/config/. Save the backup copy to another directory. Edit the original configtool.xml.tmpl file and remove the following lines pertaining to the updateConfig parameter:
<ConfigTool Name="DCM" Desc="Distributed Configuration Manager" InstallType="Core">
   <Command>%ORACLE_HOME%\dcm\bin\dcmctl.bat</Command>
   <Parameter Name="" Value="updateConfig"/>
</ConfigTool>

<ConfigTool Name="DCM" Desc="Distributed Configuration Manager" InstallType="Portals">
   <Command>%ORACLE_HOME%\dcm\bin\dcmctl.bat</Command>
   <Parameter Name="" Value="updateConfig"/>
</ConfigTool>

<ConfigTool Name="DCM" Desc="Distributed Configuration Manager" InstallType="BIServices">
   <Command>%ORACLE_HOME%\dcm\bin\dcmctl.bat</Command>
   <Parameter Name="" Value="updateConfig"/>
</ConfigTool>

<ConfigTool Name="DCM" Desc="Distributed Configuration Manager" InstallType="Infrastructure_ID">
   <Command>%ORACLE_HOME%\dcm\bin\dcmctl.bat</Command>
   <Parameter Name="" Value="updateConfig"/>
</ConfigTool>

<ConfigTool Name="DCM" Desc="Distributed Configuration Manager" InstallType="Infrastructure">
   <Command>%ORACLE_HOME%\dcm\bin\dcmctl.bat</Command>
   <Parameter Name="" Value="updateConfig"/>
</ConfigTool>

<ConfigTool Name="DCM" Desc="Distributed Configuration Manager" InstallType="OCS">
   <Command>%ORACLE_HOME%\dcm\bin\dcmctl.bat</Command>
   <Parameter Name="" Value="updateConfig"/>
</ConfigTool>
Save the file, and then run the chgiphost script:
On UNIX:
ORACLE_HOME/chgip/scripts/chgiphost.sh -mid
On Windows:
ORACLE_HOME/chgip/scripts/chgiphost.bat -mid
Use the following commands to restore DCM managed components:
On UNIX:
bkp_restore.sh -m restore_config -F dcm-resyncforce
On Windows:
bkp_restore.bat -m restore_config -F dcm-resyncforce
Perform the following steps to start the Middle-tier instance.
Start OPMN and OPMN-managed processes:
ORACLE_HOME/opmn/bin/opmnctl startall
Start the Application Server Control Console:
ORACLE_HOME/bin/emctl start iasconsole
The chgiphost script must be run with the updateConfig parameter in ORACLE_HOME/chgip/config/configtool.xml.tmpl file. Use the original version of configtool.xml.tmpl file. Replace the modified version of this file (from step 4) with the backed-up copy.
Run the chgiphost script to update the host information for DCM-managed components:
chgiphost.sh -mid
When an instance of Oracle Application Server requires an image restore to correct a problem, you can use LOHA to recover the instance. Perform the following steps to recover the instance:
Completely shutdown the instance.
Perform step 1 of Section 21.3.3, "Restoring a Node on a New Host" to unpack the latest image backup of the instance.
Perform steps 3 and 4 of Section 21.3.3, "Restoring a Node on a New Host" to register and configure the instance.
If the instance has any dependencies on other instances of Oracle Application Server, the other instances must be up and running.