| Oracle® Application Server Enterprise Deployment Guide 10g Release 2 (10.1.2) B13998-07 |
|
 Previous |
 Next |
| Oracle® Application Server Enterprise Deployment Guide 10g Release 2 (10.1.2) B13998-07 |
|
 Previous |
 Next |
This chapter provides instructions for setting up authentication services. The following options exist for providing authentication services in Enterprise Deployment configurations:
If you are creating a Security Infrastructure for the myPortalCompany configuration shown in Figure 2-2, "Enterprise Deployment Architecture for myPortalCompany.com", or the myBIFCompany configuration shown in Figure 2-3, "Enterprise Deployment Architecture for myBIFCompany.com" you must configure OracleAS Single Sign-On on IDMHOST1 and IDMHOST2. Do not perform the steps in this section if you are configuring myJ2EECompany.
After the Data Tier is complete, follow these steps to install the Identity Management components (IDMHOST1 and IDMHOST2).
|
Note: You must configure the Load Balancing Router (login.mycompany.com) shown in Figure 5-17, "Identity Management Tier Configuration"for persistent HTTP sessions. |
Follow these steps to install Identity Management on IDMHOST1:
Ensure that the system, patch, kernel and other requirements are met. These are listed in the Oracle Application Server Quick Installation and Upgrade Guide in the the Oracle Application Server platform documentation library for the platform and version you are using.
Copy the staticport.ini file from the Disk1/stage/Response directory to the Oracle home directory.
Edit the staticport.ini file and uncomment these entries:
Oracle HTTP Server port = 7777
Oracle HTTP Server Listen port = 7777
Application Server Control port = 1810
|
Note: See Section B.3, "Using the Static Ports Feature with Oracle Universal Installer" for more information. |
Start the Oracle Universal Installer as follows:
On UNIX, issue this command: runInstaller
On Windows, double-click setup.exe
The Welcome screen appears.
Click Next.
On UNIX systems, the Specify Inventory Directory and Credentials screen appears.
Specify the directory you want to be the oraInventory directory and the operating system group that has permission to write to it.
Click Next.
On UNIX systems, a dialog appears, prompting you to run the oraInstRoot.sh script.
Open a window and run the script, following the prompts in the window.
Return to the Oracle Universal Installer screen and click Next.
The Specify File Locations screen appears with default locations for:
The product files for the installation (Source)
The name and path to an Oracle home (Destination)
|
Note: Ensure that the Oracle home directory path for IDMHOST1 is the same as the path to the Oracle home location of IDMHOST2. For example, if the path to the Oracle home on IDMHOST1 is:
then the path to the Oracle home on IDMHOST2 must be:
|
Specify the Destination Name and Path, if different from the default, and click Next.
The Select a Product to Install screen appears.
Figure 5-1 Oracle Universal Installer Select a Product to Install Screen
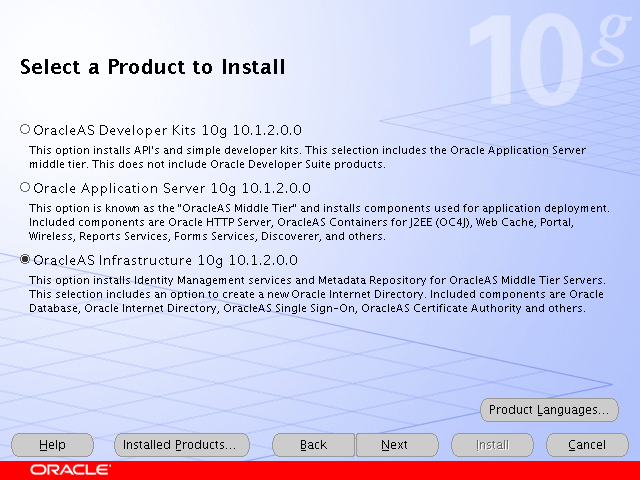
Select OracleAS Infrastructure 10g, as shown in Figure 5-1, and click Next.
The Select Installation Type screen appears.
Figure 5-2 Oracle Universal Installer Select Installation Type Screen
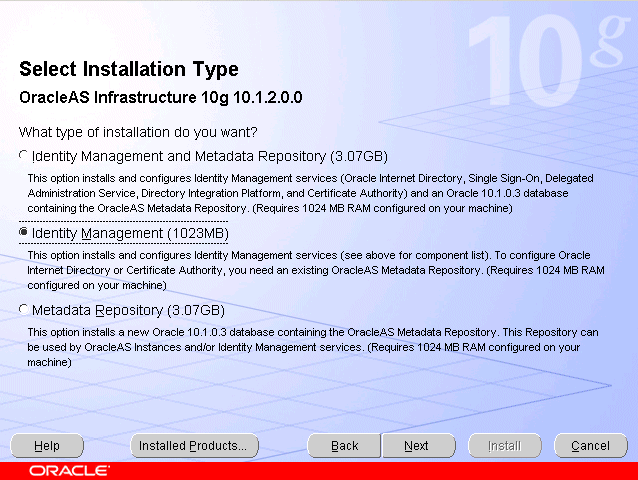
Select Identity Management, as shown in Figure 5-2, and click Next.
The Confirm Pre-Installation Requirements screen appears.
Ensure that the requirements are met and click Next.
The Select Configuration Options screen appears.
Figure 5-3 Oracle Universal Installer Select Configuration Options Screen
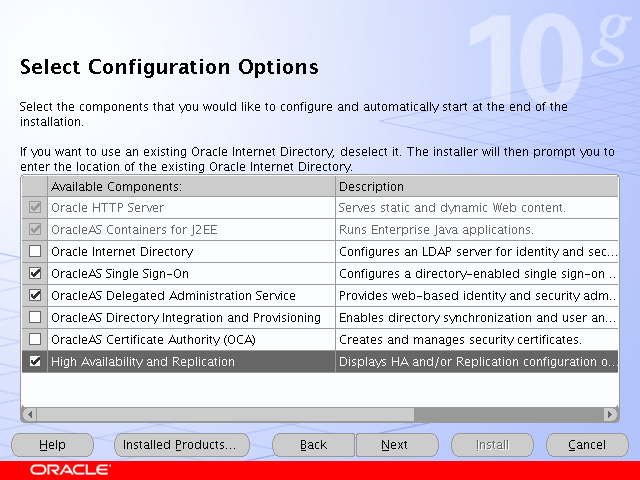
Select OracleAS Single Sign-On, Oracle Delegated Administration Services, and High Availability and Replication, as shown in Figure 5-3.
The Specify Port Configuration Options screen appears.
Select Manual, specify the location of the staticports.ini file, and click Next.
The Select High Availability Option screen appears.
Figure 5-4 Oracle Universal Installer Select High Availability Option Screen
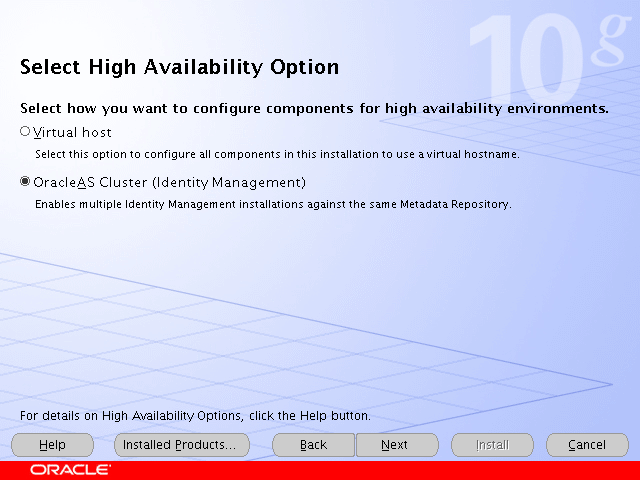
Select OracleAS Cluster (Identity Management), as shown in Figure 5-4, and click Next.
The Create or Join an OracleAS Cluster (Identity Management) screen appears.
Figure 5-5 Oracle Universal Installer Create or Join an OracleAS Cluster (Identity Management) Screen
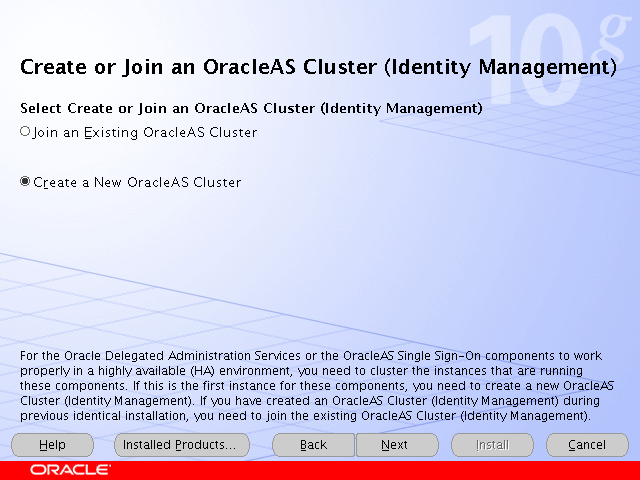
Select Create a New OracleAS Cluster, as shown in Figure 5-5, and click Next.
The Specify New OracleAS Cluster Name screen appears.
Figure 5-6 Oracle Universal Installer Specify New OracleAS Cluster Name Screen
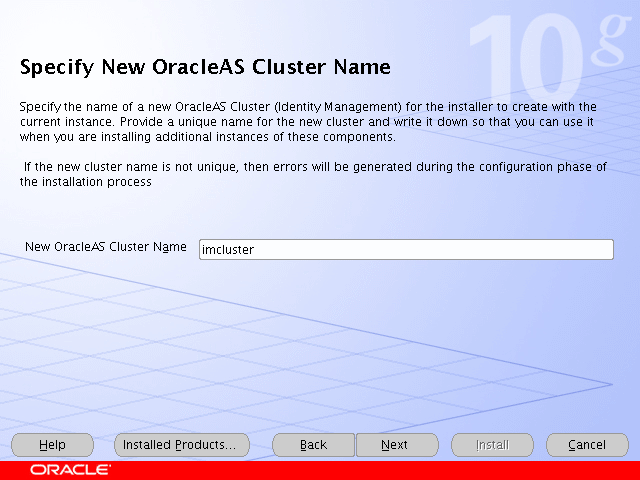
Complete the New OracleAS Cluster Name field with a name for the cluster, as shown in Figure 5-6, and click Next.
|
Note: Write down the cluster name. You will need to provide it in subsequent installations of instances that will join the cluster. |
The Specify LDAP Virtual Host and Ports screen appears.
Figure 5-7 Oracle Universal Installer Specify LDAP Virtual Host and Ports Screen
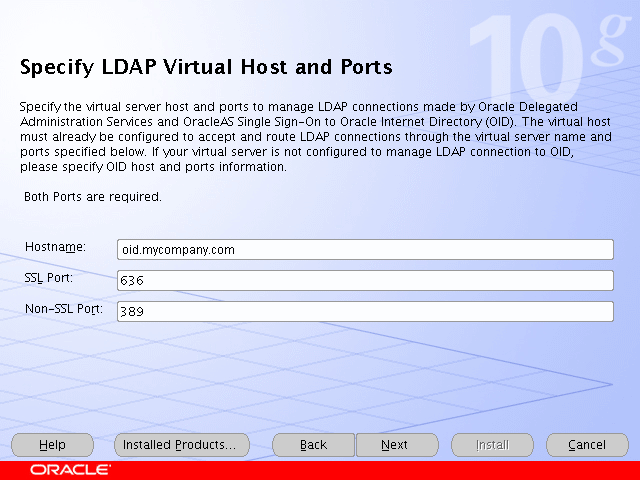
Enter the name of the Load Balancing Router, the SSL port, and the non-SSL port, as shown in Figure 5-7.
Click Next.
The Specify OID Login screen appears.
Complete the fields and click Next.
The Specify HTTP Load Balancer Host and Listen Ports screen appears.
Figure 5-8 Oracle Universal Installer Specify HTTP Load Balancer Host and Listen Ports Screen
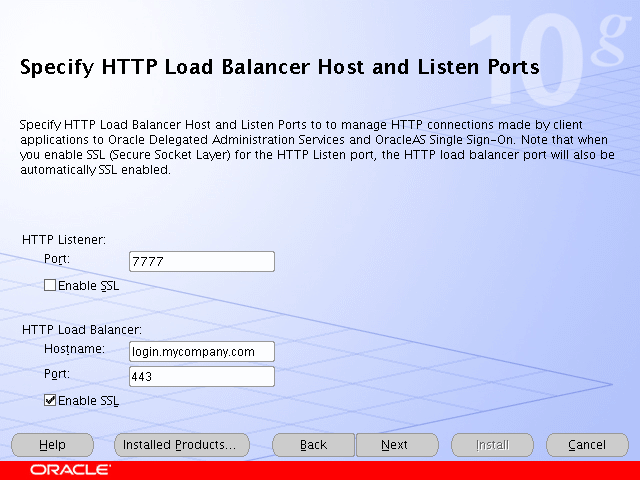
Enter the listen port of the HTTP Server and the host name and port of the HTTP Load Balancer, enabling the SSL option for the load balancer, as shown in Figure 5-8.
Click Next.
The Specify Instance Name and ias_admin Password screen appears.
Specify the instance name and password and click Next.
The Summary screen appears.
Review the selections to ensure that they are correct (if they are not, click Back to modify selections on previous screens), and click Install.
The Install screen appears with a progress bar. On UNIX systems, a dialog opens prompting you to run the root.sh script.
Open a window and run the script.
The Configuration Assistants screen appears. Multiple configuration assistants are launched in succession; this process can be lengthy. When it completes, the End of Installation screen appears.
Click Exit, and then confirm your choice to exit.
Follow these steps to test the first Identity Management installation with the Oracle Internet Directory:
Stop all components on OIDHOST1, using this command:
ORACLE_HOME/opmn/bin/opmnctl stopall
Ensure that all components on OIDHOST2 are running:
ORACLE_HOME/opmn/bin/opmnctl status
Access the following URLs:
https://login.mycompany.com/pls/orasso
https://login.mycompany.com/oiddas
Follow these steps to install Identity Management on IDMHOST2:
Ensure that the system, patch, kernel and other requirements are met. These are listed in the Oracle Application Server Quick Installation and Upgrade Guide in the the Oracle Application Server platform documentation library for the platform and version you are using.
Copy the staticport.ini file from the Disk1/stage/Response directory to the Oracle home directory.
Edit the staticport.ini file and uncomment these entries:
Oracle HTTP Server port = 7777
Oracle HTTP Server Listen port = 7777
Application Server Control port = 1810
|
Note: See Section B.3, "Using the Static Ports Feature with Oracle Universal Installer" for more information. |
Start the Oracle Universal Installer as follows:
On UNIX, issue this command: runInstaller
On Windows, double-click setup.exe
The Welcome screen appears.
Click Next.
On UNIX systems, the Specify Inventory Directory and Credentials screen appears.
Specify the directory you want to be the oraInventory directory and the operating system group that has permission to write to it.
Click Next.
On UNIX systems, a dialog appears, prompting you to run the oraInstRoot.sh script.
Open a window and run the script, following the prompts in the window.
Return to the Oracle Universal Installer screen and click Next.
The Specify File Locations screen appears with default locations for:
The product files for the installation (Source)
The name and path to an Oracle home (Destination)
|
Note: Ensure that the Oracle home directory path for IDMHOST1 is the same as the path to the Oracle home location of IDMHOST2. For example, if the path to the Oracle home on IDMHOST1 is:
then the path to the Oracle home on IDMHOST2 must be:
|
Specify the Destination Name and Path, if different from the default, and click Next.
The Select a Product to Install screen appears.
Figure 5-9 Oracle Universal Installer Select a Product to Install Screen

Select OracleAS Infrastructure 10g, as shown in Figure 5-9, and click Next.
The Select Installation Type screen appears.
Figure 5-10 Oracle Universal Installer Select Installation Type Screen

Select Identity Management as shown in Figure 5-10, and click Next.
The Confirm Pre-Installation Requirements screen appears.
Ensure that the requirements are met and click Next.
The Select Configuration Options screen appears.
Figure 5-11 Oracle Universal Installer Select Configuration Options Screen

Select OracleAS Single Sign-On, Oracle Delegated Administration Services, and High Availability and Replication, as shown in Figure 5-11.
Click Next.
The Select High Availability Option screen appears.
Figure 5-12 Oracle Universal Installer Select High Availability Option Screen

Select OracleAS Cluster (Identity Management), as shown in Figure 5-12, and click Next.
The Create or Join an OracleAS Cluster (Identity Management) screen appears.
Figure 5-13 Oracle Universal Installer Create or Join an OracleAS Cluster (Identity Management) Screen
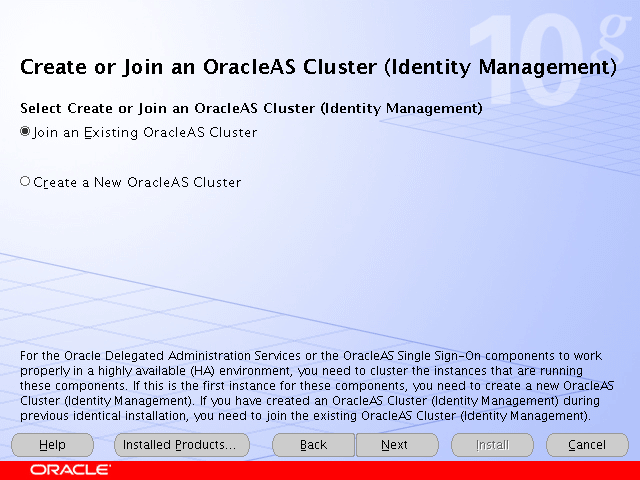
Select Join an Existing OracleAS Cluster, as shown in Figure 5-5, and click Next.
The Specify Existing OracleAS Cluster Name screen appears.
Figure 5-14 Oracle Universal Installer Specify Existing OracleAS Cluster Name Screen
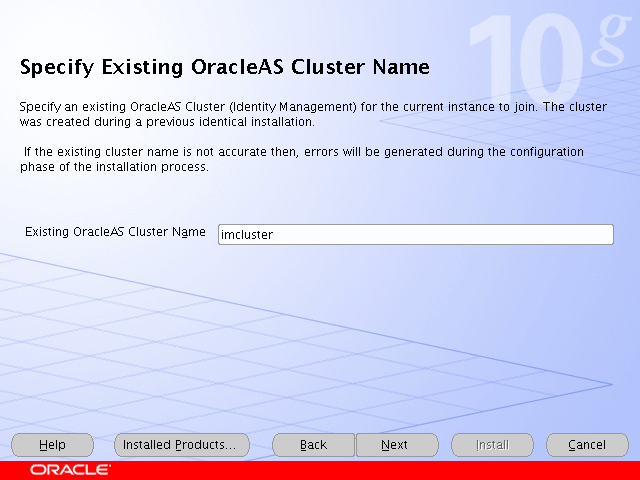
Complete the Existing OracleAS Cluster Name field with the name you provided for the cluster when installing the first instance, as shown in Figure 5-6, and click Next.
The Specify LDAP Virtual Host and Ports screen appears.
Figure 5-15 Oracle Universal Installer Specify LDAP Virtual Host and Ports Screen

Enter the name of the Load Balancing Router, the SSL port, and the non-SSL port, as shown in Figure 5-7.
Click Next.
The Specify OID Login screen appears.
Complete the fields and click Next.
The Specify HTTP Load Balancer Host and Listen Ports screen appears.
Figure 5-16 Oracle Universal Installer Specify HTTP Load Balancer Host and Listen Ports Screen

Enter the listen port of the HTTP Server and the host name and port of the HTTP Load Balancer, enabling the SSL option for the load balancer, as shown in Figure 5-16.
Click Next.
The Specify Instance Name and ias_admin Password screen appears.
Specify the instance name and password and click Next.
The Summary screen appears.
Review the selections to ensure that they are correct (if they are not, click Back to modify selections on previous screens), and click Install.
The Install screen appears with a progress bar. On UNIX systems, a dialog opens prompting you to run the root.sh script.
Open a window and run the script.
The Configuration Assistants screen appears. Multiple configuration assistants are launched in succession; this process can be lengthy. When it completes, the End of Installation screen appears.
Click Exit, and then confirm your choice to exit.
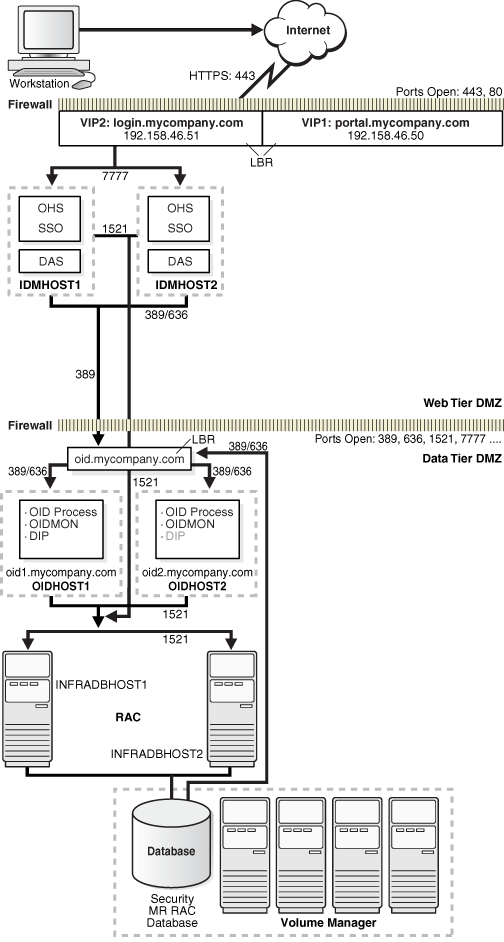
The Identity Management configuration is now as shown in Figure 5-17.
Figure 5-17 Identity Management Tier Configuration
After both Identity Management configurations are complete, test the configurations as follows:
Stop all components on APPHOST1, using this command:
ORACLE_HOME/opmn/bin/opmnctl stopall
Ensure that all components on APPHOST2 are running, using this command:
ORACLE_HOME/opmn/bin/opmnctl status
Access the following URLs from two browsers:
https://login.mycompany.com/pls/orasso
https://login.mycompany.com/oiddas
Start all components from APPHOST1, using this command:
ORACLE_HOME/opmn/bin/opmnctl startall
Stop all components on APPHOST2, using this command:
ORACLE_HOME/opmn/bin/opmnctl stopall
Ensure that the login session is still valid for the orasso and oiddas logins.
The Oracle Application Server Java Authentication and Authorization Service (JAAS) Provider (also referred to as JAZN) LDAP-based provider is used for authentication and authorization to the OC4J applications.
In the myJ2EECompany configuration, this provider is used without Oracle Application Server Single Sign-On, because communication to the data tier is prohibited (Oracle Application Server Single Sign-On requires Portal Services access to the database). This section explains how to configure the Oracle Application Server instances on the application tier to use the JAZN LDAP provider.
For instructions on how to use Oracle Enterprise Manager 10g to manage the data in this provider, see Chapter 8 in the Oracle Application Server Containers for J2EE Security Guide.
You will need to follow the steps in this section on both Oracle Application Server instances (APPHOST1 and APPHOST2) that will use the JAZN LDAP provider. Ensure that you specify the same Oracle Internet Directory computer for APPHOST1 and APPHOST2—that is, the load balancing router for OIDHOST1 and OIDHOST2.
Ensure that the middle tier instance is stopped and the Oracle Internet Directory instance is running. Start the Oracle Enterprise Manager 10g Application Server Control Console, if necessary, and perform these steps:
On the Application Server page, click the Infrastructure link.
The Infrastructure page appears.
In the Identity Management section, click Configure.
The Configure Identity Management: Internet Directory page appears.
In the Host field, enter the host name of the Load Balancing Router (for example, oid.mycompany.com, inFigure 2-1).
In the Port field, enter 389.
Click Next.
The Configure Identity Management: Login page appears.
In the User Name field, enter the name of the user (in the IASAdmins group) that can log in to Oracle Internet Directory.
In the Password field, enter the user's password.
Click Next.
The Configure Identity Management: Validation page appears.
Ensure that the Oracle Internet Directory Host and Oracle Internet Directory Port values are correct.
If the values are correct, click Finish. (If not, click Back, and then click Back again to navigate to the Configure Identity Management: Internet Directory page and correct the Host and Port fields.)
A message appears notifying you that the configuration was successful.
To use the OracleAS JAAS Provider, you must populate Oracle Internet Directory with certain user entries. The Oracle Application Server Containers for J2EE Security Guide, section titled "Creating Administrative Users and Groups for JAZN/LDAP", provides instructions for loading the entries.