|
Oracle® Application Server Integration InterConnect User's Guide
10g Release 2 (10.1.2) B14069-02 |
|
 Previous |
 Next |
|
Oracle® Application Server Integration InterConnect User's Guide
10g Release 2 (10.1.2) B14069-02 |
|
 Previous |
 Next |
This appendix provides an overview of the Interconnect Interoperability feature with plugin for BPEL (BPEL Plug-in) and how it enables interaction between Oracle BPEL Process Manager and OracleAS Integration InterConnect. It contains the following topics:
The BPEL Plug-in bridges Oracle BPEL Process Manager and OracleAS Integration InterConnect. You can use the BPEL processes defined in Oracle BPEL Process Manager for business process automation requirements in OracleAS Integration InterConnect.
Following are the benefits of the BPEL Plug-in:
BPEL processes defined in Oracle BPEL Process Manager can be used for business process automation requirements in OracleAS Integration InterConnect.
Oracle BPEL Process Manager can be used with existing InterConnect based integration solutions.
J2CA adapters plugged into Oracle BPEL Process Manager can be integrated with OracleAS Integration InterConnect.
This section contains the following topics:
This section describes the various topologies in which Oracle BPEL Process Manager and InterConnect hubs can exist and how the BPEL Plug-in enables the interaction between multiple BPEL servers and InterConnect hubs. It contains following scenarios:
Scenario 1: One BPEL Server Interacting with One InterConnect Hub
Scenario 2: One BPEL Server Interacting with Two InterConnect Hubs
Scenario 3: Two BPEL Servers Interacting with One InterConnect Hub
Scenario 4: One BPEL Server in Load-Balancing Mode Interacting with One InterConnect Hub
In this scenario, one instance of the BPEL Plug-in handles all interactions between the BPEL server and the InterConnect hub as shown in Figure A-1. To implement this scenario, create one application for the BPEL server in iStudio and define all interactions in this application. The BPEL Plug-in publishes and subscribes to the InterConnect hub queue with the application name representing the BPEL server.
Figure A-1 One BPEL Server Interacting with One InterConnect Hub

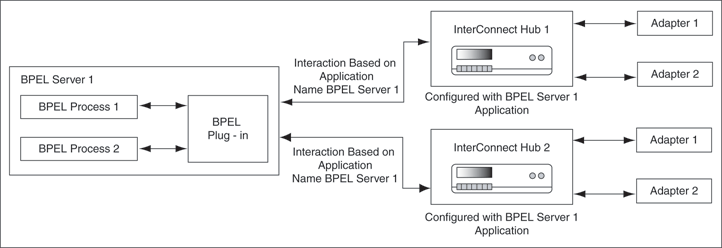
In this scenario, one instance of the BPEL Plug-in handles all interactions between the BPEL server and both the InterConnect hubs as shown in Figure A-2. To implement this scenario, create one application for the BPEL server in each InterConnect hub. The BPEL Plug-in publishes and subscribes to both the InterConnect hub queues using the corresponding application name.
Figure A-2 One BPEL Server Interacting with Two InterConnect Hubs
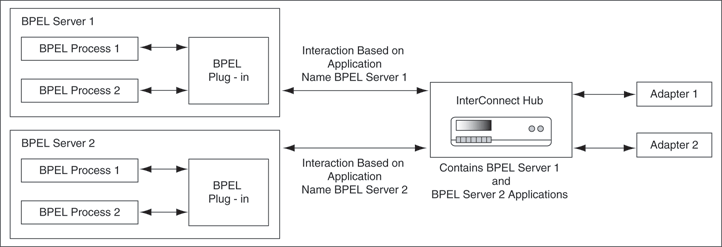
In this scenario, there are two instances of the BPEL Plug-in as shown in Figure A-3. To implement this scenario, create two applications in iStudio. Each application represents one BPEL server. The BPEL Plug-in publishes and subscribes to the InterConnect hub queue by using the corresponding application name.
Figure A-3 Two BPEL Servers Interacting with One InterConnect Hub
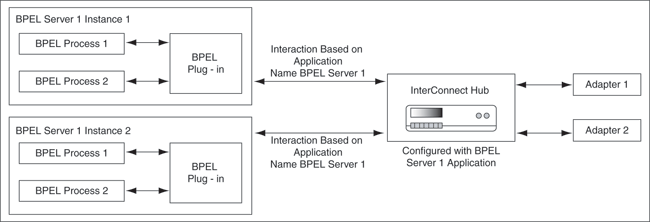
In this scenario, there are two instances of a BPEL server running in load-balancing mode as shown in Figure A-4. These instances are identical during run time. Thus, two instances of the Interconnect Interoperability feature with plugin for BPEL are created. Both instances cater to the same BPEL processes and publish or subscribe to the InterConnect hub queue with the same application name. Although both the instances subscribe to hub queue with the same application name but Advanced Queuing (AQ) ensures that the message is delivered to only one of the them.
If more than one subscriber have subscribed with the same name then AQ delivers the message to only one of them.
Figure A-4 One BPEL Server in Load-Balancing Mode Interacting with One InterConnect Hub
When the BPEL Plug-in accesses the metadata for the first time, it is stored locally in cache. The BPEL Plug-in performs the following tasks to create and refresh the local cache of adapter metadata:
When the connection is created for InterConnect hub, the BPEL Plug-in checks whether a local cache is available for that particular InterConnect hub. If a local cache is not available, then a local cache for that particular InterConnect hub is created. To create the local cache, the adapter connects to the InterConnect repository and retrieves all the relevant metadata.
A queue is created during the creation of the InterConnect hub schema to hold the local cache refresh notifications for the BPEL Plug-in.
The BPEL Plug-in creates a subscribing thread for this queue to receive the Refresh local cache message. On receiving the message, it refreshes the local cache with the new metadata from the InterConnect repository.
Refresh Local Metadata is a new feature available with iStudio to refresh the metadata of BPEL Plug-in. You can refresh the metadata of the BPEL Plug-in by right clicking on a BPEL application in iStudio and selecting Refresh Local Metadata option. This triggers the BPEL Plug-in to get the current metadata from InterConnect and store it locally. This is similar to Sync adapters functionality available with InterConnect adapters.
This section describes the types of interaction between Oracle BPEL Process Manager and OracleAS Integration InterConnect. It contains the following topics:
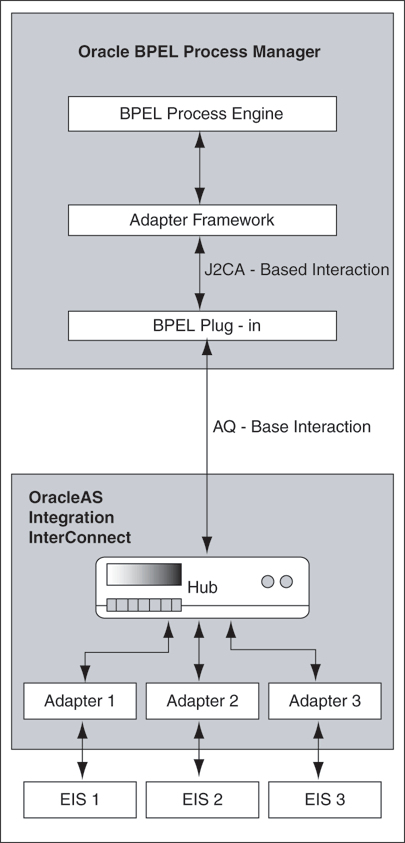
The BPEL Plug-in is deployed in the OC4J container of the Oracle BPEL Process Manager. Oracle BPEL Process Manager processes communicate with the BPEL Plug-in through adapter framework.
When the BPEL Plug-in receives a message from Oracle BPEL Process Manager, it converts the message into a format supported by Interconnect. The BPEL Plug-in identifies the recipient list by looking up the InterConnect metadata and queues the message to the InterConnect hub queue. The BPEL Plug-in directly interacts with the InterConnect Hub. However, when the BPEL Plug-in receives a message from the InterConnect hub, then it translates the received message into the XMLRecord object and delivers it to the BPEL process that subscribed to the message.
Figure A-5 displays the interaction process between Oracle BPEL Process Manager and OracleAS Integration InterConnect.
|
Note: TheXMLRecord object contains two record elements: one for the header and one for the payload.
|
Figure A-5 Interaction Process between Oracle BPEL Process Manager and OracleAS Integration InterConnect
In outbound interaction, Oracle BPEL Process Manager sends a message to OracleAS Integration InterConnect. This involves an invoke activity in Oracle BPEL Process Manager and a publish event in OracleAS Integration InterConnect as shown in Figure A-6.
Figure A-6 Outbound Interaction between Oracle BPEL Process Manager and OracleAS Integration InterConnect
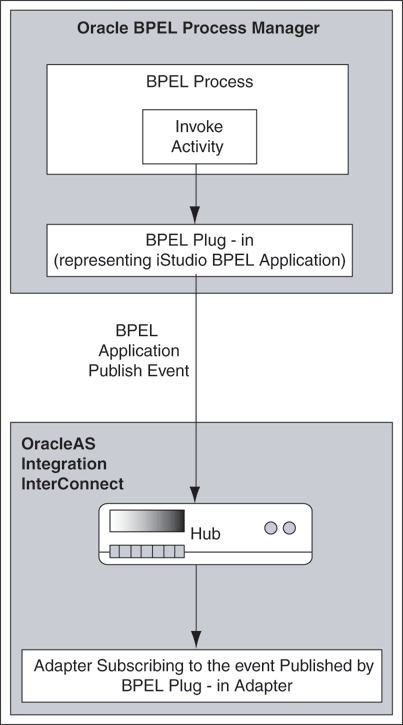
An outbound interaction between Oracle BPEL Process Manager and OracleAS Integration InterConnect consists of the following steps:
The BPEL Plug-in receives a message from a BPEL process through invoke activity.
The BPEL Plug-in converts the message into an InterConnect message format so that it can be added to the hub queue.
The BPEL Plug-in adds appropriate header to the message, based on the type of the message.
Mapping between the Oracle BPEL Process Manager message and the InterConnect message is established based on the interaction specification parameters such as BusinessObjectName, EventName, and EventVersion defined at design time.
|
Note: Mapping between the Oracle BPEL Process Manager message and the InterConnect message is established based on the values specified at design time. Thus, you should not change the data in generated WSDL files. |
The BPEL Plug-in uses the local cache of adapter metadata to find a list of the recipients of the message and adds it to the recipient list of the message. It also evaluates the content based routing (CBR) conditions specified in the InterConnect repository before publishing the message to the hub queue.
|
See Also: "Local Cache of Adapter Metadata Concepts" for more information about how the BPEL Plug-in creates the local cache of adapter metadata. |
The BPEL Plug-in queues the message to the InterConnect hub queue by using the Oracle AQ APIs.
In inbound interaction, OracleAS Integration InterConnect sends a message to Oracle BPEL Process Manager. This involves a receive activity in Oracle BPEL Process Manager and a subscribe event in OracleAS Integration InterConnect as shown in Figure A-7.
Figure A-7 Inbound Interaction Between Oracle BPEL Process Manager and OracleAS Integration InterConnect
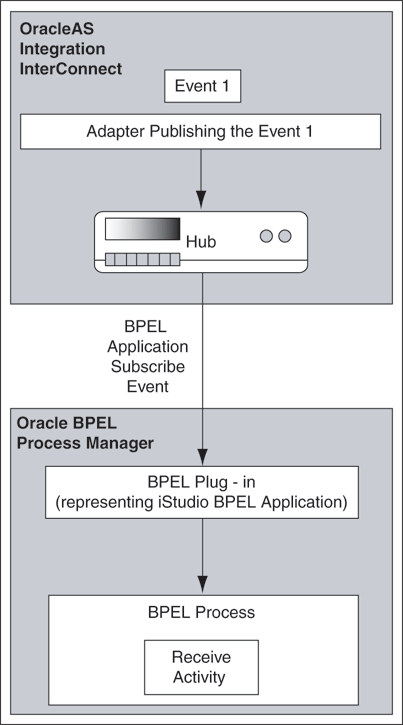
An inbound interaction between Oracle BPEL Process Manager and OracleAS Integration InterConnect consists of the following steps:
The BPEL Plug-in subscribes to the hub queue with the application name configured in the oc4j-ra.xml file. The task of subscribing to a hub queue is performed during the endpoint activation call to the adapter. The BPEL Plug-in keeps a track of all the subscribed hub queues so that a hub queue is not subscribed more than once for the same application.
The BPEL Plug-in receives all the events that the corresponding application in OracleAS Integration InterConnect is subscribing to.
The BPEL Plug-in translates the received events into the XMLRecord object. The received event is given to an endpoint by matching the value of BusinessObjectName, Eventname, and EventVersion parameters of the received message to values defined for endpoints.
The BPEL Plug-in uses the onMessage method to pass the received event to a BPEL process.
A Request/Reply interaction between Oracle BPEL Process Manager and OracleAS Integration InterConnect involves:
invoke and receive activity in Oracle BPEL Process Manager (for asynchronous request/reply)
receive and reply activity in Oracle BPEL Process Manager (for synchronous request/reply)
invoke procedure and implement procedures in OracleAS Integration InterConnect
There can be two scenarios for request/reply interaction between Oracle BPEL Process Manager and OracleAS Integration InterConnect.
Scenario 1: BPEL Process Sending a Request and Receiving a Reply
In this scenario, a BPEL process sends a request to the InterConnect hub and receives a reply asynchronously. This interaction involves using invoke and receive activity in Oracle BPEL Process Manager and invoke procedure in OracleAS Integration InterConnect as shown in Figure A-8.
Figure A-8 BPEL Process Sending a Request and Receiving a Reply
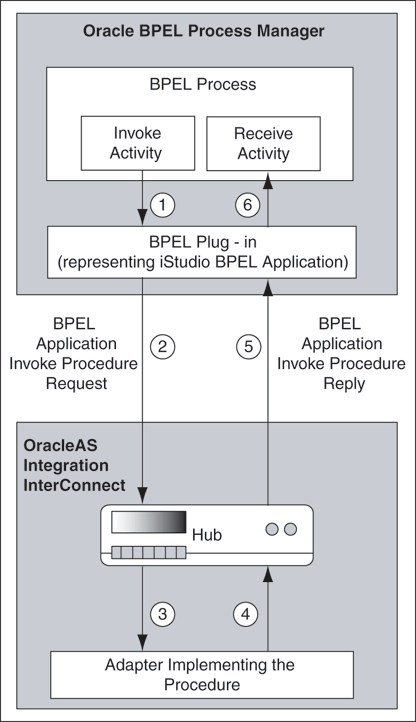
When a BPEL process sends a request to InterConnect and receives a reply, the following steps are performed:
The BPEL Plug-in receives a message from a BPEL process. It checks the value of ICMsgType to find whether the message should be sent as a simple message or a request message.
The BPEL Plug-in converts the message into an InterConnect message object.
The BPEL Plug-in uses the local cache of adapter metadata to find a list of the recipients of the message and adds it to the recipient list of the message.
The BPEL Plug-in adds a request specific header to the message so that the receiving adapter can identify it is a request message. It also adds a correlation id element in the message header and this element is used to map a response to its request.
The BPEL Plug-in receives the response from InterConnect and translates it to the XMLRecord object. The response for a request contains the correlation id in its header. The BPEL Plug-in extracts the correlation id element and puts it in the inbound header of the message, which will be delivered to message endpoints.
The BPEL Plug-in invokes the onMessage method of an endpoint to deliver the received messages to a BPEL process.
Scenario 2: BPEL Process Receiving a Request and Sending a Reply
In this scenario, the BPEL process receives a request from InterConnect and sends a reply to InterConnect synchronously. This interaction involves the receive and reply activity in Oracle BPEL Process Manager and the implement procedure in OracleAS Integration InterConnect as shown in Figure A-9.
Figure A-9 BPEL Process Receiving a Request and Sending a Reply
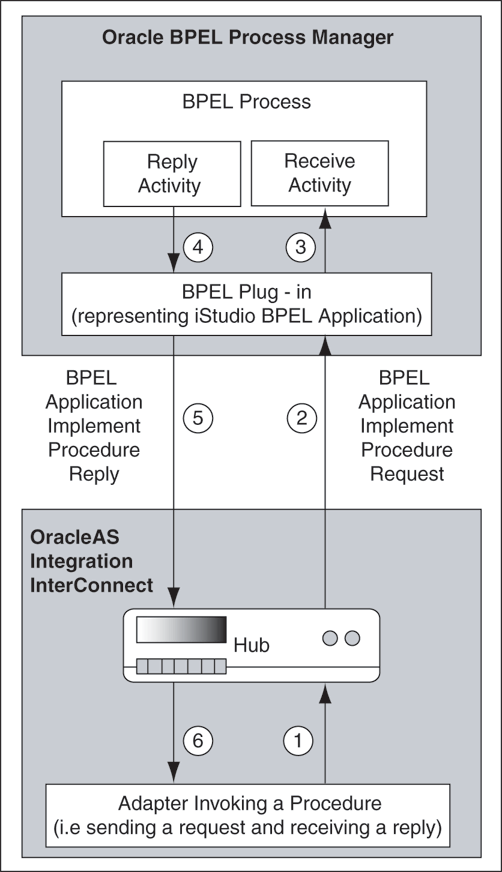
When the BPEL process receives a request from OracleAS Integration InterConnect and sends a reply, the following steps are performed:
The BPEL Plug-in receives the request message from InterConnect.
The BPEL Plug-in converts the message into the XMLRecord object by Oracle BPEL Process Manager. The request message contains the correlation id in its header. The BPEL-IC adapter extracts the correlation id and puts it in the inbound header of the message, which will be delivered to the message endpoints.
The BPEL Plug-in invokes the onMessage method to deliver the received message to a BPEL process.
The BPEL Plug-in receives the response from BPEL process through WSIF handler using Java 2 Connector (J2C) extensions.
The BPEL Plug-in converts the received response to an InterConnect message object. It also identifies the list of recipients for this response message and adds them to the recipient list of the message.
The BPEL Plug-in adds a response specific header to the message so that the receiving adapter can identify it is a response message. It also adds a correlation id element in the message header.
The BPEL Plug-in adds the response message to the InterConnect hub queue using the Oracle JMS APIs.
When deploying a BPEL process from standalone BPEL server to a middle-tier BPEL server on same host, you need to manually update the port parameter in the bpel.xml file. The reason being that standalone installation and the middle-tier insallation use different port numbers.
However, when deploying a BPEL process from standalone BPEL server to a middle-tier BPEL server on a different host, you need to manually update the port and the host parameters in the bpel.xml file. This is required because the host and port of the BPEL server on which the BPEL process was developed might be different from the one where it is getting moved.
Perform the following one-time configuration tasks for the integration scenario between Oracle BPEL Process Manager and OracleAS Integration InterConnect:
In Oracle BPEL Process Manager, add JNDI locations of connection factories for the various InterConnect hubs along with the connection information and application name in oc4j-ra.xml of the deployed BPEL Plug-in. Edit the oc4j-ra.xml file located in ORACLE_BPELHOME/integration/bpelpm/ orabpel/system/appserver/OC4J/J2EE/home/application-deployements/default/ICAdapter for the following changes:
The location of the connection factory.
<connector-factory location="eis/ICAdapter" connector-name="Interconnect Adapter">
The name of the application.
<config-property name="applicationName" value="BPELServer"/>
The path of the repository.
<config-property name="connectionString"
value="jdbc:oracle:thin:@HostName:PortNo:SID"/>
The user name of the repository.
<config-property name="userName" value="ichub904"/>
The password of the repository.
<config-property name="password" value="ichub904"/>
The name of the repository.
<config-property name="repoName" value="InterConnectRepository"/>
In the application.xml file located in the BPEL_HOME/integration/orabpel/system/appserver/oc4j/j2ee/home/config directory, specify the path of the oai.jar file of the Interconnect to the BPEL server classpath. For example,
<library path="C:\oracle\ORACLEMIDDLETIER\integration\interconnect\lib\oai.jar"/>
Specify whether your InterConnect repository is CORBA-based or RMI-based in the pc.properties file located in the OracleBPELPMHOME\integration\orabpel\system\services\config\ directory.
If your InterConnect repository is CORBA-based then specify the value of oracle.tip.adapter.ic.repoConnMode parameter in the pc.properties file as CORBA else specify the value as RMI. The default value of this parameter is RMI.
|
Note: From InterConnect release 10.1.2.0.1, the repository is RMI-based. Prior to InterConnect release 10.1.2.0.1, the repository is CORBA-based. |
After configuration, you need to restart the InterConnect repository.
|
Note: For using BPEL Plug-in with Oracle JDeveloper, the Oracle BPEL Process Manager should be up and running. This is because the servlet which serves the URLs in WSIL browser is deployed in the BPEL Server and will not work if the BPEL server is not running. |
This section describes how to design and execute the following integration scenario:
OracleAS Integration InterConnect FTP adapter publishes a NewCustomer event to the InterConnect hub queue.
A BPEL process subscribes to the NewCustomer event through BPEL Plug-in.
This event goes through a single-level human workflow approval.
After approval, the BPEL process publishes the AddCustomer event to the InterConnect hub queue.
OracleAS Integration InterConnect Database adapter subscribes to the AddCustomer event and inserts the approved customer data in the database.
The figure provides an overview of this scenario.
This scenario consists of the following steps:
This example assumes that you are familiar with basic BPEL constructs, such as activities and partner links, and JDeveloper environment for creating and deploying BPEL Process.
Creating the XSD Files
You need to create the following files for this use case:
AddCustomerCommonView.xsd: Use the following code to create the file
<?xml version="1.0"?>
  <schema targetNamespace=
   "http://oracle.com/interconnect/customer/event/addCustomer"
    xmlns="http://www.w3.org/2001/XMLSchema"
    xmlns:ns1="http://oracle.com/interconnect/customer/event/addCustomer">
         <element name="Customer" type="ns1:customerType"/>
         <complexType name="customerType">
            <sequence>
                 <element name="id" type="string"/>
                 <element name="title" type="string"/>
                 <element name="name" type="string"/>
                 <element name="email" type="string"/>
                 <element name="street" type="string"/>
                 <element name="city" type="string"/>
                 <element name="state" type="string"/>
                 <element name="zip" type="string"/>
            </sequence>
         </complexType>
  </schema>
NewCustomerCommonView.xsd: Use the following code to create the file:
<?xml version="1.0"?>
  <schema targetNamespace=
   "http://oracle.com/interconnect/customer/event/newCustomer"
    xmlns="http://www.w3.org/2001/XMLSchema"
    xmlns:ns1="http://oracle.com/interconnect/customer/event/newCustomer">
         <element name="Customer" type="ns1:customerType"/>
         <complexType name="customerType">
            <sequence>
                 <element name="ID" type="string"/>
                 <element name="Title" type="string"/>
                 <element name="FirstName" type="string"/>
                 <element name="LastName" type="string"/>
                 <element name="Email" type="string"/>
                 <element name="Address" type="ns1:addressType"/>
            </sequence>
         </complexType>
         <complexType name="addressType">
            <sequence>
                 <element name="Street" type="string"/>
                 <element name="City" type="string"/>
                 <element name="State" type="string"/>
                 <element name="Zip" type="string"/>
            </sequence>
         </complexType>
  </schema>
NewCustomerFileAppView.xsd:
<?xml version="1.0"?>
  <schema targetNamespace=
   "http://oracle.com/interconnect/customer/event/newCustomer"
    xmlns="http://www.w3.org/2001/XMLSchema"
    xmlns:ns1="http://oracle.com/interconnect/customer/event/newCustomer">
         <element name="Customer" type="ns1:customerType"/>
         <complexType name="customerType">
            <sequence>
                 <element name="ID" type="string"/>
                 <element name="Action" type="string"/>
                 <element name="Name" type="string"/>
                 <element name="Addr" type="ns1:addressType"/>
            </sequence>
         </complexType>
         <complexType name="addressType">
            <sequence>
                 <element name="Street" type="string"/>
                 <element name="City" type="string"/>
                 <element name="State" type="string"/>
                 <element name="Zip" type="string"/>
            </sequence>
         </complexType>
  </schema>
Creating the DBAPP Schema
In addition, run the following SQL script:
/* ************************************
   Create DBAPP Schema
   ************************************ */
CREATE USER          DBAPP
PROFILE              DEFAULT
IDENTIFIED BY        WELCOME1
DEFAULT TABLESPACE   USERS
TEMPORARY TABLESPACE TEMP
ACCOUNT UNLOCK;
/* ************************************
   Grant Privileges to DBAPP Schema
   ************************************ */
GRANT RESOURCE               TO DBAPP;
GRANT CONNECT                TO DBAPP;
GRANT EXECUTE ON  DBMS_AQ    TO DBAPP;
GRANT EXECUTE ON  UTL_RAW    TO DBAPP;
GRANT EXECUTE ON  DBMS_AQADM TO DBAPP;
GRANT EXECUTE ON  DBMS_AQIN  TO DBAPP;
GRANT EXECUTE ANY PROCEDURE  TO DBAPP;

/* ************************************
   Create DBAPP.Customer Table
   ************************************ */
CREATE TABLE DBAPP.Customer_table
 (
   CustomerId     NUMBER NOT NULL,
   FirstName      VARCHAR2(30),
   LastName       VARCHAR2(30),
   Title          VARCHAR2(30),
   BusinessName   VARCHAR2(255),
   CustomerType   VARCHAR2(1),
   EmailAddress   VARCHAR2(255),
   Address        VARCHAR2(30),
   City           VARCHAR2(300),
   State          VARCHAR2(30),   Zip            NUMBER
 )
/
In addition, your Oracle BPEL Process Manager should be configured for use with BPEL Plug-in. See AppendixA, "Configuration" for more information.
To create a common view in iStudio:
From the File menu, select New Project. The New Project dialog box is displayed.
Enter ICInteroperability in the Project Name field and click OK. The Hub Information dialog box is displayed.
Enter information in the following fields:
Hub database username: The name of the hub database user.
Hub database password: The password associated with the hub database user.
Hub database url: The URL of the database in the following format:
machine name:port number:database sid
In iStudio, click ICInteroperability, Common View, and then click Business Object.
Right-click Business Object and select New. The Create Business Object dialog box is displayed.
Enter Customer in the Business Object Name field.
In iStudio, click Customer and then click Event.
Right-click Event and select New. The Create Event dialog box is displayed.
Perform the following steps in the Create Event dialog box:.
Enter NewCustomer in the Event Name field.
Click Import, XML, XSD and then Local File System.
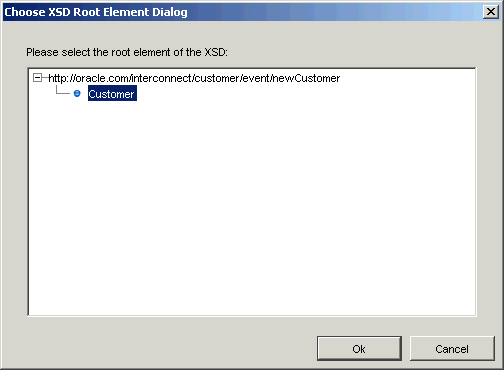
Select NewCustomerCommonView.xsd and click OK. The Choose Root Element dialog box is displayed.
Select Customer as root element of the XSD as shown in Figure A-11 and then click OK.
Figure A-11 Choose Root Element Dialog box
Click Save in the Create Event dialog box.
Repeat steps 7 to 10 to create another event AddCustomer by using the file AddCustomerCommonView.xsd.
To create an FTP application that publishes the NewCustomer event:
In iStudio, right-click Applications, and select New. The Create Application dialog box is displayed.
Enter the FTPAPP in the Application Name field and click OK.
In iStudio, click Applications, FTPAPP, and then Published Events.
Right-click Published Events and select New. The Select an event dialog box is displayed.
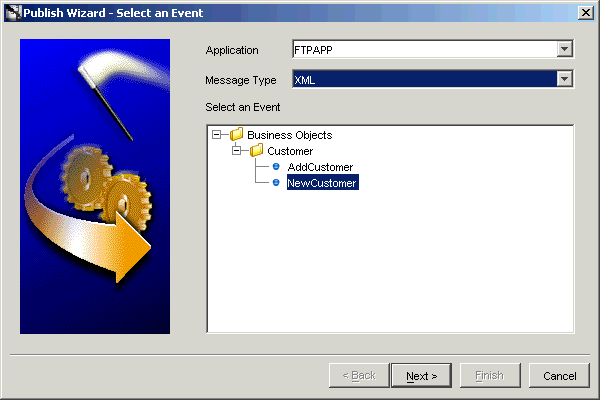
Perform the following steps as shown in Figure A-12:
Select XML from the Message Type list.
Select NewCustomer from the Select an Event list, and then click Next. The Publish Wizard- Define Application View dialog box is displayed.
Figure A-12 Publish Wizard- Select an Event Dialog Box
Click Import, XML, XSD and then Local File System.
Select NewCustomerFileAppView.xsd and click OK. The Choose XSD Root Element dialog box is displayed.
Select Customer as root element and click OK.
Click Next. The Define Mapping dialog box is displayed.
Click Define Mapping. The Mapping Parameters dialog box is displayed.
Perform the following:
In FTPAPP View, click ns1:NewCustomer, Customer and then id.
In Transformations, select CopyFields.
In Common View, click ns1:NewCustomer, Customer and then id.
Click Add.
In FTPAPP View, click ns1:NewCustomer, Customer and then addr.
In Transformations, select CopyFields.
In Common View, click ns1:NewCustomer, Customer and then address.
Click Add.
In FTPAPP View, click ns1:NewCustomer, Customer and then name.
In Transformations, select ExpandFields.
In Common View, click ns1:NewCustomer, Customer.
Press the SHIFT key and select FirstName and LastName.
In the Additional Parameters section, enter comma "," in the Value field as shown in
Click Add.
Click OK.
Click Finish in the Define Mapping dialog box.
To create a BPEL application that subscribes to the NewCustomer event:
In iStudio, right-click Applications, and select New. The Create Application dialog box is displayed.
Enter the BPELServer in the Application Name field and click OK.
Click BPELServer, and then click Subscribed Events.
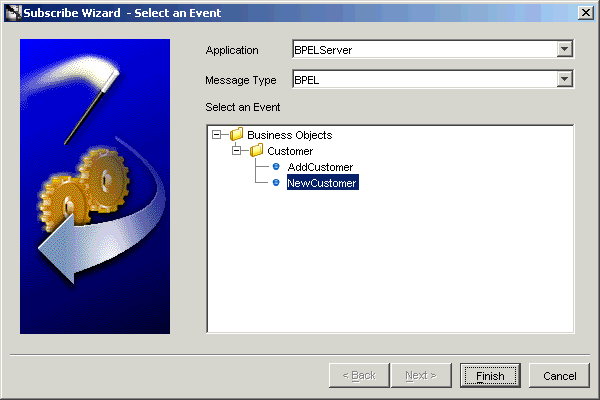
Right-click Subscribed Events and select New. The Subscribe Wizard- Select an event dialog box is displayed.
Select BPEL from the Message Type list.
Select NewCustomer from the Select an Event list.
Figure A-13 Subscribe Wizard - Select an Event Dialog Box
Click Next.
Click Finish.
To create a BPEL application that publishes the AddCustomer event from Oracle BPEL Process Manager to OracleAS Integration InterConnect.
In iStudio, click BPELServer, and then Published Events.
Right-click Published Events and select New. The Publish Wizard- Select an event dialog box is displayed.
Select BPEL from the Message Type list.
Select AddCustomer from the Select an Event list.
Click Finish.
|
Note: You should create one application for each BPEL server instance in each InterConnect hub and group all the events for this instance in this application. |
To create a database application that subscribes to the AddCustomer event:
In iStudio, right-click Applications, and New. The Create Application dialog box is displayed.
Enter DBAPP in the Application Name field and click OK.
Click Applications, DBAPP, and then right-click Subscribed Events.
Select New. The Select an Event dialog box is displayed.
Perform the following steps in the Select an Event dialog box:
Select Database from the Message Type list.
Select AddCustomer from the Select an Event list and click Next. The Subscribe Wizard- Define Application View dialog box is displayed.
Click Import, and click Database. The Database Login dialog box is displayed.
Perform the following steps in the Database Login dialog box:
Enter the name of the database user in Username field.
Enter the password associated with the database user in the Password field.
Enter the database URL in following format in the URL field:
computer name:port number:database sid
Select oracle.jdbc.driver.OracleDriver from the Driver list.
Click Login. The Define Application View dialog box is displayed.
Click Next. The Oracle Database Browser dialog box is displayed.
Click DBAPP, Table/Views, DBAPP.CUSTOMER_TABLE and then click Done. The Subscribe Wizard- Define Application View dialog box is displayed.
Click Next. The Define Mapping dialog box is displayed.
Click Define Mapping. The Mapping Parameters dialog box is displayed.
Perform the following steps in the Mapping Parameters dialog box:
In Common View, click AddCustomer, ns1_ns0Customer, and click ID.
In Transformations, select CopyFields.
In DBAPP View, click AddCustomer, and click CUSTOMERID.
Click Add.
Repeat steps 1 to 3 to map the following fields in the Common View to DBAPP View:
| Common View Fields | DBAPP View Fields |
|---|---|
| Title | TITLE |
| Street | ADDRESS |
| City | CITY |
| State | STATE |
| Zip | ZIP |
Map the Name field of the Common View to the First Name and the Last Name field of the DBAPP View by selecting the Expand transformation. Specify comma " ," as the delimiter.
Click OK.
Click Next in the Define Mapping dialog box. The Define Stored Procedure dialog box is displayed.
Figure A-17 Subscribe Wizard- Define Stored Procedure
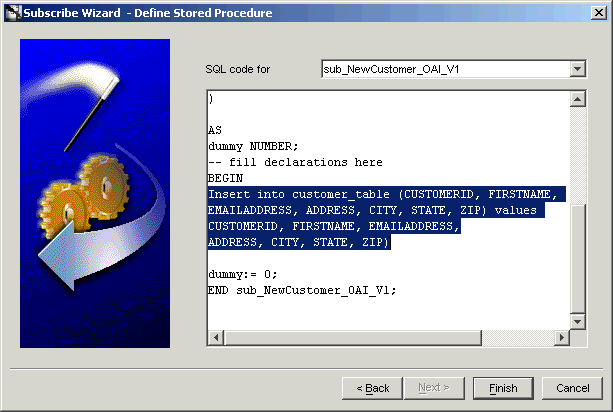
Perform the following steps in the Define Stored Procedure dialog box:
Select sub_AddCustomer_OAI_V1 from the SQL code for list.
In the BEGIN section of the sub_AddCustomer_OAI_V1 procedure, add the following code:
Insert into customer_table (CUSTOMERID, FIRSTNAME, EMAILADDRESS, ADDRESS, CITY, STATE, ZIP) values (CUSTOMERID, FIRSTNAME, EMAILADDRESS,ADDRESS, CITY, STATE, ZIP)
Click Finish.
To deploy the stored procedure generated for subscribing event of DBAPP Application:
In iStudio, click the Deploy tab.
Click Application, right-click DBAPP, and select Deploy PL/SQL. The Deploy PL/SQL- Select Events/Procedures dialog box is displayed.
Figure A-18 Deploy PL/SQL- Select Events/ Procedures Dialog Box
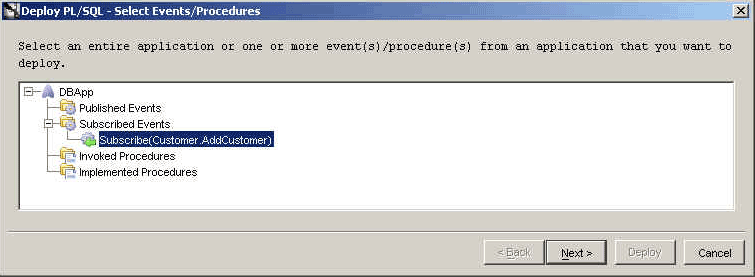
Click DBAPP, Subscribed Events, and then Subscribe(Customer.AddCustomer).
Click Next. The Deploy PL/SQL- Database Information dialog box is displayed.
Perform the following:
Enter the name of the database user in the Database username field.
Enter the password associated with the database user in the Database password field.
Enter the database URL in following format in the Database URL field:
computer name:port number:database sid
Click Next. The Deploy PL/SQL- Summary dialog box is displayed.
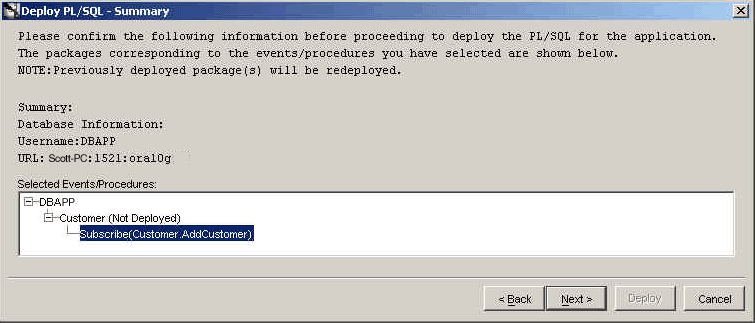
Click DBAPP, Subscribed Events, and Subscribe(Customer.AddCustomer), and then click Next. The Deploy PL/SQL- Status dialog box is displayed.
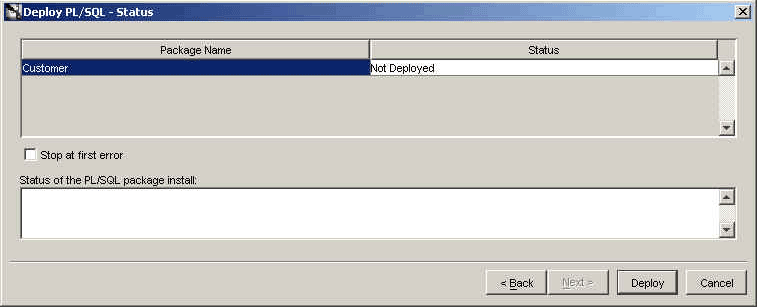
Click Customer in the Package Name and click Deploy. The generated PL/SQL is deployed for the selected application, event or procedure.
Ensure that the BPEL Server and JDeveloper BPEL Designer are started. To start the BPEL PM Server, select Start, All Programs, Oracle - Oracle_Home, Oracle BPEL Process Manager version_number, Start BPEL PM Server.
To start the JDeveloper BPEL Designer, select Start, All Programs, Oracle - Oracle_Home, Oracle BPEL Process Manager version_number, JDeveloper BPEL Designer.
|
See Also: Oracle BPEL Process Manager Developer's Guide for information on starting and stopping BPEL Server. |
To create a receive activity:
Right-click Applications and select New. The New Gallery dialog box is displayed.
Double-click Workspace from Items and click OK. The Create Workspace dialog box is displayed.
Enter BPELICIntegration in the Workspace Name field and accept the default path in the Directory Name field.
Deselect Add a New Empty Project.
Click OK.
Right-click BPELICIntegration in the Applications Navigator section of the designer window. If the Applications Navigator section does not currently appear, select Application Navigator from the View main menu.
Select New Project.
Select BPEL Process Project from Items and click OK. The BPEL Process Project dialog box is displayed.
Enter CustomerCreation in the BPEL Process Name field.
Figure A-21 BPEL Process Project Dialog Box
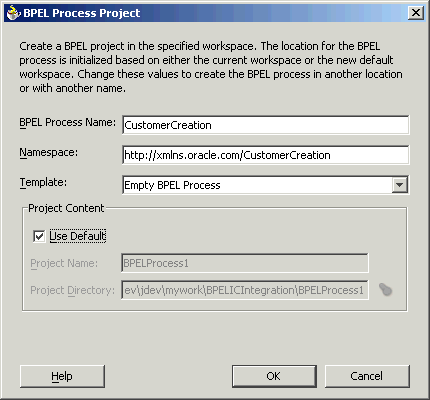
Select Empty BPEL Process from Template list.
Select the Use Default button.
Click OK.
The bpel.xml, CustomerCreation.bpel, CustomerCreation.wsdl, and build.xml files are created.
Ensure that Process Activities is selected in the drop-down list of the Component Palette section in the upper right section of JDeveloper BPEL Designer.
Drag and drop a PartnerLink activity onto the right side of the designer window anywhere beneath the header Partner Links. Note that both sides of the designer window have sections in which partner links can be placed. The Create Partner dialog box is displayed.
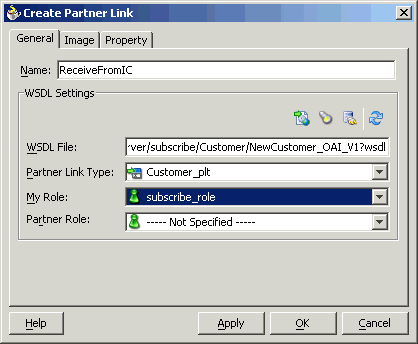
Perform the following tasks to create a partner link as shown in Figure A-23:
Enter ReceiveFromIC in the Name field.
Click the flashlight (the second icon from the left named WSIL Browser) to access the WSDL Chooser dialog box.
Select LocalBPELServer, adapters, InterConnect, eis-ICadapter-BPELServer, Subscribed Events, Customer.NewCustomer as shown in the Figure A-22 and click OK.
Select subscribe_role from the My Role list.
Click OK.
After performing these steps, the Create Partner Link dialog box would appear as shown in Figure A-23.
Figure A-23 Create Partner Link Dialog box
Drag and drop a Receive activity from the Component Palette to the Drop Activity Here section.
Double-click the Receive activity. The Receive dialog box is displayed.
Perform the following:
Enter ReceiveNewCustomer in the Name field.
Select ReceivefromIC in the Partner Link list.
Click the first icon to the right of the Variable field. This is the automatic variable creation icon.
Click OK on the Create Variable dialog box that appears. A variable named ReceiveNewCustomer_subscribe_InputVariable is automatically created in the Input Variable field.
Select Create Instance and click OK.
To add user tasks to handle the manual approval or rejection of a create customer request:
Drag and drop a User Task activity from the Component Palette section to below the ReceiveNewCustomer activity. The Workflow Wizard is displayed.
Leave the Create New Workflow check box selected and click Next. The Workflow Pattern window is displayed.
Select Simple Workflow from the WorkFlow Patterns as shown in Figure A-24.
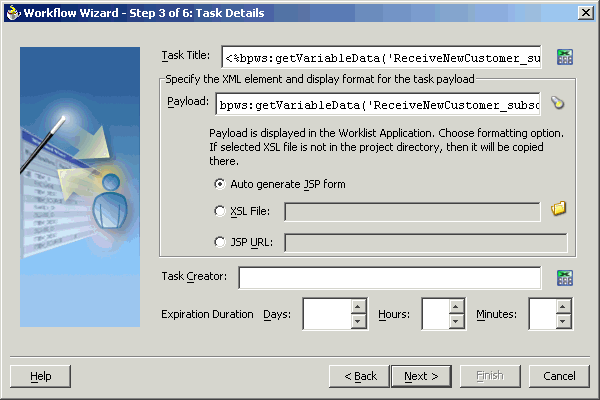
Click Next. The Task Details window is displayed as shown in Figure A-25.
Figure A-25 Workflow Wizard: Task Details
Perform the following:
Click the icon to the right of the Task Title field shown in Figure A-25 to display the XPath Expression Builder window.
Select Variables, Process, Variables, ReceiveNewCustomer_subscribe_InputVariable, Customer, ns2:Customer, id as shown in Figure A-26.
Click the right arrow.
Click OK.
In the Task Details window shown in Figure A-25, click the flashlight icon to the right of the Payload field to display the Variable XPath Builder window.
Select Variables, Process, Variables, ReceiveNewCustomer_subscribe_InputVariable, Customer, ns2:Customer as shown in Figure A-27.
Click OK.
Leave the Task Creator field empty.
Click Next in the Task Details window. The Task Outcomes dialog box is displayed.
Leave the two default outcomes as ACCEPT and REJECT.
Click Next. The Task Notification dialog box is displayed.
Accept the default settings and click Next. The Assignees dialog box is displayed.
Click the flashlight icon to the right of the Users field. The identity lookup dialog box is displayed.
Click LookUp.
Select your user name in the search user and click Select.
Click OK.
Click Next.
Click Finish.
To create a invoke activity:
Drag and drop a PartnerLink activity onto the right side of the designer window anywhere beneath the header Partner Links. The Create Partner dialog box is displayed.
Perform the following:
Enter SendToIC in the Name field.
Click the flashlight (the second icon from the left named WSIL Browser) to access the WSDL Chooser dialog box.
Select LocalBPELServer, adapters, InterConnect, eis-ICadapter-BPELServer, Published Events, Customer.AddCustomer as shown in the Figure A-30.
Click OK.
Select publish_role from the Partner Role list.
Click OK.
Drag and drop a Invoke activity from the Component Palette to the <case Task Outcome is Accept> section.
Double-click the Invoke activity. The Invoke dialog box is displayed.
Perform the following:
Enter SendApprovedCustomer in the Name field.
Select SendToIC in the Partner Link list.
Click the first icon to the right of the Input Variable field. This is the automatic variable creation icon. The Create Variable dialog box is displayed.
Click OK. A variable named SendApprovedCustomer_publish_InputVariable is automatically created in the Input Variable field.
After performing these steps, the Create Partner Link dialog box would appear as shown in Figure A-30.
Drag and Drop a Transform activity from BPEL Component Pallette before the Invoke step created in Step 7. Map the input variable corresponding to Receive activity created in AppendixA, "Creating a Receive Activity to Receive NewCustomer Event" to the input variable corresponding to the Invoke activity created in Step 7. Map all the fields of the customer payload to the target variable.
After designing the BPEL process, you need to compile and deploy the process to Oracle BPEL Server. If compilation and deployment are successful, you can run and manage the BPEL process from Oracle BPEL Console.
|
See Also: Oracle BPEL Process Manager Developer's Guide for information on how to deploy a BPEL process. |
For run time, you need to configure the FTP adapter to poll an input directory where the incoming payload is to be copied. For information about how to configure the FTP adapter, refer to the Oracle Application Server Integration InterConnect Adapter for FTP Installation and User's Guide
During run time, copy an XML file containing information about the new customer, to the folder from which the InterConnect FTP adapter will read the file. Following example shows a sample input XML file:
<?xml version="1.0" encoding="UTF-8" ?>
<Customer xmlns="http://oracle.com/interconnect/customer/event/newCustomer">
  <ID xmlns="">1234</ID>
  <Action xmlns="">Action11</Action>
  <Name xmlns="">Name12</Name>
  <Addr xmlns="">
     <Street>Street13</Street>
     <City>City14</City>
     <State>State15</State>
     <Zip>4567</Zip>
  </Addr>
</Customer>
The FTP adapter sends the file to the OAI hub. From the OAI hub, this file is received by the CustomerCreation BPEL process. The process waits for the human approval as shown in Figure A-31.
You can accept or reject the request by using the BPEL Console. Once approved, the CustomerCreation BPEL process sends the AddCustomer message to the InterConnect hub queue. The InterConnect Database adapter receives the message and insert the new customer data into the Customer_table table.
|
See Also: Oracle BPEL Process Manager Developer's Guide for information about how to use BPEL Console and BPEL Worklist. |