|
Oracle® Application Server Integration InterConnect User's Guide
10g Release 2 (10.1.2) B14069-02 |
|
 Previous |
 Next |
|
Oracle® Application Server Integration InterConnect User's Guide
10g Release 2 (10.1.2) B14069-02 |
|
 Previous |
 Next |
This chapter describes how to manage OracleAS Integration InterConnect using the Oracle Enterprise Manager 10g Application Server Control Console. It contains the following topics:
The Oracle Enterprise Manager 10g Application Server Control Console provides a comprehensive system management platform to perform monitoring and administration tasks on an OracleAS Integration InterConnect instance. It provides real-time system monitoring details such as up and down status, current CPU and memory consumption, and current performance status of various adapters.
The following OracleAS Integration InterConnect components can be managed by using the Oracle Enterprise Manager 10g Application Server Control Console:
Repository is used to store metadata in the hub database. At run time, the repository provides access to this metadata to adapters. You can use the Oracle Enterprise Manager 10g Application Server Control Console to monitor and configure the repository.
Oracle Advanced Queuing (AQ) is the underlying messaging infrastructure of OracleAS Integration InterConnect. The OAI_HUB_QUEUE advanced queue in OracleAS Integration InterConnect is responsible for routing and delivering the messages. You can use the Oracle Enterprise Manager Database Control to manage hub queues and to view and manage the errors that may have occurred during message delivery.
Adapters are the run-time engines that carry out the integration based on the metadata modeled during design time. Adapters transform and route messages between the application and the hub. You can use the Oracle Enterprise Manager 10g Application Server Control Console to configure and monitor adapters.
You can perform the following monitoring and administration tasks by using the Oracle Enterprise Manager 10g Application Server Control Console:
Start and stop the repository, adapters, and hub queue.
View the current running status (started or stopped) and memory and CPU usage of the repository, adapters, and hub queue.
Configure the repository and adapters.
View the OracleAS Integration InterConnect log files.
This section provides information about how to monitor and configure various OracleAS Integration InterConnect components. It contains the following topics:
Perform the following steps to access OracleAS Integration InterConnect from the Oracle Enterprise Manager 10g Application Server Control Console:
Go to the following URL:
http://hostname:port/
where:
hostname is the name of the host on which the OracleAS Integration InterConnect middle-tier instance is installed
port is the number assigned during OracleAS Integration InterConnect installation. The following sources also identify the port number used to access the Oracle Enterprise Manager 10g Application Server Control Console:
Enter the following login details when prompted:
| Field | Value |
|---|---|
| Username | Enter ias_admin
|
| Password | Enter the password you specified during J2EE and Web Cache installation and OracleAS Integration InterConnect installation for the ias_admin user.
|
The Oracle Enterprise Manager 10g Application Server Control Console is displayed, as shown in Figure 11-1:
Figure 11-1 Oracle Enterprise Manager 10g Application Server Control Console
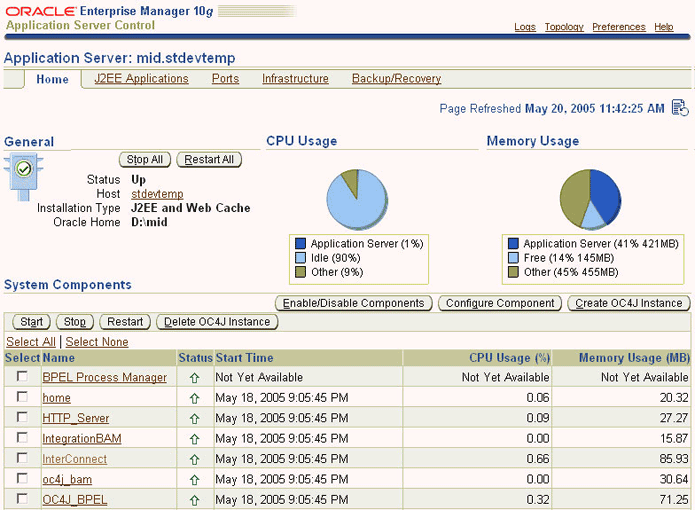
The System Components section provides basic information about various component installed on Oracle Application Server. Click InterConnect. The OracleAS Integration InterConnect middle-tier instance page is displayed, as shown in Figure 11-2:
Figure 11-2 OracleAS Integration InterConnect Middle-Tier Instance Page
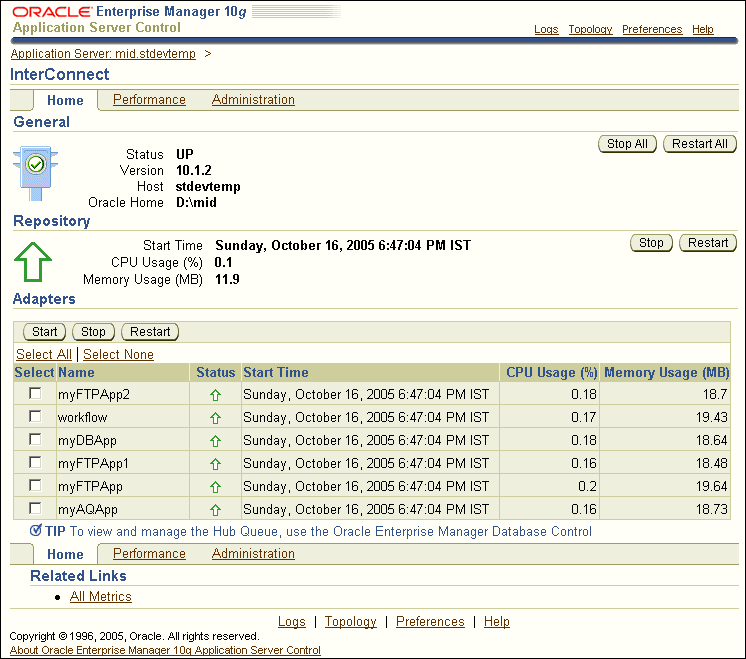
You can view the status and metrics of an OracleAS Integration InterConnect instance by using the following sections on the OracleAS Integration InterConnect middle-tier instance page:
The General section of the OracleAS Integration InterConnect middle-tier instance page, as shown in Figure 11-2, displays the current status of the OracleAS Integration InterConnect instance. It provides the following information:
Status: The status of the OracleAS Integration InterConnect instance. The overall status of the instance depends upon the status of the repository and adapters. If the repository and all the adapters are running, then the status is shown as UP. However, if any one of these components is not running, then the status is shown as Down.
Version: The version of OracleAS Integration InterConnect.
Host: The Application Server middle-tier host computer on which OracleAS Integration InterConnect is installed.
Oracle Home: The location of the Oracle home directory on the host computer.
The Repository section of the OracleAS Integration InterConnect middle-tier instance page, as shown in Figure 11-2, displays the current status of the repository. It provides the following information:
Start Time: The time when the repository was started.
CPU Usage: The amount of CPU being used by the repository.
Memory Usage: The amount of memory being used by the repository.
The Adapters section of the OracleAS Integration InterConnect middle-tier instance page, as shown in Figure 11-2, displays the current status of all adapters. It provides the following information about each adapter:
Status: The status of an adapter.
Start Time: The time when an adapter was started.
CPU Usage: The amount of CPU being used by an adapter.
Memory Usage: The amount of memory being used by an adapter.
This section describes how to start and stop various components of OracleAS Integration InterConnect by using the Oracle Enterprise Manager 10g Application Server Control Console. It contains the following topics:
To start, stop, or restart the repository, use either of the following methods:
Click Start, Stop, or Restart in the Repository section of the OracleAS Integration InterConnect middle-tier instance page, as shown in Figure 11-2.
Click Start All, Stop All, or Restart All in the General section of OracleAS Integration InterConnect middle-tier instance page, as shown in Figure 11-2.
|
Note: The Start All, Stop All, or Restart All buttons in the General section start, stop, or restart all the adapters and the repository. However, the hub queue is not started. |
To start, stop, and restart adapters, use either of the following methods:
Select one or more adapters in the Adapters section of the OracleAS Integration InterConnect middle-tier instance page. Click Start, Stop, or Restart, as shown in Figure 11-2.
Click Start All, Stop All, and Restart All in the General section of OracleAS Integration InterConnect middle-tier instance page, as shown in Figure 11-2.
You cannot start or stop the hub queue from the Oracle Enterprise Manager 10g Application Server Control Console. You can start and stop the hub queue by using the Oracle Enterprise Manager Database Control Console.
|
See Also: For information about Oracle Enterprise Manager Database Control, refer <Guide name to be added>. |
You can view the performance metrics of all adapters by clicking the Performance tab on the OracleAS Integration InterConnect middle-tier instance page. The Adapter Performance page is displayed, as shown in Figure 11-3. You can use the Type list to view only inbound messages, only outbound messages, or all messages.
Figure 11-3 OracleAS Integration InterConnect Middle-Tier Instance Adapters Performance Page
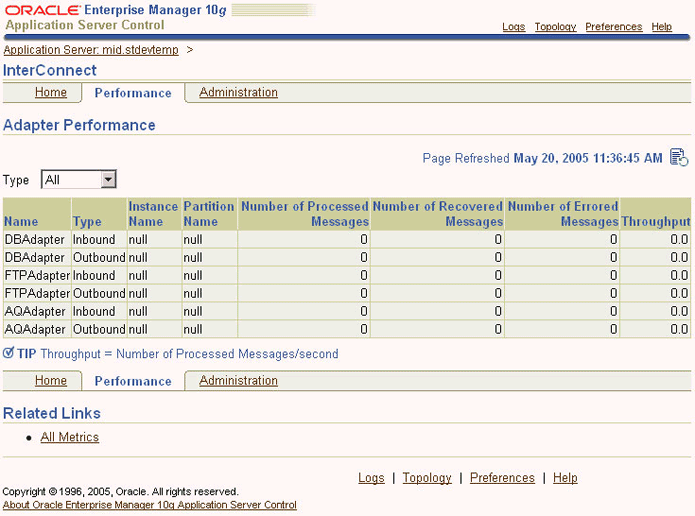
The Adapter Performance page provides the following information for each adapter:
Name: The name of the adapter.
Type: The type of the adapter, Inbound or Outbound.
Instance Name: The name of the adapter instance.
Partition Name: The name of the adapter partition.
Number of Processed Messages: The number of messages successfully processed.
Number of Recovered Messages: The number of messages that have been recovered. When a message could not be delivered to the target application by the adapter, it is moved to the oai_agent_error table. If the adapter is down, then the message is persisted in the queue until the adapter is up and running. The message is then delivered to the application.
Number of Errored Messages: The number of messages that are not successfully processed and delivered to the target application.
Throughput: The number of messages processed in a second.
You can configure the OracleAS Integration InterConnect components by clicking the Administration tab on the OracleAS Integration InterConnect middle-tier instance page. Figure 11-4 displays the page that appears when you click the Administration link.
Figure 11-4 OracleAS Integration InterConnect Middle-Tier Instance Administration Page
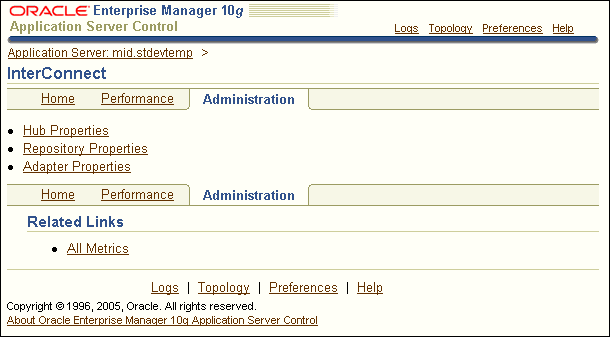
You can use the Administration page to configure the following OracleAS Integration InterConnect components:
Repository
Adapters
Hub
To configure the repository:
Click Repository Properties, shown in Figure 11-4. The Repository Properties page is displayed, as shown in Figure 11-5.
Figure 11-5 OracleAS Integration InterConnect Middle-Tier Instance Repository Properties Page
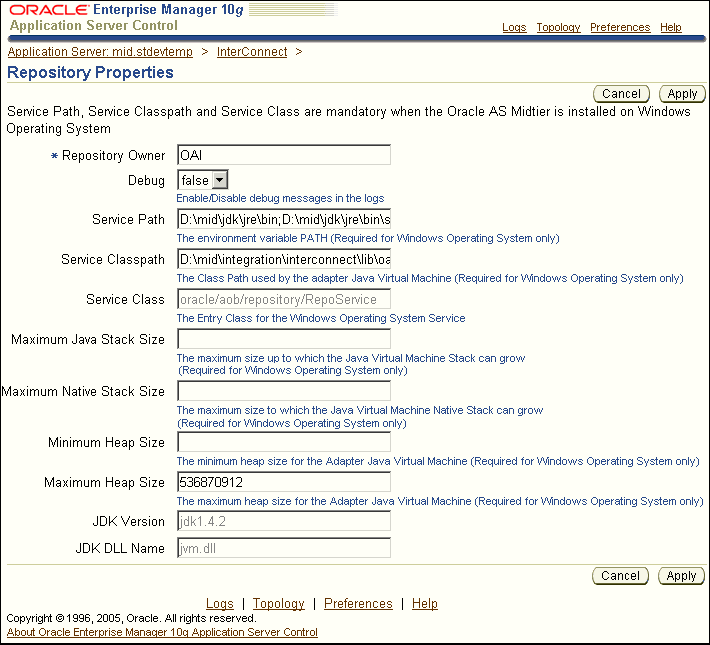
Modify any of the properties listed in Table 11-1 and click Apply.
Table 11-1 Repository Properties
| Property | Description |
|---|---|
|
Repository Owner |
The name of the repository owner. |
|
Debug |
Enable or Disable debugging of messages in the logs. |
|
Service Path |
The value of the environment variable PATH. This parameter is mandatory when Oracle Application Server middle-tier is installed on Microsoft Windows. |
|
Service Classpath |
The class path used by the adapter Java Virtual Machine. This parameter is mandatory when Oracle Application Server middle-tier is installed on Microsoft Windows. |
|
Service Class |
The Entry Class for the Windows Operating System Service. This parameter is mandatory when Oracle Application Server middle-tier is installed on Microsoft Windows. |
|
Maximum Java Stack Size |
The maximum size up to which the Java Virtual Machine Stack can grow. This parameter is required for Microsoft Windows only. |
|
Maximum Native Stack Size |
The maximum size to which the Java Virtual Machine Native Stack can grow. This parameter is required for Microsoft Windows only. |
|
Minimum Heap Size |
The minimum heap size for the Adapter Java Virtual Machine. This parameter is required for Microsoft Windows only. |
|
Maximum Heap Size |
The maximum heap size for the Adapter Java Virtual Machine. This parameter is required for Microsoft Windows only. |
|
JDK Version |
The JDK Version. |
|
JDK DLL Name |
The name of the JDK DLL. |
To configure the adapters:
Click Adapter Properties, shown in Figure 11-4. The Adapter Properties page is displayed, as shown in Figure 11-6.
Figure 11-6 OracleAS Integration InterConnect Middle-Tier Instance Adapters Properties Page
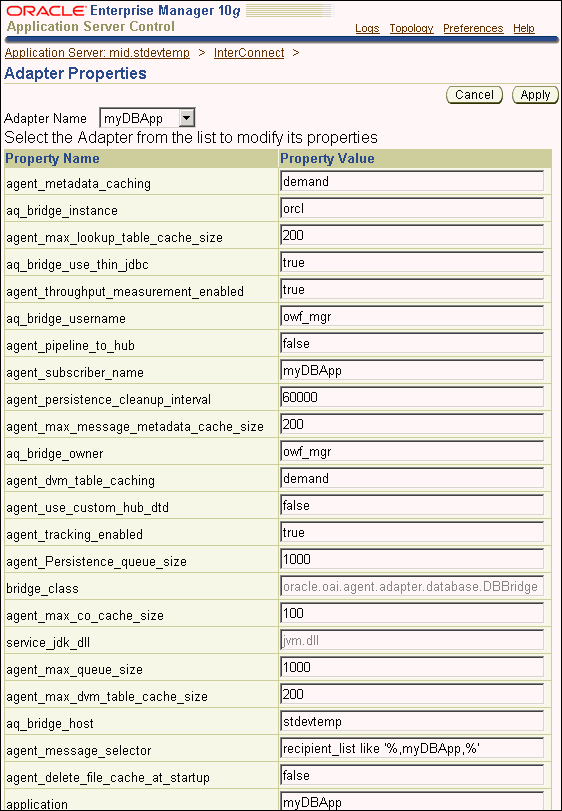
Select an adapter from the Adapter Name list. The properties for the selected adapter are displayed.
|
Note: The adapter properties are different for different adapters. For example, the properties that are displayed when you select a database adapter are different from the properties of the FTP adapter. |
Modify the adapter properties and click Apply.
To configure the Hub properties, click Hub Properties, shown in Figure 11-4. The Hub Properties page is displayed, as shown in Figure 11-7.
Figure 11-7 OracleAS Integration InterConnect Middle-Tier Instance Hub Properties Page
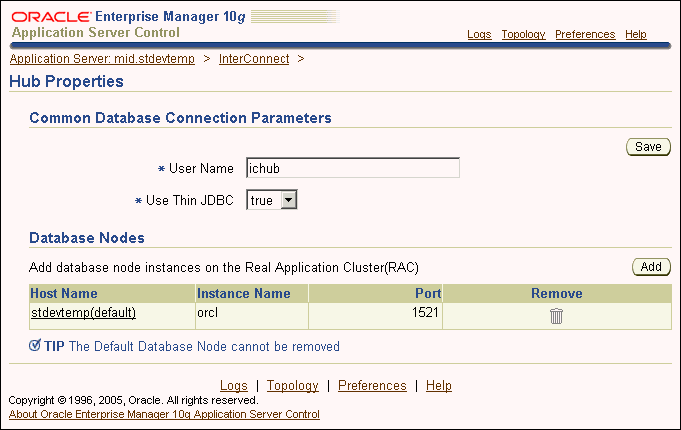
You can use the Hub Properties page to:
Modify the Common Database Connection Parameters
To modify the common database connection parameters, update any of the following fields and click Save:
User Name: The user name for connecting to Real Application Cluster.
Use Thin JDBC: Specify whether to use a thin JDBC driver or thick JDBC driver.
To add a database node instance on the Real Application Cluster:
Click Add. The Add Database Node page is displayed, as shown in Figure 11-8.
Figure 11-8 OracleAS Integration InterConnect Middle-Tier Instance Add Database Node Page
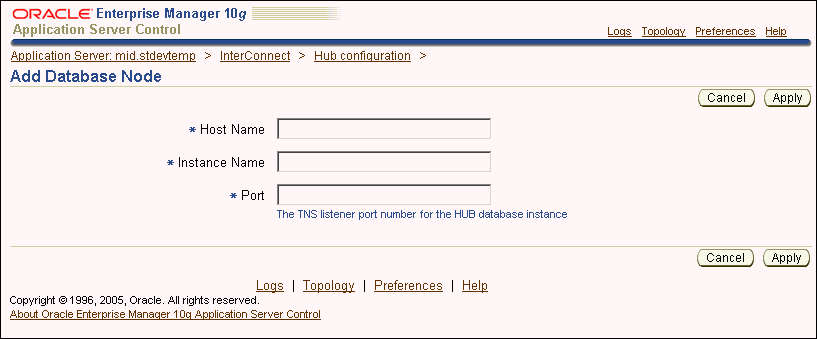
Enter the host name of the database node.
Enter the instance name of the database node.
Enter the TNS listener port number for the hub database instance of a node.
Click Apply.
To modify a database node:
Click the node name. The Edit Database Node page is displayed.
Enter the host name of the database node.
Enter the instance name of the database node.
Enter the TNS listener port number for the hub database instance of a node.
Click Apply.
Delete a Database Node
To delete a database node, click Remove.
To view the InterConnect log files:
Click Log on the OracleAS Integration InterConnect middle-tier instance page. The View Logs page is displayed, as shown in Figure 11-9.
Figure 11-9 OracleAS Integration InterConnect Middle-Tier Instance View Logs Page
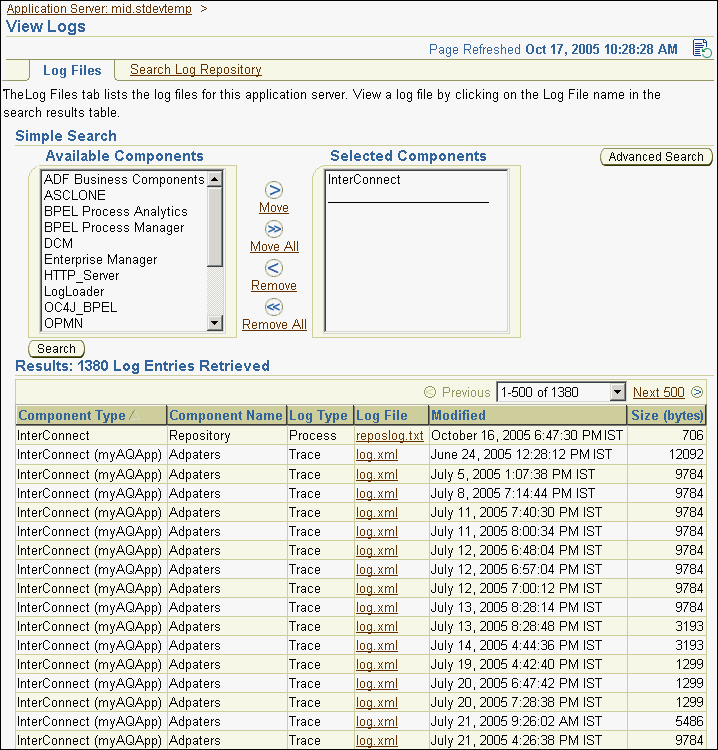
Select InterConnect from the Available Components list and click Move.
Click Search. All InterConnect log files are displayed in the Results section.
Select the file that you want to view.