|
Oracle® BPEL Process Manager Quick Start Guide
10g Release 2 (10.1.2) B15604-02 |
|
 Previous |
 Next |
|
Oracle® BPEL Process Manager Quick Start Guide
10g Release 2 (10.1.2) B15604-02 |
|
 Previous |
 Next |
This tutorial describes how to use JDeveloper BPEL Designer to design, deploy, and test your first BPEL process.
This tutorial contains these topics:
This tutorial teaches you how to use JDeveloper BPEL Designer to build, deploy, and test your first BPEL process. The process is a flow that you create to call a Credit Rating service. When you run this process, you enter your social security number into an HTML user interface. The Credit Rating service takes your number and returns a credit rating. Creating this process is intended to be the first step toward building a more sophisticated application (like that shown in Chapter 3, "Loan Process Tutorial").
This tutorial contains these topics:
Creating and Configuring a Partner Link for the Credit Rating Service
Validating, Compiling, and Deploying the Credit Flow Process
Ensure that JDeveloper BPEL Designer (which provides extensions to Oracle JDeveloper) and Oracle BPEL Server are started. See "Starting Oracle BPEL Process Manager Components" for instructions.
During this tutorial, the BPEL process that you design communicates with a Credit Rating service described in "Introduction". You must first start the service and test that it is running.
Select Start > All Programs > Oracle - Oracle_Home > Oracle BPEL Process Manager 10.1.2 > Developer Prompt to open up a command prompt at the Oracle_Home\integration\orabpel\samples directory.
Change directories to the utils\CreditRatingService subdirectory:
cd utils\CreditRatingService
Enter the following command:
obant
This deploys and starts the Credit Rating service for using this tutorial. If successful, a message similar to the following appears at the end:
BUILD SUCCESSFUL
Total time: 13 seconds
C:\oraBPEL\integration\orabpel\samples\utils\CreditRatingService>ENDLOCAL
Log into Oracle BPEL Console by selecting Start > All Programs > Oracle - Oracle_Home > Oracle BPEL Process Manager 10.1.2 > BPEL Console.
Enter bpel as the password when prompted.
All services are running if the CreditFlow, TaskActionHandler, and TaskManager services display in the Dashboard tab.
You must create a workspace and a project to begin. The project automatically creates the basics for your BPEL process, including:
BPEL process source (projectname.bpel)
Web services description language (WSDL) client interface (projectname.wsdl)
BPEL process deployment descriptor (bpel.xml)
Follow these instructions to create a new Credit Flow project.
|
Caution: Do not include any special characters in the project name (such as periods). If you do include special characters, errors appear when you attempt to compile your project. |
Return to JDeveloper BPEL Designer.
Select File > New from the main menu.
Double-click Workspace in the Items window to display the Create Workspace window.
Enter myBPELworkspace in the Workspace Name field and accept the default path in the Directory Name field.
Deselect the Add a New Empty Project check box.
Click OK.
Right-click myBPELworkspace in the Applications Navigator section.
Select New Project to define a new BPEL process project.
Double-click BPEL Process Project in the Items window to display the BPEL Process Project window.
Enter myCreditFlow in the BPEL Process Name field. All other fields default to the correct values for creating an asynchronous BPEL process.
Click OK. The BPEL process files are created in the Oracle_Home\integration\jdev\jdev\mywork\myBPELworkspace\myCreditFlow directory.
The following sections appear. If they do not appear, click Diagram View in JDeveloper BPEL Designer and double-click myCreditFlow.bpel in the Applications Navigator section. See the Oracle BPEL Process Manager Developer's Guide for a description of JDeveloper BPEL Designer sections.
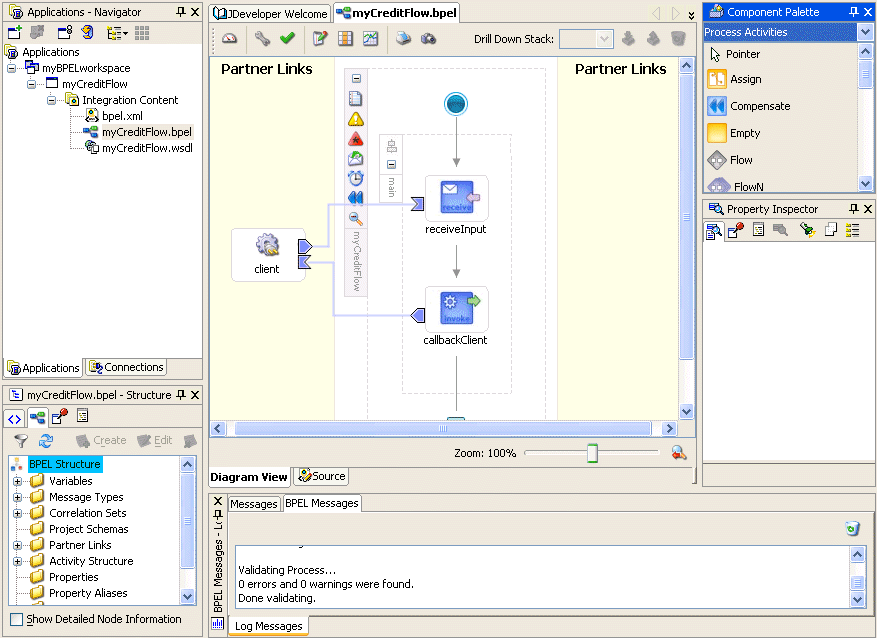
You now review the sections of the WSDL file.
Double-click myCreditFlow.wsdl in the Applications Navigator section.
View the following section of code. A myCreditFlowProcessRequest element is accepted as input. A myCreditFlowProcessResponse element is returned as output.
<element name="myCreditFlowProcessRequest">
   <complexType>
      <sequence>
         <element name="input" type="string"/>
      </sequence>
   </complexType>
</element>
<element name="myCreditFlowProcessResponse">
   <complexType>
      <sequence>
         <element name="result" type="string"/>
      </sequence>
   </complexType>
</element>
View the following section of code. Two port types are defined, each with a one-way operation. One operation initiates the asynchronous process. The other operation calls back the client with the asynchronous response.
<portType name="myCreditFlow">
   <operation name="initiate">
      <input message="client:myCreditFlowRequestMessage"/>
   </operation>
</portType>

<!-- portType implemented by the requester of myCreditFlow BPEL processfor asynchronous callback purposes-->
<portType name="myCreditFlowCallback">
   <operation name="onResult">
      <input message="client:myCreditFlowResponseMessage"/>
   </operation>
</portType>
View the following section of code. The partnerLinkType for this asynchronous process has two roles. One role is for the service provider, and the other is for the requester.
<plnk:partnerLinkType name="myCreditFlow">
   <plnk:role name="myCreditFlowProvider">
      <plnk:portType name="client:myCreditFlow"/>
   </plnk:role>
   <plnk:role name="myCreditFlowRequester">
      <plnk:portType name="client:myCreditFlowCallback"/>
   </plnk:role>
</plnk:partnerLinkType>
You now edit the input and output messages of the WSDL file. This WSDL file represents the user interface with which you interact when you run your BPEL process and request a credit rating in "Running the Credit Flow Process".
Change input to ssn.
Change result to creditRating and string to int as the output to be returned.
<element name="CreditFlowProcessRequest">
   <complexType>
      <sequence>
         <element name="ssn" type="string"/>
      </sequence>
   </complexType>
</element>
<element name="CreditFlowProcessResponse">
   <complexType>
      <sequence>
         <element name="creditRating" type="int"/>
      </sequence>
   </complexType>
</element>
Select Save from the File main menu.
Close the WSDL window by clicking the x in myCreditFlow.wsdl at the top of the designer window.
Double-click myCreditFlow.bpel in the Applications Navigator section.
You now review the sections of the BPEL file.
Click Source at the bottom of the designer window.
View the following section of code. The partnerLink created for the client interface includes two roles, myRole and partnerRole. An asynchronous BPEL process typically has two roles for the client interface: one for the flow itself, which exposes an input operation, and one for the client, which gets called back asynchronously.
<partnerLinks>   <partnerLink name="client" partnerLinkType="client:myCreditFlow"
   myRole="myCreditFlowProvider" partnerRole="myCreditFlowRequester"/></partnerLinks>
View the following section of code. The <receive> activity in the main body of the process is followed by an <invoke> activity to perform an asynchronous callback to the requester. Note the difference between this and a synchronous process, which uses a <reply> activity to respond synchronously to the caller.
  <sequence name="main">

    <!-- Receive input from requestor.
    Note: This maps to operation defined in myCreditFlow.wsdl
    -->
    <receive name="receiveInput" partnerLink="client"
 portType="client:myCreditFlow" operation="initiate" variable="inputVariable"
 createInstance="yes"/>

    <!-- Asynchronous callback to the requester.
     Note: the callback location and correlation id is transparently handled
     using WS-addressing.
     -->
    <invoke name="callbackClient" partnerLink="client"
 portType="client:myCreditFlowCallback" operation="onResult"
 inputVariable="outputVariable"/>
  </sequence>
</process>
Click Diagram View. You are now ready to design your BPEL process.
You now create and configure a partner link for the synchronous Credit Rating service.
This section contains these tasks:
|
Summary: Partner links define the external services with which your BPEL process interacts. You must create a partner link for the Credit Rating service. |
Ensure that Process Activities is selected in the drop-down list of the Component Palette section in the upper right part of JDeveloper BPEL Designer.
Drag and drop a PartnerLink activity onto the right side of JDeveloper BPEL Designer.
The Create Partner Link window appears.
Enter the following values to create a partner link for the Credit Rating service:
|
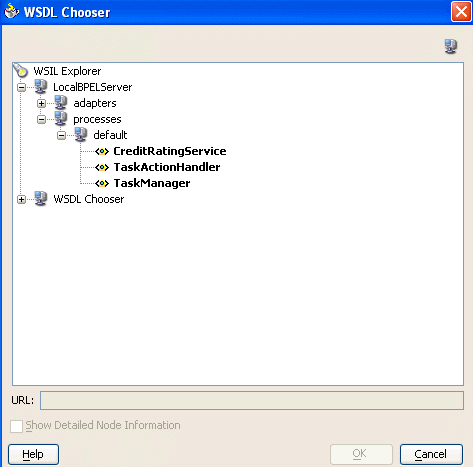
Note: For the WSDL File field below, click the flashlight (the second icon from the left named WSIL Browser) to access the WSDL Chooser window shown below for automatically selecting the Credit Rating service deployed in "Starting and Testing Your Service". |
| Field | Value |
|---|---|
| Name | creditRatingService |
| WSDL File | Access this URL by clicking the WSIL Browser flashlight icon and expanding and selecting LocalBPELServer > processes > default > CreditRatingService.
http://localhost:9700/orabpel/default/CreditRatingService/CreditRatingService?wsdl See Also: "Setting the Hostname in Your Web Browser Preferences" if you receive a parsing error when attempting to add a WSDL file in the WSDL Chooser window. |
| Partner Link Type | CreditRatingService |
| My Role | Leave unspecified. Because this is a synchronous partner link, no role is required. |
| Partner Role | CreditRatingServiceProvider |
Click OK.
The creditRatingService partner link appears on the right side of the design window.
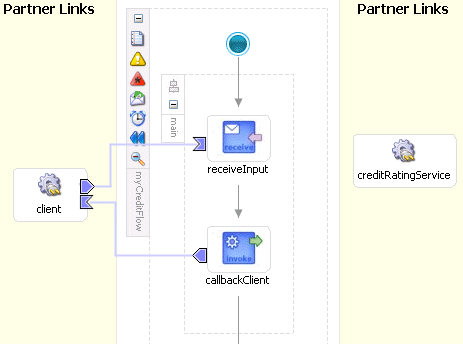
Description of the illustration creditflowplink.gif
Select Save from the File main menu.
Go to the Component Palette section.
Drag and drop a Scope activity between the receiveInput and callbackClient activities.
Double-click the Scope activity to display the Scope window.
Enter GetCreditRating in the Name field of the General tab.
Click OK.
Select Save from the File main menu.
Click the + sign to expand the GetCreditRating Scope activity.
Drag and drop an Invoke activity from the Component Palette section into the GetCreditRating Scope activity.
Double-click the Invoke icon to display the Invoke window.
Enter the following details:
| Field | Value |
|---|---|
| Name | invokeCRS |
| Partner Link | creditRatingService |
The Operation (process) field is automatically filled in.
Click the first icon to the right of the Input Variable field. This is the automatic variable creation icon.

Click OK on the Create Variable window that appears.
A variable named invokeCRS_process_InputVariable is automatically created in the Input Variable field. This variable is automatically assigned a message type of CreditRatingServiceRequestMessage.
Click the first icon to the right of the Output Variable field.
Click OK on the Create Variable window that appears.
A variable named invokeCRS_process_OutputVariable is automatically created in the Output Variable field. This variable is automatically assigned a message type of CreditRatingServiceResponseMessage.
Click OK.
Select Save from the File main menu.
Drag and drop an Assign activity from the Component Palette section to above the invokeCRS Invoke activity.
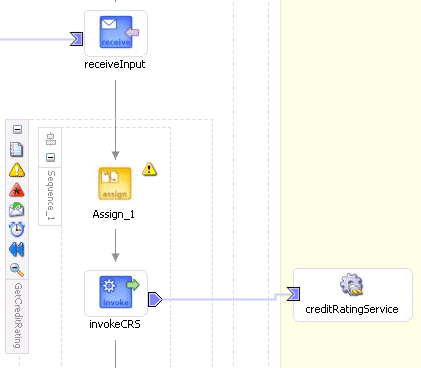
Double-click the Assign icon to display the Assign window.
Enter assignSSN in the Name field of the General tab.
Click Apply.
Click the Copy Rules tab.
Click Create to display the Create Copy Rule window.
Enter the following values:
| Field | Value |
|---|---|
| From |
|
|
Variable |
|
Expand and select Variables > inputVariable > payload > client:myCreditFlowProcessRequest > client:ssn
Note: The namespace number values (for example, ns1, ns2) can vary. Use the namespace values that automatically appear. |
| To |
|
|
Variable |
|
Expand and select Variables > invokeCRS_process_InputVariable > payload > ns1:ssn |
Click OK to close the Create Copy Rule window and the Assign window.
Select Save from the File main menu.
|
Summary: This Assign activity returns details about the client's assigned credit rating. |
Drag and drop a second Assign activity from the Component Palette section to below the invokeCRS Invoke activity within the GetCreditRating Scope activity.
Double-click the Assign icon to display the Assign window.
Enter assignCreditRating in the Name field of the General tab.
Click Apply.
Click the Copy Rules tab.
Click Create to display the Create Copy Rule window.
Enter the following values:
| Field | Value |
|---|---|
| From |
|
|
Variable |
|
Expand and select Variables > invokeCRS_process_OutputVariable > payload > ns1:rating
Note: The namespace number values (for example, ns1, ns2) can vary. Use the namespace values that automatically appear. |
| To |
|
|
Variable |
|
Expand and select Variables > outputVariable > payload > client:myCreditFlowProcessResponse > client:creditRating |
Click OK to close the Create Copy Rule window and the Assign window.
The Scope activity looks as follows:
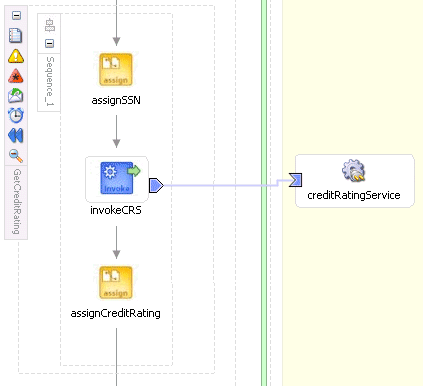
Select Save from the File main menu.
You have now completed the Credit Rating service design and are ready to proceed to the validation, compilation, and deployment tasks described in the following section.
You are now ready to deploy your BPEL process.
Go to the Applications Navigator section.
Right-click myCreditFlow.
Select Deploy > LocalBPELServer > Deploy to default domain.
Enter bpel when prompted for the domain password.
Click OK.
This compiles the BPEL process. Review the bottom of the window for any errors. If there are no errors, the following message appears:
[3:43:31 PM] Successful compilation: 0 errors, 0 warnings.
Deploying to http://localhost:9700 domain: default. Please wait ...
            bpel_myCreditFlow_1.0.jar deployed successfully.
If there are errors, click BPEL Validation Errors to display details about the type and location of the error.
Make corrections and deploy again.
You are now ready to begin the process of applying for and receiving a loan offer.
Log into Oracle BPEL Console by selecting Start > All Programs > Oracle - Oracle_Home > Oracle BPEL Process Manager 10.1.2 > BPEL Console.
Enter bpel when prompted for the password.
The Dashboard tab of Oracle BPEL Console appears.
Click myCreditFlow in the Deployed BPEL Processes list.
Enter a nine-digit integer value that does not begin with zero in the ssn field of the HTML Form and click Post XML Message. Note that the name ssn that displays in the user interface is the value you entered in "Editing the WSDL File Source Code".
The BPEL Processes tab displays a message similar to the following:
Test Instance Initiated

Instance '39e706a46ad531be:858bf1:fcc240f310:-7ffc' is being processed asynchronously.
Click Visual Flow to view a visual audit trail of the current state of the process instance.
An audit trail displaying the current state of the process appears. It indicates that you have successfully invoked the Credit Rating service.
Click callbackClient in the audit trail to see the results of the loan offer, including the credit rating returned (560) by the Credit Rating service to the client.
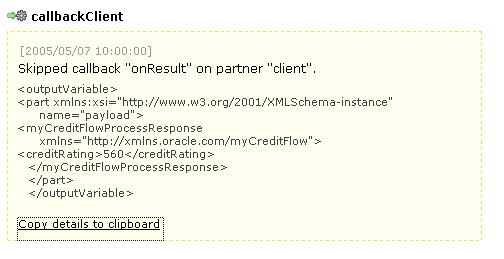
Click the Audit link at the top to observe additional information.