|
Oracle® Application Server Portal User’s Guide
10g (9.0.4) Part No. B10358-01 |
|
|
|
|
|
Oracle® Application Server Portal User’s Guide
10g (9.0.4) Part No. B10358-01 |
|
|
|
|
This chapter shows you all the different things you can do to the content in your page group to make it easier for your users to find and work with. It contains the following main sections:
The contents of this chapter are intended for users with at least the Manage All privilege on a page group (that is, page group administrators). If a particular task requires different privileges, the required privileges will be listed before the steps of that task.
Portals are all about bringing together the information that users need to do their jobs more effectively. Since managing business documents and other content is an important part of most jobs, and since the portal is the focal point for user collaboration and the logical location to publish and access business content, it only makes sense that content management features should be part of the OracleAS Portal framework.
OracleAS Portal includes several attributes, page types, and item types that are intended as a starting point for describing the content in your portal. If you find that you wish to store more information about the pages and items in your portal, you can create your own attributes and add them to page and item types. You can also create your own page and item types. See Section 5.2, "Working with Attributes, Page Types, and Item Types".
Because of its self-service features, a portal has the potential to contain a great deal of content. To make it easier for your users to find the information stored in the portal, OracleAS Portal provides the ability to classify content using categories and perspectives. Users can then search for content of a particular category (for example, Sales Report), or that is written from a particular perspective (for example, Sales Representative). See Section 5.3, "Working with Categories" and Section 5.4, "Working with Perspectives".
To ensure validity of content, OracleAS Portal can route content for approval before it is published on the page. Simple or multi-step processes can be defined with single or multiple reviewers at each step. Notifications are sent to each approver in the approval process indicating that action is required, while the Status portlet tracks the item’s progression from the contributor’s point of view. Expiry notifications alert users to content that is about to expire. See Section 5.5, "Setting Up Approvals".
Additional features support collaborative document creation, ease content management tasks, and make finding published items very easy. These features include item version control, check-in/check-out, publish and expiration dates, and automatic indexing. Users can also subscribe to items or pages and are notified whenever the subscribed content changes. See Section 5.6, "Configuring Page Group Item Management Settings".
OracleAS Portal provides an assortment of base attributes, page types, and item types that you can expose to the user community. Each page and item type includes attributes that are used to store information about the page or item. If the base page and item types do not quite meet your requirements, you can create your own page and item types. This means that you can have complete control over what information is stored by specifying which attributes to include in the page or item type. If the base attributes do not cover the kind of information you want to store about your pages or items, you can create your own attributes and add those to your page and item types. You can control exactly which page and item types are made available to the users of your page group.
OracleAS Portal also includes a selection of built-in extensible item types. If you do not want to create your own item types, you can edit these built-in item types to meet your requirements.
This section contains the following sub-sections:
|
Privileges: Any user with at least the Manage Classifications privilege on a page group can create and manage attributes and types. To edit the built-in page and item types, you must have at least the Manage Classifications privilege on the Shared Objects page group. |
There are two types of attributes:
Content attributes are associated with item types and page types, and store information about an item or page, such as the associated category, description, or perspectives. These attributes are included in the add and edit pages where users can provide information about the item or page they are adding or editing. Page group administrators can create their own item types and page types and specify exactly what information they want users to supply by choosing which attributes to include. In addition, page group administrators can create their own attributes for containing extra information.
For a list of the content attributes provided by default, see Section B.2.1, "Base Content Attributes".
Display attributes are associated with regions, and display information about an item or portlet, such as the author, display name, and creation date. Page designers can choose which attributes to display in a region. Some content attributes can also be used as display attributes. See Section 7.5.2.10, "Changing the Attributes Displayed in a Region".
For a list of the display attributes provided by default, see Section B.2.2, "Base Display Attributes".
To create an attribute:
In the Navigator, click the link for the page group in which you want to create the attribute.
To get to the Navigator click the Navigator link on any page. By default you can find a Navigator link on the Portal Builder page.
Click the Attributes link.
|
Tip: If you create an attribute in a particular page group, that attribute is available only in that page group. If you want the attribute to be available in multiple page groups, either create it in the Shared Objects page group, or (if the attribute already exists) promote it to the Shared Objects page group. See Section 4.5, "Sharing Objects Between Page Groups". |
Next to Create New, click the Attribute link.
In the Name field, enter a name for the attribute. The name is used internally only.
The name must be unique within the page group and the Shared Objects page group. The name is limited to 60 characters, and can contain only alphanumeric characters (A-Z a-z 0-9) and the underscore character (_); spaces and other special characters are not allowed.
In the Display Name field, enter a descriptive name for the attribute. The display name is displayed as a label for the attribute when users add or edit an item or page of a type that includes the attribute.
The display name is limited to 60 characters and can contain any character, including spaces.
From the Datatype list, choose the type of data that the attribute will store.
Boolean stores a value of TRUE or FALSE.
Date stores a date in the format DD-MON-YYYY HH12:MI PM, for example, 20-SEP-2002 10:57 AM.
File stores a file, such as a Microsoft Excel spreadsheet or an HTML document.
Number stores a numeric value, for example, 8479.
PL/SQL stores PL/SQL code, for example, htp.p(’Hello World’);
Text stores a text string.
URL stores the URL of a Web site or page, for example, http://www.oracle.com.
Click Create.
Click Close.
You can specify how an attribute is displayed when users add or edit an item or page of a type that includes the attribute. For example, you can change the label for the attribute by editing the attribute’s display name.
To edit an attribute:
Use the Navigator to browse to the attribute that you want to edit.
To get to the Navigator click the Navigator link on any page. By default you can find a Navigator link on the Portal Builder page.
|
Tip: If the attribute is shared, it will be in the Shared Objects page group. See Section 4.5, "Sharing Objects Between Page Groups". |
In the row for the attribute, click the Edit link.
In the Name field, edit the name of the attribute. The name is used internally only.
The name must be unique within the page group and the Shared Objects page group. The name is limited to 60 characters and can contain only alphanumeric characters (A-Z a-z 0-9) and the underscore character (_); spaces and other special characters are not allowed.
In the Display Name field, edit the descriptive name of the attribute. The display name is displayed as a label for the attribute when users add or edit an item or page of a type that includes the attribute.
The display name is limited to 60 characters and can contain any character, including spaces.
Select Enable Translations if you want users to be able to translate the values stored in the attribute into different languages.
If you clear this check box, the values stored in the attribute will be the same in all languages.
For Date, Number, and URL attributes:
In the List Of Values field, enter the name of a list of values from which users can choose a value for the attribute. If you are not sure of the name of the list of values, click the List icon and select from the list provided.
|
Note: The list of values must already exist. |
For PL/SQL attributes:
In the PL/SQL Execute Options radio group, select which privileges to use when executing the PL/SQL stored in the attribute:
Public executes the PL/SQL with the privileges of the OracleAS Portal PUBLIC schema.
Creator executes the PL/SQL with the privileges of the schema associated with the user who created the item or page that includes the PL/SQL attribute.
Schema executes the PL/SQL with the privileges of a specific schema. If you select this radio button, enter the name of the schema in the field provided. If you are not sure of the name of the schema, click the Browse Database Schemas icon and select from the list provided.
For Text attributes:
In the Length field, enter the number of characters the attribute can store.
In the Display Option radio group, select how to display the attribute when users add or edit an item or page of a type that includes the attribute:
Single-line Field displays the attribute as a field that contains a single line of text.
Multi-line Field displays the attribute as a field that contains multiple lines of text.
List Of Values displays the attribute as a list from which users can choose a value.
If you select this radio button, enter the name of the list of values in the field provided. If you are not sure of the name of the list of values, click the List icon and select from the list provided.
|
Note: The list of values must already exist. |
Click OK.
Page types define the contents of a page and the information that is stored about a page. The information stored about a page is determined by the attributes of the page type.
By default, OracleAS Portal includes several base page types so that page managers can get started creating pages right out of the box. For a complete list of base page types, see Section B.3, "Base Page Types".
However, you may find that you want to store more information about your pages than the base page types allow. If this is the case, you can create your own page types. You base your page type on one of the base page types. The page type automatically inherits all of the base page type’s attributes. But, after you create your page type, you can edit it to add other attributes that are specific to your requirements. These attributes can be other default OracleAS Portal attributes, or attributes that you have created yourself.
In addition to adding attributes to page types, you can also add calls to PL/SQL or HTTP procedures. You can pass attributes as parameters to those procedures if required.
To create a page type:
In the Navigator, click the link for the page group in which you want to create the page type.
To get to the Navigator click the Navigator link on any page. By default you can find a Navigator link on the Portal Builder page.
|
Tip: If you create a page type in a particular page group, that page type is available only in that page group. If you want the page type to be available in multiple page groups, either create it in the Shared Objects page group, or (if the page type already exists) promote it to the Shared Objects page group. See Section 4.5, "Sharing Objects Between Page Groups". |
Click the Page Types link.
Next to Create New, click the Page Type link.
In the Name field, enter a name for the page type. The name is used internally only.
The name must be unique within the page group and the Shared Objects page group. The name is limited to 60 characters and can contain only alphanumeric characters (A-Z a-z 0-9) and the underscore character (_); spaces and other special characters are not allowed.
In the Display Name field, enter a descriptive name for the page type. The display name is used in the Create Page Page Type list, so shorter display names are better.
The display name is limited to 60 characters and can contain any character, including spaces.
From the Base Page Type list, choose the base page type from which you want your page type to inherit attributes. You can choose from Standard, PL/SQL, or URL.
Click Create.
Click Close.
When you first create a page type, it is exactly the same as the base page type from which you chose to inherit attributes. To truly customize the page type, you need to edit it to add more attributes, and possibly procedure calls.
|
Note: You cannot edit the base page types. |
To edit the basic properties of a page type:
Use the Navigator to browse to the page type that you want to edit.
To get to the Navigator click the Navigator link on any page. By default you can find a Navigator link on the Portal Builder page.
|
Tip: If the page type is shared, it will be in the Shared Objects page group. See Section 4.5, "Sharing Objects Between Page Groups". |
In the row for the page type, click the Edit link.
In the Name field, edit the name of the page type. The name is used internally only.
The name must be unique within the page group and the Shared Objects page group. The name is limited to 60 characters and can contain only alphanumeric characters (A-Z a-z 0-9) and the underscore character (_); spaces and other special characters are not allowed.
In the Display Name field, edit the descriptive name of the page type. The display name is used in the Create Page Page Type list, so shorter display names are better.
The display name is limited to 60 characters and can contain any character, including spaces.
In the Description field, enter information about the page type that may be useful to others, such as its arguments, functionality, or usage. The description is displayed only when editing the page type.
In the Icon field, enter the path and file name of an image to associate with the page type. Click Browse to locate the image if you are not sure of its path or file name. When you click Apply or OK, the file is uploaded to the Oracle Application Server Metadata Repository.
|
Note: This icon is not currently used within OracleAS Portal. The icon may be used in future releases. |
Click OK.
To add attributes to a page type:
Use the Navigator to browse to the page type that you want to edit.
To get to the Navigator click the Navigator link on any page. By default you can find a Navigator link on the Portal Builder page.
|
Tip: If the page type is shared, it will be in the Shared Objects page group. See Section 4.5, "Sharing Objects Between Page Groups". |
In the row for the page type, click the Edit link.
Click the Attributes tab.
In the Available Attributes list, select the attributes that you want to add to the page type.
Click the Move Right icon to move the selected attributes to the Selected Attributes list.
The order of attributes in the Selected Attributes list determines the order in which the attributes are displayed when users create or edit a page of this type. Use the icons to the right of the list to change the order.
Click Apply to add the attributes to the page type.
When you have added the attributes, you can change their display properties if necessary:
In the Default Value field, enter the value to use by default for the attribute. If page managers do not specify a value for the attribute, the default value is used. You can leave this field blank if you prefer.
Select the Required check box if you want it to be mandatory for page managers to provide a value for the attribute. The attribute will be displayed on the first page of the Create Page Wizard, and the Main tab of the Edit Page page.
If you do not select this check box, page managers do not need to provide a value for the attribute and the attribute will be displayed on the Optional tab of the Edit Page page.
Click OK.
To remove attributes from the page type, select the attributes in the Selected Attributes list, and click the Move Left icon.
For an example of how you might use a procedure call in a page or item type, see Example 5-1, "Adding an HTTP Procedure Call to an Item Type" or Example 5-2, "Adding a PL/SQL Procedure Call to an Item Type".
To add a procedure call to a page type:
Use the Navigator to browse to the page type that you want to edit.
To get to the Navigator click the Navigator link on any page. By default you can find a Navigator link on the Portal Builder page.
|
Tip: If the page type is shared, it will be in the Shared Objects page group. See Section 4.5, "Sharing Objects Between Page Groups". |
In the row for the page type, click the Edit link.
Click the Procedures tab.
From the Type list, choose whether the call is to an HTTP or PL/SQL procedure.
In the Procedure Call field, enter one of the following:
The URL of the HTTP procedure, including the protocol used to access it, for example:
http://search.oracle.com
The name of the PL/SQL procedure. The procedure must already exist in the database and must be prefixed with its owning schema, for example:
SCOTT.MY_PROC
The PUBLIC user must be granted execute privileges on the procedure.
In the Link Text field, enter the text to display as a hypertext link that users can click to execute the procedure call.
This link is displayed only if the page includes a Page Function item and you do not select Display Procedure Results With Page, or you have not specified an icon. For information about adding a Page Function item to a page, see Including a Page Type’s Procedure Call on a Page.
In the Icon field, enter the path and file name of an image to associate with this procedure call. If you specify an icon, it is used instead of the Link Text, however you must still enter a value in the Link Text field to serve as the image’s rollover text.
Click Browse to locate the image if you are not sure of its path or file name.
Select Display Procedure Results With Page to display the results of the procedure call directly in the page instead of displaying a link for users to click. This makes the results immediately visible to users, rather than requiring them to click a link to execute the procedure call themselves.
If the procedure you are calling has parameters, you can pass values to those parameters using the page type’s attributes.
In the Attribute list, choose the attribute whose values you want to pass to a parameter in the procedure.
In the Pass As field, enter the parameter name if it is different from the attribute name.
Click Apply to add the procedure call to the page type.
Click OK.
To remove a procedure call from the page type, click the Delete Procedure icon next to the procedure call in the Existing Procedure Calls section.
To edit an existing procedure call, for example, to add more parameter/attribute mappings, click the Edit Procedure icon next to the procedure call in the Existing Procedure Calls section. You can then edit the procedure call properties in the fields below. Remember to click Apply to save your changes.
If a page type includes a procedure call, the link to execute the procedure call will be displayed in a page of that type only if a Page Function item is added to the page.
To include a page type’s procedure call on a page:
In the Page Groups portlet, under Edit a Page, click the Browse Pages icon next to the Name field.
Select the page to which you want to add the Page Function item, then click Edit.
In the region where you want to add the Page Function item, click the Add Item icon.
If you do not see the Add Item icon, the region may be a portlet region, in which case, you cannot add items to this region.
From the Built-In Navigation Item Types list, choose Page Function.
If there are no page functions associated with the current page, this item type is not displayed. If you know there are page functions, but this item type does not appear in the list, contact your page group administrator. Your administrator selects which item types to display here.
If you do not see Page Function in the list, the page may not have any page functions associated with it or the Page Function item type may not have been included in the page group. For information about how to include this item type, see Section 5.2.3.3, "Making an Item Type Available to a Page Group".
Click Next.
From the Page Function list, choose the page function that you want to include in the page.
Click Finish.
When you create a page type, it is not immediately available for use by page creators. This is because you will probably want to edit the page type first to add attributes and procedure calls. When you are happy with the page type, and are ready for page creators to start creating pages of that type, you must make the page type available in the page group.
To make a page type available to a page group:
From the Page Groups portlet’s Page Group list, choose the page group with which you want to work, then click Edit.
By default, the Page Groups portlet is located on the Build tab of the Builder page.
Click the Configure tab.
In the Page Types and Template section, click the Edit link.
|
Note: You can also reach the Page Defaults page by clicking the Configure link on the first page of the Create Page Wizard. |
From the Hidden Page Types list, select the page type that you want to make available.
The Hidden and Visible Page Type lists include all the base page types, and the page types owned by this page group and the Shared Objects page group.
Click the Move Right icon to move the selected page type into the Visible Page Types list.
The order of page types in the Visible Page Types list determines the order in which the page types are displayed in the Page Type list when creating a page.
Click OK to return to the Configure tab.
Click Close.
You can also exclude a page type from a page group, meaning that page creators cannot create pages of that type in the page group. For example, if you have created your own page types, you might want to exclude some of the base page types from the page group. To do this, select the page type in the Visible Page Type list and click the Move Left icon.
When you delete a page type, all pages of that type and all the items in those pages are also deleted. You cannot undo this action.
|
Note: You cannot delete the base page types. |
To delete a page type:
Use the Navigator to browse to the page type that you want to delete.
To get to the Navigator click the Navigator link on any page. By default you can find a Navigator link on the Portal Builder page.
|
Tip: If the page type is shared, it will be in the Shared Objects page group. See Section 4.5, "Sharing Objects Between Page Groups". |
In the row for the page type, click the Delete link.
Item types define the contents of an item and the information that is stored about an item. The information stored about an item is determined by the attributes of the item type.
By default, OracleAS Portal includes several base item types to cover the most common content that contributors will want to add. OracleAS Portal also includes several built-in custom item types so that content contributors can get started adding content right out of the box. For a complete list of base and built-in item types, see Section B.4, "Base Item Types".
However, you may find that you want to store more information about your items than the built-in item types allow. If this is the case, you can extend the built-in item types to meet your requirements. You can add different attributes to the built-in item types to store exactly the information that you want. You can also add calls to PL/SQL and HTTP procedures and even pass attributes to the parameters of those procedures. For example, if the Review item type includes a Search attribute to store a search string, you could add a procedure call to a search engine and pass the search string to that search engine. When users run the search engine, the search results for the search string are displayed.
If you prefer, you can create your own item types. You can base an item type on one of the base item types. Basing your item type on a base item type means that your item type will inherit certain attributes. You can then extend your item type to include other attributes and procedure calls. You can also choose to base your item type on none of the base item types (choose <None> from the Base Item Type list), which gives you complete control over the attributes included in the item type.
To create an item type:
In the Navigator, click the link for the page group in which you want to create the item type.
To get to the Navigator click the Navigator link on any page. By default you can find a Navigator link on the Portal Builder page.
|
Tip: If you create an item type in a particular page group, that item type is available only in that page group. If you want the item type to be available in multiple page groups, either create it in the Shared Objects page group, or (if the item type already exists) promote it to the Shared Objects page group. See Section 4.5, "Sharing Objects Between Page Groups". |
Click the Item Types link.
Next to Create New, click the Item Type link.
In the Name field, enter a name for the item type. The name is used internally only.
The name must be unique within the page group and the Shared Objects page group. The name is limited to 60 characters and can contain only alphanumeric characters (A-Z a-z 0-9) and the underscore character (_); spaces and other special characters are not allowed.
In the Display Name field, enter a descriptive name for the item type. The display name is used in the Add Item Item Type list, so shorter display names are better.
The display name is limited to 60 characters and can contain any character, including spaces.
From the Base Item Type list, choose the base item type from which you want your item type to inherit attributes. You can choose from None, Base File, Base Image Map, Base Image, Base PL/SQL, Base Page Link, Base Text, and Base URL.
Click Create.
Click Close.
When you first create an item type, it includes exactly the same attributes as the base item type on which you based it. If you chose <None> as the base item type, your new item type includes only the Display Name attribute. To truly customize the item type, you need to edit it to add more attributes, and possibly procedure calls.
|
Note: You cannot edit the base item types. However you can extend the built-in item types. |
To edit the basic properties of an item type:
Use the Navigator to browse to the item type that you want to edit.
To get to the Navigator click the Navigator link on any page. By default you can find a Navigator link on the Portal Builder page.
|
Tip: If the item type is shared (or is one of the built-in item types), it will be in the Shared Objects page group. See Section 4.5, "Sharing Objects Between Page Groups". |
In the row for the item type, click the Edit link.
In the Name field, edit the name of the item type. The name is used internally only.
The name must be unique within the page group and the Shared Objects page group. The name is limited to 60 characters and can contain only alphanumeric characters (A-Z a-z 0-9) and the underscore character (_); spaces and other special characters are not allowed.
In the Display Name field, edit the descriptive name of the item type. The display name is used in the Add Item Item Type list, so shorter display names are better.
The display name is limited to 60 characters and can contain any character, including spaces.
In the Description field, enter information about the item type that may be useful to others, such as its arguments, functionality, or usage. The description is displayed only when editing the item type.
In the Icon field, enter the path and file name of an image to associate with the item type. Click Browse to locate the image if you are not sure of its path or file name. When you click Apply or OK, the file is uploaded to the Oracle Application Server Metadata Repository.
|
Note: This icon is not currently used within OracleAS Portal. The icon may be used in future releases. |
You can create your own help to display when users click the context sensitive help icon while adding an item of this type. To associate your custom help with the item type, enter the URL of the help in the Help URL For Add Item Wizard field
You can also create your own help to display when users click the context sensitive help icon while editing an item of this type. To associated your custom help with the item type, enter the URL of the help in the Help URL For Edit Item Wizard field.
Click OK.
To add attributes to an item type:
Use the Navigator to browse to the item type that you want to edit.
To get to the Navigator click the Navigator link on any page. By default you can find a Navigator link on the Portal Builder page.
|
Tip: If the item type is shared (or is one of the built-in item types), it will be in the Shared Objects page group. See Section 4.5, "Sharing Objects Between Page Groups". |
In the row for the item type, click the Edit link.
Click the Attributes tab.
In the Available Attributes list, select the attributes that you want to add to the item type.
Click the Move Right icon to move the selected attributes to the Selected Attributes list.
The order of attributes in the Selected Attributes list determines the order in which the attributes are displayed when users add or edit an item of this type. Use the icons to the right of the list to change the order.
Click Apply to add the attributes to the item type.
When you have added the attributes, you can change their display properties if necessary:
In the Default Value field, enter the value to use by default for the attribute. If content contributors do not specify a value for the attribute, the default value is used. You can leave this field blank if you prefer.
You can use PL/SQL expressions and function calls to determine the default value for an attribute. You must precede the expression or function call with a # character. The function being called must already exist in the database and must be prefixed with its owning schema.
For example, to set the default value of the Author attribute to the current user, you would set the default value of the attribute to #USER. To set the default value of the Publish Date attribute to the first day of the month, you would set the default value of the attribute to #TO_CHAR(LAST_DAY(SYSDATE)+1, 'DD-MON-YYYY HH12:MI PM'). If you had a function (GET_CURRENT_PROJECT) that returns the current project id of a user, you could set the default value of a Project ID attribute to #PROJECTS.GET_CURRENT_PROJECT.
|
Note: You cannot pass attribute values as parameters to a function when it is called from an attribute default value. You can however pass PL/SQL expressions as parameters. You can use expressions and function calls only for the default values of attributes, not for the actual values of attributes. If you are using an expression to determine the default value of a date attribute, you must make sure that the date value is converted to the DD-MON-YYYY HH12:MI PM date format as shown in the second example above. |
Select the Required check box if you want it to be mandatory for content contributors to provide a value for the attribute. The Required icon will be displayed next to the attribute when contributors add or edit an item of this type.
If you do not select this check box, content contributors do not need to provide a value for the attribute.
Clear the Add Wizard check box if you do not want to display the attribute on the Add Item Wizard.
For example, to make it easier for content contributors to add an item of this type, you might want to limit the number of attributes displayed on the Add Item Wizard. Contributors can provide values for the extra attributes when they edit the item.
Clear the Edit Wizard check box if you do not want to display the attribute on the Edit Item pages.
For example, if you want to supply a default value for an attribute, and do not want content contributors to be able to change that value, clear both the Add Wizard and Edit Wizard check boxes so that the attribute does not display in the wizards.
You could create an item type called Performance Review and add the Expiration Period attribute to it. You set a default value for the attribute, 01-JAN-2003, so that every Performance Review item added by users expires on this date. Since users do not need to know about or edit this date, you clear the Add Wizard and Edit Wizard check boxes for the attribute. When users add and edit their performance review items, they will not see the Expiration Period attribute even though it is stored for each item.
Click OK.
To remove attributes from the item type, select the attributes in the Selected Attributes list, and click the Move Left icon.
|
Tip: If you intend any of the attributes that you add to include important information that you want users to see immediately, you should instruct page designers to display those attributes in the regions on their pages. See Section 7.5.2.10, "Changing the Attributes Displayed in a Region". |
For an example of how you might use a procedure call in an item type, see Example 5-1, "Adding an HTTP Procedure Call to an Item Type" or Example 5-2, "Adding a PL/SQL Procedure Call to an Item Type".
To add a procedure call to an item type:
Use the Navigator to browse to the item type that you want to edit.
To get to the Navigator click the Navigator link on any page. By default you can find a Navigator link on the Portal Builder page.
|
Tip: If the item type is shared (or is one of the built-in item types), it will be in the Shared Objects page group. See Section 4.5, "Sharing Objects Between Page Groups". |
In the row for the item type, click the Edit link.
Click the Procedures tab.
From the Type list, choose whether the call is to an HTTP or PL/SQL procedure.
In the Procedure Call field, enter one of the following:
The URL of the HTTP procedure, including the protocol used to access it, for example:
http://search.oracle.com
The name of the PL/SQL procedure. The procedure must already exist in the database and must be prefixed with its owning schema, for example:
SCOTT.MY_PROC
The PUBLIC user must be granted execute privileges on the procedure.
In the Link Text field, enter the text to display as a hypertext link that users can click to execute the procedure call.
This link is displayed only if the region containing the item displays the Associated Function attribute and you do not select Display Procedure Results With Item, or you have not specified an icon. For information about adding the Associated Function attribute to a region, see Including an Item Type’s Procedure Call on a Page.
In the Icon field, enter the path and file name of an image to associate with this procedure call. If you specify an icon, it is used instead of the Link Text, however you must still enter a value in the Link Text field to serve as the image’s rollover text.
Click Browse to locate the image if you are not sure of its path or file name.
Select Display Procedure Results With Item to display the results of the procedure call directly in the page instead of displaying a link for users to click. This makes the results immediately visible to users, rather than requiring them to click a link to execute the procedure call themselves.
If the procedure you are calling has parameters, you can pass values to those parameters using the item type’s attributes.
In the Attribute list, choose the attribute whose values you want to pass to a parameter in the procedure.
In the Pass As field, enter the parameter name if it is different from the attribute name.
Click Apply to add the procedure call to the item type.
Click OK.
To remove a procedure call from the item type, click the Delete Procedure icon next to the procedure call in the Existing Procedure Calls section.
To edit an existing procedure call, for example, to add more parameter/attribute mappings, click the Edit Procedure icon next to the procedure call in the Existing Procedure Calls section. You can then edit the procedure call properties in the fields below. Remember to click Apply to save your changes.
Example 5-1 Adding an HTTP Procedure Call to an Item Type
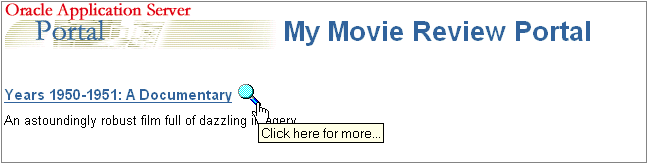
Imagine that your portal provides movie reviews to subscribers. To customize the hundreds of movie reviews you plan to upload, you create a Movie Review item type to use for each review. Knowing that users will want to find additional information about each movie, you decide to include a link to a search engine within the review.
To include this link, you choose HTTP as the procedure type, and add the following to the Procedure Call field (Figure 5-1):
http://www.google.com/search
You include the Link Text Click here for more. . ., and you specify an icon to associate with the procedure. You choose not to display the procedure results with the item because you want users to click the icon to access the search.
For the search engine to return information about the appropriate movie, you need to pass it the movie title. Say your Movie Review item type includes an attribute called Movie Title. To pass the value in this attribute to the search engine, you select it in the Attribute list (you could also use the Display Name attribute if it is used to store the title of the movie).
Finally, you need to make sure that the attribute value is sent to the correct search engine parameter. In the case of Google, the search parameter name is q, so you enter this name in the Pass As field (Figure 5-2).
This information is appended to the Procedure Call as follows:
http://www.google.com/search?q=<MovieTitle>
Each movie review will now include a link to a customized search based on the movie title (Figure 5-3).
When users click the specified icon, the customized search content (based on the movie title) displays (Figure 5-4). The movie title, which is the search criteria, displays at the top of the search results page.
Figure 5-1 Adding an HTTP Procedure Call to an Item Type

Figure 5-2 Passing Attribute Values to HTTP Procedure Parameters

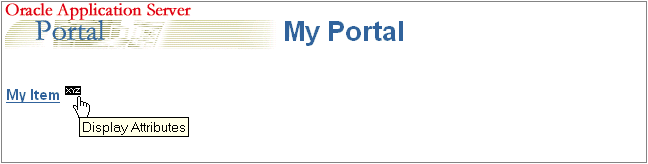
Example 5-2 Adding a PL/SQL Procedure Call to an Item Type
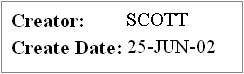
Imagine that you have written the following procedure that displays the creator and create date of an object in an HTML table:
--
-- procedure display_attributes
-- created Monday 17-JUN-2002 10:35
--
create or replace
procedure display_attributes (
  p_creator in varchar2,
  p_create_date in varchar2)
as
begin
  htp.p(’<table><tr><td><b>Creator:</b></td>’
  || ’<td>’ || p_creator || ’</td></tr>’
  || ’<tr><td><b>Create Date:</b></td>’
  || ’<td>’ || p_create_date || ’</td></tr>’
  || ’</table>’);
exception
when others then
  htp.p(sqlerrm);
end;
You can add a call to this procedure to an item type (My Item Type) so that this information is displayed for items of that type.
You choose PL/SQL as the procedure type, and add the following to the Procedure Call field (Figure 5-5):
SCOTT.DISPLAY_ATTRIBUTES
You include the link text Display Attributes, and you specify an icon to associate with the procedure.
For the procedure to return the appropriate attribute values, you need to pass it the attribute names. Your procedure includes two parameters: p_creator and p_create_date. You need to pass these two parameters information from the Creator and Create Date attributes (Figure 5-6).
Each item of type My Item Type will now include a link to run the procedure (Figure 5-7).
When users click the specified icon, the additional attributes are displayed as an HTML table (Figure 5-8).
Figure 5-5 Adding a PL/SQL Procedure Call to an Item Type

Figure 5-6 Passing Attribute Values to PL/SQL Procedure Parameters

If an item type includes a procedure call, the link to execute the procedure call will be displayed with an item of that type only if the Associated Functions attribute is displayed in the region that contains the item.
To include an item type’s procedure call on a page:
In the Page Groups portlet, under Edit a Page, click the Browse Pages icon next to the Name field.
Select the page to which you want to add the link, then click Edit.
In the region to which you want to add the link, click the Edit Region icon.
Click the Attributes/Style tab.
In the Available Attributes list, select Associated Function.
Click the Move Right arrow.
Click Apply.
Click Close.
When you create an item type, it is not immediately available for use by content contributors. This is because you will probably want to edit the item type first to add attributes and procedure calls. When you are happy with the item type, and are ready for content contributors to start adding items of that type, you must make the item type available in the page group.
To make an item type available to a page group:
From the Page Groups portlet’s Page Group list, choose the page group with which you want to work, then click Edit.
By default, the Page Groups portlet is located on the Build tab of the Builder page.
Click the Configure tab.
In the Content Type and Classification section, click the Edit link.
|
Note: You can also reach the Select Content Type and Configure Content page by clicking the configure the list of available item types link on the first page of the Add Item Wizard. |
From the Hidden Item Types list, select the item type that you want to make available.
The Hidden and Visible Item Type lists include all the item types owned by this page group and the Shared Objects page group.
Click the Move Right icon to move the selected item type into the Visible Item Types list.
The order of page types in the Visible Item Types list determines the order when items in a region are grouped by item type. For information about how to group items by item type, see Section 7.5.2.12, "Grouping Items in a Region".
Click OK to return to the Configure tab.
Click Close.
You can also exclude an item type from a page group, meaning that content contributors cannot add items of that type to pages in the page group. For example, if you have created your own item types, you might want to exclude some of the built-in item types from the page group. To do this, select the item type in the Visible Item Type list and click the Move Left icon.
When you delete an item type, all items of that type are also deleted. You cannot undo this action.
|
Note: You cannot delete the base item types. |
To delete an item type:
Use the Navigator to browse to the item type that you want to delete.
To get to the Navigator click the Navigator link on any page. By default you can find a Navigator link on the Portal Builder page.
|
Tip: If the item type is shared, it will be in the Shared Objects page group. See Section 4.5, "Sharing Objects Between Page Groups". |
In the row for the item type, click the Delete link.
Categories answer the question "What is this item or page?" and are used to classify content. Sales Report, Action Item, Corporate Graphic, and Location Maps are all examples of typical categories. The purpose of categories is to enable users to quickly display a listing of a particular type of content. For example, if you want users to be able to quickly access all of the company’s sales reports, you could create a category called Sales Report. When a user adds an item or page to the page group, they can assign it to the Sales Report category. To find all of the available sales reports, other users can search on the Sales Report category to see a listing of pages and items that belong to that category.
For information about assigning items and pages to a category, see Section 2.1.10.1, "Classifying the Content of an Item" and Section 7.8.5, "Assigning a Category to a Page". For information about searching on categories, see Section 1.2.1.2, "Performing an Advanced Search".
Since categories have the potential to be quite large, you can also create a hierarchy of categories. For example, in the Sales Report category, you might want to have separate, subordinate categories for the Eastern Division, the Central Division, and the Western Division.
When you create a category, a page is also created. This page is used to list all the items and pages that belong to the category. For example, if the items in a region are grouped by category, the name of the category is displayed as a link in the group by banner. When users click this link, the category’s page is displayed, listing all the items and pages that belong to the category.
The first time you create a category in a page group, a page template is also created and all category pages in the page group are based on this page template. This means that if you want to change the way category pages look, you just need to edit the category page template (rather than each individual category page).
|
Privileges: Any user with at least the Manage Classifications privileges on a page group can create and manage categories. |
This section contains the following sub-sections:
To create a category:
In the Navigator, click the link for the page group in which you want to create the category.
To get to the Navigator click the Navigator link on any page. By default you can find a Navigator link on the Portal Builder page.
|
Tip: If you create a category in a particular page group, that category is available only in that page group. If you want the category to be available in multiple page groups, either create it in the Shared Objects page group, or (if the category already exists) promote it to the Shared Objects page group. See Section 4.5, "Sharing Objects Between Page Groups". |
Click the Categories link.
Next to Create New, click the Category link. Or, if you want to create the category under an existing category, click the Create link next to the category under which you want to create the new category.
In the Name field, enter a name for the category. The name can be used in a URL to directly access the category. Direct access URLs take the following format:
http://<hostname>:<portnumber>/pls/<dad>/url/page/<pagegroupname>/<categoryname>
For example:
http://mymachine.mycompany.com:5000/pls/portal/url/page/myportal/mycategory
http://mymachine.mycompany.com:5000/pls/portal/url/page/myportal/mycategory/mysubcategory
The name must be unique within the page group and the Shared Objects page group. The name is limited to 60 characters and can contain only alphanumeric characters (a-z A-Z 0-9) and the underscore character (_); spaces and special characters are not allowed.
In the Display Name field, enter a descriptive name for the category.
The display name can contain up to 240 characters and can contain any character, including spaces.
Click Create.
Click Close.
When you create a category, not all of the available properties are available. You can edit a category after creating it to specify the rest of the available properties.
To edit the basic properties of a category:
Use the Navigator to browse to the category that you want to edit.
To get to the Navigator click the Navigator link on any page. By default you can find a Navigator link on the Portal Builder page.
|
Tip: If the category is shared, it will be in the Shared Objects page group. See Section 4.5, "Sharing Objects Between Page Groups". |
In the row for the category, click the Properties link.
In the Name field, edit the name of the category. The name can be used in a URL to directly access the category.
The name must be unique within the page group and the Shared Objects page group. The name is limited to 60 characters and can contain only alphanumeric characters (a-z A-Z 0-9) and the underscore character (_); spaces and other special characters are not allowed.
In the Display Name field, edit the descriptive name of the category.
The display name can contain up to 240 characters and can contain any character, including spaces.
In the Description field, enter information about the category that may be useful to other users. The description is displayed only when editing the category.
Click OK.
To specify category images:
Use the Navigator to browse to the category that you want to edit.
To get to the Navigator click the Navigator link on any page. By default you can find a Navigator link on the Portal Builder page.
|
Tip: If the category is shared, it will be in the Shared Objects page group. See Section 4.5, "Sharing Objects Between Page Groups". |
In the row for the category, click the Properties link.
Click the Image tab.
In the Title Image Name field, enter the path and file name of an image to use when the category is displayed in a list of objects item.
In the Rollover Image Name field, enter the path and file name of an image to use as a rollover image when the category is displayed in a list of objects item. The rollover image is displayed when users place their cursors over the title image.
In the Banner Image Name field, enter the path and file name of an image to display in the category page.
In the Icon Name field, enter the path and file name of an image to use when categories are displayed next to items in a region.
Click OK.
When you create a category in a page group it is immediately available for page managers and content contributors to apply to the pages and content in that page group. You can also make shared categories available in your page group. And, if you want, you can hide categories so that page managers and contributors cannot use them.
To make a category available in a page group:
From the Page Groups portlet’s Page Group list, choose the page group with which you want to work, then click Edit.
By default, the Page Groups portlet is located on the Build tab of the Builder page.
Click the Configure tab.
In the Content Type and Classification section, click the Edit link.
In the Hidden Categories list, select the category that you want to make available.
The Hidden and Visible Categories lists include all the categories owned by this page group and the Shared Objects page group.
Click the Move Right icon to move the selected category into the Visible Categories list.
The order of categories in the Visible Categories list determines the order used when items in a region are grouped by category.
If you want to make a sub-category visible, its parent category must also be included in the Visible Categories list.
Click OK to return to the Configure tab.
Click Close.
To exclude a category from a page group, select the category in the Visible Categories list and click the Move Left icon. Any items that have already been assigned to that category will still be visible when users view the page, however content contributors cannot assign the category to new items.
If you hide a shared category, it is hidden only in the current page group (not in all page groups). To hide a shared category in all page groups, you must hide it in the Shared Objects page group.
Even if you exclude all categories from a page group, if an item or page type includes the category attribute, the category list will still be displayed when adding or editing items or pages. The General category will be displayed in the list even though it is not included in the page group.
When you delete a category, any item or page that is assigned to that category is reassigned to the General category. If the category includes sub-categories, those sub-categories will also be deleted.
To delete a single category:
Use the Navigator to browse to the category that you want to delete.
To get to the Navigator click the Navigator link on any page. By default you can find a Navigator link on the Portal Builder page.
|
Tip: If the category is shared, it will be in the Shared Objects page group. See Section 4.5, "Sharing Objects Between Page Groups". |
In the row for the category, click the Delete link.
In the confirmation page, click Yes.
To delete multiple categories:
In the Navigator, click the link for the page group that owns the categories that you want to delete.
To get to the Navigator click the Navigator link on any page. By default you can find a Navigator link on the Portal Builder page.
|
Tip: If the categories are shared, they will be in the Shared Objects page group. See Section 4.5, "Sharing Objects Between Page Groups". |
Click the Categories link.
Click the actions link.
Select the check boxes next to the categories that you want to delete.
To delete all the categories in the page group, select the check box in the header row.
Click Delete.
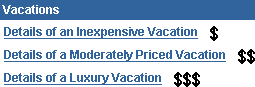
Perspectives are used to further classify content by a cross-category grouping. Perspectives often answer the question "Who will be interested in this item?" A human resources page group might have perspectives such as All Employees, Design Analysts, Quality Assurance Engineers, and Sales Representatives. A travel agency page group might have perspectives such as Inexpensive Vacations, Moderately Priced Vacations, and Luxury Vacations. The purpose of perspectives is to enable users to quickly display a listing of content that is pertinent to them. For example, if you want some users to be able to quickly access all of the content that relates to being a sales representative (such as sales reports, contact management applications, and calendaring services), you could create a perspective called Sales Representatives. When a user adds an item to the page group, they can assign it to this and other perspectives. To find all of the available content, other users can then search on this perspective to see a listing of the items that are part of it.
For information about assigning items to perspectives, see Section 2.1.10.1, "Classifying the Content of an Item". For information about searching on categories, see Section 1.2.1.2, "Performing an Advanced Search".
Unlike categories, users can choose more than one perspective for an item. For example, a sales report might belong to both the Sales Representatives and Marketing Managers perspectives.
Since perspectives have the potential to be quite large, you can also create a hierarchy of perspectives. For example, in the Sales Representatives perspective, you might want to have separate subordinate perspectives for sales representatives in the eastern division, the central division, and the western division.
When you create a perspective, a page is also created. This page is used to list all the items and pages that belong to the perspective. For example, regions can be set up to display perspectives. When users click a perspective, that perspective’s page is displayed, listing all the items and pages that belong to the perspective.
The first time you create a perspective in a page group, a page template is also created and all perspective pages in the page group are based on this page template. This means that if you want to change the way perspective pages look, you just need to edit the perspective page template (rather than each individual perspective page).
|
Privileges: Any user with at least the Manage Classifications privileges on a page group can create and manage perspectives. |
This section contains the following sub-sections:
To create a perspective:
In the Navigator, click the link for the page group in which you want to create the perspective.
To get to the Navigator click the Navigator link on any page. By default you can find a Navigator link on the Portal Builder page.
|
Tip: If you create a perspective in a particular page group, that perspective is available only in that page group. If you want the perspective to be available in multiple page groups, either create it in the Shared Objects page group, or (if the perspective already exists) promote it to the Shared Objects page group. See Section 4.5, "Sharing Objects Between Page Groups". |
Click the Perspectives link.
Next to Create New, click the Perspective link. Or, if you want to create the perspective under an existing perspective, click the Create link next to the perspective under which you want to create the new perspective.
In the Name field, enter a name for the perspective. The name can be used in a URL to directly access the perspective. Direct access URLs take the following format:
http://<hostname>:<portnumber>/pls/<dad>/url/page/<pagegroupname>/<perspectivename>
For example:
http://mymachine.mycompany.com:5000/pls/portal/url/page/myportal/myperspective
http://mymachine.mycompany.com:5000/pls/portal/url/page/myportal/myperspective/mysubperspective
The name must be unique within the page group and the Shared Objects page group. The name is limited to 60 characters and can contain only alphanumeric characters (a-z A-Z 0-9) and the underscore character (_); spaces and special characters are not allowed.
In the Display Name field, enter a descriptive name for the perspective.
The display name can contain up to 240 characters and can contain any character, including spaces.
Click Create.
Click Close.
When you create a perspective, not all of the available properties are available. You can edit a perspective after creating it to specify the rest of the available properties.
To edit the basic properties of a perspective:
Use the Navigator to browse to the perspective that you want to edit.
To get to the Navigator click the Navigator link on any page. By default you can find a Navigator link on the Portal Builder page.
|
Tip: If the perspective is shared, it will be in the Shared Objects page group. See Section 4.5, "Sharing Objects Between Page Groups". |
In the row for the perspective, click the Properties link.
In the Name field, edit the name of the perspective. The name can be used in a URL to directly access the perspective.
The name must be unique within the page group and the Shared Objects page group. The name is limited to 60 characters and can contain only alphanumeric characters (a-z A-Z 0-9) and the underscore character (_); spaces and other special characters are not allowed.
In the Display Name field, edit the descriptive name of the perspective.
The display name can contain up to 240 characters and can contain any character, including spaces.
In the Description field, enter information about the perspective that may be useful to other users. The description is displayed only when editing the category.
Select the Display Icon With Items check box if you want to display an image rather than the display name when the perspective is displayed next to items in a region (Figure 5-9):
If you select this check box you should also specify an Icon image for the perspective. If you do not specify an Icon image, the display name is displayed even if this check box is selected.
Click OK.
To specify perspective images:
Use the Navigator to browse to the perspective that you want to edit.
To get to the Navigator click the Navigator link on any page. By default you can find a Navigator link on the Portal Builder page.
|
Tip: If the perspective is shared, it will be in the Shared Objects page group. See Section 4.5, "Sharing Objects Between Page Groups". |
In the row for the perspective, click the Properties link.
Click the Image tab.
In the Title Image Name field, enter the path and file name of an image to use when the perspective is displayed in a list of objects item.
In the Rollover Image Name field, enter the path and file name of an image to use as a rollover image when the perspective is displayed in a list of objects item. The rollover image is displayed when users place their cursors over the title image.
In the Banner Image Name field, enter the path and file name of an image to display in the perspective page.
In the Icon Name field, enter the path and file name of an image to use when perspectives are displayed next to items in a region.
Click OK.
When you create a perspective in a page group it is immediately available for content contributors to apply to the items in that page group. You can also make shared perspectives available in your page group. And, if you want, you can hide perspectives so that contributors cannot use them.
To make a perspective available to a page group:
From the Page Groups portlet’s Page Group list, choose the page group with which you want to work, then click Edit.
By default, the Page Groups portlet is located on the Build tab of the Builder page.
Click the Configure tab.
In the Content Type and Classification section, click the Edit link.
In the Hidden Perspectives list, select the perspective that you want to make available.
The Hidden and Visible Perspectives lists include all the perspectives owned by this page group and the Shared Objects page group.
Click the Move Right icon to move the selected perspective into the Visible Perspectives list.
The order of perspectives in the Visible Perspectives list determines the order in which the perspectives are listed when adding or editing a page or item.
If you want to make a subperspective visible, its parent perspective must also be included in the Visible Perspectives list.
Click OK to return to the Configure tab.
Click Close.
To exclude a perspective from a page group, select the perspective in the Visible Perspectives list and click the Move Left icon.
If you hide a shared perspective, it is hidden only in the current page group (not in all page groups). To hide a shared perspective in all page groups, you must hide it in the Shared Objects page group.
When you delete a perspective, if the perspective includes sub-perspectives, those sub-perspectives will also be deleted.
To delete a single perspective:
Use the Navigator to browse to the perspective that you want to delete.
To get to the Navigator click the Navigator link on any page. By default you can find a Navigator link on the Portal Builder page.
|
Tip: If the perspective is shared, it will be in the Shared Objects page group. See Section 4.5, "Sharing Objects Between Page Groups". |
In the row for the perspective, click the Delete link.
In the confirmation page, click Yes.
To delete multiple perspectives:
In the Navigator, click the link for the page group that owns the perspectives that you want to delete.
To get to the Navigator click the Navigator link on any page. By default you can find a Navigator link on the Portal Builder page.
|
Tip: If the perspectives are shared, they will be in the Shared Objects page group. See Section 4.5, "Sharing Objects Between Page Groups". |
Click the Perspectives link.
Click the actions link.
Select the check boxes next to the perspectives that you want to delete.
To delete all the perspectives in the page group, select the check box in the header row.
Click Delete.
OracleAS Portal allows you to manage and control the publishing of content on your portal through the use of approvals. OracleAS Portal provides a special privilege for approvals, Manage Items With Approval. Each item added or modified by a user with this privilege must be approved before it is published to the portal. This allows you to delegate the creation of portal content without relinquishing control over what is actually displayed to your users, or compromising the quality of the content. For example, you may want each of your company’s product whitepapers to be reviewed by your legal department before they are published. Using approvals, you can easily establish an approval process that includes the legal department as one of the required approvers. This ensures that each author of a whitepaper cannot publish their documents to the portal until they have been checked by the legal department.
This section contains the following sub-sections:
To enable approvals and expose the Manage Items With Approval privilege:
From the Page Group portlet’s Page Group list, choose the page group with which you want to work, then click Edit.
By default, the Page Groups portlet is located on the Build tab of the Builder page.
Click the Configure tab.
In the Approvals and Notifications section, click the Edit link.
Select the Enable Approvals and Notifications check box.
Click OK to return to the Configure tab.
Click Close.
An approval process is a series of one or more approval routing steps. Each routing step includes one or more users and/or groups (approvers) who must approve an item before it is published. Routing to the approvers can be in serial (one at a time) or in parallel (all at once). Each step can be defined to require a response by any one approver or by all approvers.
The approval process begins when a user with the Manage Items With Approval privilege adds or modifies an item on a page. The item is automatically checked out of the portal (so that it cannot be modified), and routed through the approval process. Each approver is notified via the Notification portlet that an item requires his or her approval. Once the required number of responses is received during a step, the process continues to the next step. The approval process ends when the final step is reached and the document is approved by the last required approver. The approval process also ends when any approver rejects the item.
You can create one approval process for the entire page group, or you can enable page designers to establish approval processes that are unique to individual pages (or even to ignore the approval process for a particular page). The steps for setting up an approval process for a page group are provided below. For information about how to set up an approval process for a page, see Section 7.9.1, "Setting Up an Approval Process for a Page".
To set up an approval process for a page group:
From the Page Group portlet’s Page Group list, choose the page group with which you want to work, then click Edit.
By default, the Page Group portlet is located on the Build tab of the Builder page.
Click the Approval tab.
The Approval tab is available only if approvals and notifications have been enabled for the page group. See Section 5.5, "Setting Up Approvals".
In the Approvers field in the Approval Routing List section, select one or more approvers (users or groups) for the first step of the approval routing list. Click the Browse Users icon to add a user, or the Browse Groups icon to add a group.
Use a semicolon (;) as the separator between multiple users and groups. Each step of the approval process can include both users and groups.
We recommend that approvers have at least the View privilege on the page that includes the item to be approved (so that they can view the page).
OracleAS Portal includes the following special approvers:
#PAGE_GROUP_MANAGER#: Any user or group with the Manage All privilege on the page group, or the Manage All global privilege on All Page Groups.
#PAGE_MANAGER#: Any user or group with the Manage privilege on the page.
#CONTENT_MANAGER#: Any user or group with Manage Content or Manage privileges on the page.
By default, when you enable approvals and notifications for the page group, a single step approval process is defined at the page group level with #CONTENT_MANAGER# as the default approver.
In the Routing Method for Approvers radio group, select:
One at a time, all must approve (Serial, All) to send the approval notification to approvers in the step one at a time in the sequence specified. All of the approvers must respond to the approval notification.
All at the same time, all must approve (Parallel, All) to send the approval notification to approvers in the step all at the same time. All of the approvers must respond to the approval notification.
All at the same time, only one must approve (Parallel, Any) to send the approval notification to approvers in the step all at the same time. Only one of the approvers must respond to the approval notification.
Click Add Step to continue adding steps to the approval routing list.
For each step, select approvers and a routing method. Each step you add is listed in the Approval Process section. You can edit existing steps by clicking the list of users and groups, or the Edit icon. When you edit a step, the step details are displayed in the Approval Routing List section and the Add Step button changes to Update Step.
Because Oracle Internet Directory (OID) can include multiple directory containers that can use the same group names, the distinguished name (DN) is displayed next to any group that does not belong to the local OracleAS Portal instance.
Click OK when the approval routing list is complete.
If there are pending items for the approval process, you cannot reorder the approval routing steps. Also, you cannot edit active steps (that is, any step which is currently active within an approval process). However, you can still delete and edit any steps which are not currently active.
To enable page managers to specify their own approval processes:
From the Page Group portlet’s Page Group list, choose the page group with which you want to work, then click Edit.
By default, the Page Groups portlet is located on the Build tab of the Builder page.
Click the Configure tab.
In the Approvals and Notifications section, click the Edit link.
Select the Override the Page Group Approval Process check box.
Click OK to return to the Configure tab.
Click Close.
Enabling this option also allows page managers to ignore the approval process completely by defining an empty approval process at the page level. This means that users with the Manage Items With Approval privilege on the page will be able to add items to the page without requiring approval.
For information about how to set up an approval process for a page, see Section 7.9.1, "Setting Up an Approval Process for a Page".
The Pending Approvals Monitor portlet allows you to list pending approvals in the page groups that you administer. You can list the pending approvals by approver, date, page group, or submitter.
The Pending Approvals Monitor portlet only lists pending approvals for other users. If you would like to view your own pending approvals, use the My Notifications portlet. For information about the My Notifications portlet or approving or rejecting items that require your approval, see Section 2.4.2, "Approving or Rejecting Content".
To monitor pending approvals:
Go to the page that contains your Pending Approvals Monitor portlet.
In the first list, choose how you want to view the pending approvals that you want to monitor. You can view pending approvals by approver, date, page group, or submitter.
In the second list and third lists, choose the operator and value to use to filter the list of pending approvals.For example, to list all the pending approvals waiting to be approved.
Click Go.
You can also customize or edit the defaults of the portlet to automatically list pending approvals.
Figure 5-11 List Pending Approvals Waiting to Be Approved by SCOTT

Figure 5-12 List Pending Approvals Submitted After 11-DEC-2002

Figure 5-13 List Pending Approvals for Items That Were Submitted by Any User Other Than SCOTT

Expiry notifications notify one or more recipients (users or groups) when an item in the page group is about to expire.
To set up expiry notifications for a page group:
From the Page Group portlet’s Page Group list, choose the page group with which you want to work, then click Edit.
By default, the Page Group portlet is located on the Build tab of the Builder page.
Click the Approval tab.
The Approval tab is available only if approvals and notifications have been enabled for the page group. See Section 5.5, "Setting Up Approvals".
In the Recipients field in the Expiry Notifications section, select one or more recipients (users or groups) to notify when an item in the page group is about to expire. Click the Browse Users icon to add a user, or the Browse Groups icon to add a group.
Use a semicolon (;) as the separator between multiple users and groups. This field can include both users and groups.
Because Oracle Internet Directory (OID) can include multiple directory containers that can use the same group names, the distinguished name (DN) is displayed next to any group that does not belong to the local OracleAS Portal instance.
In the Notification Time for Recipients field, enter how long (in hours) before the item is due to expire to notify the recipients. The default is 48 hours.
Click OK.
To display expiry notifications on a page:
In the Page Groups portlet, under Edit a Page, click the Browse Pages icon next to the Name field.
Select the page on which you want to display expiry notifications, then click Edit.
In the region where you want to display expiry notifications, click the Add Portlets icon.
If you do not see the Add Portlets icon, the region may be an item region, in which case, you cannot add portlets to this region.
Click the link for the My Notifications portlet.
By default, the My Notifications portlet is located under the Portal Content Tools page of the Portlet Repository. If you cannot find the My Notifications portlet under this page, use the Search field.
Click OK.
Next to the portlet, click the Actions icon.
Click Edit Defaults.
In the Display Name field, enter a different title for the portlet if required. For example, if the portlet will be used only to display expiry notifications, you might change the display name to Items About to Expire.
In the Display Limit radio group, select whether to display all notifications or limit the portlet to display only a specified number of notifications.
Make sure the Show Expiry Notifications check box is selected.
The portlet can also display approval and subscription notifications.
Select the Display Notification Type Icon in Portlet check box if you want to display an icon to illustrate whether the notification is an approval, expiry, or subscription notification. This is useful if you intend to use the portlet to display other types of notifications.
Select the Display Notification Status in Portlet check box if you want to display the status of the notification in the portlet. This informs users whether the item is about to expire or has already expired.
In the Page Group Option radio group, select whether to display expiry notifications for all page group or a specified selection of page groups.
This option is more useful for individual users who can customize the portlet to filter the list to include only those expiry notifications that they are actually interested in
In the User Group Option radio group, select whether to display expiry notifications for all user groups or a specified selection of user groups.
This option is more useful for individual users who can customize the portlet to filter the list to include only those expiry notifications that they are actually interested in.
Use a semicolon (;) as the separator between multiple groups.
Because OID can include multiple containers that can use the same group names, the distinguished name (DN) is displayed next to any group that does not belong to the local Portal instance.
Click OK.
This section contains the following sub-sections:
The contents of this section are intended for users with at least the Manage All privilege on a page group (that is, page group administrators).
You can limit the amount of space provided in your page group to store uploaded documents.
To change the page group quota:
From the Page Group portlet’s Page Group list, choose the page group with which you want to work, then click Edit.
By default, the Page Groups portlet is located on the Build tab of the Portal Builder page.
In the Total document storage quota radio group, select Limit to to limit the amount of space provided to store uploaded documents.
In the field, enter the maximum amount of space (in megabytes) to provide for uploaded documents in the page group.
When this limit is reached, users will no longer be able to upload documents to the page group.
Select No limit if you do not want to impose a limit for uploaded documents.
Click OK.
OracleAS Portal lets you select the level of item versioning you want to use for items in a page group. Item versioning determines what happens to the old version of an item when a new version is added.
Page managers can override the item versioning level for the page. However, they can only provide a higher level of item versioning than the page group, not a lower level. For example, if you set item versioning for a page group to Simple, then page managers can set the item versioning for pages within the page group to Audit, but not to None. See Section 7.8.8, "Setting the Item Versioning Level for a Page".
To set the item versioning level for a page group:
From the Page Group portlet’s Page Group list, choose the page group with which you want to work, then click Edit.
By default, the Page Groups portlet is located on the Build tab of the Portal Builder page.
Click the Items tab.
In the Item Versioning radio group, select:
None to completely replace the item’s previous version when editing an item. If you choose this option, none of the item’s previous versions are retained in the database.
Simple to offer the content contributor a choice of completely replacing the item’s previous version or creating a new version when editing an item. If the contributor chooses the latter option, all the item’s previous versions are retained in the portal repository.
Audit to always create a new version when editing an item. If you choose this option, all the item’s previous versions are retained in the portal repository.
Click OK.
You can display unpublished items in Edit mode of the pages of a page group. Unpublished items are items that have a future publish date, have expired, or have been deleted.
Only users with at least the Manage Content privilege on the page (or the Manage Item privilege on the item if item level security is enabled) can see unpublished items in Edit mode. Users with the Manage Content privilege on a page can edit, move, or restore unpublished items in that page.
To display unpublished items:
From the Page Group portlet’s Page Group list, choose the page group with which you want to work, then click Edit.
By default, the Page Groups portlet is located on the Build tab of the Portal Builder page.
Click the Items tab.
Select Display Unpublished Items In Edit Mode.
Click OK.
To be able to continue to display deleted items, you must first choose to retain them in the Oracle Application Server Metadata Repository.
To retain deleted items in the Oracle Application Server Metadata Repository:
From the Page Group portlet’s Page Group list, choose the page group with which you want to work, then click Edit.
By default, the Page Groups portlet is located on the Build tab of the Portal Builder page.
Click the Items tab.
Select Retain Deleted Items.
Click OK.
Periodically, you may want to perform a system purge to permanently remove expired and deleted items from the Oracle Application Server Metadata Repository.
To permanently remove expired and deleted items:
From the Page Group portlet’s Page Group list, choose the page group with which you want to work, then click Edit.
By default, the Page Groups portlet is located on the Build tab of the Portal Builder page.
Click the Items tab.
Select Purge Deleted Items to remove deleted items during the system purge.
Select Purge Expired Items to remove expired items during the system purge.
Click Purge.
When the page refreshes, the purge is complete, and you can click OK.
A system purge may take a few minutes if there are a lot of expired or deleted items.
If a region includes the New Item Indicator, when a user adds a new item or portlet to that region, the New icon is displayed next to it to inform other users that it is new and may contain information they haven’t yet seen.
If a region includes the Updated Item Indicator, when a user edits an existing item or portlet in that region, the Updated icon is displayed next to it, to inform other users that it has been updated and may contain new information.
You can control how long an item or portlet is considered new or recently updated by changing the display period of these icons.
To change the New and Updated icon display period:
From the Page Group portlet’s Page Group list, choose the page group with which you want to work, then click Edit.
By default, the Page Groups portlet is located on the Build tab of the Portal Builder page.
Click the Items tab.
In the Icon Display Period field, enter the number of days to display the New and Updated icons.
If you set the icon display period to 0, the icons will not be displayed at all.
The display period applies to both the New and Updated icons. You cannot set a different display period for the individual icons.
Click OK.
|
Note: When you change the icon display period, if a page has been cached, the new setting may not be immediately apparent. To make sure that the icons are correctly displayed immediately, clear the cache for the page group. To do this click the Access tab, then click the Clear Cache link. |
To add the New or Updated Item Indicator to a region:
In the Page Groups portlet, under Edit a Page, click the Browse Pages icon next to the Name field.
Select the page to which you want to add the New or Updated Item Indicator, then click Edit.
In the region to which you want to add the indicator, click the Edit Region icon.
Click the Attributes/Style tab.
In the Available Attributes list, select:
New Item Indicator if you want to display the New icon in the region.
Updated Item Indicator if you want to display the Updated icon in the region.
Click the Move Right arrow.
Click Apply.
Click Close.
In Internet Explorer, by default, when users add or edit a text item, the area of the page where they enter the text includes a WYSIWYG editor. You can disable this feature so that users are provided with a simple text area instead.
|
Note: The rich text editor is not available in Netscape. In Netscape, the field for entering text is always a simple text area. |
To disable the rich text editor:
From the Page Group portlet’s Page Group list, choose the page group with which you want to work.
By default, the Page Groups portlet is located on the Build tab of the Portal Builder page.
Click the Items tab.
Clear Enable Rich Text Editor For Internet Explorer.
Click OK.
|
 Copyright © 2003 Oracle Corporation All rights reserved |
|