|
Oracle® Application Server Portal Developer's Guide
10g Release 2 (10.1.2) B14134-02 |
|
 Previous |
 Next |
|
Oracle® Application Server Portal Developer's Guide
10g Release 2 (10.1.2) B14134-02 |
|
 Previous |
 Next |
Web Clipping is a browser-based declarative tool that enables you to integrate any Web application with OracleAS Portal. It is designed to give you quick integration by leveraging the Web application's existing user interface. Web Clipping has been implemented as a Web provider using the Java Portal Developers Kit, which is a component of OracleAS Portal.
With Web Clipping, you can collect Web content into portlets in a single centralized Web page. You can use Web Clipping to consolidate content from Web sites scattered throughout a large organization.
This chapter contains the following sections:
Web Clipping allows clipping of an entire Web page or a portion of it and reusing it as a portlet. Basic and HTML-form-based sites may be clipped. Use Web Clipping when you want to copy content from an existing Web page and expose it in your portal as a portlet. The Web Clipping portlet supports:
Navigation through various styles of login mechanisms, including form- and JavaScript-based submission and HTTP Basic and Digest Authentication with cookie-based session management.
Fuzzy matching of clippings, meaning that if a Web clipping gets reordered within the source page or if its character font, size, or style changes, it will still be identified correctly by the Web Clipping engine and delivered as the portlet content.
Reuse of a wide range of Web content, including basic support of pages written with HTML 4.0.1, JavaScript, applets, and plug-in enabled content, retrieved through HTTP GET and POST (form submission).
Personalization, enabling page designers to expose input parameters that page viewers can modify when they personalize the portlet. These parameters can be exposed as public parameters that a page designer can map as OracleAS Portal page parameters. This feature enables end users to obtain personalized clippings.
Integrated authenticated Web content through Single Sign-On, including integration with external applications, which enables you to leverage Oracle Application Server Single Sign-On and to clip content from authenticated external Web sites.
Inline rendering, enabling you to set up Web Clipping portlets to display links within the context of the portlet. As a result, when a user clicks a link in the Web Clipping portlet, the results display within the same portlet. You can use this feature with internal and external Web sites.
Proxy authentication, including support for global proxy authentication and per-user authentication. You can specify proxy server authentication details including type (Basic or Digest) and realm, through the Web Clipping Provider Test page. In addition, you can specify one of the following schemes for entering user credentials.
All users automatically log in using a user name and password you provide.
All users will need to log in using a user name and password they provide.
All public users (not authenticated into Portal) automatically log in using a user name and password you provide, while valid users (authenticated into Portal) will need to log in using a user name and password they provide.
See the Oracle Application Server Portal Configuration Guide for more information.
Migration from URL-based portlets, enabling you to migrate your URL-based portlets to Web Clipping. See Section 5.5, "Migrating from URL-Based Portlets" for more information.
Navigation and clipping of HTTPS-based external Web sites, provided that appropriate server certificates are acquired.
Clipping of page content from HTML 4.0.1 pages, including:
Clipping of <applet>, <body>, <div>, <embed>, <img>, <object>, <ol>, <span>, <table>, and <ul> tagged content
Preservation of <head> styles and fonts, and Cascading Style Sheets (CSS)
Navigation through hyperlinks (HTTP GET), form submissions (HTTP POST), frames, and URL redirection
National Language Sets (NLS) in URLs and URL parameters. See Section 5.6, "Current Limitations for Web Clipping" for information about how Web Clipping determines the character set of clipped content.
By default, all Web clipping definitions are stored persistently in the Oracle Application Server infrastructure database. Any secure information, such as passwords, are stored in encrypted form, according to the Data Encryption Standard (DES), using Oracle encryption technology.
To add Web page content to a portal page, follow the steps described in the following sections:
To add a Web Clipping portlet to an OracleAS Portal page:
Navigate to the Page Groups portlet. By default, the Page Groups portlet is located on the Build tab of the Portal Builder page.
In the Layout & Appearance section, for Pages, click Browse.
Figure 5-1 shows the Page Groups portlet.
Figure 5-2 shows the Page Groups tab with the list of pages. For the page to which you want to add the Web Clipping portlet, click Edit in the Actions column.
The page is displayed. In the region in which you want to add the Web Clipping portlet, click the Add Portlet icon.
Figure 5-3 shows a portion of the page.
In the Add Portlets page, navigate to the Web Clipping Portlet link and click it. The Web Clipping Portlet moves to the Selected Portlets box.
By default, the Web Clipping portlet is located in the Portal Builder page of the Portlet Repository. If you cannot find this page, use the Search field to find the portlet.
Click OK to add a Web Clipping portlet to your page.
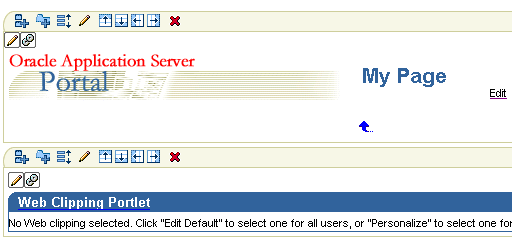
Figure 5-4 shows the Web Clipping portlet added to your page.
Figure 5-4 Web Clipping Portlet Added to a Page
To select a section of a Web page to display in the Web Clipping portlet, you use the Web Clipping Studio. Using the Web Clipping Studio, you can:
Section the chosen target page
Choose the exact portion of the Web content to clip
Preview the clipped content as a portlet
Save the clipped content as a portlet
Set portlet properties and save the updated portlet information
To select a section of a Web page to display in the Web Clipping portlet:
Above the Web Clipping portlet, click the Edit Defaults icon, as shown in Figure 5-5.
The Find a Web Clipping page is displayed.
In the URL Location field, enter the location of the starting Web page that links to the content you want to clip, as shown in Figure 5-6.
Click Start.
The Web Clipping Studio displays the page you specified, as shown in Figure 5-7.
Figure 5-7 Browsing to a Page Containing Content for a Web Clipping
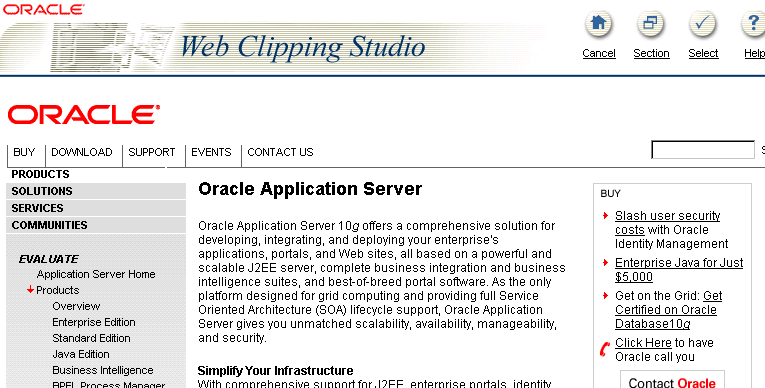
Note that the URL in the browser bar changes from:
http://host:port/portal/page?_dad=portal&_schema=PORTAL...
To:
http://host:port/portalTools/webClipping...
Browse to the page that contains the content you want to clip.
As you click hyperlinks in the Web page, your navigation links are recorded.
Once you display the page that contains the content you want to clip, in the Web Clipping Studio banner, click Section, as shown in Figure 5-8.
Figure 5-8 Sectioning the Target Web Page

Sectioning divides the target Web page into its clippable sections, as shown in Figure 5-9. After you click Section, you are no longer able to browse links in the displayed page. If you want to continue navigation, click Unsection in the Web Clipping Studio banner.
At the top left of the section of the Web content you want to clip, click Choose.
You can choose only one section as a clipping at a time.
|
Note: To increase the number of sections available from which to choose, click Section Smaller in the Web Clipping Studio banner. For example, you would click Section Smaller to drill down one level of nested tables. To decrease the number of sections available from which to choose, click Section Larger. |
Web Clipping Studio displays a preview of your chosen section. If it is the section you want, click Select in the Web Clipping Studio banner. The Web Clipping Studio displays the Find a Web Clipping page, with the properties of the clipping.
If you do not want to use the section you clipped in your portlet, click Unselect to return to the page containing the section. You can choose another section on the page, or click Unsection to navigate to another page.
Some sections may contain no data, only whitespace. For example, a Web page may contain an HTML <DIV> tag that contains no text or images. If you click Choose on a section that contains no data, Web Clipping displays a preview, but the preview correctly shows only whitespace. In this case, click Unselect in the preview page to return to the sectioned page. Then, select a section containing data.
In the Find a Web Clipping page, click OK to display the selected Web clipping in the Web Clipping portlet on your page. (You can edit default properties in the page. See Section 5.2.3, "Setting Web Clipping Portlet Properties" for more information.)
Figure 5-10 shows the content added to the Web Clipping portlet.
Figure 5-10 Clipped Content Added to the Web Clipping Portlet on a Portal Page
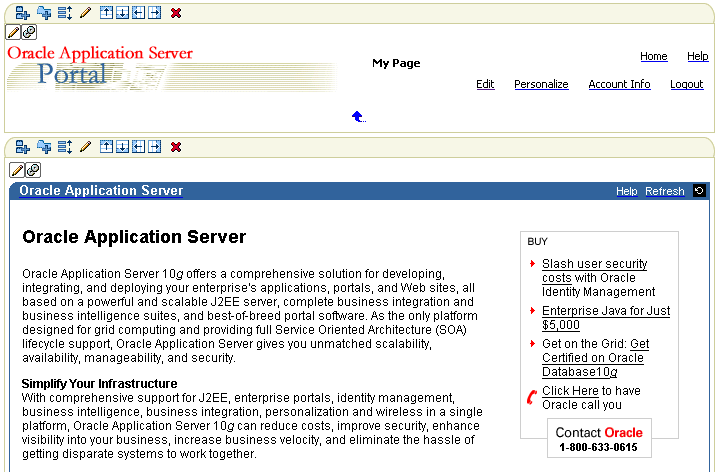
Note that the Refresh link in the Web Clipping Portlet retrieves fresh data from the originating Web site. The Portlet Refresh link reloads the portlet, but it may retrieve the data from the cache, depending upon the settings for expiration.
You can edit various portlet settings to change the appearance of the Web Clipping portlet and to specify how end users can interact with the portlet.
To set Web Clipping portlet properties:
At the top left of the Web Clipping portlet, click the Edit Defaults icon. Web Clipping Studio displays the Find a Web Clipping page with a Properties section, as shown in Figure 5-11.
Figure 5-11 Properties Section of Find a Web Clipping Page
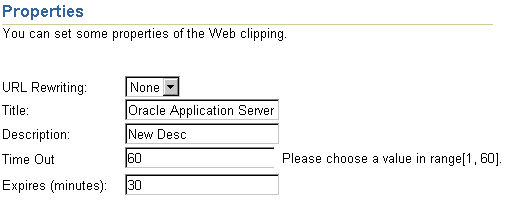
From the URL Rewriting list in the Properties section, choose Inline if you want link targets to be displayed inside the portlet, or choose None if you want link targets to be displayed in a new browser window.
In the Title field, enter a title to display in the portlet banner.
In the Description field, enter a description of the portlet.
In the Time Out (seconds) field, enter the amount of time (in seconds) for the Web Clipping provider to attempt to contact the Web page from which the content was clipped.
In the Expires (minutes) field, enter the amount of time (in minutes) that cached content is valid. Any requests for portlet content that occur within the time period you specify will be satisfied from the cache.
Once the cache period is exceeded, requests for portlet content will be satisfied by retrieving content from the portlet's Web Clipping data source. The cache will also be refreshed with this content.
If you entered any information in a form while clipping content for the Web Clipping portlet, the Parameterize Inputs section is available. Select the Click to start parameterizing check box to customize parameters associated with the Web Clipping portlet content. Then:
From the Parameters list, choose the parameters that you want to customize.
From the Personalizable list, select a parameter if you want to allow end users to provide their own values for the parameters when they personalize the portlet. Select None if you do not want to allow this.
In the Display Name field, enter a name to be displayed for the parameter.
In the Default Value field, enter a value to use by default for the parameter.
Section 5.4.3, "Personalizing a Web Clipping Portlet" provides an example of personalizing parameters.
Click OK.
This section walks you through an example that demonstrates how you can leverage OracleAS Single Sign-On to integrate content from authenticated external Web sites into a Web Clipping portlet.
The example incorporates a secured page from Oracle MetaLink (an external application) into a Web Clipping portlet.
To integrate an external application:
Set up the external application in OracleAS Portal, specifying the authentication information. Refer to the Oracle Application Server Portal Configuration Guide for more detail.
Log in to OracleAS Portal as a user who has SSO Administration privileges, for example, the orcladmin user.
Navigate to the Administer External Applications portlet. (Click the Administer tab, then click the Portal subtab. In the SSO Server Administration section, which is in the middle column, select Administer External Applications.)
Click Add External Application.
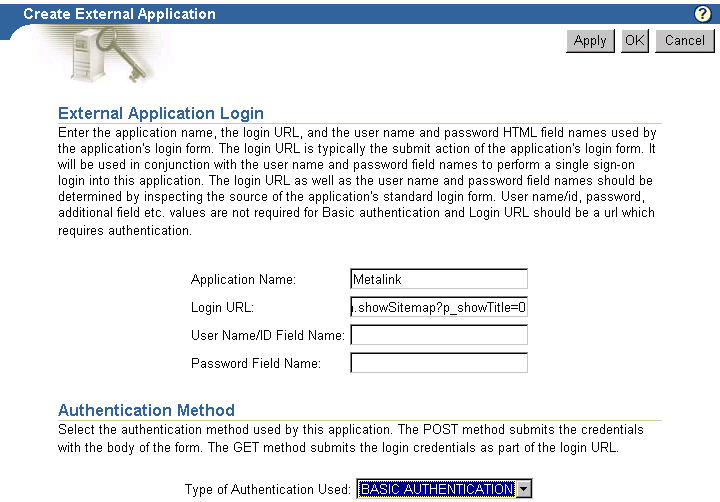
In the Create External Application page, in the Application Name field, enter a name for the application, for example, Metalink.
For Login URL, enter the URL to log into the application, for example, http://metalink.oracle.com/metalink/plsql/sit_main.showSitemap?p_showTitle=0. To determine the URL, navigate to the desired application in a browser and note the URL.
For User Name/ID Field Name, enter the field name that the external application uses for the user name. Determine the field name by viewing the source for the desired page. If the Authentication method uses Basic Authentication, you do not need to enter a field name. For Metalink, you do not need to enter anything in this field.
For Password Field Name, enter the field name that the external application uses for the password. Determine the field name by viewing the source for the desired page. If the Authentication method uses Basic Authentication, you do not need to enter a field name. For Metalink, you do not need to enter anything in this field.
Select Basic Authentication as the authentication method.
Figure 5-12 shows a portion of the Create External Application page:
Figure 5-12 Creating an External Application
In the Additional Fields section, you can enter names and values of any additional fields that are submitted with the login form of the external application. To specify the page to be redirected to after you log in, enter redirectFieldName for Field Name. For this example, you do not need to enter additional fields. Figure 5-13 shows the Additional Fields section.
Click OK.
To test your credentials with Oracle Metalink, in the Administer External Applications page, click the name of the application you just created. Then, in the External Application Login page, log into the application Oracle Metalink using your Oracle Metalink user name and password.
In the Administer External Applications page, click Close.
For more information about OracleAS Single Sign-On and external applications, see the Oracle Application Server Single Sign-On Administrator's Guide.
For the Web Clipping portlet, create a new Web Clipping provider:
Click the Administer tab, then click the Portlets tab.
Select Register a Provider.
In the Register a Provider page, enter webClippingMetalink for the Name and webClipping Metalink for the Display Name. Enter a Timeout and Timeout Message. Choose Web for the Implementation Style.
Click Next.
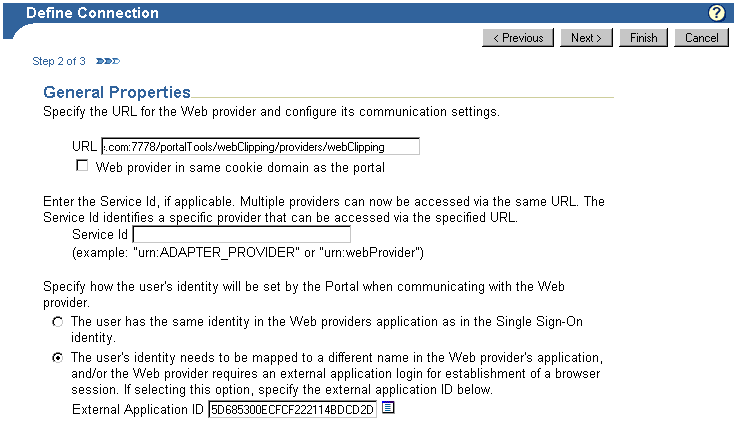
In the General Properties section of the Define Connection page, for the URL, enter:
http://host:port/portalTools/webClipping/providers/webClipping
Note that host:port refers to the host and port where the providers are located. This corresponds to the URL for OracleAS Portal.
For the user's identity, select The user's identity needs to be mapped to a different name in the Web provider's application, and/or the Web provider requires an external application login for establishment of a browser session. If selecting this option, specify the external application ID below.
For External Application ID, click the List of Values icon and select the external application you added.
Figure 5-14 shows the top part of the Define Connections page.
Figure 5-14 Specifying an External Application for a Web Clipping Provider
In the User/Session Information section, select User to send user specific information to the provider. For Login Frequency, select Once Per User Session.
Check that the proxy settings are correct. If you use a proxy server to contact the Web providers from the middle tier, enter the proxy server for Middle Tier.
If you use a proxy server to contact the Web providers from the portal repository, enter the proxy server for Portal Repository.
Usually, because the OracleAS Portal and Web Clipping URLs point to the same middle tier, this step is not necessary.
Click Finish.
In the Registration Confirmation page, if the registration was successful, click OK.
Add a portlet to a page, using the Web Clipping Metalink provider that you just created:
In OracleAS Portal, navigate to the page in which you want to add the portlet.
In the region in which you want to add the Web Clipping portlet, click the Add Portlet icon.
In the Add Portlets to Region page, search for Web Clipping Metalink. It is located in the Portlet Staging Area. Click it to move it to the Selected Portlets box.
Click OK.
Section 5.2.1, "Adding a Web Clipping Portlet to a Page" describes in detail how to add a portlet.
If you have not entered your credentials for the External Application representing Metalink, the portlet will contain an Update login information link. Click the link and enter your credentials. Then, click OK.
Select a section of a page to display in the Web Clipping portlet:
In the Web Clipping portlet, click the Edit Defaults icon.
The Find a Web Clipping page is displayed.
In the URL Location field, the default URL for the External Application is displayed. Change it to the location of the starting Web page that links to the content you want to clip. In this case, enter http://www.metalink.oracle.com.
Click Start. The Web Clipping Studio displays the page you specified. Log into Oracle Metalink.
Browse to the page that contains the content you want to clip. After you display the page that contains the content you want to clip, click Section in the Web Clipping Studio banner. Figure 5-15 shows the external application displayed in Web Clipping Studio.
Figure 5-15 External Application in Web Clipping Studio
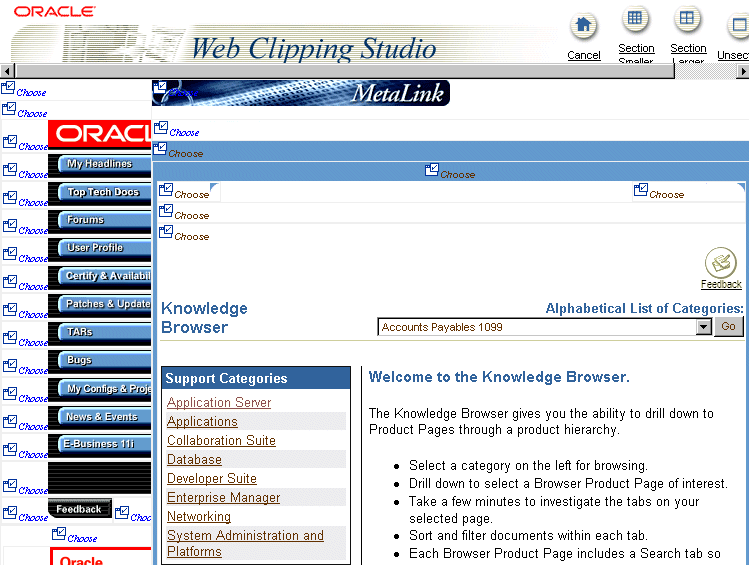
At the top left of the section of the Web content you want to clip, click Choose.
Web Clipping Studio displays a preview of your chosen section. If it is the section you want, click Select in the Web Clipping Studio banner.
The Web Clipping Studio displays the Find a Web Clipping page, with the properties of the clipping, as shown in Figure 5-16.
Figure 5-16 Properties of the External Application
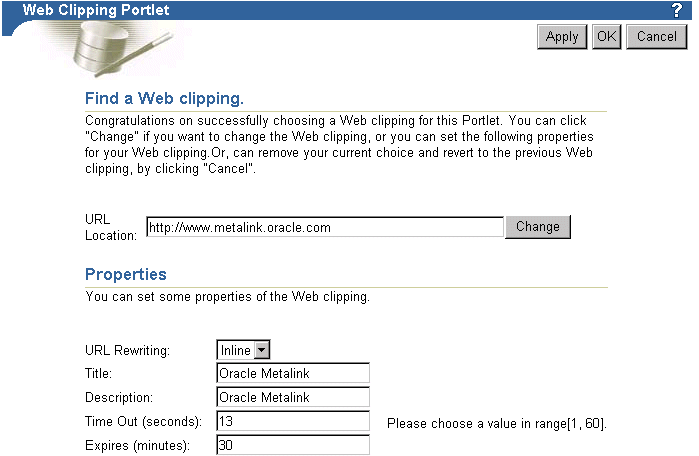
In the Find a Web Clipping page, from the URL Rewriting list, choose Inline to specify that you want link targets displayed inside the portlet, rather than in a new browser window. OK to display the selected Web clipping in the Web Clipping portlet on your page, as shown in Figure 5-17.
Figure 5-17 External Application Displayed in Portlet
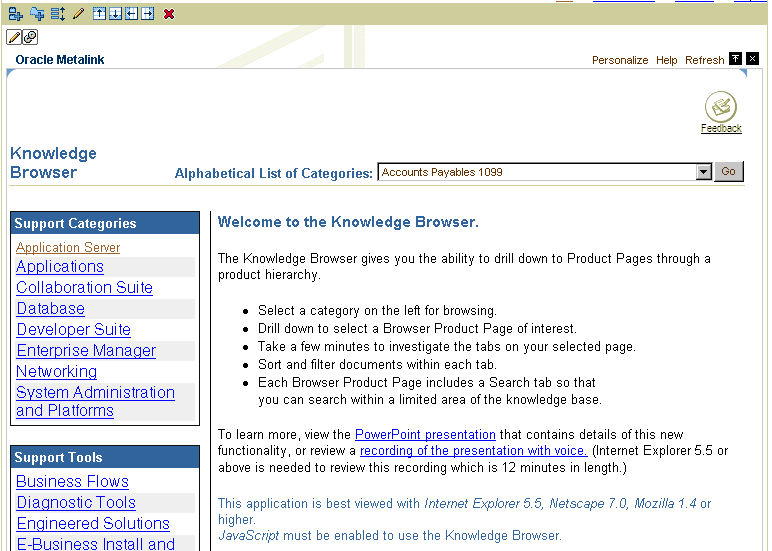
Now, the Web clipping, even though it is from a page requiring authentication, is available in your portlet.
Note that you can associate only one external application with a provider. For each external application, you must register a new provider. Each portal user accesses the authenticated content using their user name and password for that system, not the page designer's credentials.
This section walks you through an example that demonstrates how you can enable end users to personalize their own view of the content in a Web Clipping portlet.
In the example, you perform the following tasks:
Administrators can set up personal pages for all users. This task assumes that the administrator has enabled this functionality. In this task, you add the Web Clipping portlet to your personal page.
In the Work In field of the Page Groups portlet, select the page group that contains personal pages.
By default the Page Groups portlet is located on the Build tab of the Portal Builder page.
In the Pages section, select Personal Pages. Expand the node for the first letter of your user name. Figure 5-18 shows the Personal Pages.
Figure 5-18 Expanding Page Group Map Nodes
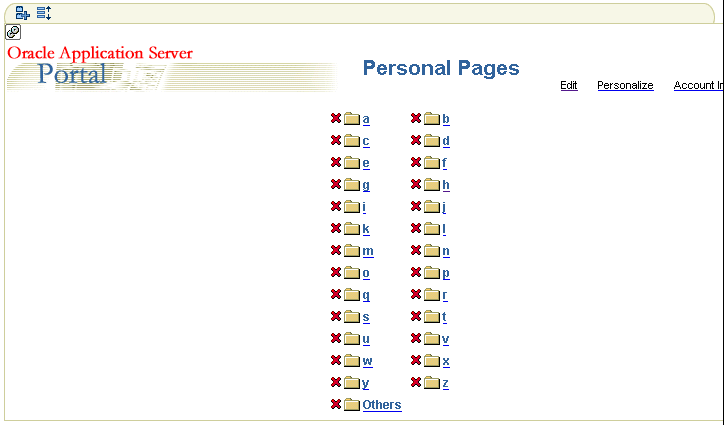
Click your user name. Your personal page is displayed.
In any portlet region, click the Add Portlets icon.
In the Add Portlets page, click the Web Clipping Portlet link.
By default, the Web Clipping portlet is located in the Portal Tools page of the Portlet Repository. If you cannot find this page, use the Search field to find the portlet.
The Web Clipping portlet is added to the Selected Portlets list. Click OK.
In this task, you navigate to the Oracle Technology Network (OTN) and search for specific information, then select the results as the clipping for your portlet.
In the Web Clipping portlet, click the Edit Defaults icon.
In the Web Clipping Studio's Find a Web Clipping page, in the URL Location field, enter:
http://www.oracle.com/technology/products/ias/portal/index.html
Click Start. OTN displays the Portal Center page.
Enter a search string in the Search field at the top of the page. For this example, enter "web clipping portlet" (including the quotation marks), then click Search.
The Search result is displayed in the Web Clipping Studio, as shown in Figure 5-19.
Figure 5-19 Searching for Information on OTN
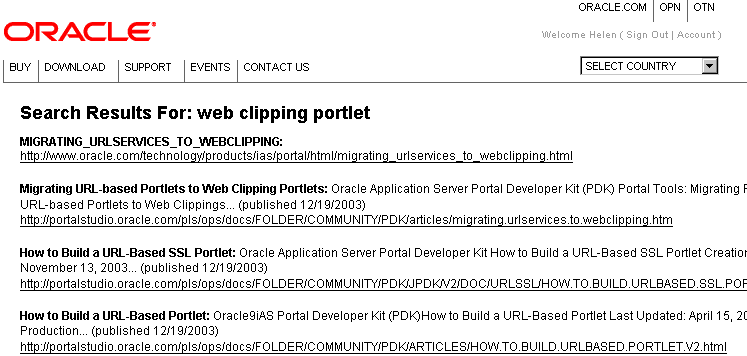
Click Section. Web Clipping Studio divides the target Web page into its clippable sections, as shown in Figure 5-20.
Figure 5-20 Sectioning the Target Web Page
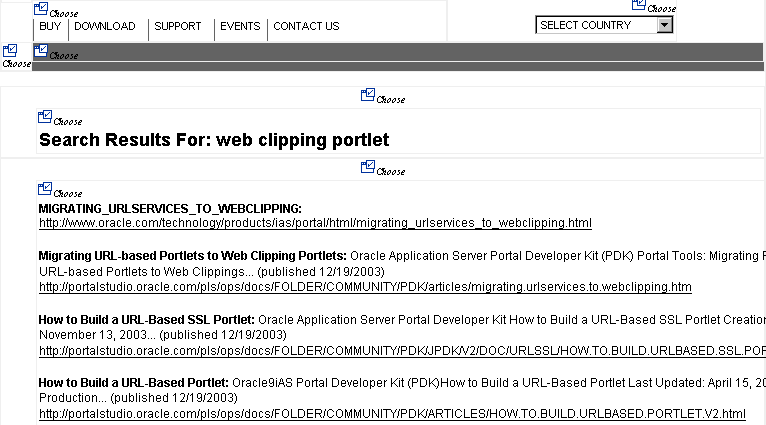
At the top left corner of the search result, click Choose.
A preview of the search result section displays.
Some sections may contain no data, only whitespace. For example, a Web page may contain an HTML <DIV> tag that contains no text or images. If you click Choose on a section that contains no data, Web Clipping displays a preview, but the preview correctly shows only whitespace. In this case, click Unselect in the preview page to return to the sectioned page. Then, select a section containing data.
Click Select to confirm that the search result section is the one you want to clip.
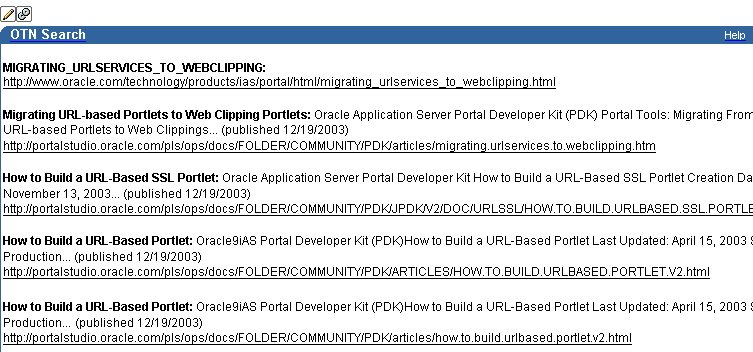
In the Find a Web Clipping page, click OK to display the selected Web Clipping in the Web Clipping portlet on your page. Figure 5-21 shows the Web Clipping displayed in the page.
Figure 5-21 Selected Web Clipping Displayed in Web Clipping Portlet
In this task, you edit the properties of the Web Clipping portlet to allow end users to display different search results in the portlet:
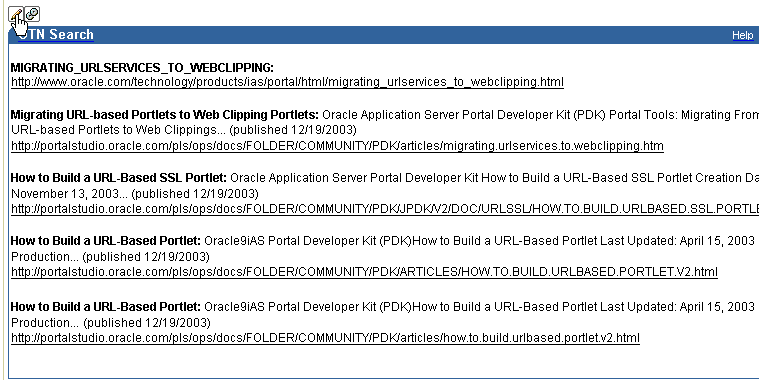
Above the Web Clipping portlet you just added, click the Edit Defaults icon, as shown in Figure 5-22.
Figure 5-22 Clicking Edit Defaults for the Web Clipping Portlet
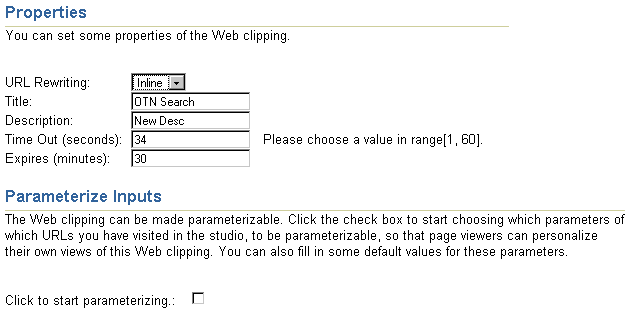
In the Find a Web Clipping page, modify the following items in the Properties section:
From the URL Rewriting list, choose Inline to specify that you want link targets displayed inside the portlet, rather than in a new browser window.
In the Title field, enter OTN Search. This title displays in the header of your Web Clipping portlet, as well as the pages where users can personalize parameters for the Web clipping.
Figure 5-23 shows the Properties and Parameterize Inputs sections of the Find a Web Clipping page.
Figure 5-23 Setting Properties for a Web Clipping
Because the content displayed in the portlet was reached by entering information in the Search field on OTN, you can customize the parameters used by the search to allow end users to specify their own search string.
In the Parameterize Inputs section, select the Click to start parameterizing check box.
In the parameters table, make the following changes:
In the Parameters column, choose p_Query from the list.
In the Personalizable column, choose Param1 from the list.
In the Display Name column, enter OTN Search.
Make sure that Default Value displays "web clipping portlet" to be sure you have selected the right parameter.
Figure 5-24 shows the parameters table.
Figure 5-24 Specifying Parameters for User Input

Click OK to display the default search results in the Web Clipping portlet on your page.
In the Editing Views section, click View Page.
In the Web Clipping portlet header, click Personalize, as shown in Figure 5-25.
Figure 5-25 Clicking Personalize in the Web Clipping Portlet Header

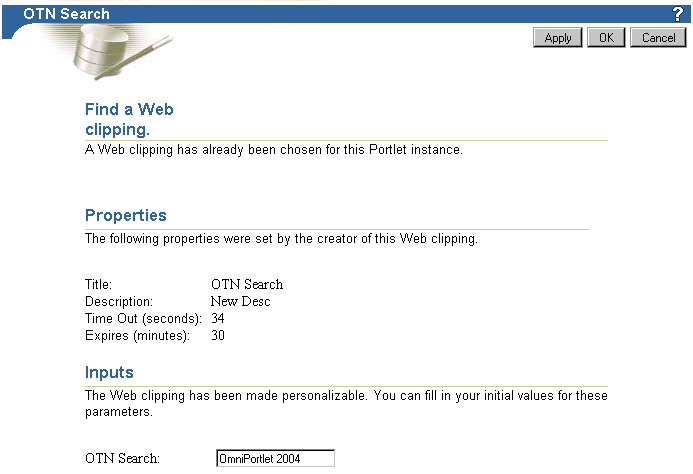
In the page that displays, scroll down to the Inputs section. Notice that the parameter field for the search string is labeled OTN Search, as you specified for the Display Name for this parameter. In the OTN Search field, enter a different search string. For example, enter OmniPortlet 2004, as shown in Figure 5-26.
Figure 5-26 Specifying Input for Parameters
Click OK.
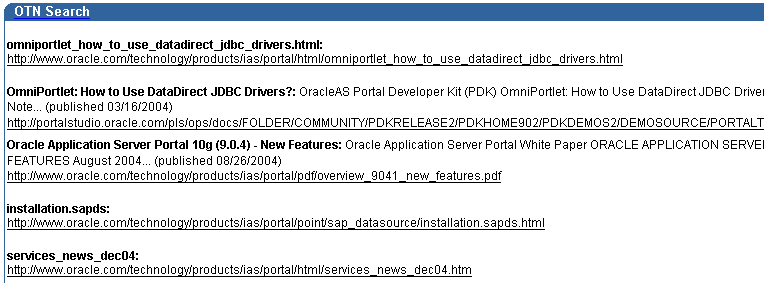
The Web Clipping portlet now displays the results of performing a search on OTN for OmniPortlet 2004 information, as shown in Figure 5-27.
Figure 5-27 New Web Clipping Result Based on Customer Input Parameter
You can migrate URL-based portlets that are stored in a provider.xml file to Web Clipping portlets. These Web Clipping portlets will exist in the Web Clipping Repository, but you can access the portlets through pointers defined in the provider.xml file.
Note that, during the migration process, no modifications will be done on the original files used by these URL-based portlets.
The following sections describe:
Before you begin the migration, take the following steps:
Verify that the Web provider that contains the URL-based portlets you want to migrate is functional. The migration process will not succeed with non-functional URL-based portlets. To verify, make sure that the URL-based portlets are used by your Portal pages and that they appear correctly.
Find existing URL-based portlets.
Before you run the migration tool, make sure that you know the file path to the service deployment properties file, which holds pointers to everything about the service, including the path to the provider.xml file that holds the URL services definitions.
You must run the migration tool once for each service. If you have multiple services, find the entire list of service deployment properties files that will be used during migration.
The location of these service deployment properties files may vary depending on individual deployment scenarios. Typically, with JPDK samples, they are located in:
$INSTALL_HOME/j2ee/home/applications/jpdk/jpdk/WEB-INF/deployment
JPDK samples that are shipped with the OracleAS Portal are located in the same directory path.
The list of sample service deployment properties files include:
urlbasicauth.properties
urlexternalauth.properties
urlnls.properties
urlparams.properties
urlsample.properties
urlssl.properties
In the migration process, the service deployment properties file as well as the provider.xml file used to contain old URL-based portlets will be copied and imported into the Web Clipping application, together with all the previous customizations based on the File Preference store. Because no modifications will be done on the original files used by these URL-based portlets, you do not need to back up any of these files. They can continue to be used as URL-based portlets.
Depending on the types of URL-based portlets you have, you may need to rearrange them:
Because Web Clipping does not offer parallel functionality for the XML Filter capability that URL-based portlets offer, isolate all of the URL-based portlets that use the XML Filter into a separate service deployment (and provider.xml file) that will not be migrated.
Because you may face limitations when migrating URL-based portlets that use external applications, you may decide that the migration is too costly for that subset of your URL-based portlets. In this case, you can isolate them into a separate service deployment (and provider.xml file) that will not be migrated.
Make sure that the machine where you are planning to run the migration tool has local access to the service deployment files and files that the deployment files point to, for both the URL-based portlets provider and the Web Clipping provider.
Make sure that both the Web Clipping Repository and the HTTP Proxy are configured, and that the proxy settings concur with those used by your deployment of URL-based portlets. If you have a proxy server that requires authentication, the Web Clipping provider must be configured with Requires Authentication enabled. Set the Login scheme to use a global log in (Use Login below for all users).
Check the Web Clipping Provider Test page at:
http://host:port/portalTools/webClipping/providers/webClipping
See the Oracle Application Server Portal Configuration Guide for more information about setting proxy authentication.
Shut down the OC4J instance where your Portal Tools application is running. This step ensures that no modifications are made to the files that will be migrated. Do not restart the OC4J instance until after the migration is completed.
To shut down the OC4J instance in an Oracle Application Server instance, use the following command (from the Oracle_home/opmn/bin directory):
opmnctl stopproc gid="OC4J_Instance"
In this example, OC4J_Instance refers to the OC4J instance where your Portal Tools application was deployed. Typically, it is OC4J_Portal.
To shut down a standalone OC4J instance, change to the OC4J_HOME/j2ee/home directory, then use the following command:
java -jar admin.jar ormi://host:port/ admin admin_password -shutdown
The migration tool parses the service deployment properties file to find the provider.xml file that contains the XML definition of the URL-based portlets to be migrated.
The tool changes the Provider Definition class from URLProviderDefinition to WcProviderDefinition. For each of the URL-based portlets defined in the provider.xml file, an equivalent clipping definition is created and inserted into the Web Clipping Repository. Then, the PortletDefinition XML snippet corresponding to the portlet being migrated is replaced with a new one that uses WcPortletDefinition as its class. The replacement XML snippet contains a Clip Id that is a pointer to the newly inserted clipping definition.
The new PortletDefinition XML snippet will no longer contain the same information as it did when it was a URLPortletDefinition. Namely, the migration tool uses the URL to visit as well as the headerTrimTag and footerTrimTag to generate an equivalent Web Clipping definition that will be stored within the Web Clipping Repository and only accessible from the provider.xml file through the Clip Id. The only information remaining will be the title and description. Refer to Section 5.2.3, "Setting Web Clipping Portlet Properties" for instructions on modifying your clipping.
To migrate portlets, take the following steps:
Set environment variables:
On UNIX, set LD_LIBRARY_PATH to either the Install_home/lib or Install_home/lib32, depending on whether the operating system is 32-bit or 64-bit.
On Windows, set PATH to Install_home\bin
Change to the ORACLE_HOME/portal/jlib directory.
Use the following command to import the portlet to Web Clipping:
java -Doracle.ons.oraclehome=ORACLE_HOME -jar wcwebdb.jar -import -from urlservices webclip_depprop urlsvc_depprop
In the example, the parameters have the following meanings:
ORACLE_HOME refers to the directory where Oracle Application Server is installed.
webclip_depprop refers to the path to your webClipping service deployment properties file. The path is typically:
Inst_Home/j2ee/OC4J_Instance/applications/portalTools/webClipping/WEB-INF/deployment/webClipping.properties
Inst_Home refers to the location where OC4J is installed. OC4J_Instance refers to the OC4J instance where your PortalTools application is deployed. In an Oracle Application Server instance, it is usually OC4J_Portal; in a standalone OC4J instance, it may be home.
urlsvc_depprop refers to the path for the URL-based portlets service deployment properties file that points to URL-based portlets that you wish to migrate.
For example, assume your URL-based portlets are deployed in the following directory on UNIX:
$Inst_Home/j2ee/home/applications/jpdk/
Assume that Web Clipping is deployed in the following directory and that Inst_Home is the same directory where Oracle Application Server is installed, ORACLE_HOME:
$Inst_Home/j2ee/home/applications/portalTools/
In this case, use the following command:
cd $Inst_Home/portal/jlib;
java -Doracle.ons.oraclehome=$ORACLE_HOME -jar wcwebdb.jar -import -from urlservices \
$Inst_Home/j2ee/home/applications/portalTools/webClipping/WEB-INF/deployment/webClipping.properties \
$Inst_Home/j2ee/home/applications/jpdk/jpdk/WEB-INF/deployment/urlsample.properties
Repeat Step 3 for each service you want to migrate.
After you migrate all of the URL-based portlets, take the following steps:
Start the OC4J instance that hosts your provider.
To start the OC4J instance in an Oracle Application Server instance, use the following command:
opmnctl startproc gid="OC4J_Instance"
In this example, OC4J_Instance refers to the OC4J instance where your Portal Tools application was deployed. Typically, it is OC4J_Portal.
To start a standalone OC4J instance, change directory to $OC4J_HOME/j2ee/home, then use the following command:
java -jar oc4j.jar -err errors.log
Update all Portal instances where URL-Based portlets were previously registered. Go to Portal Navigator to find your previously registered URL-based Portlet provider. Click Edit Registration and then click the Connection tab to edit the connection information to the newly migrated provider.
If you previously registered your URL-based Portlet provider using the Service Id mechanism, your provider URL looked similar to the following:
http://host:port/jpdk/jpdk/providers
In this case, because the Service Id field already contains urn:someservice, you now need only to update the provider URL value to the following:
http://host:port/portalTools/webClipping/providers
If you registered your URL-based Portlet provider using a provider URL that contained the Service Id, your provider URL looked similar to the following:
http://host:port/jpdk/jpdk/providers/service_id
In this case, you need to update the provider to the following:
http://host:port/portalTools/webClipping/providers/service_id
For the most part, the rest of the registration details can remain as they are. However, if you plan on using the in-line rendering functionality of the migrated portlets, you must select Once Per User Session for Login Frequency.
Restore HTTP proxy authentication setting that you altered in preparation for the migration. During the migration process, URL-based portlets are converted to Web Clipping portlets. If the Web Clipping provider has originally been configured with Requires Authentication enabled, your migrated URL-based portlets may not function properly.
Check the test page at:
http://host:port/portalTools/webClipping/providers/webClipping
If the Login Scheme is not set to Use login below for all users, then authentication is accomplished by mapping the current portal user to a proxy server username and password. A portal user's proxy server credentials can only be entered through the Customize link of the Web Clipping portlet. However this cannot be accomplished through the Customize link of the migrated URL-based portlets. The workaround is to temporarily add a Web Clipping portlet to the page and customize it to provide the security credentials. After this is complete, you can remove the temporary portlet.
Review each Portal page where you had used URL-based portlets and verify that the page still contains the content. Occasionally, you may find that, after migration, what used to be a "trimmed" Web page is now the entire Web page. This may be due to some of the limitations of the migration tool, which are discussed in Section 5.5.5, "Limitations in Migrating URL-Based Portlets". If this happens, edit the portlet by altering the Web Clipping associated with it.
After you have migrated the portlets, you no longer use the provider.xml file to edit the portlets. Instead, you use Web Clipping to edit the portlets, as described in Section 5.2.3, "Setting Web Clipping Portlet Properties".
Note the following:
Whatever modifications you make to the clipping will affect it at the portlet definition level and therefore will affect all the instances of that portlet which may exist across Portal pages.
When you modify the clipping and you have made the portlet rendering to be Inline, and have registered the provider with a Login Frequency of Once per User Session, then page viewers who have an instance of the particular portlet on their page, will need to log out of OracleAS Portal and log in again to see the changes implemented. This feature avoids disruption of the page viewer's usage of a particular portlet when it is being modified.
For portlets with Web Clippings that require authentication to an external application prior to accessing the page containing the clip, the "off-line" editing mechanism detailed in the previous item does not provide such authentication information. Consequently, there is no way to modify the migrated clipping if the original URL-based portlet uses external applications. There is currently no workaround for this limitation.
This sections describes limitations in migrating URL-based portlets to Web Clipping and describes some differences between the two methods.
There is a fundamental difference between URL-based portlets and Web Clipping in the way that clippings are defined.
URL-based portlets use the headerTrimTags and footerTrimTags tags to define the begin and end of a particular section in an HTML page. On the other hand, Web Clippings use the HTML tag path (for example, html/ body/table[2]/tr[2]/td[1]) to denote the path to use when looking for an HTML tag that would contain the clipping within the page.
While the header and footer trim tags for URL-based portlets offer greater flexibility (that is, the clipping does not need to reside within one single HTML tag), it is not as robust. When a clipping can no longer be found in the same location within a page, there is no way to apply fuzzy matching logic to find the clipping again. On the other hand, Web Clipping stores key pieces of information to locate the clipping within the page. If the clipping is not in the same location, the fuzzy match feature looks for other candidates on the same HTML page to account for the possibility that the clip may have moved.
The migration tool tries to find the clipping (HTML Tag) that encapsulates the headerTrimTags and footerTrimTags. Often, this will not be the exact HTML that was extracted by the URL-based portlet. In these cases, the entire Web page will be returned as the content of the migrated Web Clipping Portlet. To amend this, simply edit the portlet.
URL-based portlets that have been migrated to Web Clipping do not support proxy authentication by default. This is because URL-based portlets inherently do not support proxy authentication and Web Clipping preserves the edit mode of the portlets. Their edit mode does not provide an opportunity to enter authentication information. To work around this restriction, add an empty Web Clipping portlet to the same portal and use the Web Clipping portlet Customize link to enter the user name and password for proxy authentication.
URL-based portlets that used external applications are migrated as full-page Web Clipping portlets. This means that the URL previously specified by the URL-based portlet definition will be the one used to display the full page after the log in process. Whatever headerTrimTags and footerTrimTags you have previously specified will be lost, because external application integration occurs at the Portal side while the migration tool only handles the provider side. Because you are not connected to any Portal instances at the time of the migration, and the external applications framework resides only on the Portal side, the migration tool cannot fetch the authentication information necessary to log in to parse the HTML and use the headerTrimTags and footerTrimTags that you have previously specified to compute an HTML Tag Path to store in the Web Clipping Definition.
In maintaining migrated portlets, you can edit the clipping through links in the test page. However, this does not include URL-based portlets that used external applications to authenticate themselves to the external sites. There is currently no workaround for this issue.
URL-based portlets that use the XML Filter cannot be migrated to Web Clipping portlets because there is a lack of such a functionality in the Web Clipping Portlet. Before proceeding with migration, make sure that you have backed up the URL-based portlets that use the XML Filter into a separate URL-based portlet provider. You must do this because the migration occurs at the provider level. That is, upon interpreting that a particular provider.xml file has URLProviderDefinition for its provider definition class, all the portlet definitions contained within that provider definition are migrated.
This section describes current limitations for Web Clipping. For information about the latest limitations in a release, be sure to read the Oracle Application Server Release Notes.
If the site to which you are connecting uses a large amount of JavaScript to manipulate cookies or uses the JavaScript method document.write to modify the HTML document being written, you may not be able to clip content from the site.
When you integrate with partner applications (through the use of mod_osso), you cannot clip directly through those partner applications in an authenticated manner. However, you can use the partner applications through the external application framework.
You cannot use the Web Clipping portlet to clip OracleAS Portal pages. As a workaround, examine the portlet that is supplying the data and take the appropriate action:
For database provider portlets, use export/import to copy pages across portals.
For Web provider portlets, re-register the same provider in the destination portal and edit the portal manually.
Web Clipping checks for NLS settings in the following way:
Web Clipping checks the Content-Type in the HTTP header for the charset attribute. If this is present, it assumes that this is the character encoding of the HTML page.
If the charset attribute is not present, it checks the HTML META tag on the page to determine the character encoding.
If the HTML META tag is not found, Web Clipping uses the charset in the previous browsed page. If this is the first page, it defaults to the ISO-8859-1 character encoding.
If the value of the charset for Content-Type or META tag is not supported (for example, if the charset was specified as NONE), Web clipping uses the default character set, ISO-8859-1, not the charset in the previously browsed page.
To use the Web Clipping portlet, you must use Netscape 7.0 or higher, or Microsoft Internet Explorer 5.5 or higher for Windows 2000, or Microsoft Internet Explorer 6.0 or higher for Windows XP.
If you use browser versions older than these, you may encounter JavaScript errors.
For troubleshooting information, see Appendix B, "Troubleshooting Portlets and Providers".
In this chapter, you learned how to use Web Clipping to add Web content to a Portal page, including adding authenticated content and personalized content to a page. In addition, you learned how to migrate URL-based portlets to Web Clipping. For more information about using Web Clipping, click the Help link on any of the Web Clipping pages.