| Oracle® Application Server Forms and Reports Services Installation Guide 10g Release 2 (10.1.2) for Windows B16392-03 |
|
 Previous |
 Next |
| Oracle® Application Server Forms and Reports Services Installation Guide 10g Release 2 (10.1.2) for Windows B16392-03 |
|
 Previous |
 Next |
In this release, you can configure Forms and Reports Services to use the services of an Oracle Application Server Infrastructure. This configuration enables Forms and Reports Services to be a part of an Oracle Application Server Farm. Forms and Reports Services can then use the services of an OracleAS Infrastructure in the same way as used by the Business Intelligence and Forms components.
Forms and Reports Services can be configured to use the following services of an OracleAS Infrastructure:
Oracle Identity Management
This enables Forms and Reports Services to use Oracle Identity Management components such as Oracle Application Server Single Sign-On, Oracle Internet Directory, and so on.
To configure Forms and Reports Services to use Oracle Identity Management, refer to Section 6.1, "Configuring Forms and Reports Services to Use Oracle Identity Management".
Oracle Application Server Metadata Repository
To configure Forms and Reports Services to use OracleAS Metadata Repository, refer to Section 6.2, "Configuring Forms and Reports Services to Use OracleAS Metadata Repository".
|
Note: Once you configure Forms and Reports Services, you cannot reverse this configuration, though you can reassociate to a different Oracle Identity Management and OracleAS Metadata Repository. |
This chapter includes the following topics:
Configuring Forms and Reports Services to Use Oracle Identity Management
Configuring Forms and Reports Services to Use OracleAS Metadata Repository
Testing the Configuration on Oracle Application Server Forms Services
Testing the Configuration on Oracle Application Server Reports Services
This section describes the procedure to configure Oracle Identity Management. Oracle Identity Management components provide directory, security, and user-management functionality. Some of these components (such as OracleAS Single Sign-On) have schemas in the Oracle Application Server Metadata Repository.
Before starting the configuration, ensure that:
The Oracle Identity Management instance is started (status is Up)
You know the Oracle Internet Directory host and port numbers
You know the password for cn=orcladmin, or another user who is a member of the iASAdmins group
To configure Oracle Identity Management:
Navigate to the Application Server Control home page.
Click Infrastructure.
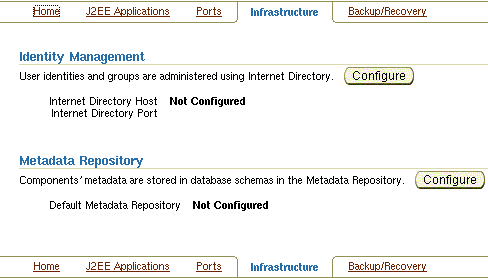
Internet Directory Host in the Identity Management section and Default Metadata Repository in the Metadata Repository section display Not Configured as shown in Figure 6-1.
Figure 6-1 Identity Management and Metadata Repository Sections

In the Identity Management section, click Configure to display the Configure Identity Management: Internet Directory page.
On the Configure Identity Management: Internet Directory page:
In the Host field, enter the name of the computer on which Oracle Internet Directory and Identity Management are running.
For example, host.oracle.com
In the Port field, enter the port at which Oracle Internet Directory is listening. The default port number is 389.
Select Use Only SSL Connections with Internet Directory if you want to use only SSL to connect to Oracle Internet Directory.
|
Note: If you select Use Only SSL Connections with Internet Directory, then the default port number is636. |
Click Next to display the Configure Identity Management: Login page.
On the Configure Identity Management: Login page:
In the User Name field, the user name to log on to Oracle Internet Directory is displayed as cn=orcladmin. You may change this provided the user belongs to the IASAdmin group and the user name is in the cn=user_name format. For example, cn=admin where admin is the username.
You must log on as a user who belongs to the necessary groups in Oracle Internet Directory. For more information about the necessary groups, see Oracle Application Server Installation Guide.
In the Password field, enter the password for the user name.
Click Next to display the Configure Identity Management: Validation page.
The Configure Identity Management: Validation page displays a summary of the Oracle Application Server and Oracle Internet Directory details. Click Finish to complete the configuration.
The configuration of Oracle Identity Management is complete. For more information about Oracle Identity Management, see Oracle Identity Management Concepts and Deployment Planning Guide.
This section describes the procedure to configure OracleAS Metadata Repository. OracleAS Metadata Repository is a collection of schemas that are used by other Oracle Application Server components.
Before starting the configuration, ensure that:
OracleAS Metadata Repository is started (status is Up)
The Oracle Identity Management instance is started (status is Up)
You know the password for cn=orcladmin, or another user who is a member of the iASAdmins group
To configure OracleAS Metadata Repository:
Navigate to the Application Server Control home page.
Click Infrastructure.
Internet Directory Host in the Identity Management section and Default Metadata Repository in the Metadata Repository section display Not Configured as shown in Figure 6-1.
In the Metadata Repository section, click Configure to display the Configure Repository: Internet Directory page.
On the Configure Repository: Internet Directory page:
In the User Name field, the user name to log on to Oracle Internet Directory is displayed as cn=orcladmin. You may change it provided the user is in the IASAdmin group and the user name is in the cn=user_name format. For example, cn=admin where admin is the user name.
You must log on as a user who belongs to the necessary groups in Oracle Internet Directory. For more information about the necessary groups, see Oracle Application Server Installation Guide.
In the Password field, enter the password for the user name.
Click Next to display the Configure Repository: Location page.
On the Configure Repository: Location page:
From the Repository list, select an existing OracleAS Metadata Repository.
Click Next to display the Configure Repository: Validation page.
The Configure Repository: Validation page displays a summary of the Oracle Application Server instance and the new database. Click Finish to complete the configuration.
The configuration of OracleAS Metadata Repository is complete. Forms and Reports Services is now a part of the OracleAS Metadata Repository's farm. For more information about OracleAS Metadata Repository's farms, see Oracle Application Server High Availability Guide.
After configuring Forms and Reports Services to use the services of an OracleAS Infrastructure, you must make the Reports Server secure. The in-process server reduces the maintenance and administration of the Reports Server by providing a means for starting the server automatically. For more information about the in-process server, see Oracle Application Server Reports Services Publishing Reports to the Web.
To secure Reports Server managed by OPMN (including in-process server), perform the following steps:
Update the server_name.conf file located in the ORACLE_HOME/reports/conf directory. To do this:
Navigate to the Application Server Control home page.
Under the System Components section, click the Reports Server:server_name link to display the Reports Server page.
On the Reports Server page, under the Administration section, click Configuration to display the Configuration page.
On the Configuration page, click Edit Configuration File to display the Edit Configuration File page.
On the Edit Configuration page, the server_name.conf file is displayed.
In the server_name.conf file, search for the security element. Uncomment the security element. After uncommenting, the security element must look like this:
<security id="rwSec" class="oracle.reports.server.RWSecurity">
<!--property name="securityUserid" value="portal_db_username/portal_db_
password@%portal_db_tnsname" confidential="yes" encrypted="no"/-->
<property name="oidEntity" value="reports_oid_entity"/>
</security>
Ensure that the value of oidEntity is the same as the value of oidEntity in the rwserver.template file. The rwserver.template file is located in the ORACLE_HOME/reports/conf directory.
Save your changes and restart the Reports Server.
If your server is not managed by OPMN, then edit the server configuration file (server_name.conf) manually, and perform steps 2 and 3 in Section 6.3, "Making the Reports Server Secure".
All newly started servers will be secure by default.
|
Note: OracleAS Reports Services enables Reports-related groups (prefixedRW_) such as RW_ADMINISTRATORS, RW_DEVELOPER and IASADMINS to run the certain Web commands such as getjobid, getserverinfo, showjobs, and showenv. If OracleAS Portal is not configured to use the services of the OracleAS Infrastructure that is configured with the Forms and Reports Services installation, RW_ groups are not created. In this case, to enable these users to run the Web commands, you have to create the RW_ groups manually and add users to these RW_ groups. For more information on the Reports-related (RW_) groups, refer to the chapter "Deploying Reports in OracleAS Portal" in Oracle Application Server Reports Services Publishing Reports to the Web. |
Once the configuration of Oracle Identity Management and OracleAS Metadata Repository is complete, the status of the Oracle Process and Management Notification (OPMN) services is displayed as Down. You must restart the OPMN services.
To restart the OPMN services:
Navigate to the Application Server Control home page.
Click Start All to display the Processing: Start All page. The Processing: Start All page displays the progress of the Start All operation.
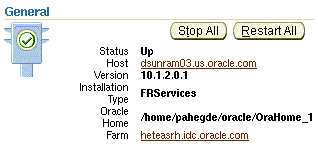
After the Start All operation is complete, the Application Server Control home page displays the earlier standalone Forms and Reports Services instance as part of an OracleAS Farm as shown in Figure 6-2.
Figure 6-2 Forms and Reports Services Part of an OracleAS Farm

To test whether the configuration of Oracle Application Server Forms Services to use the services of an OracleAS Infrastructure is successful:
Navigate to the Application Server Control home page.
In the System Components section, click Forms to display the Forms Overview page.
Click the Configuration tab on the Forms Overview page.
From the View list, select Forms Web Configuration (formsweb.cfg).
Click Create New Section. The section that you create will be added to the formsweb.cfg file.
In the Section Name You Want to Add field, enter a name for the section. For example, modosso.
Click OK.
The section that you added is displayed in the Configuration page. You can add comments in the field next to the section name. Select the section that you added and click Edit to display the Edit Section page.
On the Edit Section page, you must add parameters to the section you created. To add parameters:
In the Name field, enter a name for the parameter. For example, ssoMode.
In the Value field, enter true.
Click Add New Parameter.
The parameter name and value are displayed in the Edit Section page. Click Apply.
Run a form by typing the following URL to display the Oracle Single Sign-On page:
http://host-name:port-mumber/forms/frmservlet?config=modosso
For example,
http://host.oracle.com:7778/forms/frmservlet?config=modosso
On the Oracle Single Sign-On page, log on with the Oracle Internet Directory user name and password.
If the configuration is successful, an OracleAS Forms Services page is displayed.
To test whether the configuration of Oracle Application Server Reports Services to use the services of an OracleAS Infrastructure is successful:
Navigate to the following URL to open the Reports demo page:
http://host-name:port-number/repdemo
For example,
http://host.oracle.com:80/repdemo
Click either the Test a JSP Web Report link or the Test a Paper Report on the Web link.
On the Getting Started with Oracle Reports page, click Run Report.
If the configuration is successful, a "Reports Ran Successfully" message is displayed.