|
Oracle® Reports Building Reports
10g Release 2 (10.1.2) B13895-01 |
|
 Previous |
 Next |
|
Oracle® Reports Building Reports
10g Release 2 (10.1.2) B13895-01 |
|
 Previous |
 Next |
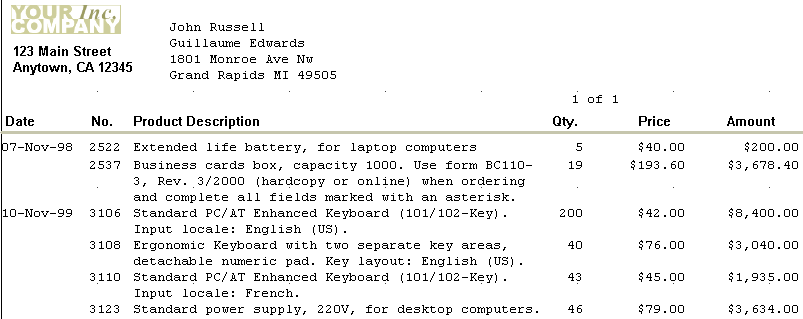
In this chapter, you will learn about reports that display output on preprinted forms. By following the steps in this chapter, you can generate the report output shown in Figure 32-1.
Figure 32-1 Printing reports on preprinted forms
Concepts
Using the various tools in the Paper Layout view and the Paper Design view, you can format a report to print on preprinted forms.
|
Note: Many of the concepts in this example are used in the following example reports:
|
Data Relationships
This report uses two queries linked in a master/detail relationship. You will create a break in the detail group and two summary columns in the master group.
Layout
This report consists of two partial default layouts, one with a mailing label format and one with a tabular format. You will move fields to the correct positions on the page and restrict the master repeating frame to appearing once per form.
Example Scenario
In this example, you will learn formatting techniques for printing reports on preprinted forms when you do not have access to a computer readable version of the forms. Such reports must be designed so that the data prints in exact positions on the form. This example report consists of data formatted such that all values fall precisely within the corresponding fields of a preprinted sales order. The form is on a standard sized 8.5 inches by 11 inches (21.6 centimeters by 27.9 centimeters) page. The employee name and the customer's name and address must display in the region at the top of the page. The order item details must only display 40 characters. Anything over 40 characters will be placed on a second page of the form. At the end of our example, we add page numbers. This section is optional, as your forms may not require page numbers.
|
Note: The above measurements are for the form we use in this example. If you do not have access to an online, or computer readable version of your preprinted form, you will need to take these measurements yourself, then use the steps below to create your own report definition. |
As you build this example report, you will:
Manually create the data model for your report using the tools in the Data Model view to manually create two queries. You will also link the two queries, create a break group, and create two summary columns.
Create the layout for your report using the tools in the Paper Layout view. You will also use the Report Block Wizard to create a mailing label portion of your report and a tabular report that displays the order detail information
Format your report in the Paper Design view using the tools in the Paper Design view to add format masks and adjust the appearance of your report.
Add page numbers (optional) using the tools in the Paper Layout view to add page numbering fields.
To see a sample report that uses preprinted forms, open the examples folder named preprint, then open the Oracle Reports example named preprint.rdf. For details on how to open it, see "Accessing the Example Reports" in the Preface.
To build the example in this chapter, you must have access to the Order Entry sample schema provided with the Oracle Database. If you do not know if you have access to this sample schema, contact your database administrator.
The steps in this section will show you how to manually create the data model for your report. Your data model will consist of two linked queries. The first query will retrieve all the customers that have orders in the database. The second query will retrieve all of the order information for each of the customers, and will contain a break group based on the date of each order.
The steps in this section will show you how to manually create two queries in the Data Model view.
To create the queries:
Launch Reports Builder (or, if already open, choose File > New > Report).
In the Welcome or New Report dialog box, select Build a new report manually, then click OK.
In the Data Model view that displays, click the SQL Query tool in the tool palette then click in an open area of the Data Model view to display the SQL Query Statement dialog box.
In the SQL Query Statement field, enter the following SELECT statement:
SELECT FIRST_NAME||' '||LAST_NAME EMPLOYEE_NAME
  , CUST_FIRST_NAME||' '||CUST_LAST_NAME CUSTOMER_NAME
  , CUST_ADDRESS
  , CUSTOMER_ID
FROM EMPLOYEES, CUSTOMERS
WHERE EMPLOYEE_ID = ACCOUNT_MGR_ID
AND CUSTOMER_ID IN (SELECT UNIQUE(CUSTOMER_ID) FROM ORDERS)
ORDER BY LAST_NAME, CUST_LAST_NAME
|
Note: You can enter this query in any of the following ways:
|
Click OK.
|
Note: If you are not already connected to a database, you will be prompted to connect to the database when you click Query Builder or Next. Ensure that you connect to a database that has the appropriate schema for this example. Section 32.1, "Prerequisites for this example" describes the sample schema requirements for this example. |
If the Connect dialog box displays, type the connection information for the database where the Order Entry sample schema resides, then click Connect.
The query displays in the Data Model view, and should look something like this:
Figure 32-2 Data Model view of the first query
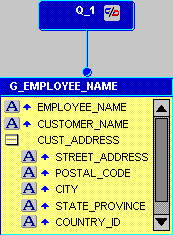
Right-click the query (Q_1), then choose Property Inspector from the pop-up menu.
In the Property Inspector, under General Information, set the Name property to Q_CUSTOMER.
Double-click the group (G_EMPLOYEE_NAME) to display the Property Inspector, and set the Name property to G_CUSTOMER.
In the Data Model view, click the SQL Query tool in the tool palette to create a second query with the following SELECT statement:
SELECT to_char(ORDER_DATE, 'DD-Mon-YY') ORDER_DATE
  , I.PRODUCT_ID
  , PRODUCT_DESCRIPTION
  , QUANTITY
  , UNIT_PRICE
  , QUANTITY * UNIT_PRICE ITEM_TOTAL
  , CUSTOMER_ID
FROM ORDERS O, ORDER_ITEMS I, PRODUCTS P
WHERE O.ORDER_ID = I.ORDER_ID
AND I.PRODUCT_ID = P.PRODUCT_ID
ORDER BY ORDER_DATE, I.PRODUCT_ID
Right-click the query object, then choose Property Inspector from the pop-up menu.
In the Property Inspector, set the Name property to Q_ORDERS.
Double-click the new group object to display the Property Inspector.
In the Property Inspector, set the Name property to G_ORDER_ITEMS.
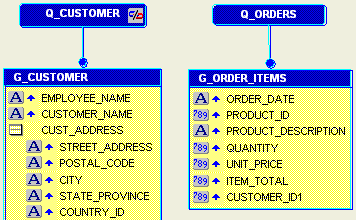
Your data model should now look like this:
Figure 32-3 Data Model view with two queries
|
Note: In Q_CUSTOMER, the second WHERE clause restricts the values returned to only those customers who have current orders. In Q_ORDERS, we have used "to_char" to account for a new datatype, "Datetime." Since this new datatype is not recognized by Oracle Reports, you cannot use format masks on this particular column yet. |
Save your report as preprint_your_initials.rdf.
The steps in this section will show you how to modify your data model to link the two queries and to cause the data retrieved to break on a particular column.You will also create several summary columns to calculate information for each order.
To modify your data model:
In the Data Model view, click the Data Link tool in the tool palette.
Click the CUSTOMER_ID column in the G_Customer group.
While holding down your mouse button, drag your cursor to the CUSTOMER_ID1 column in the G_ORDER_ITEMS group and release your mouse button to create a link between the two queries.
Now, create a break group by clicking the ORDER_DATE column in the G_ORDER_ITEMS group and dragging it above the group.
|
Tip: You can select the group or the query title and use the resize handles to modify the look of your data model. |
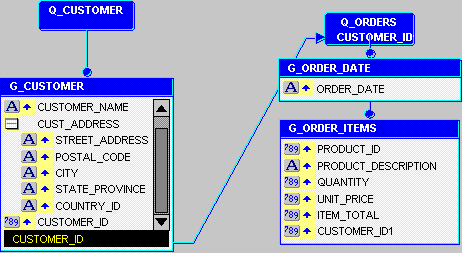
Your data model should now look like this:
Figure 32-4 Data Model view of the linked queries and break group
Click the Summary Column tool in the tool palette, then click in the G_CUSTOMER group to create a summary column. You may want to resize the group so that you can see your summary columns.
Double-click the new summary column object (CS_1) to display the Property Inspector, and set the following properties:
Under General Information, set the Name property to CS_PAGE_TOTAL.
Under Summary, set the Function property to Sum, set the Source property to ITEM_TOTAL, and set the Reset At property to Page.
Create another summary column in the G_CUSTOMER group, and set its properties as follows:
Under General Information, set the Name property to CS_ORDER_TOTAL.
Under Summary, set the Function property to Sum, set the Source property to ITEM_TOTAL, and set the Reset At property to G_CUSTOMER.
|
Note: These two summary columns calculate the total items per page and the total items in the order for the report. |
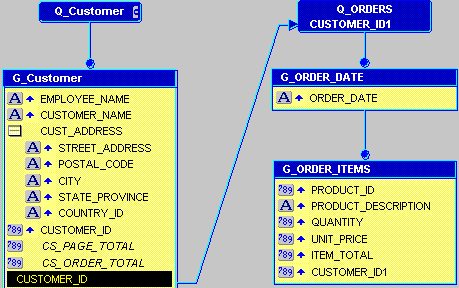
Your data model is now complete, and should look like this:
Figure 32-5 Complete Data Model view of the preprinted forms example
Save your report.
The steps in this section will show you how to create a layout that displays the objects in the desired locations on your preprinted form. You will start by adjusting the margin of your report, then creating the mailing label portion that will print at the top of each page that shows the address information for the customer. You will then create the body of the report, which contains the order information that display the date, order number, description, number, price per item, and total price.
Before you can start adding layout objects, you will need to adjust the margin of your layout.
To set up the layout:
Click the Paper Layout button in the toolbar to display the Paper Layout view of your report.
To make it easier for you to manipulate your layout objects, expand the size of the Paper Layout window.
Click the Edit Margin button in the toolbar to view the margin portion of the layout.
Using the resize handles, adjust the size of the margin (the solid black bar) to the dimensions of your form. In our example, our form is 8.5 inches by 11 inches (21.6 centimeters by 27.9 centimeters), so we will expand the margin to 8.5 inches (21.6 centimeters) across, and 11 inches (27.9 centimeters) down.
|
Tip: You can use the corner resize handles to adjust the size of your margin. |
Click the Edit Margin button in the toolbar again to return to the body of the layout.
Now, you are ready to create your report layout.
In this section, you will use the Report Block Wizard to create a mailing label for the address section of your preprinted form.
To create an address label:
In the Paper Layout view, click the Report Block tool in the tool palette.
Using the rulers along the edges of the Paper Layout view, drag a rectangle starting at 1 inch (2.5 centimeters) from the left and 0.25 inches (0.5 centimeters) from the top, to 6 inches (15 centimeters) from the left and 1.25 inches (3 centimeters) from the top. Release your mouse button to display the Report Block Wizard.
On the Style page of the Report Block Wizard, select Mailing Label, then click Next.
On the Groups page, click G_CUSTOMER and click Down in the Available Groups list to specify the Print Direction and move this group to the Displayed Groups list, then click Next.
In the Mailing Label Text field, create a mailing label by clicking the appropriate columns and buttons (for example, click EMPLOYEE_NAME in the Available Fields list, then click > and New Line, and so on), so that the Mailing Label Text field looks like this:
&<EMPLOYEE_NAME>
&<CUSTOMER_NAME>
&<C_STREET_ADDRESS>
&<C_CITY>, &<C_STATE_PROVINCE> &<C_POSTAL_CODE>
|
Note: For more information on building a mailing label report, see Chapter 6, "Building a Mailing Label Report". |
Click Next.
On the Template page, select No template, then click Finish to display your report layout in the Paper Layout view. It should look something like this:
Figure 32-6 Paper Layout view of the initial layout

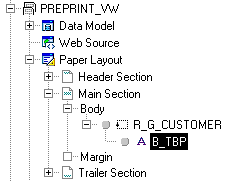
The region that you just created is a boilerplate object called B_TBP. While this object is selected, view the Object Navigator and notice the new boilerplate object:
Figure 32-7 Report Block boilerplate object in the Object Navigator
While the object is selected, choose Tools > Property Inspector to display the Property Inspector (or right-click the object and choose Property Inspector).
In the Property Inspector, under General Layout, set the Horizontal Elasticity property to Variable. This ensures that appropriate space is available for the mailing label text.
Save your report.
In this section, you will add a report block that displays the order items and details that correspond to the customer identified in each mailing label. These items and details are required for your preprinted form.
To add order item details to your report:
In the Object Navigator, click the repeating frame R_G_CUSTOMER that surrounds the boilerplate object B_TBP created in Section 32.3.2, "Create an address label for your form".
In the Paper Layout view, with R_G_CUSTOMER selected, use the corner resize handles to adjust the size of the repeating frame to the size of your preprinted form (in our example, 8.5 inches (21.6 centimeters) across and 11 inches (27.9 centimeters) down). Make sure the frame does not extend beyond the single page boundary.
Click the Report Block tool in the tool palette.
Using the rulers as guides, drag a region 0.25 inches (0.5 centimeters) from the left and 1.5 inches (4 centimeters) from the top, to 8.25 inches (21 centimeters) from the left and 2 inches (5 centimeters) from the top. Release your mouse button to display the Report Block Wizard.
On the Style page of the Report Block Wizard, select Group Left, then click Next.
On the Groups page, click the following groups and click Down in the Available Groups list to specify the Print Direction and move them to the Displayed Groups list, then click Next:
G_ORDER_DATE
G_ORDER_ITEMS
On the Fields page, click the following fields in the Available Fields list and click the right arrow (>) to move them to the Displayed Fields list, then click Next:
ORDER_DATE
PRODUCT_ID
PRODUCT_DESCRIPTION
QUANTITY
UNIT_PRICE
ITEM_TOTAL
On the Labels page, remove the label names since they are not required for the preprinted form, and adjust the widths as follows, then click Next:
| Fields and Totals | Labels | Width |
|---|---|---|
| ORDER_DATE | <none>
|
9
|
| PRODUCT_ID | <none>
|
8
|
| PRODUCT_DESCRIPTION | <none>
|
40
|
| QUANTITY | <none>
|
4
|
| UNIT_PRICE | <none>
|
8
|
| ITEM_TOTAL | <none>
|
10
|
|
Note: The Width values are based on the space available on the preprinted form. |
On the Template page, select No Template, then click Finish to display your report layout in the Paper Layout view. It should look something like this:
Figure 32-8 Paper Layout view of the preprinted form example with mailing label and order item details

Save your report.
Now that you have added the elements you want displayed on your report, you need to set up the layout so that only records required for the preprinted form display on each page, and that the correct amount of information displays in the available amount of space on the form. Also, the form requires that a summary of each page displays in the same location on the page.
To adjust the layout and add page summaries:
In the Object Navigator, click M_G_ORDER_ITEMS_GRPFR, as shown in the following image:
Figure 32-9 Selected frame in the Object Navigator
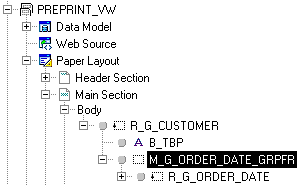
In the Paper Layout view, you should see the same object selected, as shown in the following image:
Figure 32-10 Selected repeating frame in the Paper Layout view

In the Object Navigator, double-click the properties icon next to M_G_ORDER_ITEMS_GRPFR to display the Property Inspector, and set the following properties:
Under General Layout, set the Vertical Elasticity property to Fixed to ensure that only this area is available for the order items to display.
In the Object Navigator, double-click the properties icon next to R_G_CUSTOMER to display the Property Inspector, and set the following properties:
Under Repeating Frame, set the Maximum Records per Page property to 1, to ensure that only one customer's information prints per page.
In the Object Navigator, double-click the view icon next to the Paper Layout node to display the Paper Layout view.
In the Paper Layout view, click the Field tool in the tool palette.
Draw a region 7 inches (18 centimeters) from the left and 10.25 inches (26 centimeters) from the top, to 8 inches (20 centimeters) from the left and 10.5 inches (27 centimeters) from the top.
|
Note: This field, as well as the second field you will create, should not be located within the repeating frame called M_G_ORDER_DATE_GRPFR. If you cannot fit these fields on the page, resize the repeating frame so that you can place the fields below the repeating frame, but still on the same page. |
Double-click the new field object (F_1) to display the Property Inspector, and set the following properties:
Under General Information, set the Name property to F_PAGE_TOTAL.
Under Field, set the Source property to CS_PAGE_TOTAL (the summary column you created in Section 32.2, "Manually create the data model for your report").
Following the steps above, create another field directly below F_PAGE_TOTAL in the Paper Layout view, then set its Name property to F_ORDER_TOTAL and Source property to CS_ORDER_TOTAL.
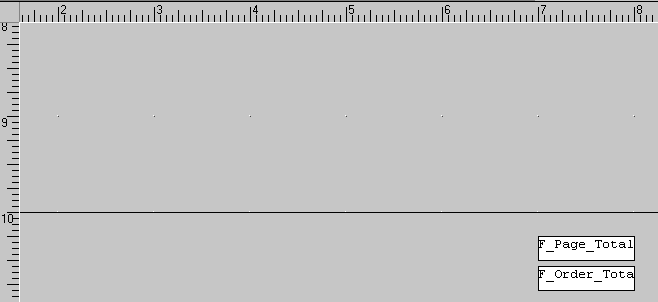
The new layout objects should now look like this:
Figure 32-11 F_PAGE_TOTAL and F_ORDER_TOTAL fields in the Paper Layout view
Save your report.
The steps in this section will show you how to preview your report in the Paper Design view, and make a few last-minute tweaks using the tools in the Paper Design view. It is sometimes easier to use the Paper Design view to finish your report, since you can see actual data displayed.
To format your report in the Paper Design view:
Click the Paper Design button in the toolbar to display the Paper Design view.
In the Paper Design view, click the field F_PRODUCT_DESCRIPTION.
|
Tip: If you cannot find this field, you can use the Object Navigator to find the field name and click it. When you select an item in the Object Navigator, the corresponding object is selected in the Paper Design view. |
Increase the size of this field as much as possible, given the size of the area on your form.
Shift-click to select the four numbered fields, then click the Align Right button in the toolbar.
At the bottom of the page, Shift-click the two fields (F_PAGE_TOTAL and F_ORDER_TOTAL), then click the Line Color tool in the tool palette and choose No Line.
Shift-click the three currency number fields on the right.
Click the Currency button in the toolbar to add a dollar sign to the amounts.
Click the Commas button to add a comma to values over 999.
Click the Add Decimal Place button twice to add two decimal places to the values.
In the Object Navigator, Shift-click the following three objects:
B_TBP
F_ORDER_TOTAL
F_PAGE_TOTAL
Choose Tools > Property Inspector to display the Property Inspector, and set the following properties:
Under Advanced Layout, set the Print Object On property to All Pages, and set the Base Printing On property to Enclosing Object.
In the Paper Design view, adjust the sizes of the fields according to the measurements on your preprinted form.
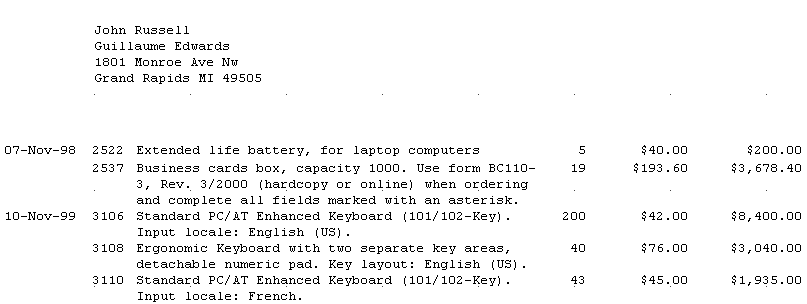
Your report should now look like this:
Figure 32-12 Final preview of your preprinted form report
|
Note: To see a more complete view of the report, you can open the sample report we have provided, calledpreprint.rdf. To view the report, open the report and click the Run Paper Layout button in the toolbar.
|
When you print your report on to the form, it might look something like this:
Figure 32-13 Final report printed on a sample preprinted form

|
Note: The Paper Design view of your report will not look like the image above. We printed our report on a sample preprinted form. The above image is a snapshot of that form. |
Save your report.
Some preprinted forms may require you to print page numbers. The steps in this section will show you how to add page numbers to your output that will display when the number of order items extends beyond a single page.
To add page numbers to your report:
Click the Paper Layout button in the toolbar to display the Paper Layout view.
Click the Field tool in the tool palette.
Draw a small region on your layout 6 inches (15 centimeters) from the left and 0.25 inches (0.5 centimeters) from the top, to 7 inches (18 centimeters) from the left and 0.5 inches (1.5 centimeters) from the top.
Double-click the new field object, F_1, to display the Property Inspector, and set the following properties:
Under General Information, set the Name property to F_PAGE_NUMBER.
Under General Layout, set the Horizontal Elasticity property to Variable.
Under Field, set the Source property to Page Number, and set the Visible property to No. Click the Page Numbering property field to display the Page Numbering dialog box.
In the Page Numbering dialog box:
Clear the Header Section and Trailer Section check boxes, and make sure that the Main Section check box is selected.
In the Reset At list, click R_G_Customer.
Click OK.
In the Paper Layout view, following the steps above to create another field from (7.25, 0.25) to (8.25, 0.5) inches (or (18.5, 0.5) to (21, 1.5) centimeters) .
Double-click the new field object to display the Property Inspector, and set the following properties:
Under General Information, set the Name property to F_TOTAL_PAGES.
Under General Layout, set the Horizontal Elasticity property to Variable.
Under Field, set the Source property to Total Pages, and set the Visible property to No. Click the Page Numbering property field to display the Page Numbering dialog box.
In the Page Numbering dialog box:
Clear the Header Section and Trailer Section check boxes, and make sure that the Main Section check box is selected.
In the Reset At list, click R_G_Customer.
Click OK.
Now that you have created the page number fields, you need to make them visible.
In the Paper Layout view, click the Text tool in the tool palette.
Draw a region on your layout 6 inches (15 centimeters) from the left and 1 inch (2.5 centimeters) from the top, to 8 inches (20 centimeters) from the left and 1.25 inches (3 centimeters) from the top.
Click inside the rectangle and type &<F_PAGE_NUMBER> of &<F_TOTAL_PAGES>.
|
Note: The "&<F_PAGE_NUMBER>" text will replace that text with the current value of the summary field you just created, which determines the page number of the current page. The "&<F_TOTAL_PAGES>" text will replace that text with the current total number of pages of the report, based on the value of the summary field of the same name. |
With the text object selected, choose Tools > Property Inspector to display the Property Inspector, and set the following properties:
Under General Information, set the Name property to B_PAGE_NUMBERS.
Under Advanced Layout, set the Print Object On property to All Pages, and set the Base Printing On property to Enclosing Object.
In the Paper Design view, click the Run Paper Layout button in the toolbar to run your report and display it in the Paper Design view.
Your report should now look like the following image. Notice how Reports Builder calculates that this particular report is one page, thus displays "1 of 1" above the order details.
Figure 32-14 Paper Design view of the preprinted form report with page numbers

Save your report.
Congratulations! You have successfully built a report that you can print on a preprinted form. You now know how to:
manually create two queries and link them.
create a summary column.
create a break group in your data model.
use the tools in the Paper Layout view to create your layout.
use the Report Block Wizard to create a mailing label report.
use the Report Block Wizard to create a tabular report.
add page numbering using fields in the Paper Layout view.
For more information on any of the wizards, views, or properties used in this example, refer to the Oracle Reports online Help, which is available in Reports Builder or hosted on the Oracle Technology Network (OTN), as described in Section 3.1.1, "Using the Oracle Reports online Help".