| Oracle® Application Server Enterprise Deployment Guide 10g (10.1.4.0.1) Part Number B28184-02 |
|
|
View PDF |
| Oracle® Application Server Enterprise Deployment Guide 10g (10.1.4.0.1) Part Number B28184-02 |
|
|
View PDF |
Installing and Configuring the Security Infrastructure
Installing and Configuring the Application and Web Tiers
Configuring the Oracle HTTP Server with the Load Balancing Router
Configuring Application Authentication and Authorization
The security infrastructure for myJ2EECompany contains the components depicted in Figure 2-15, "Data Tier Configuration". The Oracle Internet Directory administration utility oiddas is required for Oracle Internet Directory administration. oiddas is installed in the application server environment with the Oracle Internet Directory server.
To install and configure this security infrastructure:
Follow all instructions in Section 2.1, "Installing the Oracle Application Server Metadata Repository for the Security Infrastructure".
Follow all instructions in Section 2.2, "Installing the Oracle Internet Directory Instances in the Data Tier".
Follow all instructions in Section 2.3, "Configuring the Virtual Server to Use the Load Balancing Router".
Follow all instructions in Section 2.4, "Testing the Data Tier Components".
The Application Tier consists of multiple computers hosting middle tier Oracle Application Server Release 3 (10.1.3) instances. Each instance can contain multiple Oracle Containers for J2EE instances on which you deploy applications. In the complete configuration, requests are balanced among the OC4J instances on the application tier computers to create a performant and fault tolerant application environment.
The Web Tier(WEBHOST1 and WEBHOST2) consists of Oracle HTTP Servers from the Release 2 (10.1.2.0.0) Companion CD. Figure 2–1, "Enterprise Deployment Architecture for myJ2EEcompany.com with JAZN-SSO/DAS" on page 2-4 and Figure 2–2, "Enterprise Deployment Architecture for myJ2EEcompany.com with Oracle Access Manager" on page 2-5, show the Application Tier (APPHOST1 and APPHOST2) and Web tiers.
You can install an Oracle Application Server instance consisting only of one OC4J instance, using the Advanced installation option of the Oracle Universal Installer. Follow these steps to install and create the instances on APPHOST1 and APPHOST2:
Ensure that the system, patch, kernel and other requirements are met as specified in the Oracle Application Server Installation Guide. You can find this guide in the Oracle Application Server platform documentation library for the platform and version you are using.
Start the Oracle Universal Installer as follows:
On UNIX, issue this command: runInstaller
On Windows, double-click setup.exe
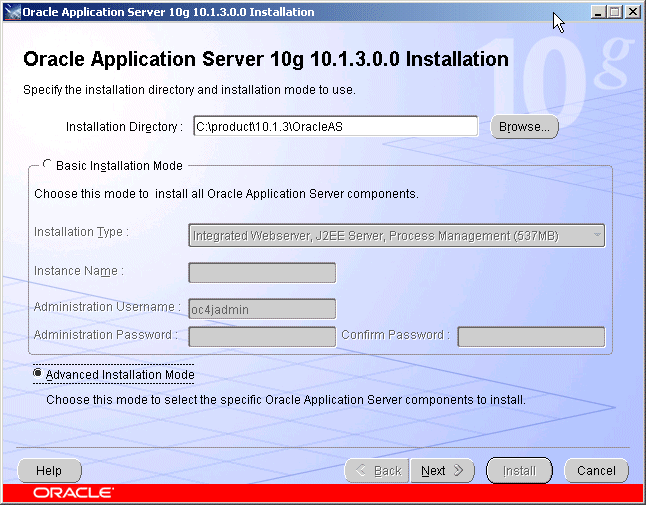
The Oracle Application Server 10.1.3.0.0 Installation screen appears with the Basic Installation Mode and the Integrated Web Server, J2EE Web Server and Process Management installation type selected.
Specify an installation directory for the instance, or leave the default.
Select the Advanced Installation Mode and click Next.
A confirmation dialog appears.
Figure 3-1 Oracle Universal Installer Oracle Application Server 10.1.3.0.0 Installation Screen with Advanced Installation Mode Selected
Click Yes.
A progress dialog appears, then the Select Installation Type screen appears.
Figure 3-2 Oracle Universal Installer Select Installation Type Screen
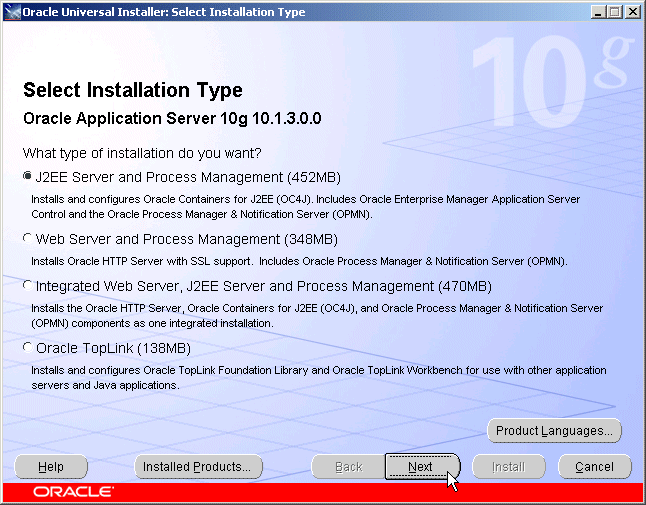
Select the J2EE Server and Process Management option and click Next.
The Specify Port Configuration Options screen appears.
Figure 3-3 Oracle Universal Installer Specify Port Configuration Options Screen
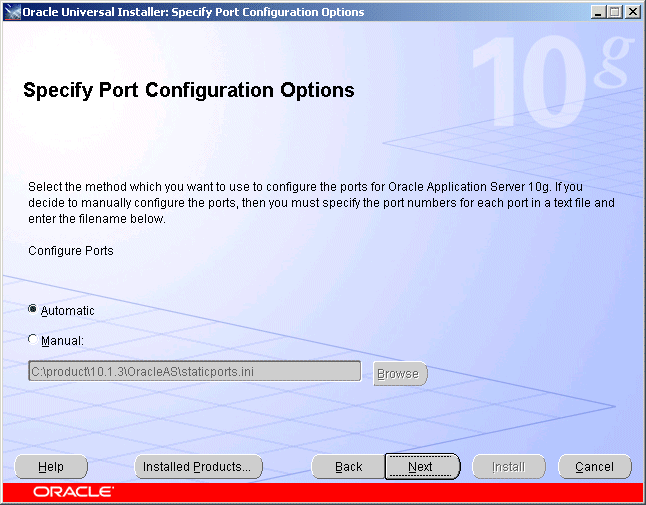
Select Automatic and click Next.
The Administration Instance Settings screen appears.
Figure 3-4 Oracle Universal Installer Administration Instance Settings Screen
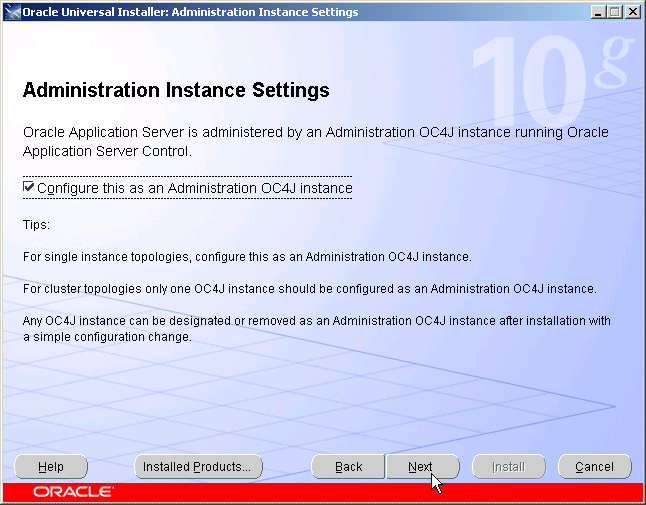
Check the box to designate the instance installed on APPHOST1 as an administration OC4J instance.
Click Next.
The Administration Settings screen appears.
Figure 3-5 Oracle Universal Installer Administration Settings Screen
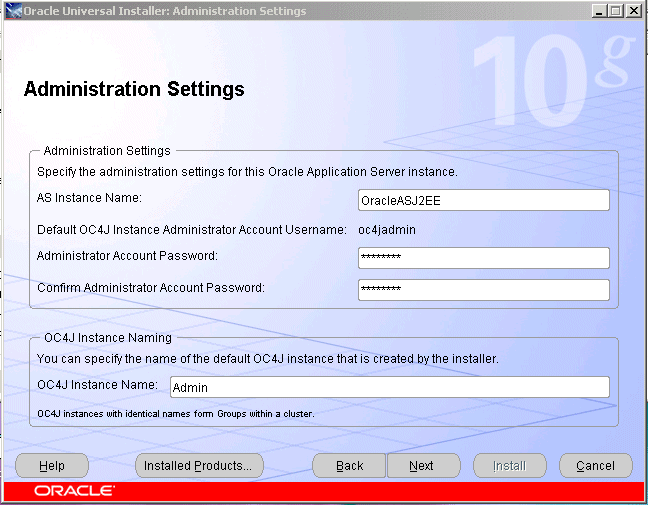
Specify an instance name for the application server instance.
Note:
The instance name you specify will be prepended to the host name. For example, if you specifyJ2EE as the instance name and the host name is server1.mycompany.com, the instance name will be J2EE.server1.mycompany.com.Specify and confirm the administrator password for the default OC4J instance.
Specify a name for the default OC4J instance created by the installer (the default is home), such as Admin, or a similar name that designates it as the instance dedicated to Application Server Control, and click Next.
Note:
You will not deploy applications to this instance; it will not be clustered with the user-created OC4J instances on which applications are deployed.The Cluster Topology Configuration screen appears.
Figure 3-6 Oracle Universal Installer Cluster Topology Configuration Screen
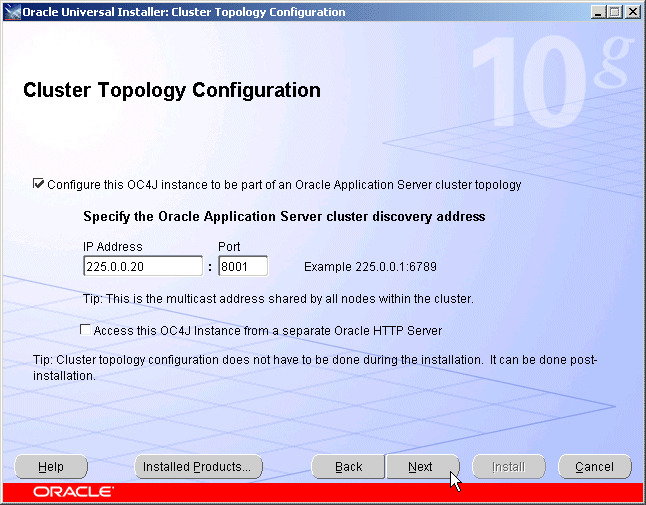
Specify the multicast address and port.
Leave the checkbox blank for the option Access this OC4J instance from a separate Oracle HTTP Server for the OC4J Admin instance installed on APPHOST1.
Click Next.
The Summary screen appears.
Click Install.
The Preparing to Install dialog appears, then the Install screen appears.
The Configuration Assistants screen appears. When the configuration process completes, the End of Installation screen appears.
Click Exit, and then confirm your choice to exit.
Use the netstat command to identify an unoccupied HTTP port:
netstat -an
Create one or more OC4J instances for application deployment by performing these steps:
Issue this command in APPHOST1_ORACLE_HOME/BIN:
createinstance -instancename Apps -port HTTP port
In the preceding command, Apps is the instance name and HTTP port is an unoccupied http port. Use the same instance name for all of the instances, so that the OC4J instances will be members of the same group.
The following message appears:
Creating OC4J instance "Apps"...
Set OC4J administrator's password for "Apps" (password text will not be displayed as it is entered:
Provide and confirm a password.
Note:
The instances in a group of OC4J instances must have the same password, so that the user specified in a deployment command can deploy to the entire group.The following message appears:
The password for OC4J administrator "oc4jadmin" has been set.
New OC4J instance "Apps" is created.
Note:
An OC4J instance that you create does not have its own OC4J binary libraries; it uses the libraries installed in the instance created by the installer.Start the newly created instance by issuing this command in APPHOST1_ORACLE_HOME/OPMN/BIN:
opmnctl startproc process-type=Apps
In the preceding command, Apps is the name you gave the OC4J instance when creating it.
Ensure that the AJP ports in the series 12501, 12502... are not in use by issuing the netstat command:
netstat -an
Specify the AJP port by issuing this command in APPHOST1_ORACLE_HOME/OPMN/BIN:
opmnctl config port update ias-component=OC4J process-type=Apps portid=default-web-site protocol=ajp range=12501
In the preceding command, Apps is the name you gave the OC4J instance when creating it.
Restart OPMN by issuing this command in APPHOST1_ORACLE_HOME/OPMN/BIN:
opmnctl reload
Verify that the installation was successful by viewing the instance in Oracle Enterprise Manager 10g. Start a browser and access the OC4J Admin instance at:
http://APPHOST1:8888/em
Note:
TheORACLE_HOME/install/readme.txt file contains the URLs for the installation and a command to verify the status of processes.Repeat Steps 1 through 24 to install the second Oracle Application Server instance on APPHOST2 and create OC4J instances, specifying the APPHOST2 host name.
Verify that the installation was successful by viewing the instance in Oracle Enterprise Manager 10g. Start a browser and access the OC4J Admin instance at:
http://APPHOST2:8888/em
Note:
TheORACLE_HOME/install/readme.txt file contains the URLs for the installation and a command to verify the status of processes.Obtain the standalone Oracle HTTP Server from the Oracle Application Server Companion CD, included in the Oracle Application Server CD Pack.
Follow these steps to install an Oracle HTTP Server on WEBHOST1 and WEBHOST2:
Start the Oracle Universal Installer as follows:
On UNIX, issue this command: runInstaller
On Windows, double-click setup.exe
The Welcome screen appears.
Click Next.
On UNIX systems, the Specify Inventory Directory and Credentials screen appears.
Specify the directory you want to be the oraInventory directory and the operating system group that has write permission to it.
Click Next.
On UNIX systems, a dialog appears, prompting you to run the orainstRoot.sh script.
Open a window and run the script, following the prompts in the window.
Return to the Oracle Universal Installer screen and click Next.
The Specify File Locations screen appears with default locations for:
The product files for installation (Source)
The name and path to the Oracle home (Destination)
Click Next.
The Select a Product to Install screen appears.
Figure 3-7 Oracle Universal Installer Select a Product to Install Screen
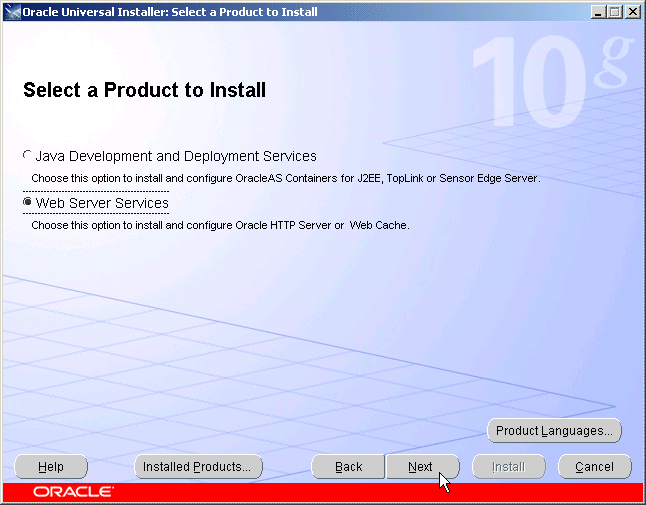
Select Web Server Services, as shown in Figure 3-7, and click Next.
The Select Installation Type screen appears.
Figure 3-8 Oracle Universal Installer Select Installation Type Screen
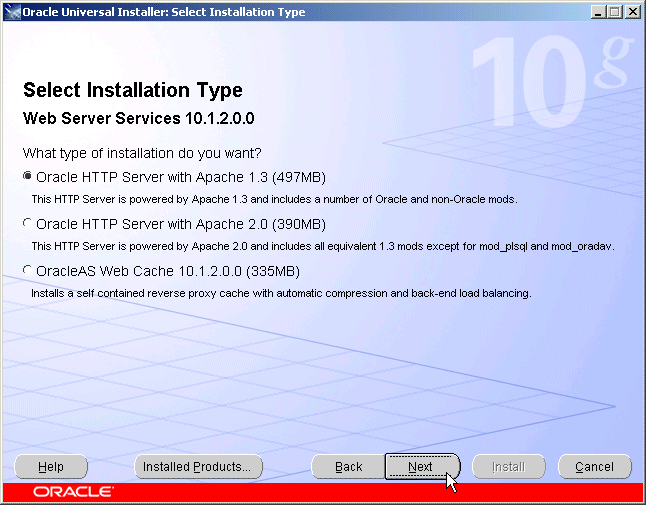
Select Oracle HTTP Server with Apache 1.3 and click Next.
Note:
If you wish to use the Oracle HTTP Server based on Apache 2.0 for the OracleAS Single Sign-On/Oracle Delegated Administration Services configuration, select Oracle HTTP Server with Apache 2.0 and perform the steps in Section 3.3, "Configuring the Oracle HTTP Server with Apache 2.0 for Use With Oracle Application Server Single Sign-On/Oracle Delegated Administration Services".The Summary screen appears.
Click Install.
The Install screen appears. When processing completes, the Next button activates.
Click Next.
The Configuration Assistants screen appears. When the configuration completes, the End of Installation screen appears.
Click Exit, and then confirm your choice to exit.
Verify that the installation was successful by viewing the Oracle HTTP Server server home page. Start a browser and access http://hostname:7777.
If you chose Oracle HTTP Server with Apache 2.0 as the installation option and are configuring myJ2EE with SSO/DAS, you must perform the following configuration steps after installation:
Stop the Oracle HTTP Server.
Apply Patch No. 5070025 (available on MetaLink).
Comment out or remove these LoadModule directives in ORACLE_HOME/ohs/conf/httpd.conf:
LoadModule auth_module modules/mod_auth.so
LoadModule auth_anon_module modules/mod_auth_anon.so
LoadModule auth_dbm_module modules/mod_auth_dbm.so
Start the Oracle HTTP Server.
The Load Balancing Router (myapp.mycompany.com (shown in Figure 2–1, "Enterprise Deployment Architecture for myJ2EEcompany.com with JAZN-SSO/DAS" must be configured to receive client requests and balance them to the two Oracle HTTP Server instances on the Web tier. See the load balancing router documentation for instructions on configuring the load balancer, and follow the instructions in this section configure the Oracle HTTP Server.
Incoming requests must be associated with the Load Balancing Router hostname and port in the myJ2EECompany configuration. To configure this, perform these steps on WEBHOST1 and WEBHOST2:
Open the Oracle HTTP Server configuration file:
ORACLE_HOME/Apache/Apache/conf/httpd.conf
Perform the following steps:
Add the LoadModule certheaders_module directive for the appropriate platform.
UNIX:
LoadModule certheaders_module libexec/mod_certheaders.so
Windows:
LoadModule certheaders_module modules/ApacheModuleCertHeaders.dll
Add the following lines to create a NameVirtualHost directive and a VirtualHost container for myapp.mycompany.com and port 443.
NameVirtualHost *:7777
<VirtualHost *:7777>
  ServerName myapp.mycompany.com
  Port 443
  ServerAdmin you@your.address
  RewriteEngine On
  RewriteOptions inherit
  SimulateHttps On
</VirtualHost>
Notes:
TheLoadModule directives (in particular, the LoadModule rewrite_module directive) must appear in the httpd.conf file at a location preceding the VirtualHost directives. The server must load all modules before it can execute the directives in the VirtualHost container.
It is a good idea to create the VirtualHost directives at the end of the httpd.conf file.
Save the httpd.conf file.
Restart the components using these commands in ORACLE_HOME/opmn/bin:
opmnctl stopall
opmnctl startall
mod_oc4j, an Oracle HTTP Server module, performs the request routing to the OC4J instances over the AJP13 protocol. The routing configuration is specified in the mod_oc4j.conf file. (The mod_oc4j.conf file is referenced by the main server configuration file for Oracle HTTP Server, httpd.conf, with an Include directive.) The path to the mod_oc4j.conf file is:
ORACLE_HOME/Apache/Apache/conf/mod_oc4j.conf
For complete descriptions of all directives and their uses, see the Oracle HTTP Server Administrator's Guide.
The default file at installation resembles Example 3-1:
Example 3-1 mod_oc4j.conf File
LoadModule oc4j_module modules/ApacheModuleOc4j.dll
<IfModule mod_oc4j.c>
    <Location /oc4j-service>
        SetHandler oc4j-service-handler
        Order deny,allow
        Deny from all
        Allow from localhost my-pc.mycompany.com my-pc
    </Location>
</IfModule>
Before you configure mod_oc4j.conf on WEBHOST1 and WEBHOST2, copy the mod_oc4j.conf file from APPHOST1 to WEBHOST1.
Follow these steps on WEBHOST1:
Open the ORACLE_HOME/Apache/Apache/conf/mod_oc4j.conf file.
Add an Oc4JConnTimeout directive to specify a time out value smaller than the time out value used by the firewall between the Web tier and the Application Tier. For example:
Oc4jConnTimeout 10
Modify the Oc4JMount directives to specify the destinations to which requests should be load balanced.
The syntax for the Oc4JMount directive is:
Oc4jMount path [destination]
path is the context root of the application and destination is an ajp13 destination, a cluster, or an instance. cluster is the default destination type.
Save and close the file.
Copy the file from WEBHOST1 to WEBHOST2.
Restart the Oracle HTTP Server on WEBHOST1 and WEBHOST2.
In order to ensure consistent availability of all services, ensure that the connection time out values for all Oracle Application Server components are set to a lower time out value than that on the firewall and Load Balancing Router. If the firewall or Load Balancing Router drops a connection without sending a TCP close notification message, then Oracle Application Server components will continue to try to use the connection when it is no longer available.
The Oracle Application Server Java Authentication and Authorization Service (JAAS) Provider (also referred to as JAZN) LDAP-based provider is used for authentication and authorization to the OC4J applications.
In the myJ2EECompany configuration, this provider is used without Oracle Application Server Single Sign-On. This section explains how to configure the Oracle Application Server instances on the application tier to use the JAZN LDAP provider. For instructions on how to use Oracle Enterprise Manager 10g to manage the data in this provider, see Chapter 8 in the Oracle Containers for J2EE Security Guide.
You will need to follow the steps in this section on both Oracle Application Server instances (APPHOST1 and APPHOST2) that will use the JAZN LDAP provider. Ensure that you specify the same Oracle Internet Directory computer for APPHOST1 and APPHOST2—that is, the load balancing router for OIDHOST1 and OIDHOST2.
Before you begin the steps in this section, ensure that the middle tier instance is stopped and the Oracle Internet Directory instance is running. Start the Oracle Enterprise Manager 10g Application Server Control Console, if necessary, and perform these steps:
On the OC4J:home page, click the Administration link.
The Administration Tasks list appears.
In the Security section, click the Go To Task icon for Identity Management.
The Identity Management: page appears.
Click Configure if no host is configured, or click Change if you want to change the configured host.
The Configure Identity Management: Connect Information screen appears.
In the Oracle Internet Directory Host field, enter the host name of the Load Balancing Router (for example, oid.mycompany.com, in Figure 2–1).
In the Oracle Internet Directory User DN field, enter the Distinguished Name of the user that can log in to Oracle Internet Directory (the user must be in the IASAdmins group).
In the Password field, enter the Oracle Internet Directory user's password.
Select the checkbox to use the non-SSL connection to Oracle Internet Directory. In the Port field, enter 389.
Click Next.
The Configure Identity Management: Application Server Control page appears.
Select Use Oracle Identity Management Security Provider.
Click Next.
The Configure Identity Management: Deployed Applications page appears.
Select the applications deployed to the OC4J instance that you want to use the Oracle Identity Management Security Provider.
Click Configure.
A message appears notifying you that the configuration was successful, and notifies you that you must restart the OC4J instance.
Click Restart.
The instance is restarted, and the configuration is complete.
To use the OracleAS JAAS Provider, you must populate Oracle Internet Directory with certain user entries. In 10g (10.1.4.0.1), the accounts and groups are managed by Mbeans. You may still need to map or create an anonymous user account. See "Summary of OC4J Accounts" in the Oracle Containers for J2EE Security Guide.