| Oracle® Identity Federation Administrator's Guide 10g (10.1.4.0.1) Part Number B25355-02 |
|
|
View PDF |
| Oracle® Identity Federation Administrator's Guide 10g (10.1.4.0.1) Part Number B25355-02 |
|
|
View PDF |
Additional topics pertinent to Oracle Identity Federation server configuration and management are described here. This includes:
There are several ways to perform a federated single sign-on (SSO) operation, depending on the back-end in use and where the flow will be initialized. Table 7-1 shows the possible combinations:
Table 7-1 Federated Single Sign-On Combinations
| Combination | Flow |
|---|---|
|
OracleAS Single Sign-On with Liberty 1.x/SAML 2.0 |
User accesses a resource protected by |
|
Oracle Access Manager with Liberty 1.x/SAML 2.0 |
User accesses a resource protected by webgate, triggering SAML 2.0/Liberty 1.x single sign-on, with Oracle Identity Federation acting as SP. |
|
Oracle Access Manager with SAML 1.x/WS-Federation |
User accesses a resource protected by webgate, triggering SAML 1.x/WS-Federation single sign-on, with Oracle Identity Federation acting as SP. |
|
eTrust SiteMinder with SAML 2.0/Liberty 1.x |
User accesses a resource protected by eTrust SiteMinder Agent, triggering SAML 2.0/Liberty 1.x single sign-on, with Oracle Identity Federation acting as SP. |
|
eTrust SiteMinder with SAML 1.x/WS-Federation |
User accesses a resource protected by eTrust SiteMinder Agent, triggering SAML 1.x/WS-Federation single sign-on, with Oracle Identity Federation acting as SP. |
|
SP-initiated single sign-on with SAML 2.0/Liberty 1.x |
User initiates a Liberty 1.x/SAML 2.0 single sign-on by directly accessing an Oracle Identity Federation URL, with Oracle Identity Federation acting as SP. |
|
SP-initiated single sign-on with SAML 1.x |
User initiates a SAML 1.x single sign-on by directly accessing an Oracle Identity Federation URL, with Oracle Identity Federation acting as SP. |
|
SP-initiated single sign-on with WS-Federation |
User initiates a WS-Federation single sign-on by directly accessing an Oracle Identity Federation URL, with Oracle Identity Federation acting as SP. |
|
IdP-initiated single sign-on with SAML 2.0/Liberty 1.x |
User initiates a SAML 2.0/Liberty 1.x single sign-on by directly accessing an Oracle Identity Federation URL, with Oracle Identity Federation acting as IdP. |
|
IdP-initiated single sign-on with SAML 1.x |
User initiates a SAML 1.x single sign-on by directly accessing an Oracle Identity Federation URL, with Oracle Identity Federation acting as IdP. |
|
IdP-initiated single sign-on with WS-Federation |
User initiates a WS-Federation single sign-on by directly accessing an Oracle Identity Federation URL, with Oracle Identity Federation acting as IdP. |
This section explains how to configure the different combinations:
OracleAS Single Sign-On can be configured to trigger a Liberty 1.x or SAML 2.0 SSO operation when requesting a resource protected by mod_osso.
Note:
This feature is not supported with SAML 1.x and WS-Federation protocols.To achieve this, the OracleAS Single Sign-On partner application must be defined and must be protected by mod_osso. The partner application must also be configured to use the SSO Security level associated with the SASSO Authentication plug-in. You do this by editing the ORACLE_HOME/sso/conf/policy.properties file of the Oracle SSO deployment, and setting the partner application (defined by its hostname and port) to the same security level as the SASSOAuthLevel property.
For example:
MediumHighSecurity_AuthPlugin = oracle.security.sso.server.auth.SASSOAuth
MediumSecurity_AuthPlugin = oracle.security.sso.server.auth.SSOServerAuth
...
www.app.com\:7890 = MediumHighSecurity
...
SASSOAuthnUrl = http\://oif_host\:oif_port/sso/authn
SASSOLogoutUrl = http\://oif_host\:oif_port/sso/jsp/sasso_logout_success.jsp
SASSOAuthLevel = MediumHighSecurity
Save the file and restart OC4J_SECURITY to apply the changes.
The next time a user attempts an unauthenticated access to the protected resource, the user is redirected to Oracle Identity Federation where a Liberty 1.x/SAML 2.0 SSO operation occurs.
When requesting the protected resource, it is possible to specify URL query parameters that Oracle Identity Federation can use to perform the SSO operation. The parameters are:
providerid - This is the identifier of the Liberty 1.x or SAML 2.0 IdP to use to perform the SSO operation (optional). If missing, the default SSO provider, set in the Oracle Identity Federation administration console at Service Provider -> Global Settings -> Default SSO Identity Provider, will be used.
federationid - This is the identifier of the affiliation to use for the SSO (optional). An example of such a URL is:
http://protected_app:port/path?providerid=http://idp.com
See "Working with Affiliations" for more information.
Note:
Check that the URL query parameter values are correctly encoded.Refer to the Oracle SSO documentation for details about OracleAS Single Sign-On configuration.
Oracle Access policies can be set up to initiate a Liberty 1.x/SAML 2.0 SSO when the user requests a resource protected by the Oracle Access Manager WebGate agent.
To do this, use the Oracle Access Policy Manager to set up a policy domain or policy that protects the resource. When creating the authentication rule for the policy domain or policy, select the Fed SSO – SAML 2.0/Liberty 1.x authentication scheme. Oracle Identity Federation automatically creates this authentication scheme when it is configured to use Oracle Access. The scheme initiates the Liberty 1.x or SAML 2.0 single sign-on when the resource is accessed, resulting in a session for the local user associated with the federated user. Set up the authorization rules and expression for the policy domain or policy to allow access for the resulting local user.
When requesting the protected resource, it is possible to specify URL query parameters that Oracle Identity Federation can use to perform the SSO operation. The parameters are:
providerid - This is the identifier of the Liberty 1.x or SAML 2.0 IdP to use to perform the SSO operation (optional). If missing, the default SSO provider, set in the Oracle Identity Federation administration console at Service Provider -> Global Settings -> Default SSO Identity Provider, will be used.
federationid - This is the identifier of the affiliation to use for the SSO (optional). An example of such a URL is:
http://protected_app:port/path?providerid=http://idp.com
See "Working with Affiliations" for more information.
Note:
Check that the URL query parameter values are correctly encoded.Refer to the Oracle Access Manager Identity and Common Administration Guide for configuration details.
Oracle Access Manager policies can be set up to initiate a SAML 1.x or WS-Federation SSO when a user requests a resource protected by the Oracle Access Manager WebGate agent.
To do this, use the Oracle Access Policy Manager to set up a policy domain or policy that protects the resource. When creating the authentication rule for the policy domain or policy, select the Fed SSO – SAML 1.x or Fed SSO – WS-Federation authentication scheme. Oracle Identity Federation automatically creates these authentication schemes when it is configured to use Oracle Access Manager. The schemes use SAML 1.x or WS-Federation to initiate a federated SSO when the resource is accessed, resulting in a session for the local user associated with the federated user. Set up the authorization rules and expression for the policy domain or policy to allow access for the resulting local user.
This section contains these topics:
When the Fed SSO – SAML 1.x authentication scheme is in use, Oracle Identity Federation will look for a cookie named ObSAMLDomain in the HTTP request which indicates the IdP that is to be used for the SSO. Oracle Identity Federation automatically sets this persistent cookie to the name of the IdP's configured domain at the end of a SAML 1.x SSO. Consequently, the user must have performed at least one successful SAML 1.x SSO for this feature to work. If Oracle Identity Federation does not find the ObSAMLDomain cookie, it assumes the user is local and performs a local Access Manager login.
Note:
This feature was known as SmartMarks in Oracle COREid Federation and is now known in release 10.1.4.2 as SP-initiated IdP discovery.Some additional Oracle Identity Federation configuration is needed at the SP for the SAML 1.x authentication scheme to work. In the SAML 1.x or WS-Federation Domain configuration for the IdP, SP-initiated IdP discovery must be enabled and the Transfer URL and Transfer Query String fields must be set. The Transfer URL is the URL used at the IdP to initiate a SAML 1.x SSO, and the Transfer Query String provides the parameters for the SSO to be directed back to the SP.
Note:
This URL and query string are not specified by the SAML 1.x specifications, so they will depend on the SAML implementation used by the IdP. When Oracle Identity Federation processes the SSO, it will concatenate the Transfer URL, the Transfer Query String, and the URL for the requested resource (the target) to be used in a redirection to the IdP. This requires that any target URL parameter be the last parameter in the Transfer Query String, as demonstrated the Oracle Identity Federation example which follows.When the IdP is another Oracle Identity Federation installation, the Transfer URL and Transfer Query String are partially set according to Oracle Identity Federation conventions. The Transfer Query String needs to be completed with information specific to the IdP configuration for the SP: the SP domain name as configured at the IdP and the SSO method to be used.
Example
Consider an IdP named Acme and an SP named Zenith, both using Oracle Identity Federation. In the Acme domain configured at Zenith:
Transfer URL = https://fed.acme.com/shareid/saml/ObSAMLTransferService
Transfer Query String = DOMAIN=Zenith&METHOD=post&TARGET=
If the target URL is https://www.acme.com/, then the complete redirection URL is:
https://fed.acme.com/shareid/saml/ObSAMLTransferService?DOMAIN=Zenith&METHOD=post&TARGET=https://www.zenith.com/
Note:
This is the Oracle Identity Federation URL for IdP-initiated SSO with SAML 1.x as discussed in "SP-initiated SSO with SAML 1.x".When the Fed SSO – WS-Federation authentication scheme is in use, Oracle Identity Federation uses the ObSAMLDomain cookie to determine the IdP as described earlier for SAML 1.x. However, unlike SAML 1.x, if the ObSAMLDomain cookie is not found, Oracle Identity Federation will display an IdP selection page listing the configured IdPs that can be used for WS-Federation. If there is only one such IdP, Oracle Identity Federation skips the selection page and immediately uses that IdP. Once the WS-Federation SSO has completed successfully, Oracle Identity Federation will set the ObSAMLDomain cookie to the IdP domain. So the user only has to select the IdP on the first access to the SP.
Since the WS-Federation Passive Requester Profile specifies how to perform SP-initiated SSO, no additional Oracle Identity Federation configuration is required to make the WS-Federation authentication scheme work.
Like all Access authentication schemes, the Fed SSO – SAML 1.x and Fed SSO – WS-Federation schemes have authentication levels that represent the strength of the authentication method. The default authentication level for the Fed SSO schemes is 1 (the lowest strength), but these levels may be adjusted using the Access System Console.
Note:
Oracle Identity Federation also creates other authentication schemes for the configured assertion mappings, and the authentication level of the assertion mapping scheme used to create the local session must be equal to or greater than the WS-Federation SSO scheme levels.Liberty 1.x/SAML 2.0 SSO can be triggered by requesting a resource protected by eTrust SiteMinder policy.
To do this, create a policy under eTrust SiteMinder, which will protect a resource using the Form Authentication scheme. You will need to add a Form Authentication scheme through the eTrust SiteMinder Admin Console. While adding the Authentication scheme, select the scheme type as HTML Form Template, then make these changes:
Set Protection level to 1.
Under the Scheme Setup tab:
Set Server name to CASiteMinderHost.domain:Port
Set Target to /siteminderagent/forms/login.fcc.redirect.html
Under the Advance tab, set Library to smauthhtml.
After configuring the Form Authentication scheme, add the HTML file shown here under <NetegritySMInstallArea>\SMWebAgent\Samples\Forms, naming it login.fcc.redirect.html.
<html>
 <!--Redirect to OIF-->
    <body onload="setTimeout(location.href=getRedirectURL(), 1);"/>
    <script>
    //<!--

    function getRedirectURL ()
    {
        var targetParam = getQueryParam("TARGET");
        if (targetParam.indexOf("$SM$") == 0)
            targetParam = targetParam.substring
             (4, targetParam.length);
        // Redirect
        var redirectURL =
         "http://<SPHost.Domain>:<Port>/fed/sp/smredirect?providerid="
         + escape("http://<idPHost.Domain>:<Port>/fed/idp")
         +"&targetURL=" + targetParam;

        return redirectURL;
    }

    function getQueryParam (param)
    {
        var result = "";
        var url = location.href;
        var qIndex = url.indexOf("?");
        if (qIndex > -1)
        {
            var queryString = url.substring(qIndex + 1, url.length);
            var params = queryString.split("&");
            for (var i = 0, n = params.length; i < n; ++i)
            {
                var nvPair = params[i].split("=");
                if (nvPair[0] == param)
                {
                    result = nvPair[1];
                    break;
                }
            }
        }
        return result;
    }
    //-->
    </script>
</html>
This form redirects the user to a servlet on the SP that will:
process the targetURL query parameter
initiate a flow that results in the user being ultimately redirected to the URL specified by this parameter once single sign-on completes
When requesting the protected resource, it is possible to specify URL query parameters that Oracle Identity Federation can use to perform the SSO operation. The parameters are:
providerid - This is the identifier of the Liberty 1.x or SAML 2.0 IdP to use to perform the SSO operation (optional). If missing, the default SSO provider, set in the Oracle Identity Federation administration console at Service Provider - > Global Settings - > Default SSO Identity Provider, will be used.
federationid - This is the identifier of the affiliation to use for the SSO (optional). An example of such a URL is:
http://protected_app:port/path?providerid=http://idp.com
See "Working with Affiliations" for more information.
Note:
Check that the URL query parameter values are correctly encoded.Refer to the eTrust SiteMinder documentation for configuration details.
SAML 1.x/WS-Federation SSO can be triggered by requesting URLs in a specific format.
To trigger SAML 1.x SSO from the IdP, use a URL in the following format:
http(s)://<idPHost.Domain>:<Port>/shareid/saml/ObSAMLTransferService?DOMAIN=<SP-DomainName>&METHOD=POST&TARGET=<Resource-protected-by-CASiteMinder>
where Resource-protected-by-CASiteMinder is any resource protected by eTrust SiteMinder.
To initiate SAML 1.x SSO from the SP, protect the resource at eTrust SiteMinder by a Form Authentication scheme as described earlier in "eTrust SiteMinder with Liberty 1.x/SAML 2.0". Use a form that looks something like this:
<html>
 <!--Redirect to OSFS-->
    <body onload="setTimeout(location.href=getRedirectURL(), 1);"/>
    <script>
    //<!--

    function getRedirectURL ()
    {
        var targetParam = getQueryParam("TARGET");
        if (targetParam.indexOf("$SM$") == 0)
            targetParam = targetParam.substring(4, targetParam.length);
        // Redirect
        var redirectURL =
          "http://<SPHost.Domain>:<Port>/shareid/saml/ObSAMLTransferForm?"+
         "&TARGET=" + targetParam;
        return redirectURL;
    }

    function getQueryParam (param)
    {
        var result = "";
        var url = location.href;
        var qIndex = url.indexOf("?");
        if (qIndex > -1)
        {
            var queryString = url.substring(qIndex + 1, url.length);
            var params = queryString.split("&");
            for (var i = 0, n = params.length; i < n; ++i)
            {
                var nvPair = params[i].split("=");
                if (nvPair[0] == param)
                {
                    result = nvPair[1];
                    break;
                }
            }
        }
        return result;
    }
    //-->
    </script>
</html>
Accessing the SP resource redirects the user to an Oracle Identity Federation servlet, which looks for a cookie (named ObSAMLDomain) in the HTTP request that indicates which IdP to use for the SSO, and then redirects the user for authentication to that IdP. Oracle Identity Federation automatically sets this persistent cookie to the name of the IdP's configured domain at the end of an idP-initiated SAML 1.x single sign-on. This means that the user must have done at least one successful SAML 1.x SSO for the feature to work. If Oracle Identity Federation does not find the ObSAMLDomain cookie, it assumes the user is local and performs a local login at the Service Provider domain.
Note:
This feature was known as SmartMarks in Oracle COREid Federation.Some additional Oracle Identity Federation configuration is needed at the SP for the SAML 1.x authentication scheme to work. In the SAML 1.x/WS-Federation Domain configuration for the IdP, SP-initiated IdP discovery must be enabled and the Transfer URL and Transfer Query String fields must be set. The Transfer URL is the URL used at the IdP to initiate a SAML 1.x SSO, and the Transfer Query String provides the parameters for the SSO to be directed back to the SP.
Note:
This URL and query string are not specified by the SAML 1.x specifications, so they will depend on the SAML implementation used by the IdP. When Oracle Identity Federation processes the SSO, it will concatenate the Transfer URL, the Transfer Query String, and the URL for the requested resource (the target) to be used in a redirection to the IdP. This requires that any target URL parameter be the last parameter in the Transfer Query String.When the IdP is another Oracle Identity Federation installation, the Transfer URL and Transfer Query String are partially set according to Oracle Identity Federation conventions. The Transfer Query String must be completed with information specific to the IdP configuration for the SP: the SP domain name as configured at the IdP, and the SSO method to be used.
To trigger WS-Federation SSO, use URLs in the following format:
http(s)://<SPHost.Domain>:<Port>/shareid/wsfederation/ObWSFedResourceSTS?wa=wsignin1.0&wctx=<Resource-Protected-by-CASiteMinder>
Here Resource-protected-by-CASiteMinder is any resource protected by eTrust SiteMinder.
Oracle Identity Federation uses the ObSAMLDomain cookie in the HTTP request, which indicates the IdP to be used for authentication. If the ObSAMLDomain cookie is not found, Oracle Identity Federation displays an IdP selection page listing the configured IdPs that can be used for WS-Federation. If there is only one such IdP, Oracle Identity Federation skips the selection page and immediately uses that IdP. Once the WS-Federation SSO has completed successfully, Oracle Identity Federation sets the ObSAMLDomain cookie to the IdP domain. The user only needs to select the IdP on the first access to the SP.
Here is an example URL:
http://costarica.myorg.co.in:7779/shareid/wsfederation/ObWSFedResourceSTS?wa=wsignin1.0&wctx=http://mulshi.myorg.co.in/mytest/index.html
When Oracle Identity Federation server is integrated with OracleAS Single Sign-On, Oracle Access Manager or CA eTrust SiteMinder, a user can initiate a Liberty 1.x/SAML 2.0 SSO operation by directly requesting a service at the Oracle Identity Federation/SP instance.
The URL to be requested on the Oracle Identity Federation server is:
http(s)://Oracle Identity Federation_host:Oracle Identity Federation_port/fed/sp/initiatesso
It is possible to specify query parameters when requesting that URL:
providerid - This is the identifier of the Liberty 1.x or SAML 2.0 IdP to use to perform the SSO operation (optional). If missing, the default SSO provider, set in the Oracle Identity Federation administration console at Service Provider - > Global Settings - > Default SSO Identity Provider, will be used.
federationid - This is the identifier of the affiliation to use for the SSO (optional).
See "Working with Affiliations" for more information.
returnurl - This is the URL to which the user is sent after a successful SSO operation. It is required if the Unsolicited Relay State property, set in the Oracle Identity Federation administration console at Server Properties - > Circle Of Trust - > Settings for the IdP, is empty.
An example of such a URL is:
http://oif_host:oif_port/fed/sp/initiatesso?providerid=http://idp.com&returnurl=ProtectedAppURL
Check that the query parameter values are correctly URL-encoded.
When Oracle Identity Federation is integrated with OracleAS Single Sign-On, Oracle Access Manager, or eTrust SiteMinder, it is possible to initiate a SAML 1.x SSO operation by directly requesting a service at the Oracle Identity Federation/SP instance using the following URL:
http(s)://oif_host:oif_port/shareid/saml/ObSAMLTransferForm?TARGET=targetURL
where targetURL is the URL of the requested resource. The ObSAMLTransferForm service follows the same rules as the Fed SSO – SAML 1.x authentication scheme discussed in "Using the Fed SSO - SAML 1.x Authentication Scheme". It looks for the ObSAMLDomain cookie to specify the IdP to be used. If the ObSAMLDomain cookie is not found, a local login is performed.
For example:
http://oif_host:oif_port/shareid/saml/ObSAMLTransferForm? TARGEt=http://host:port/protected.html
Note:
With Oracle Access Manager, you can protect the targetURL by a policy domain using any authentication scheme, as long as the authentication level of the scheme is less than or equal to the authentication level of the assertion mapping authentication scheme used to create the local user.When Oracle Identity Federation is integrated with OracleAS Single Sign-On, Oracle Access Manager, or eTrust SiteMinder, you can initiate a WS-Federation SSO request from the SP with a URL with the format:
http(s)://oif_host:oif_port/shareid/wsfederation/ObWSFedResourceSTS?wa=wsignin1.0& wctx=targetURL
where targetURL is the URL of the requested resource. The ObWSFedResourceSTS service follows the same rules as the Fed SSO – WS-Federation authentication scheme discussed in "Using the Fed SSO - WS-Federation Authentication Scheme". If the ObSAMLDomain cookie is present, it is used to determine the IdP. If there is only one IdP configured for WS-Federation, that IdP is used. Otherwise an IdP selection page is displayed.
Here is an example URL:
http://host:port/shareid/wsfederation/ObWSFedResourceSTS? wa=wsignin1.0&wctx=http://host:port/protected.html
Note:
With Oracle Access Manager, you can protect the targetURL by a policy domain using any authentication scheme, as long as the authentication level of the scheme is less than or equal to the authentication level of the assertion mapping authentication scheme used to create the local user.For the Liberty 1.x and SAML 2.0 protocols, Oracle Identity Federation provides the ability to initiate an SSO operation by directly requesting a URL at the Oracle Identity Federation instance acting as an IdP; this is called an SSO IdP-initiated operation.
The url to be requested on the Oracle Identity Federation server is of the form:
http(s)://oif_host:oif_port/fed/idp/initiatesso
It is possible to specify query parameters when requesting that URL:
providerid - This is the identifier of the Liberty 1.x or SAML 2.0 SP to use to perform the SSO operation (required).
federationid - This is the identifier of the affiliation to use for the SSO (optional).
See "Working with Affiliations" for more information.
returnurl - This is the url to which the user is sent after a successful SSO operation (optional).
An example of such a URL is:
http://oif_host:oif_port/fed/idp/initiatesso?providerid=http://sp.com&returnurl=ProtectedAppURL
Note:
Check that the query parameter values are correctly URL-encoded.When Oracle Identity Federation is enabled for SSO with SAML1.x, it is possible to initiate an SSO request from the IdP. The URL for the request is of the form:
http(s)://oif_host:oif_port/shareid/saml/ObSAMLTransferService
with these parameters:
DOMAIN is the domain name configured for the SP
METHOD is POST or ARTIFACT
TARGET is the target URL that is to be accessed
For example:
http://oif_host:oif_port/shareid/saml/ObSAMLTransferService?DOMAIN=SP_domain&METHOD=post&TARGET=http://host2:port/protected.html
When Oracle Identity Federation is enabled for SSO with WS-Federation, it is possible to initiate an SSO request from the IdP, using a URL in the following format:
http(s)://oif_host:oif_port/shareid/wsfederation/ObWSFedIdentitySTS
with these parameters:
wa is wsignin1.0
wtrealm is the request realm URI defined by the SP
wctx is the target URL to be accessed
For example:
http://oif_host:oif_port/shareid/wsfederation/ObWSFedIdentitySTS?wa=wsignin1.0& wtrealm=http://sp_host/&wctx=http://sp_host:port/protected.html
The run-time functioning of affiliations depend on whether the Oracle Identity Federation server is acting as an IdP or an SP.
Oracle Identity Federation Acting as IdP
When Oracle Identity Federation is an IdP, provided the affiliation/SP is present and enabled in the circle of trust, the Oracle Identity Federation server is ready to process any requests originating from service providers using the affiliation.
Oracle Identity Federation Acting as SP
As an SP, you can trigger a single sign-on operation with an IdP using an affiliation to which the SP belongs. To do so, just include a federationid query parameter in the URL protected by the IdM back-end, and set the parameter value to the affiliation ID.
For example with an OracleAS Single Sign-On back-end, assuming that a resource is protected by mod_osso and configured for Oracle Identity Federation authentication, requesting the URL of this resource with the federationid query parameter will instruct Oracle Identity Federation to use an affiliation when performing single sign-on with a peer IdP. Here is an example of such a URL:
http://protected_res_host:protected_res_port/path?federationid=http://affiliationid
It is also possible to directly access the http://oif_host:oif_port/fed/sp/initiatesso URL with the same federationid query parameter. In this case, Oracle Identity Federation will trigger a single sign-on operation, and will use the Unsolicited SSO RelayState for the peer IdP as the URL to which the user is redirected after successful authentication.
Note:
The Unsolicited SSO RelayState is set on the Server Configuration -> Circle of Trust -> Edit Trusted Provider page of the Oracle Identity Federation administration console.Take these steps to export an identity provider's self-signed certificate into the service provider's keystore. This procedure is utilized in SAML 1.x and WS-Federation configurations.
At the Identity Provider, export the self-signed certificate from the keystore by running the keytool utility in the Oracle Identity Federation home directory:
C:\<OIFHome>\jdk\jre\lib\security>keytool -keystore
C:\<OIFHome>\fed\shareid\oblix\config\keystore -storepass <password>
   -export -alias shareid -file <myfile>
where storepass is the password that was specified when Oracle Identity Federation was installed.
Copy the certificate file to a location that can be accessed by the service provider.
At the service provider, import the IdP's certificate into the keystore:
C:\<OIFHome>\jdk\jre\lib\security>keytool -keystore
C:\<OIFHome>\fed\shareid\oblix\config\keystore -storepass <password>
   -import -alias <anyName>-file <myfile>
Restart the Oracle Identity Federation service provider from the Oracle Enterprise Manager console.
The transient/one-time identifier, commonly referred as the anonymous identifier, is used when the Service Provider (SP) only requires the user to be authenticated by the Identity Provider (IdP) but does not need to know the user's identity.
The IdP typically knows the user's identity, since it will have authenticated the user, but the SP will have no knowledge of any aspects of the identity, except the fact that the user has been authenticated at the IdP.
Transient/one-time identifiers must be configured at both the SP and the IdP.
Take these configuration steps at the service provider:
Log on to the Oracle Identity Federation administration console.
Go to Server Configuration - > Service Provider.
In the Anonymous User Identifier field, enter the User ID of an account from the user data store that will be used to identify anonymous users. This User ID should be of the same type as the one used to reference users (that is, corresponding to the User ID Attribute or Login ID Column on the User Data Store page).
Click Save.
Go to Server Configuration - > Service Provider, then choose Liberty 1.2 or SAML 2.0 as appropriate.
Note:
Transient identifiers are not supported for Liberty 1.1.For the Default Authn Request NameID Format, select Transient/One-time Identifier.
Click Save, then Refresh Server.
Take these configuration steps at the identity provider:
Log on to the Oracle Identity Federation administration console.
Go to Server Configuration - > Identity Provider, then choose Liberty 1.2 or SAML 2.0 as appropriate.
Note:
Transient identifiers are not supported for Liberty 1.1.Click the Select button for Assertion NameID Formats.
Check the box to enable the Transient/One-time Identifier Name ID format.
Click Apply, then Refresh Server.
Oracle Identity Federation supports several kinds of Name ID to reference a user when exchanging SAML messages with remote providers. They include:
X.509 Subject Name
A name ID based on this format will typically contain a Distinguished Name (DN) referencing a user in an LDAP directory (for example: cn=alice,cn=users,dc=oracle,dc=com). This format is identified by the URI urn:oasis:names:tc:SAML:1.1:nameid-format:X509SubjectName.
Email Address
The name ID value consists of an email address (for example: alice@oracle.com). This Name ID type is identified by the URI urn:oasis:names:tc:SAML:1.1:nameid-format:emailAddress.
Windows Domain Qualified Name
A Windows domain qualified user name is a string of the form DomainName\UserName. This Name ID type is identified by the URI urn:oasis:names:tc:SAML:1.1:nameid-format:WindowsDomainQualifiedName.
Kerberos Principal Name
Indicates that the content of the Name ID element is in the form of a Kerberos principal name using the format name[/instance]@REALM. This format is identified by the URI urn:oasis:names:tc:SAML:2.0:nameid-format:kerberos.
Persistent Identifier
Indicates that the content of the element is a persistent opaque identifier for a principal that is specific to one identity provider and one service provider (or affiliation of service providers). This Name ID type is identified by the URI urn:oasis:names:tc:SAML:2.0:nameid-format:persistent.
Transient Identifier
Indicates that the content of the element is an opaque identifier (similar to a Persistent identifier) whose lifetime is limited to the current user session. This Name ID type is identified by the URI urn:oasis:names:tc:SAML:2.0:nameid-format:transient.
Unspecified
The content of a Name ID with this Format is not bound to the SAML 2.0 specifications, but only to the implementations interacting together. This Name ID type is identified by the URI urn:oasis:names:tc:SAML:1.1:nameid-format:unspecified.
Customizable Name ID Format
Oracle Identity Federation provides a way for the administrator to define a Name ID format that will fit the needs of a specific deployment. With a customizable format, it is also possible to define the URI by which the format will be identified. This format is not defined by the SAML 2.0 specifications.
When generating a Name ID to include in an outgoing message, Oracle Identity Federation:
creates a random value for the NameID when the format is of opaque type, such as Persistent or Transient, and uses a federation record to store the information about the created random name ID.
retrieves a user attribute for the NameID when the format is of non-opaque type, such as X.509 Subject Name, Email Address, Windows Domain Qualified Name, Kerberos Principal Name, Unspecified and the Customizable Name ID Format.
The following configurations are described:
Configuring the Name ID Formats for a Specific Remote Provider
Configuring Attributes in SSO Assertions with Oracle Identity Federation/IdP
To configure the X.509 Subject Name, Email Address, Windows Domain Qualified Name, Kerberos Principal Name, Persistent and Transient Name ID Formats, follow the instructions provided in "Select SAML 2.0 Identity Provider NameID Formats".
The Unspecified and Customizable formats are not configurable through the Oracle Identity Federation Administration Console. Take these steps to configure the formats (and any other formats that must be enabled, if Unspecified and Customizable are configured):
Open the $ORACLE_HOME/fed/conf/config.xml file.
Locate the FederationConfig XML element, and set its useLocalConfig attribute to true:
<FederationConfig useLocalConfig="true">
Locate the XML Config element named idpsaml20, and look for the nameidformats propertyset. It contains the list of enabled Name ID Formats on the Oracle Identity Federation/IdP. If a specific format is not enabled, Oracle Identity Federation will not be able to process messages containing this format. For a format to be enabled, it needs to be added to the list. In the example below, all the Name ID Formats are enabled:
<Config name="idpsaml20">
 ...
   <propertyset name="nameidformats">
   <propertyvalue>x509</propertyvalue>   <!-- X.509 Subject Name -->
   <propertyvalue>emailaddress</propertyvalue>  <!-- Email Address -->
   <propertyvalue>windowsnamequalifer</propertyvalue> <!-- Windows Domain Qualified Name -->
   <propertyvalue>kerberos</propertyvalue>   <!-- Kerberos Principal Name -->
   <propertyvalue>persistent</propertyvalue>   <!-- Persistent Identifier -->
   <propertyvalue>transient</propertyvalue>   <!-- Transient Identifier -->
   <propertyvalue>unspecified</propertyvalue>  <!-- Unspecified -->
   <propertyvalue>custom</propertyvalue>   <!-- Customizable Name ID format -->
   </propertyset>
 ...
</Config>
Note:
It should be stressed that if configuring Unspecified or Customizable formats, any other format that needs to be enabled must also appear in this list. Thus, if you want to enable Email, X509 and Unspecified formats, you cannot specify this combination of formats through the Administration Console, but will need to make the file edits instead as shown here.The possible values for the nameidformats setting are:
x509 for X.509 Subject Name
emailaddress for Email Address
windowsnamequalifer for Windows Domain Qualified Name
kerberos for Kerberos Principal Name
persistent for Persistent Identifier
transient for Transient Identifier
unspecified for Unspecified
custom for Customizable Name ID
Once the Name ID Formats are enabled, map the non-opaque enabled Name ID Types to user attributes (the Customizable Name ID Format requires extra configuration):
To map the X.509 Subject Name Format, locate the XML Config element named idpsaml20, look for the nameformatx500 property, and set its value to the user attribute:
<Config name="idpsaml20">
...
   <property name="nameformatx500">dn</property>
...
</Config>
To map the Email Address Format, locate the XML Config element named idpsaml20, look for the nameformatemail property, and set its value to the user attribute:
<Config name="idpsaml20">
...
   <property name="nameformatemail">mail</property>
...
</Config>
To map the Windows Domain Qualified Name Format, locate the XML Config element named idpsaml20, look for the nameformatwindows property, and set its value to the user attribute:
<Config name="idpsaml20">
...
   <property name="nameformatwindows">windowsDQN</property>
...
</Config>
To map the Kerberos Principal Name Format, locate the XML Config element named idpsaml20, look for the nameformatkerberos property, and set its value to the user attribute:
<Config name="idpsaml20">
...
   <property name="nameformatkerberos">kerberosid</property>
...
</Config>
To map the Unspecified Format, locate the XML Config element named idpsaml20, look for the nameformatunspecified property, and set its value to the user attribute:
<Config name="idpsaml20">
...
   <property name="nameformatunspecified">uid</property>
...
</Config>
To configure the Customizable Name ID, locate the XML Config element named idpsaml20, look for the nameformatcustom property, and set its value to the user attribute. The format for this Name ID also needs to be configured: locate the XML Config element named idpsaml20, look for the customnameidformat property, and set its value to the format the administrator wants to use. Finally the Customizable Name ID format feature needs to be enabled, in addition to adding it to the list of enabled Name IDs in step 3: Locate the XML Config element named idpsaml20, look for the customnameidenabled property, and set its value to true if the Customizable Name ID needs to be enabled, otherwise set it to false.
Here is an example of the configuration for the Customizable Name ID Format:
<Config name="idpsaml20">
...
   <property name="customnameidenabled">true</property>
   <property name="customnameidformat">Social-Security-Number</property>
   <property name="nameformatcustom">ssn</property>
...
</Config>
Finally, the Default Assertion NameID Format needs to be set. That setting will determine which kind of Name ID to send in an SSO Assertion when the Service Provider does not specify any particular one to use. Locate the XML Config element named idpsaml20, look for the defaultnameidformat property, and set its value to the Name ID Format to be used:
<Config name="idpsaml20">
...
   <property name="defaultnameidformat">x509</property>
...
</Config>
The possible values for the defaultnameidformat setting are:
x509 for X.509 Subject Name
emailaddress for Email Address
windowsnamequalifer for Windows Domain Qualified Name
kerberos for Kerberos Principal Name
persistent for Persistent Identifier
transient for Transient Identifier
unspecified for Unspecified
custom for Customizable Name ID
Save the file and exit.
Note:
Navigating to the Server Properties -> Identity Provider -> SAML 2.0 page, then clicking the Assertion NameID Formats, making any (or no) changes on the new screen and clicking Save will remove any of the settings not defined in the screen; the Unspecified and Customizable Name ID Format configuration will be removed.If using RDBMS as the Oracle Identity Federation transient data store, restart OC4J_FED. Otherwise, click the Refresh Server on the Oracle Identity Federation Administration Console.
To configure the X.509 Subject Name, Email Address, Windows Domain Qualified Name, Kerberos Principal Name, Persistent and Transient Name ID Formats in Oracle Identity Federation, follow the instructions in "Service Provider - SAML 2.0 Properties" and "Select SAML 2.0 Service Provider NameID Formats" .
The Unspecified and Customizable formats are not configurable through the Oracle Identity Federation Administration Console. Take these steps to configure the formats (and any other formats that must be enabled, if Unspecified and Customizable are configured):
Open the $ORACLE_HOME/fed/conf/config.xml file.
Locate the FederationConfig XML element, and set its useLocalConfig attribute to true:
<FederationConfig useLocalConfig="true">
Locate the XML Config element named spsaml20, and look for the nameidformats propertyset. It contains the list of enabled Name ID Formats for automatic account linking on the Oracle Identity Federation/SP. If a specific format is not enabled, Oracle Identity Federation will not be able to automatically link federation records to users when processing assertions containing this format. For a format to be enabled, it needs to be added to the list. In the example below, all the Name ID Formats are enabled:
<Config name="spsaml20">
 ...
   <propertyset name="nameidformats">
   <propertyvalue>x509</propertyvalue>   <!-- X.509 Subject Name -->
   <propertyvalue>emailaddress</propertyvalue>  <!-- Email Address -->
   <propertyvalue>windowsnamequalifer</propertyvalue> <!-- Windows Domain Qualified Name -->
   <propertyvalue>kerberos</propertyvalue>   <!-- Kerberos Principal Name -->
   <propertyvalue>unspecified</propertyvalue>  <!-- Unspecified -->
   <propertyvalue>custom</propertyvalue>   <!-- Customizable Name ID format -->
   </propertyset>
 ...
</Config>
Note:
It should be stressed that if configuring Unspecified or Customizable formats, any other format that needs to be enabled must also appear in this list. Thus, if you want to enable Email, X509 and Unspecified formats, you cannot specify this combination of formats through the Administration Console, but will need to make the file edits instead as shown here.The possible values for the nameidformats setting are:
x509 for X.509 Subject Name
emailaddress for Email Address
windowsnamequalifer for Windows Domain Qualified Name
kerberos for Kerberos Principal Name
unspecified for Unspecified
custom for Customizable Name ID
Once the Name ID Formats are enabled, map the non-opaque enabled Name ID Types to user attributes (the Customizable Name ID Format requires extra configuration):
To map the X.509 Subject Name Format, locate the XML Config element named spsaml20, look for the nameformatx500 property, and set its value to the user attribute:
<Config name="spsaml20">
...
   <property name="nameformatx500">dn</property>
...
</Config>
To map the Email Address Format, locate the XML Config element named spsaml20, look for the nameformatemail property, and set its value to the user attribute:
<Config name="spsaml20">
...
   <property name="nameformatemail">mail</property>
...
</Config>
To map the Windows Domain Qualified Name Format, locate the XML Config element named spsaml20, look for the nameformatwindows property, and set its value to the user attribute:
<Config name="spsaml20">
...
   <property name="nameformatwindows">windowsDQN</property>
...
</Config>
To map the Kerberos Principal Name Format, locate the XML Config element named spsaml20, look for the nameformatkerberos property, and set its value to the user attribute:
<Config name="spsaml20">
...
   <property name="nameformatkerberos">kerberosid</property>
...
</Config>
To map the Unspecified Format, locate the XML Config element named spsaml20, look for the nameformatunspecified property, and set its value to the user attribute:
<Config name="spsaml20">
...
   <property name="nameformatunspecified">uid</property>
...
</Config>
To configure the Customizable Name ID, locate the XML Config element named spsaml20, look for the nameformatcustom property, and set its value to the user attribute. The format for this Name ID also needs to be configured: locate the XML Config element named spsaml20, look for the customnameidformat property, and set its value to the format the administrator wants to use. Finally the Customizable Name ID format feature needs to be enabled, in addition to adding it to the list of enabled Name IDs in step 3: Locate the XML Config element named spsaml20, look for the customnameidenabled property, and set its value to true if the Customizable Name ID needs to be enabled, otherwise set it to false.
Here is an example of the configuration for the Customizable Name ID Format:
<Config name="spsaml20">
...
   <property name="customnameidenabled">true</property>
   <property name="customnameidformat">Social-Security-Number</property>
   <property name="nameformatcustom">ssn</property>
...
</Config>
Finally, the Default Authn Request NameID Format needs to be set. That setting will determine which kind of Name ID the Oracle Identity Federation/SP will request when sending an Authn Request message to the IdP. The IdP would then authenticate the user and send back an SSO Assertion containing a Name ID of the requested format. Locate the XML Config element named spsaml20, look for the defaultauthnrequestnameidformat property, and set its value to the Name ID Format to be used:
<Config name="spsaml20">
...
   <property name="defaultauthnrequestnameidformat">x509</property>
...
</Config>
The possible values for the defaultauthnrequestnameidformat setting are:
x509 for X.509 Subject Name
emailaddress for Email Address
windowsnamequalifer for Windows Domain Qualified Name
kerberos for Kerberos Principal Name
persistent for Persistent Identifier
transient for Transient Identifier
unspecified for Unspecified
custom for Customizable Name ID
Save the file and exit.
Notes:
Navigating to the Server Properties -> Identity Provider -> SAML 2.0 page, then clicking the Assertion NameID Formats, making any (or no) changes on the new screen and clicking Save will remove any of the settings not defined in the screen; the Unspecified and Customizable Name ID Format configuration will be removed.
Navigating to the Server Properties -> Service Provider -> SAML 2.0, then clicking Save will reset the Default Authn Request NameID Format setting to a value defined in the screen; since the Unspecified and Customizable Name ID Format choice are not available on the Oracle Identity Federation Administration Console, it would set the Default Authn Request NameID Format to another value if it was previously set to one of these two settings.
If using RDBMS as the Oracle Identity Federation transient data store, restart OC4J_FED. Otherwise, click the Refresh Server on the Oracle Identity Federation Administration Console.
To configure the X.509 Subject Name, Email Address, Windows Domain Qualified Name, Kerberos Principal Name, Persistent and Transient Name ID Formats, follow the instructions in "Editing a Trusted Provider" and "Edit Trusted Provider: Select NameID Formats" .
The Unspecified and Customizable formats are not configurable through the Oracle Identity Federation Administration Console. Take these steps to configure these formats (and any other formats that must be enabled, if Unspecified and Customizable are configured):
Open the $ORACLE_HOME/fed/conf/config.xml file.
Locate the FederationConfig XML element, and set its useLocalConfig attribute to true:
<FederationConfig useLocalConfig="true">
Save the file and exit.
Open the $ORACLE_HOME/fed/conf/cot.xml file.
Locate the XML PeerProvider element whose providerID attribute contains the Identifier of the remote provider for which the specific configuration needs to be set.
Locate the XML Config element, child of the PeerProvider element. Using this Config element, perform the steps described earlier in "Configuring the Name ID Formats as an IdP" and "Configuring the Name ID Formats as an SP" to configure the Name ID Formats. For example:
<PeerProvider providerID="http://idp.com" ...>
...
   <Config>
      ...
      <propertyset name="nameidformats">
      <propertyvalue>x509</propertyvalue>   <!-- X.509 Subject Name -->
      <propertyvalue>emailaddress</propertyvalue>  <!-- Email Address -->
      </propertyset>
      <property name="nameformatx500">dn</property>
      <property name="nameformatemail">mail</property>
      <property name="defaultauthnrequestnameidformat">x509</property>
      ...
   </Config>
   ...
</PeerProvider>
Save the file and exit.
Notes:
Navigating to the Server Properties -> Circle of Trust page, selecting the remote provider and clicking Update, making any (or no) changes on the new screen and clicking Save will remove any of the settings not defined in the screen; the Unspecified and Customizable Name ID Format configuration will be removed.
Navigating to the Server Properties -> Circle of Trust page, selecting the remote provider and clicking Update, then clicking Save will reset the Default Authn Request NameID Format setting (if set) to a value defined in the screen; since the Unspecified and Customizable Name ID Format choice are not available on the Oracle Identity Federation Administration Console, it would set the Default Authn Request NameID Format to another value if it was previously set to one of these two settings.
If using RDBMS as the Oracle Identity Federation transient data store, restart OC4J_FED. Otherwise, click the Refresh Server on the Oracle Identity Federation Administration Console.
When Oracle Identity Federation is acting as the IdP, it can be configured to send attributes in SSO Assertions, on a per-provider basis and depending on the Name ID Format contained in the assertion (the administrator can configure Oracle Identity Federation so that it will include attributes in the SSO assertion only for specific Name ID Formats).
To configure attributes in SSO assertions for the X.509 Subject Name, Email Address, Windows Domain Qualified Name, Kerberos Principal Name, Persistent, and Transient Name ID Formats, follow the instructions in "Edit Trusted Provider: Attribute Mappings" .
The Unspecified and Customizable formats are not configurable through the Oracle Identity Federation Administration Console. Take these steps to configure these formats (and any other formats that must be enabled, if Unspecified and Customizable are configured):
Open the $ORACLE_HOME/fed/conf/config.xml file.
Locate the FederationConfig XML element, and set its useLocalConfig attribute to true:
<FederationConfig useLocalConfig="true">
Save the file and exit.
Open the $ORACLE_HOME/fed/conf/cot.xml file.
Locate the XML PeerProvider element whose providerID attribute contains the Identifier of the remote provider for which the specific configuration needs to be set.
Locate the XML Config element, child of the PeerProvider element, and look for the propertyset element named sendattributefornameid. This propertyset element will contain the list of Assertion Name ID Formats that indicate to Oracle Identity Federation that attributes need to be included in SSO Assertions containing this a Name ID Format. Add the desired Name ID Formats to the list, like this:
<PeerProvider providerID="http://idp.com" ...>
...
   <Config>
      ...
      <propertyset name="sendattributefornameid">
      <propertyvalue>x509</propertyvalue>   <!-- X.509 Subject Name -->
      <propertyvalue>emailaddress</propertyvalue>  <!-- Email Address -->
      <propertyvalue>windowsnamequalifer</propertyvalue> <!-- Windows Domain Qualified Name -->
      <propertyvalue>kerberos</propertyvalue>   <!-- Kerberos Principal Name -->
      <propertyvalue>persistent</propertyvalue>  <!-- Persistent Identifier -->
      <propertyvalue>transient</propertyvalue>  <!-- Transient Identifier -->
      <propertyvalue>unspecified</propertyvalue>  <!-- Unspecified -->
      <propertyvalue>custom</propertyvalue>   <!-- Customizable Name ID format -->
      </propertyset>
      ...
   </Config>
   ...
</PeerProvider>
The possible values are:
x509 for X.509 Subject Name
emailaddress for Email Address
windowsnamequalifer for Windows Domain Qualified Name
kerberos for Kerberos Principal Name
persistent for Persistent Identifier
transient for Transient Identifier
unspecified for Unspecified
custom for Customizable Name ID
Save the file and exit.
Note:
Navigating to the Server Properties -> Circle of Trust page, selecting the remote provider and clicking Update, clicking the Attribute Mappings, making any (or no) changes on the new screen and clicking Save will remove any of the settings not defined in the screen; the Unspecified and Customizable Name ID Format configuration will be removed.If using RDBMS as the Oracle Identity Federation transient data store, restart OC4J_FED. Otherwise, click the Refresh Server on the Oracle Identity Federation Administration Console.
Typically, when performing a single sign-on operation, the service provider specifies the Name ID format for the identity provider to use when it sends the Assertion containing the user information; this is done by selecting the Default Authn Request NameID Format in the Service Provider configuration.
However, you can configure the service provider not to specify any Name ID format. To achieve this:
Log on to the Oracle Identity Federation administration console.
Go to Server Configuration - > Service Provider, then choose Liberty 1.2 or SAML 2.0 as appropriate.
Note:
Unspecified format is not supported for Liberty 1.1.Select Unspecified as the Default Authn Request NameID Format.
Click Save, then Refresh Server.
When the IdP receives a single sign-on request from an SP without any requested Name ID Format, the IdP will use an existing federation to perform the single sign-on operation. If no federation exists, the IdP will create a new federation based on the default Assertion Name ID Format configured at the IdP. To configure this format:
Log on to the Oracle Identity Federation administration console.
Go to Server Configuration - >Identity Provider, then choose Liberty 1.2 or SAML 2.0 as appropriate.
Note:
Unspecified format is not supported for Liberty 1.1.Click Assertion NameID Formats.
Select the Default Assertion NameID Format.
Click Apply, then Refresh Server.
This section explains automatic account linking at a service provider and how to use the feature. It contains these topics:
Automatic account linking at the SP allows the service provider to directly map an identity contained in an assertion to a user. With this feature:
a new federation can be created, when none exists for the user and the peer IdP, without having to prompt the user for credentials. This is achieved in conjunction with a federation data store.
the Oracle Identity Federation server is not required to use a federation data store to persist federation records.
See Also:
"Edit Federation Data Store".Automatic account linking is supported for SAML 2.0 SSO operations with non-opaque name identifiers, when enabled:
X.509
e-mail address
Kerberos principal name
Windows domain qualified name
Unspecified
Customizable Name ID Format
This feature is not supported for:
Liberty 1.x SSO
SAML 2.0 SSO operations using persistent and transient name identifiers
Make sure that federation creation is allowed when using this feature (see "Service Provider - Global Settings").
Take these steps to configure automatic account linking at the SP:
Configure the Service Provider to request a non-opaque SAML 2.0 Name ID:
Go to the Oracle Identity Federation administration console.
Go to Server Configuration - > Service Provider, then SAML 2.0.
Select the Default Authn Request NameID Format to be one of: X.509, Email Address, Kerberos Principal Name or Windows Domain Qualified Name.
Note:
You can select Unspecified - in that case, the IdP will decide the Name ID format, which must be non-opaque.Click Apply.
Map the selected Name ID format to a user attribute that uniquely reference a user record:
Go to Server Configuration - > Service Provider, then SAML 2.0.
Click Account Linking NameID Formats.
Check which Name ID formats are to be enabled, and the attribute name that will contain the user information for the specified name IDs.
Note:
dn references the DN of an LDAP entry.Click Apply.
Enable the automatic account linking feature:
Go to Server Configuration - > Service Provider, then SAML 2.0.
Check the Auto Account Linking Enabled property.
Click Apply, then Refresh Server.
This section explains automatic account linking at an identity provider and how to use the feature. It contains these topics:
Automatic account linking at the identity provider allows the IdP to create a federation automatically, if no federation exists and if the SP did not request that one be created. With this feature:
a new federation can be created, when none exists for the user and the peer SP, without the SP having to request it. This is achieved in conjunction with a federation data store.
the Oracle Identity Federation server is not required to use a federation data store to persist federation records.
See Also:
"Edit Federation Data Store"Automatic account linking is supported for SAML 2.0 SSO operations with non-opaque name identifiers, when enabled:
X.509
e-mail address
Kerberos principal name
Windows domain qualified name
Unspecified
Customizable Name ID Format
This feature is not supported for:
Liberty 1.x SSO
SAML 2.0 SSO operations using persistent and transient name identifiers
Take these steps to configure the IdP for automatic account linking:
Specify the Name ID format mappings:
Go to Server Configuration - > Identity Provider, then SAML 2.0.
Click Assertion NameID Formats.
Check which Name ID formats are to be enabled, and the attribute name that will contain the user information for the specified name IDs.
Note:
dn references the DN of an LDAP entry.Click Apply.
Optionally, configure the Default Assertion Name ID Format to use a non-opaque Name ID.
Enable the automatic account linking feature:
Go to Server Configuration - > Identity Provider, then SAML 2.0.
Check the Auto Account Linking Enabled property.
Click Apply, then Refresh Server.
Both Microsoft Active Directory Federation Services (ADFS) and Oracle Identity Federation can perform either Identity Provider (IdP) or Service Provider (SP) roles in a federated environment.
This section explains how to configure these products to work with each other. It contains the following topics:
Configuring ADFS as IdP with Oracle Identity Federation as SP
Configuring ADFS as SP with Oracle Identity Federation as an IdP
For reference, here are the definitions of some comparative federation terms used in Oracle Identity Federation and Microsoft Active Directory Federation Services (ADFS).
Identity Provider/Account Partner/IdP
An identity provider/account partner is responsible for managing, authenticating, and asserting a set of identities within a given circle of trust.
Identity providers are service providers offering business incentives so that other service providers affiliate with them.
Service Provider/Resource Partner/SP
A service provider/resource partner provides services or goods to a Principal while relying on an Identity Provider/account provider to authenticate the Principal's identity.
This section describes the steps needed to configure Oracle Identity Federation so that it is integrated with Active Directory Federation Services (ADFS) as IdP. The configuration consists of two nodes:
Node A has Oracle Identity Federation installed as a Service Provider (SP) type server.
Node B has ADFS installed as an identity provider (IdP) type server.
Configuration topics covered in this section include:
Prior to performing this configuration, ensure that Oracle Identity Federation is already installed at Node A, and is configured as a service provider. Also ensure that ADFS is installed at Node B, and is configured as an identity provider.
Take these steps at node A where Oracle Identity Federation is installed:
Log in to Oracle Identity Federation as the oif_admin user.
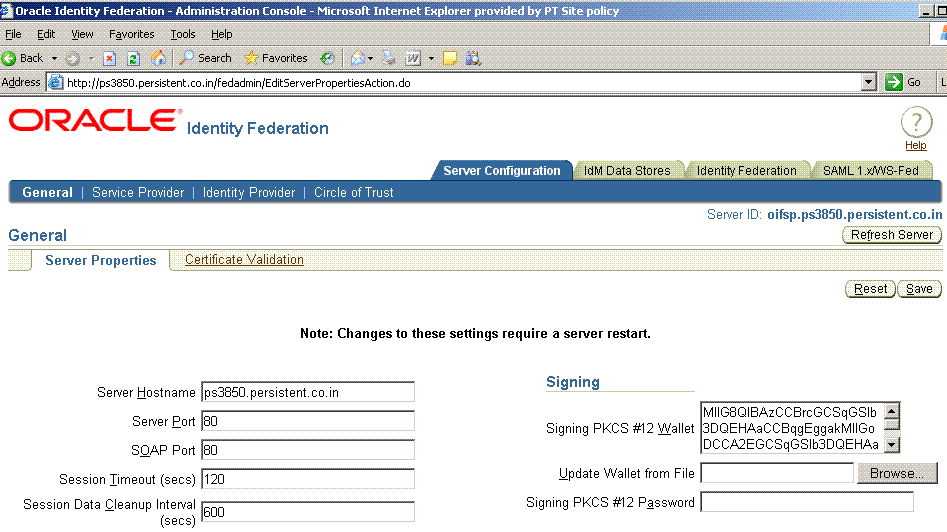
Click SAML 1.x/WS-Fed.
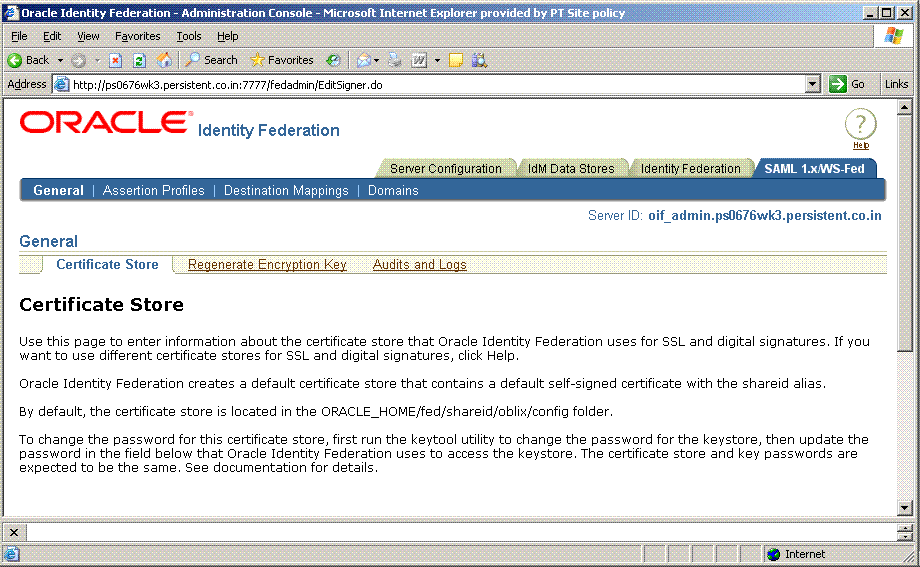
Select the Domains tab.
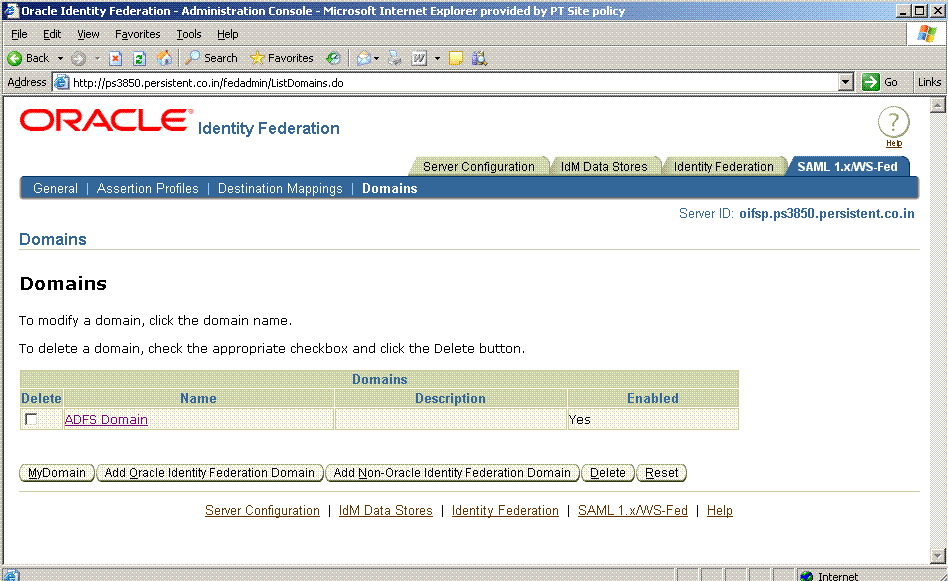
Click MyDomain.
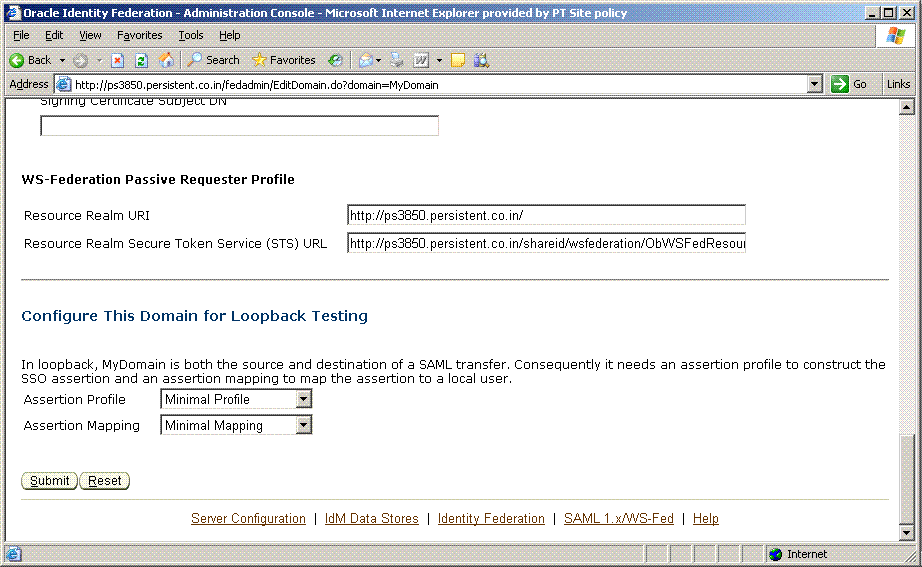
Collect this information:
Resource Realm URI - this URI identifies the SP to the IdP.
Resource Realm Secure Token Service (STS) URL - this is the URL to which the IdP redirects the user along with the security token.
Collect this information on node B where ADFS is installed:
Navigate to Start -> All Programs -> Administrative Tools -> Active Directory Federation Services.
In the console tree, double-click Federation Service, right-click Trust Policy, and click Properties.
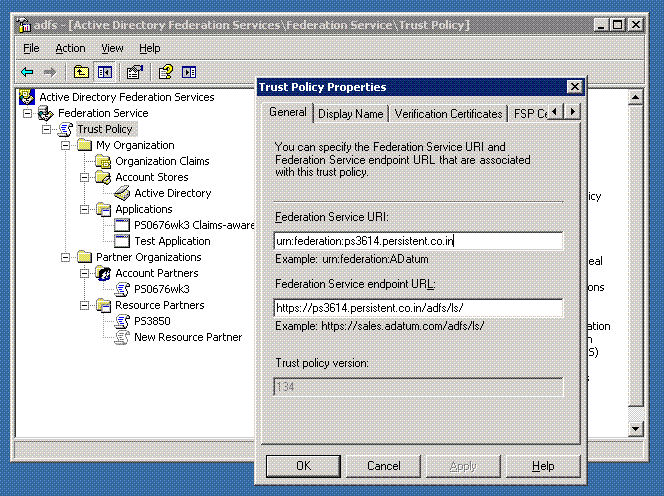
Collect this information:
Federation Service URI - identifies the IdP to the SP.
Federation Service endpoint URL - this is the IdP URL to which the SP redirects the user to obtain a security token.
Servers that are running the Federation Service component of ADFS in an account federation service require token-signing certificates to sign security tokens that the servers produce. In this step, you export the token-signing certificate from ADFS node B to a file. Take these steps to export the certificate:
Navigate to Start -> All Programs -> Administrative Tools -> Active Directory Federation Services.
Right-click Federation Service, and click Properties.
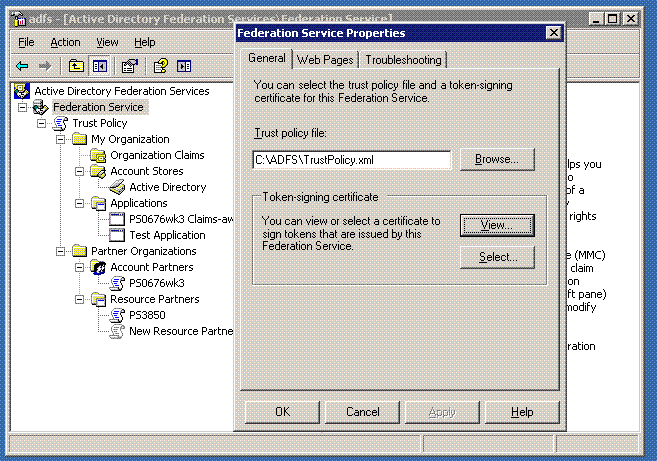
Click View to review the certificate.
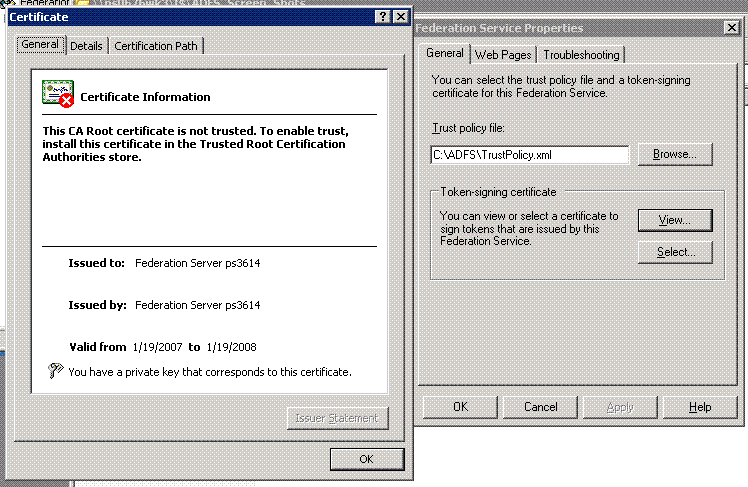
On the Details tab, click Copy to File.
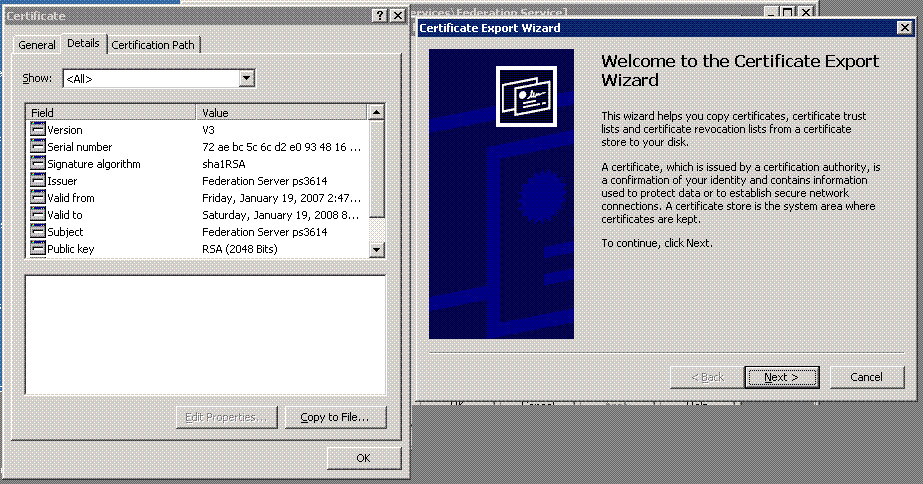
The Welcome to the Certificate Export Wizard page appears.
Click Next.
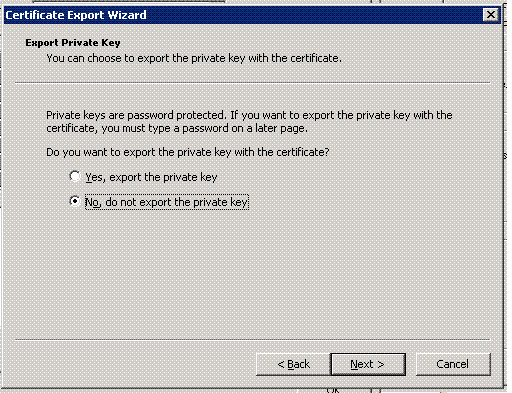
The Export Private Key page appears.
Select No, do not export the private key, then click Next.
The Export File Format page appears.
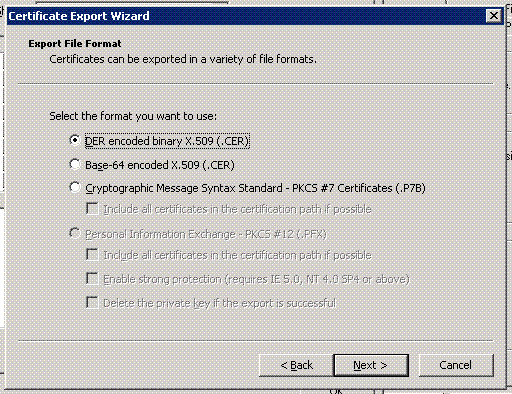
Select DER encoded binary X.509 (.Cer) and click Next.
Note:
DER encoded Binary X.509 and Base-64 encoded X.509 certificates use.cer as the filename extension. Cryptographic Message Syntax Standard - PKCS #7 certificates use .P7B as the filename extension.The File to Export page appears.
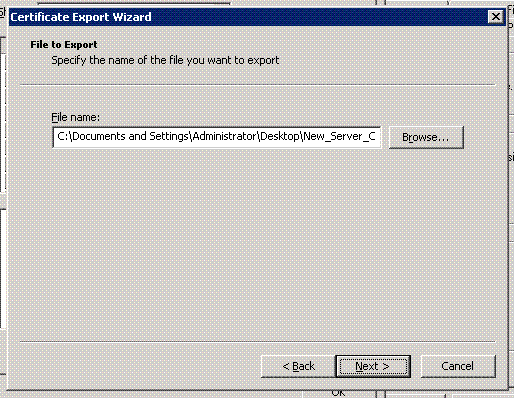
Choose a directory and filename using the format File_Name.cer, and click Next.
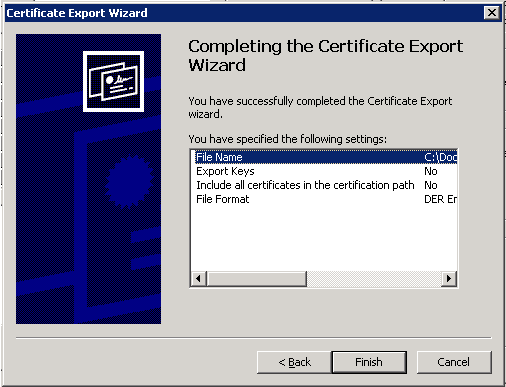
Review the certificate export options you specified with the wizard, and click Finish.
This section explains how to configure a service provider instance of Oracle Identity Federation to recognize ADFS as an identity provider.
Take these steps to import the ADFS identity provider's token signing certificate to the SP's keystore:
Copy the certificate file you collected in"Export the token-signing certificate" to a location that can be accessed by the service provider.
At the service provider, import the IdP's token signing certificate into the keystore:
C:\OIF Home\jdk\bin>keytool -keystore
C:\OIF Home\fed\shareid\oblix\config\keystore -storepass password
-import -alias anyName -file myfile
where the parameters are:
password - the password of the oif_admin user
anyName - unique name for alias
myfile - certificate files in the File_Name.cer format collected earlier
Restart the Oracle Identity Federation SP instance from the Oracle Enterprise Manager console.
Take these steps to add assertion-to-user mappings in Oracle Identity Federation:
Log in to Oracle Identity Federation as the oif_admin user.
Click SAML 1.x/WS-Fed -> Destination Mappings
The current assertion-to-user mappings are displayed.
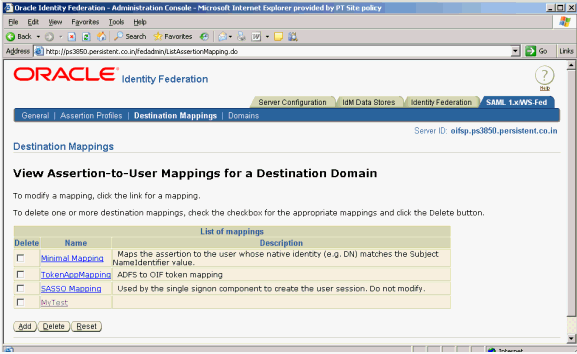
Click Add to add new Assertion-to-User Mappings.
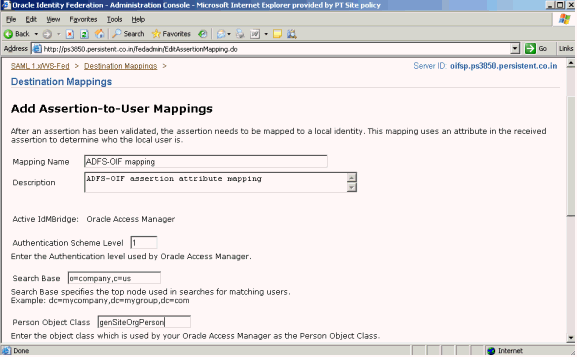
Add this information:
Mapping Name - user-defined name; enter any desired name.
Description - enter a brief description of the mapping.
Authentication Scheme Level - enter the authentication level used by Oracle Access Manager.
Search Base - enter the LDAP directory information tree (DIT) node from which Oracle Identity Federation should start the search to locate the user; for example, o=company, c=us.
Person Object Class - enter the object class that Oracle Access Manager uses as the person object class, for example, gensiteorgperson.
Note:
Authentication Scheme Level, Search Base, and Person Object Class do not have default values. You will need to supply this data.Scroll down to add local user attribute mapping.
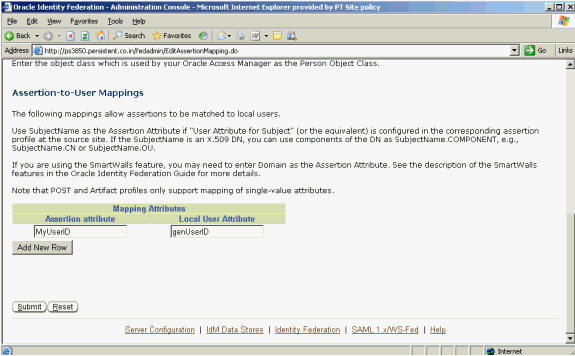
Map the assertion attribute to a local user attribute to identify the local user. To add more attributes, click Add New Row.
Click Submit. Check the destination mapping list to verify that your new mapping was created.
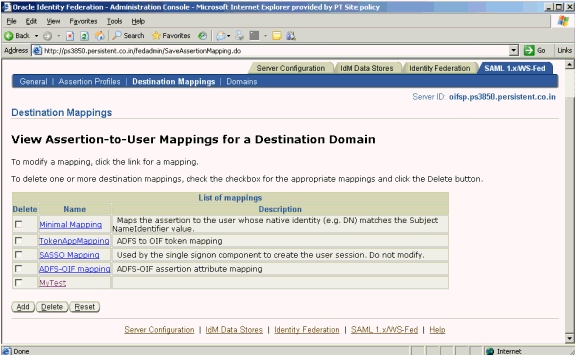
Take these steps to create a non-Oracle Identity Federation domain at the Oracle Identity Federation server for ADFS:
Log in to the Oracle Identity Federation server as the oif_admin user.
Click the SAML 1.x/WS-Fed tab, and navigate to Domains-> Add Non-Oracle Identity Federation Domain.
Click Add Non-Oracle Identity Federation Domain.
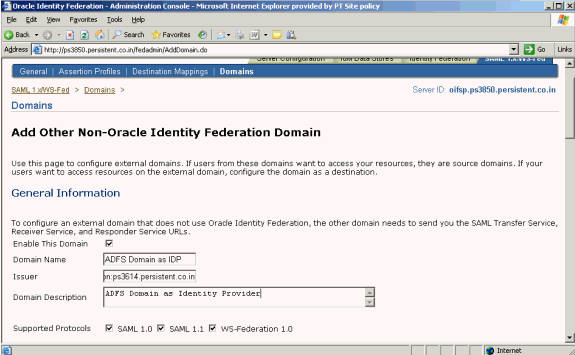
Add this information:
Domain Name
Domain Description
Issuer - Enter the Federation Service URI collected in "Prerequisites".
Check the Enable This Domain box.
Check the required Supported Protocols.
Scroll down to configure this domain as an IdP.
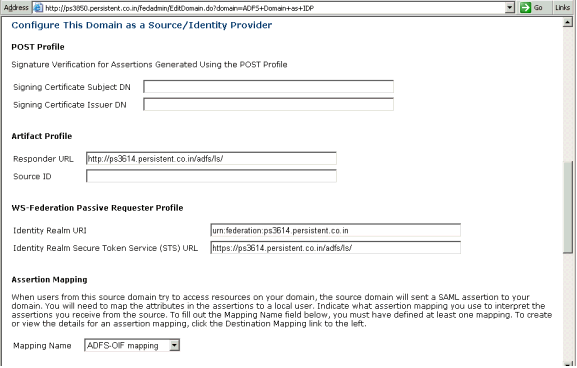
Provide this information:
Responder URL - Enter the Federation Service endpoint URL collected in "Prerequisites".
Note:
Oracle Identity Federation generates a Source ID based on this Responder URL. To change the SourceID, you change the Responder URL, delete the information in the Source ID field and click Submit to regenerate the source ID. Do not manually re-generate the SourceID.Identity Realm URI - Enter the "Federation Service URI" collected in the "Prerequisites".
Identity Realm Secure Token Service (STS) URL - Enter the Federation Service endpoint URL collected in the "Prerequisites".
Mapping Name - Select the mapping created earlier in "Create Assertion-to-User Mappings".
Scroll down to configure the Resource Realm URI and Resource Realm Secure Token Service (STS) URL.
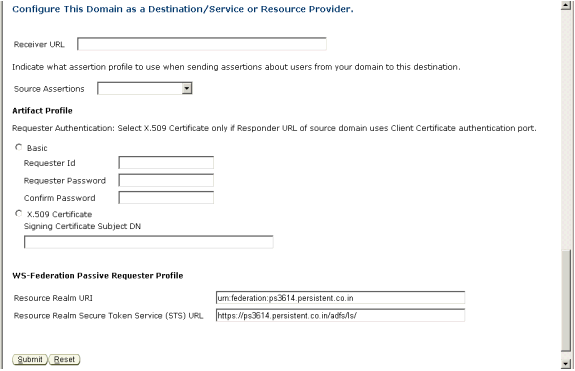
Provide this information:
Resource Realm URI - Enter the "Federation Service URI" collected in the "Prerequisites".
Resource Realm Secure Token Service (STS) URL - Enter the Federation Service endpoint URL collected in the "Prerequisites".
Click Submit to submit the configuration.
Check the Domain list to ensure that the domain was created and is enabled.
Take these steps to configure the ADFS Identity Provider to recognize Oracle Identity Federation as a service provider, by adding a Resource Partner:
Navigate to All Programs -> Administrative Tools -> Active Directory Federation Services.
Double-click Federation Service, double-click Trust Policy, double-click Partner Organizations, and right-click Resource Partners. Point to New, and click Resource Partner.
The Welcome to the Add Resource Partner Wizard page appears.
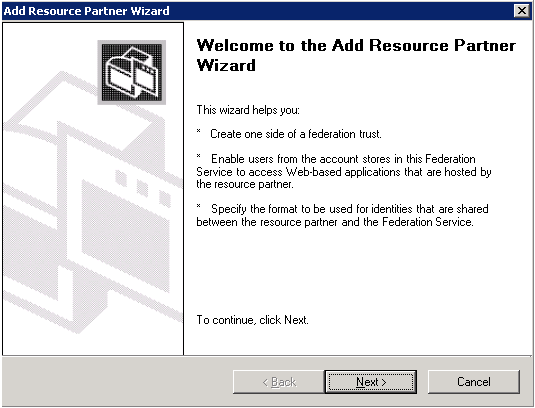
Click Next.
The Import Policy File page appears.
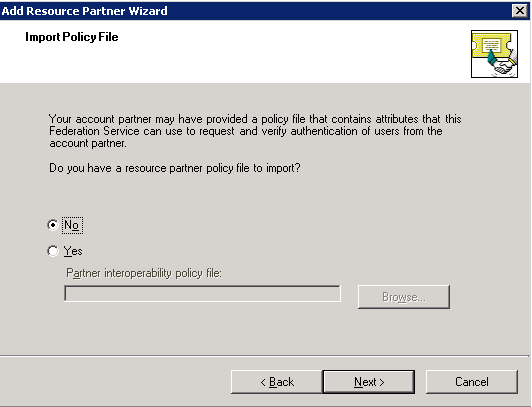
Select No for the question, and click Next.
The Resource Partner Details page appears.
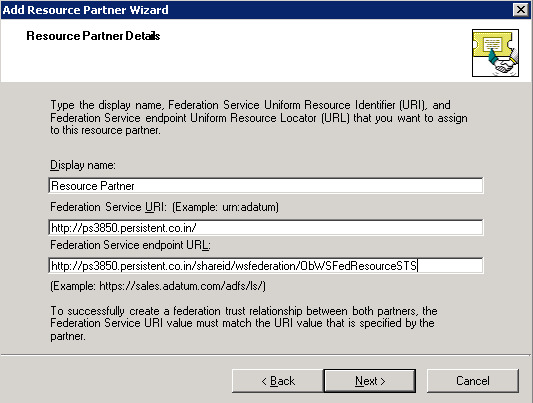
Provide this information:
Display name – Enter "Resource Partner".
Federation Service URI – Enter the Resource Realm URI collected in "Prerequisites".
Federation Service endpoint URL – Enter the Resource Realm Secure Token Service (STS) URL collected in "Prerequisites".
Click Next.
The Federation Scenario page appears.
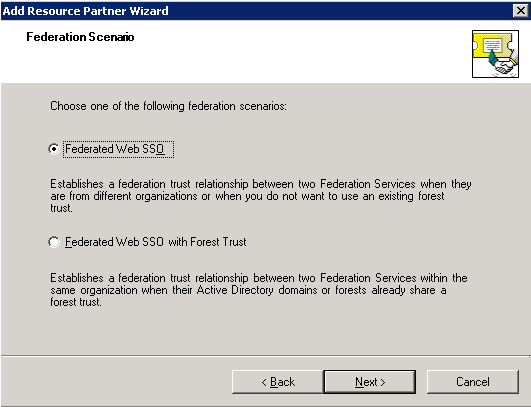
Select Federated Web SSO, and click Next.
The Resource Partner Identity Claims page appears.
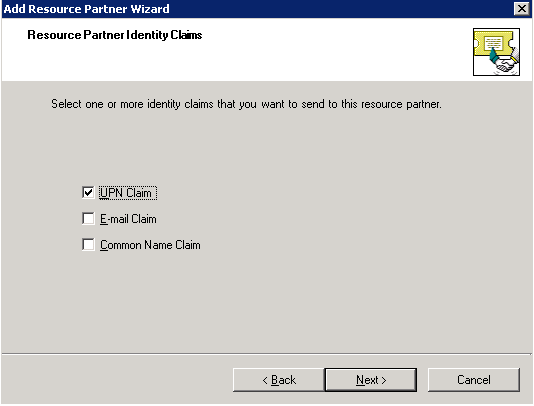
Select the UPN Claim check box and click Next.
The Select UPN Suffix page appears.
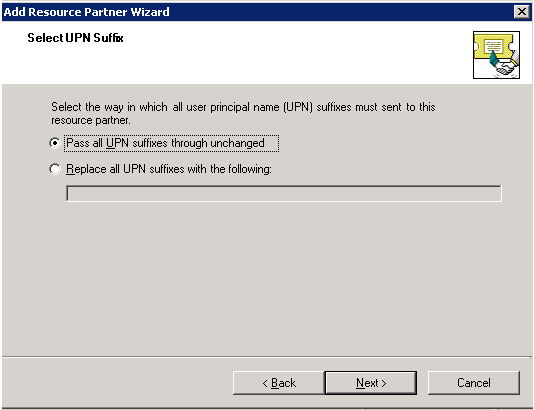
Select Pass all UPN domain suffixes through unchanged, and click Next.
The Enable this Resource Partner page appears.
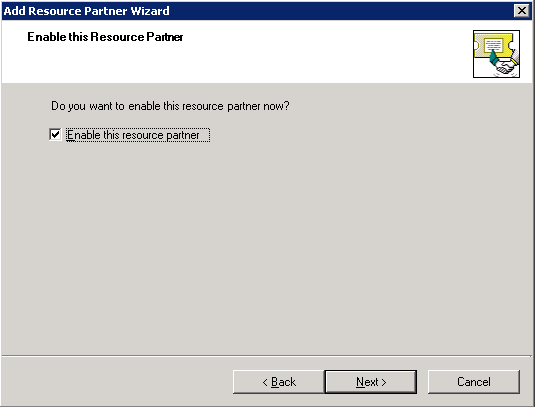
Check the Enable this resource partner box and click Next.
The wizard completion page appears.
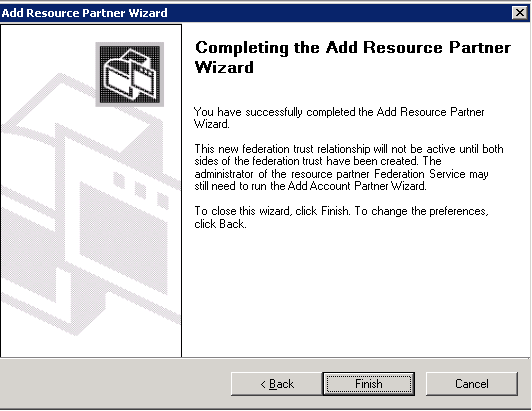
Verify your settings for the new resource partner and click Finish.
To configure claims, you must create a custom claim, map custom claim extraction to that claim, and create an outgoing custom claim mapping.
Take these steps to create an Organization Custom Claim:
Navigate to Start -> All Programs -> Administrative Tools -> Active Directory Federation Services.
Double-click Federation Service, double-click Trust Policy, double-click My Organization, right-click Organization Claims; point to New, then click Organization Claim.
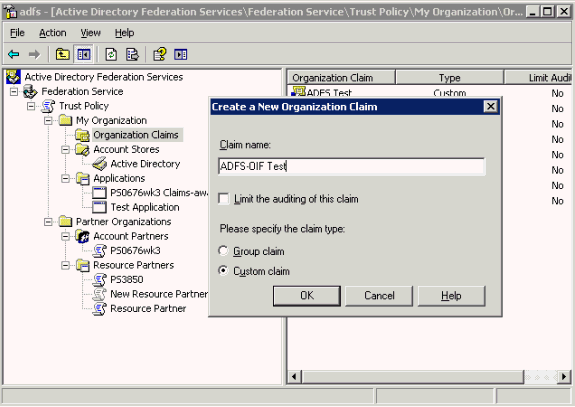
In the Create a New Organization Claim dialog box, in Claim name, type ADFS-OIF Test, Select Custom Claim, then click OK.
Take these steps to create a custom claim extraction:
Navigate to Start -> All Programs -> Administrative Tools -> Active Directory Federation Services.
Double-click Federation Service, double-click Trust Policy, double-click My Organization, double-click Account Stores, right-click Active Directory; point to New, and click Custom Claim Extraction.
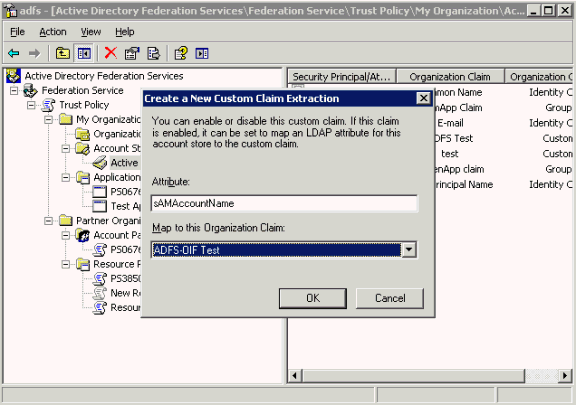
In the dialog box, select ADFS-OIF Test for Map to this Organization Claim.
Enter the attribute name to which you would like to map the assertion attribute.
Click OK.
Take these steps to create an outgoing custom claim to map to your organization custom claim:
Navigate to Start -> All Programs -> Administrative Tools -> Active Directory Federation Services.
Double-click Federation Service, double-click Trust Policy, double-click Partner Organizations, double-click Resource Partners, right-click Resource Partner; point to New, and click Outgoing Custom Claim Mapping.
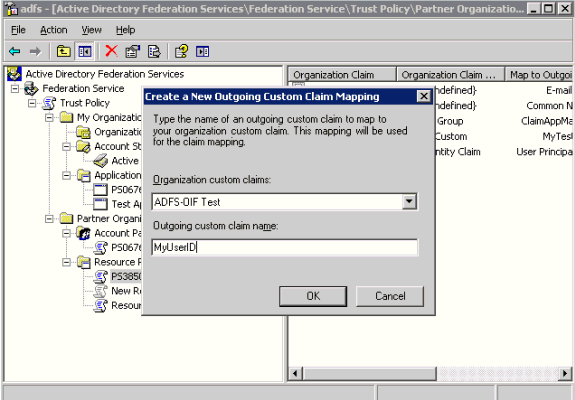
Provide this information:
Organization custom Claims – enter ADFS-OIF Test.
Outgoing custom claim name – enter MyUserID. (This attribute is collected from the administrator of the destination domain.)
Click OK.
When ADFS is enabled for single sign-on (SSO) with WS-Federation, an SSO request can be initiated from the IdP, using a URL in the format https://adfs_host/adfs/ls/.
The parameters are:
wa - specifies the action to perform. By including the action, URIs can be overloaded to perform multiple functions. For sign-in, this string MUST be "wsignin1.0".
wtrealm - the request realm URI defined by the SP
wctx - the protected resource URL to be accessed, at the SP's domain
wreply - optional parameter; the URL to which responses are directed
For example:
https://adfs_host/adfs/ls/?wa=wsignin1.0&wtrealm=http://oif_host:oif_port
/&wctx=<protected_resource_url>&wreply=http://oif_host:oif_port
/shareid/wsfederation/ObWSFedResourceSTS
When Oracle Identity Federation is enabled for SSO with WS-Federation, it is possible to initiate an SSO request from the SP, using a URL in the following format:
http(s)://oif_host:oif_port/shareid/wsfederation/ObWSFedResourceSTS
with these parameters:
wa - This required parameter specifies the action to be performed. By including the action, URIs can be overloaded to perform multiple functions. For sign-in, this string MUST be "wsignin1.0".
wctx - the protected resource URL to be accessed
For example:
http(s)://oif_host:oif_port/shareid/wsfederation/ObWSFedResourceSTS?wa=wsignin1.0&wctx=<protected resource url>
The URL for IdP-initiated logout with WS-Federation is:
https://adfs_host/adfs/ls/?wa=wsignout1.0
The URL for SP-initiated logout with WS-Federation is:
http(s)://oif_host:
oif_port/shareid/wsfederation/ObWSFedResourceSTS?wa=wsignout1.0
wa is a required parameter that specifies the action to perform. By including the action, URIs can be overloaded to perform multiple functions. For logout, this string MUST be "wsignout1.0".
This section explains how to configure Microsoft Active Directory Federation Services (ADFS) as a service provider with Oracle Identity Federation acting as an identity provider. The steps illustrate a configuration scenario consisting of two nodes:
Node A for Oracle Identity Federation
Node B for ADFS
Ensure that Oracle Identity Federation is installed as an identity provider (IdP) type server, and ADFS is installed as a service provider (SP) type server.
Go to node A, where Oracle Identity Federation is installed, and collect this information:
Log in to Oracle Identity Federation as the oif_admin user.
Navigate to SAML 1.x/WS-Fed -> Domains -> MyDomain.
The MyDomain page appears.
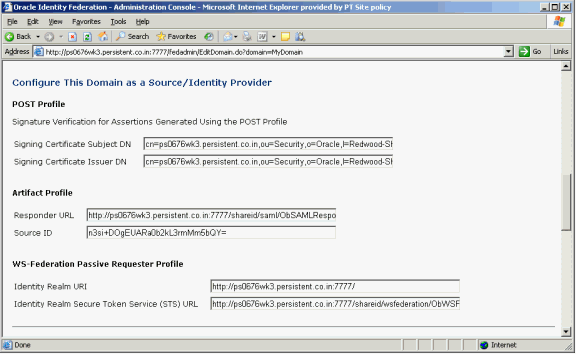
Collect this information:
Identity Realm URI - identifies the IdP to the SP.
Identity Realm Secure Token Service (STS) URL - this is the URL to which the SP redirects the user to the IdP to obtain a security token.
Take these steps to export the identity provider's signing certificate from the Oracle Identity Federation SAML1.x/WS-Fed keystore. This procedure is used in SAML 1.x and WS-Federation configurations.
At the Identity Provider, export the self-signed certificate from the keystore by running the keytool utility in the Oracle Identity Federation home directory:
C:\<OIF Home>\jdk\bin>keytool
-keystore C:\OIF_Home\fed\shareid\oblix\config\keystore
-storepass password
-export
-alias shareid
-file myfile
The parameters are:
password - the password of the oif_admin user
myfile - A filename in the format File_Name.cer to store the certificate.
Copy this certificate file to a location that can be accessed by the service provider.
Go to the node B where ADFS is installed and collect the following information:
Navigate to Start -> All Programs -> Administrative Tools -> Active Directory Federation Services.
In the console tree, double-click Federation Service, right-click Trust Policy, and click Properties.
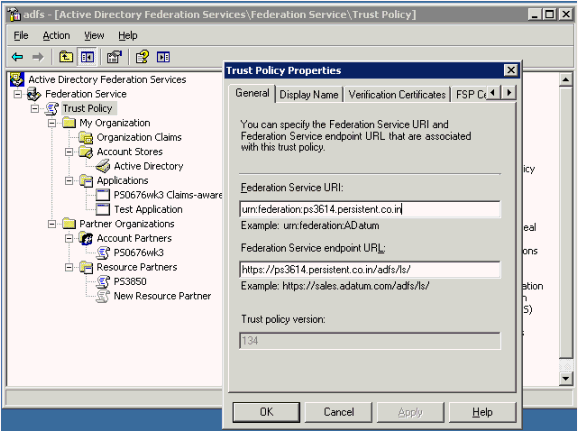
Collect this information:
Federation Service URI - URI which identifies the SP to the IdP.
Federation Service endpoint URL - the SP URL to which the IdP redirects the user along with the security token.
Take these steps to configure Oracle Identity Federation (acting as an identity provider) to recognize ADFS as a service provider.
When users request resources, the source site (IdP) provides the destination site with an assertion that attests to the user's identity. Take these steps to define an assertion profile, which defines the contents of the assertion that is to be sent to the destination.
Log in to Oracle Identity Federation as the oif_admin user.
Navigate to SAML 1.x/WS-Fed -> Assertion Profile.
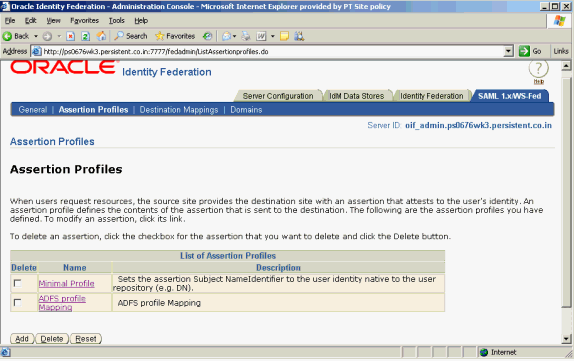
Click Add to add a new assertion.
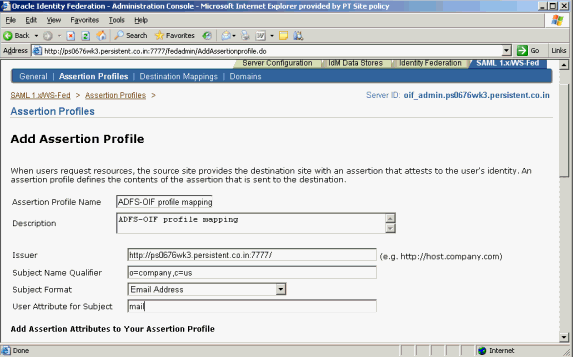
Add this information:
Assertion Profile Name
Description
Issuer – for example, http://oif_host:oif_port/
Subject Name Qualifier – This optional subject name qualifier allows the SAML-compliant server to determine the namespace for a user. This information may be useful to the source domain for informational purposes. Thus, an assertion for jsmith@oblix.com, may contain J. Smith's department. For example: ou=Department,o=Company,c=US
Subject Format – This is the format of the Subject who is the user being identified by the assertion. The subject appears in an assertion as the NameIdentifier sub-element of the assertion Subject element. Choose the format from this list of attribute formats:
None - No format is specified.
Email address - The NameIdentifier is formatted as an email address.
X509 subject name - The NameIdentifier is in the form of a DN, for example, cn=myname,dc=example,dc=com.
Windows domain - A Windows domain qualified user name formatted as DomainName\UserName; for example, oblix\jsmith.
Unspecified - The contents of the NameQualifier sub-element of the assertion subject is unspecified, and it is up to the individual implementation to determine how to interpret this data. The value is set to "urn:oasis:names:tc:SAML:1.1:nameid-format:unspecified" in the shareid-config.xml file. The Format value is used in the assertion. The SAML specification defines an unspecified format as a URI value for the Format attribute.
Other-A format value that is not one of the predefined values defined in the SAML specification. A format of Other allows any other URI values that SAML partners might use. Examples include: "<http://company.com/saml/nameid-format/company-id>" "urn:company.com:saml:nameid-format:company-id". These formats assume that company.com has registered its URN path. The value you specify in this field is set in the shareid-config.xml file.
User Attribute for Subject - This is the local LDAP user attribute whose value will be used as the value for the Subject assertion element. To be more specific, this field determines the value of the NameIdentifier sub-element of the assertion's Subject element. The Subject element identifies the source domain user. If this field is left blank, the DN of the user's directory entry is used.
Scroll down to add more attributes to the assertion profile:
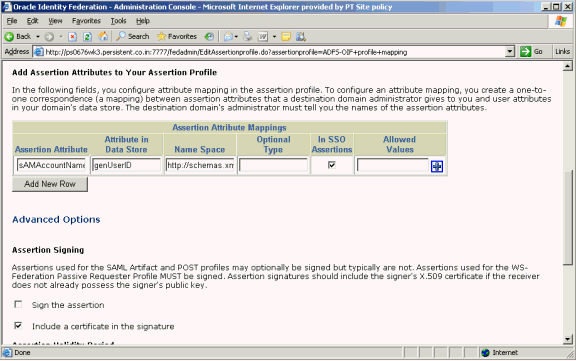
Provide this data:
Assertion Attribute - Use this field to map assertion attributes from a peer site to your data store's user attributes.
Attribute in Data Store - Enter local data store attribute.
Name Space - Specify namespaces and types if other SAML-aware products or applications are going to use the namespaces or types.
In SSO Assertions - Specify if this attribute is used in SSO assertions.
Click Submit to add the assertion profile.
Take these steps in the Oracle Identity Federation server to add a non- Oracle Identity Federation domain for Microsoft ADFS:
Log in to Oracle Identity Federation as the oif_admin user.
Navigate to SAML 1.x/WS-Fed -> Domains.
Click the Add Non-Oracle Identity Federation Domain button.
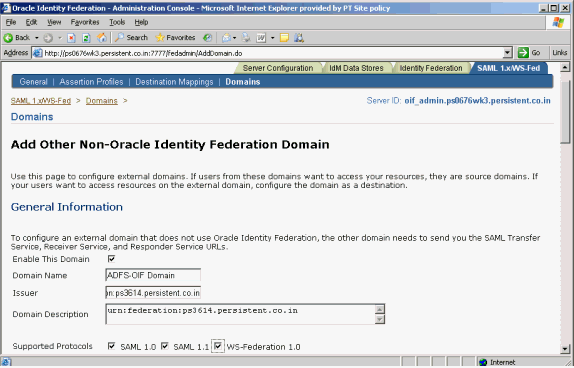
Add this information:
Domain name
Domain description
Check Enable This Domain
Check Supported Protocols according to your requirements
Issuer - Federation Service URI collected in "Prerequisites"
Scroll down to the section Configure this Domain as a Source/Identity Provider.
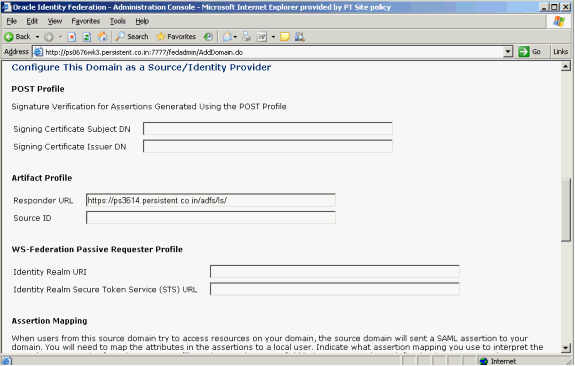
Enter the Responder URL. This is the Federation Service endpoint URL collected in the Prerequisites. Oracle Identity Federation generates Source ID based on Responder URL.
Note:
To change the SourceID, you change the Responder URL, delete the information in the Source ID field, and click Submit to regenerate the source ID. Do not manually regenerate the SourceID.Scroll down to the section Configure This Domain as a Destination/Service or Resource Provider.
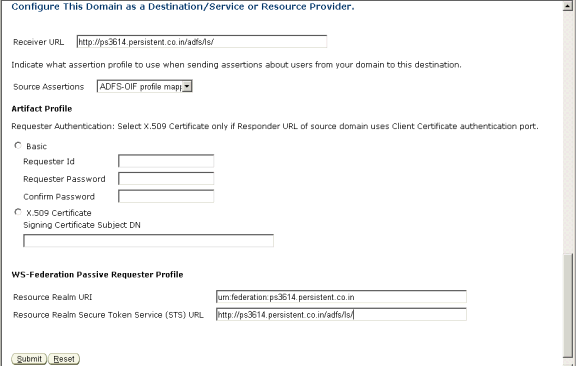
Enter this information:
Receiver URL – This is the Federation Service endpoint URL collected in the Prerequisites. The receiver service at the destination domain processes assertions.
Source Assertions - Indicate what assertion profile to use when sending assertions about users from your domain to this destination.
Resource Realm URI This is the Federation Service URI collected in the prerequisites.
Resource Realm Secure Token Service (STS) URL - This is the Federation Service endpoint URL collected in the prerequisites.
Click Submit to submit the configuration.
Check the Domain list to verify that the domain was created and ensure that it is enabled.
This section explains the configuration needed in ADFS, as service provider, to recognize Oracle Identity Federation as an identity provider. This involves adding a new account partner for ADFS.
Take these steps to add an account partner:
Navigate to Start -> All Programs -> Administrative Tools -> Active Directory Federation Services.
Double-click Federation Service, double-click Trust Policy, double-click Partner Organizations, right-click Account Partners, point to New, and click Account Partner.
The Welcome to the Add Account Partner Wizard page appears.
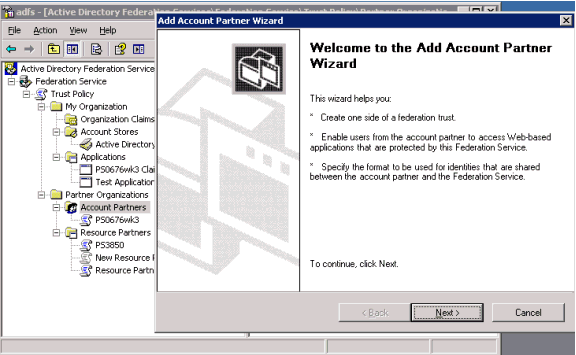
Click Next.
The Import Policy File page appears.

Select No, and click Next.
The Account Partner Details page appears.
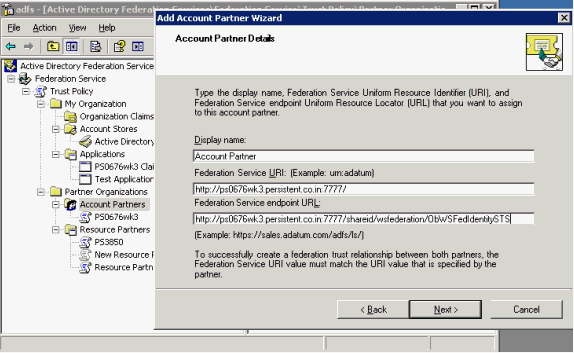
Enter this information:
Display name - enter "Account Partner".
Federation Service URI – enter the Identity Realm URI collected in the Prerequisites. Note: This value is case sensitive.
Federation Service endpoint URL – enter the Identity Realm Secure Token Service (STS) URL collected in the Prerequisites.
Click Next.
The Account Partner Verification Certificate page appears.
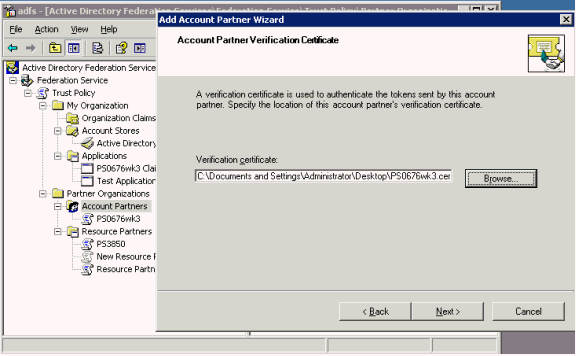
Click Browse. Select the certificate that you collected earlier in the Prerequisites, and click Next.
The Federation Scenario page appears.
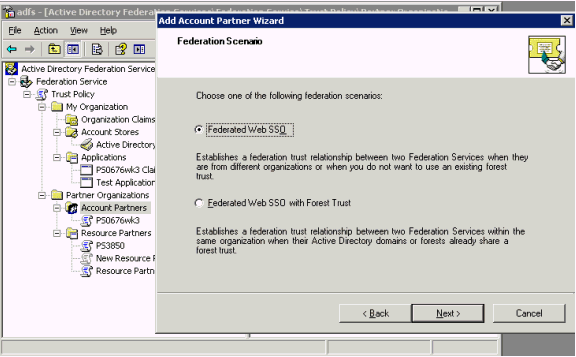
Select Federated Web SSO and click Next.
The Account Partner Identity Claims page appears.
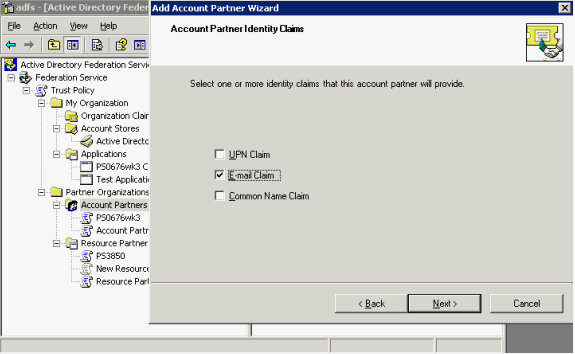
Select the Email Claim check box and click Next.
The Accepted E-mail Suffixes page appears.
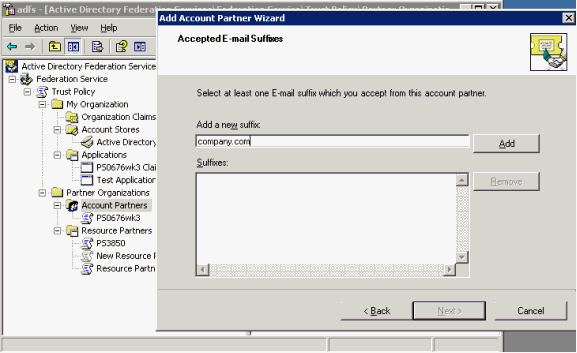
Enter a suffix (company.com in the example), and click Add.
The suffix is added and the page reappears.
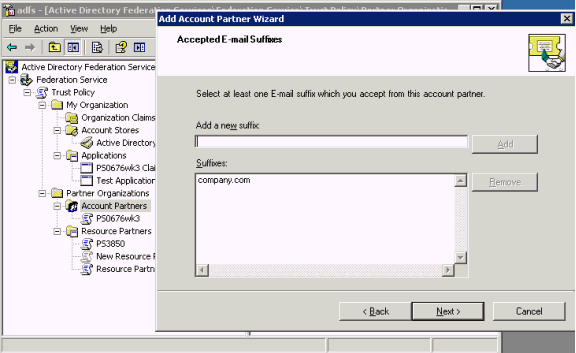
Click Next.
The Enable this Account Partner page appears.
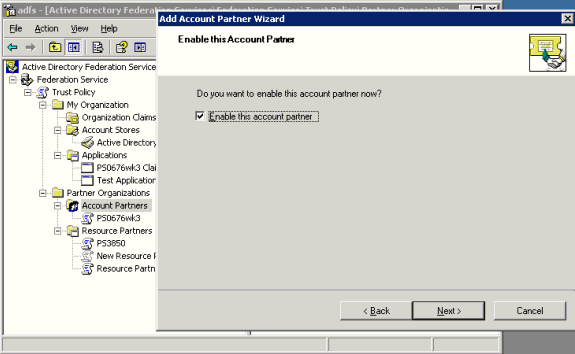
Check the Enable this account partner box, and click Next.
The Add Account Partner Wizard completion page appears. Click Finish.
In Active Directory Federation Services (ADFS), an organization group claim represents a user's membership in a group or role. An organization custom claim is used by the Federation Service to provide custom information, such as an employee identification number, about a user.
This section explains how to configure a custom claim and create the claim transform to map it to the organization custom claim.
The major tasks are as follows:
Create custom claim for claims-aware application.
Create custom claim extraction.
Create incoming custom claim mapping.
Enable e-mail identity claim for application.
Enable claims for applications.
Take these steps to create the custom claim:
Navigate to Start -> All Programs -> Administrative Tools -> Active Directory Federation Services.
Double-click Federation Service, double-click Trust Policy, double-click My Organization, right-click Organization Claims, point to New, and click Organization Claim.
The Create a New Organization Claim dialog box appears.
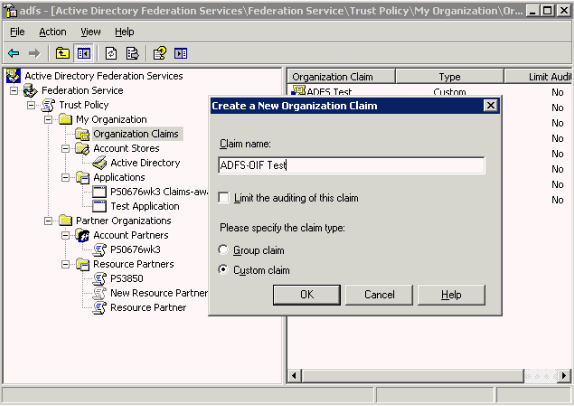
Provide this information:
Claim name – enter a claim name (ADFS-OIF Test in the example).
Check the Custom Claim box.
Click OK.
In ADFS, an organization custom claim maps to a user attribute.
Take these steps to define an LDAP attribute to map the custom claims for a claims-aware application:
Navigate to Start -> All Programs -> Administrative Tools -> Active Directory Federation Services.
Double-click Federation Service, double-click Trust Policy, double-click My Organization, double-click Account Stores; right-click Active Directory, point to New, and click Custom Claim Extraction.
The Create a New Custom Claim Extraction dialog appears.
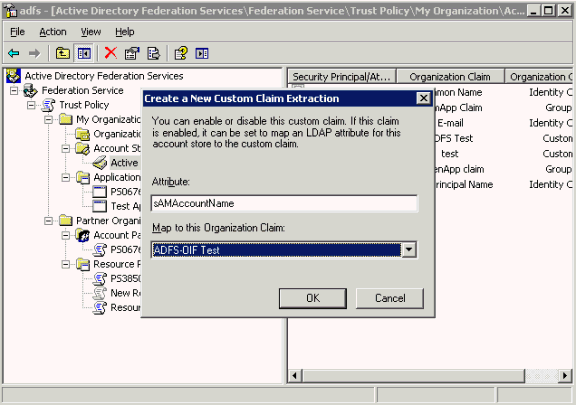
Provide this information:
Attribute - Enter the name to which you would like to map the assertion attribute (sAmAccountName in the example).
Map to this Organization Claim – select the claim you defined earlier (ADFS-OIF Test in the example)
Click OK.
The resource Federation Service uses incoming custom claim mappings to map custom claims, sent by an account partner, to claims that can be used by the resource partner to make authorization decisions.
Take these steps to create a mapping for the claim transform:
Navigate to Start -> All Programs -> Administrative Tools -> Active Directory Federation Services.
Double-click Federation Service, double-click Trust Policy, double-click Partner Organizations, double-click Account Partners; right-click Account Partner, point to New, and click Incoming Custom Claim Mapping.
The Create a New Incoming Custom Claim Mapping dialog appears.
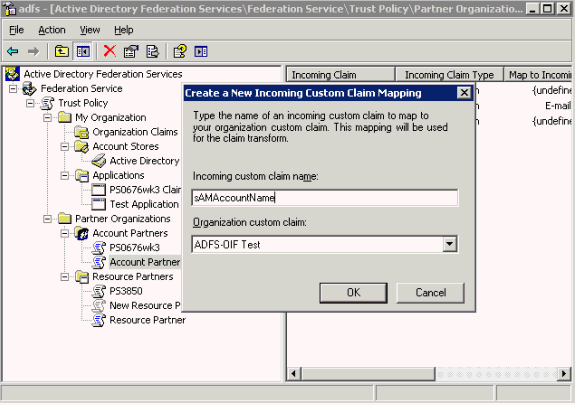
Provide this information:
Organization custom claim - Enter the custom claim name (ADFS-OIF Test in the example).
Incoming custom claim name – enter the attribute name (sAmAccountName in the example). Note: This attribute is passed on to the Source Domain Administrator by the destination domain administrator for use in creating Assertion Profile..
In Active Directory Federation Services (ADFS), organization identity claims are created along with the account or resource partner. They are incoming claims on the resource partner and outgoing claims on the account partner. Identity claims are enabled when you specify the identity type such as a UPN, e-mail, or common name.
Take these steps to establish an e-mail identity type for the claim:
Navigate to Start -> All Programs -> Administrative Tools -> Active Directory Federation Services.
Double-click Federation Service, double-click Trust Policy, double-click My Organizations, double-click Account Stores; click Active Directory, right click Email Identity Claim, and click Properties.
The Claim Extraction Properties dialog appears.
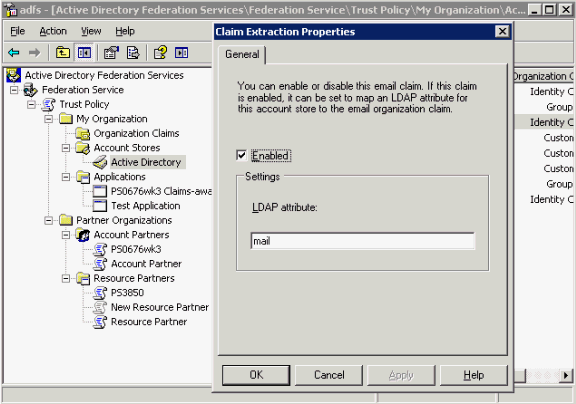
Enter the LDAP attribute and check the Enabled check box.
Click OK.
Take these steps to enable applicable claims for the application:
Navigate to Start -> All Programs -> Administrative Tools -> Active Directory Federation Services.
Double-click Federation Service, double-click Trust Policy, double-click My Organizations, double-click Applications; click the application name, right click Email Identity Claim, and click Enable.
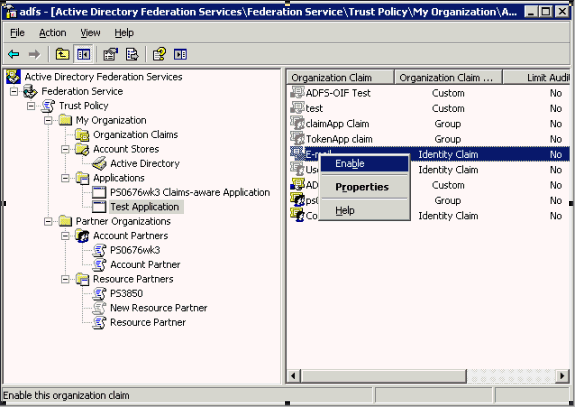
When Oracle Identity Federation is enabled for SSO with WS-Federation, an SSO request can be initiated from the IdP, using a URL in the format:
http://oif_host:oif_port/shareid/wsfederation/ObWSFedIdentitySTS/
The parameters are:
wa - a required parameter which specifies the action to be performed. By including the action, URIs can be overloaded to perform multiple functions. Note: For sign-in, this string must be "wsignin1.0".
wtrealm - the request realm URI defined by the SP
wctx - the protected resource URL to be accessed at the SP's domain
For example:
http://oif_host:oif_port
/shareid/wsfederation/ObWSFedIdentitySTS/?wa=wsignin1.0
&wtrealm=Federation_Service_URI
&wctx=https://protected_resource/claimapp/\https://protected_resource/claimapp/
When ADFS is enabled for SSO with WS-Federation, it is possible to initiate an SSO request from the SP, using a URL in the following format:
https://adfs_host/adfs/ls/
The parameters are:
wa - This required parameter specifies the action to be performed. By including the action, URIs can be overloaded to perform multiple functions. For sign-in, this string must be "wsignin1.0".
wctx - This is the protected resource URL to be accessed at the SP's domain
wreply - This optional parameter is the URL to which responses are directed.
For example:
https://adfs_host
/adfs/ls/?wa=wsignin1.0
&wreply=https://protected_resource/claimapp/
&wct=2007-02-16T14:41:01Z
&wctx=https://protected_resource/claimapp/
The URL is:
http(s)://oif_host:oif_port/shareid/wsfederation/ObWSFedIdentitySTS?wa=wsignout1.0
The URL is:
https://adfs_host/adfs/ls/?wa=wsignout1.0
where wa is a required parameter that specifies the action to be performed. By including the action, URIs can be overloaded to perform multiple functions. For logout, this string must be "wsignout1.0".
This section describes the logout no-fail-on-error feature, which is introduced in patch set 10.1.4.2.
During a Liberty 1.x / SAML 2.0 Logout operation, Oracle Identity Federation contacts the remote providers with which the user performed a federated SSO operation, and instructs them to terminate their local session for that user.
In Oracle Identity Federation release 10.1.4.0.1, if a remote provider did not support the Global Logout protocol, Oracle Identity Federation reported an Internal Server Error to the user's browser.
In the 10.1.4.2.0 patch set release, the administrator can configure how Oracle Identity Federation should respond when an error occurs in the logout flow. The administrator can:
decide to force Oracle Identity Federation to finish the logout operation successfully, or
report an error to the user's browser.
Take these steps to configure the behavior of Oracle Identity Federation during logout:
Open the $ORACLE_HOME/fed/conf/config.xml file.
Locate the FederationConfig XML element, and set its useLocalConfig attribute to true:
<FederationConfig useLocalConfig="true">
Locate the XML Config element named serverconfig, and find the slofailonerror property:
<Config name="serverconfig">
...
   <property name="slofailonerror">false</property>
...
</Config>
Set the value of the property:
true to force Oracle Identity Federation to report a failure to the user's browser if an error occurs
false to instruct Oracle Identity Federation to successfully finish the logout operation, even if an error occurred
Save the file and exit
Restart the OC4J_FED instance.
Oracle Identity Federation provides logout capabilities to sign off a user session. Logouts are triggered:
through the WS-Fed/Liberty 1.x/SAML 2.0 protocols when a remote provider invokes a logout operation; or
by invoking a URL on the Oracle Identity Federation server that initiates the Logout flow; this involves interacting with remote providers to sign off the user.
When invoking the Oracle Identity Federation logout service through the /fed/user/logout URL, you can specify a return URL parameter to which the user will be redirected.
See Also:
"Configuring the Logout Service" .At the end of the logout operation, Oracle Identity Federation can optionally indicate the status of the signoff operation to report if the Global Logout operation was successful. Knowing the status can be useful because in some cases, there could be an error at a remote server, or one peer provider might not support the Global Logout protocol.
By default, Oracle Identity Federation does not return any logout status. When this feature is configured, a query parameter is appended to the return URL to indicate the logout status:
the orafed_slostatus query parameter indicates the Liberty 1.x/SAML 2.0 logout status, with these possible values:
0 means success
1 means failure
the orafed_slowsfed query parameter indicates the WS-Fed logout status, with these possible values:
0 means success
1 means failure
Take these steps to configure the logout status feature:
Open the $ORACLE_HOME/fed/conf/config.xml file.
Locate the FederationConfig XML element, and set its useLocalConfig attribute to true:
<FederationConfig useLocalConfig="true">
Locate the XML Config element named serverconfig, and find the sloreturnstatus property:
<Config name="serverconfig">
   ...
   <property name="sloreturnstatus">false</property>
   ...
</Config>
Set the value of the property:
true to direct Oracle Identity Federation to add the status of the Global Logout on the return URL when using Liberty 1.x/SAML 2.0 protocols
false to direct Oracle Identity Federation to omit the status of the Global Logout when using Liberty 1.x/SAML 2.0 protocols
Save the file and exit.
Open the $ORACLE_HOME/fed/shareid/oblix/config/shareid-config.xml file.
Set the useLocalConfig attribute to true to force changes to be persisted at restart:
<SHAREidConfiguration … useLocalConfig="true">
Locate the LogoutConfig XML element.
Set the SloReturnStatus attribute to either true or false:
true to direct Oracle Identity Federation to add the status of the Global Logout on the return URL when using WS-Fed protocols
false to direct Oracle Identity Federation to omit the status of the Global Logout when using WS-Fed protocols
Restart the OC4J_FED instance.
With release 10.1.4.2.0, Oracle Identity Federation supports the SAML 2.0 authentication query protocol (AuthnQuery) on the IdP side. This protocol is used to query the IdP to request statements about authentication acts that have occurred in a previous interaction between the indicated subject and the authentication authority (IdP).
Note:
The protocol must not be used as a request for new authentication using credentials provided in the query.Take these steps to configure Oracle Identity Federation to respond to authentication queries:
Open the $ORACLE_HOME/fed/conf/config.xml file.
Locate the XML element named FederationConfig and set its useLocalConfig attribute to true:
<FederationConfig useLocalConfig="true">
Locate the XML Config element named idpsaml20, and look for the authnresponderenabled property:
<Config name="idpsaml20">
...

   <property name="authnresponderenabled">false</property>
...

</Config>
Change the value of the property to true if you want Oracle Identity Federation to respond to AuthnQuery messages.
Save the file and exit.
Restart the OC4J_FED instance.
Once Oracle Identity Federation is configured in this way, you can use the SAML 2.0 AuthnQuery message element to make authentication queries to the IdP (see [SAMLCore] in Table B-1 for details about AuthnQuery). In response, the IdP will return assertions with authentication statements that match the query's requirements.
At times, the SP requester knows the unique identifier of one or more assertions (which have been exchanged in the past), and may want to obtain these assertions anew.
With release 10.1.4.2.0, Oracle Identity Federation supports the SAML 2.0 assertion ID request protocol (AssertionIDRequest) which allows the SP to query for existing assertions by their identifiers.
Take these steps to configure Oracle Identity Federation to support AssertionIDRequest messages:
Open the $ORACLE_HOME/fed/conf/config.xml file.
Locate the XML element named FederationConfig and set its useLocalConfig attribute to true:
<FederationConfig useLocalConfig="true">
Locate the XML Config element named idpsaml20, and look for the assertionidresponderenabled property:
<Config name="idpsaml20">
...
   <property name="assertionidresponderenabled">false</property>
...
</Config>
Change the value of the property to true to enable the assertion ID request functionality.
Save the file and exit.
Restart the OC4J_FED instance.
Once assertion ID request functionality is configured in this way, Oracle Identity Federation caches the most recent assertions generated by the SAML authority for later retrieval by the SP requester. You can use the SAML 2.0 AssertionIDRequest message element to request old assertions from Oracle Identity Federation; they are returned in a Response message (see [SAMLCore] in Table B-1 for details about AssertionIDRequest).
This section describes topics related to configuring Oracle Identity Federation with eTrust SiteMinder:
Configuring Oracle Identity Federation for Startup eTrust SiteMinder Operations
Configuring Oracle Identity Federation to use a different User Data Store
See Also:
"Deploying Oracle Identity Federation with eTrust SiteMinder" for eTrust SiteMinder configuration details and examples.When integrating the Oracle Identity Federation server with eTrust SiteMinder, policy objects must be created in the SiteMinder Policy Server. These objects can be created:
by running a Perl script on the SiteMinder Policy machine, or
by letting Oracle Identity Federation automatically create the objects at startup
The following policy objects are created:
AgentGroup
An AgentGroup regroups the Web Agents defined by a cluster of Oracle Identity Federation servers, such as in a load balanced/HA scenario.
The default name of the group is OracleFederation, but it can be changed in the Perl script as well as in the Oracle Identity Federation configuration files.
Web Agent
A Web Agent, specific to a physical Oracle Identity Federation server, is used to interact with the SiteMinder Policy Server at runtime to authenticate users and create user sessions.
The agent is a member of the federation AgentGroup, and its name is defined to be SMBridgeAgent.OIF_INSTANCE_NAME, where OIF_INSTANCE_NAME is the instance name of the Oracle Application Server on which Oracle Identity Federation is running. (You can find the instance name on the Enterprise Manager console, where it is displayed at the top left of the welcome page. For example: Application Server: orclfed.stadm04.us.oracle.com).
If using the Perl script to create the policy objects, you will need to edit the script to reflect the instance name of the running Application Server.
Note:
The instance name of an Application Server is unique across all deployments, even in a load balanced/HA scenario.Other policy objects
Oracle Identity Federation will create and use various policy objects to authenticate users, or to create an eTrust SiteMinder session in SP mode.
These objects have a prefixed name that can be configured to allow multiple logical Oracle Identity Federation servers to integrate with a given eTrust SiteMinder server. By default the Prefix name is OracleFederation and it should not be changed (even in a load balanced/HA scenario), unless different logical Oracle Identity Federation instances/clusters will interact with the eTrust SiteMinder server. If a specific prefix needs to be used, you will need to edit the Perl script and the Oracle Identity Federation Configuration files.
Oracle Identity Federation defines a realm that is used during authentication procedures. This realm:
is named PREFIX_Login
is linked to the AgentGroup described earlier
is protecting the /PREFIX/Login resource
has an authentication scheme named PREFIX_Login
has an associated rule named PREFIX_Login
Oracle Identity Federation defines a second realm that is used to create eTrust SiteMinder user sessions in SP mode. This realm:
is named PREFIX_LoginNoPwd
is linked to the AgentGroup described earlier
is protecting the /PREFIX/LoginNoPwd resource
has an authentication scheme named PREFIX_LoginNoPwd
Finally, Oracle Identity Federation defines a Response Object that it uses to retrieve user attributes from the eTrust SiteMinder server at runtime. This object is named PREFIX_UserAttributes.
When Oracle Identity Federation is integrated with eTrust SiteMinder server, policy objects can be created automatically, or through a perl script.
Creating Policy Objects with a Script
Take these steps to develop and implement the createSMConfig.pl script:
Open the $ORACLE_HOME/fed/setup/sm/createSMConfig.pl file.
Set the following variables:
$adminName: this is the eTrust SiteMinder administrator ID.
$adminPwd: this is the eTrust SiteMinder administrator password.
$domain_name: this is the eTrust SiteMinder to contain the policy objects.
$userdir_name: this is the eTrust SiteMinder-configured name of the user directory for the domain.
$ip_address: this is the IP address of the machine where the Oracle Identity Federation server is installed.
$shared_secret: this is the secret string shared between the agent and the policy server.
$oif_instance_name: the instance name of the Oracle Application Server where Oracle Identity Federation is running.
$prefix: the prefix to use for the Oracle Identity Federation policy objects. By default it is OracleFederation.
Have the eTrust SiteMinder administrator create an AgentGroup, and add all web agents created by the perl script to this agent group. Each server instance would add one agent.
The administrator must edit the two newly created realms, and reference the AgentGroup instead of the Oracle Identity Federation Web Agent.
Save the script changes.
Note:
If the script is used to create the policy objects and if the AgentGroup name and Prefix are changed from their default values, you must update the Oracle Identity Federation configuration. See the discussion "Creating Policy Objects Automatically" below for details.Creating Policy Objects Automatically
Take these steps:
Follow the steps listed in "Edit User Data Store" to set up the eTrust SiteMinder configuration information.
Save.
If the AgentGroup name or the Prefix needs to be changed, continue with the remaining steps. Otherwise, restart the OC4J_FED instance (last step).
Open the $ORACLE_HOME/fed/shareid/oblix/config/shareid-config.xml file.
Set the useLocalConfig attribute to true to force changes to be persisted at restart:
<SHAREidConfiguration … useLocalConfig="true">
Locate the IdMBridge XML element whose Name attribute is SM.
Add the XML attribute named AgentGroupName to specify the name of the AgentGroup to use:
<IdMBridge Name="SM" ... AgentGroupName="OIFGroup" ...></IdMBridge>
Add the XML attribute named PrefixName to specify the prefix to use:
<IdMBridge Name="SM" ... PrefixName="OIFPrefix" ...></IdMBridge>
Save the file.
Restart OC4J_FED.
Oracle Identity Federation can be configured to perform various checks and operations at each startup.
Create Policy Objects if Missing
To check for the presence of the policy objects in the eTrust SiteMinder Policy server, and create them if missing:
Open the $ORACLE_HOME/fed/shareid/oblix/config/shareid-config.xml file.
Set the useLocalConfig attribute to true to force changes to be persisted at restart:
<SHAREidConfiguration … useLocalConfig="true">
Locate the IdMBridge XML element whose Name attribute is SM.
Set the XML attribute named SkipInitialize to false to indicate that Oracle Identity Federation needs to check the policy objects:
<IdMBridge Name="SM" ... SkipInitialize="false" ...></IdMBridge>
Set the XML attribute named AllowSMCreation to true to indicate that policy objects can be created if missing:
<IdMBridge Name="SM" ... AllowSMCreation="true" ...></IdMBridge>
Save and restart OC4J_FED.
Check if Policy Objects are Missing
To check for the presence of the policy objects in the eTrust SiteMinder policy server, and report an error if missing (but not to create the objects):
Open the $ORACLE_HOME/fed/shareid/oblix/config/shareid-config.xml file.
Set the useLocalConfig attribute to true to force changes to be persisted at restart:
<SHAREidConfiguration … useLocalConfig="true">
Locate the IdMBridge XML element whose Name attribute is SM.
Set the XML attribute named SkipInitialize to false to indicate that Oracle Identity Federation needs to check the policy objects:
<IdMBridge Name="SM" ... SkipInitialize="false" ...></IdMBridge>
Set the XML attribute named AllowSMCreation to false to indicate that an error needs to be reported if the policy objects are missing:
<IdMBridge Name="SM" ... AllowSMCreation="false" ...></IdMBridge>
Save and restart OC4J_FED.
Bypass Policy Object Verification and Creation
To bypass the verification and creation of the Oracle Identity Federation policy objects:
Open the $ORACLE_HOME/fed/shareid/oblix/config/shareid-config.xml file.
Set the useLocalConfig attribute to true to force changes to be persisted at restart:
<SHAREidConfiguration … useLocalConfig="true">
Locate the IdMBridge XML element whose Name attribute is SM.
Set the XML attribute named SkipInitialize to true to indicate that Oracle Identity Federation should not check the policy objects:
<IdMBridge Name="SM" ... SkipInitialize="true" ...></IdMBridge>
Save and restart OC4J_FED.
You can configure Oracle Identity Federation server to use a user repository other than the one used by the CA SiteMinder server. For example, the CA SiteMinder Policy server could use an LDAP server as the user repository while Oracle Identity Federation is configured to use an RDBMS.
Start by following the steps listed in "Edit User Data Store" to set up the CA SiteMinder configuration information.
Next, take these steps to indicate to Oracle Identity Federation that the user data store is different from the one used by CA SiteMinder:
Open the $ORACLE_HOME/fed/shareid/oblix/config/shareid-config.xml file.
Set the useLocalConfig attribute to true to force changes to be persisted at restart:
<SHAREidConfiguration … useLocalConfig="true">
Locate the IdMBridge XML element whose Name attribute is SM.
Set the XML attribute named SecondaryBridgeEqualToSMUserDir to:
false to indicate that the user data store is different from the one used by the CA SiteMinder policy server.
true to indicate that the user data store is the same for both.
For example:
<IdMBridge Name="SM" ... SecondaryBridgeEqualToSMUserDir="false" ...></IdMBridge>
Save and restart OC4J_FED.