|
Siebel Business Process Designer Administration Guide > For Developers: Basics of Building Workflow Processes >
Tutorial: Using Process Designer in Siebel Tools
This tutorial takes you through the steps involved in designing, simulating, and deploying a workflow process using Siebel Business Process Designer. This tutorial is organized as follows:
Designing Your Workflow Process
In this tutorial, you complete the following sequence of tasks to design your workflow process:
- Create a new workflow process record. See To create a new workflow process.
- Draw the workflow process in the Palette Designer. See To design the workflow process.
- Define properties for the steps of the workflow process. See To set properties for the workflow process.
- Create a trigger for the workflow process. See To define the run-time event that triggers the workflow process.
- Define condition criteria for a Decision branch of the workflow process. See To define condition criteria for the workflow's Decision step.
- Validate the workflow process. See To validate the workflow process.
NOTE: The login information (SADMIN/SADMIN) as well as the other settings listed in this tutorial are provided as examples. You should modify these example settings as appropriate for your own setup.
You create a workflow process and set its properties using the Process Designer in Siebel Tools. To create a new workflow process
- Log in to Siebel Tools as SADMIN/SADMIN connecting to the Sample database.
- In the Object Explorer Types tab, choose the Project object type.
- In the Projects OBLE, right-click and select New Record to create a new project.
- Name the project "77 Workflow."
- Lock the project.
- In the Object Explorer Types tab, choose the Workflow Process object type.
NOTE: If the Workflow Process object type does not appear in the Object Explorer by default, you can add it. Choose View > Options, and on the Object Explorer tab, select the Workflow Process type.
- In the Workflow Process OBLE, right-click and select New Record to create a new workflow process record.
- Fill in the record's fields to give the workflow process the following properties:
Property |
Value |
Process Name |
77 Workflow Large Opportunity Creates Activity |
Workflow Mode |
Service Flow |
Project |
77 Workflow |
Business Object |
Opportunity |
This workflow is to be invoked by a run-time event. Once a user creates a new Opportunity record, the revenue of the opportunity will be evaluated. If the value of the opportunity is over $10,000, an Activity record will be created to have the sales representative follow up on the deal. To design the workflow process
- Right-click on the new workflow process record you created in Step 5 and select Edit Workflow Process.
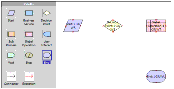
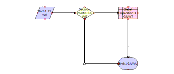
- From the Palette Designer, drag and drop step icons to the design canvas to match the following graphic. Add one Start step, one Decision Point, one Siebel Operation step, and one End step.
- Drag and drop Connector branches to connect all the steps, as depicted in the following graphic.
Make sure that all of the connectors are correctly attached. A connector is correctly attached when red dots and squares appear at each of its ends. If you see a white square at one end, that end is not correctly attached.
NOTE: To create an elbow on a Connector branch, as in the branch connecting the Decision step to the End step in the following graphic, right-click the branch, choose Edit > Add Point. Then select the point on the branch and drag it to the appropriate place in the design canvas.
To set properties for the workflow process
- Select the Start step.
The corresponding Start step record is selected in the WF Steps list applet below the Palette Designer. When you select a step icon in the design canvas, the corresponding step is selected in the list applet so that you can define its properties.
- For the Start step, set the Name property to "Start."
- Select the Decision step.
- For the Decision step, set the Name property to "Is opportunity over 10K?"
- Select the Siebel Operation step.
- For the Siebel Operation step, set the following properties:
Property |
Value |
Name |
Insert Activity to Follow Up |
Business Component |
Action |
Operation |
Insert |
- In the design canvas, right-click the Siebel Operation step and choose Show Fields.
The list applet below the design canvas toggles to the Input Arguments list applet.
- In the Input Arguments list applet, right-click and choose New Record to add two new records with the following properties:
Field Name |
Type |
Value |
Description |
Literal |
Please call the customer ASAP since this is a large opportunity. |
Type |
Literal |
To Do. |
- Select the End step, and set its Name property to "End."
To define the run-time event that triggers the workflow process
- In the design canvas, select the Connector branch that connects the Start step to the Decision step.
The list applet below the design canvas toggles to the WF Step Branch list applet.
- Set the branch properties as follows:
Property |
Value |
Name |
Evaluate Oppty |
Type |
Default |
Event Object Type |
BusComp |
Event Object |
Opportunity |
Event |
WriteRecord |
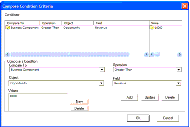
The business scenario for this tutorial dictates that when an opportunity's revenue is greater than $10,000, an activity is inserted for the sales representative to follow up with the customer. To determine whether this activity is inserted or not, you set condition criteria on the workflow's Decision step. To define condition criteria for the workflow's Decision step
- In the design canvas, double-click the Connector branch that connects the Decision step to the Siebel Operation step.
The Compose Condition Criteria dialog box appears.
- In the Compare To dropdown picklist, select Business Component.
- In the Operation dropdown picklist, select Greater Than.
- In the Object dropdown picklist, select Opportunity.
- In the Field dropdown picklist, select Revenue.
- In the Values box, click the New button to add a new value.
- In the Add Value dialog box, type "10000" and click OK.
- In the Compose Condition Criteria dialog box, click the Add button.
The conditions you have set in the Compose Condition Criteria dialog box appear as shown in Figure 9.
Figure 9. Condition Criteria for "Insert Activity to Follow Up" Siebel Operation Step
|
|
- Click OK.
To validate the workflow process
- In the Palette Designer, right-click and select Validate.
The Validate dialog box appears.
- Click Start.
"Starting validation..." appears in the bottom-left corner of the Validate dialog box.
- If the validation is successful, there are no errors to report and in the bottom-left corner of the dialog box, a message reads, "Total tests failed: 0."
NOTE: See Using the Validate Tool to Correct Errors in Workflow Processes for a list of possible errors.
- Click Cancel to exit the Validate dialog box.
Testing Your Workflow Process
In this section of the tutorial, you simulate the workflow process you created in Designing Your Workflow Process. In this tutorial, you complete the following sequence of tasks to test your workflow process:
- Before you can test your workflow process, you must create an opportunity that matches your test criteria. You create this opportunity, and make note of its row ID. This row ID is then used in the workflow process properties to run the test. See To prepare for testing the workflow process.
- You start the simulation process with the Simulate command, and then you set the Debug properties for the run-time client. See To begin your test of the workflow process.
- You run the Process Simulator in Siebel Tools by using the Start, Next Step, and Stop buttons. See To run the Process Simulator.
To prepare for testing the workflow process
- Launch Siebel Call Center logging in as SADMIN/SADMIN to the Sample database.
- From the application-level menu, choose Navigate > Site Map > Opportunities.
- Add an opportunity with the following properties:
Name |
77 Workflow Large Test Opportunity |
Revenue |
$400,000 |
- From the applet-level menu, choose About Record to find the row ID for the opportunity in the Row # field. Make a note of this row ID.
- In Siebel Tools, in the Palette Designer, right-click and select Show Process Properties.
- In the WF Process Props list applet, select the Object Id record.
- In the Default String field, insert the row ID value you noted in Step 4.
To begin your test of the workflow process
- In the Palette Designer, right-click and select Simulate.
A read-only version of the workflow process diagram now shows where the Palette Designer appeared previously. The simulation buttons (Start, Next Step, Continue, and Stop) appear above the workflow process diagram.
Because the simulator in Siebel Tools begins by launching an instance of the run-time client, you must first set the appropriate Debug properties.
- Set the Debug properties for your run-time client, as follows:
- In Siebel Tools, navigate to View > Options > Debug.
- Set the following properties for your run-time client:
Executable |
C:\sea77\client\BIN\siebel.exe
|
CFG file |
C:\sea77\client\BIN\ENU\uagent.cfg
|
Browser |
C:\Program Files\Internet Explorer\iexplore.exe
|
Working directory |
C:\sea77\client\BIN
|
Arguments |
/h |
User name |
SADMIN |
Password |
SADMIN |
Data source |
Sample |
- Click OK.
To run the Process Simulator
- In the read-only version of the workflow process diagram, click the Start button.
The simulation process begins, and a debug instance of your run-time client is launched. This can take several seconds.
Once the debug instance is launched, you are automatically navigated to your Inbox in the run-time client.
- In your Inbox, navigate to Submitted Items List to find the Debug Workflow record.
- Click the Debug Workflow hyperlink.
- In Siebel Tools, view the read-only version of the workflow process diagram.
The Start step icon is selected, the Start simulation button is unavailable, and the other simulation buttons are active.
- (Optional) In order to see additional information as you simulate your workflow process, in the Palette Designer, right-click and select Watch Window.
You can hide the Watch window at any time by right-clicking and selecting Hide Watch Window.
- Click the Next Step button to continue simulating the workflow process.
In the read-only version of the workflow process, the Siebel Operation step icon is selected.
- Click the Next Step button again to continue simulating the workflow process.
- Click the Stop button to end the simulation.
- From the application-level menu in the run-time client, choose Navigate > Site Map > Opportunities > Activities to see your test opportunity.
If an Activity record has been generated, the simulation of your workflow process was completed successfully.
Deploying Your Workflow Process
When you have finished a successful simulation of your workflow process, you are ready to deploy it. To deploy the workflow process
- In Siebel Tools, in the WF Process Props list applet, scroll to the Object ID process property for your workflow process.
- In the Default String field for the Object ID process property, delete the row ID.
- In the Palette Designer, right-click and select All Processes.
- Select your workflow process record and click the Deploy button.
The Status of the workflow process changes to Completed.
- From the application-level menu in the run-time client, choose Navigate > Site Map > Administration - Business Process > Workflow Deployment.
- In the parent applet, select your workflow process and click the Activate button.
In the child applet, your workflow process record shows a status of Active. You may need to refresh the list of records to see this newly updated status. To refresh the list, perform a null query in the child applet.
|