|
Siebel Business Process Framework: Workflow Guide > Example Workflow Processes > Example Workflow Process That Creates an Activity for a Sales Representative >
Defining The Workflow Process
Perform the procedures included in this topic to create a workflow process for this example. Make sure you perform the procedures in the order they are presented. Creating a New Workflow Process Object Definition
To start creating a new workflow process, you first define a new workflow process object definition. To create a new workflow process object definition
- In the Object Explorer in Siebel Tools, choose the Project object type.
- In the Projects Object List Editor (OBLE), create a new project named Workflow Examples.
- Make sure the Locked property contains a checkmark.
For brevity, note that example workflow processes in this book use the Workflow Examples project. In a development environment, you should use a project that most closely fits your development requirements. For more information, see Using Siebel Tools.
- In the Object Explorer, choose the Workflow Process object type.
For more information, see About the Workflow Process Object Hierarchy.
- In the Workflow Processes OBLE, right-click then choose New Record to create a new workflow process object definition using values described in the following table:
Property |
Value |
Process Name |
Large Opportunity Creates Activity |
Workflow Mode |
Service Flow |
Business Object |
Opportunity |
Project |
Workflow Examples |
For more information, see Reference of Workflow Process Object Definition Properties.
- From the application-level menu, choose File > Save.
Adding Steps and Connectors to a Workflow Process
This topic describes how to add steps and connectors to a workflow process. To add steps and connectors to a workflow process
- In the Workflow Processes OBLE, right-click the record you created in Creating a New Workflow Process Object Definition, then choose Edit Workflow Process.
- Add steps and connectors until your workflow process resembles the workflow illustrated in the following diagram:
For more information, see About Workflow Process Steps and Connectors, and Diagramming a Workflow Process.
- Click the Decision Point, then use the Properties window to change the Name property to the value described in the following table:
Property |
Value |
Name |
Is Opportunity Over 10k? |
The Properties window is context-sensitive. When you click a step or connector in the design canvas, the step's or connector's properties are displayed in the Properties window.
If the Properties window is not visible, right-click a step, then choose View Properties Window.
- Clicking each remaining step in succession, use the Properties window to change each step's Name property according to values described in the following table:
Step Type |
Name Property |
Siebel Operation |
Insert Activity to Follow Up |
End |
End |
- Clicking each connector in succession, use the Properties window to change the connector's Name property according to values described in the following table:
Connector |
Name Property |
Between the Start Step and the Decision Point |
Evaluate Oppty |
Between the Decision Point and the Siebel Operation |
Yes |
Between the Decision Point and the End step |
No |
TIP: Note that the connector emanating from the Start step defaults to the name Connector 0. In some cases you can suppress this text. To suppress the text label for a connector, right-click the connector then choose Edit > Hide Text.
- From the application-level menu, choose File > Save.
Next, define properties and arguments for workflow process steps. Defining Properties and Arguments for a Workflow Process Step
In this topic, you define properties for workflow process steps. To define properties for workflow process steps
- Click the Insert Activity to Follow Up step, then use the Properties window set properties using values from the following table:
Property |
Value |
Business Component |
Action |
Operation |
Insert |
- With the Insert Activity to Follow Up step still chosen, add an input argument in the MVPW using values from the following table:
Field Name |
Type |
Value |
Description |
Literal |
This is a large opportunity. Please call the customer ASAP. |
For more information, see About Process Properties.
Note that you must first specify the Field Name, then the Value.
- Add a second process property using values from the following table:
Field Name |
Type |
Value |
Type |
Literal |
To Do |
Defining the Invocation Mechanism for a Workflow Process
In this topic, you define the run-time event that invokes the workflow process. To define the run-time event that invokes the workflow process
- Choose the No connector, then use the Properties window to make sure the Type property is set to Default.
- Choose the Yes connector, then set the Type property to Condition.
- In the design canvas, click the Evaluate Oppty connector then use the Properties window to set properties using values from the following table:
Property |
Value |
Event Object Type |
BusComp |
Event Object |
Opportunity |
Event |
WriteRecord |
Type |
Default |
When defining these properties, enter them in the top to bottom order displayed in the table. Since Event Object and Event are context sensitive, based on the value entered in Event Object Type, you must define Event Object Type first.
The business scenario dictates that when an opportunity's revenue is greater than $10,000, an activity record for the sales representative to follow up with the customer is inserted in the Activities view. You define this logic by using condition criteria on the decision point. Next, you define the condition criteria for the workflow process. Defining Condition Criteria for the Workflow Process
in this topic, you define the condition criteria for the workflow's Decision Point. To define condition criteria for the workflow's Decision Point
- In the design canvas, right-click the Yes connector, then choose Edit Conditions.
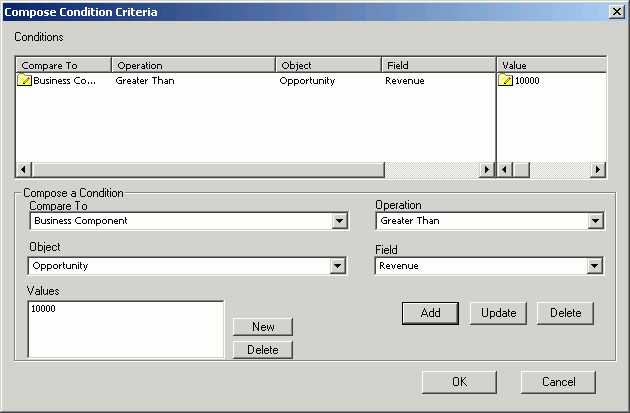
The Compose Condition Criteria dialog box appears. Conditional logic can be defined for a connector emanating out of a Start Step, Decision Point, Wait Step, or User Interact Step. Note that condition criteria is defined on the connector emanating from a step. It is not defined directly on a step.
- In the Compare To dropdown picklist, choose Business Component.
The Compare To picklist is used to indicate whether an object, expression, or process property used in the comparison. In this example, the comparison is made against the run-time value of a field from the Opportunity business component, as specified in the Object picklist. Note that the items in the Object picklist are context sensitive: they change based on the value chosen in the Compare To picklist.
- In the Object dropdown picklist, choose Opportunity.
- In the Operation dropdown picklist, choose Greater Than.
The Operation picklist in this example is used to specify that the condition applies if the value defined in the Values section of the Compose Condition Criteria dialog is Greater Than the run-time value of the business component Revenue field. The Revenue field is specified in the Field picklist.
- In the Field dropdown picklist, choose Revenue.
- In the Values box, click the New button to add a new value.
- In the Add Value dialog box, type 10000, then click OK.
- In the Compose Condition Criteria dialog box, click the Add button.
The condition you defined in the lower portion of the Compose Condition Criteria dialog is added to the Conditions list in the upper portion of the dialog. At this point, you can add more criteria. For this example, you only add a single condition criteria.
The condition you set in the Compose Condition Criteria dialog box is displayed in the following image:
If the Revenue field on an Opportunity is greater than 10000, then the Yes branch is taken, otherwise the No branch is taken.
- Click OK.
- From the application-level menu, choose File > Save.
Modifications you can perform after defining a condition include:
- To update a condition, click the condition in the Conditions window of the Compose Condition Criteria dialog box, modify the condition, then click Update.
- To delete a condition, click the condition in the Conditions window of the Compose Condition Criteria dialog box, then click Delete.
For more information, see Defining Conditional Logic on a Branch Connector. Next, you test the workflow process.
|