| Bookshelf Home | Contents | Index | PDF | |
|
Siebel Events Management Guide > Registering for an Event > Registering an Account (for Finance customers)You can control which contacts can register for an event by registering an account and issuing invitations to specific contacts associated with that account. Control of which contacts can register is determined by the registration status value you select for the account. The status value that affects account contacts' (namely, company employees) ability to register is Invited. If the account is registered for the event with a status of Invited, all contacts associated with the account can view the event listing on the Events Web site home page and register for the event. Once an account is registered, the contacts themselves are not registered until action is taken to register individual attendees or attendee lists. An individual attendee can be registered by yourself, the administrator, as described in Registering an Attendee, or by the contact, as described in End-User Procedures for Self-Registering for an Event. A contact list can only be registered by an administrator, as described in Registering One or More Attendees. It is important to note that an individual attendee can still be invited directly to an event, whether or not that attendee's account is registered for the event. If an attendee registers for an event prior to the attendee's account being registered for the event, the account is automatically registered for the event with a status of Restricted Invite. Additional considerations for registering accounts are as follows:
The following procedure describes how to register an account for an event. To register an account for an event
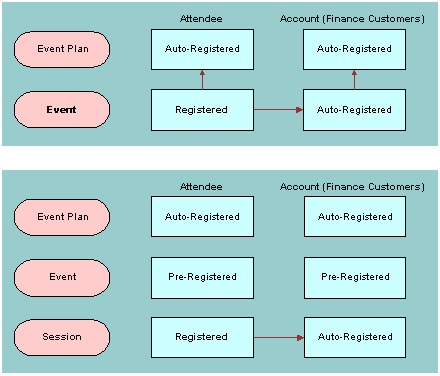
Registration WorkflowSiebel Events Management uses workflow rules to eliminate redundant data entry during the registration process.
Figure 4 illustrates the process for attendee event registration. NOTE: Pre-Registered in the preceding workflow indicates that the attendee has already been registered. The event plan and event registration records do not remain synchronized throughout the event management process. If you register an attendee in error, the workflow process still creates a corresponding registration record for the: If you recognize this error and manually delete the individual from the Attendees list, no further workflow is engaged. If you want to eliminate all history for the erroneous registration, you also need to manually delete the individual from the Attendees list for the parent event. You will also want to check to see whether any other employees from the account have been registered. If not, you will want to delete the registration records that were created for the account when you erroneously registered the account employee. The account attendee records are created at both the event plan and event levels. Maintaining up-to-date account attendee records is important because:
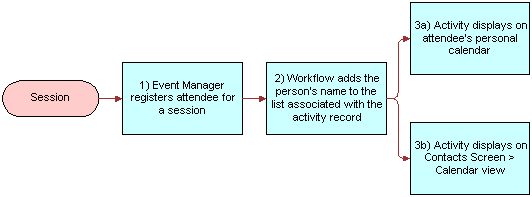
NOTE: Registered contacts continue to see the event in the My Events list. Session Registration and Activity RecordsAs part of session management, the workflow performs the following tasks:
These workflow activities are generated so that all internal employees who are registered for a session can see that session displayed on their personal calendar within the Siebel application (shown in the Calendar screen). In addition, for all external contacts who are registered for a session, an Activity of Type = Session shows on the contact-centric calendar, which is found in the Contacts screen, Calendar view. Figure 5 illustrates the workflow triggered during session registration. Removing a Session ActivityIf you register an attendee for a session in error, you need to remove the session activity from the attendee's personal calendar. This requires deleting the individual from the Attendee's list for the session, then removing the attendee's name from the Contacts field in the Activities form. The following procedure describes how to remove a session activity from an attendee's personal calendar. To remove a session activity from an attendee's personal calendar
Troubleshooting RegistrationIf you are experiencing difficulty submitting credit card information using the Shopping Cart, make sure that Siebel Events Management is properly configured for the database software in use. For more information, see Installing and Configuring Events Management. Canceling Registrations and Using the Waiting ListIn Siebel Events Management, registration can only be canceled from administrative screens. End users that want to cancel their event or session registration must contact the organization holding the event and ask that an administrator cancel the registration. When an event registration is canceled, all registrations for specific events and sessions associated with the event are canceled as well. Likewise, if an event registration is canceled, so are all registrations for specific sessions of the event. However, if a session registration is canceled, the event registrations are not canceled. When the administrator cancels a registration for an event or session that is full, a seat becomes available. However, in some cases, it may be desirable to prevent a seat from becoming available. To prevent a seat from becoming available, the administrator should reduce the capacity immediately prior to canceling the registration. If the capacity is not reduced, and a seat becomes available, it is allocated to the next user whose registration is added by the administrator or whose registration status is changed from Waitlisted to Confirmed, whichever comes first. In other words, after a seat becomes available, it is recommended that administrators immediately change the registration status of the next wait listed person to Confirmed. Otherwise, a new registrant may accidentally be given the seat designated for the wait listed person. The following procedure describes how to cancel an event registration from an administrative screen. To cancel a potential attendee's registration for an event
After canceling a registration, the Event form shows that Openings increased by one and Seats Taken decreased by one. You can give the new seat to the first person on the waiting list, as described in the following procedure. To do this, you first identify the person on the waiting list who has the oldest claim to an open seat. Next, you confirm their interest and availability for the event. Then, you change that person's registration status from Waitlisted to Confirmed. The following procedure is specific to an event, however, the concept can also be applied to an event or a session registration. To allocate an open seat to a person on the waiting list
|
 |
|
| Siebel Events Management Guide |