| Bookshelf Home | Contents | Index | Search | PDF | |
Siebel Consumer Sector Guide > Product Distribution > Administrator Procedures >
Setting Up Sizes, Size Scales, and Size Distributions
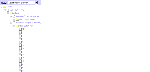
The seed data included with Siebel Consumer Sector applications contains an LOV type called SIZE_RUN_TYPE to support the creation of size scales and size distributions. The SIZE_RUN_TYPE type consists of a two-level hierarchy of values, as shown in Figure 2. The first-level value specifies the products or product lines that are to be given size values, such as apparel, footwear, belts, or hats. The seed data includes the types Apparel and Footwear. Each of these values has a second level, or Child List of Values, which specifies the complete range of sizes for the products or product lines. Examples of ranges of sizes for an Apparel size type would be 2, 4, 6, 8 and S, M, L, XL. These values could also include sizes for footwear product lines.
NOTE: Size scales and size distributions can be created only for products of type AF.
Creating Size Type Values and a Child List of Values
To set up sizes and size distributions, you must complete the SIZE_RUN_TYPE LOV hierarchy by performing the following tasks, in this order:
- Create any additional size type values needed for each of your company's lines of business or product lines.
- To each size type value, add all the possible sizes manufactured by your company.
If a size type encompasses products sold in countries with different size systems, the size type should include values for every size in which your products are available. For instance, for a size type representing shoes sold in both the United States and Great Britain, you might create values for sizes 5 through 15 and sizes 36 through 46.
For more information on adding types or changing values in the List of Values hierarchy, see Applications Administration Guide.
Creating a Size Scale
A size scale specifies a group of all the available sizes for a product or product line. A product or product line may have multiple size scales to reflect the various size conventions used in different parts of the world.
For instance, for men's shoe products sold in Europe, your company might use a size scale that includes nine sizes ranging from 39 to 47. For sales of the same shoes in North America, your company might use a size scale that includes nine sizes ranging from 5 to 13.
Another example of a size scale would be a product line that includes both T-shirts and dresses. You might create a size scale for the T-shirts consisting of the sizes XS, S, M, L, and XL, and a second size scale for the dresses consisting of the sizes 2, 4, 6, 8, 10, 12, and 14. Both size scales would be a women's apparel product line, but their values would differ greatly.
NOTE: The size values within a size scale can include only those specified in the SIZE_RUN_TYPE list of values hierarchy. For information on creating this hierarchy, see Setting Up Sizes, Size Scales, and Size Distributions.
To create a size scale
- From the application-level menu, choose View > Site Map > Data Administration > Size Scale.
The Size Scale and Size Range lists appear.
- In the Size Scale list, add a new record and complete the necessary fields.
Some of the fields in the Size Scale list are described in the following table.
- With the record you created in Step 2 selected, add a new record in the Size Range list and complete the necessary fields.
Some of the fields in the Size Range list are described in the following table.
- Repeat Step 3 for every size available for the selected size scale for that product or product line.
Creating Size Distributions
A size distribution specifies quantities for each size within an apparel or footwear product type. Typically, a size distribution is created to reflect historical consumption trends. For example, the size distribution for men's casual shirts might specify the following size proportions: two smalls, three mediums, four larges, and two extra-larges.
Account representatives or buyers can use size distributions to facilitate the allocation of their products' appropriate size quantities when assembling a quote. The user selects a size distribution and a multiplier for each of the products the user is including in a quote. The application then uses the size distribution proportion and the quote multiplier values to calculate size-specific quantities and total quantities for each product.
Size scales must be created before size distributions. For information on creating size scales, see Creating a Size Scale.
To create a size distribution
- From the application-level menu, choose View > Site Map > Data Administration > Size Distribution.
The Size Distribution and Size Distribution Proportion lists appear.
- In the Size Distribution list, add a record, complete the necessary fields, and step off this record to populate the child Size Distribution Proportion list.
- In the Size Distribution list, reselect the record you just created.
- In the Size Distribution Proportion list, add a new record.
- Select a Size value.
- Enter a quantity in the Size Proportion column.
| Bookshelf Home | Contents | Index | Search | PDF | |
Siebel Consumer Sector Guide Published: 18 April 2003 |