| Bookshelf Home | Contents | Index | Search | PDF | |
Siebel Web Client Administration Guide > Configuring and Using Mobile Web Client >
User Synchronization Options for Mobile Web Client
This section describes user synchronization options supported by Siebel Remote and Siebel Mobile Web Client.
Users access synchronization options by doing either of the following:
- Selecting File > Synchronize > Database from the application-level menus in the Siebel application.
- Starting Siebel Remote in stand-alone mode. The stand-alone synchronization feature allows mobile users to synchronize their local databases with the server database without starting the Siebel application.
Synchronization occurs in the background, so you can continue to use Siebel applications during synchronization.
The auto-synchronization option for running Siebel Remote in stand-alone mode helps maintain the frequency of synchronization. After initializing their local databases, mobile users enable or disable auto-synchronization by choosing View > User Preferences > DB Synchronization. For more information, see Using Auto-Synchronization.
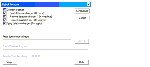
Synchronization Dialog Box
The Siebel Remote synchronization dialog box shown in Figure 2 contains a list of synchronization actions.
Depending on your database options, the list may appear different from that in the example. For instance, if you do not have a local database, the dialog box may contain only the Connect to Server action.
Synchronization Actions
This section describes the available synchronization actions in the Siebel Remote synchronization dialog box.
- Connect to server. Connects to the server, dials the phone number if necessary, and performs version, schema, and database initialization checking. If a Local Database Initialization (dbinit) or upgrade is pending, this action downloads and applies the pending Local Database Initialization or upgrade.
This action must run successfully for the following three actions to be invoked: Send database changes, Retrieve database changes, and Retrieve requested files.
- Send database changes. Sends the local transactions to the server by sending one or more DX files and associated attachment files to the server. This action displays the number of transactions that still need to be sent.
- Retrieve database changes. Retrieves transactions from the server by retrieving one or more DX transaction files and associated attachment files from the server. These files are generated by the Transaction Router on the Siebel Remote Server. This action displays the number of transactions that still need to be retrieved.
- Retrieve requested files. Retrieves user-requested attachment files from the server. This action displays the number of files that still need to be retrieved.
- Apply database changes. Applies database changes retrieved from the server to the local database. This action displays the number of transactions that still need to be applied.
Synchronization Action States
In the Siebel Remote synchronization dialog box, you can enable or disable each action by checking the check box to the left of the action. Explanations of the possible check box states are shown below:
While an action is running, you can click the check box for the action to disable it before the action has finished. If an action is running when you disable it, it stops as soon as possible, and synchronization continues with the next action.
The action status check boxes persist throughout the session. If you start synchronization with the option Apply database changes disabled, it remains disabled throughout synchronization. If you restart Siebel applications, the action status check boxes return to their default state (enabled).
Item Status Field
The word pausing appears in the Item Status field. Actions are made up of one or more items and may be hidden. The items (and sub-items) that appear in this field update the synchronization status for the user. Below the Item Status field is the item progress indicator, which indicates the remaining processing time for the item.
NOTE: The progress indicator provides reasonably accurate time estimates for long-running items, such as transferring files or merging transactions, but less accurate estimates for short-running items, such as connecting to the server or database.
Skip File Button
The Skip File button is enabled whenever synchronization is performing an item or sub-item that is not critical to the current action. Retrieving an optional attachment file is the only action that can be skipped. Clicking this button skips the current item or sub-item, and the current action continues. Double-clicking this button generates a prompt and skips all remaining optional items for this action.
Overall Transfer Progress Panel
This panel appears when communications with the server are active. The progress indicator displays the progress toward completing the actions that require the communications line.
Transfer Time Remaining Field
This field contains the estimated time for completing the actions.
NOTE: The estimated time may be inaccurate when large attachment files are transferred.
Synchronize/Stop Command Button
The Synchronize button starts synchronization. You can click this button even while synchronization is still performing hidden actions, such as connecting to the local database and extracting local database changes. When you click this button, the synchronization dialog box is hidden (unless SHIFT is held down), and the label on the button changes to Stop.
Clicking the button again (Stop) stops synchronization if it is still running. When synchronization finishes, the button changes to OK. Clicking the button again hides the synchronization dialog box.
If the dialog box is hidden while synchronization is running, invoking synchronization redisplays the dialog box. If synchronization is finished, invoking synchronization resets and redisplays the dialog box.
Cancel/Hide Button
Clicking the Synchronize button automatically hides the synchronization dialog box, unless you hold down SHIFT when you click the button. If the dialog box is hidden, you can redisplay it by clicking the corresponding icon in the system tray.
If the synchronization dialog box is displayed:
- If synchronization has not started, clicking Cancel closes the synchronization dialog box and aborts synchronization.
- If synchronization has started, the label on this button changes to Hide. Clicking this button hides the synchronization dialog box.
Setup Button
Clicking the Setup button displays the Docking Preferences dialog box. The two File options control which files to synchronize. File options can be changed while synchronization is running.
- Retrieve Published Files Box. When this check box is selected, synchronization retrieves all newly published files.
- Retrieve Auto Update Files Box. If this check box is selected, synchronization retrieves updates to local files marked for auto-update. Auto-update files that are not local or have not been requested are not retrieved.
The auto-update flag is local to each node, so users can choose to update files automatically, without affecting other users. If you do not choose the Retrieve Auto Update Files option during this synchronization session, then synchronization marks the files that need to be updated. Synchronization then makes all auto-update files current during the next session, when Retrieve Auto Update Files is enabled.
When the Mobile Web Client receives a transaction on a file table, synchronization decides whether to retrieve the file locally. The default is not to download files to the Mobile Web Client unless the file is requested. File screens generally have a request field that users can select to download the file during the next docking session (if the Retrieve Requested Files action is enabled). Files are also uploaded to the server by docking.
If you change a file, you must upload the new file with the transaction to make the corporate database consistent. These files are stored near the corporate database on a file server. Name files carefully to avoid conflicts, such as two users attempting to modify a file at the same time.
- Dial-up Networking Connection. The Connection box allows users to select a dial-up networking connection. Leaving the box blank causes synchronization to use an existing network connection. Changes to the dial-up networking options takes effect the next time synchronization makes a connection to the server.
- Auto-Start Siebel Remote Box. If this check box is selected, Siebel Remote begins synchronization as soon as you invoke synchronization. The Siebel Remote synchronization dialog box is not displayed. If you want to display the dialog box throughout your session, press SHIFT when you click Start.
Using Auto-Synchronization
Auto-synchronization increases the frequency of synchronization sessions, thereby decreasing the volume of transactions for each session and shortening the average connect time.
The Auto-Synchronization Agent runs in the background at scheduled times to perform automatic synchronization when the user is connected to the network.
Follow the procedure below to invoke auto-synchronization and the available options. One of the options is a synchronization reminder that prompts the user to synchronize if a specified period passes without a synchronization session.
The Siebel Autosync shortcut is installed in the Startup folder when the Siebel client is installed. This enables the Auto-Synchronization Agent to be launched when the Windows session is started.
NOTE: Auto-synchronization can be enabled only if a local database exists on the client machine.
To enable auto-synchronization
- Verify that the local database is initialized.
- Log into the local database, and navigate to View > User Preferences > DB Synchronization.
- Choose one of the available Auto-Synchronization options listed in Table 10.
- Specify a value for the Synchronization Frequency picklist, as listed in Table 11, then complete other relevant options in this section.
- In the Synchronization Reminder form, check or pick the following:
- Enable Synchronization Reminder. Appears when the Mobile Web Client is running, and if the last synchronization was earlier than the minimum days between synchronization sessions.
Reminds the user to perform synchronization by displaying the message "Perform database synchronization now?" Respond accordingly.
- Min Days Between Sync Sessions. Specifies the minimum number of days between synchronization sessions.
| Bookshelf Home | Contents | Index | Search | PDF | |
Siebel Web Client Administration Guide Published: 18 June 2003 |