| Oracle® BPEL Process Manager Developer's Guide 10g (10.1.3.1.0) Part Number B28981-03 |
|
|
View PDF |
| Oracle® BPEL Process Manager Developer's Guide 10g (10.1.3.1.0) Part Number B28981-03 |
|
|
View PDF |
This chapter provides an overview of key BPEL process deployment and domain management concepts. An overview of Oracle BPEL Control from which you can manage processes and domains is also provided. In addition, an overview of several build and command line tools is also provided.
This chapter contains the following topics:
See Also:
The following documentation for tutorials in which you deploy BPEL processes:After you complete the design of your BPEL process, you compile and deploy the process to Oracle BPEL Server. If compilation and deployment are successful, you can run and manage the BPEL process from Oracle BPEL Control.
Deployment sends the Oracle BPEL Process Manager archive (a set of files in a JAR file with a directory structure similar to the project directory structure) to Oracle BPEL Server. The deployment operation automatically validates and compiles the project directory into the BPEL archive. Therefore, you do not need to explicitly validate, compile, and recompile a project before deployment. Use Oracle BPEL Control to view any currently running BPEL processes before compiling and deploying additional processes.
BPEL processes can be compiled and deployed in Oracle JDeveloper.
Note:
You must wait for deployment of one BPEL process to complete before attempting to deploy another process. Attempting to deploy a second process while the first process is still deploying can cause problems.To compile and deploy a BPEL process in Oracle JDeveloper, right-click the BPEL project (for this example, named OrderBooking) in the Application Navigator and select Deploy:

You have two deployment methods from which to choose:
You can deploy directly to the default domain or any other domain you have created by using an integration server connection.
Domains enable you to partition and manage instances of your processes. A discussion on the importance of domains is provided later in this chapter.
If this is the first time you have deployed this BPEL process to Oracle BPEL Server, a default version label of 1.0 is automatically created. A version identifies a specific deployed instance of a BPEL process. The version label is appended to the end of the JAR file name created when you deploy the BPEL process.
If this label version is already deployed and the server mode is production, you are prompted to either overwrite the existing version or enter a different version label:
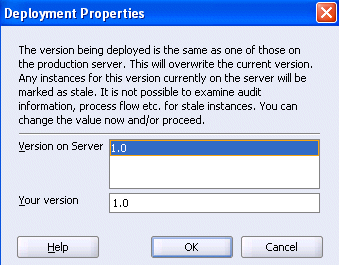
If you overwrite the version, the old process definition on the server is replaced by the new definition. You cannot revert to the old definition. In addition, any process instances that ran under the old definition are marked as stale. The stale instances cannot be examined, and all flow and audit information is lost. If you enter a different version label for the new process definition (for example, 2.0), it is deployed to Oracle BPEL Server, while the older, deployed process definition (1.0) also continues to run simultaneously on Oracle BPEL Server. The instances that ran under the old definition are retained, and not marked as stale. You can still examine the flow and audit information for these instances.
If the server mode is development, you are not prompted and the version is automatically overwritten.
This is a key benefit of versioning. For example, you may have an older instance of a BPEL process running with one customer that is still valid. You then begin a partnership with a different customer that requires a slight modification to the design of this BPEL process. At some point you plan to migrate the old customer to the newer version of the BPEL process, but for now that is not necessary. Versioning enables you to run both processes.
If you want to use a more descriptive version name for a process, right-click the process again in the Application Navigator and select Deploy > connection_name > Deploy to domain_name domain. Provide a more descriptive name when prompted in the Your version field of the Deployment Properties window (for example, sales_div_1.0). You can then retire the other process version on Oracle BPEL Control.
If you select BPEL Process Deployer, the BPEL Process Deployer window opens. This window enables you to customize your settings by selecting a different or creating a new Oracle BPEL Server connection and deploying to domains other than default. If this process version is already deployed, you can also select to overwrite the existing version or enter a different version label to enable both to run simultaneously.
After you select a deployment method, the Log Window at the bottom of Oracle JDeveloper displays messages about the status of the deployment. For example, the following message under the Messages tab indicates that deployment was successful.

The following message under the Apache Ant tab also indicates that deployment was successful.

Caution:
Use caution when reusing version labels in a production environment, due to the potential loss of data. In a development environment, it can be useful to reuse version numbers to avoid creating unnecessary revisions of the process on Oracle BPEL Server.If deployment is unsuccessful, errors display in the Log Window. Click the error to display the line of code that caused deployment to fail.
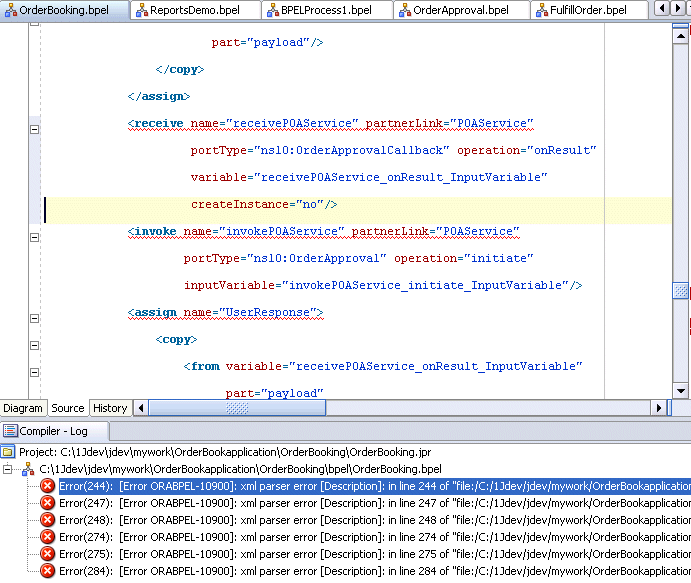
Make corrections and redeploy.
See Also:
Oracle BPEL Process Manager Order Booking Tutorial and Oracle BPEL Process Manager Quick Start Guide for instructions on creating integration server connections
You can also compile without immediately deploying an Oracle BPEL Process Manager archive to Oracle BPEL Server. Perform this action by right-clicking the BPEL process and selecting Make or Rebuild. This places the Oracle BPEL Process Manager archive in the following directory:
JDev_Oracle_Home\jdev\mywork\my_application\project_name\output
From this directory, you can deploy the process in either of two ways:
Copy the archive to the appropriate domain directory (for this example, default)
SOA_Oracle_Home\bpel\domains\default\deploy
or
Log into Oracle BPEL Control by selecting Start > All Programs > Oracle - Oracle_Home > Oracle BPEL Process Manager > BPEL Control.
Click BPEL Processes.
Click Deploy New Process in the Related Tasks section.
Click Browse to select the BPEL suitcase JAR file for the process, then click Open.
Click Deploy.
Click the Dashboard tab to view the newly deployed process.
During compilation and deployment, the BPEL process archive and its components are compiled and packaged into a JAR file known as a BPEL suitcase. This JAR file includes the following files:
project_name.bpel file implementation of the process
project_name.wsdl file
bpel.xml deployment descriptor file
Any other local resources that are required, such as XML schemas, Java classes or libraries, and so on
The suitcase JAR file is deployed to the JDev_Oracle_Home\jdev\mywork\application_name\process_name\output directory. The suitcase JAR file name follows the convention of bpel_projectname_versionnumber.jar. For example:
bpel_LoanProcess_1.0.jar
When the testing and development phase of a BPEL process has completed, you are ready to deploy the process to a production environment. The configuration properties for the production environment are typically different from those for the development environment. For example, the partner link Web service URL for the production environment is typically different from the one used in the testing environment.
In previous releases, you resolved this conflict by modifying the bpel.xml deployment descriptor file or providing separate bpel.xml files for the development and production environments. This was a big effort if the bpel.xml file required many modifications or if you had multiple versions of bpel.xml that required modifications.
Beginning with this release, a customize ant task is provided that enables you to specify the property value for development and production environments in a single build file location. The customize task captures the changes between different versions of bpel.xml using the build file. This task can be used as a subtask of bpelc or as a standalone ant task. The bpelc subtask can contain multiple customize tasks. The customize task can contain multiple subtasks.
This section provides an end-to-end example of using the customize ant task.
Copy the target domain URL WSDL file of the partner link Web service to the directory in which the bpel.xml file for your BPEL process is located (for this example, IncrementService.wsdl is used).
Open the bpel.xml file in the same directory.
Modify the directory path for the IncrementService.wsdl file under the partnerLinkBinding element to indicate that this WSDL file is located in the same directory:
<?xml version="1.0" encoding="UTF-8"?>
<BPELSuitcase>
  <BPELProcess src="Invoke.bpel" id="Invoke">
    <partnerLinkBindings>
      <partnerLinkBinding name="client">
        <property name="wsdlLocation">Invoke.wsdl</property>
      </partnerLinkBinding>
      <partnerLinkBinding name="IncrementService">
        <property name="wsdlLocation">IncrementService.wsdl</property>
      </partnerLinkBinding>
    </partnerLinkBindings>
    <configurations>
      <property name="testIntroduction"><![CDATA[
 This BPEL process invokes a synchronous integer increment service.
 ]]></property>
    </configurations>
  </BPELProcess>
</BPELSuitcase>
Create a custom build.xml file in the same directory as the bpel.xml file and the IncrementService.wsdl file that uses the customize task. You specify properties for the host name, port, domain name, and process revision of the partner link Web service that map to values set in the ant-orapbel-properties file.
<?xml version="1.0" encoding="iso-8859-1"?>
<project name="bpel.deploy" default="compile" basedir=".">
     <target name="compile">
        <bpelc input="${basedir}/bpel.xml" out="${process.dir}/output"
               rev="${rev}" home="${bpel.home}">
            <customize>
                 <partnerLinkBinding name="IncrementService">
                     <property name="wsdlLocation">
                     http://${host_name}:${port_number}
                     /orabpel/${domain_name}
                     /IncrementService/${rev}/IncrementService?wsdl</property>
                 </partnerLinkBinding>
            </customize>
        </bpelc>
     </target>
</project>
Note:
You can use your own custom build properties file instead of the ant-orapbel-properties file. Ensure that you import the custom file in thebuild.xml file.Specify values for the host name, port, domain name, and process revision properties in the SOA_Oracle_Home\bpel\utilities\ant-orapbel-properties file.
#Development or production environment

host_name=jsmith-pc.us.oracle.com
port_number=80
domain_name=default
rev=1.0
# --------------------------------------------------
# END OF FILE
This single file is the only location that requires editing between the development and production environments. For example, if the host name for the production environment is different (for example, jwilliams-pc.us.oracle.com), you change it in this file.
Go into the main build.xml file located one directory above the bpel.xml, IncrementService.wsdl, and custom build.xml files.
Specify a new target name in the process-deploy section (for this example, the default target name of compile is changed to compile1).
<target name="process-deploy"
 depends="validateTask, compile1, deployProcess, deployTaskForm,
 deployDecisionServices" />
Create a new target name section below the target name. For this example, a section with a value of compile1 is specified that calls the custom build.xml script you created in Step 4. The target name section points to the bpel directory that includes the bpel.xml, IncrementService.wsdl, and custom build.xml files.
<target name="process-deploy"
 depends="validateTask, compile1, deployProcess, deployTaskForm,
 deployDecisionServices" />
    <target name="validateTask">
        <echo>
--------------------------------------------------------------
| Validating workflow
--------------------------------------------------------------
        </echo>
        <validateTask dir="${process.dir}/bpel" />
    </target>
    <target name="compile1">
        <ant dir="${process.dir}/bpel"/>
    </target>
     <target name="compile">
Deploy the BPEL process with ant.
ant process-deploy
Go to Oracle BPEL Control to see that all processes deployed correctly.
The customize ant task can be used to modify several types of properties. This section provides syntax examples of using the customize ant task with these properties.
By default, the bpel.xml file set in the build.xml file is used. You can also can specify custom input and output deployment descriptor files. This action modifies the specified input XML file and writes the results to the specified outFile. Table 19-1 describes the attributes to use.
Table 19-1 Attributes
| Attribute | Description | Required |
|---|---|---|
inFile |
Specifies the input XML file. When used as a subtask of bpelc, the default value is the deployment descriptor file (bpel.xml). |
No |
outFile |
Specifies the output XML file. When used as a subtask of bpelc, the default value of this is the deployment descriptor file (bpel.xml). |
No |
When used as a bpelc subtask, the customize ant task can add or modify configurations properties of the deployment descriptor.
<configurations>
  <property name="propName">propValue</property>
</partnerLinkBinding>
When used as a bpelc subtask, the customize ant task can add or modify properties of a partnerLinkBinding.
<partnerLinkBinding name="partnerLinkName">
  <property name="propName">propValue</property>
</partnerLinkBinding>
See Also:
"customize ant Task Example"When used as a bpelc subtask, the customize ant task can add or modify properties of an activationAgent.
<activationAgents name="actAgentName">
  <property name="propName">propValue</property>
</partnerLinkBinding>
BPEL processes (specifically, the suitcase JAR file) are deployed to domains. A BPEL domain allows a developer or administrator to partition a single instance of Oracle BPEL Process Manager into multiple virtual BPEL sections.
Here are some examples of how to use BPEL domains:
Partition a single Oracle BPEL Process Manager instance into a multideveloper environment. In this case, the domain ID typically identifies the developer owning that domain.
Partition a single Oracle BPEL Process Manager instance into both a development and QA environment. In this case, the domain IDs can be test and qa.
Partition a single Oracle BPEL Process Manager instance into an environment used by multiple departments or partners. In these cases, the domain IDs are the names of the departments or partners.
The following sections describe key BPEL domain issues:
Oracle BPEL Process Manager domain management and administration is performed from Oracle BPEL Control and Oracle BPEL Admin Console.
Beginning with this release, Oracle BPEL Control and Oracle BPEL Admin Console are secured with Oracle Application Server J2EE and JAAS security features. Access to BPEL domains is now protected through user IDs and passwords. In previous releases, only a password was required.
When Oracle BPEL Process Manager is installed, an initial domain named default is created. The initial password for accessing the default domain through Oracle BPEL Control or any domain you create is the same as that specified for the oc4jadmin user during installation. The procedural instructions described in this chapter for performing tasks use the oc4jadmin user.
You can also use the bpeladmin user or default user and their default password of welcome1 to access domains. The bpeladmin user provides access to all domains and the default user provides access to only the default domain.
The oc4jadmin, bpeladmin, and default users enable you to access Oracle BPEL Control through the following methods:
Selecting Start > All Programs > Oracle - Oracle_Home > Oracle BPEL Process Manager > BPEL Control
Going to the following URL:
http://localhost:port/BPELConsole
where port is:
8888 if you installed Oracle BPEL Process Manager from the Oracle Application Server SOA software CD.
9700 if you installed the Oracle BPEL Process Manager for Developers or Oracle BPEL Process Manager for OracleAS Middle Tier install type from the Oracle BPEL Process Manager software CD.
The oc4jadmin and bpeladmin users enable you to access Oracle BPEL Admin Console through the following URL:
http://localhost:port/BPELAdmin
You cannot access Oracle BPEL Admin Console with the default user. Both Oracle BPEL Control and Oracle BPEL Admin Console are described further in subsequent sections of this chapter.
See Also:
Security chapter of the Oracle BPEL Process Manager Administrator's Guide for additional details about Oracle BPEL Control and Oracle BPEL Admin Console users and the roles that provide access to domains
Oracle BPEL Process Manager Installation Guide for information about supported Web browsers
Passwords for the oc4jadmin, bpeladmin, and default users can be changed through Oracle Enterprise Manager 10g Application Server Control Console. Oracle recommends that you change the passwords for the bpeladmin and default users after installation.
See Also:
Oracle Application Server Administrator's Guide for instructions on changing the oc4jadmin, bpeladmin, and default passwords
Oracle BPEL Process Manager Administrator's Guide for additional details about Oracle BPEL Process Manager security
You can create additional domains by performing the following procedures.
Access Oracle BPEL Admin Console:
http://localhost:port/BPELAdmin
Enter the oc4jadmin username and password.
Click the BPEL Domains tab.
Click Create New BPEL Domain.
The Create New BPEL Domain window appears.
Follow the on-screen instructions to create a new domain with an ID.
Return to Oracle JDeveloper.
Right-click a process.
Select Deploy > connection_name > Refresh.
Select Deploy > connection_name > Deploy to domain_name domain.
where domain_name is the ID you entered in Step 5.
Log in to Oracle BPEL Control.
Select the new domain name from the drop-down list in the upper right corner of Oracle BPEL Control.
The process you deployed in Step 9 displays in the Dashboard tab.
Oracle BPEL Server is automatically installed in production mode. If you attempt to deploy a process in production mode and a label version of that process is already deployed, you are prompted to either overwrite the existing version or enter a different version label.
Follow these instructions to see the current mode of your server in Oracle JDeveloper.
Right-click the BPEL process in the Application Navigator.
Select Deploy > BPEL Process Deployer.
The Server Mode field of the BPEL Process Deployer window displays the mode.
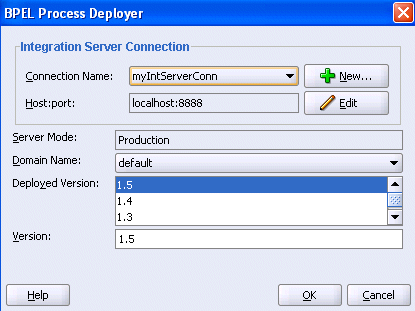
You can change this mode to development. When you attempt to deploy a process in development mode and a label version of that process is already deployed, it is automatically overwritten and you are not prompted to make a decision.
Follow these instructions to change the current mode of your server.
Access Oracle BPEL Admin Console:
http://localhost:port/BPELAdmin
Enter the oc4jadmin username and password.
Click the Server tab.
Change the productionServer property value to false.
Click Apply.
Return to the BPEL Process Deployer window. The Server Mode field now displays as Development.
In addition to the domain deployment methods described in "Compiling and Deploying a BPEL Process", there are other methods for deploying a BPEL suitcase into a domain:
If the domain is local, configure the deploy option of the bpelc ant task to perform local deployment to a specific domain. The following example shows an ant build script deploying the BPEL suitcase to a domain named qa:
<?xml version="1.0"?>
<project name="LoanFlow" default="main" basedir=".">
<property name="deploy" value="qa"/>
<property name="rev" value="1.0"/>
<target name="main">
<bpelc orabpelhome="${orabpelHome}" rev="${rev}" deploy="${deploy}"/>
</target>
</project>
If the domain is not local to the environment in which to compile the BPEL suitcase, use the Deploy New Process link under the Dashboard tab in Oracle BPEL Control to remotely upload and deploy a BPEL JAR file. Links to this task are located in the bottom-left portion of the Dashboard tab and bottom-left portion of the BPEL Processes tab. You can simply run the bpelc task without the deploy option to create the BPEL suitcase JAR in the current directory. If you have already deployed the BPEL suitcase locally, you can upload it from your local deployment directory. See "BPEL Suitcase JAR File" for more information on where deployed BPEL suitcases can be found.
Deploying a BPEL process is equivalent to copying the BPEL suitcase JAR file into the deploy directory of the appropriate BPEL domain. Even if you are accessing the domain remotely, all you need is disk sharing, FTP, secure copy (SCP), or some other access to the server hosting the domain. You can add this to your ant build.xml script to remove the deploy option as described above and then add your own task to perform the remote copy of the generated JAR file into the appropriate location.
Oracle BPEL Control enables you to manage the life cycle and state of a deployed BPEL process. Select the name of the BPEL process on the Dashboard tab and then select the Manage tab on the left. On this page you can first retire and then undeploy the selected BPEL process. Retiring a process prevents any new instances of that process from being created. If a specific version of a BPEL process is undeployed before all pending in-flight instances are completed, those instances are marked as stale and their execution is cancelled. Note that every task that can be performed in Oracle BPEL Control can also be performed programmatically.
If compilation and deployment are successful, you can run and manage the BPEL process from Oracle BPEL Control. This section provides an overview of the main pages of Oracle BPEL Control.
Log into Oracle BPEL Control by selecting Start > All Programs > Oracle - Oracle_Home > Oracle BPEL Process Manager > BPEL Control.
Enter the oc4jadmin username and password.
See the following sections for an overview of Oracle BPEL Control:
When you log into Oracle BPEL Control, the Dashboard tab displays by default. This page displays the currently deployed BPEL processes and instances of BPEL processes that are currently running (in-flight) and that have recently completed. Click a deployed BPEL process in the Name column to access a page for creating an instance and testing your process. Use Oracle BPEL Control to view any currently running BPEL processes before compiling and deploying additional processes. An asterisk identifies the version that is the default process. Default processes are described later in this chapter.
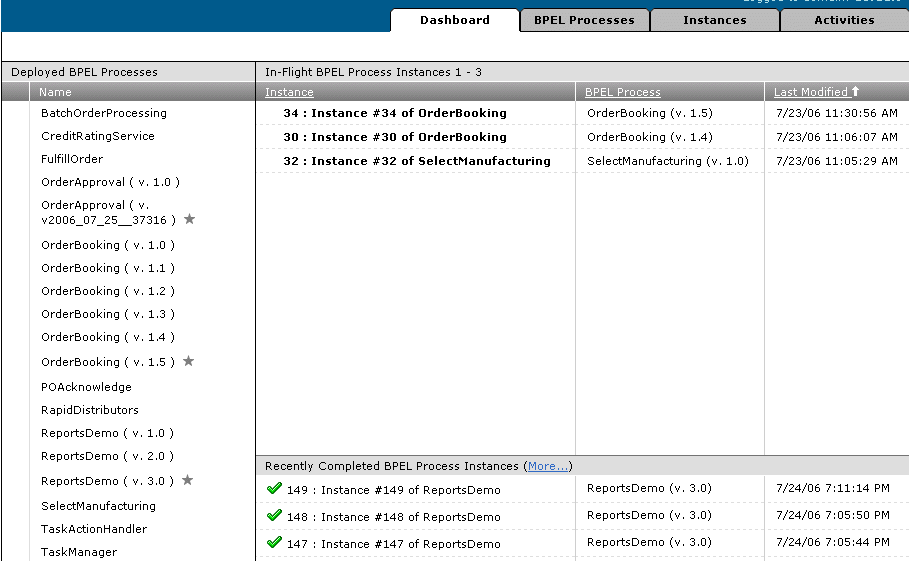
Each Oracle BPEL Control window includes links in the upper right corner for managing BPEL domains, accessing the BPEL site on the Oracle Technology Network, and switching to another domain. The domain into which you are currently logged is always displayed. When Oracle BPEL Process Manager is installed, an initial domain named default is created. You can create additional domains. A drop-down list enables you to access any of these domains.
Click the Domain list to display a list of available domains.

Select an appropriate domain to access (for this example, sales).
The Dashboard tab of the selected domain appears without prompting you to enter the password.
Click the BPEL Processes tab to view BPEL process life cycles and states. Note that different version labels of OrderBooking are currently active. A process identified with an asterisk (for this example, OrderBooking version 1.5) is the default process.
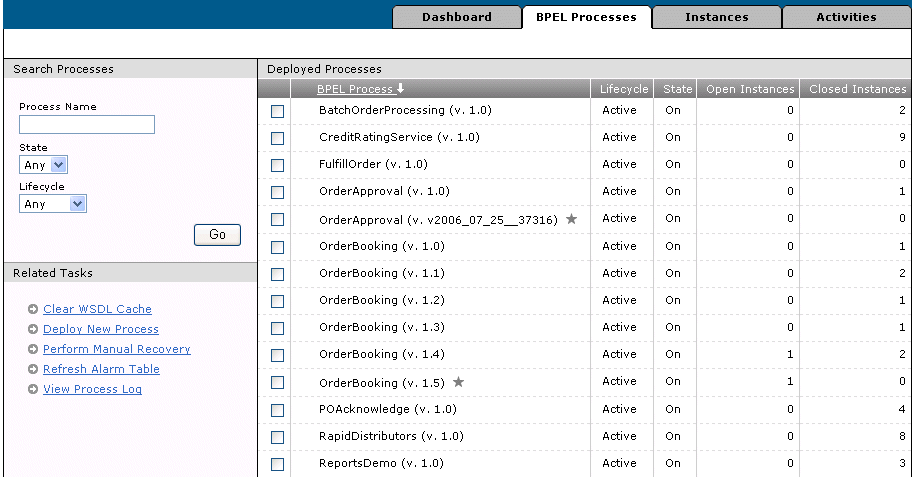
Instructions for using the sections of the BPEL Processes tab are listed in Table 19-2.
Table 19-2 BPEL Processes Tab
| For This Section... | See... |
|---|---|
| Clear WSDL Cache | "Clearing the WSDL Cache" |
| Deploy New Process | "Deploying New Processes" |
| Perform Manual Recovery | "Performing Manual Recovery" |
| Refresh Alarm Table | "Refreshing the Alarm Table" |
| View Process Log | "Viewing the Process Logs" |
| Deployed Processes | "Managing the Process Life Cycle" |
Click Clear WSDL Cache to clear the cache for all WSDLs of the selected domain.
Click Deploy New Process to deploy BPEL processes from Oracle BPEL Control instead of using Oracle JDeveloper.
Click Perform Manual Recovery to perform a manual recovery of messages. For example, if you are using the file adapter and your system server crashes while inbound messages are being processed, you can manually perform recovery when the server restarts to ensure that all message records are recovered. For example, a file has ten messages and the server crashes after three messages have been processed. This causes the fourth message to go undelivered. When the server restarts and begins processing with message five (the offset of the last successfully rejected message), you can manually recover message four to ensure that all messages are preserved.
Click Refresh Alarm Table to refresh the alarm table for the selected domain. This registers all pending wait/onAlarm activities with the system.
Click View Process Log to view the events of all BPEL processes in the selected domain (for example, when a process was compiled, undeployed, marked as the default instance, and so on).
This section describes how to manage the life cycle of a process.
Click a specific process in the BPEL Process list.
The Manage window appears. This window enables you to manage the life cycle and state of the BPEL process.
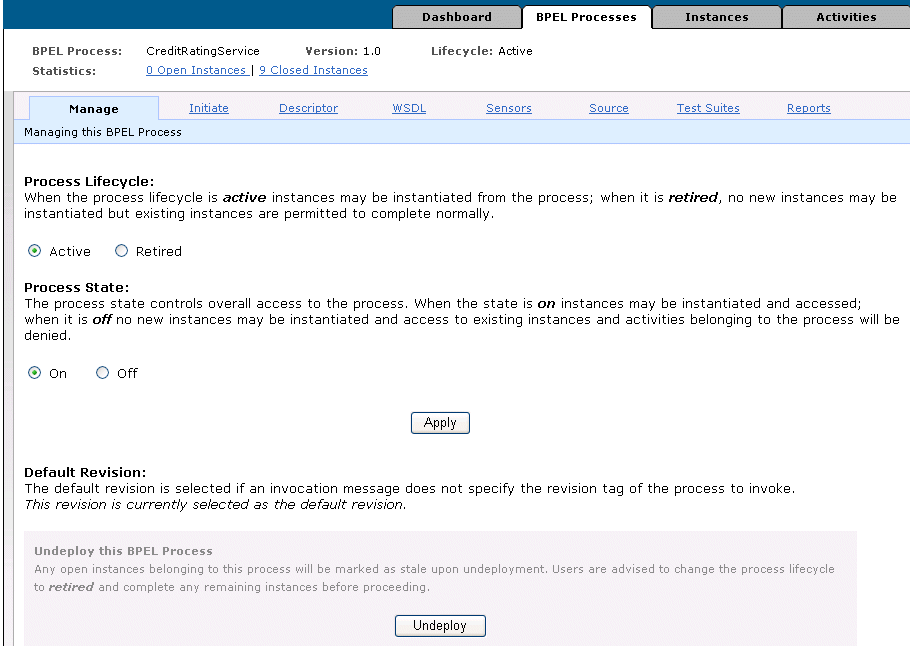
Instructions for using the sections of this window are listed in Table 19-3.
Table 19-3 Managing the Process Life Cycle
| For This Section... | See... |
|---|---|
| Manage | "Status Indicators for BPEL Processes"
"Process Life Cycle Recommendations for a Development Environment" "Process Life Cycle Recommendations for a Production Environment" "Example: Life Cycle of Processes" |
| Initiate | "Initiating Processes" |
| Descriptor | "Viewing and Setting Deployment Descriptors" |
| WSDL | "Viewing WSDL File Contents" |
| Sensors | "Viewing Sensor Data" |
| Source | "Viewing BPEL File Contents" |
| Test Suites | "Running Test Suites" |
| Reports | "Creating Reports" |
For each BPEL process, Oracle BPEL Control shows the following status indicators:
Life cycle
A process life cycle can be active or retired. If the process life cycle is retired, you cannot create a new instance.
State
A process state can be on or off. If the process state is off, you cannot access instances or create new ones.
Open Instances
The number of open instances. An open instance is an instance that is currently being processed.
Completed Instances
The number of completed instances. A completed instance is an instance that has completed processing, either successfully or due to an error.
Perform the following process management tasks from this window:
Manage the process life cycle (either Active or Retired)
Manage the process state (either On or Off)
Explicitly change the default process
Undeploy the process
Ensure that you understand the following process life cycle and state concepts:
In a development environment, Oracle recommends that you always deploy processes to the same version on Oracle BPEL Server. This way, you do not need to be concerned about marking processes explicitly as default. The life cycle to follow for this environment is as follows:
Design your process.
Deploy the process to Oracle BPEL Server (version is 1.0). This becomes the default process for any new instances.
Redesign the process as needed.
Redeploy the process as version 1.0 (this is a newer version that overwrites the older version, but version 1.0 remains the default process).
In a production environment, Oracle recommends that you increment version numbers as you deploy newer versions. For example, if OrderBooking version 1.0 is running in a production environment, then deploy the newer version of OrderBooking to version 2.0. It is your decision as to when to mark a process as default; new instances are started using this definition. When you are certain that you have adequately tested and verified your process, select Mark as Default on the Manage window shown in Step 1. All version 1.0 instances switch seamlessly to version 2.0. This enables you to decide when a process is ready for production mode. The life cycle to follow for this scenario is as follows:
Design your process.
Deploy the process to Oracle BPEL Server with a different version number (for example, use version 2.0 if the older default version is 1.0).
Test version 2.0 of the process.
Activate version 2.0 by marking it as the default process.
WARNING:
Do not overwrite existing versions of a process with newer versions in a production environment. This marks all existing instances of the overwritten process as stale. Stale instances cannot be examined, and all flow and audit information is lost. Instead, create a separate version as described in this section and mark the newer version as the default.
This section provides a brief example of the various life cycle states of two process versions. In the first stage, two instances of the same process version are created, as shown in Table 19-4. CreditRatingService version 1.0 receives two messages, which results in the creation of two instances.
Table 19-4 Stage 1: Two Instances Created
| Stage | Action | Life Cycle | State | Default Process | On Arrival of New Message Request |
|---|---|---|---|---|---|
| 1 | Deploy CreditRatingService version 1.0 | Active=1.0 | On=1.0 | Version 1.0 (automatically set as default version in Oracle JDeveloper) | Create two instances for CreditRatingService version 1.0 |
The life cycle and state of the CreditRatingService version displays in the BPEL Processes tab shown in Figure 19-1. Because CreditRatingService version 1.0 was the first deployed version of this process, it automatically became the default process. The two messages that resulted in the creation of two CreditRatingService version 1.0 instances have both completed.
The two completed instances of CreditRatingService version 1.0 display in the Instances tab shown in Figure 19-2.
In stage 2, you deploy CreditRatingService again, but this time with a new version number of 2.0, as shown in Table 19-5.
Table 19-5 Stage 2: Multiple Process Versions Created
| Stage | Action | Life Cycle | State | Default Process | On Arrival of New Message Request |
|---|---|---|---|---|---|
| 2 | Deploy CreditRatingService version 2.0 | Active=1.0 | On=1.0 | Version 2.0 (automatically set as default version in Oracle JDeveloper) | -- |
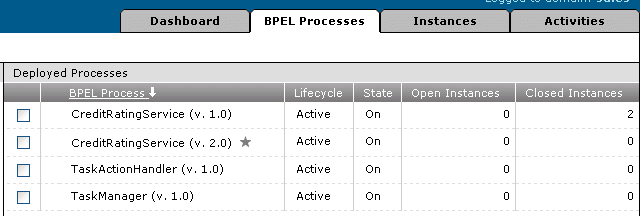
This causes CreditRatingService version 2.0 to become the default version, as indicated by the asterisk in Figure 19-3. CreditRatingService version 1.0 continues to be deployed. This is the convention followed by Oracle JDeveloper.
Figure 19-3 Stage 2: Multiple Process Versions Created
If you again deploy CreditRatingService in Oracle JDeveloper, and select version 1.0 in the Your version field of the Deployment Properties window, CreditRatingService version 1.0 again becomes the default version, as shown in Table 19-6 and Figure 19-4.
Table 19-6 Stage 2: Multiple Process Versions Created
| Stage | Action | Life Cycle | State | Default Process | On Arrival of New Message Request |
|---|---|---|---|---|---|
| 2 | Redeploy CreditRatingService version 1.0 | Active=1.0 | On=1.0 | Version 1.0 (automatically set as default version in Oracle JDeveloper) | -- |
Figure 19-4 Stage 2: Multiple Process Versions Created

In stage 3, you explicitly change CreditRatingService version 2.0 in Oracle BPEL Control to be the default version and retire CreditRatingService version 1.0, as shown in Table 19-7.
Table 19-7 Stage 3: Change Default Process and Retire Instance
| Stage | Action | Life Cycle | State | Default Process | On Arrival of New Message Request |
|---|---|---|---|---|---|
| 3 | Change default process to OrderBooking version 2.0 | Active=1.0 | On=1.0 | Version 2.0 (explicitly set in Oracle BPEL Control) | Create an instance for OrderBooking version 2.0 |
| 3 | Retire OrderBooking version 1.0 | Retired=2.0 | On=2.0 | Version 2.0 | No action |
Figure 19-5 shows Mark as Default being selected for CreditRatingService version 2.0. This makes it the default process.
Figure 19-5 Stage 3: Change Default Process and Retire Instance
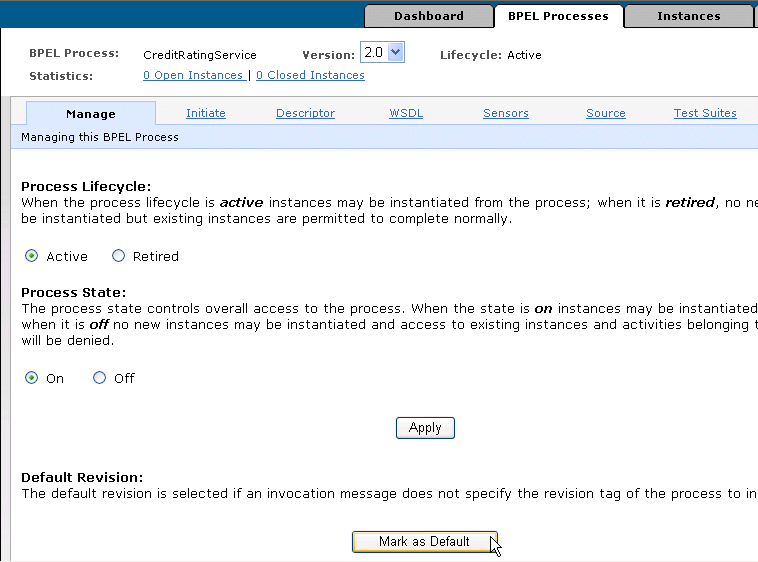
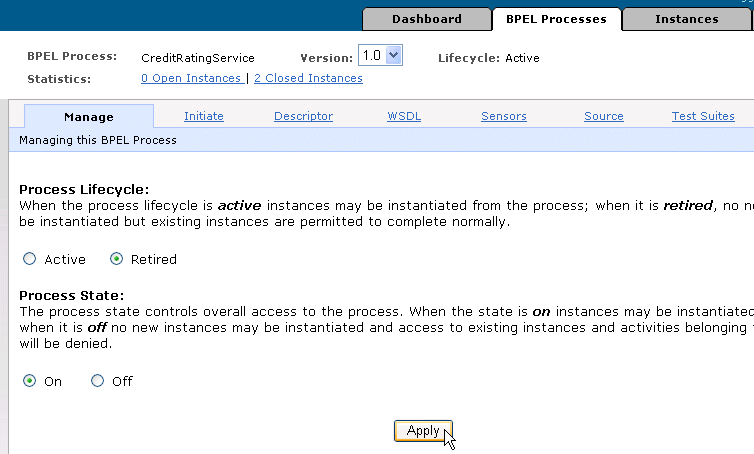
Figure 19-6 shows CreditRatingService version 1.0 being retired.
Figure 19-6 Stage 3: Change Default Process and Retire Instance
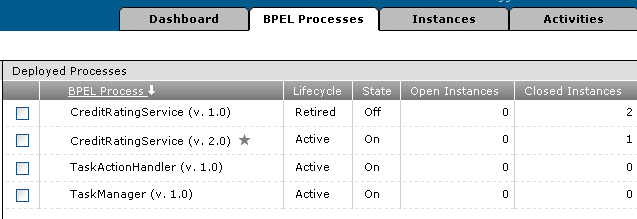
The modified life cycle and state of the two CreditRatingService versions displays in the BPEL Processes tab shown in Figure 19-7. Because CreditRatingService version 2.0 was explicitly selected as the default process, it now displays the asterisk. The message that resulted in the creation of an CreditRatingService version 1.0 instance has completed. CreditRatingService version 1.0 displays as Retired.
Figure 19-7 Stage 3: Change Default Process and Retire Instance

The completed instance of CreditRatingService version 2.0 displays in the Instances tab shown in Figure 19-8.
Figure 19-8 Stage 3: Change Default Process and Retire Instance

If you click the Dashboard tab, the retired CreditRatingService version 1.0 no longer appears. This means you can no longer create an instance for this version.
In stage 4, you make CreditRatingService version 1.0 inactive and then undeploy it, as shown in Table 19-8.
Table 19-8 Stage 4: Deactivate and Undeploy a Process
| Stage | Action | Life Cycle | State | Default Process | On Arrival of New Message Request |
|---|---|---|---|---|---|
| 4 | Make CreditRatingService version 1.0 inactive | Retired=2.0 | Off=2.0 | Version 2.0 | No action |
| 4 | Undeploy CreditRatingService version 1.0 | Retired=2.0 | Off=2.0 | Version 2.0 | No action |
The state of CreditRatingService version 1.0 is changed to Off (inactive) in Figure 19-9.
Figure 19-9 Stage 4: Deactivate and Undeploy a Process
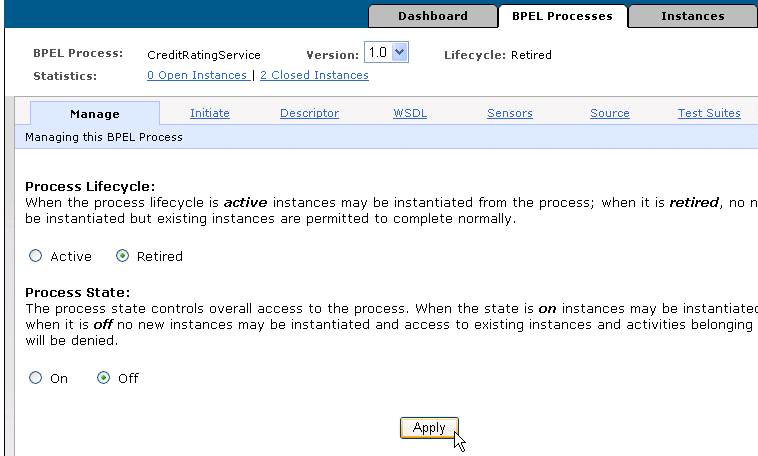
The state of CreditRatingService version 1.0 displays as Off in the BPEL Processes tab shown in Figure 19-10. Because you initially retired this process, any live instances had already completed normally. If you had instead made this version inactive before retiring it, any live instances would have faulted and been aborted.
Figure 19-10 Stage 4: Deactivate and Undeploy a Process
CreditRatingService version 1.0 is then undeployed, as shown in Figure 19-11.
Figure 19-11 Stage 4: Deactivate and Undeploy a Process

The BPEL Processes tab in Figure 19-12 no longer displays CreditRatingService version 1.0. The asterisk also no longer displays for CreditRatingService version 2.0. However, this version is still the default. If you click this instance in the BPEL Process list, you see that no Mark as Default button displays in the Manage window. Instead, the following message appears.
This revision is currently selected as the default revision.
Figure 19-12 Stage 4: Deactivate and Undeploy a Process

The two completed instances of the undeployed CreditRatingService version 1.0 display as disabled in the Instances tab shown in Figure 19-13.
Figure 19-13 Stage 4: Deactivate and Undeploy a Process

Clicking one of the completed instances displays the status as Stale in Figure 19-14.
Figure 19-14 Stage 4: Deactivate and Undeploy a Process

Click Initiate to run processes from the BPEL Processes tab. This is the same window that displays when you click a process in the Deployed BPEL Processes list of the Dashboard tab.
Click Descriptor to view and change deployment descriptor bpel.xml file properties of a BPEL process at run time. This prevents you from having to reset these properties during design time and redeploy the BPEL process.
Click Sensors to view the fault, activity, and variable sensor data of a process.
Test suites enable you to simulate the interaction between a BPEL process and its Web service partners prior to deployment in a production environment. This helps to ensure that a process interacts with Web service partners as expected by the time it is ready for deployment to a production environment. Click Test Suites to run the test cases of a deployed test suite for a BPEL process instance and view XML document reports. By default, report results are formatted as JUnit XML test results.
See Also:
Chapter 20, "Testing BPEL Processes"Click Reports to create reports in Oracle BPEL Control that enable you to:
Receive an overall view of business process instance performance
Analyze data for the BPEL process instances and make critical decisions
Analyze data of the activities that constitute a business process
Identify and debug faults and take appropriate corrective actions
Click the Instances tab to view BPEL process instances.
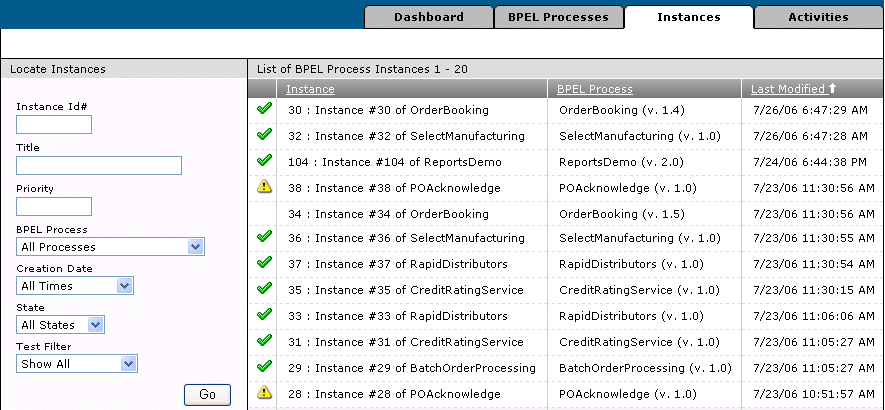
Click an instance in the Instance column (for example, Instance #30 of OrderBooking). From the window that appears, you can perform the following tasks:
View the state of the instance (for example, Completed, Active, or Faulted)
Delete the instance.
Click Flow to view a visual representation of the history of the activities in this instance.
Click Debug to view the BPEL Debugger, which takes the BPEL source code that implements this process and matches it against the state of this particular instance. Points in the code where execution is currently paused are highlighted in yellow (for example, the process is currently waiting for a loan service to call back with a loan offer).
Click Interactions to view details about the activities in this instance.
Click Sensor Values to view the results of any activity, fault, or variable sensors you created in this instance.
Click Test to save an instance as a test case. You can then import it into an Oracle JDeveloper project.
Note:
The Flow and Audit links do not provide details about the actions or states of any header variables you defined during design time. As a workaround, use the Debug link to view header variable details.See Also:
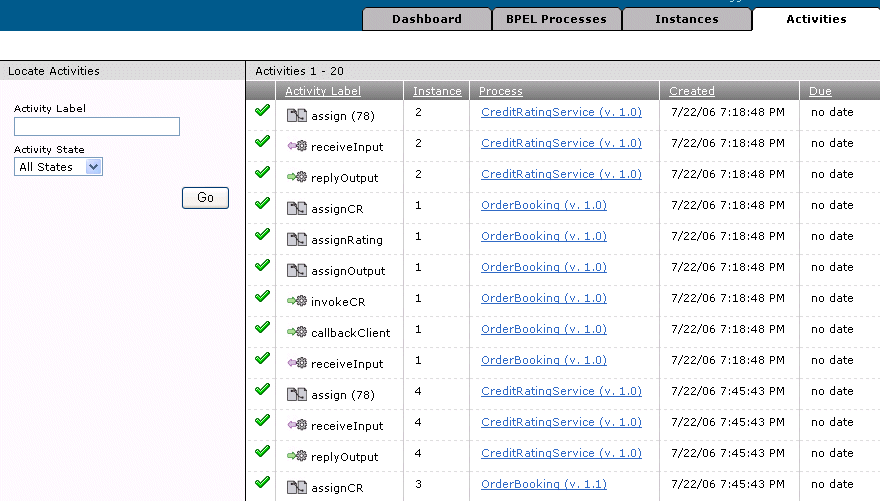
The following documentation for additional details about sensors and test cases:Click the Activities tab to view the status of activities in the deployed BPEL process instance.
See Also:
The following documentation for tutorials in which you run processes from Oracle BPEL Control and view their results from the Audit and Flow links:When you deploy a BPEL process, several build and compiler command line tools are automatically invoked. This section provides an overview of these tools, plus an additional command line tool for generating XML facades:
ant is a Java-based build tool used by Oracle BPEL Process Manager for compiling and deploying the BPEL process. ant is similar to a make file. However, instead of being extended with operating system-dependent, shell-based commands, ant is extended using Java classes. The configuration files are XML-based and call out a target tree where various tasks are executed.
See Also:
http://ant.apache.org/bpelc (or bpelc.sh for UNIX operating systems) is the Oracle BPEL Process Manager tool that compiles and deploys BPEL processes.
Table 19-9 shows the supported bpelc options:
Table 19-9 Parameters
| Attribute | Description | Required |
|---|---|---|
classpath |
Specifies where to find user class files. This attribute is similar to a PATH structure and can also be set through a nested classpath element. |
No |
deploy |
Deploys the BPEL process archive to the specified domain in the local Oracle home. The domain must be accessible through the file system for this option to work. | No |
force |
Always compiles the process; the compiler does not check the time stamp of .bpel, .wsdl and .xml files. The value defaults to false. |
No |
help |
Displays the help message. This value defaults to false. |
No |
home |
The orabpel home directory (or whatever you named your SOA_Oracle_Home directory), which is typically available as ant property $home. |
No |
input |
The deployment descriptor location path, By default, it looks for bpel.xml under the current directory. |
No |
keepGenerated |
Includes the BPEL process Java classes in the generated BPEL archive. The value defaults to false. |
No |
lib |
Oracle BPEL Process Manager system lib directory. |
No |
out |
Specifies the location in which to deploy the BPEL archive. This option is used when the deploy attribute is not used. For example:
|
No |
rev |
The revision (version) tag for the deployed process. | No |
verbose |
Generates additional debugging messages about compiler actions. The value defaults to false. |
No |
The following ant task compiles and generates a BPEL archive file in the current directory using the default bpel.xml deployment descriptor.
Use the following bpelc task sample to deploy a BPEL archive into the default domain deploy directory:
<bpelc home="${home}" rev="${rev}" deploy="default"/>
To deploy the BPEL archive into the c:\myproject directory:
<bpelc home="${home}" rev="${rev}" out="C:\myproject"/>
Specify a deployment descriptor file name:
<bpelc home="${home}" rev="${rev}" deploy="default" input="orderdd.xml"/>
Specify a user classpath for bpelc:
<bpelc home="${home}" rev="${rev}" deploy="default"/>
<classpath>
<pathelement location="dist/test.jar"/>
<pathelement path="${java.class.path}"/>
</classpath>
</bpelc>
Note:
Whileschemac is currently included with Oracle BPEL Process Manager, Oracle recommends that you use JAXB, which provides a standard Java object-to-XML API. See the Oracle Application Server TopLink Application Developer's Guide for details about JAXB. schemac will not be included with Oracle Application Server 11g.schemac (or schemac.sh for UNIX operating systems) is a schema compiler utility provided with Oracle BPEL Process Manager. You use this utility to generate XML facades. XML facades are a set of Java interfaces and classes through which you can access and modify BPEL (and other XML) variables and map individual XML values to Java variables with get and set methods. Classes are generated only for the complexTypes schema types and element with an anonymous complexType. This is similar to the jaxb compiler.
You can invoke schemac from the operating system command prompt to perform specific tasks. schemac command line syntax uses the following format:
schemac options filename | classname(s)
where filename is the name of a file ending with .xsd and containing a valid XML schema definition and classname is the name of a valid Java class (without the .java suffix). Only use this argument when the -R option is supplied.
Table 19-10 describes the supported options:
Table 19-10 Parameters
| Attribute | Description | Required |
|---|---|---|
input |
The XML schema is the name of a file (ending with .xsd or .wsdl) containing a valid XML schema definition. |
Yes |
out |
Specify where to place generated facade class files. This value defaults to the current directory. | No |
doc |
Generates Javadoc for the generated classes and redirects it to the specified location. | No |
jar |
Archives the generated classes into the specified JAR file name. | No |
verbose |
Generates more debugging messages about the compiler actions. Defaults to false. |
No |
noCompile |
Generates only the Java source files and does not compile the generated sources when set to true. This value defaults to false. |
No |
help |
Displays the help message. This value defaults to false. |
No |
sourceOut |
Specifies the location in which to redirect the generated Java files. For example:
|
No |
nsMap |
To override the default Java package name, specify the namespace to the Java package mapping file. For example:
The content of
Note: If it is a name-value property file, you must escape the colon ( |
No |
Generate the facade classes from an XSD and place them under the current directory:
<schemac input="${basedir}/Order.xsd "/>
Generate the facade classes from a WSDL schema file:
<schemac input="${basedir}/PurchaseOrder.wsdl "/>
Generate the Javadoc into the c:\myjavadoc directory:
<schemac input="${basedir}/Order.xsd" doc="c:\myjavadoc"/>
Archive the generated facade classes into a .jar file:
<schemac input="${basedir}/XPath.wsdl" jar="myorderfacade.jar"/>
Redirect the generated facade classes into a specific directory:
<schemac input="${basedir}/Order.xsd " out="${basedir}/BPEL-INF/classes"/>
Specify the namespace Java package mapping file to override the default behavior:
<schemac input="${basedir}/Order.xsd " out="${basedir}/BPEL-INF/classes"
 nsMap="mynsmap.txt"/>
See Also:
Oracle Application Server TopLink Application Developer's Guide for details about JAXB
SOA_Oracle_Home\bpel\samples\tutorials\702.Bindings for XML facade samples
This chapter describes how to compile and deploy BPEL processes. It describes key features of BPEL suitcase JAR files. It also describes how to create and manage BPEL domains, including creating domains, changing Oracle BPEL Server modes (production or development), managing BPEL suitcase JAR files, and undeploying processes. An overview of Oracle BPEL Control is also provided, including a detailed description of managing different versions of BPEL processes. Finally, a discussion on how to use the ant, bpelc, and schemac build tools is provided.