4 Extending the Functionality of the Connector
This chapter describes procedures that you can perform to modify the connector for addressing your specific business requirements.
This chapter discusses the following optional procedures:
Note:
- These procedures are aimed at extending the functionality of the connector.
-
If you are using Oracle Identity Manager 11.1.2 or later and modify the parent form (add or delete an attribute), then edit the application instance in usage and create a new form and make it active.
-
The Section 4.1, "Modifying Existing Field Mappings" section described the procedure to modify the mappings between fields of the target system and Oracle Identity Manager.
-
The Section 4.2, "Adding New Fields for Target Resource Reconciliation" section describes the procedure to add mappings between fields of the target system and Oracle Identity Manager
-
The Section 4.3, "Adding New Fields for Provisioning" section describes the procedure to add mappings between fields of the target system and Oracle Identity Manager.
-
The Section 4.4, "Configuring the Connector for Multiple Installations of the Target System" section describes the procedure to configure the connector for multiple installations of the target system.
4.1 Modifying Existing Field Mappings
Default mappings between fields of the target system and Oracle Identity Manager are listed in the following sections:
If you want to modify these mappings, then:
-
Log in to the Design Console.
-
Expand Administration, and double-click Lookup Definition.
-
Search for and open the lookup definition that you want to modify.
Table 4-1 describes the contents of the lookup definition that contains field mapping information for reconciliation and provisioning.
Table 4-1 Lookup Definitions That Store Field Mapping Information
Lookup Definition Contents of the Code Key Column Contents of the Decode Column Lookup.Exchange.Configuration
This is used during reconciliation and provisioning.
Names of fields on Microsoft Active Directory
Names of process form fields for Microsoft Active Directory
AtMap.Exchange
This is used during provisioning.
Names of Microsoft Exchange fields on Microsoft Active Directory
Names of process form fields for Microsoft Exchange
-
Make the required change in the field mappings by modifying the Code Key and Decode values.
For example, you can change the Code Key value for distinguishedName to sAMAccountName.
-
Click the save icon.
4.2 Adding New Fields for Target Resource Reconciliation
Note:
This section describes an optional procedure. Perform this procedure only if you want to add new fields for target resource reconciliation.By default, the fields listed in Table 1-3, "Mailbox Fields for Target Resource Reconciliation" are mapped for reconciliation between the target system and Oracle Identity Manager. If required, you can add new fields for target resource reconciliation.
Before you add a new field for target resource reconciliation, you must first determine the target system name of the field as follows:
-
Install the Microsoft Active Directory schema, if it is not already installed.
Refer to the Microsoft Web site for information about installing the schema.
-
Open the Microsoft Active Directory schema.
-
Expand the Console Root folder, expand the schema, and then click Attributes.
-
Search for the field that you want to add, and then note down its name.
For example, if you want to add the Telephone Number field for reconciliation, then note down telephoneNumber. Figure 4-1 shows the Telephone Number field added in the telephoneNumber Properties dialog box.
Figure 4-1 New Field Added for Reconciliation
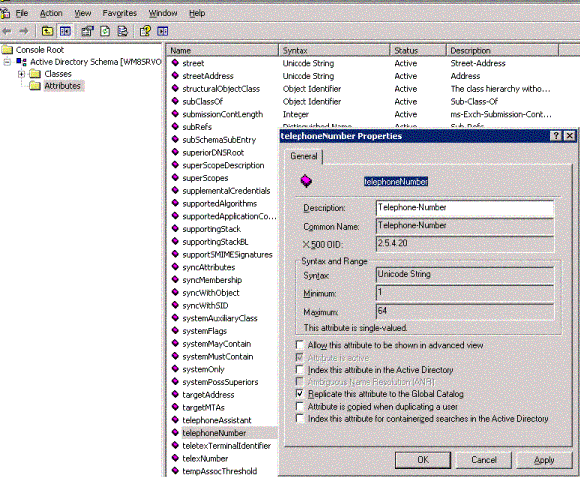
Description of "Figure 4-1 New Field Added for Reconciliation"
To add a new field for target resource reconciliation:
See Also:
One of the following guides for detailed information about these steps:-
For Oracle Identity Manager release 9.1.0.x: Oracle Identity Manager Design Console Guide
-
For Oracle Identity Manager release 11.1.1: Oracle Fusion Middleware Developer's Guide for Oracle Identity Manager
-
Log in to the Oracle Identity Manager Design Console.
-
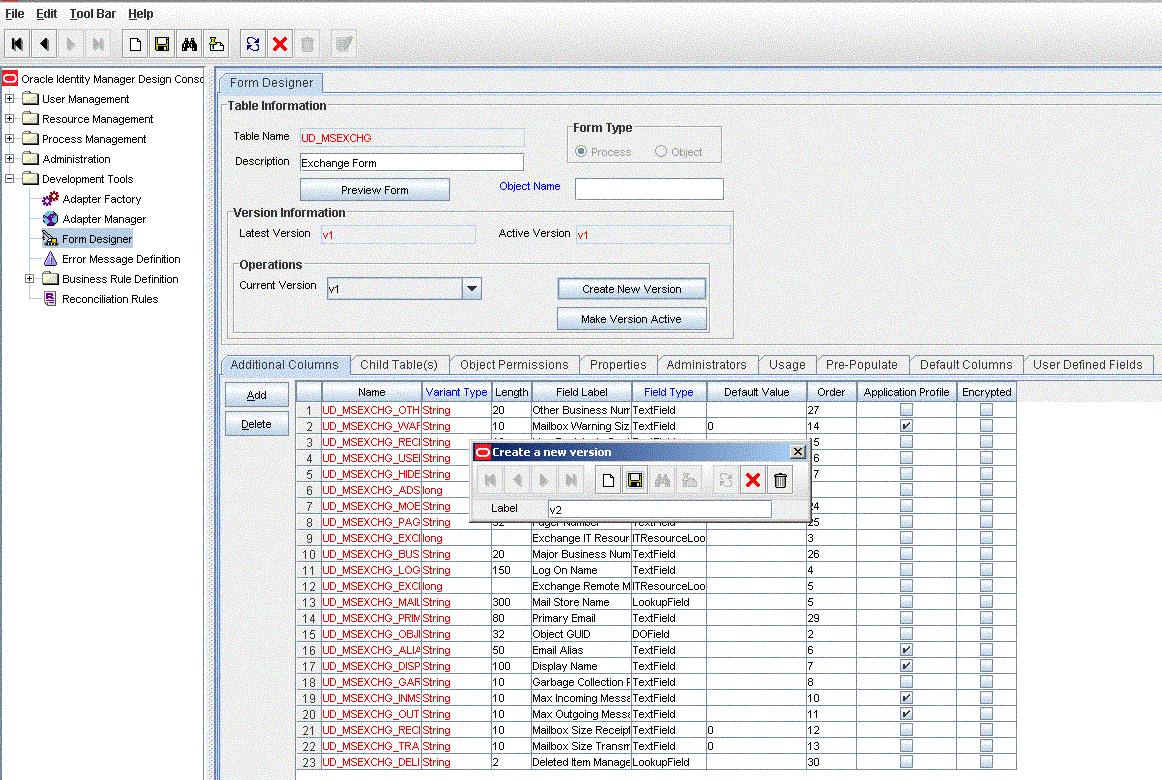
Create a new version of the process form as follows:
-
Expand Development Tools.
-
Double-click Form Designer.
-
Search for and open the UD_MSEXCHG process form.
-
Click Create New Version. On the Create a new version dialog box, enter a new version in the Label field, and then click the Save icon. Figure 4-2 shows the new version of the form created in the process form.
-
-
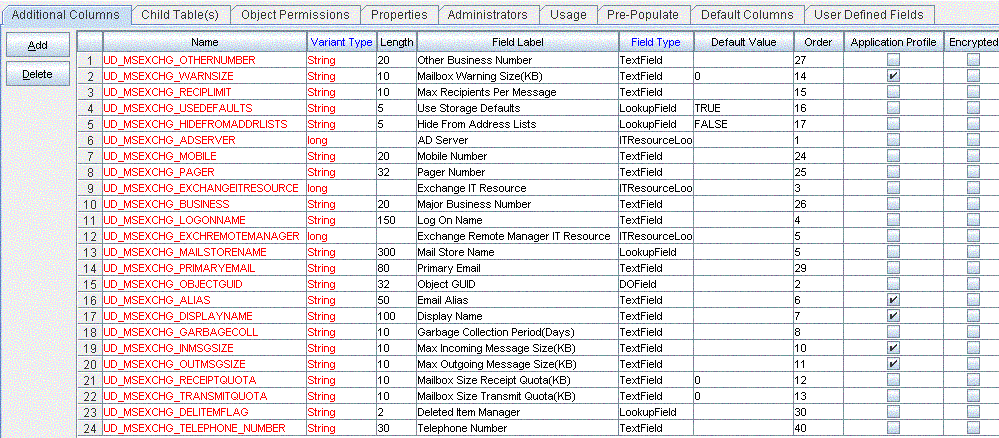
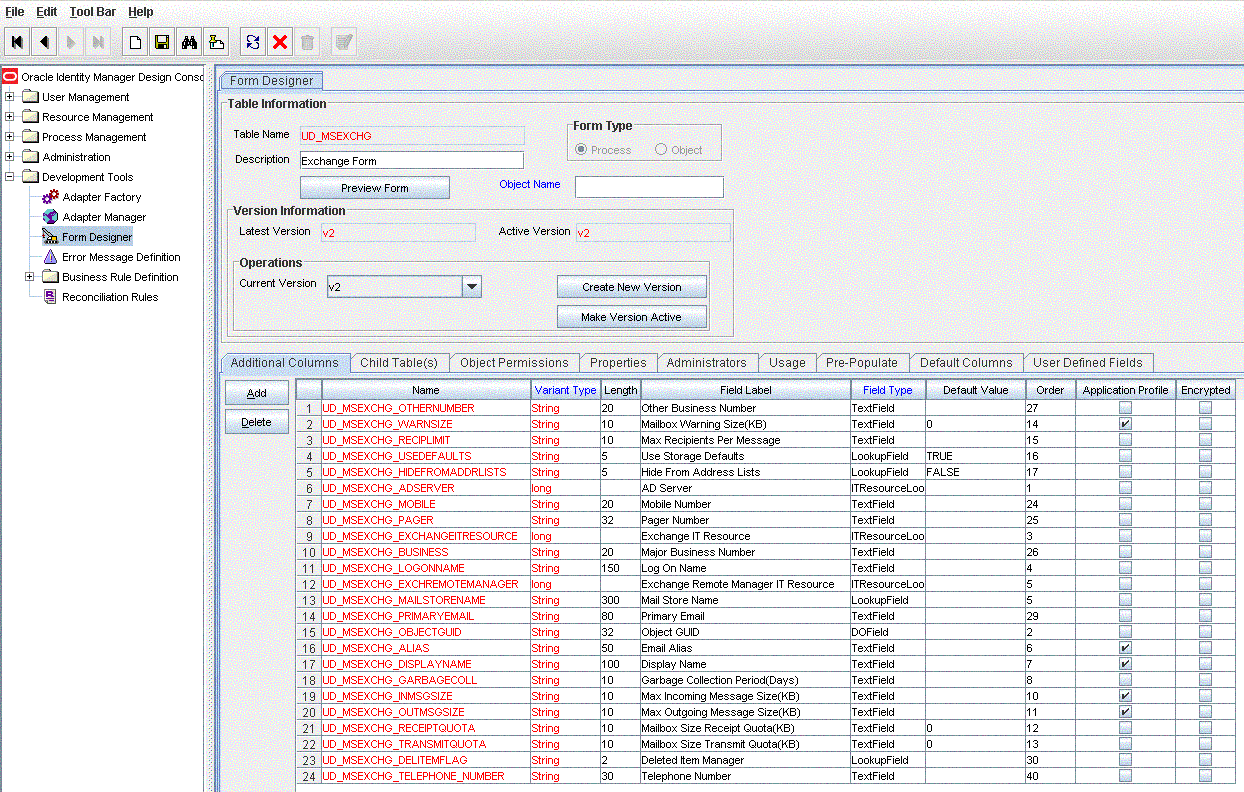
Add the new field on the process form as follows:
-
Click Add. A field is added to the list. Enter the details of the field.
For example, if you are adding the Telephone Number field, enter
UD_MSEXCHG_TELEPHONE_NUMBERin the Name field and then enter the rest of the details of this field. -
Click Save.
-
To activate the newly created form, click Make Version Active. Figure 4-3 shows details of the new field added in the process form.
Figure 4-3 New Field Added to the Process Form
Description of "Figure 4-3 New Field Added to the Process Form"
-
-
Add the new field to the list of reconciliation fields in the resource object as follows:
-
Expand Resource Management.
-
Double-click Resource Objects.
-
Search for and open the Exchange User resource object.
-
On the Object Reconciliation tab, click Add Field.
-
In the Add Reconciliation Field dialog box, enter the details of this field.
For example, enter
Telephone Numberin the Field Name field and select String from the Field Type list.Later in this procedure, you will enter the field name as the Decode value of the entry that you create in the lookup definition for reconciliation.
-
If you are using Oracle Identity Manager release 11.1.1, then click Create Reconciliation Profile. This copies changes made to the resource object into the MDS.
-
Click Save. Figure 4-4 shows the new reconciliation field added to the resource object in the process form.
Figure 4-4 New Field Added to the Resource Object
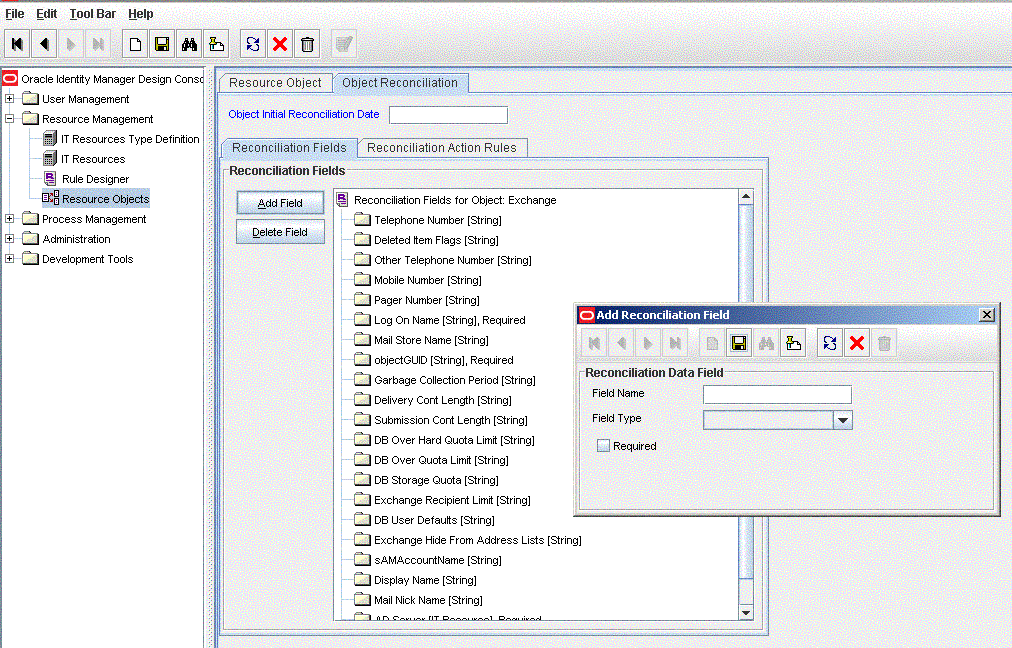
Description of "Figure 4-4 New Field Added to the Resource Object"
-
-
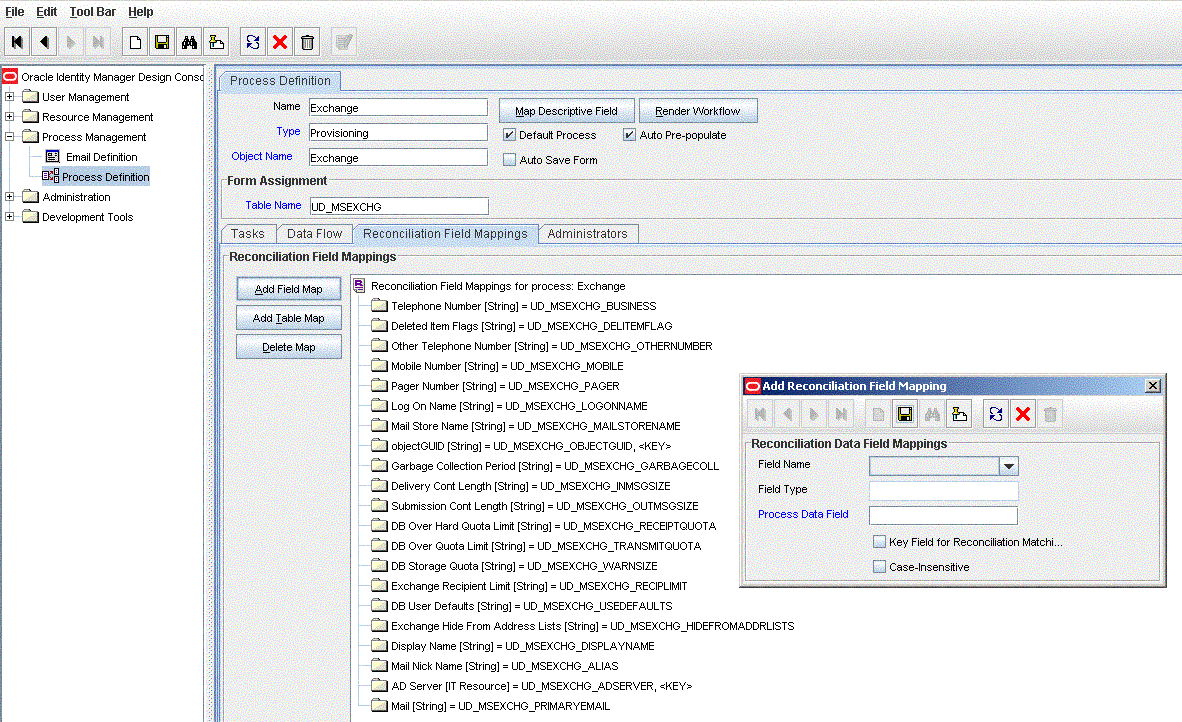
Create a reconciliation field mapping for the new field on the process form as follows:
-
Expand Process Management.
-
Double-click Process Definition.
-
From the Process Definition table, select and open the Exchange User resource object.
-
Click Reconciliation Field Mappings and then click Add Field Map.
-
In the Field Name field, select the value for the field that you want to add.
For example, select
Telephone Number. -
In the Field Type field, select the type of the field that is prepopulated.
-
Double-click the Process Data Field field. A list of process data columns is displayed. From the list, select the process data column corresponding to the process data field.
For example, select
Telephone Number= UD_EXCHANGEUSER_TELEPHONE_NUMBER. -
Click the Save icon. Figure 4-5 shows the mapping of new reconciliation field to the Process Data Field in the process form.
-
-
Create an entry for the field in the lookup definition for reconciliation as follows:
-
Expand Administration.
-
Double-click Lookup Definition.
-
Search for and open the AtMap.Exchange lookup definition.
-
Click Add and enter the Code Key and Decode values for the field. The Code Key value must be the name of the field on the target system, which you determined at the start of this procedure.
For example, enter
telephoneNumberin the Code Key field and then enter Telephone Number in the Decode field. -
Click Save. Figure 4-6 shows the code key and the decode value added to the lookup definition in the process form.
Figure 4-6 AtMap.Exchange Lookup Definition
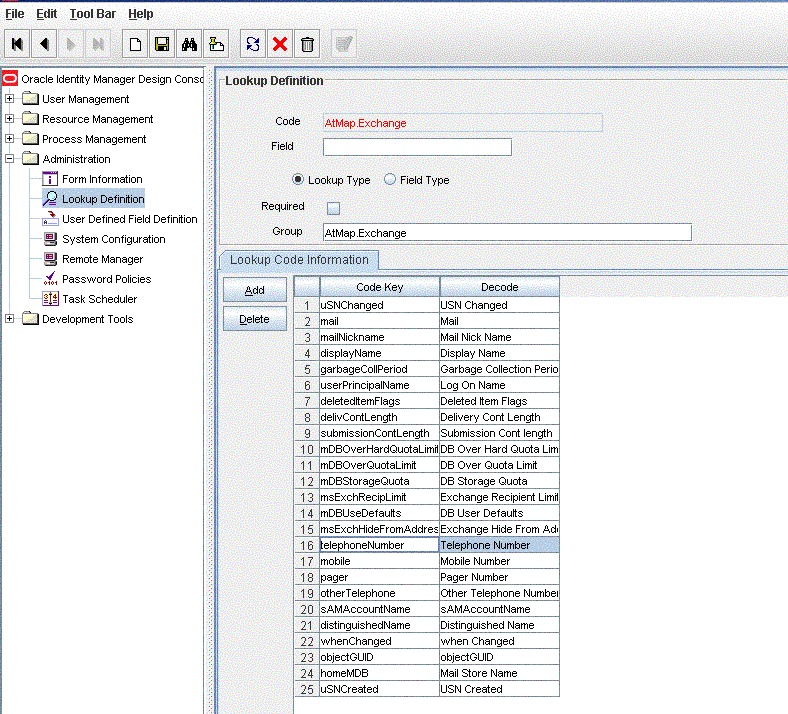
Description of "Figure 4-6 AtMap.Exchange Lookup Definition"
-
-
If you are using Oracle Identity Manager release 11.1.2 or later, create a new UI form and attach it to the application instance to make this new field visible. See Section 2.3.1.1.3, "Creating a New UI Form" and Section 2.3.1.1.7, "Updating an Existing Application Instance with a New Form" for the procedures.
4.3 Adding New Fields for Provisioning
Note:
This section describes an optional procedure. Perform this procedure only if you want to add new fields for provisioningBy default, the fields listed in Table 1-6, "Mailbox Fields Used in Provisioning" are mapped for provisioning between Oracle Identity Manager and the target system. If required, you can map additional fields for provisioning.
Before you add a new field for provisioning, you must first determine the name of the field from the Microsoft Active Directory schema as follows:
-
Log in to Microsoft Active Directory.
-
Open the Microsoft Active Directory schema.
-
Expand the Console Root folder, expand the schema, and then click Attributes.
-
Search for the field that you want to add, and then note down its name.
For example, if you want to add the Telephone Number field for reconciliation, then note down telephoneNumber. Figure 4-7 shows the Telephone Number added in the telphoneNumber Properties dialog box.
Figure 4-7 New Field Added for Provisioning
Description of "Figure 4-7 New Field Added for Provisioning"
To add a new field for provisioning:
See Also:
One of the following guides for detailed information about these steps:-
For Oracle Identity Manager release 9.1.0.x: Oracle Identity Manager Design Console Guide
-
For Oracle Identity Manager release 11.1.1: Oracle Fusion Middleware Developer's Guide for Oracle Identity Manager
-
Log into Oracle Identity Manager Design Console.
-
Create a new version of the process form:
-
Expand Development Tools.
-
Double-click Form Designer.
-
Search for and open the UD_MSEXCHG process form.
-
Click Create New Version. On the Create a new version dialog box, enter a new version in the Label field, and then click the Save icon. Figure 4-8 shows the new version form created in the process form.
Figure 4-8 New Version Created in the Process Form
Description of "Figure 4-8 New Version Created in the Process Form"
-
-
Add the new field on the process form.
If you have added the field on the process form by performing Step 3 of "Adding New Fields for Target Resource Reconciliation", then you need not add the field again. If you have not added the field, then:
-
Click Add. A field is added to the list. Enter the details of the field.
For example, if you are adding the Telephone Number field, enter
UD_MSEXCHG_TELEPHONE_NUMBERin the Name field and then enter the rest of the details of this field. -
Click Save and then click Make Version Active. Figure 4-9 shows the new field added in the process form.
Figure 4-9 New Field Added in the Process Form
Description of "Figure 4-9 New Field Added in the Process Form"
-
-
Create a new variable in the Adapter Factory section:
-
Expand Development Tools.
-
Click Adapter Factory and query to get all adapters. The adapter factory table is displayed.
-
Double-click MEXC Set User Properties.
Navigate to the Variable List tab, click Add, and create a new variable corresponding to the value that you want to provision.
Click Save. Figure 4-10 shows the new variable added in the process form.
Figure 4-10 New Variable Added in the Process Form
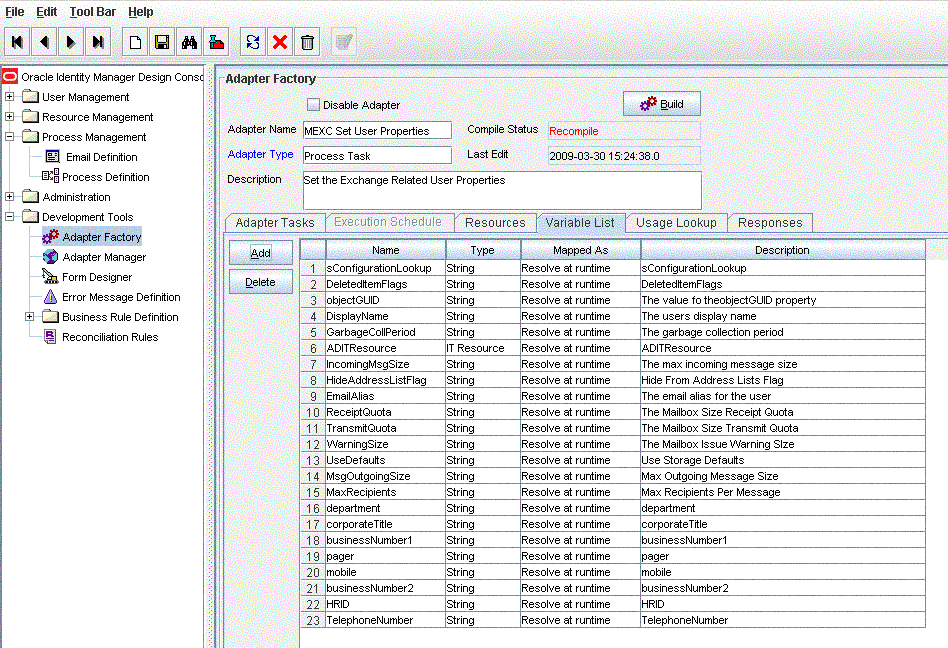
Description of "Figure 4-10 New Variable Added in the Process Form"
-
-
Add string array to the vector:
-
In the Adapters Task tab, double-click Set User Properties.
-
Expand the method and right-click Input: Vector.
-
Select Add String Type and then select Add String Array. A new string array item is added at the end of the vector.
-
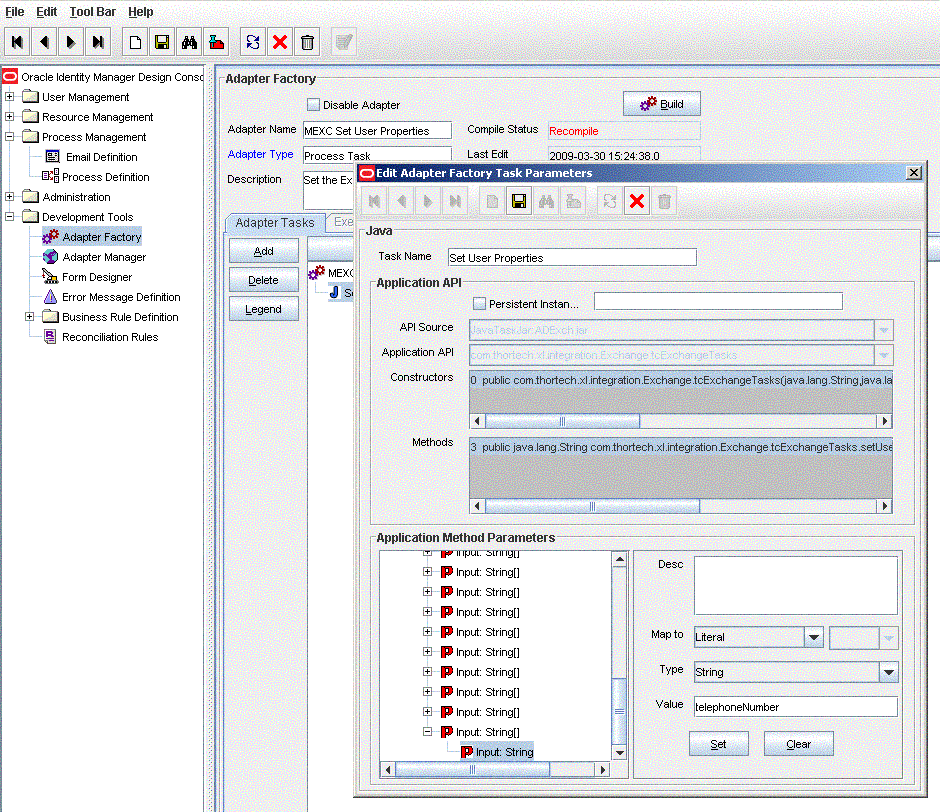
Right-click Input: String[ ], select Add String and then add two strings.
-
Click Save. Figure 4-11 shows the string array added to the vector in the process form.
Figure 4-11 String Array Added to the Vector
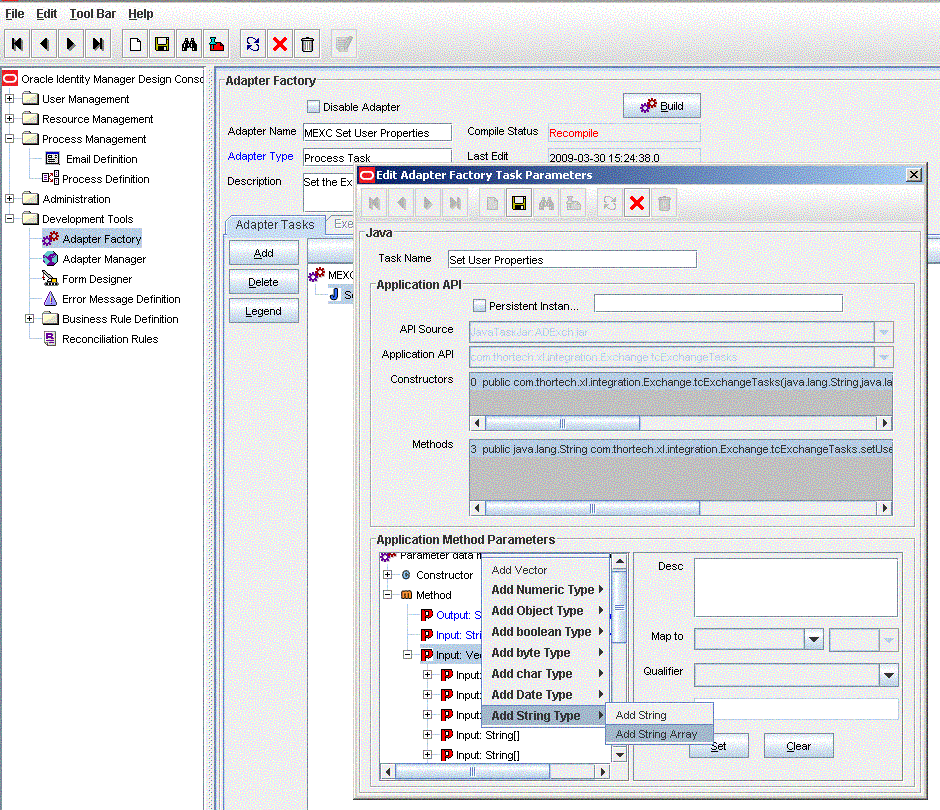
Description of "Figure 4-11 String Array Added to the Vector"
-
-
Map the string:
-
Map the first item to a literal. The value of the literal should be the attribute value on the target system.
-
Click Save. Figure 4-12 shows the string mapped to a literal in the process form.
-
-
-
Map the second item to the corresponding adapter variable:
-
Click Save. Figure 4-13 shows the string mapped to the adapter variable in the process form.
Figure 4-13 String Mapped to Adapter Variable
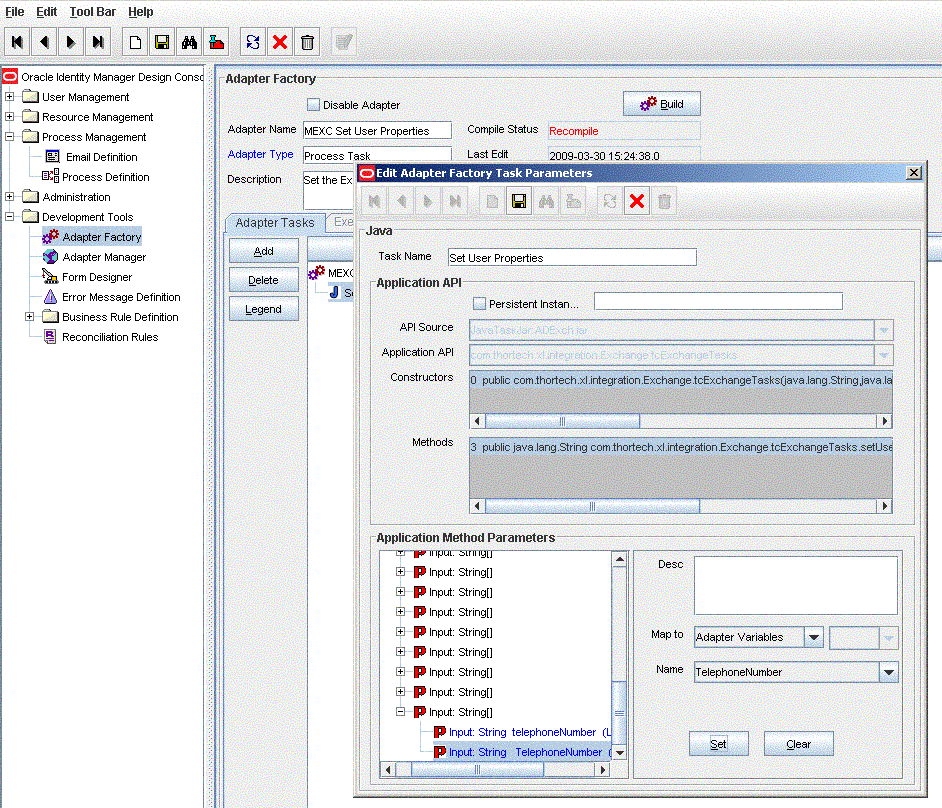
Description of "Figure 4-13 String Mapped to Adapter Variable"
-
-
Map the variable to process data:
-
Expand Process Management.
-
Double-click Process Definition.
-
Select Set the Exchange Related User Properties.
-
Double-click Process Task and navigate to the Integration tab. The newly mapped variable will have the mapped status as
N. Figure 4-14 shows the newly mapped variable in the process definition.Figure 4-14 Mapped Variable in Process Definition
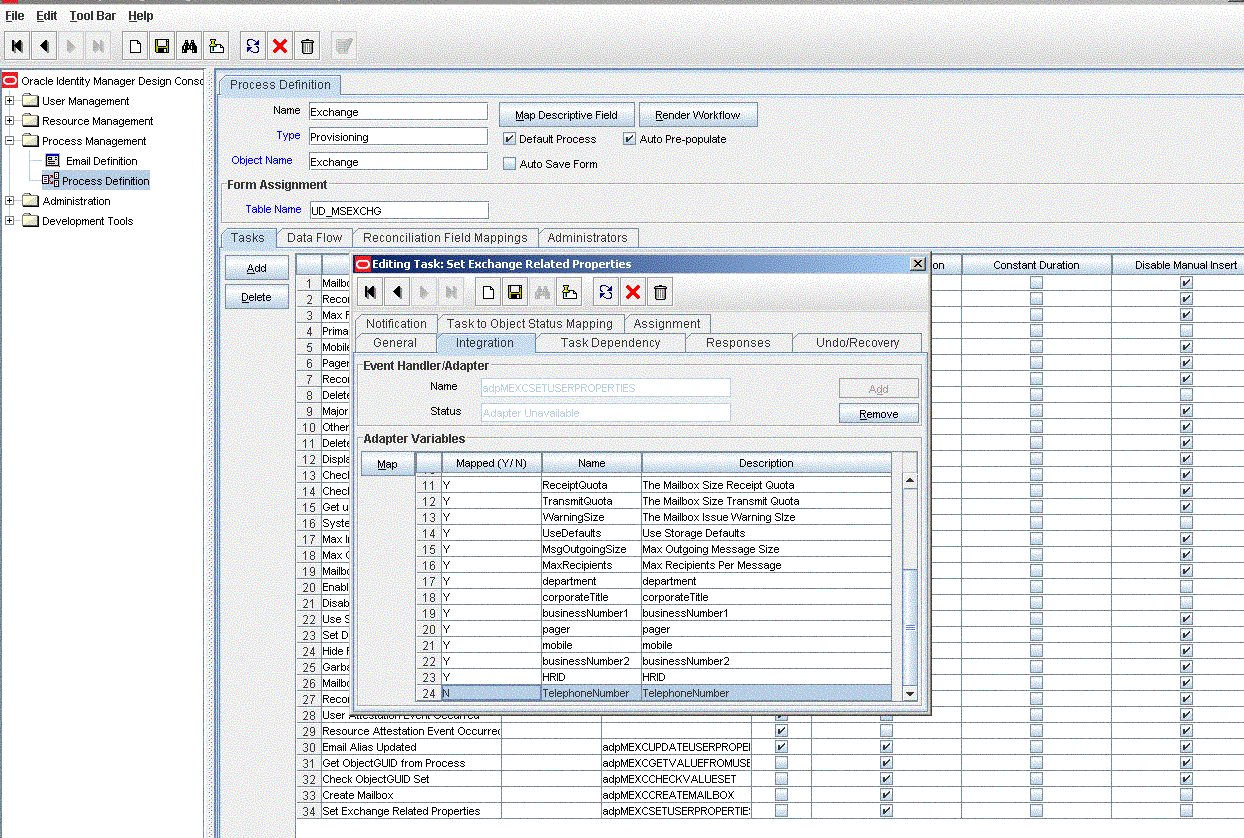
Description of "Figure 4-14 Mapped Variable in Process Definition"
-
-
-
In the Map To field, select Process Data.
-
In the Qualifier field, select the name of the form label, which you have entered in the form.
-
Click Save. Figure 4-15 shows the adapter variable mapped to the process data field.
-
-
Figure 4-15 Variable Mapped to Process Data Field
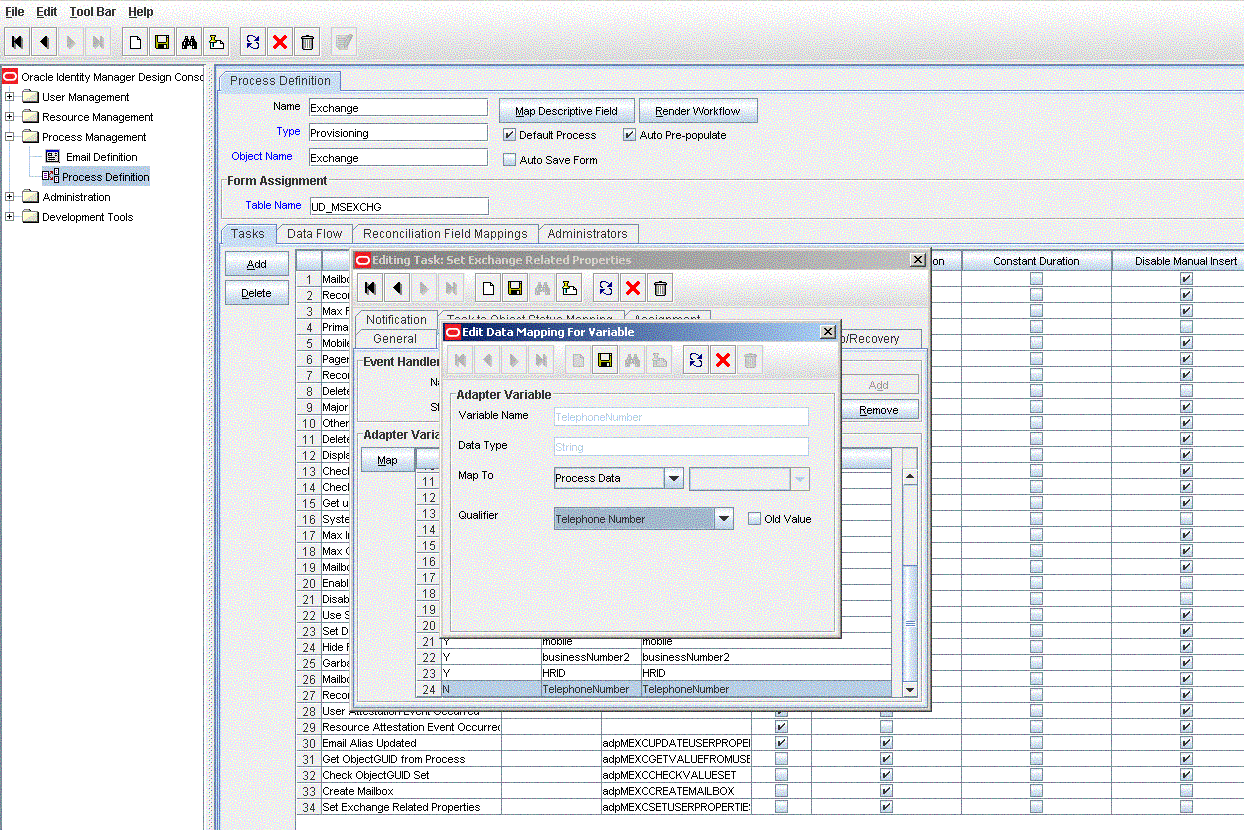
Description of "Figure 4-15 Variable Mapped to Process Data Field"
Note:
Perform steps 8 through 10 only if you want to perform request-based provisioning. -
Update the request dataset.
When you add an attribute on the process form, you also update the XML file containing the request dataset definitions. To update a request dataset:
-
In a text editor, open the XML file located in the OIM_HOME/DataSet/file directory for editing.
-
Add the AttributeReference element and specify values for the mandatory attributes of this element.
See Also:
The "Configuring Requests" chapter of the Oracle Fusion Middleware Developer's Guide for Oracle Identity Manager guide for more information about creating and updating request datasetsFor example, while performing Step 3 of this procedure, if you added Telephone Number as an attribute on the process form, then enter the following line:
<AttributeReference
name = "Telephone Number"
attr-ref = "Telephone Number"
type = "String"
widget = "text"
length = "30"
available-in-bulk = "false"/>
In this AttributeReference element:
-
For the name attribute, enter the value in the Name column of the process form without the tablename prefix.
For example, if UD_MSEXCHG_TELEPHONE_NUMBER is the value in the Name column of the process form, then you must specify
Telephone Numberas the value of the name attribute in the AttributeReference element. -
For the attr-ref attribute, enter the value that you entered in the Field Label column of the process form while performing Step 3.
-
For the type attribute, enter the value that you entered in the Variant Type column of the process form while performing Step 3.
-
For the widget attribute, enter the value that you entered in the Field Type column of the process form, while performing Step 3.
-
For the length attribute, enter the value that you entered in the Length column of the process form while performing Step 3.
-
For the available-in-bulk attribute, specify
trueif the attribute must be available during bulk request creation or modification. Otherwise, specifyfalse.
While performing Step 3, if you added more than one attribute on the process form, then repeat this step for each attribute added.
-
-
Save and close the XML file.
-
-
Run the PurgeCache utility to clear content related to request datasets from the server cache.
See Oracle Fusion Middleware System Administrator's Guide for Oracle Identity Manager for more information about the PurgeCache utility.
-
If you are using Oracle Identity Manager release 11.1.1 or later, import into MDS, the request dataset definitions in XML format.
See the "Importing Request Datasets into MDS" section for detailed information about the procedure.
-
If you are using Oracle Identity Manager release 11.1.2 or later, create a new UI form and attach it to the application instance to make this new field visible. See Section 2.3.1.1.3, "Creating a New UI Form" and Section 2.3.1.1.7, "Updating an Existing Application Instance with a New Form" for the procedures.
4.4 Configuring the Connector for Multiple Installations of the Target System
Note:
This section describes an optional procedure. Perform this procedure if your target system is installed in a cross-domain or multi-forest environment.If your target system is installed in a clustered environment, then you need not perform this procedure.
You may want to configure the connector for multiple installations of Microsoft Exchange. The following example illustrates this requirement:
The Tokyo, London, and New York offices of Example Multinational Inc. have their own installations of Microsoft Exchange. The company has recently installed Oracle Identity Manager, and they want to configure Oracle Identity Manager to link all the installations of Microsoft Exchange.
To meet the requirement posed by such a scenario, you must configure the connector for multiple installations of Microsoft Exchange.
To configure the connector for multiple installations of the target system:
See Also:
One of the following guides for detailed instructions on performing each step of this procedure:-
For Oracle Identity Manager release 9.1.0.x: Oracle Identity Manager Design Console Guide
-
For Oracle Identity Manager release 11.1.1: Oracle Fusion Middleware Developer's Guide for Oracle Identity Manager
-
Create and configure one IT resource for each target system installation.
The IT Resources form is in the Resource Management folder. An IT resource is created when you import the connector XML file. You can use this IT resource as the template for creating the remaining IT resources, of the same IT resource type. For information about the procedure to create an IT resource, see "Creating the IT Resource".
-
Create copies of the reconciliation scheduled tasks for each installation of the target system. While creating a scheduled task, specify attribute values corresponding to the target system installation for which you are creating the scheduled task.
See "Reconciliation Scheduled Tasks" for information about the values to be specified for the scheduled task attributes.
Note:
In Oracle Identity Manager release 11.1.1, a scheduled job is an instance of a scheduled task. In this guide, the term scheduled task used in the context of Oracle Identity Manager release 9.1.0.x is the same as the term scheduled job in the context of Oracle Identity Manager release 11.1.1.See Oracle Fusion Middleware System Administrator's Guide for Oracle Identity Manager for more information about scheduled tasks and scheduled jobs.
-
Manually synchronize the lookup definitions in Oracle Identity Manager with the lookup field values on the target system.
When you use the Administrative and User Console to perform provisioning, you can specify the IT resource corresponding to the Microsoft Exchange installation to which you want to provision the user.
This section also discusses the following topics:
4.4.1 Creating Copies of the Connector
To create a copy of the connector:
-
Create copies of the IT resource, resource object, process form, provisioning process, scheduled tasks, and lookup definitions that hold attribute mappings.
-
Create a copy of the Lookup.Exchange.Configuration lookup definition. In the copy that you create, change the values of the following entries to match the details of the process form copy that you create.
-
ROExgInMsgSizeCol
-
ROExgOutMsgSizeCol
See "Configuring the Lookup.Exchange.Configuration Lookup Definition" for information about these entries.
-
-
Map the new process tasks to the copy of the Lookup.Exchange.Configuration lookup definition.
-
If you have create a copy of the Lookup.AD.Configuration, then you must enter the name of the copy in the AD Configuration Lookup Code Key of the Lookup.Exchange.Configuration lookup definition.
4.4.2 Populating the Second IT Resource on the Process Form
Populating the second IT resource on the process form may not work because it cannot be populated through the user interface if you are using the Oracle Identity Manager 11g release (11.1.2) or later. You must perform the following procedure to ensure that the second IT resource can be populated on the process form:
-
Create an entity adapter using the following sample Java class:
package oracle.oim.apisamples.adapters; import java.util.HashMap; import java.util.Map; import java.util.Properties; import Thor.API.tcResultSet; import Thor.API.tcUtilityFactory; import Thor.API.Operations.tcITResourceInstanceOperationsIntf; import com.thortech.xl.util.config.ConfigurationClient; public class ITResourcePrepop { private static Map<String, String> CHILD_PARENT_ITRESNAME_MAP = new HashMap<String, String>(); static { CHILD_PARENT_ITRESNAME_MAP.put("ITRes_Key1", "ITRes_Name1"); CHILD_PARENT_ITRESNAME_MAP.put("ITRes_Key2", "ITRes_Name2"); CHILD_PARENT_ITRESNAME_MAP.put("ITRes_Key3", "ITRes_Name3"); } public Long getITResourceKey() { return new Long(4); } //public Long getITResourceKey(Long svrKey) throws Exception { Public Long getITResourceKey(long svrKey) throws Exception { //Long svrKey = (Long)osvrKey; Properties jndi = ConfigurationClient.getComplexSettingByPath( "Discovery.CoreServer").getAllSettings(); tcUtilityFactory factory = new tcUtilityFactory(jndi, "xelsysadm", "Password"); tcITResourceInstanceOperationsIntf itInstIntf = (tcITResourceInstanceOperationsIntf)factory.getUtility( "Thor.API.Operations.tcITResourceInstanceOperationsIntf"); System.out.println("signature login complete"); String itResName = getITResourceNameFromKey(itInstIntf, svrKey + ""); String parentITResName = CHILD_PARENT_ITRESNAME_MAP.get(itResName); String parentITResKey = getITResourceKeyFromName(itInstIntf, parentITResName); Long retVal = Long.parseLong(parentITResKey); return retVal; } private String getITResourceNameFromKey(tcITResourceInstanceOperationsIntf itInstIntf, String itresKey) throws Exception { HashMap map = new HashMap(); map.put("IT Resources.Key", itresKey); tcResultSet rs = itInstIntf.findITResourceInstances(map); rs.goToRow(0); String itResName = rs.getStringValue("IT Resources.Name"); System.out.println("IT resource name = " + itResName); return itResName; } private String getITResourceKeyFromName(tcITResourceInstanceOperationsIntf itInstIntf, String itresName) throws Exception { HashMap map = new HashMap(); map.put("IT Resources.Name", itresName); tcResultSet rs = itInstIntf.findITResourceInstances(map); rs.goToRow(0); String itResKey = rs.getStringValue("IT Resources.Key"); System.out.println("Returning IT resource key = " + itResKey); return itResKey; } } -
Compile the adapter.
-
On the Data Object Manager form in the design console, attach the entity adapter to the tcUD_MSEXCHG data object.
-
Map the return value of this adapter to the Microsoft AD IT resource name.
-
Schedule the adapter to run as post-insert.