3 Using the Connector
This chapter discusses the following:
Note:
In Oracle Identity Manager release 11.1.x, a scheduled job is an instance of a scheduled task. In this guide, the term scheduled task used in the context of Oracle Identity Manager release 9.1.0.x is the same as the term scheduled job in the context of Oracle Identity Manager release 11.1.x.See Oracle Fusion Middleware System Administrator's Guide for Oracle Identity Manager for more information about scheduled tasks and scheduled jobs.
-
The Section 3.1, "Guidelines on Using the Connector" section described the guidelines that you must apply while using the connector.
-
The Section 3.2, "Configuring the Lookup.Exchange.Configuration Lookup Definition" section describes the parameters of the Lookup.Exchange.Configuration lookup definition.
-
The Section 3.3, "Scheduled Task for Lookup Field Synchronization" section describes the Exchange Mail Store Lookup Reconciliation scheduled task.
-
The Section 3.4, "Configuring Reconciliation" section describes the different types of reconciliation and the scheduled tasks that are created for this connector.
-
The Section 3.5, "Configuring Scheduled Tasks" section describes the procedure to configure scheduled tasks that are created when you deploy the connector.
-
The Section 3.6, "Configuring Provisioning in Oracle Identity Manager Release 11.1.1" and Section 3.7, "Configuring Provisioning in Oracle Identity Manager Release 11.1.2" sections describe how to use this connector for provisioning.
3.1 Guidelines on Using the Connector
This section contains the following topics:
-
Section 3.1.1, "Guidelines on Configuring Reconciliation Runs"
-
Section 3.1.2, "Guidelines on Performing Provisioning Operations"
3.1.1 Guidelines on Configuring Reconciliation Runs
The following are guidelines that you must apply while configuring reconciliation:
-
The connector does not support Delete Mailbox reconciliation in Microsoft Exchange 2007. This is because when you delete a mailbox in Microsoft Exchange 2007, the corresponding Microsoft Active Directory user object is also removed.
-
Before a mailbox reconciliation run is performed, you must ensure that the lookup definitions are synchronized with the lookup fields of the target system. In other words, scheduled tasks for lookup field synchronization must be run before mailbox reconciliation runs, and, when required, before provisioning operations.
-
The scheduled tasks for lookup field synchronization must be run before the scheduled tasks for reconciliation of existing and deleted mailbox data.
-
The scheduled task for reconciliation of mailbox data must be run before the scheduled task for reconciliation of deleted mailbox data.
-
If the operating environment consists of one Microsoft Active Directory installation and multiple Microsoft Exchange 2007 installations, then to reconcile mailboxes from a particular Exchange installation:
-
Change the value of the AD Server IT Resource attribute of the mailbox reconciliation scheduled task (Exchange Reconciliation Task) so that it points to the required Exchange installation.
Note:
This scheduled task is explained in detail later in this chapter. -
Run the scheduled task.
-
3.1.2 Guidelines on Performing Provisioning Operations
The following are guidelines that you must apply while performing provisioning operations:
-
When you perform a Create Mailbox provisioning operation on Microsoft Exchange 2007, a Remote Manager is used to run the Create User cmdlet (script) that creates the mailbox for the user on the target system.
-
During the mailbox provisioning operations on Microsoft Exchange 2007 and Microsoft Exchange 2010, the Remote Manager may throw the following or a similar error:
Get-ItemProperty: Cannot find pathTo prevent such an error, you must ensure that the Remote Manager uses an installed instance of a 64-bit version of JDK.
-
The following points describe the behavior of the connector during Enable, Disable, and Delete Mailbox provisioning operations:
-
When you perform an Enable Mailbox provisioning operation on Microsoft Exchange 2000, 2003, or 2007, the following target system attributes are set to their default values:
-
Max Incoming Message Size (KB)
-
Max Outgoing Message Size (KB)
-
-
When you perform a Disable Mailbox provisioning operation on Microsoft Exchange 2000, 2003, or 2007, the following target system attributes are set to zero (0):
-
Max Incoming Message Size (KB)
-
Max Outgoing Message Size (KB)
-
-
When you perform a Delete Mailbox provisioning operation on Microsoft Exchange 2000, 2003, or 2007, the connector deletes the Microsoft Exchange attributes of that user.
-
-
While performing provisioning operations on Microsoft Exchange 2007, you must select the Log On Name, Exchange IT Resource, and the Exchange Remote Manager IT resource fields along with the mandatory fields of the process form. You must not select these fields while performing provisioning operations on Microsoft Exchange 2000 and 2003. If you select these fields for Microsoft Exchange 2000 and 2003, then provisioning fails.
-
According to Microsoft, you must restart Microsoft Exchange 2000 and Microsoft Exchange 2003 each time you enable or disable a mailbox through provisioning. However, you need not restart Microsoft Exchange 2007 after enabling or disabling a mailbox through provisioning, because it is a supported operation in Microsoft Exchange 2007.
Note:
The Enable Mailbox and Disable Mailbox actions are not directly supported by Microsoft Exchange 2000 or Microsoft Exchange 2003. However, the connector supports both provisioning and reconciliation of Enable Mailbox and Disable Mailbox actions through flag fields on the process form. -
Specifying multibyte values for fields
Note:
This point is also mentioned in the "Known Issues and Troubleshooting" chapter.Some Asian languages use multibyte character sets. If the character limit for fields on the target system is specified in bytes, then the number of Asian-language characters that you can enter in a particular field may be less than the number of English-language characters that you can enter in the same field. The following example illustrates this point:
Suppose you can enter 50 characters of English in the Display Name field of the target system. If you have configured the target system for the Japanese language, then you would not be able to enter more than 25 characters in the same field.
-
The character length of target system fields must be taken into account when specifying values for the corresponding Oracle Identity Manager fields
During a provisioning operation, you must keep the lengths of target system fields in mind while entering values for Oracle Identity Manager process form fields. The character limit specified for some process form fields may be more than that of the corresponding target system field.
-
If the operating environment consists of one Microsoft Active Directory installation and multiple Microsoft Exchange 2007 installations, then to perform a provisioning operation on a particular Exchange installation:
-
Run the scheduled task for lookup field synchronization (Exchange Mail Store Lookup Reconciliation).
-
While performing the provisioning operation on the Administrative and User Console, select the IT resource for the Exchange installation.
-
3.2 Configuring the Lookup.Exchange.Configuration Lookup Definition
When you deploy the connector, the Lookup.Exchange.Configuration lookup definition is created in Oracle Identity Manager. The entries in this lookup definition are used during both reconciliation and provisioning.
To configure the Lookup.Exchange.Configuration lookup definition:
-
Log in to the Oracle Identity Manager Design Console.
-
Expand Administration, and double-click Lookup Definition.
-
Search for and open the Lookup.Exchange.Configuration lookup definition.
-
Enter decode values for each of the parameters listed in Table 3-1.
Table 3-1 Attributes of the Lookup.Exchange.Configuration Lookup Definition
Parameter Name Description Default/Sample Value PageSize
This parameter is used during reconciliation. The value represents the number of records to be fetched for a reconciliation run. You can configure this value according to your requirement. The value must be between 1 and 1000. It is recommended that you set the value of this parameter to 100.
100
ldapUserObjectClass
This is the object class used in the schema. By default Microsoft Active Directory has the user object class. You can change this value if you want to define your own schema.
user
ROExgInMsgSizeCol
If you create a copy of the process form, then specify the name of the attribute (column) in the new process form that holds the incoming message size value.
UD_MSEXCHG_INMSGSIZE
ROExgOutMsgSizeCol
If you create a copy of the process form, then specify the name of the attribute (column) in the new process form that holds the outgoing message size value.
UD_MSEXCHG_OUTMSGSIZE
DefaultInComingMsgSize
Enter the maximum incoming message size (in KB). This value is used when you enable a mailbox.
10240
DefaultOutGoingMsgSize
Enter the maximum incoming message size (in KB). This value is used when you enable a mailbox.
10240
AD Configuration Lookup
This parameter holds the name of the configuration lookup definition in Microsoft Active Directory. The default value is
Lookup.AD.Configuration. If you create a copy of the Lookup.AD.Configuration lookup definition, then you must enter the name of that copy.Lookup.AD.Configuration
isExchange2010
This parameter holds the value if the connector is configured with Exchange 2010 server or not. If the connector is configured with Exchange 2010 server then change the value to
yes.By default it isno.no
-
Click Save.
3.3 Scheduled Task for Lookup Field Synchronization
The Exchange Mail Store Lookup Reconciliation scheduled task is used to fetch the list of mail stores created on the target system. This data is used to update the list of mail stores in Oracle Identity Manager.
Table 3-2 lists the attributes of this scheduled task.
Note:
-
Attribute values are predefined in the connector XML file that you import. Specify values only for those attributes that you want to change.
-
Values (either default or user-defined) must be assigned to all the attributes. If even a single attribute value is left empty, then reconciliation is not performed.
Table 3-2 Attributes of the Exchange Mail Store Lookup Reconciliation Scheduled Task
| Attribute | Description |
|---|---|
|
AD IT Resource |
Enter the name of the Microsoft Active Directory IT resource Sample value: |
|
Lookup Code Name |
Name of the lookup definition to which mail store data must be copied Default value: |
After mail store lookup synchronization, the mail store names are stored in the Lookup.ExchangeReconciliation.MailStore lookup definition in the following format:
MAIL_STORE_NAME/ADMINISTRATIVE_GROUP_NAME/MAIL_STORE_SERVER_NAME
In the format, the mail store is located under the administrative group and this group is located in the Exchange server.
During a provisioning operation, you can view the values in the lookup field and select the value that you want to use.
3.4 Configuring Reconciliation
The following sections provide information about the attributes of the scheduled tasks:
See Also:
The "Reconciliation Configuration Options" section in Oracle Identity Manager Connector Concepts for detailed information about the configuration options described in some of the following topics-
Section 3.4.1, "Limited Reconciliation vs. Regular Reconciliation"
-
Section 3.4.2, "Full Reconciliation vs. Incremental Reconciliation"
-
Section 3.4.4, "Creating the Reconciliation Scheduled Task (Optional)"
3.4.1 Limited Reconciliation vs. Regular Reconciliation
This section discusses the Query attribute of the scheduled tasks for reconciliation.
By default, all target system records that are added or modified after the last reconciliation run are reconciled during the current reconciliation run. You can specify the subset of newly added or modified target system records that must be reconciled. You do this by creating a query condition to act as a filter for reconciliation.
To create a query condition in a nonnative format, use a combination of target system fields and the following logical operators:
Note:
You can use any target system fields, even the ones that are not supported (by default) for reconciliation and provisioning.-
The AND operator represented by the ampersand (&)
-
The OR operator represented by the vertical bar (|)
-
The EQUAL operator represented by the equal sign (=)
You must apply the following guidelines while creating the query condition:
-
The default Query attribute value is
(objectClass=user). When you create query, it is recommended that you retain the default value as one of the query conditions. For example:(&(mailNickName=*)(objectClass=user)) -
You must independently verify that the query returns the objects that you want it to return. The scheduled task does not validate your query.
-
For the target system fields, you must use the same case (uppercase or lowercase) as given in the table shown earlier in this section. This is because the attribute names are case-sensitive.
-
You must not include special characters other than the equal sign (=), ampersand (&), and vertical bar (|) in the query condition.
Note:
The default Query attribute value is(objectClass=user).
The following are sample query condition:
-
(&(objextClass=user)(givenname=john) -
(&(objectClass=user)(sn=Doe) -
(&(&(sn=Doe)(givenname=John))(objectClass=user)) -
(|(|(sn=lastname)(givenname=firstname))(objectClass=user))
While performing the procedure described in the section, set the value of the Query attribute to the query condition that you create.
3.4.2 Full Reconciliation vs. Incremental Reconciliation
This section discusses the Submit All Records attribute of the scheduled tasks for reconciliation in Microsoft Exchange.
After you deploy the connector, you first reconcile all the existing target system records into Oracle Identity Manager. At the end of this reconciliation run, the MEXC Timestamp attribute of the scheduled task is set to the time stamp at which the scheduled task finished running. This is a full reconciliation run.
During the next reconciliation run, the value of MEXC Timestamp is used to determine the time stamp at which the last run finished. User records added or modified after the time stamp are selected for reconciliation during the current run. This is incremental reconciliation.
Some user records may never be reconciled into Oracle Identity Manager during subsequent reconciliation runs. For example, user records that are added or modified around the time that the MEXC Timestamp attribute is updated may not meet the time-stamp criterion for reconciliation during the next reconciliation run. To ensure that such records are reconciled into Oracle Identity Manager, you must run full reconciliation at periodic intervals.
While configuring the reconciliation scheduled tasks by performing the procedure described in Section 3.5, "Configuring Scheduled Tasks":
-
To run full reconciliation, set the value of the Submit All Records attribute to
yes. -
To continue with incremental reconciliation, accept the default value of
nofor the attribute.
3.4.3 Reconciliation Scheduled Tasks
When you run the Connector Installer, reconciliation scheduled tasks are automatically created in Oracle Identity Manager. The Microsoft Exchange connector provides the following scheduled tasks for reconciliation:
3.4.3.1 Exchange Reconciliation Task
The Exchange Reconciliation Task scheduled task is used to reconcile data from active mailboxes. Table 3-3 lists the attributes of this scheduled task.
Table 3-3 Attributes of the Exchange Reconciliation Task Scheduled Task
| Attribute | Description |
|---|---|
|
ResourceObject |
This attribute holds the name of the resource object against which reconciliation runs must be performed. Default value: Note: For the resource object shipped with this connector, you must not change the value of this attribute. However, if you create a copy of the resource object, then you can enter the unique name for that resource object as the value of this attribute. |
|
Recon Attribute Lookup Code Name |
Enter the name of the lookup table containing the mapping for the Exchange attributes. You are not allowed to delete attributes from this table. Default value: |
|
User Search Base |
Enter the DN in which the search for user accounts is rooted in. This specifies the exact location in the LDAP tree from where the accounts are to be reconciled. If any account does not come under the specified DN, then the account is not reconciled. Default value: Note: You can also include the organizational unit in the value that you enter for this attribute. For example:
|
|
User Search Scope |
Enter the search scope used to locate user accounts. Default value: |
|
Submit All Records |
Enter Enter Default value: See "Full Reconciliation vs. Incremental Reconciliation" for more information about this attribute. |
|
Distribution Group Name |
Enter the name of the distribution group from which mailboxes are reconciled. A star symbol denotes that the reconciliation run brings mailboxes from all distribution groups, available with the exchange enabled Microsoft Active Directory server. Default value: |
|
Run Distribution Group Mailbox Recon |
Enter Default value: |
|
Run Query-Based Distribution Group Mailbox Recon |
Enter yes if you want to run mailbox reconciliation from a query-based distribution group. Default value: |
|
Query |
Enter the query condition to be used during the reconciliation of the mailboxes. Default value: By default the scheduled task is configured to fetch accounts having mailboxes and mail users. This value is Note: By default, the value of objectClass is |
|
Mail Store Name |
Enter the name of the mail store from which the mailboxes are to be reconciled. A star symbol denotes that the reconciliation run brings mailboxes from all mail store names, available with the Exchange enabled Microsoft Active Directory server. Default value: |
|
Storage Group Name |
Enter the name of the storage group from which the mailboxes are to be reconciled. A star symbol denotes that the reconciliation run brings mailboxes from all storage group names, available with the Exchange enabled Microsoft Active Directory server. Default value: |
|
Mail Store Server Name |
Enter the name of the Exchange server from where the mail stores are to be reconciled. A star symbol denotes that the reconciliation run brings mail stores from all mail store server names, available with the Exchange enabled Microsoft Active Directory server. Default value: |
|
AD Server IT Resource |
Enter the name of the IT resource for Microsoft Active Directory server. Sample value: |
|
Reconciliation Type |
Enter a value to specify the mode of reconciliation in which the connector is configured. Default value: |
|
MEXC Timestamp |
This attribute stores the date and time when the previous reconciliation run ended. Default value: |
|
Task Scheduler Name |
This attribute holds the name of the scheduled task. Value: Note: For this scheduled task, you must not change the value of this attribute. However, if you create a copy of this scheduled task, then you must enter the unique name of that scheduled task as the value of the attribute in that scheduled task. |
|
Configuration Lookup |
This attribute holds the name of the lookup definition containing values that are used during both reconciliation and provisioning: Value: Note: You must not change the value of this attribute. |
Note:
You must enter appropriate values for Reconciliation Type and Run Query-Based Distribution Group Mailbox Recon parameters. If you enter incorrect values, then reconciliation fails and an error message is displayed.3.4.3.1.1 Configuring Mail Store Reconciliation
You can configure the reconciliation of mailboxes from either all mail stores or from a specific mail store. If you want to configure the reconciliation of mailboxes from a specific mail store, then you must enter the combination of the mail store name, group name, and the server name of that mail store. You can specify one of the following combinations:
-
The asterisk (*) in all fields
This will fetch mailboxes from all mail stores.
-
Mail store name, distribution group name, and Exchange server name
If you enter an incorrect combination of values in the mailStoreName, groupName, and serverName fields, then reconciliation fails and a message is displayed stating that the combination of parameters entered is incorrect. The correct combination for this entry is displayed on the server console and also recorded in the log file.
3.4.3.2 Exchange Delete Recon Task
This scheduled task is used to reconcile data about deleted mailboxes. Table 3-4 lists the attributes of this scheduled task.
Note:
Delete reconciliation is not supported in Microsoft Exchange 2007.Table 3-4 Attributes of the Exchange Delete Recon Task Scheduled Task
| Attribute | Description |
|---|---|
|
User Search Base |
The DN in which the search for user accounts is rooted in. Default value: Note: You can also include the organizational unit in the value that you enter for this attribute. For example:
|
|
User Search Scope |
Enter the search scope used to locate user accounts. Default value: |
|
Task Scheduler Name |
Enter the name of the scheduled task for delete reconciliation. Default value: |
|
AD Server IT Resource |
Enter the name of the IT resource for Microsoft Active Directory server. Sample value: |
|
Target Resource Object |
Enter the name of the Microsoft Exchange resource object to be created. This is a user configurable name. Default value: |
|
MEXC_Timestamp |
This attribute stores the date and time when the previous reconciliation run started for mailboxes. This timestamp is used for delete reconciliation. Default value: |
|
Query |
Enter the query condition to be used during the reconciliation of the mailboxes. Default value: Note: By default, the value of objectClass is |
|
Recon Attribute Lookup Code Name |
Enter the name of the lookup table containing the mapping for the Exchange attributes. You are not allowed to delete attributes from this table. Default value: |
|
Configuration Lookup |
This attribute holds the name of the lookup definition containing values that are used during both reconciliation and provisioning: Value: Note: You must not change the value of this attribute. |
Note:
Each attribute of a scheduled task must have a value. For some attributes, you can either enter a value or accept the default value. For the rest, you must accept the default value. If even a single attribute value is left empty, then reconciliation is not performed.3.4.4 Creating the Reconciliation Scheduled Task (Optional)
You can use the Exchange Reconciliation Task scheduled task to perform different types of reconciliation. If you use the same scheduled task for all the reconciliation types, you must change the value for the reconciliation type, every time you run the scheduled task. Alternatively, you can create a different scheduled task for each reconciliation type by creating a copy of the existing scheduled task. See "Types of Reconciliation Enabled by the Connector" for more information about the types of reconciliation supported by the connector.
Depending on the Oracle Identity Manager release you are using, perform the procedure described in one of the following sections:
-
Section 3.4.4.1, "Creating Scheduled Tasks in Oracle Identity Manager Release 9.1.0.x"
-
Section 3.4.4.2, "Creating Scheduled Jobs in Oracle Identity Manager Release 11.1.1"
3.4.4.1 Creating Scheduled Tasks in Oracle Identity Manager Release 9.1.0.x
To create a copy of the scheduled task:
-
Log in to the Oracle Identity Manager Administrative and User Console.
-
Expand Resource Management.
-
Select Create Scheduled Task.
-
On the Step 1: Provide Scheduled Task Details and Schedule page, enter the following information:
-
In the Task Name field, enter the name of the scheduled task, for example,
Exchange Mail Store Lookup Reconciliation. -
In the Class Name field, enter the class name of the scheduled task, whose copy you are creating. Figure 3-1 shows the scheduled task created in the Create Scheduled Task page.
Figure 3-1 Step 1: Provide Scheduled Task Details and Schedule
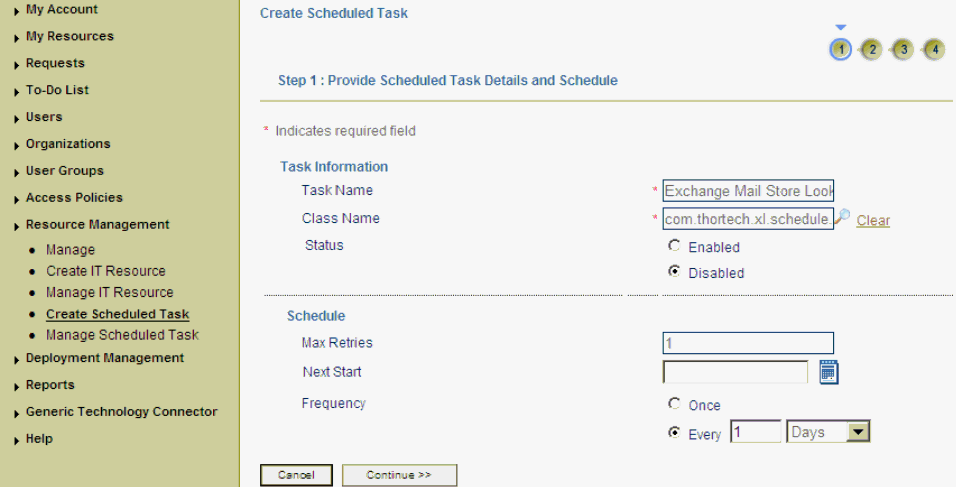
Description of "Figure 3-1 Step 1: Provide Scheduled Task Details and Schedule"
-
-
Click Continue.
-
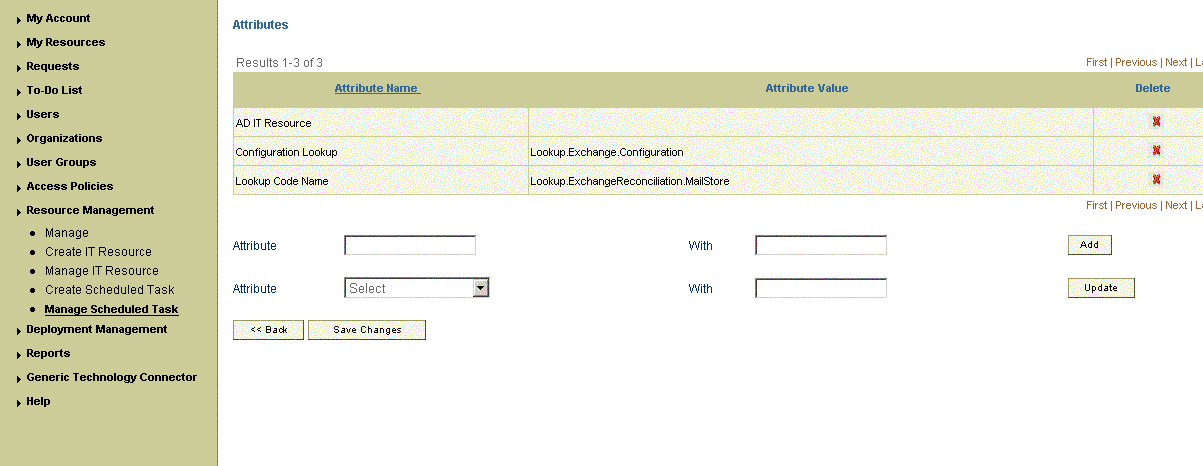
On the Step 2: Define Scheduled Task Attributes page, in the Task Attributes section, enter the attributes of the scheduled task whose copy you are creating, specify values for the attributes, and click Add. Figure 3-2 shows the attributes fields in the Create Scheduled Task page.
Figure 3-2 Step 2: Define Scheduled Task Attributes
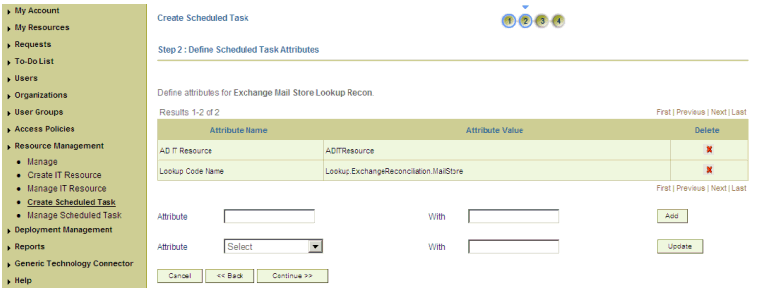
Description of "Figure 3-2 Step 2: Define Scheduled Task Attributes"
-
Click Continue.
-
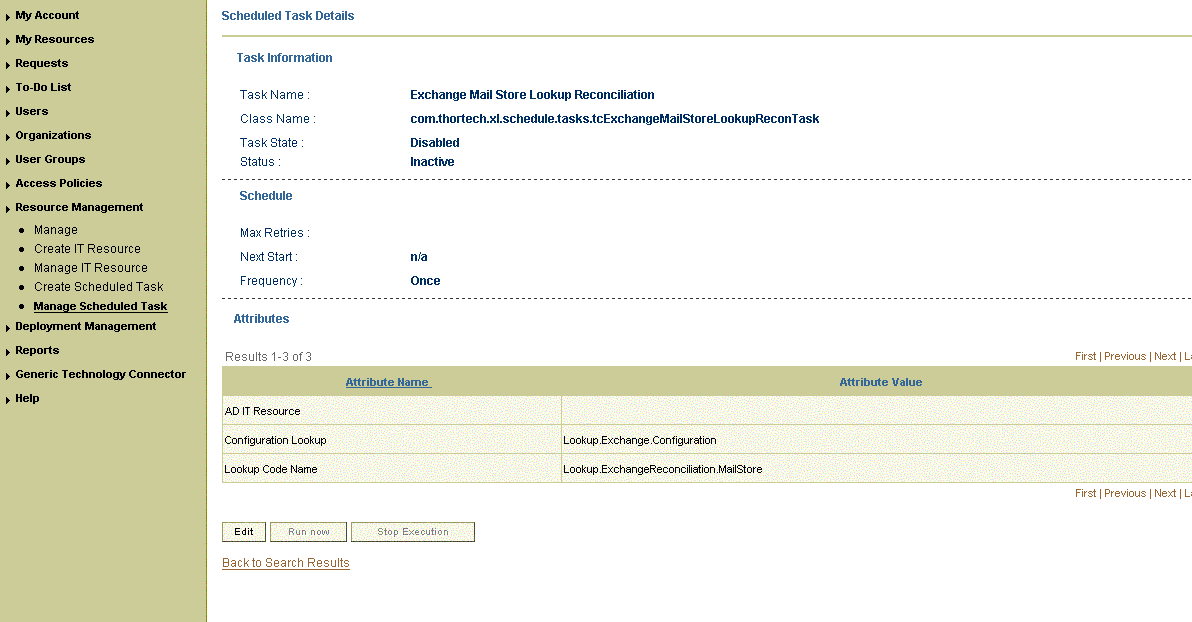
On the Step 3: Verify Scheduled Task Details page, review the information that you have entered and then click Continue to proceed. Figure 3-3 shows the details of the scheduled task that is created in the Create Scheduled Task page.
Figure 3-3 Step 3: Verify Scheduled Task Details
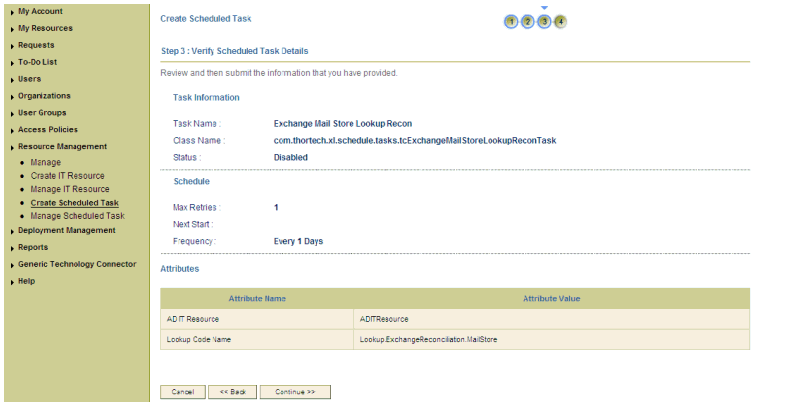
Description of "Figure 3-3 Step 3: Verify Scheduled Task Details"
-
The Step 4: Scheduled Task Created page displays a message specifying the successful creation of the scheduled task. Figure 3-4 shows the success message for creation of the scheduled task in the Create Scheduled Task page.
Figure 3-4 Step 4: Scheduled Task Created
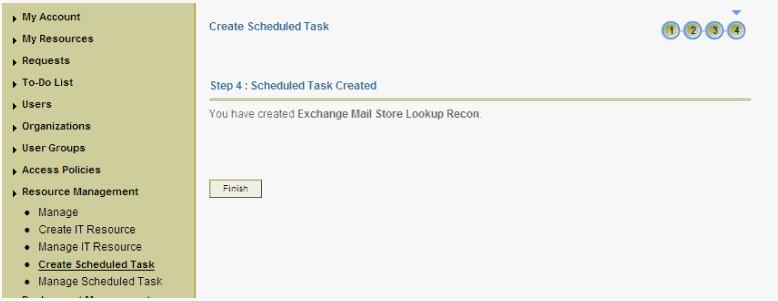
Description of "Figure 3-4 Step 4: Scheduled Task Created"
3.4.4.2 Creating Scheduled Jobs in Oracle Identity Manager Release 11.1.1
To create a copy of the scheduled task:
Note:
See Oracle Fusion Middleware System Administrator's Guide for Oracle Identity Manager for detailed information about this procedure.-
Log in to the Oracle Identity Manager Administrative and User Console.
-
On the Welcome to Oracle Identity Manager Self Service page, click Advanced in the upper-right corner of the page.
-
On the Welcome to Oracle Identity Manager Advanced Administration page, click the System Management tab, and then click Scheduler.
-
On the left pane, from the Actions list, select Create.
The Create Job page is displayed.
-
In the Job Information region, enter values for the following fields:
-
Job Name: Enter the name for the job, for example,
Exchange Reconciliation Task. -
Task: Specify the name of the scheduled task that runs the job, whose copy you are creating. Alternatively, you can search and specify a scheduled task.
-
Start Date: Specify the date on which you want the job to run. .
-
Start Time: Enter the time when you want the job to run.
-
Retries: Enter an integer value in this field. This number represents the number of times the scheduler tries to start the job before assigning the Stopped status to the job.
-
Schedule Type: Depending on the frequency at which you want the job to run, select one of the following schedule types:
-
Periodic
-
Cron
-
Single
-
No pre-defined schedule
-
-
-
In the Parameters region, specify values for the attributes of the scheduled job whose copy you are creating, and then click Apply.
A message confirming that the job has been successfully created is displayed. Click OK to close the message.
3.5 Configuring Scheduled Tasks
This section describes the procedure to configure scheduled tasks. You can apply this procedure to configure the scheduled tasks for lookup field synchronization and reconciliation.
Table 3-5 lists the scheduled tasks that you must configure.
| Scheduled Task Name | Description |
|---|---|
|
This scheduled task is used to synchronize the values of mail stores between the target system and Oracle Identity Manager. For information about this scheduled task and its attributes, see "Scheduled Task for Lookup Field Synchronization". |
|
|
This scheduled task is used to reconcile mailbox related data. For information about this scheduled task and its attributes, see "Exchange Reconciliation Task". |
|
|
This scheduled task is used to reconcile data about deleted mailboxes. For information about this scheduled task and its attributes, see "Exchange Delete Recon Task". |
To configure a scheduled task:
-
Depending on the Oracle Identity Manager release you are using, perform one of the following steps:
-
For Oracle Identity Manager release 9.1.0.x or 11.1.1:
-
Log in to the Administrative and User Console.
-
On the Welcome to Oracle Identity Manager Self Service page, click Advanced in the upper-right corner of the page.
-
-
For Oracle Identity Manager release 11.1.2:
-
Log in to Oracle Identity System Administration.
-
Create and activate a sandbox. For detailed instructions on creating and activating a sandbox, see the "Managing Sandboxes" section of Oracle Fusion Middleware Developer's Guide for Oracle Identity Manager.
-
In the left pane, under System Management, click Scheduler.
-
-
-
Depending on the Oracle Identity Manager release you are using, perform one of the following steps:
-
If you are using Oracle Identity Manager release 9.1.0.x, expand Resource Management, and then click Manage Scheduled Task.
-
If you are using Oracle Identity Manager release 11.1.1, then:
-
On the Welcome to Oracle Identity Manager Self Service page, click Advanced.
-
Click the System Management tab, and then click Scheduler.
-
On the left pane, click Advanced Search.
-
-
-
On the page that is displayed, you can use any combination of the search options provided to locate a scheduled task. Click Search after you specify the search criteria.
The list of scheduled tasks that match your search criteria is displayed in the search results table.
-
Depending on the Oracle Identity Manager release you are using, perform one of the following steps:
-
If you are using Oracle Identity Manager release 9.1.0.x, then in the search results table, click the Edit icon in the Edit column for the scheduled task.
-
If you are using Oracle Identity Manager release 11.1.x, then select the link for the scheduled task from the list of scheduled tasks displayed in the search results table.
-
-
Modify the details of the scheduled task. To do so:
-
If you are using Oracle Identity Manager release 9.1.0.x, then on the Edit Scheduled Task Details page, modify the following parameters, and then click Continue:
-
Status: Specify whether you want to leave the task in the enabled state. In the enabled state, the task is ready for use.
-
Max Retries: Enter an integer value in this field. This number represents the number of times Oracle Identity Manager must attempt to complete the task before assigning the ERROR status to the task. The default value is 1.
-
Next Start: Use the date editor to specify the date when you want the task to run. After you select a date value in the date editor, you can modify the time value that is automatically displayed in the Next Start field.
-
Frequency: Specify the frequency at which you want the task to run.
Figure 3-5, shows Status, Max Retries, Next Start, and Frequency field details that you can modify in the Edit Scheduled Task page.
-
-
If you are using Oracle Identity Manager release 11.1.1, then on the Job Details tab, you can modify the following parameters:
-
Retries: Enter an integer value in this field. This number represents the number of times the scheduler tries to start the job before assigning the Stopped status to the job.
-
Schedule Type: Depending on the frequency at which you want the job to run, select the appropriate schedule type.
Note:
See Oracle Fusion Middleware System Administrator's Guide for Oracle Identity Manager for detailed information about schedule types.In addition to modifying the job details, you can enable or disable a job.
-
-
-
Specify values for the attributes of the scheduled task. To do so:
Note:
-
Attribute values are predefined in the connector XML file that you import. Specify values only for those attributes that you want to change.
-
Values (either default or user-defined) must be assigned to all the attributes. If even a single attribute value is left empty, then reconciliation is not performed.
-
Reconciliation can be run in partial mode or in custom mode depending on values configured for the
Queryscheduled task attribute. -
Reconciliation type depends on the MEXC Timestamp and Submit All Records attributes. If the value for Submit All Records is yes, then all mail boxes are fetched from the target system regardless of the value of the MEXC Timestamp attribute.
-
See "Reconciliation Scheduled Tasks" for the list of scheduled tasks and their attributes.
-
If you are using Oracle Identity Manager release 9.1.0.x, then on the Attributes page, select the attribute from the Attribute list, specify a value in the field provided, and then click Update. Figure 3-6 shows the attribute details in the Attributes page.
-
If you are using Oracle Identity Manager release 11.1.1, then on the Job Details tab, in the Parameters region, specify values for the attributes of the scheduled task.
-
-
After specifying the attributes, do one of the following:
-
If you are using Oracle Identity Manager release 9.1.0.x, then click Save Changes to save the changes.
Note:
The Stop Execution option is not available in the Administrative and User Console. If you want to stop a task, then click Stop Execution on the Task Scheduler form of the Design Console. -
If you are using Oracle Identity Manager release 11.1.1, then click Apply to save the changes.
Note:
The Stop Execution option is available in the Administrative and User Console. You can use the Scheduler Status page to either start, stop, or reinitialize the scheduler.
-
3.6 Configuring Provisioning in Oracle Identity Manager Release 11.1.1
This section discusses the following topics:
3.6.1 Using the Connector for Provisioning
Apply the following guideline when you start using the connector for provisioning operations:
Before you provision the Microsoft Exchange resource object to a user, ensure that the user has an account in Microsoft Active Directory. If the user does not have a Microsoft Active Directory account, then the provisioning operation fails.
To create a Microsoft Active Directory account for the user, you can follow one of the following approaches:
-
In Oracle Identity Manager, provision the Microsoft Active Directory resource object to the user.
-
Manually create an account in Microsoft Active Directory for the user.
Note:
Mail redirection function can be set during Microsoft Active Directory provisioning. If mail redirection is set, then there is no need to provision Microsoft Exchange resource object. Provisioning is not required as mails are not physically stored in the mailbox, but are redirected on receipt.3.6.2 Performing Provisioning Operations
Provisioning a resource for an OIM User involves using Oracle Identity Manager to create a Microsoft Exchange account for the user.
When you install the connector on Oracle Identity Manager release 11.1.1, the direct provisioning feature is automatically enabled. This means that the process form is enabled when you install the connector.
If you have configured the connector for request-based provisioning, then the process form is suppressed and the object form is displayed. In other words, direct provisioning is disabled when you configure the connector for request-based provisioning. If you want to revert to direct provisioning, then perform the steps described in Section 3.6.3, "Switching Between Request-Based Provisioning and Direct Provisioning on Oracle Identity Manager Release 11.1.1."
The following are types of provisioning operations:
-
Direct provisioning
-
Request-based provisioning
-
Provisioning triggered by policy changes
See Also:
Oracle Identity Manager Connector Concepts for information about the types of provisioningThis section discusses the following topics:
3.6.2.1 Direct Provisioning
To provision a resource by using the direct provisioning approach:
Note:
Before you provision a Microsoft Exchange resource, ensure that a Microsoft Active Directory resource is already provisioned.If the Allow Multiple check box of the resource object is selected, then you can provision more than one mailbox for an OIM User. However, the target system supports only one mailbox for each user.
-
Log in to the Administrative and User Console.
-
If you want to first create an OIM User provision a Microsoft Active Directory user, and then provision a Microsoft Exchange mailbox to the user, then:
-
If you are using Oracle Identity Manager release 9.1.0.x, then:
-
From the Users menu, select Create.
-
On the Create User page, enter values for the OIM User fields and then click Create User.
-
-
If you are using Oracle Identity Manager release 11.1.1, then:
-
On the Welcome to Identity Administration page, from the Users region, click Create User.
-
On the Create User page, enter values for the OIM User fields, and then click Save.
-
-
-
If you want to provision a Microsoft Exchange mailbox to an existing OIM User, then:
-
If you are using Oracle Identity Manager release 9.1.0.x, then:
-
From the Users menu, select Manage.
-
Search for the OIM User and select the link for the user from the list of users displayed in the search results
-
-
If you are using Oracle Identity Manager release 11.1.1, then:
-
On the Welcome to Identity Administration page, search for the OIM User by selecting Users from the list on the left pane.
-
From the list of users displayed in the search results, select the OIM User. The user details page is displayed on the right pane.
-
-
-
Depending on the Oracle Identity Manager release you are using, perform one of the following steps:
-
If you are using Oracle Identity Manager release 9.1.0.x, then:
-
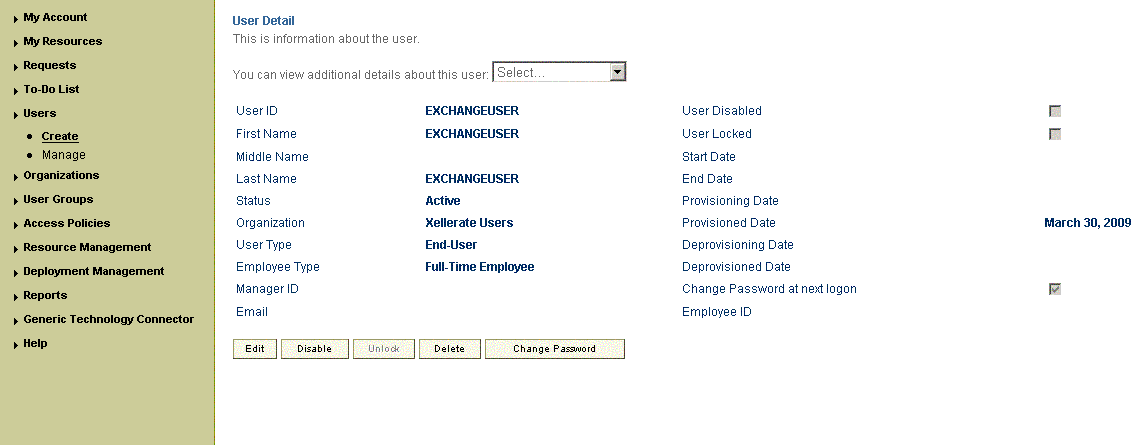
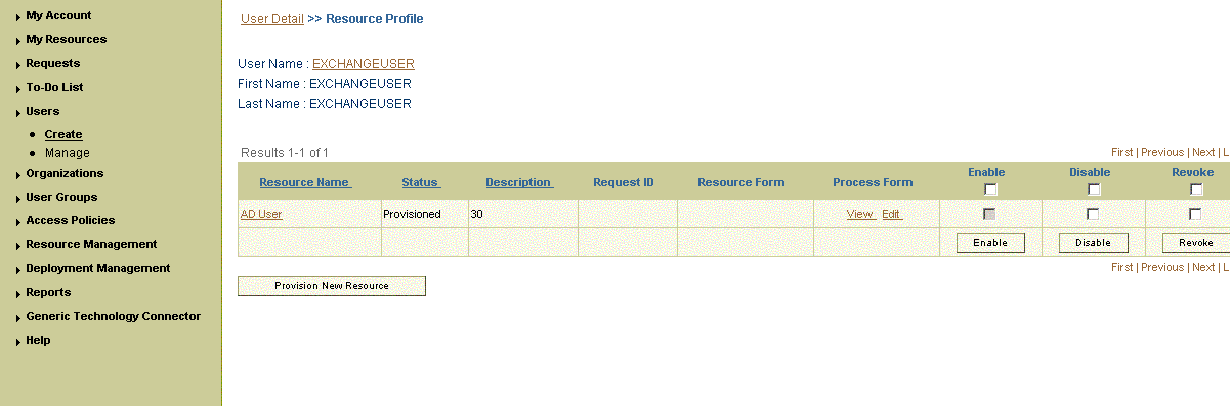
On the User Detail page, select Resource Profile from the list at the top of the page. Figure 3-7 shows the details of the user that you created in the User Detail page.
-
On the Resource Profile page, click Provision New Resource.
Figure 3-8 shows the resource name that you provision in the User Detail Resource Profile page.
-
-
If you are using Oracle Identity Manager release 11.1.1, then:
-
On the user details page, click the Resources tab.
-
From the Action menu, select Add Resource. Alternatively, you can click the add resource icon with the plus (+) sign. The Provision Resource to User page is displayed in a new window.
-
-
-
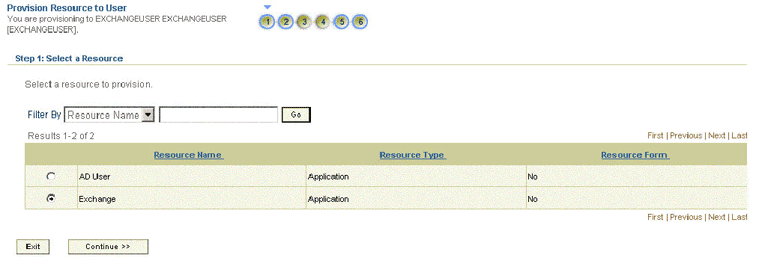
On the Step 1: Select a Resource page, select Exchange from the list, and then click Continue.
Figure 3-9 shows Exchange resource selected to provision in the Provision Resource to User page.
-
On the Step 2: Verify Resource Selection page, click Continue.
Figure 3-10 shows the resource name selected for provisioning to the Exchange User in the Provision Resource to User page.
Figure 3-10 Step 2: Verify Resource Selection
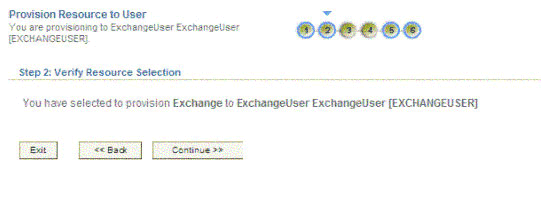
Description of "Figure 3-10 Step 2: Verify Resource Selection"
-
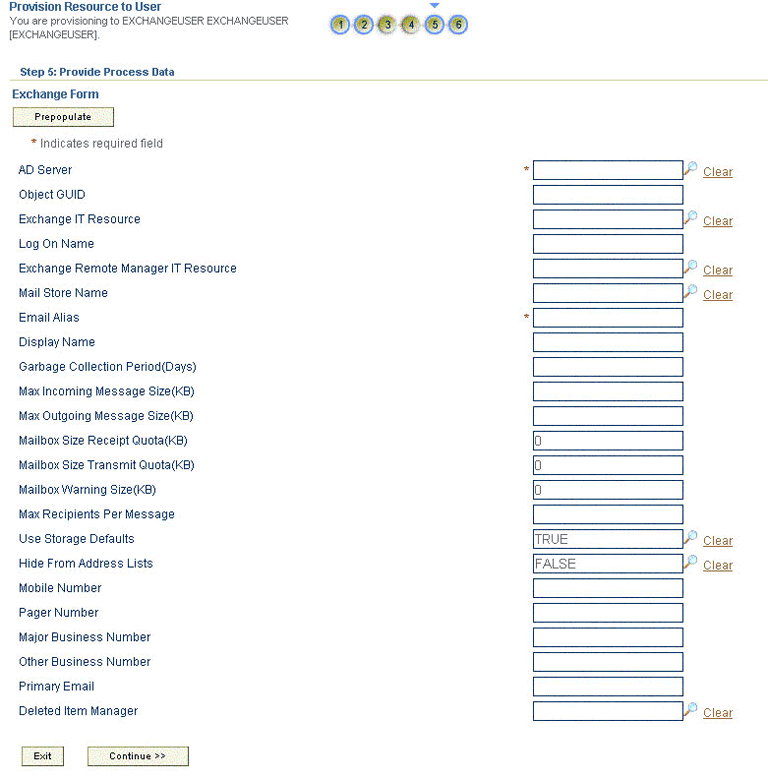
On the Step 5: Provide Process Data page, enter the details of the mailbox that you want to create on the target system and then click Continue.
Figure 3-11 shows the details of the mailbox name that is provisioned to the Exchange User in the Provision Resource to User page.
-
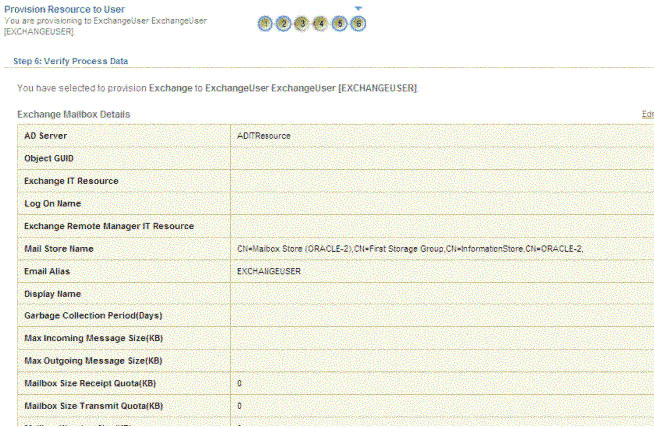
On the Step 6: Verify Process Data page, verify the data that you have provided and then click Continue.
Figure 3-12 shows the details of the process data you created in the Provision Resource to User page.
-
The "Provisioning has been initiated" message is displayed. Perform one of the following steps:
-
If you are using Oracle Identity Manager release 9.1.0.x, click Back to User Resource Profile. The Resource Profile page is displayed. The mailbox is created on the target system and provisioned as a resource to the OIM User. The page that is displayed provides options to disable or revoke the resource from the OIM User.
-
If you are using Oracle Identity Manager release 11.1.1, then:
-
Close the window displaying the "Provisioning has been initiated" message.
-
On the Resources tab, click Refresh to view the newly provisioned resource.
-
-
3.6.2.2 Request-Based Provisioning
Note:
The information provided in this section is applicable only if you are using Oracle Identity Manager release 11.1.1.A request-based provisioning operation involves both end users and approvers. Typically, these approvers are in the management chain of the requesters. The following sections discuss the steps to be performed by end users and approvers during a request-based provisioning operation:
Note:
The procedures described in these sections are built on an example in which the end user raises or creates a request for provisioning a target system account. This request is then approved by the approver.3.6.2.2.1 End User's Role in Request-Based Provisioning
The following steps are performed by the end user in a request-based provisioning operation:
See Also:
Oracle Fusion Middleware User's Guide for Oracle Identity Manager for detailed information about these steps-
Log in to the Administrative and User Console.
-
On the Welcome page, click Advanced in the upper-right corner of the page.
-
On the Welcome to Identity Administration page, click the Administration tab, and then click the Requests tab.
-
From the Actions menu on the left pane, select Create Request.
The Select Request Template page is displayed.
-
From the Request Template list, select Provision Resource and click Next.
-
On the Select Users page, specify a search criterion in the fields to search for the user that you want to provision the resource, and then click Search. A list of users that match the search criterion you specify is displayed in the Available Users list.
-
From the Available Users list, select the user to whom you want to provision the account..
If you want to create a provisioning request for more than one user, then from the Available Users list, select users to whom you want to provision the account.
-
Click Move or Move All to include your selection in the Selected Users list, and then click Next.
-
On the Select Resources page, click the arrow button next to the Resource Name field to display the list of all available resources.
-
From the Available Resources list, select Exchange, move it to the Selected Resources list, and then click Next.
-
On the Resource Details page, enter details of the account that must be created on the target system, and then click Next.
-
On the Justification page, you can specify values for the following fields, and then click Finish.
-
Effective Date
-
Justification
On the resulting page, a message confirming that your request has been sent successfully is displayed along with the Request ID.
-
-
If you click the request ID, then the Request Details page is displayed.
-
To view details of the approval, on the Request Details page, click the Request History tab.
3.6.2.2.2 Approver's Role in Request-Based Provisioning
The following are steps performed by the approver in a request-based provisioning operation:
-
Log in to the Administrative and User Console.
-
On the Welcome page, click Self-Service in the upper-right corner of the page.
-
On the Welcome to Identity Manager Self Service page, click the Tasks tab.
-
On the Approvals tab, in the first section, you can specify a search criterion for request task that is assigned to you.
-
From the search results table, select the row containing the request you want to approve, and then click Approve Task.
A message confirming that the task was approved is displayed.
3.6.3 Switching Between Request-Based Provisioning and Direct Provisioning on Oracle Identity Manager Release 11.1.1
Note:
It is assumed that you have performed the procedure described in Section 2.3.1.6, "Configuring Oracle Identity Manager for Request-Based Provisioning."On Oracle Identity Manager release 11.1.1, if you want to switch from request-based provisioning to direct provisioning, then:
-
Log in to the Design Console.
-
Disable the Auto Save Form feature as follows:
-
Expand Process Management, and then double-click Process Definition.
-
Search for and open the Exchange process definition.
-
Deselect the Auto Save Form check box.
-
Click the Save icon.
-
-
If the Self Request Allowed feature is enabled, then:
-
Expand Resource Management, and then double-click Resource Objects.
-
Search for and open the Exchange resource object.
-
Deselect the Self Request Allowed check box.
-
Click the Save icon.
-
On Oracle Identity Manager release 11.1.1, if you want to switch from direct provisioning back to request-based provisioning, then:
-
Log in to the Design Console.
-
Enable the Auto Save Form feature as follows:
-
Expand Process Management, and then double-click Process Definition.
-
Search for and open the Exchange process definition.
-
Select the Auto Save Form check box.
-
Click the Save icon.
-
-
If you want to enable end users to raise requests for themselves, then:
-
Expand Resource Management, and then double-click Resource Objects.
-
Search for and open the Exchange resource object.
-
Select the Self Request Allowed check box.
-
Click the Save icon.
-
3.7 Configuring Provisioning in Oracle Identity Manager Release 11.1.2
To configure provisioning operations in Oracle Identity Manager release 11.1.2:
Note:
The time required to complete a provisioning operation that you perform the first time by using this connector takes longer than usual.-
Log in to Oracle Identity Administrative and User console.
-
Create a user. See the "Managing Users" chapter in Oracle Fusion Middleware User's Guide for Oracle Identity Manager for more information about creating a user.
-
On the Account tab, click Request Accounts.
-
In the Catalog page, search for and add to cart the application instance, and then click Checkout.
-
Specify values for fields in the application form and then click Ready to Submit.
-
Click Submit.
-
If you want to provision a Microsoft Exchange mailbox to an existing OIM User, then:
-
On the Users page, search for the required user.
-
On the user details page, click Accounts.
-
Click the Request Accounts button.
-
Search for the Exchange application instance in the catalog search box and select it.
-
Click Add to Cart.
-
Click Checkout.
-
Specify values for fields in the application form and then click Ready to Submit.
-
Click Submit.
-