4 Extending the Functionality of the Connector
After you deploy the connector, you might need to configure it to meet your business requirements. The following are procedures that you can perform to extend the functionality of the connector:
-
Table 1-2, "Reconciled Target System Fields" lists the target system fields whose values are fetched into Oracle Identity Manager. Check if this set of fields meets your requirements. See Section 4.1, "Adding New Attributes for Reconciliation" if there are additional target system fields that you want include in this set.
-
The Section 1.5.4.1, "Lookup.EBS.HRMS.Recon Lookup Definition" section lists the predefined attribute mappings. See Section 4.2, "Modifying the Names of Predefined Attributes Mapped for Reconciliation" if you want to modify the names of any of these attributes.
-
The Section 1.5.4.1, "Lookup.EBS.HRMS.Recon Lookup Definition" section lists the predefined attribute mappings. You can remove some of these attribute mappings. See Section 4.3, "Deleting Predefined Attributes Mapped for Reconciliation" if you want to perform this procedure.
-
See Section 4.4, "Modifying Field Lengths on the OIM User Form" if the lengths of fields on the OIM User form do not match the lengths of target system fields.
-
Predefined reconciliation queries are stored in the ebsERQuery.properties file located in one of the following directories:
-
For Oracle Identity Manager release 9.1.0.x:
OIM_HOME/xellerate/XLintegrations/EBSER/config
-
For Oracle Identity Manager release 11.1.x:
OIM_HOME/server/XLintegrations/EBSER/config
Open this file in a text editor, and check if the predefined queries meet your requirements. See Section 4.5, "Configuring Reconciliation Queries" if you want to modify a predefined query or create your own query.
-
-
In a particular reconciliation query, the connector allows you to specify the value of a WHERE clause parameter as the value of a scheduled task attribute. For example, you can add a parameter in the WHERE clause of the ReconcileCurrentPersons query so that it returns records of persons whose last name is the one that you specify in the scheduled task. See Section 3.2.6, "Configuring Limited Reconciliation" if you want to use this feature of the connector.
Note:
In Oracle Identity Manager release 11.1.x, a scheduled job is an instance of a scheduled task. In this guide, the term scheduled task used in the context of Oracle Identity Manager release 9.1.0.x is the same as the term scheduled job in the context of Oracle Identity Manager release 11.1.x.See Oracle Fusion Middleware System Administrator's Guide for Oracle Identity Manager for more information about scheduled tasks and scheduled jobs.
-
See Section 4.9, "Configuring the Connector for Multiple Trusted Source Reconciliation" if Oracle E-Business HRMS is only one of multiple trusted sources that you want to configure for Oracle Identity Manager.
4.1 Adding New Attributes for Reconciliation
Note:
In this section, the term "attributes" refers to the identity data fields that store user data.
This section describes an optional procedure. Perform this procedure only if you want to add new attributes for reconciliation.
By default, the attributes listed in Table 1-2 are mapped for reconciliation between Oracle Identity Manager and the target system. If required, you can map additional attributes for reconciliation as follows:
Note:
A sample scenario in which you add the Full Name field for reconciliation has been used to illustrate the procedure.-
Log in to the Design Console.
-
Create a UDF for the field that you want to add as follows:
Note:
If you are using the 11.1.2.x version of Oracle Identity Manager, create a custom attribute as described in Section "Creating a Custom Attribute" of Oracle Fusion Middleware Administrator's Guide for Oracle Identity Manager.-
Expand Administration, and then double-click User Defined Field Definition.
-
Search for and open the USR table.
-
Click Add.
-
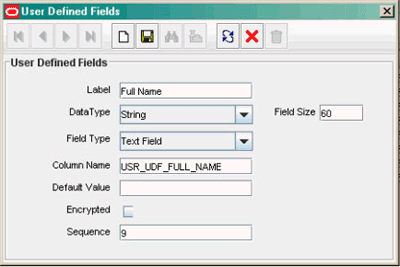
In the User Defined Fields dialog box, enter the following values:
-
Label: Enter a label for the field. For example, enter
Full Name. -
DataType: Select a data type for the field. For example, select
String. -
Field Size: Enter a length for the field. For example, enter
20. -
Column Name: Enter a column name for the field. For example, enter
FULL_NAME.Oracle Identity Manager automatically appends
USR_UDF_to the column name that you specify. So, for example, if you specifyFULL_NAMEas the column name, then the actual column name is changed toUSR_UDF_FULL_NAME.The following screenshot shows the User Defined Fields dialog box:
-
-
Click the Save icon.
-
-
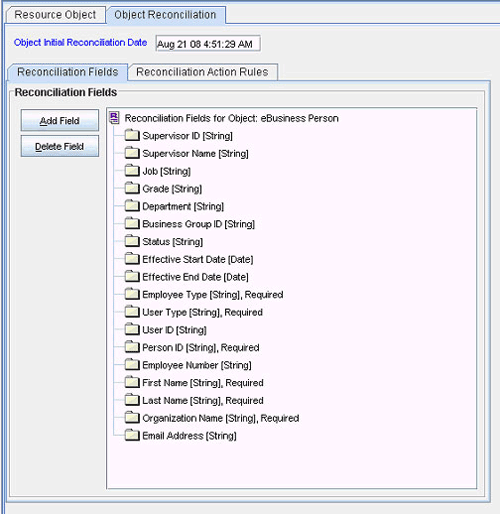
Add a reconciliation field in the resource object as follows:
-
Expand Resource Management, and double-click Resource Objects.
-
Search for and open the eBusiness Person resource object.
-
On the Reconciliation Fields subtab of the Object Reconciliation tab, click Add.
-
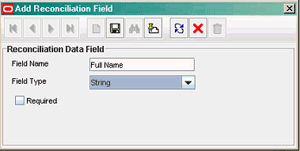
In the Add Reconciliation Field dialog box:
-
In the Field Name field, enter a name for the reconciliation field.
-
From the Field Type list, select the data type of the field.
-
Click the Save icon, and then close the dialog box.
The following screenshot shows the Add Reconciliation Field dialog box:
-
-
If you are using Oracle Identity Manager release 11.1.x, then click Create Reconciliation Profile. This copies changes made to the resource object into the MDS.
-
Click the Save icon.
-
-
In the process definition, create a reconciliation field mapping as follows:
-
Expand Process Management, and double-click Process Definition.
-
Search for and open the eBusiness HRMS Person process definition.
-
On the Reconciliation Field Mappings tab, click Add Field Map.
-
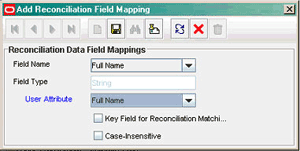
In the Add Reconciliation Field Mapping dialog box:
-
From the Field Name list, select Full Name.
-
From the User Attribute list, select FULL_NAME.
-
Click the Save icon, and then close the dialog box.
The following screenshot shows the Add Reconciliation Field Mapping dialog box:
-
-
Click the Save icon.
-
-
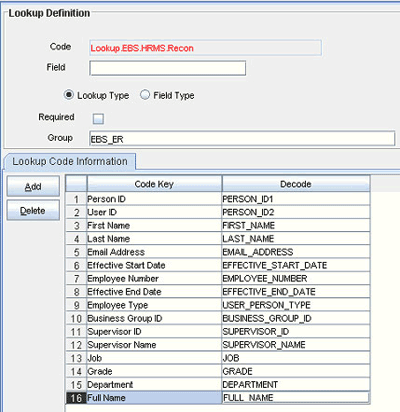
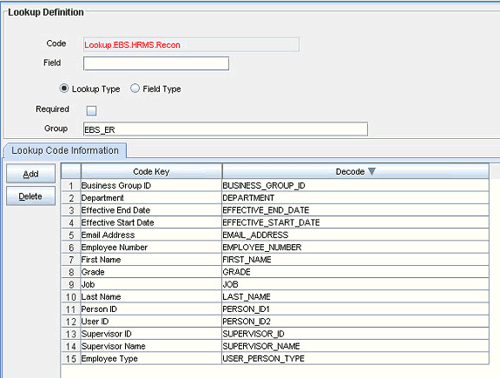
In the lookup definition that holds attribute mappings for reconciliation, add an entry as follows:
-
Expand Administration, and double-click Lookup Definition.
-
Search for and open the Lookup.EBS.HRMS.Recon lookup definition.
-
Click Add.
-
In the Code Key column, enter (for example)
Full Name. -
In the Decode column, enter (for example)
FULL_NAME.The following screenshot shows the Lookup.EBS.HRMS.Recon lookup definition:
-
-
Add a column in the SELECT clause of reconciliation queries that you use from the properties file:
-
Open the properties file in a text editor. This file is in the following directory:
OIM_HOME/xellerate/XLIntegration/EBSER/config
-
Add the column name in the SELECT clause of each query in the properties file.
Caution:
This does not apply to the query to reconcile deleted users. Do not make changes in that query. -
Save and close the file.
-
4.2 Modifying the Names of Predefined Attributes Mapped for Reconciliation
Note:
In this section, the term "attributes" refers to the identity data fields that store user data.
This section describes an optional procedure. Perform this procedure only if you want to modify the name of a predefined attribute mapped for reconciliation.
You can modify the names of the predefined target system attributes that are mapped for reconciliation. For example, you can change the FIRST_NAME attribute to FName. See Section 1.5.4.1, "Lookup.EBS.HRMS.Recon Lookup Definition" for more information about predefined attribute mappings.
To modify the name of a predefined attribute mapped for reconciliation:
-
Modify the name of the attribute in the Decode column of the Lookup.EBS.HRMS.Recon lookup definition as follows:
-
Expand Administration, and double-click Lookup Definition.
-
Search for and open the Lookup.EBS.HRMS.Recon lookup definition.
-
In the Decode column, modify the entry for the attribute.
The following screenshot shows Lookup.EBS.HRMS.Recon lookup definition:
-
Click the Save icon.
-
-
In all the reconciliation queries in the properties file, change the column name for the attribute.
Note:
The column name must be the same as the name of the attribute in the Decode column of the Lookup.EBS.HRMS.Recon lookup definition.-
Open the properties file in a text editor.
-
Change the name of the column in the SELECT clause of each query in the properties file.
-
Save and close the file.
-
4.3 Deleting Predefined Attributes Mapped for Reconciliation
Note:
In this section, the term "attributes" refers to the identity data fields that store user data.
This section describes an optional procedure. Perform this procedure only if you want to delete any of the predefined attribute mappings.
The Section 1.5.4.1, "Lookup.EBS.HRMS.Recon Lookup Definition" section shows the predefined attribute mappings for reconciliation. Of the attributes listed in the table, you can remove the following attributes:
-
PERSON_ID1
-
EMPLOYEE_NUMBER
-
BUSINESS_GROUP_ID
-
SUPERVISOR_ID
-
SUPERVISOR_NAME
-
JOB
-
GRADE
To remove the mapping for any one of these attributes:
-
In all the reconciliation queries in the properties file, remove the column from the SELECT clause as follows:
-
Open the properties file in a text editor.
-
Remove the column name in the SELECT clause of each query in the properties file.
Caution:
This does not apply to the query to reconcile deleted users. Do not make changes in that query. -
Save and close the file.
-
-
Log in to the Design Console.
-
In the lookup definition that holds attribute mappings for reconciliation, remove the entry for the attribute as follows:
-
Expand Administration, and double-click Lookup Definition.
-
Search for and open the Lookup.EBS.HRMS.Recon lookup definition.
-
Select the row corresponding to the entry that you want to remove.
The following screenshot shows Lookup.EBS.HRMS.Recon lookup definition:
-
Click Delete, and then click the Save icon.
-
-
Remove the attribute from the OIM User form as follows:
-
Expand Administration, and double-click User Defined Field Definition.
-
Search for and open the Users form.
The following screenshot shows Users form:
-
Delete the row corresponding to the attribute that you want to remove.
-
Click the Save icon.
-
-
Delete the field from the eBusiness Person resource object as follows:
-
Expand Resource Management, and double-click Resource Objects.
-
Search for and open the eBusiness Person resource object.
-
On the Reconciliation Fields subtab of the Object Reconciliation tab, select the field that you want to delete and then click Delete.
The following screenshot shows the reconciliation fields:
-
Click the Save icon.
-
-
Remove the reconciliation field mapping from the eBusiness HRMS Person process definition as follows:
-
Expand Process Management.
-
Double-click Process Definition.
-
Search for and open the eBusiness HRMS Person process definition.
-
On the Reconciliation Field Mappings tab, click the entry for the field that you want to remove and then click Remove Field Map.
The following screenshot shows the reconciliation field mappings:

-
Click the Save icon.
-
4.4 Modifying Field Lengths on the OIM User Form
Note:
This section describes an optional procedure. Perform this procedure only if you want to modify field lengths on the OIM User form.You might want to modify the lengths of fields (attributes) on the OIM User form. For example, if you use the Japanese locale, then you might want to increase the lengths of OIM User form fields to accommodate multibyte data from the target system.
If you want to modify the length of field on the OIM User form, then:
-
Log in to the Design Console.
-
Expand Administration, and double-click User Defined Field Definition.
-
Search for and open the Users form.
-
Modify the length of the required field.
The following screenshot shows the Users form:
-
Click the Save icon.
4.5 Configuring Reconciliation Queries
Note:
This section describes an optional procedure. Perform this procedure only if you want to modify one of the predefined reconciliation queries or create your own query.You can modify existing queries in the properties file. In addition, you can add your own queries in the file. The query whose name you specify as the value of the Query Name scheduled task attribute is applied during reconciliation.
To modify an existing query or to add a query in the properties file:
Caution:
You must not modify the DeletedPersons query. If you add a WHERE clause to this query, then only a subset of the actual set of person IDs is brought to Oracle Identity Manager for comparison. OIM Users whose user IDs do not match any of these person IDs are deleted from Oracle Identity Manager.-
Open the properties file in a text editor. If you are creating your own properties file, then ensure that the extension is .properties. You can place this properties file in any directory on the target system host computer.
-
Apply the following guidelines while modifying or adding a query:
Note:
Before you modify or add a query in the properties file, you must run the query by using any standard database client to ensure that the query produces the required results when it is run against the target system database.-
Query Name
Do not include spaces in the query name.
Ensure that the query name is not the same as the name of any other query in the properties file.
-
SELECT clause
Add or modify the column list in the SELECT clause. Note that changes that you make in the SELECT clause must be duplicated in the Lookup.EBS.HRMS.Recon lookup definition and, if required, on the process form. See Section 4.1, "Adding New Attributes for Reconciliation" for more information.
If you are adding columns from tables other than those listed in the OimUserGrants.sql file, then add the required entries in the OimUserGrants.sql file and the OimUserSynonyms.sql file. See Section 2.1.2.1, "Creating a Target System User Account for Connector Operations" for information about the existing permissions in these files.
Apply the following format if you want to add an entry in the OimUserGrants.sql script:
PROMPT GRANT SELECT ON SCHEMA_NAME.TABLE_NAME TO &USERNAME;
GRANT SELECT ON SCHEMA_NAME.TABLE_NAME TO &USERNAME;
Apply the following format if you want to add an entry in the OimUserSynonyms.sql script:
PROMPT CREATE SYNONYM TABLE_NAME FOR SCHEMA_NAME.TABLE_NAME;
CREATE SYNONYM TABLE_NAME FOR SCHEMA_NAME.TABLE_NAME;
-
WHERE clause
Ensure that the following conditions are included in the WHERE clause of the query:
Note:
The remaining conditions in the WHERE clause of all the predefined queries are optional. Retain these conditions only if you want them to be applied during reconciliation.-
PPT.USER_PERSON_TYPE_IN('Employee','Contractor','Contingent Employee')
The person types listed in this condition must be the same as the ones listed in the Lookup.EBS.HRMS.PersonTypes lookup definition. See Section 1.5.4.2, "Lookup.EBS.HRMS.PersonTypes Lookup Definition" for more information about this lookup definition.
-
(ROUND((PAPF.LAST_UPDATE_DATE – TO_DATE('01011970','DDMMYYYY')) *1440 *60 *1000) > :lastExecutionTime)
This condition is used to determine if a target system record was added or updated after the time stamp stored in the Last Execution Time scheduled task attribute.
-
If you are adding a column from a table other than the tables listed in the OimUserGrants.sql file and if that table contains a column in which time-stamp information is stored, then add the following condition:
(ROUND((TABLE_ALIAS.TIME_STAMP_COLUMN_NAME – TO_DATE('01011970','DDMMYYYY')) *1440 *60 *1000) > :lastExecutionTime)
The following is a sample extension to the WHERE clause:
AND HAOU.NAME IN ('Sales', 'Operations') \This sample condition is used to restrict user records fetched to the ones who belong to the Sales or Operations departments. HAOU is the alias for the HR_ALL_ORGANIZATION_UNITS table.
-
-
Comments
Use the number sign to begin each comment line in the properties file.
Add comments to describe changes that you make in existing queries and also to describe new queries that you add in the file.
See existing comments in the file for an example.
-
Line breaks
If you want to introduce line breaks in the query (to improve readability), then add a backslash (\) at the end of each line.
-
SQL keywords
You must ensure that the query does not contain any clause or keyword that modifies or can be used to modify data in the database. An error message is written to the log file if the following keywords are encountered:
-
ALTER
-
CREATE
-
DELETE
-
DROP
-
EXECUTE
-
INSERT
-
UPDATE
-
-
-
Save and close the properties file.
4.6 Configuring Validation of Data During Reconciliation
You can configure validation of reconciled single-valued data according to your requirements. For example, you can validate data fetched from the First Name attribute to ensure that it does not contain the number sign (#).
Note:
This feature cannot be applied to the Locked/Unlocked status attribute of the target system.To configure validation of data:
-
Write code that implements the required validation logic in a Java class.
The validation class must implement the oracle.iam.connectors.common.validate.Validator interface and the validate method.
The following sample validation class checks if the value in the First Name attribute contains the number sign (#):
package oracle.iam.connectors.common.validate; import java.util.HashMap; public class TestValidator implements Validator { public boolean validate(HashMap hmUserDetails, HashMap hmEntitlementDetails, String field) { /* * You must write code to validate attributes. Parent * data values can be fetched by using hmUserDetails.get(field) * For child data values, loop through the * ArrayList/Vector fetched by hmEntitlementDetails.get("Child Table") * Depending on the outcome of the validation operation, * the code must return true or false. */ /* * In this sample code, the value "false" is returned if the field * contains the number sign (#). Otherwise, the value "true" is * returned. */ boolean valid=true; String sFirstName=(String) hmUserDetails.get(field); for(int i=0;i<sFirstName.length();i++){ if (sFirstName.charAt(i) == '#'){ valid=false; break; } } return valid; } -
Create a JAR file to hold the Java class.
-
If you are using Oracle Identity Manager release 9.1.0.x, then copy the JAR file into the OIM_HOME/xellerate/ScheduleTask directory.
If you are using Oracle Identity Manager release 11g, then use UploadJars utility to upload the JAR file into the database.
See Also:
The Java documents shipped with the connector for more information about this interface -
Log in to the Design Console.
-
Search for and open the Lookup.EBS.HRMS.Validation lookup definition. If it does not exist, create one.
-
In the Code Key column, enter the resource object attribute name. In the Decode column, enter the class name that is implementing the validation logic.
For example, if you want to perform validation of the First Name attribute, then you must enter the following values in the Code Key and Decode columns:
-
Code Key: First Name
-
Decode: oracle.iam.connectors.common.validate.TestValidator
Here, the Code Key specifies the name of the resource object attribute that you want to validate and Decode is the complete package name of the Implementation class.
-
-
Save the changes to the lookup definition.
-
To enable validation in the scheduled task for your database, set the value of the Use Validation For Reconciliation entry to yes, and then save your changes.
4.7 Configuring Transformation of Data During Reconciliation
You can configure transformation of reconciled single-valued account data according to your requirements. For example, you can use First Name and Last Name values to create a different value for the Full Name field in Oracle Identity Manager.
Note:
This feature cannot be applied to the Locked/Unlocked status attribute of the target system.To configure transformation of single-valued account data fetched during reconciliation:
-
Write code that implements the required transformation logic in a Java class.
The transformation class must implement the oracle.iam.connectors.common.transform.Transformation interface and the transform method.
The following sample transformation class creates a value for the Full Name attribute by using values fetched from the First Name and Last Name attributes of the target system:
package oracle.iam.connectors.common.transform; import java.util.HashMap; public class TestTransformer implements Transformation { /* Description:Abstract method for transforming the attributes param hmUserDetails<String,Object> HashMap containing parent data details param hmEntitlementDetails <String,Object> HashMap containing child data details */ public Object transform(HashMap hmUserDetails, HashMap hmEntitlementDetails,String sField) { /* * You must write code to transform the attributes. * Parent data attribute values can be fetched by using * hmUserDetails.get("Field Name"). * To fetch child data values, loop through the * ArrayList/Vector fetched by hmEntitlementDetails.get("Child Table") * Return the transformed attribute. */ String sFirstName= (String)hmUserDetails.get("First Name"); String sLastName= (String)hmUserDetails.get("Last Name"); String sFullName=sFirstName+"."+sLastName; return sFullName; } -
Create a JAR file to hold the Java class.
-
If you are using Oracle Identity Manager release 9.1.0.x, then copy the JAR file into the following OIM_HOME/xellerate/ScheduleTask directory.
If you are using Oracle Identity Manager release 11g, then use UploadJars utility to upload the JAR file into the database.
See Also:
The Java documents shipped with the connector for more information about this interface -
Log in to the Design Console.
-
Search for and open the Lookup.EBS.HRMS.Transformation lookup definition. If it does not exist, create one.
-
In the Code Key column, enter the resource object attribute name. In the Decode column, enter the class name that is implementing the transformation logic.
For example, if you want to perform transformation of the Full Name attribute, then you must enter the following values in the Code Key and Decode columns:
-
Code Key: Full Name
-
Decode: oracle.iam.connectors.common.trasform.TestTransformer
Here, the Code Key specifies the name of the resource object attribute that you want to transform and Decode is the complete package name of the Implementation class.
-
-
Save the changes to the lookup definition.
-
To enable transformation in the scheduled task for your database, set the value of the Use Transformation For Reconciliation entry to yes, and then save your changes.
4.8 Configuring the Connector for Multiple Installations of the Target System
You may want to configure the connector for multiple installations of the target system. The following example illustrates this requirement:
The Tokyo, London, and New York offices of Example Multinational Inc. have their own installations of the target system. The company has recently installed Oracle Identity Manager, and they want to configure Oracle Identity Manager to link all the installations of the target system.
To meet the requirement posed by such a scenario, you must create a copy of the connector for each installation of the target system.
To meet the requirement posed by such a scenario, you must configure the connector for each installation of the target system. To do so, create copies of the following connector objects:
See Also:
Oracle Identity Manager Design Console Guide for detailed instructions on performing each step of this procedure-
Resource object
-
IT resource
-
Lookup definitions:
-
Lookup.EBS.ER.Configurations
-
Lookup.EBS.HRMS.DeleteRecon
-
Lookup.EBS.HRMS.PersonTypes
-
Lookup.EBS.HRMS.QueryFilters
-
Lookup.EBS.HRMS.Recon
-
-
Scheduled tasks
-
eBusiness HRMS Trusted Reconciliation
-
eBusiness HRMS Delete Reconciliation
-
4.9 Configuring the Connector for Multiple Trusted Source Reconciliation
Note:
This connector supports multiple trusted source reconciliation.
This section describes an optional procedure. Perform this procedure only if you want to configure the connector for multiple trusted source reconciliation.
The following are examples of scenarios in which there is more than one trusted source for person data in an organization:
-
One of the target systems is a trusted source for data about persons. The second target system is a trusted source for data about contractors. The third target system is a trusted source for data about interns.
-
One target system holds the data of some of the identity fields that constitute an OIM User. Two other systems hold data for the remaining identity fields. In other words, to create an OIM User, data from all three systems would need to be reconciled.
If the operating environment of your organization is similar to that described in either one of these scenarios, then this connector enables you to use the target system as one of the trusted sources of person data in your organization.
See Oracle Identity Manager Design Console Guide for detailed information about multiple trusted source reconciliation.