3 Using the Connector
After you deploy the connector, you must configure it to meet your requirements. This chapter discusses the following connector configuration procedures:
Note:
These sections provide both conceptual and procedural information about configuring the connector. It is recommended that you read the conceptual information before you perform the procedures.-
Section 3.1, "Setting Up Lookup Definitions in Oracle Identity Manager"
-
Section 3.2, "Scheduled Task for Lookup Field Synchronization"
-
Section 3.6, "Provisioning Operations Performed in an SoD-Enabled Environment"
-
Section 3.8, "Performing Provisioning Operations in Oracle Identity Manager Release 11.1.2 or Later"
3.1 Setting Up Lookup Definitions in Oracle Identity Manager
This Section discusses the following topics:
-
Section 3.1.1, "Setting Up the Configuration Lookup Definition for SSO Password Update"
-
Section 3.1.2, "Setting Up the Configuration Lookup Definition"
3.1.1 Setting Up the Configuration Lookup Definition for SSO Password Update
Depending on the connector that you are using, add the IS_SSO_EBS_BIDIRECTIONAL entry to the following lookup definition:
-
For User Management connector: Lookup.EBS.UM.Configuration
-
For User Management with HR Foundation connector: Lookup.EBS.UMHRMS.Configuration
-
For User Management with TCA Foundation connector: Lookup.EBS.UMTCA.Configuration
If the target system is configured with SSO, then the password update operation can be controlled by adding the IS_SSO_EBS_BIDIRECTIONAL entry.
If you enter the value as Yes, it will proceed to update the user's password.
If you enter the value as No, the "Password Updated" task will be rejected with the following message:
Password update is not supported if the target system is protected by SSO
3.1.2 Setting Up the Configuration Lookup Definition
Depending on the connector that you are using, you must provide Decode values for some of the entries of the following lookup definition that holds configuration information.
To set a Decode value for an entry in a lookup definition:
-
On the Design Console, expand Administration, and then double-click Lookup Definition.
-
Search for and open the lookup definition that you want to modify.
-
Enter the value in the Decode column for the Code Key that you want to set.
-
Click the Save icon.
Depending on the connector that you are using, see one of the following section for information about the Code Key entries for which you must specify values:
-
Section 3.1.2.1, "Setting Up the Lookup.EBS.UM.Configuration Lookup Definition"
-
Section 3.1.2.2, "Setting Up the Lookup.EBS.UMHRMS.Configuration Lookup Definition"
-
Section 3.1.2.3, "Setting Up the Lookup.EBS.UMTCA.Configuration Lookup Definition"
3.1.2.1 Setting Up the Lookup.EBS.UM.Configuration Lookup Definition
If you are using the User Management connector, then provide a Decode value for the following entries of the Lookup.EBS.UM.Configuration lookup definition:
-
USE_CONNECTION_POOLING
If you want the connector to use connection pooling, then set the value of the USE_CONNECTION_POOLING Code Key to
Yes. See Section 1.5.12, "Connection Pooling" for more information about this feature. -
TO_CHAR_DATE_FORMAT and RECON_DATE_FORMAT
You use the TO_CHAR_DATE_FORMAT and RECON_DATE_FORMAT entries to specify the format to which you want to convert values that are fetched from the date-type target system columns during reconciliation.
The RECON_DATE_FORMAT entry holds the Java-equivalent date format of the format specified in the TO_CHAR_DATE_FORMAT entry. Table 3-1 lists SQL date formats and the corresponding Java date formats that you can enter as the Decode value of the TO_CHAR_DATE_FORMAT and RECON_DATE_FORMAT entries, respectively.
Table 3-1 Date Formats That Can Be Entered as the Values of the TO_CHAR_DATE_FORMAT and RECON_DATE_FORMAT Entries
Value for TO_CHAR_DATE_FORMAT Value for RECON_DATE_FORMAT dd-Mon-yy
dd-MMM-yy
dd-Mon-yyyy
dd-MMM-yyyy
dd-mm-yy
dd-MM-yy
dd-mm-yyyy
dd-MM-yyyy
By default, the value of the TO_CHAR_DATE_FORMAT and RECON_DATE_FORMAT entries is set to
dd-Mon-yyanddd-MMM-yy, respectively. Therefore, by default, during reconciliation, all values that are fetched from date-type target system columns are converted to the dd-Mon-yy format.To convert the format of values fetched from date-type target system columns:
-
In a text editor, open the ebsERQuery.properties file.
-
Specify the date format to which you want to convert values fetched from the date-type target system columns during reconciliation.
Note:
See the "TO_CHAR_DATE_FORMAT" column of Table 3-1 for a list of date formats that you can specify.For example, change:
TO_CHAR (PAPF.EFFECTIVE_START_DATE) AS EFFECTIVE_START_DATEto:
TO_CHAR(PAPF.EFFECTIVE_START_DATE,'dd-Mon-yyyy') AS EFFECTIVE_START_DATE. -
Save and close the file.
-
Configure the Lookup.EBS.UM.Configuration lookup definition as follows:
-
In the Decode column of the TO_CHAR_DATE_FORMAT Code Key, enter the date format specified in the ebsERQuery.properties file. For example, enter
dd-Mon-yyyy. -
In the Decode column of the RECON_DATE_FORMAT Code Key, enter the Java-equivalent date format of the format specified in Step 4.e. For example, enter
dd-MMM-yyyy.Note:
See Table 3-1 for information about the Java-equivalent date format that must be specified. -
Click the Save icon.
-
-
-
UMX_REVOKE_ROLE_PROC
IF you want to perform a revoke role provisioning operation by using the target system account created for performing connector operations, then change the decode value from
{CALL OIM_UMX_ACCESS_ROLES_PVT.revokeUserRole(?,?,?)}to {CALL UMX_ACCESS_ROLES_PVT.revokeUserRole(?,?,?)}.Note that you need not perform this change if you are using the APPS account for performing this revoke role provisioning operation, as it points to the custom wrapper package.
3.1.2.2 Setting Up the Lookup.EBS.UMHRMS.Configuration Lookup Definition
If you are using the User Management with HR Foundation connector, then provide Decode values for the following entries of the Lookup.EBS.UMHRMS.Configuration lookup definition:
-
USE_CONNECTION_POOLING
If you want the connector to use connection pooling, then set the value of the USE_CONNECTION_POOLING Code Key to Yes. See Section 1.5.12, "Connection Pooling" for more information about this feature.
-
UD_EBSH_USR_BIZGRPID and UD_EBSH_USR_PERTYPEID
Business Group ID and Person Type ID are two of the attributes on the process form. By entering values for these attributes, you specify the subset of HRMS person records that must be considered for connector operations. The values that you specify for these fields are used during provisioning operations. Alternatively, you can set values for these attributes in the UD_EBSH_USR_BIZGRPID and UD_EBSH_USR_PERTYPEID entries of the Lookup.EBS.UMHRMS.Configuration lookup definition. During a provisioning operation, if you do not enter values for these attributes on the process form, then the connector uses the Decode values of the UD_EBSH_USR_BIZGRPID and UD_EBSH_USR_PERTYPEID entries.
Note:
These entries in the lookup definition are also used during request-based provisioning.To determine the Decode value for the UD_EBSH_USR_BIZGRPID Code Key, run the following query on the target system database:
SELECT business_group_id FROM hr_all_organization_units WHERE business_group_id = organization_id and hr_all_organization_units.name = 'ORGANIZATION_NAME'
To determine the Decode value for the UD_EBSH_USR_PERTYPEID Code Key, run the following query on the target system database:
SELECT person_type_id, user_person_type FROM per_person_types WHERE business_group_id = BUSINESS_GROUP_ID AND system_person_type = 'EMP'In this query, replace the BUSINESS_GROUP_ID with the value returned from the query for the UD_EBSH_USR_BIZGRPID Code Key. This query returns the Person Type ID for records that are of the EMP type, for example, Employee, Retiree, and Contractor.
-
TO_CHAR_DATE_FORMAT and RECON_DATE_FORMAT
You use the TO_CHAR_DATE_FORMAT and RECON_DATE_FORMAT entries to specify the format to which you want to convert values that are fetched from the date-type target system columns during reconciliation.
The RECON_DATE_FORMAT entry holds the Java-equivalent date format of the format specified in the TO_CHAR_DATE_FORMAT entry. Table 3-1 lists SQL date formats and the corresponding Java date formats that you can enter as the Decode value of the TO_CHAR_DATE_FORMAT and RECON_DATE_FORMAT entries, respectively.
Table 3-2 Date Formats That Can Be Entered as the Values of the TO_CHAR_DATE_FORMAT and RECON_DATE_FORMAT Entries
TO_CHAR_DATE_FORMAT RECON_DATE_FORMAT dd-Mon-yy
dd-MMM-yy
dd-Mon-yyyy
dd-MMM-yyyy
dd-mm-yy
dd-MM-yy
dd-mm-yyyy
dd-MM-yyyy
By default, the value of the TO_CHAR_DATE_FORMAT and RECON_DATE_FORMAT entries is set to
dd-Mon-yyanddd-MMM-yy, respectively. Therefore, by default, during reconciliation, all values that are fetched from date-type target system columns are converted to the dd-Mon-yy format.To convert the format of values fetched from date-type target system columns:
-
In a text editor, open the ebsERQuery.properties file.
-
Specify the date format to which you want to convert values fetched from the date-type target system columns during reconciliation.
Note:
See the "TO_CHAR_DATE_FORMAT" column of Table 3-1 for a list of date formats that you can specify.For example, change:
TO_CHAR (PAPF.EFFECTIVE_START_DATE) AS EFFECTIVE_START_DATEto:
TO_CHAR(PAPF.EFFECTIVE_START_DATE,'dd-Mon-yyyy') AS EFFECTIVE_START_DATE. -
Save and close the file.
-
Configure the Lookup.EBS.UMHRMS.Configuration lookup definition as follows:
-
In the Decode column of the TO_CHAR_DATE_FORMAT Code Key, enter the date format specified in the ebsERQuery.properties file. For example, enter
dd-Mon-yyyy. -
In the Decode column of the RECON_DATE_FORMAT Code Key, enter the Java-equivalent date format of the format specified in Step 4.e. For example, enter
dd-MMM-yyyy.Note:
See Table 3-1 for information about the Java-equivalent date format that must be specified. -
Click the Save icon.
-
-
-
UMX_REVOKE_ROLE_PROC
IF you want to perform a revoke role provisioning operation by using the target system account created for performing connector operations, then change the decode value from
{CALL OIM_UMX_ACCESS_ROLES_PVT.revokeUserRole(?,?,?)}to {CALL UMX_ACCESS_ROLES_PVT.revokeUserRole(?,?,?)}.Note that you need not perform this change if you are using the APPS account for performing this revoke role provisioning operation, as it points to the custom wrapper package.
3.1.2.3 Setting Up the Lookup.EBS.UMTCA.Configuration Lookup Definition
If you are using the User Management with TCA Foundation connector, then provide Decode values for the following entries of the Lookup.EBS.UMTCA.Configuration lookup definition:
-
USE_CONNECTION_POOLING
If you want the connector to use connection pooling, then set the value of the USE_CONNECTION_POOLING Code Key to Yes. See Section 1.5.12, "Connection Pooling" for more information about this feature.
-
TO_CHAR_DATE_FORMAT and RECON_DATE_FORMAT
You use the TO_CHAR_DATE_FORMAT and RECON_DATE_FORMAT entries to specify the format to which you want to convert values that are fetched from the date-type target system columns during reconciliation.
The RECON_DATE_FORMAT entry holds the Java-equivalent date format of the format specified in the TO_CHAR_DATE_FORMAT entry. Table 3-1 lists SQL date formats and the corresponding Java date formats that you can enter as the Decode value of the TO_CHAR_DATE_FORMAT and RECON_DATE_FORMAT entries, respectively.
Table 3-3 Date Formats That Can Be Entered as the Values of the TO_CHAR_DATE_FORMAT and RECON_DATE_FORMAT Entries
TO_CHAR_DATE_FORMAT RECON_DATE_FORMAT dd-Mon-yy
dd-MMM-yy
dd-Mon-yyyy
dd-MMM-yyyy
dd-mm-yy
dd-MM-yy
dd-mm-yyyy
dd-MM-yyyy
By default, the value of the TO_CHAR_DATE_FORMAT and RECON_DATE_FORMAT entries is set to
dd-Mon-yyanddd-MMM-yy, respectively. Therefore, by default, during reconciliation, all values that are fetched from date-type target system columns are converted to the dd-Mon-yy format.To convert the format of values fetched from date-type target system columns:
-
In a text editor, open the ebsERQuery.properties file.
-
Specify the date format to which you want to convert values fetched from the date-type target system columns during reconciliation.
Note:
See the "TO_CHAR_DATE_FORMAT" column of Table 3-1 for a list of date formats that you can specify.For example, change:
TO_CHAR (PAPF.EFFECTIVE_START_DATE) AS EFFECTIVE_START_DATEto:
TO_CHAR(PAPF.EFFECTIVE_START_DATE,'dd-Mon-yyyy') AS EFFECTIVE_START_DATE. -
Save and close the file.
-
Configure the Lookup.EBS.UMTCA.Configuration lookup definition as follows:
-
In the Decode column of the TO_CHAR_DATE_FORMAT Code Key, enter the date format specified in the ebsERQuery.properties file. For example, enter
dd-Mon-yyyy. -
In the Decode column of the RECON_DATE_FORMAT Code Key, enter the Java-equivalent date format of the format specified in Step 4.e. For example, enter
dd-MMM-yyyy.Note:
See Table 3-1 for information about the Java-equivalent date format that must be specified. -
Click the Save icon.
-
-
-
UMX_REVOKE_ROLE_PROC
IF you want to perform a revoke role provisioning operation by using the target system account created for performing connector operations, then change the decode value from
{CALL OIM_UMX_ACCESS_ROLES_PVT.revokeUserRole(?,?,?)}to {CALL UMX_ACCESS_ROLES_PVT.revokeUserRole(?,?,?)}.Note that you need not perform this change if you are using the APPS account for performing this revoke role provisioning operation, as it points to the custom wrapper package.
3.2 Scheduled Task for Lookup Field Synchronization
Note:
In Oracle Identity Manager releases 11.1.x and 11.1.2.x, a scheduled job is an instance of a scheduled task. In this guide, the term scheduled task used in the context of Oracle Identity Manager release 9.1.0.x is the same as the term scheduled job in the context of Oracle Identity Manager releases 11.1.x and 11.1.2.x.See Oracle Fusion Middleware Administrator's Guide for Oracle Identity Manager for more information about scheduled tasks and scheduled jobs.
The eBusiness UM Lookup Definition Reconciliation scheduled task is used for lookup field synchronization.
Note:
The procedure to configure this scheduled task is described later in the guide.The descriptions of some attributes also instruct you not to change the default values. However, if you create a copy of this scheduled task, then you can enter attribute values specific to the target system installation for which you create the copy of scheduled task. See Section 4.9, "Configuring the Connector for Multiple Installations of the Target System" for more information about creating copies of connector objects.
You must specify values for attributes whose default value is the "Enter a value" string.
Table 3-4 describes the attributes of this scheduled task.
Table 3-4 Attributes of the eBusiness UM Lookup Definition Reconciliation Scheduled Task
| Attribute | Description |
|---|---|
|
Query Properties File |
Enter the full path and name of the file containing the lookup definition synchronization query that you want to run. Sample value: |
|
IT Resource Name |
Enter the name of the IT resource that you configure by performing the procedure described in Section 2.3.3.6, "Configuring the IT Resource". Sample value: |
|
Lookup Definition Name |
Enter the name of the lookup definition that you want to synchronize with the target system. You can specify one of the following lookup definitions:
|
|
Task Name |
This attribute holds the name of the scheduled task. Value: Note: For this scheduled task, you must not change the value of this attribute. However, if you create a copy of this scheduled task, then you must enter the unique name of that scheduled task as the value of the attribute in that scheduled task. |
Note:
The IllegalInputException exception is thrown if lookup field data synchronized by the connector contains characters that are treated as illegal by Oracle Identity Manager. When a record containing an illegal character is encountered, the connector skips that record and proceeds to reconcile other records.You can search for the string Skipped code = in the log to track down the entry that caused the exception.
For information about special characters that are supported by Oracle Identity Manager, see one of the following guides:
-
For Oracle Identity Manager release 9.1.0.x:
Oracle Identity Manager Globalization Guide
-
For Oracle Identity Manager releases 11.1.x and 11.1.2.x:
Oracle Fusion Middleware Developer's Guide for Oracle Identity Manager
3.3 Configuring Reconciliation
As mentioned earlier in this guide, reconciliation involves duplicating in Oracle Identity Manager the creation of and modifications to user accounts on the target system. This section discusses the following topics related to configuring reconciliation:
3.3.1 Reconciliation Time Stamp
This section describes the Last Execution Time attribute of the scheduled task.
The Last Execution Time attribute holds the time stamp at which the last reconciliation run started. This attribute is used in conjunction with the reconciliation query specified by the Query Name attribute. During a reconciliation run, only target system records added or modified after the time stamp value stored in the Last Execution Time attribute are fetched into Oracle Identity Manager for reconciliation.
Apply the following guidelines while deciding on a value for the Last Execution Time attribute:
-
For a particular reconciliation mode, if you want to fetch all target system records for reconciliation, then set the value of the attribute to 0.
-
If you want to specify a time stamp, then first run the following query to convert the time stamp into the required format:
SELECT (TO_DATE('DATE_TO_BE_CONVERTED','DD-MON-YYYY') - TO_DATE('01011970', 'DDMMYYYY')) *24*60*60*1000 as ts FROM DUALIn this query, replace DATE_TO_BE_CONVERTED with the date that you want to use as the time stamp. For example, if you want to use 5-Dec-2008 as the time stamp, then run the following query:
SELECT (TO_DATE('5-Dec-2008','DD-MON-YYYY') - TO_DATE('01011970', 'DDMMYYYY')) *24*60*60*1000 as ts FROM DUALThe query returns the following value:
1228435200000
Specify this value as the value of the Last Execution Time attribute.
-
The Last Execution Time attribute is updated during each reconciliation run. For example, the Last Execution Time attribute is set to the time stamp at which the run begins.
3.3.2 Batched Reconciliation
During a reconciliation run, all changes in the target system records are reconciled into Oracle Identity Manager. Depending on the number of records to be reconciled, this process may require a large amount of time. In addition, if the connection breaks during reconciliation, then the process would take longer to complete.
You can configure batched reconciliation to avoid these problems.
To configure batched reconciliation, you must specify a value for the Batch Size user reconciliation scheduled task attribute. The value that you specify is the number of records that must be included in each batch. The default value is 1000.
3.3.3 Configuring Limited Reconciliation
Note:
This section describes an optional procedure. Perform this procedure only if you want to add filter parameters for reconciliation. The alternative to performing this procedure is to add a condition directly in the WHERE clause of the reconciliation query that you want to run.By default, all target system records that are added or modified after the last reconciliation run are reconciled during the current reconciliation run. You can customize this process by specifying the subset of added or modified target system records that must be reconciled. You do this by adding a filter parameter in the reconciliation query and specifying a value for the parameter in the, for example, Lookup.EBS.UM.QueryFilters lookup definition.
For example, you can add a parameter in the WHERE clause of the UM_USER_RECON query so that it returns FND_USER records whose user name is the one that you specify in the lookup definition.
To add a filter parameter in a reconciliation query:
Note:
Before you modify a query in the properties file, you must run the query by using any standard database client to ensure that the query produces the required results when it is run against the target system database.-
Modify the query as follows:
-
Open the properties file in a text editor.
-
Add the condition in the WHERE clause of the query that you want to modify.
Note:
The parameter name must begin with the colon (:) as a prefix. In addition, there must be no space between the colon and parameter name and within the parameter name.For example, in the following snippet of the UM_USER_RECON query, the variable condition highlighted in bold has been added:
round((rolegrp.LAST_UPDATE_DATE - to_date('01011970', 'ddmmyyyy')) * 1440 * 60 * 1000)> :lastExecutionTime \ GROUP BY rolegrp.USER_NAME, fnd.EMPLOYEE_ID, fnd.USER_ID, fnd.DESCRIPTION, fnd.EMAIL_ADDRESS,fnd.FAX, \ fnd.START_DATE, fnd.END_DATE) \ ) usr where UPPER(USER_NAME) = UPPER(:username) -
Save and close the file.
-
-
Configure the Lookup.EBS.UM.QueryFilters lookup definition as follows:
-
Log in to the Design Console.
-
Expand the Administration folder, and then double-click Lookup Definition.
-
Search for and open the Lookup.EBS.UM.QueryFilters lookup definition.
-
To add a row, click Add.
-
In the Code Key column, enter the variable name that you specified in the properties file. Do not include the colon (:) character. For example, enter
usernamein the Code Key column. -
In the Decode column, enter the value that you want to assign to the parameter for subsequent reconciliation runs. Use one of the following formats to specify a value:
-
value|DATE|DATE_FORMATSample value:
1-Dec-1975|DATE|DD-Mon-YYYYNote:
For the USER NAME example, you can enter the following sample value. -
value|STRINGSample value:
jdoe|STRING -
value|NUMBERSample value:
33|NUMBER
-
-
Click the Save icon.
-
When you next run the query that you have modified, the condition that you add is applied as an additional filter during reconciliation.
3.3.4 Reconciliation Scheduled Tasks
The following scheduled tasks are used to reconcile user data:
-
The eBusiness UM Target Resource User Reconciliation scheduled task is used for the User Management connector.
-
The eBusiness UM Target Resource User-HRMS Reconciliation scheduled task is used for the User Management with HR Foundation connector.
-
The eBusiness UM Target Resource User-TCA Reconciliation scheduled task is used for the User Management with TCA Foundation connector.
Table 3-5 describes the attributes of these scheduled tasks.
Note:
-
Any updates made to the First Name and Last Name fields are retrieved only from the FND user form, and not from Oracle E-Business HRMS or Oracle E-Business TCA.
-
Values for most attributes are predefined in the connector XML file that you import. Specify values only for those attributes that you want to change.
-
Values (either default or user-defined) must be assigned to all the attributes. If even a single attribute value were left empty, then reconciliation would not be performed.
-
The descriptions of some attributes also instruct you not to change the default values. However, if you create a copy of this scheduled task, then you can enter attribute values specific to the target system installation for which you create the copy of scheduled task. See Section 4.9, "Configuring the Connector for Multiple Installations of the Target System" for more information about creating copies of connector objects.
Table 3-5 Attributes of the eBusiness UM Target Resource User Reconciliation Scheduled Task
| Attribute | Description |
|---|---|
|
Recon Lookup Definition |
This attribute holds the name of the lookup definition that holds mappings between the target system with the process form fields.
Note: You must not change this value. |
|
Target Date Format |
Enter the format of date values stored in the target system database. Default value: |
|
Query Properties File |
Enter the full path and name of the file containing the user reconciliation query that you want to run. Sample value: |
|
Query Name |
Enter the name of the query in the reconciliation query file that you want to run. Default value:
|
|
IT Resource Name |
Enter the name of the IT resource that you configure by performing the procedure described in Section 2.3.3.6, "Configuring the IT Resource". Sample value: |
|
Last Execution Time |
This attribute holds the time stamp at which the last reconciliation run started. Default value: See Section 3.3.1, "Reconciliation Time Stamp" for information about setting a value for the Last Execution Time attribute. |
|
Batch Size |
Enter the number of records that must be included in each batch fetched from the target system.Default value: This attribute is discussed in Section 3.3.2, "Batched Reconciliation". |
|
Task Name |
This attribute holds the name of the scheduled task.
Note: For this scheduled task, you must not change the value of this attribute. However, if you create a copy of this scheduled task, then you must enter the unique name of that new scheduled task as the value of the Task Name attribute in that scheduled task. |
|
Resource Object Name |
This attribute holds the name of the resource object for the connector.
Note: Do not change the default value. However, if you create a copy of the resource object, then you can specify the name of the new resource object as the value of the Resource Object attribute. |
|
Query Filter Lookup Definition |
This attribute holds the name of the lookup definition that contains information about reconciliation filter parameters.
Note: You must ensure that the filter parameters in this lookup definition can be applied along with the query specified by the Query Name attribute. An error is encountered if this condition is not met. |
3.4 Configuring Scheduled Tasks
This section describes the procedure to configure scheduled tasks. You can apply this procedure to configure the scheduled tasks for lookup field synchronization and reconciliation.
To configure a scheduled task:
-
Log in to the Administrative and User Console.
-
Do one of the following:
-
If you are using Oracle Identity Manager release 9.1.0.x, expand Resource Management, and then click Manage Scheduled Task.
-
If you are using Oracle Identity Manager releases 11.1.x and 11.1.2.x, then on the Welcome page, click Advanced in the upper-right corner of the page.
-
-
Search for and open the scheduled task as follows:
-
If you are using Oracle Identity Manager release 9.1.0.x, then:
-
On the Scheduled Task Management page, enter the name of the scheduled task as the search criteria and then click Search.
The following screenshot shows the Scheduled Task Management page:
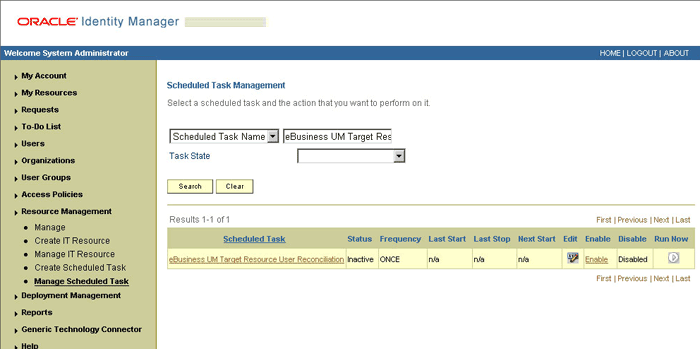
-
In the search results table, click the edit icon in the Edit column for the scheduled task.
The Edit Scheduled Task Details page is displayed. This is shown in the following screenshot:
-
-
If you are using Oracle Identity Manager releases 11.1.x and 11.1.2.x, then:
-
On the Welcome to Oracle Identity Manager Advanced Administration page, in the System Management section, click Search Scheduled Jobs.
-
On the left pane, in the Search field, enter the name of the scheduled job as the search criterion. Alternatively, you can click Advanced Search and specify the search criterion.
-
In the search results table on the left pane, click the scheduled job in the Job Name column.
-
-
-
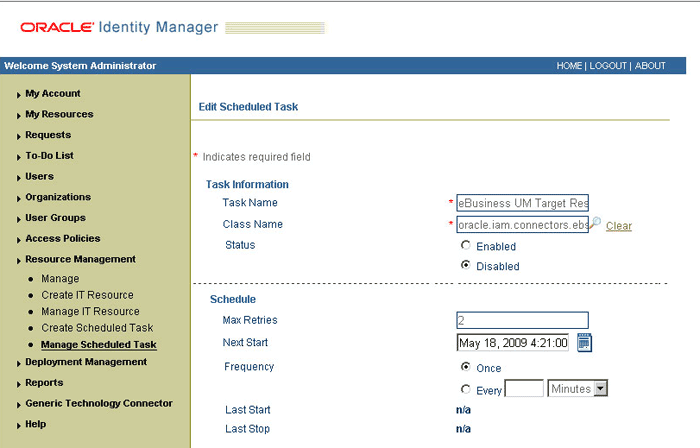
Modify the details of the scheduled task. To do so:
-
If you are using Oracle Identity Manager release 9.1.0.x, then on the Edit Scheduled Task Details page, you can modify the following parameters, and then click Continue:
-
Status: Specify whether you want to leave the task in the enabled state. In the enabled state, the task is ready for use.
-
Max Retries: Enter an integer value in this field. This number represents the number of times Oracle Identity Manager must attempt to complete the task before assigning the ERROR status to the task. The default value is 2.
-
Next Start: Use the date editor to specify the date when you want the task to run. After you select a date value in the date editor, you can modify the time value that is automatically displayed in the Next Start field.
-
Frequency: Specify the frequency at which you want the task to run.
-
-
If you are using Oracle Identity Manager releases 11.1.x and 11.1.2.x, then on the Job Details tab, you can modify the following parameters:
-
Retries: Enter an integer value in this field. This number represents the number of times the scheduler tries to start the job before assigning the Stopped status to the job.
-
Schedule Type: Depending on the frequency at which you want the job to run, select the appropriate schedule type.
Note:
See Oracle Fusion Middleware Administrator's Guide for Oracle Identity Manager for detailed information about schedule types.In addition to modifying the job details, you can enable or disable a job.
-
-
-
Specify values for the attributes of the scheduled task. To do so:
Note:
-
Attribute values are predefined in the connector XML file that you import. Specify values only for those attributes that you want to change.
-
Values (either default or user-defined) must be assigned to all the attributes. If even a single attribute value is left empty, then reconciliation is not performed.
-
Attributes of the scheduled task are discussed in Section 3.3.4, "Reconciliation Scheduled Tasks."
-
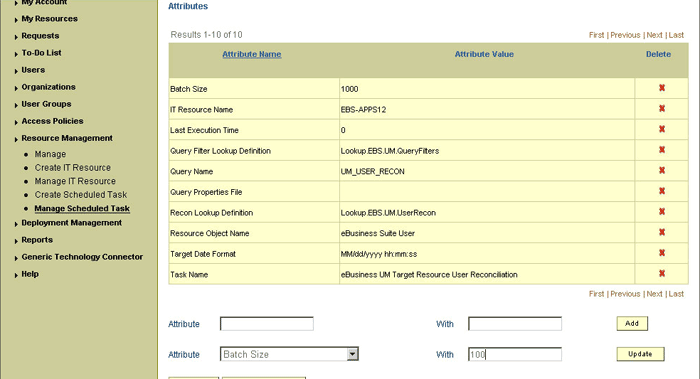
If you are using Oracle Identity Manager release 9.1.0.x, then on the Attributes page, select the attribute from the Attribute list, specify a value in the field provided, and then click Update.
The following screenshot shows the Attributes page. The attributes of the scheduled task that you select for modification are displayed on this page.
-
If you are using Oracle Identity Manager releases 11.1.x and 11.1.2.x, then on the Job Details tab, in the Parameters section, specify values for the attributes of the scheduled task.
-
-
After specifying the attributes, do one of the following:
-
If you are using Oracle Identity Manager release 9.1.0.x, then click Save Changes to save the changes.
Note:
The Stop Execution option is not available in the Administrative and User Console. If you want to stop a task, then click Stop Execution on the Task Scheduler form of the Design Console. -
If you are using Oracle Identity Manager releases 11.1.x and 11.1.2.x, then click Apply to save the changes.
Note:
The Stop Execution option is available in the Administrative and User Console. You can use the Scheduler Status page to either start, stop, or reinitialize the scheduler.
-
3.5 Attributes for Which You Can Specify Values During New Resource and Entitlement Provisioning
This section lists the resource and entitlement attributes for which values can be set on the Administrative and User Console during new resource or entitlement provisioning. During an Update Resource or Update Entitlement provisioning operation, all attributes of the resource or entitlement can be updated.
This section is divided into the following topics:
-
Section 3.5.1, "Resource Provisioning Using the User Management Connector"
-
Section 3.5.2, "Resource Provisioning Using the User Management with TCA Foundation Connector"
-
Section 3.5.3, "Resource Provisioning Using the User Management with HR Foundation Connector"
-
Section 3.5.4, "Entitlement Provisioning Using All Three Connectors"
3.5.1 Resource Provisioning Using the User Management Connector
If you are using the User Management connector, then you can set values for the following attributes while provisioning a resource:
-
IT resource representing the target system installation on which the provisioning operation is to be performed
-
Person ID
-
Description
-
Email
-
Fax
-
SSO User ID
3.5.2 Resource Provisioning Using the User Management with TCA Foundation Connector
If you are using the User Management with TCA Foundation connector, then you can set values for the following attributes while provisioning a resource:
-
IT resource representing the target system installation on which the provisioning operation is to be performed
-
Description
-
Email
-
Fax
-
SSO User ID
The Username and Password fields are pre-populated with OIM User data. The Effective Date From attribute is populated with the current date. Values cannot be set for the Effective Date To, Password Expiration Type and Password Expiration Interval attributes.
In addition the OIM User can set values for the role and responsibility attributes listed later in this section.
3.5.3 Resource Provisioning Using the User Management with HR Foundation Connector
If you are using the User Management with HR Foundation connector, then you can set values for the following attributes while provisioning a resource:
-
IT resource representing the target system installation on which the provisioning operation is to be performed
-
Description
-
Email
-
Fax
-
SSO User ID
-
Gender
-
Employee Number
The Username, Password, First Name, and Last Name fields are pre-populated with OIM User data. The Effective Date From, Hire Date fields are populated with the current date. The Business Group ID and Person Type ID attributes have default values of 202 and 13, respectively. The Effective Date To, Password Expiration Type and Password Expiration Interval fields are provisioned without any values. The OIM User cannot enter values for these attributes while submitting a request for a new resource.
3.5.4 Entitlement Provisioning Using All Three Connectors
If you are using any of the three connectors, you can set values for the following entitlement attributes along with values that you set for the resource:
-
Application Name
-
Role or Responsibility Name
-
Start Date
-
Security Group Name
The Expiration Date attribute is provisioned without any values. End-users are not allowed to fill in this attribute during new resource provisioning.
3.6 Provisioning Operations Performed in an SoD-Enabled Environment
Provisioning a resource for an OIM User involves using Oracle Identity Manager to create an Oracle E-Business Suite account for the user.
The following are types of provisioning operations:
-
Direct provisioning
-
Request-based provisioning of entitlements
See Also:
Oracle Identity Manager Connector Concepts for information about the types of provisioningThis section discusses the following topics:
-
Section 3.6.1, "Overview of the Provisioning Process in an SoD-Enabled Environment"
-
Section 3.6.2, "Direct Provisioning in an SoD-Enabled Environment"
-
Section 3.6.3, "Request-Based Provisioning in an SoD-Enabled Environment"
3.6.1 Overview of the Provisioning Process in an SoD-Enabled Environment
The following is the sequence of steps that take places during a provisioning operation performed in an SoD-enabled environment:
-
The provisioning operation triggers the appropriate adapter.
-
The adapter carries provisioning data to the corresponding BAPI on the target system.
-
If you select an account or entitlements to be provisioned to the OIM User, then the SoD check is initiated. The SoDChecker task submits the User Account and Entitlements details in a form of Duties list to Oracle Application Access Controls Governor. In other words, the SoD validation process takes place asynchronously.
-
The user runs either the Get SOD Check Results Provisioning or Get SOD Check Results Approval scheduled task.
-
The scheduled task passes the entitlement data to the Web service of Oracle Application Access Controls Governor.
-
After Oracle Application Access Controls Governor runs the SoD validation process on the entitlement data, the response from the process is returned to Oracle Identity Manager.
-
The status of the process task that received the response depends on the response itself. If the entitlement data clears the SoD validation process, then the status of the process task changes to Completed. This translates into the entitlement being granted to the user. If the SoD validation process returns the failure response, then status of the process task changes to Canceled.
3.6.2 Direct Provisioning in an SoD-Enabled Environment
This section describes the prerequisites and the procedure to perform direct provisioning. It contains the following sections:
3.6.2.1 Prerequisites
Note:
Perform the procedure in this section only in the following situations:-
The first time you perform direct provisioning.
-
If you switch from request-based provisioning to direct provisioning.
On Oracle Identity Manager release 9.1.0.x, when you run the Connector Installer, configurations for both direct provisioning and request-based provisioning of Oracle E-Business Suite user accounts are installed. Therefore, during direct provisioning, the process form is suppressed and object form is displayed. If you want to enable the use of the process form during direct provisioning, then perform the procedure described in this section.
On Oracle Identity Manager releases 11.1.x and 11.1.2.x, when you run the Connector Installer, the configuration for direct provisioning of Oracle E-Business Suite user accounts is installed. Although the process form is displayed during direct provisioning, the connector cannot complete direct provisioning operations unless you enable the use of the process form. If you want to enable the use of the process form during direct provisioning, then perform the procedure described in this section.
To enable the use of the process form during direct provisioning:
Note:
Request-based provisioning is disabled when you perform this procedure.-
Log in to the Design Console.
-
Disable the Auto Save Form feature as follows:
-
Expand Process Management, and then double-click Process Definition.
-
Search for and open the process definition for the connector that you are using:
See Section 4.9, "Configuring the Connector for Multiple Installations of the Target System" for a listing of the process definitions for each connector.
-
Deselect the Auto Save Form check box.
-
Click the Save icon.
-
-
If the Self Request Allowed feature is enabled, then:
-
Expand Resource Management, and then double-click Resource Objects.
-
Search for and open the resource object corresponding to the connector that you are using:
-
Resource object for the User Management connector:
eBusiness Suite User
-
Resource object for the User Management with HR Foundation connector:
eBusiness Suite User HR Foundation
-
Resource object for the User Management with TCA Foundation connector:
eBusiness Suite User TCA Foundation
-
-
Deselect the Self Request Allowed check box.
-
Click the Save icon.
-
3.6.2.2 Performing Direct Provisioning
To provision a resource by using the direct provisioning approach:
-
Log in to the Administrative and User Console.
-
If you want to first create an OIM User and then provision a target system account, then:
-
If you are using Oracle Identity Manager release 9.1.0.x, then:
-
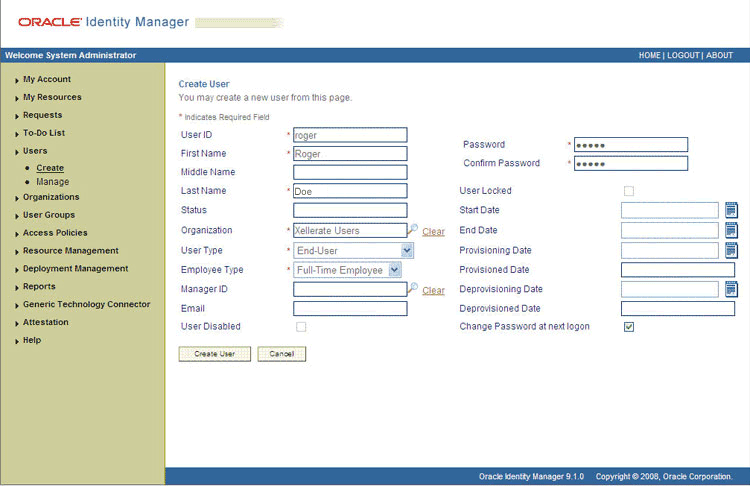
From the Users menu, select Create.
-
On the Create User page, enter values for the OIM User fields and then click Create User. The following screenshot shows the Create User page:
-
-
If you are using Oracle Identity Manager releases 11.1.x and 11.1.2.x, then:
-
On the Welcome to Identity Administration page, in the Users section, click Create User.
-
On the Create User page, enter values for the OIM User fields, and then click Save.
-
-
-
If you want to provision a target system account to an existing OIM User, then:
-
If you are using Oracle Identity Manager release 9.1.0.x, then:
-
From the Users menu, select Manage.
-
Search for the OIM User and select the link for the user from the list of users displayed in the search results.
-
-
If you are using Oracle Identity Manager releases 11.1.x and 11.1.2.x, then:
-
On the Welcome to Identity Administration page, search for the OIM User by selecting Users from the drop-down list on the left pane.
-
From the list of users displayed in the search results, select the OIM User. The user details page is displayed on the right pane.
-
-
-
Depending on the Oracle Identity Manager release you are using, perform one of the following steps:
-
If you are using Oracle Identity Manager release 9.1.0.x, then:
-
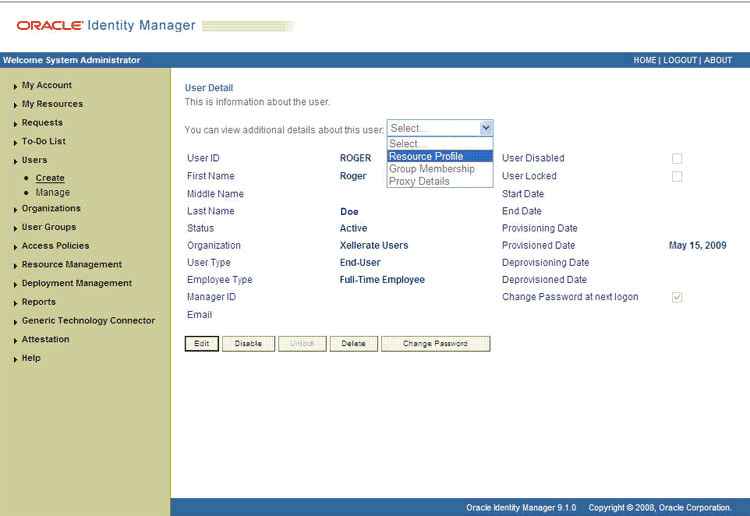
On the User Detail page, select Resource Profile from the list at the top of the page. The following screenshot shows the User Detail page:
-
On the Resource Profile page, click Provision New Resource. The following screenshot shows the Resource Profile page:

-
-
If you are using Oracle Identity Manager releases 11.1.x and 11.1.2.x, then:
-
On the user details page, click the Resources tab.
-
From the Action menu, select Add Resource. Alternatively, you can click the add resource icon with the plus (+) sign. The Provision Resource to User page is displayed in a new window.
-
-
-
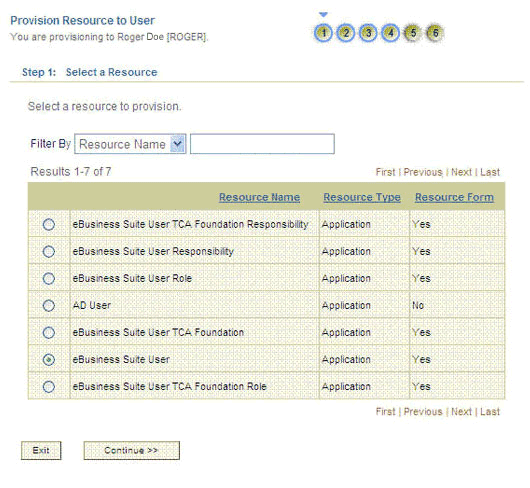
On the Step 1: Select a Resource page, select the resource that you want to provision from the list and then click Continue. The following screenshot shows the Step 1: Select a Resource page:
-
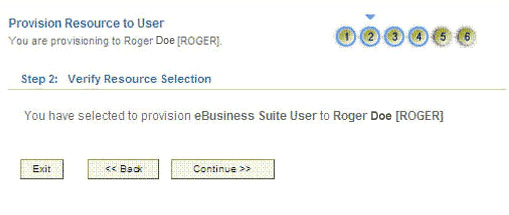
On the Step 2: Verify Resource Selection page, click Continue. The following screenshot shows the Step 2: Verify Resource Selection page:
-
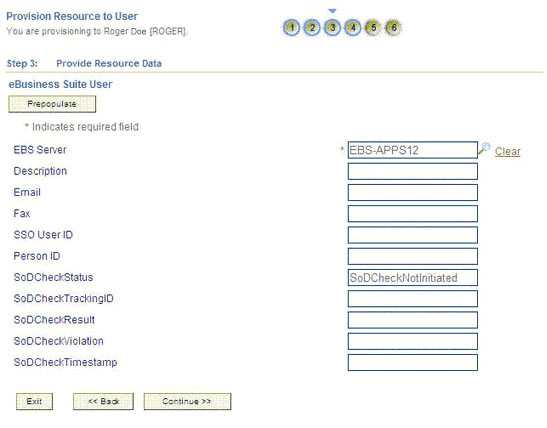
On the Step 3: Provide Resource Data page for process data, enter the details of the account that you want to create on the target system and then click Continue. The following screenshot shows the user details added:
-
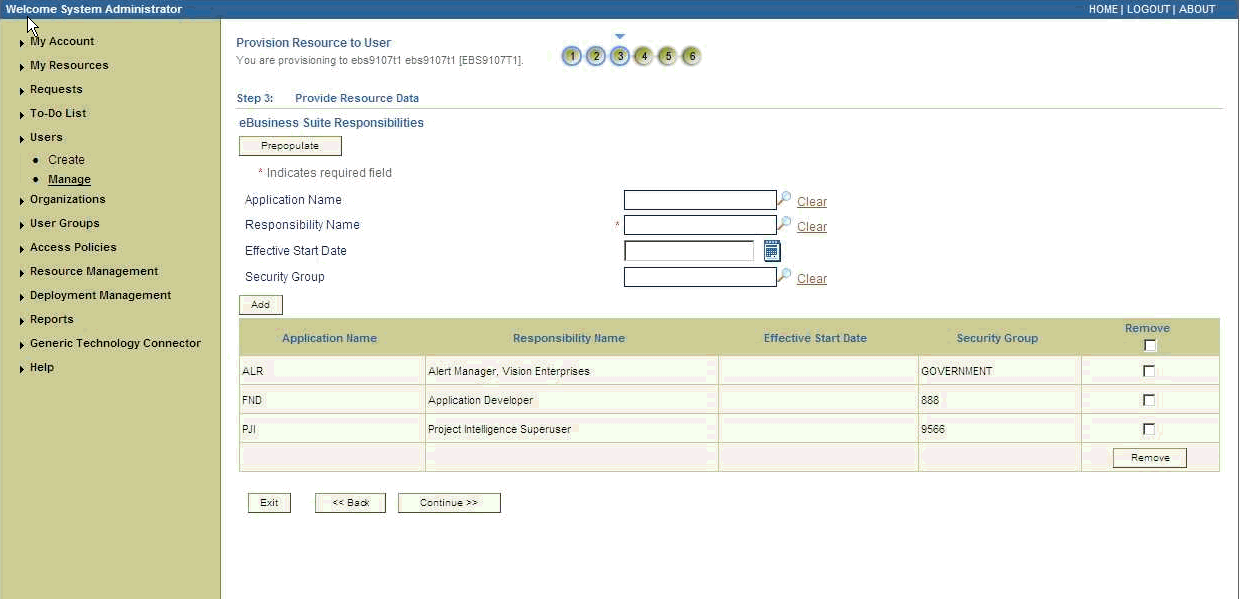
On the Step 3: Provide Process Data page for responsibility data, specify the application name, responsibility name, effective start date, and security group for the account and then click Add. If you want to add more than one responsibility, repeat the process. Then, click Continue. The following screenshot shows this page:
-
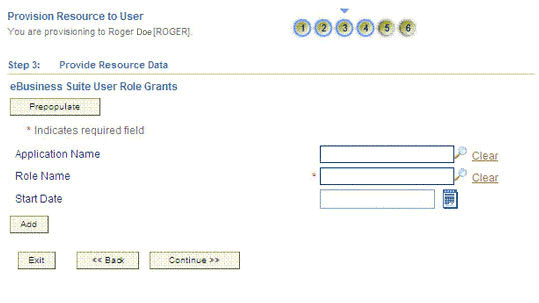
On the Step 3: Provide Process Data page for role data, specify the application name, role name, and start date for the role assignment and then click Add. If you want to add more than one role, repeat the process. Then, click Continue. The following screenshot shows this page:
-
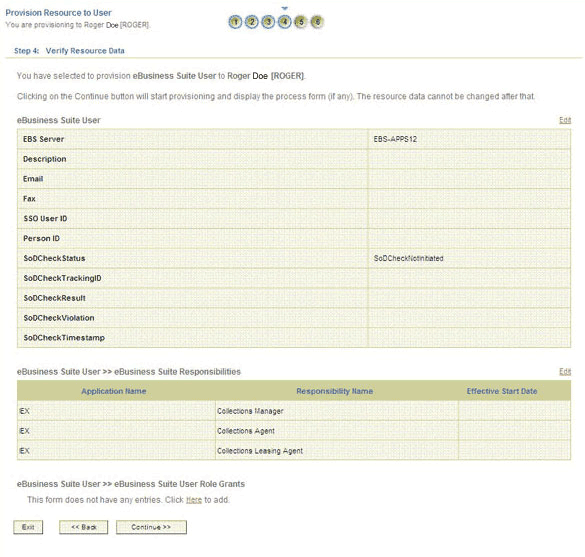
On the Step 4: Verify Process Data page, verify the data that you have provided and then click Continue. The following screenshot shows Step 4: Verify Process Data page.
-
The "Provisioning has been initiated" message is displayed. To view the newly provisioned resource, perform one of the following steps:
-
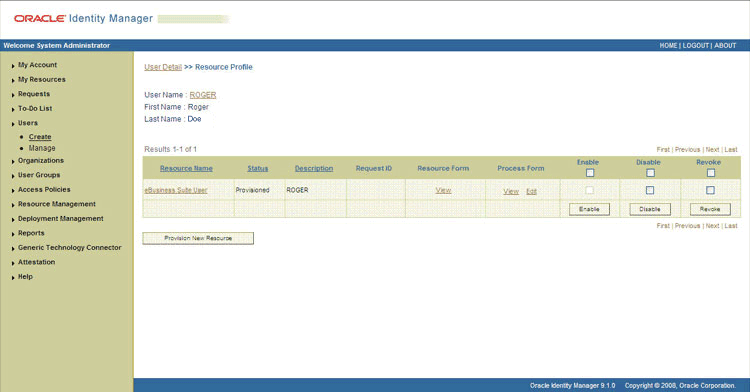
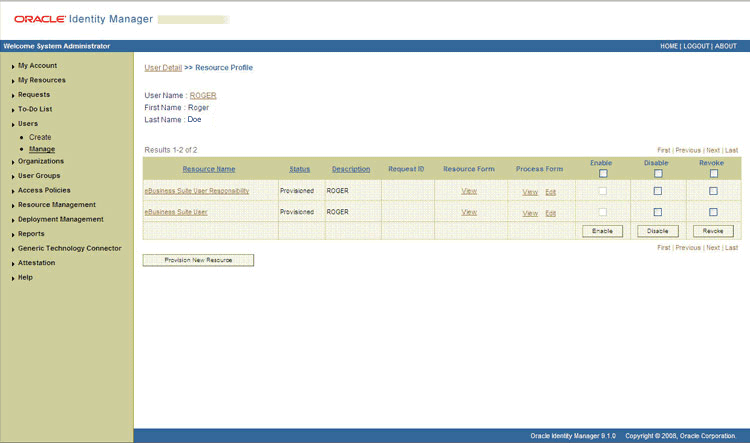
If you are using Oracle Identity Manager release 9.1.0.x, then click Back to User Resource Profile. The Resource Profile page shows that the resource has been provisioned to the user. The following screenshot shows this page:
-
If you are using Oracle Identity Manager releases 11.1.x and 11.1.2.x, then:
-
Close the window displaying the "Provisioning has been initiated" message.
-
On the Resource tab of the user details page, click Refresh to view the newly provisioned resource.
-
-
-
To view the process form, perform one of the following steps:
-
If you are using Oracle Identity Manager release 9.1.0.x, then on the Resource Profile page, click the View link in the Process Form column. The View Form page is displayed.
-
If you are using Oracle Identity Manager releases11.1.x and 11.1.2.x, then on the Resources tab of the user details page, select the row displaying the newly provisioned resource, and then click Open. The Edit Form page is displayed.
The following screenshot shows the page displaying the process form:
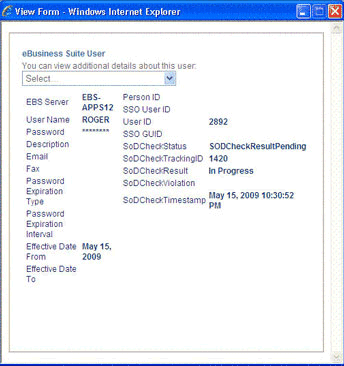
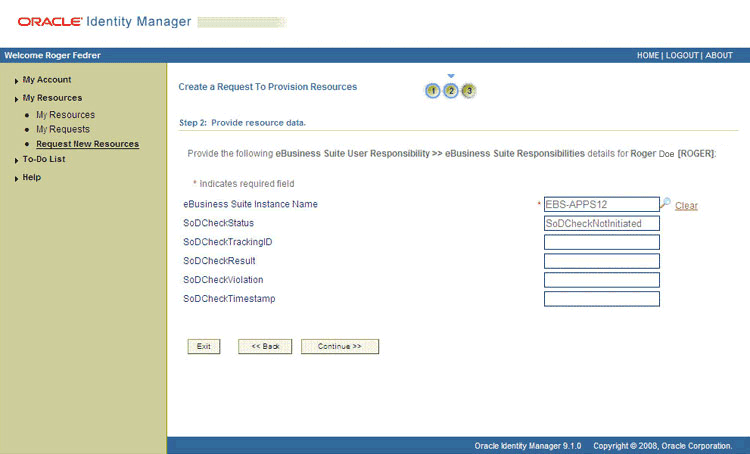
In this screenshot, the SODCheckStatus field shows SODCheckPending. The value in this field can be SoDCheckResultPending or SoDCheckCompleted.
Note:
If Oracle Identity Manager is not SoD enabled, then SOD Check Status field shows SODCheckNotInitiated. -
-
To view the Resource Provisioning Details page, which shows the details of the process tasks that were run, perform the procedure in one of the following steps:
-
If you are using Oracle Identity Manager release 9.1.0.x, then on the Resource Profile page, click the resource link in the Resource Name column.
-
If you are using Oracle Identity Manager releases 11.1.x and 11.1.2.x, then on the Resources tab of the user details page, from the Action menu, select Resource History.
The following screenshot shows the Resource Provisioning Details page:
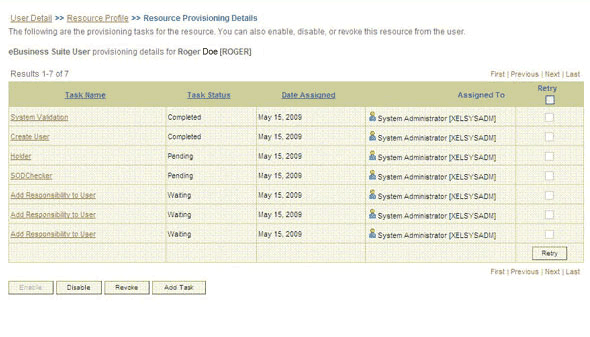
This page shows the details of the process tasks that were run. The Holder and SODChecker tasks are in the Pending state. These tasks will change state after the status of the SoD check is returned from the SoD engine. The Add Responsibility and Add Role to User tasks correspond to the responsibilities and roles selected for assignment to this user.
Note:
SoD validation by Oracle Application Access Controls Governor is asynchronous. The validation process returns a result as soon as it is completed. -
-
After the Get SOD Check Results Provisioning scheduled task is run, the results of the SoD validation process are brought to Oracle Identity Manager. To view the process form, perform the procedure described in one of the following steps:
-
If you are using Oracle Identity Manager release 9.1.0.x, then on the Resource Profile page, click the View link in the Process Form column. The View Form page is displayed.
-
If you are using Oracle Identity Manager releases 11.1.x and 11.1.2.x, then on the Resources tab of the user details page, select the row displaying the newly provisioned resource, and then click Open. The Edit Form page is displayed.
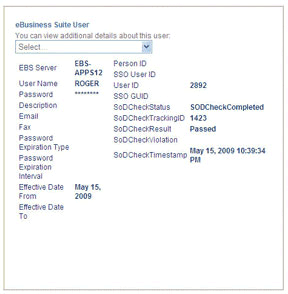
The following screenshot shows the page displaying this process form:

In this screenshot, the SOD Check Status field shows SoDCheckCompleted. Because a violation by the SoD engine in this particular example, the SoD Check Violation field shows the details of the violation.
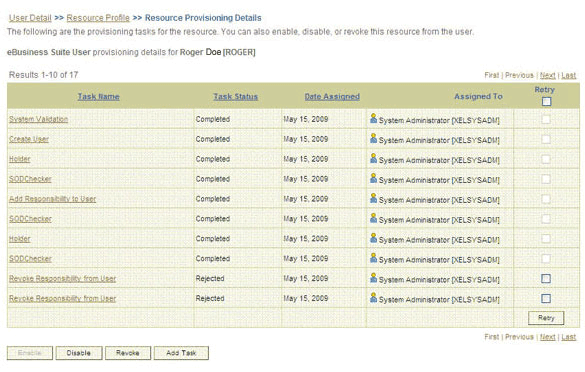
In addition, the Resource Provisioning Details page shows the status of the SODChecker and Holder tasks as Completed.
The following screenshot shows this page:
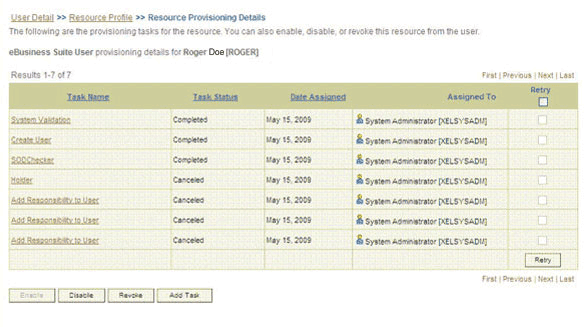
In this screenshot, the status of the Add User Role tasks is Canceled because the request failed the SoD validation process.
-
-
As the administrator assigning a resource to a user, you can either end the process when a violation is detected or modify the assignment data and then resend it. To modify the assignment data, perform the procedure in one of the following steps:
-
If you are using Oracle Identity Manager release 9.1.0.x, then click the Edit link in the Process Form column on the Resource Profile page.
-
If you are using Oracle Identity Manager releases 11.1.x and 11.1.2.x, then on the Resource tab of the user details page, select the row containing the resource, and then click Open.
-
-
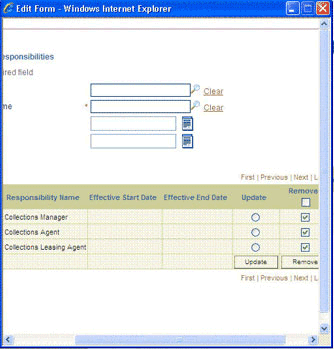
In the Edit Form window that is displayed, you can modify the role and profile data that you had selected earlier.
Note:
To modify a set of entitlements In the Edit Form window, you must first remove all entitlements and then add the ones that you want to use.In the following screenshot, one of the roles selected earlier is marked for removal:
-
Rerun the Get SOD Check Results Provisioning scheduled task to initiate the SoD validation process.
-
After the Get SOD Check Results Provisioning scheduled task is run, the results of the SoD validation process are brought to Oracle Identity Manager. Depending on the Oracle Identity Manager release you are using, perform one of the following steps:
-
If you are using Oracle Identity Manager release 9.1.0.x, then on the Resource Profile page, click the View link in the Process Form column. The process form is displayed.
-
If you are using Oracle Identity Manager releases 11.1.x and 11.1.2.x, then on the Resources tab of the user details page, select the row containing the resource, and then click Open. The process form is displayed.
The following screenshot shows the page displaying the process form:
In this screenshot, the SOD Check Status field shows SoDCheckCompleted. Because no violation was detected by the SoD engine, the SoDCheckResult field shows
Passed.In addition, the Resource Provisioning Details page shows the status of the SODChecker and Holder tasks as Completed.
The following screenshot shows this page:
On the Resource Provisioning Details page, the state of the Add Role to User task is Completed.
-
3.6.3 Request-Based Provisioning in an SoD-Enabled Environment
See Also:
Section 2.3.1, "Configuring SoD"The request-based provisioning operation involves both end users and approvers. Typically, these approvers are in the management chain of the requesters. The request-based provisioning process described in this section covers steps to be performed by both entities.
In the example used in this section, the end user creates a request for two roles on the target system. The request clears the SoD validation process and is approved by the approver.
Note:
To get SoD Violation value updated correctly, change the field label of 'SoDCheckViolation' to 'SoDCheckEntitlementViolation' in the EBS Form on Design Console.3.6.3.1 End-User's Role in Request-Based Provisioning
Depending on the Oracle Identity Manger release that you are using, end-users perform the procedure described in one of the following sections:
3.6.3.1.1 End User's Role in Request-Based Provisioning on Oracle Identity Manager Release 9.1.0.x
The following are types of request-based provisioning on Oracle Identity Manager release 9.1.0.x:
-
Request-based provisioning of accounts: OIM Users are created but not provisioned target system resources when they are created. Instead, the users themselves raise requests for provisioning accounts.
-
Request-based provisioning of entitlements: OIM Users who have been provisioned target system resources (either through direct or request-based provisioning) raise requests for provisioning entitlements.
The following steps are performed by the end user in a request-based provisioning operation:
Note:
The procedure is almost the same for request-based provisioning of both accounts and entitlements. Differences have been called out in the following sequence of steps.-
Log in to the Administrative and User Console.
-
Expand My Resources, and then click Request New Resources.
-
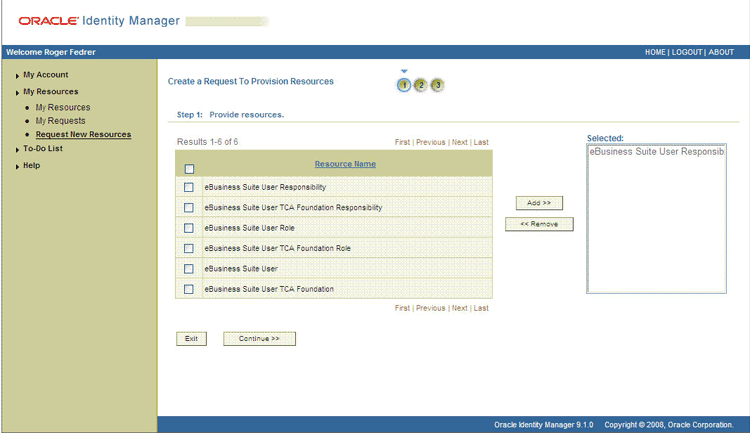
On the Step 1: Provide resources page, use the Add button to select one of the following:
-
eBusiness Suite User, if you want to create a request for a target system account
-
eBusiness Suite User Responsibility or eBusiness Suite User Role, if you want to create a request for an entitlement on the target system
The following screenshot shows the eBusiness Suite User Responsibility entitlement selected:
-
-
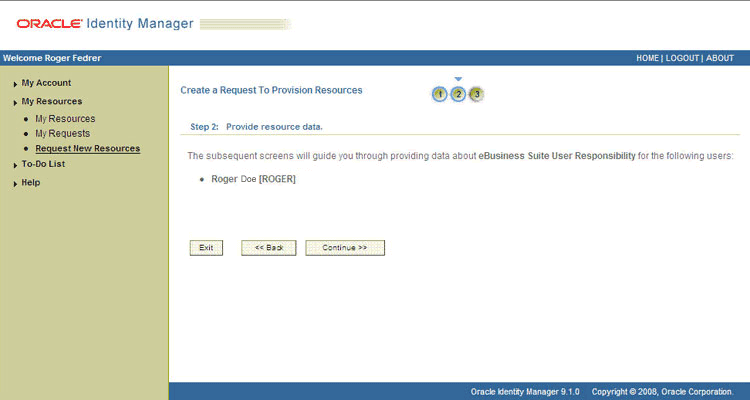
On the Step 2: Provide resource data page, click Continue.
The following screenshot shows this page:
-
On the second Step 2: Provide resource data page, select the IT resource corresponding to the target system installation on which you want the selected entitlement.
The following screenshot shows this page:
-
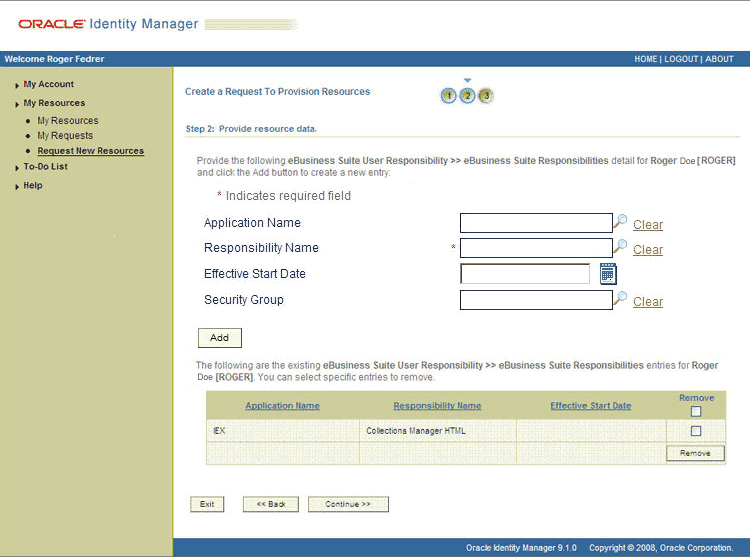
On the third Step 2: Provide resource data page, to add the responsibility data, specify the application name, responsibility name, security group name, and effective start date for the responsibility and then click Add. If you want to add more than one responsibility, repeat the process. Then, click Continue.
The following screenshot shows two roles selected on this page:
-
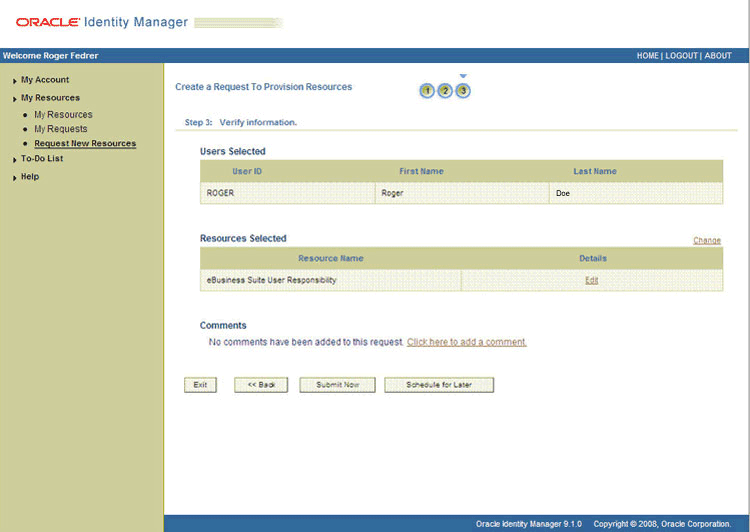
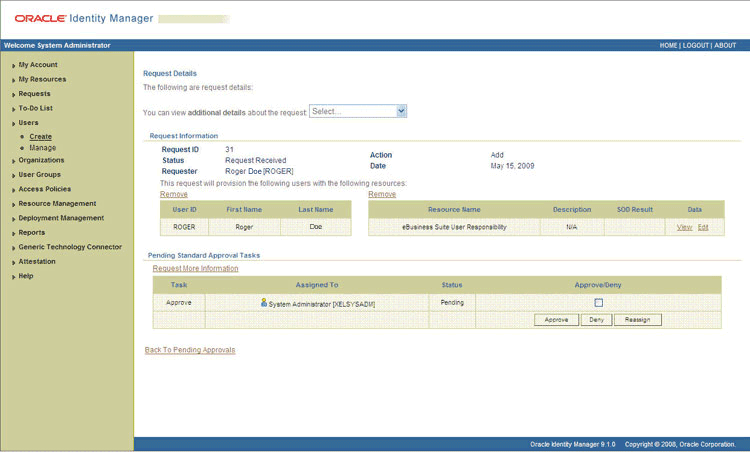
On the Step 3: Verify information page, review the information that you have provided and then submit the request. The following screenshot shows this page:
-
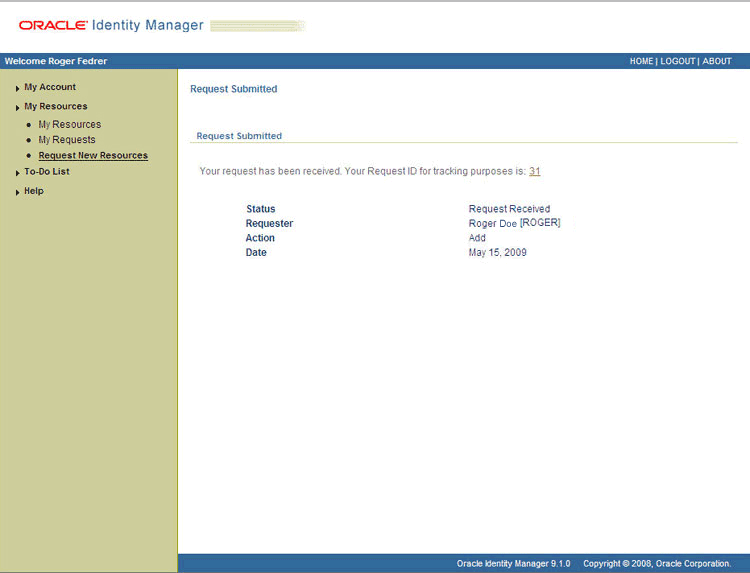
If you click Submit Now, then the Request Submitted page shows the request ID. The following screenshot shows this page:
-
If you click the request ID, then the Request Details page is displayed. The following screenshot shows this page:
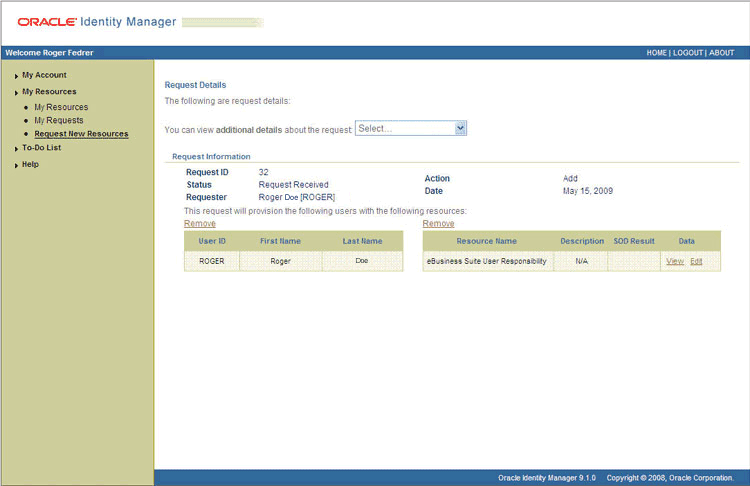
In this screenshot, the SODCheckStatus field shows SODCheckPending. The value in this field can be SoDCheckResultPending or SoDCheckCompleted.
Note:
If Oracle Identity Manager is not SoD enabled, then the SOD Check Status field shows SODCheckNotInitiated. -
To view details of the approval, select Approval Tasks from the list at the top of the page. The Approval Tasks page is displayed. The following screenshot shows this page:
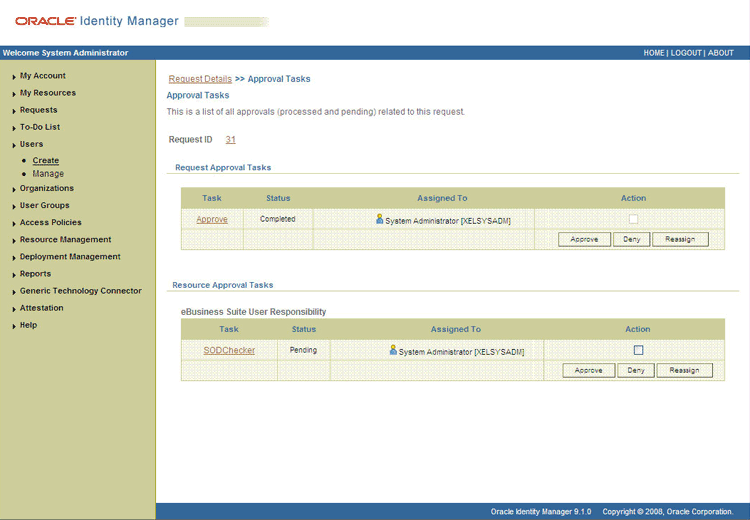
On this page, the status of the SODChecker task is Pending.
-
To initiate SoD validation of pending entitlement requests, the approver must run the Get SOD Check Results Approval scheduled task.
-
After the Get SOD Check Results Approval scheduled task is run, on the Approvals Task page, the status of the SODChecker task is Completed and the Approval task status is Pending. This page also shows details of the administrator who must now approve the request.
3.6.3.1.2 End User's Role in Request-Based Provisioning on Oracle Identity Manager Release 11.1.x
The following steps are performed by the end user in a request-based provisioning operation:
See Also:
The "Creating and Searching Requests" chapter of Oracle Fusion Middleware User's Guide for Oracle Identity Manager for detailed information about these steps-
Log in to the Administrative and User Console.
-
On the Welcome page, click Advanced in the upper-right corner of the page.
-
On the Welcome to Identity Manager Advanced Administration page, click the Administration tab, and then click the Requests tab.
-
From the Actions menu on the left pane, select Create Request.
The Select Request Template page is displayed.
-
From the Request Template list, select Provision Resource and click Next.
-
On the Select Users page, specify a search criterion in the fields to search for the user that you want to provision the resource, and then click Search. A list of users that match the search criterion you specified is displayed in the Available Users list.
-
From the Available Users list, select the user to whom you want to provision the account.
If you want to create a provisioning request for more than one user, then from the Available Users list, select users to whom you want to provision the account.
-
Click Move or Move All to include your selection in the Selected Users list, and then click Next.
-
On the Select Resources page, click the arrow button next to the Resource Name field to display the list of all available resources.
-
From the Available Resources list, select EBS User, move it to the Selected Resources list, and then click Next.
-
On the Resource Details page, enter details of the account that must be created on the target system, and then click Next.
-
On the Justification page, you can specify values for the following fields, and then click Finish:
-
Effective Date
-
Justification
On the resulting page, a message confirming that your request has been sent successfully is displayed along with the Request ID.
-
-
If you click the request ID, then the Request Details page is displayed.
-
On the Resource tab of the Request Details page, click the View Details link in the row containing the resource for which the request was created. The Resource data page in displayed in a new window.
One of the fields on this page is the SODCheckStatus field. The value in this field can be SoDCheckResultPending or SoDCheckCompleted. When the request is placed, the SODCheckStatus field contains the SoDCheckResultPending status.
Note:
If Oracle Identity Manager is not SoD enabled, then the SOD Check Status field shows SODCheckNotInitiated. -
To view details of the approval, on the Request Details page, click the Approval Tasks tab.
On this page, the status of the SODChecker task is pending.
-
To initiate SoD validation of pending requests, the approver must run the Get SOD Check Results Approval scheduled task.
-
After the Get SOD Check Results Approval scheduled task is run, on the Request Details page, click the Approval Tasks tab. The status of the SODChecker task is Completed and the Approval task status is Pending. This page also shows details of the administrator who must now approve the request.
3.6.3.2 Approver's Role in Request-Based Provisioning
This section discusses the role of the approver in a request-based provisioning operation.
The approver to whom the request is assigned can use the Pending Approvals feature to view details of the request.
In addition, the approver can click the View link to view details of the SoD validation process.
The approver can decide whether to approve or deny the request, regardless of whether the SoD engine accepted or rejected the request. The approver can also modify entitlements in the request.
Depending on the Oracle Identity Manager release that you are using, approvers can perform the procedure described in one of the following sections:
3.6.3.2.1 Approver's Role in Request-Based Provisioning on Oracle Identity Manager Release 9.1.0.x
The following are steps that the approver can perform:
-
As the approver, to edit and approve a request, click the Edit link.
-
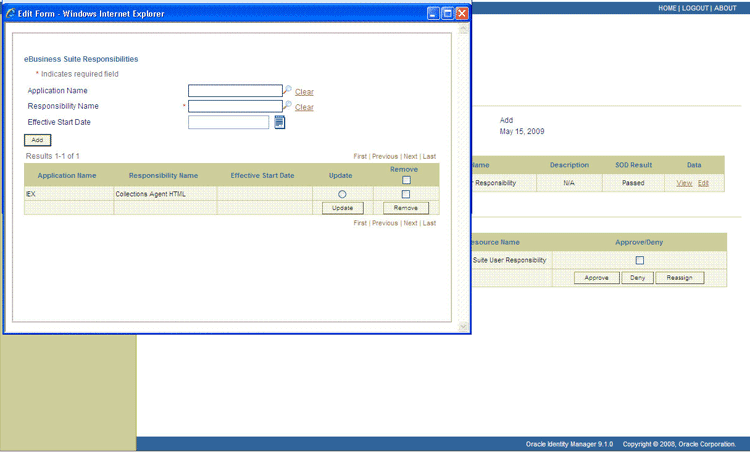
In the Edit Form window, select the entitlement request data that you want to modify from the list at the top of the window and then make the required change. In the following screenshot, one of the roles that the requester had included in the request has been removed:
-
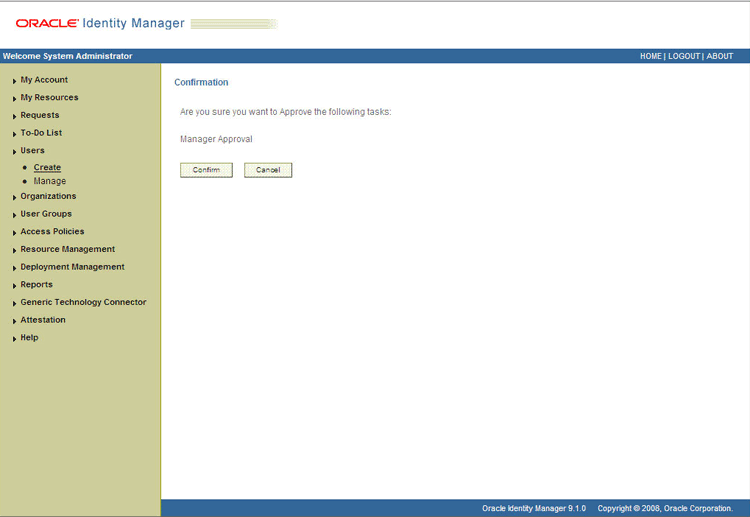
Close the Edit Form window, select the check box for the task that you want to approve, and then click Approve.
-
On the Confirmation page, click Confirm.
The following screenshot shows this page:
-
On the Request Details page, the SOD Status column shows SODCheckCompleted.
If you search for and open the requester's profile, the entitlements granted to the user are shown in the Provisioned state. This is shown in the following screenshot:
3.6.3.2.2 Approver's Role in Request-Based Provisioning on Oracle Identity Manager Release 11.1.x
The following are steps performed by the approver in a request-based provisioning operation:
-
Log in to the Administrative and User Console.
-
On the Welcome page, click Self-Service in the upper-right corner of the page.
-
On the Welcome to Identity Manager Self Service page, click the Tasks tab.
-
On the Approvals tab, in the first section, you can specify a search criterion for request task that is assigned to you.
-
From the search results table, select the row containing the request you want to approve, and then click Approve Task.
A message confirming that the task was approved is displayed.
3.7 Switching Between Request-Based Provisioning and Direct Provisioning on Oracle Identity Manager Release 11.1.x
Note:
It is assumed that you have performed the procedure described in Section 2.3.3.9, "Enabling Request-Based Provisioning."On Oracle Identity Manager release 11.1.x, if you want to switch from request-based provisioning to direct provisioning, then:
-
Log in to the Design Console.
-
Disable the Auto Save Form feature as follows:
-
Expand Process Management, and then double-click Process Definition.
-
Search for and open the process definition for the connector that you are using:
See Section 4.9, "Configuring the Connector for Multiple Installations of the Target System" for a listing of the process definitions for each connector.
-
Deselect the Auto Save Form check box.
-
Click the Save icon.
-
-
If the Self Request Allowed feature is enabled, then:
-
Expand Resource Management, and then double-click Resource Objects.
-
Search for and open the resource object corresponding to the connector that you are using:
-
Resource object for the User Management connector:
eBusiness Suite User
-
Resource object for the User Management with HR Foundation connector:
eBusiness Suite User HR Foundation
-
Resource object for the User Management with TCA Foundation connector:
eBusiness Suite User TCA Foundation
-
-
Deselect the Self Request Allowed check box.
-
Click the Save icon.
-
On Oracle Identity Manager release 11.1.x, if you want to switch from direct provisioning back to request-based provisioning, then:
-
Log in to the Design Console.
-
Enable the Auto Save Form feature as follows:
-
Expand Process Management, and then double-click Process Definition.
-
Search for and open the process definition for the connector that you are using:
See Section 4.9, "Configuring the Connector for Multiple Installations of the Target System" for a listing of the process definitions for each connector.
-
Select the Auto Save Form check box.
-
Click the Save icon.
-
-
If you want to enable end users to raise requests for themselves, then:
-
Expand Resource Management, and then double-click Resource Objects.
-
Search for and open the resource object corresponding to the connector that you are using:
-
Resource object for the User Management connector:
eBusiness Suite User
-
Resource object for the User Management with HR Foundation connector:
eBusiness Suite User HR Foundation
-
Resource object for the User Management with TCA Foundation connector:
eBusiness Suite User TCA Foundation
-
-
Select the Self Request Allowed check box.
-
Click the Save icon.
-
3.8 Performing Provisioning Operations in Oracle Identity Manager Release 11.1.2 or Later
To perform provisioning operations in Oracle Identity Manager release 11.1.2 or later:
-
Log in to Oracle Identity Administrative and User console.
-
Create a user. See the "Managing Users" chapter in Oracle Fusion Middleware User's Guide for Oracle Identity Manager for more information about creating a user.
-
On the Account tab, click Request Accounts.
-
In the Catalog page, search for and add to cart the application instance created in Step 3, and then click Checkout.
-
Specify value for fields in the application form and then click Ready to Submit.
-
Click Submit.
-
If you want to provision entitlements, then:
-
On the Entitlements tab, click Request Entitlements.
-
In the Catalog page, search for and add to cart the entitlement, and then click Checkout.
-
Click Submit.
-
3.9 Uninstalling the Connector
If you want to uninstall the connector for any reason, see "Uninstalling Connectors" in Oracle Fusion Middleware Administrator's Guide for Oracle Identity Manager.