4 Extending the Functionality of the Connector
This chapter discusses the following optional procedures:
-
Section 4.1, "Adding New Attributes for Full Reconciliation"
-
Section 4.2, "Adding New Attributes for Incremental Reconciliation"
-
Section 4.4, "Configuring Validation of Data During Reconciliation"
-
Section 4.5, "Configuring Transformation of Data During Reconciliation"
-
Section 4.6, "Setting Up the Lookup.PSFT.HRMS.CustomQuery Lookup Definition"
-
Section 4.7, "Setting Up the Lookup.PSFT.HRMS.WorkForceSync.EmpStatus Lookup Definition"
-
Section 4.8, "Configuring the Connector for Multiple Installations of the Target System"
4.1 Adding New Attributes for Full Reconciliation
You can modify the default field mappings between Oracle Identity Manager and the target system. For example, the Lookup.PSFT.HRMS.PersonBasicSync.AttributeMapping lookup definition for the PERSON_BASIC_FULLSYNC message holds the default attribute mappings. If required, you can add to this predefined set of attribute mappings.
To add a new attribute for full reconciliation:
Note:
If you do not want to add new attributes for full reconciliation, then you need not perform this procedure.
-
In the Oracle Identity Manager Design Console, make the required changes as follows:
See Also:
Oracle Identity Manager Design Console Guide for detailed instructions on performing the following steps
-
Create a new user-defined field. For the procedure to create a user-defined field, see "Creating a User-Defined Field".
-
Add a reconciliation field corresponding to the new attribute in the Peoplesoft HRMS resource object. For example, you can add the
Employee IDreconciliation field.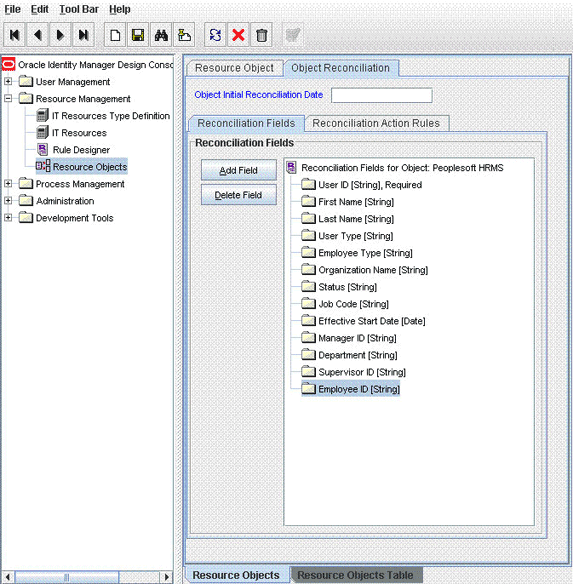
-
Modify the PeopleSoft HRMS Person process definition to include the mapping between the newly added field and the corresponding reconciliation field. For the example described earlier, the mapping is as follows:
Employee ID = Employee ID
-
If you are using Oracle Identity Manager release 11.1.1, then on the Object Reconciliation tab, click Create Reconciliation Profile. This copies changes made to the resource object into the MDS.
-
-
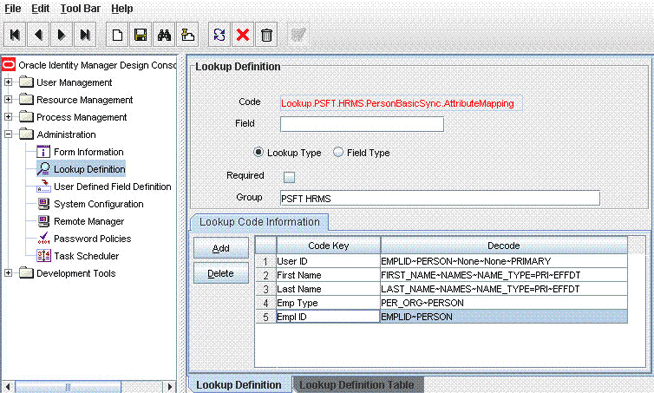
Add the new attribute in the message-specific attribute mapping lookup definition. For example, the Lookup.PSFT.HRMS.PersonBasicSync.AttributeMapping lookup definition for the PERSON_BASIC_FULLSYNC message.
The following is the format of the values stored in this table:
Code Key Decode AttributeName
NODE~PARENT NODE~NODE TYPE=Value~EFFECTIVE DATED NODE~PRIMARYFor example:
Code Key: Empl ID
Decode: EMPLID~PERSON
In this example,
Empl IDis the reconciliation field and its equivalent target system field isEMPLID.The mapping is shown in the following screenshot:
-
Add the new attribute in the Resource Object attribute reconciliation lookup definition. For example, the Lookup.PSFT.HRMS.PersonBasicSync.Recon lookup for the PERSON_BASIC_FULLSYNC message.
The following is the format of the values stored in this table:
Code Key Decode RO Attribute
ATTRIBUTE FIELD~LOOKUP NAMEFor example:
Code Key: Employee ID
Decode: Empl ID
The following screenshot displays the mapping:
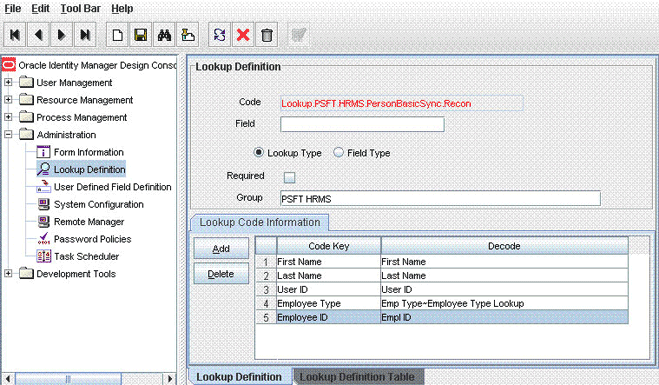
In this example, RO Attribute refers to the resource object attribute name added in the preceding steps. The decode value is the code key value in the message-specific attribute mapping lookup definition.
-
Add the new attribute in the Custom Query lookup definition. See Section 4.6, "Setting Up the Lookup.PSFT.HRMS.CustomQuery Lookup Definition" for more information.
4.2 Adding New Attributes for Incremental Reconciliation
Standard incremental reconciliation involves the reconciliation of predefined attributes. If required, you can add new attributes to the list of attributes that are reconciled.
Note:
If you do not want to add new attributes for incremental reconciliation, then you can skip this section.
To add a new attribute for incremental reconciliation:
-
In the Oracle Identity Manager Design Console, make the required changes as follows:
See Also:
Oracle Identity Manager Design Console Guide for detailed instructions on performing the following steps
-
Create a new user-defined field. For the procedure to create a user-defined field, see "Creating a User-Defined Field".
-
Add a reconciliation field corresponding to the new attribute in the Peoplesoft HRMS resource object. For the example described earlier, you can add the Employee ID reconciliation field.
-
Modify the PeopleSoft HRMS Person process definition to include the mapping between the newly added field and the corresponding reconciliation field. For the example described earlier, the mapping is as follows:
Employee ID = Employee ID
-
If you are using Oracle Identity Manager release 11.1.1, then on the Object Reconciliation tab, click Create Reconciliation Profile. This copies changes made to the resource object into the MDS.
-
-
Add the new attribute in the message-specific attribute mapping lookup definition, for example, the Lookup.PSFT.HRMS.PersonBasicSync.AttributeMapping lookup definition for the PERSON_BASIC_SYNC message.
The following is the format of the values stored in this table:
Code Key Decode AttributeName
NODE~PARENT NODE~NODE TYPE=Value~EFFECTIVE DATED NODE~PRIMARYFor example:
Code Key: Empl ID
Decode: EMPLID~PERSON
In this example,
Empl IDis the reconciliation field and its equivalent target system field is EMPLID. -
Add the new attribute in the Resource Object attribute reconciliation lookup definition, for example the Lookup.PSFT.HRMS.PersonBasicSync.Recon lookup for the PERSON_BASIC_SYNC message.
The following is the format of the values stored in this table:
Code Key Decode RO Attribute
ATTRIBUTE FIELD~LOOKUP NAMEFor example:
Code Key: Employee ID
Decode: Empl ID
In this example, RO Attribute refers to the resource object attribute name added in the preceding steps. The Decode value is the Code Key value defined in the message-specific attribute mapping lookup definition.
-
Add the new attribute in the Custom Query lookup definition. See Section 4.6, "Setting Up the Lookup.PSFT.HRMS.CustomQuery Lookup Definition" for more information.
To create a user-defined field (UDF) on Oracle Identity Manager release 9.1.0.x:
-
Log in to the Oracle Identity Manager Design Console.
-
Expand the Administration folder.
-
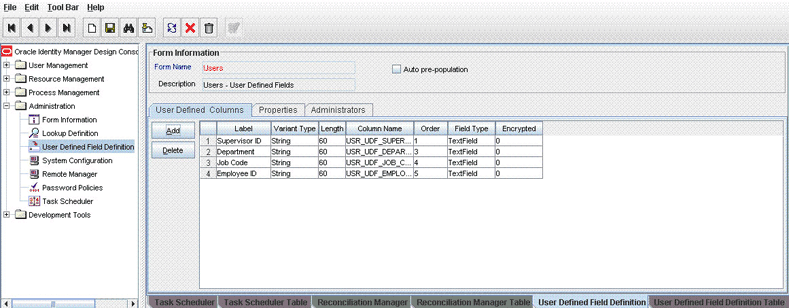
Double-click User Defined Field Definition.
-
Search for and open the Users form.
-
Click Add.
-
Enter the details of the field.
For example, if you are adding the Employee ID field, then enter
Employee IDin the Label field, set the data type to String, enter USR_UDF_EMPLOYEE_ID as the column name, and enter a field size value. -
Click Save.
To create a UDF on Oracle Identity Manager release 11.1.1:
-
Log in to the Oracle Identity Management Administration Console.
-
Click Advanced.
-
On the Configuration tab, click User Configuration.
-
From the Actions menu, select User Attributes.
-
Click Create Attribute.
-
Enter details of the attribute (UDF) that you want to create. From the Category list, select Custom Attributes.
-
Set values for the attribute properties.
-
Review the data that you have entered, and then save the attribute.
4.3 Modifying Field Lengths on the OIM User Form
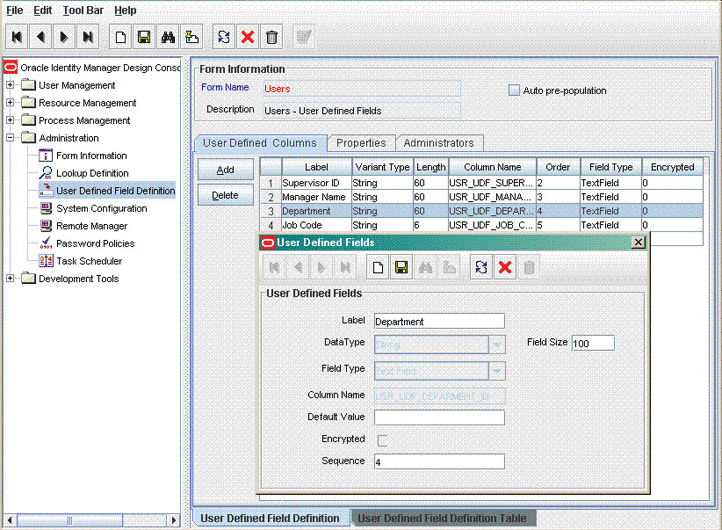
You might want to modify the lengths of the fields (attributes) on the OIM User form. For example, if you use the Japanese locale, then you might want to increase the lengths of OIM User form fields to accommodate multibyte data from the target system.
If you want to modify the length of a field on the OIM User form, then:
-
Log in to the Design Console.
-
Expand Administration, and double-click User Defined Field Definition.
-
Search for and open the Users form.
-
Modify the length of the required field.
-
Click the Save icon.
4.4 Configuring Validation of Data During Reconciliation
You can configure validation of reconciled single-valued data according to your requirements. For example, you can validate data fetched from the First Name attribute to ensure that it does not contain the number sign (#). In addition, you can validate data entered in the First Name field on the user form so that the number sign (#) is not sent to Oracle Identity Manager during reconciliation operations.
For data that fails the validation check, the following message is displayed or recorded in the log file:
Value returned for field FIELD_NAME is false.
To configure validation of data:
-
Write code that implements the required validation logic in a Java class.
This validation class must implement the oracle.iam.connectors.common.validate.Validator interface and the validate method.
See Also:
The Javadocs shipped with the connector for more information about this interface
The following sample validation class checks if the value in the First Name attribute contains the number sign (#):
public boolean validate(HashMap hmUserDetails, HashMap hmEntitlementDetails, String field) { /* * You must write code to validate attributes. Parent * data values can be fetched by using hmUserDetails.get(field) * For child data values, loop through the * ArrayList/Vector fetched by hmEntitlementDetails.get("Child Table") * Depending on the outcome of the validation operation, * the code must return true or false. */ /* * In this sample code, the value "false" is returned if the field * contains the number sign (#). Otherwise, the value "true" is * returned. */ boolean valid=true; String sFirstName=(String) hmUserDetails.get(field); for(int i=0;i<sFirstName.length();i++){ if (sFirstName.charAt(i) == '#'){ valid=false; break; } } return valid; } -
Create a JAR file to hold the Java class.
-
Copy the JAR file into the JavaTasks or ScheduleTask directory.
Note:
If you are using Oracle Identity Manager release 11.1.1, then see Oracle Fusion Middleware Developer's Guide for Oracle Identity Manager for steps to import the contents of JavaTasks directory into the Oracle Identity Manager database.
-
If you created the Java class for validating a process form field for reconciliation, then:
-
Log in to the Design Console.
-
Search for and open the message-specific configuration lookup definition.
For example, locate the Lookup.PSFT.Message.WorkForceSync.Configuration lookup definition for the WORKFORCE_SYNC message. See Section 1.5.4.2.1, "Lookup.PSFT.Message.WorkForceSync.Configuration" for information about this lookup definition. Check for the parameter Validation Lookup Definition in this lookup definition. The Decode value specifies the name of the validation lookup. In this example, the Decode value is Lookup.PSFT.HRMS.WorkForceSync.Validation.
-
Search for and open the Lookup.PSFT.HRMS.WorkForceSync.Validation lookup definition.
-
In the Code Key column, enter the resource object field name. In the Decode column, enter the class name.
For example, to perform validation on the First Name attribute you must define the following mapping in the lookup definition:
Code Key: First Name
Decode: oracle.iam.connectors.recon.validation
Here, the Code Key value specifies the name of the resource object attribute on which validation is applied and Decode value is the complete package name of the Implementation class.
-
Save the changes to the lookup definition.
-
Search for and open the message-specific configuration lookup definition, in this example, the Lookup.PSFT.Message.WorkForceSync.Configuration lookup definition.
-
Set the value of the Use Validation entry to
yes. -
Save the changes to the lookup definition.
-
-
Remove the PeopleSoftOIMListener.war file or PeopleSoftOIMListener.ear file depending on the Oracle Identity Manager release from the application server.
-
Depending on the Oracle Identity Manager release that you are using, perform one of the following steps:
-
If you are using Oracle Identity Manager release 9.1.0.x, then:
-
Copy the OIM_HOME/xellerate/XLIntegrations/PSFTER/ WAR/PeopleSoftOIMListener.war file into a temporary folder. Enter the following command to extract the contents of the PeopleSoftOIMListener.war file:
jar -xvf PeopleSoftOIMListener.war
-
Copy the validation JAR file created in Step 2 to the following directory of the extracted PeopleSoftOIMListener.war file:
WEB-INF/lib -
Delete the PeopleSoftOIMListener.war file from the temporary directory into which you extracted its contents.
-
Use the following command to re-create the file:
jar -cvf PeoplesoftOIMListener.war .
-
-
If you are using Oracle Identity Manager release 11.1.1, copy the validation JAR file created in Step 2 to the following directory:
PeoplSoftOIMListener.ear/PeoplSoftOIMListener.war/WEB-INF/lib
-
-
Depending on the Oracle Identity Manager release that you are using, perform one of the following steps:
-
If you are using Oracle Identity Manager release 9.1.0.x, then redeploy the PeopleSoftOIMListener.war file on the application server. See Section 2.2.1.4.1, "Deploying the PeopleSoft Listener on Oracle Identity Manager Release 9.1.0.x" for the procedure.
-
If you are using Oracle Identity Manager release 11.1.1, then redeploy the PeopleSoftOIMListener.ear file on the application server. See Section 2.2.1.4.2, "Deploying the PeopleSoft Listener on Oracle Identity Manager Release 11.1.1" for the procedure.
-
4.5 Configuring Transformation of Data During Reconciliation
You can configure the transformation of reconciled single-valued data according to your requirements. For example, you can use First Name and Last Name values to create a value for the Full Name field in Oracle Identity Manager.
To configure the transformation of data:
-
Write code that implements the required transformation logic in a Java class.
This transformation class must implement the oracle.iam.connectors.common.transform.Transformation interface and the transform method.
See Also:
The Javadocs shipped with the connector for more information about this interface
The following sample transformation class creates a value for the Full Name attribute by using values fetched from the First Name and Last Name attributes of the target system:
package oracle.iam.connectors.common.transform; import java.util.HashMap; public class TransformAttribute1 implements Transformation { /* Description:Abstract method for transforming the attributes param hmUserDetails<String,Object> HashMap containing parent data details param hmEntitlementDetails <String,Object> HashMap containing child data details */ public Object transform(HashMap hmUserDetails, HashMap hmEntitlementDetails,String sField) { { /* * You must write code to transform the attributes. Parent data attribute values can be fetched by using hmUserDetails.get("Field Name"). *To fetch child data values, loop through the * ArrayList/Vector fetched by hmEntitlementDetails.get("Child Table") * Return the transformed attribute. */ System.out.println("sfield =" + sField); String sCurrencyCode= (String)hmUserDetails.get(sField); sCurrencyCode = "$"+sCurrencyCode; return sCurrencyCode; } } -
Create a JAR file to hold the Java class.
-
Copy the JAR file into the
JavaTasksorScheduleTaskdirectory.Note:
If you are using Oracle Identity Manager release 11.1.1, then see Oracle Fusion Middleware Developer's Guide for Oracle Identity Manager for steps to import the contents of JavaTasks directory into the Oracle Identity Manager database.
-
If you created the Java class for validating a process form field for reconciliation, then:
-
Log in to the Design Console.
-
Search for and open the message-specific configuration lookup definition, in this example, the Lookup.PSFT.Message.WorkForceSync.Configuration lookup definition for the WORKFORCE_SYNC message.
See Section 1.5.4.2.1, "Lookup.PSFT.Message.WorkForceSync.Configuration" for information about this lookup definition. Check for the parameter Transformation Lookup Definition in this lookup definition. The Decode value specifies the name of the transformation lookup. In this example, the Decode value is Lookup.PSFT.HRMS.WorkForceSync.Transformation.
-
Search for and open the Lookup.PSFT.HRMS.WorkForceSync.Transformation lookup definition.
-
In the Code Key column, enter the resource object field name. In the Decode column, enter the class name.
For example, to perform transformation on the First Name attribute, you must define the following mapping in the lookup definition:
Code Key: First Name
Decode: oracle.iam.connectors.common.transform.TransformAttribute1
Here, the Code Key specifies the name of the resource object attribute on which transformation is applied and Decode is the complete package name of the Implementation class.
-
Save the changes to the lookup definition.
-
Search for and open the message-specific configuration lookup definition, in this example, the Lookup.PSFT.Message.WorkForceSync.Configuration lookup definition.
-
Set the value of the Use Transformation entry to
yes. -
Save the changes to the lookup definition.
-
-
Remove the PeopleSoftOIMListener.war file or PeopleSoftOIMListener.ear file depending on the Oracle Identity Manager release from the application server.
-
Depending on the Oracle Identity Manager release that you are using, perform one of the following steps:
-
If you are using Oracle Identity Manager release 9.1.0.x, then:
-
Copy the OIM_HOME/xellerate/XLIntegrations/PSFTER/ WAR/PeopleSoftOIMListener.war file into a temporary folder. Enter the following command to extract the contents of the PeopleSoftOIMListener.war file:
jar -xvf PeopleSoftOIMListener.war
-
Copy the transformation JAR file created in Step 2 to the following directory of the extracted PeopleSoftOIMListener.war file:
WEB-INF/lib -
Delete the PeopleSoftOIMListener.war file from the temporary directory into which you extracted its contents.
-
Use the following command to re-create the file:
jar -cvf PeoplesoftOIMListener.war .
-
-
If you are using Oracle Identity Manager release 11.1.1, then copy the transformation JAR file created in Step 2 to the following directory:
PeoplSoftOIMListener.ear/PeoplSoftOIMListener.war/WEB-INF/lib
-
-
Depending on the Oracle Identity Manager release that you are using, perform one of the following steps:
-
If you are using Oracle Identity Manager release 9.1.0.x, then redeploy the PeopleSoftOIMListener.war file on the application server. See Section 2.2.1.4.1, "Deploying the PeopleSoft Listener on Oracle Identity Manager Release 9.1.0.x" for the procedure.
-
If you are using Oracle Identity Manager release 11.1.1, then redeploy the PeopleSoftOIMListener.ear file on the application server. See Section 2.2.1.4.2, "Deploying the PeopleSoft Listener on Oracle Identity Manager Release 11.1.1" for the procedure.
-
4.6 Setting Up the Lookup.PSFT.HRMS.CustomQuery Lookup Definition
You configure limited reconciliation by specifying a query condition as the value of the Custom Query attribute in the message-specific configuration lookup. See Section 1.5.4.3.3, "Lookup.PSFT.HRMS.CustomQuery" for more information about this lookup definition.
You must ensure that the OIM User attribute to use in the query exists in the Lookup.PSFT.HRMS.CustomQuery lookup definition. You must add a row in this lookup definition whenever you add a UDF in the user form.
To add a new UDF to this lookup definition:
-
On the Design Console, expand Administration and then double-click Lookup Definition.
-
Search for and open the Lookup.PSFT.HRMS.CustomQuery lookup definition.
-
Click Add.
Note:
The Code Key value represents the resource object field name and the Decode value specifies the column name of the USR table.
-
In the Code Key and Decode columns, enter the values for the UDF.
The following is the format of the values stored in this table:
Code Key Decode RO Attribute Name
Column name of the USR table
If you have added a UDF Empl ID with column name as USR_UDF_EMPLOYEE_ID, then define the following entry in this lookup definition:
Code Key: Empl ID
Decode: USR_UDF_EMPLOYEE_ID
-
Click the Save icon.
4.7 Setting Up the Lookup.PSFT.HRMS.WorkForceSync.EmpStatus Lookup Definition
The Lookup.PSFT.HRMS.WorkForceSync.EmpStatus lookup definition maps the value retrieved from the ACTION node in the WORKFORCE_SYNC message XML with the status to be shown on Oracle Identity Manager for the employee. See Section 1.5.4.2.4, "Lookup.PSFT.HRMS.WorkForceSync.EmpStatus" for more information about this lookup definition.
The following section describes how to add an action, for example Suspension in this lookup definition.
To add an action in the Lookup.PSFT.HRMS.WorkForceSync.EmpStats lookup definition:
-
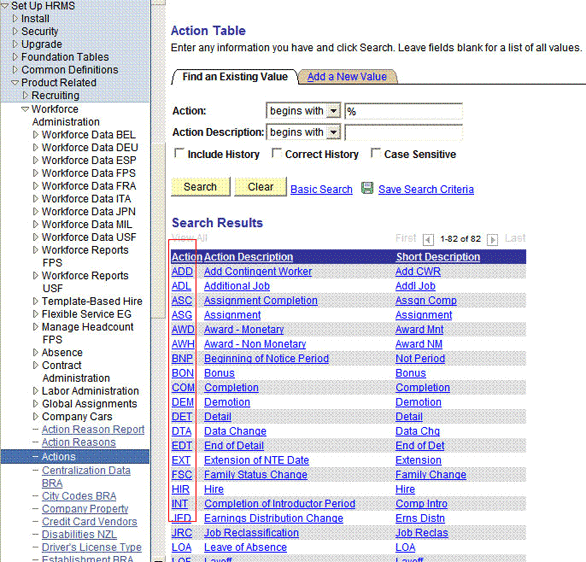
Obtain the Code Key and the description for the action to be added from your PeopleSoft functional resource.
The Code Key is usually a three-character string.
The path to obtain the Action values and its description in PeopleSoft HRMS 9.0 is as follows:
From the Main Menu, select Set Up HRMS, Product Related, Workforce Administration, and then Actions.
The following screenshot displays all the Actions:
-
Log in to the Design Console of Oracle Identity Manager.
-
Expand Administration, and then double-click Lookup Definition.
-
Search for and open the Lookup.PSFT.HRMS.WorkForceSync.EmpStats lookup definition.
-
Click Add.
Note:
The following is the format of the values stored in this lookup definition:
Code Key: ACTION value retrieved from the WORKFORCE_SYNC message XML
Decode:
ActiveorDisabledin Oracle Identity Manager -
In the Code Key and Decode columns, enter the values for the following values:
Code Key: SUS
Decode: Disabled
In this example, SUS is retrieved from the ACTION node of the WORKFORCE_SYNC message XML for the action suspension. The corresponding mapping for this action is defined as Disabled in Oracle Identity Manager.
Note:
You must define the mapping for all Actions to be performed on the target system in this lookup definition.
-
Click the Save icon.
4.8 Configuring the Connector for Multiple Installations of the Target System
You might want to configure the connector for multiple installations of the target system. The following example illustrates this requirement:
The London and New York offices of Example Multinational Inc. have their own installations of the target system. The company has recently installed Oracle Identity Manager, and they want to configure Oracle Identity Manager to link all the installations of the target system.
To meet the requirement posed by such a scenario, you can create copies of connector objects, such as the IT resource and resource object.
The decision to create a copy of a connector object is based on a requirement. For example, an IT resource can hold connection information for one target system installation. Therefore, it is mandatory to create a copy of the IT resource for each target system installation.
With some other connector objects, you do not need to create copies at all. For example, a single attribute-mapping lookup definition can be used for all installations of the target system.
All connector objects are linked. For example, a scheduled task holds the name of the IT resource. Similarly, the IT resource holds the name of the common configuration lookup definition, which is Lookup.PSFT.Configuration. If you create a copy of an object, then you must specify the name of the copy in other connector object. Table 4-1 lists association between connector objects whose copies can be created and the other objects that reference these objects. When you create a copy of an object, use this information to change the associations of that object with other objects.
Table 4-1 Connector Objects and Their Associations
| Connector Object | Name | Referenced By | Description |
|---|---|---|---|
|
IT Resource |
PSFT Server |
|
You need to create a copy of IT Resource with a different name. |
|
Resource Object |
Peoplesoft HRMS |
Message-specific configuration lookup definitions:
|
It is optional to create a copy of a resource object. If you are reconciling the same set of attributes from the other target system, then you need not create a new resource object. Note: Create copies of this resource object only if there are differences in attributes between the two installations of the target system. |
|
Common Configuration Lookup Definition |
Lookup.PSFT.Configuration |
Message-specific configuration lookup definitions:
|
It is optional to create a copy of the common configuration lookup definition. Note: Create copies of this lookup definition only if there are differences in attributes between the two installations of the target system. |
|
Message-specific Configuration Lookup Definition |
|
Attribute mapping lookup definitions:
|
It is optional to create a copy of the message-specific lookup definitions. Note: Create copies of this lookup definition only if there are differences in attributes between the two installations of the target system. |
|
Attribute Mapping Lookup Definition |
|
NA |
This lookup definition holds the information of the attributes reconciled from the XML message file from the target system. Note: Create copies of this lookup definition only if there are differences in attributes between the two installations of the target system. |
|
Recon Map Lookup Definition |
|
NA |
This lookup definition maps the resource object field with the data reconciled from the message. Note: Create copies of this lookup definition only if there are differences in attributes between the two installations of the target system. |
To create copies of the connector objects:
Note:
See the Oracle Identity Manager Design Console Guide for detailed information about the steps in this procedure.
-
Create a copy of the IT resource. See Section 2.2.1.3, "Configuring the IT Resource" for information about this IT resource.
-
Create a copy of the Peoplesoft HRMS resource object.
-
Create copy of the PERSON_BASIC_SYNC and WORKFORCE_SYNC message-specific configuration lookup.
-
Create a copy of the Lookup.PSFT.Configuration lookup definition. See Section 1.5.4.3.1, "Lookup.PSFT.Configuration" for information about this lookup definition.
-
Create a copy of the message-specific attribute mapping and Recon lookup definition, for example, the Lookup.PSFT.HRMS.PersonBasicSync.AttributeMapping and the Lookup.PSFT.HRMS.PersonBasicSync.Recon for PERSON_BASIC_SYNC message. Similarly, the Lookup.PSFT.HRMS.WorkForceSync.AttributeMapping and the Lookup.PSFT.HRMS.WorkForceSync.Recon for WORKFORCE_SYNC message.
-
Create a copy of the Peoplesoft HRMS Trusted Reconciliation scheduled task. See Section 3.2.2.1, "Configuring the Scheduled Task for Person Data Reconciliation" for information about this scheduled task.
-
Remove the PeopleSoftOIMListener.war file as described in Section 2.2.1.5, "Removing the PeopleSoft Listener."
-
Extract the removed PeopleSoftOIMListener.war file to a temporary folder.
-
Edit the web.xml file as follows:
-
Search for the </servlet> tag in the file.
-
Add the following lines above the </servlet> tag:
<init-param>
<!-- Specify Message Handler Impl classes -->
<param-name>IT_RESOURCE_NAME</param-name>
<param-value>MESSAGE~IMPLEMENTATION_CLASS;MESSAGE~IMPLEMENTATION_CLASS;MESSAGE~IMPLEMENTATION_CLASS</param-value>
</init-param>
Here, IT_RESOURCE_NAME refers to the new IT Resource name defined in Step 1 of this procedure.
Modify the second line as described in Step 4 (e) of the procedure in Section 2.2.1.4, "Deploying the PeopleSoft Listener."
-
-
Deploy the PeopleSoftOIMListener.war file as described in Section 2.2.1.4, "Deploying the PeopleSoft Listener."
To reconcile data from a particular target system installation, specify the name of the IT resource for that target system installation as the value of the ITResource scheduled task attribute.