Release 4.0
Part Number E18709-01
Contents
Previous
Next
| Oracle Application Management Pack for Oracle E-Business Suite User's Guide Release 4.0 Part Number E18709-01 | Contents | Previous | Next |
One of the key features of the Oracle Application Management Pack for Oracle E-Business Suite is the ability to clone an Oracle E-Business Suite system automatically.
The key highlights of the cloning process include:
The Oracle Application Management Pack for Oracle E-Business Suite allows Oracle E-Business Suite systems to be cloned via the Grid Control provisioning framework.
A step-by-step interview is available to guide you through the cloning process.
Grid Control automates the creation of clone systems and executes any required application-specific actions.
You can modify the standard cloning process to include custom actions.
You can perform the clone in "hot mode" in which the source system need not be shut down.
Cloning of systems deployed on Oracle Real Application Clusters (RAC) is possible. For more information on supported scenarios, see My Oracle Support Knowledge Document 783188.1, "Certified RAC Scenarios for E-Business Suite Cloning".
For information on cloning a Release 12 system on a RAC database, see My Oracle Knowledge Document 559518.1, "Cloning Oracle E-Business Suite Release 12 RAC-Enabled Systems with Rapid Clone".
In addition to the above options, the Smart Clone procedures described in a later chapter can be used to a database target cloned using an external solution as an input.
For information on cloning a Release 12 system on a RAC database, see My Oracle Knowledge Document 559518.1, "Cloning Oracle E-Business Suite Release 12 RAC-Enabled Systems with Rapid Clone".
Note: Database tier cloning with AMP is not supported from n to n DATA_TOP where n > 1 and n<=4) if
dbf filename conventions are customized (that is, not the same as that of RapidWiz)
you are not using Smart Clone, which is described in the next chapter. Smart Clone is supported for Release 11i only.
The following table lists some cloning terms used in this document.
| Term | Meaning |
|---|---|
| Source | Oracle E-Business Suite system being cloned. |
| Target | Oracle E-Business Suite system being created as a copy of the source system. |
| Image | Packaged copy of the source system ready for deployment to a target. |
| Stage | Location to store the image created from the source system.
Note: This stage directory must be outside the $COMMON_TOP/clone (for the source Applications node) or $RDBMS_ORACLE_HOME/appsutil/clone (for the source Database node). |
| Scramble | Process to obfuscate or remove sensitive data. |
| Hot mode cloning | Cloning an applications system without shutting it down. Also referred to as "hot cloning". |
| Smart Clone | Smart Clone allows you to use a database target cloned using an external solution as an input to the AMP cloning procedures. See the next chapter for more information on Smart Clone. Smart Clone can be used with only Release 11i Oracle E-Business Suite instances. |
Successful cloning using a shared stage location requires that group membership be established such that the target system user(s) has group membership in the same group(s) used to create the stage or cloning image on the shared disk resource.
For example, say the source system has a user "applmgr1" with a primary group of "appldba1". There also exists a user "oracle1" with a primary group of "oradba1". In this case "applmgr1:appldba1" owns the $APPL_TOP and you have user "oracle1:oradba1" who owns the database file system on the source system.
On the source system, the EM Agent user is "agent1" with a primary group of "agentgrp1".
On the target system, you wish to have a user "applmgr2" with primary group of "applmgr2" owning the $APPL_TOP. You wish to have user "oracle2" with primary group "oradba2" owns the target database file system.
On the target system EM agent is "agent2" with a primary group of "agentgrp2".
For cloning to be successful using a shared stage area in this above scenario, the user groups will require the following memberships:
Source:
applmgr1:appldba1--> no additional groups required in this scenario.
oracle1:oradba1--> no additional groups required in this scenario.
agent1:agentgrp1--> must add secondary memberships in groups "appldba1" and "oradba1" (if not already present). See: OS User/Group Requirement, Oracle Application Management Pack for Oracle E-Business Suite Installation Guide.
Target:
applmgr2:appldba2--> must add secondary membership in group appldba1 (if not already present).
oracle2:oradba2-->must add secondary membership in group oradba1 (if not already present).
agent2:agentgrp2--> must add secondary memberships in groups "appldba2" and "oradba2" (if not already present). See: OS User/Group Requirement, Oracle Application Management Pack for Oracle E-Business Suite Installation Guide.
In the above example, only the target requires group membership for inclusion of those groups that created the source area on the shared stage. Without these permissions, reading of files from the shared stage will fail.
Additional cloning limitations are detailed in Known Product Limitations.
Cloning via Oracle Application Management Pack for Oracle E-Business suite requires Perl 5.005 or higher on the Oracle Enterprise Manager agent. The user who starts the agent processes must set the PERL5LIB environment variable pointing to Perl 5.005 (or higher) libraries. Also, the Perl executable 5.005 must be used.
While upgrading the database from 9i to 10g (or 11g) with and Oracle E-Business Suite Release 11i instance, you need to ensure that the source instance perl.exe is pointed to the database 10g (11g) ORACLE_HOME of the Oracle E-Business Suite.
All the virtual internet protocol (VIP) addresses configured in the Oracle Cluster Ready Services (CRS) of the targets nodes identified for the created RAC instance must be up and running.
With Release 11i, for a clone job from Single Node - Single User to Single Node - Multiple User, ensure that you have write permissions for user IDs to the target base directory. Give 770 permissions to the directories from/to the target base directory with the following command:
$ chmod -R 770 <target base directory>If for a cloning process the target is multi-node and the database node domain and the applications node domain are different, perform the following step:
Include the target database node server name in the /etc/hosts file of the target applications node so that the applications node will be able to resolve the database node without the domain name. The modification should be like the following (this entry is for Linux x86; change as appropriate for your platform):
<ip-address> <Machine name with domain name> <Machine Name>For example:
140.87.205.217 adc60002demo.us.oracle.com adc60002demoFor Release 12 only: In addition to the above entry in the /etc/hosts file, the applications node context file needs to be changed.
Change the s_dbdomain entry in the <STAGE_LOC>/appsTier/context/apps/<SID>_<SERVER_NAME>.xml file to the correct domain name of the database tier.
For example, if the database node domain name is idc.oracle.com, and the applications node domain name is us.oracle.com, then the context file
/d1/QA/stage/PMS29/080522035852/PMS29_adc60010demo.xmlshould be changed to
<domain oa_var="s_dbdomain">idc.oracle.com</domain>On the HP-PA platform with an Oracle E-Business Suite instance on a 10.2.0.x database: For a Source-to-Image or a Source-to-Target clone procedure, remove the symbolic link present inside the 10.2.0.x database ORACLE_HOME on HP-PA:
<DB_OH>/jdk/jre/lib/PA_RISC/hotspotand replace it with absolute files.
Rapid Clone does not support cloning with symbolic links.
You can run diagnostic tests on your system in preparation for the cloning procedures. These tests can be accessed from the Diagnostics dashboard, available from the Pack Diagnostics link on the Oracle Applications page. For more information on running diagnostic tests, see: Running Pack Diagnostics Tests.
The following tables list tests related to cloning.
| Task | Severity | Step | Description | Notes/Expected results/Corrective Measures |
|---|---|---|---|---|
| EBS | Warning | Check if EBS has Shared File System | Check if the Oracle E-Business Suite is a multi-node applications tier with a shared file system configured. | Expected results: Yes/No. This is an informational message. If the shared file system is enabled and the result is No, please check 's_atname' to find out if all the nodes are consistent. Name of Command: CheckIfSFS |
| EBS | Critical | Get Agent ZIP Version | Check Agent zip and unzip utilities versions. | Cloning utilizes zip and unzip utilities, sometimes located in different locations on each host. Please verify if the zip version is at a minimum of InfoZip 2.3. For data files larger than 2 GB, InfoZip 3, Unzip 6 is required Different cloning flows use different zip utilities, as follows: Smart Clone uses the Agent Zip. Hot clone flows use the following:
Cold Clone flows use the following zip utilities: For Release 12 Agent Zip
For Release 11i:
Name of Command: CheckAgentZIPVersion |
| EBS | Critical | Check if AutoConfig is run on Database Tier | Verify if AutoConfig has been run on the database tier. | For cloning to work, it is mandatory that AutoConfig was successfully run on the source database tier. Name of Command: CheckIfAutoConfigIsRun |
| EBS | Critical | Check If AutoConfig Is Run on Applications Tier | Verify if AutoConfig has been run on the applications tier. | For Cloning to work, it is mandatory that AutoConfig was successfully run on the source applications tier. Name of Command: CheckIfAutoConfigIsRun |
| EBS | Warning | Get the Database Tier Operating System User Name | Get the O/S User Name for the database tier. | It is useful to know with which operating system user name the source database nodes have been created, as there could be file permissions issues in cloning. Corrective action: AutoConfig needs to be run in the Database Context to get t this value populated in the configuration. The configuration variable 's_dbuser' stores this information. Name of Command: GetDBOSUserInfo |
| EBS | Warning | Get Agent Perl Version | Verify Agent Perl utility version. | AMP Cloning requires the agent Perl utilities to be at a certain version level for certain cloning flows to function properly. Please make sure that the Perl version inside the Agent is compatible with that in the Oracle E-Business Suite instance (see the related diagnostic test for the Oracle E-Business Suite Perl Version) Name of Command: GetAgentPerlVersion |
| EBS | Warning | Get key environment variables for Database Context | Obtain key environment variables for Database Context, including:
| Certain database context variables of the source Oracle E-Business Suite instance need to be definitively set with non-null values for the cloning job to proceed successfully. If this diagnostic test fails, run AutoConfig on the database tier so that the correct environment file is generated again. The values in the environment file are used in this command. Name of Command: GetEnvironmentVariableValues |
| EBS | Warning | Get the APPS tier Operating System User Name | Get the O/S User Name for the applications tier. | If this diagnostic test fails, rerun AutoConfig on the applications tier. AutoConfig should populate the 's_appsuser' variable in the applications tier context file correctly. Name of Command: GetAppsOSUserInfo |
| EBS | Warning | Get key information required for Apps Context Configvariables | Obtain key environment variables for the applications context, including:
| Certain applications context variables of the source Oracle E-Business Suite instance need to be definitively set with non-null values for the clone job to proceed successfully. If this diagnostic test fails, run AutoConfig on the applications tier so that the correct environment file is generated again. The values in the environment file are used in this command. Name of Command: GetAPPSConfigVariables |
| EBS | Critical | Get EBS Zip Version | Check Oracle E-Business Suite zip and unzip utility versions. | Please verify if the zip version is at a minimum of InfoZip 2.3. For data files larger than 2 GB, InfoZip 3, Unzip 6 is required. Name of Command: CheckEBSZIPVersion |
| EBS | Critical | CheckIOPatches for <Oracle E-Business Suite Release Name> | Verify that certain patches have been applied on the Oracle E-Business Suite target. | Certain I/O patches need to be definitively run on the Oracle E-Business Suite instance for some of the clone flows to work successfully. Note that this step may change – depending on the Oracle E-Business Suite release (for example, 11i, 12.0, and so on). The list of patches is contained in an XML file that might be modified to include or exclude recommended patches. Name of Command: CheckEBSPatches |
| EBS | Critical | Get EBS Perl Version | Check Oracle E-Business Suite Perl utility version. | AMP Cloning requires Oracle E-Business Suite Perl utilities to be at a certain version level for certain cloning flows to function properly. Please make sure that the Perl version on the Oracle E-Business Suite instance is compatible with that in the Agent (see related diagnostic test for the Agent Perl Version). Name of Command: CheckEBSPerlVersion |
| EBS | Critical | Check if AutoConfig is run on Applications Tier | Verify if AutoConfig has been run on the applications tier. | It is mandatory that AutoConfig completed successfully on the source applications tier for cloning to work. Name of Command: CheckIfAutoConfigIsRun |
| EBS | Warning | Checks if Database is in Hot mode | Determine if the database is running in "Hot Mode" (that is, "Archive mode”). | Certain cloning procedures can be executed in “Hot Mode” (that is, with the source system up-and-running). A “Hot Mode” clone procedure requires that the database has enabled “Archive Mode”. AMP enables the archive log mode by connecting to the database. Name of Command: CheckIfDBArchiveIsEnabled |
| EBS | Warning | Get information for key Database Context Config variable | Obtain key database context variables that are required for non-“Smart Clone” cloning procedures, including:
| Certain database context variables of the source Oracle E-Business Suite instance need to be set with non-null values for the clone jobs to finish successfully. If this diagnostic test fails, rerun AutoConfig on the database tier. Name of Command: GetDBConfigVariables |
| EBS | Warning | Get key environment variables for Application Context | Obtain key environment variables for the applications context, including:
| If this diagnostic test fails, rerun AutoConfig on the applications tier. Name of Command: GetEnvironmentVariableValues |
| EBS | Warning | Checks if Oracle E-Business Suite AD Snapshot is valid | Verify if the Oracle E-Business Suite AD snapshot is valid. | In order to perform a "scale-down clone" process (that is, a multi-node source applications tier instance which has non-shared APPL_TOPs to a unified APPL_TOP in the target), AMP needs to ensure that the snapshots for the source APPL_TOPs have been updated properly. Make sure the Maintain "Update Current View Snapshots" option in adadmin is run at least once after the Oracle E-Business Suite creation. Name of Command: CheckIfADSnapshotIsValid |
| EBS | Summary: | A summary of all of the diagnostic tests that have been executed, in the following groups: Successful, Failed, With Warning, Aborted, and Total. |
| Task | Severity | Step | Description | Notes/Expected results/Corrective Measures |
|---|---|---|---|---|
| EBS | Warning | Check Host Credential for Non Smart clone flows | Checks if credentials are defined for "Host" target type for the source Oracle E-Business Suite database and applications tiers for basic cloning (that is, not Smart Clone) flows. | The system needs to check whether the host credentials set in the credential store for basic cloning flows (not Smart Clone) are appropriate before proceeding to clone. If they are not correct or not set, they need to be set for the host target type in the preferred credential store. Name of Command: CheckHostCredentialExistence |
| EBS | Warning | Check Host Credential for Non Smart clone flows | Check if the EM User has the required preferred credentials set for "Operating System Username" and "Operating System Password" in "Oracle E-Business Suite Infrastructure" target type for the database context for basic cloning (that is, not Smart Clone) flows. | If this diagnostic test fails, set the database context operating system credentials in the "Oracle E-Business Suite Infrastructure" target type in the preferred credential store. Name of Command: CheckDBContextCredentialExistence |
| EBS | Warning | Check Host Credential for Smart Clone flows | Check if the EM User has required preferred credential set for "Operating System Username" and "Operating System Password" in "Oracle E-Business Suite Infrastructure" target type for the applications context for Smart Clone flows. | If this diagnostic test fails, set the applications context operating system credentials in the "Oracle E-Business Suite Infrastructure" target type in the preferred credential store. Name of Command: CheckAppsContextCredentialExistence |
| EBS | Warning | Check Database Schema users Credential are defined Non Smart clone flows | Check that the "APPS Database Schema" User Credentials are defined for basic cloning (that is, not Smart Clone) flows in "Database Instance" target type for the source Oracle E-Business Suite. | In basic cloning (not Smart Clone) flows, AMP requires the database schema credentials of the source system. If this diagnostic test fails, ensure that the correct database schema credentials are set in preferred credential store for the database instance target type. Name of Command: CheckDBSchemaCredentialExistence |
| EBS | Check Database schema credentials for Smart clone flows | Check if the EM User has the required preferred credential set for the APPS schema users in "Oracle E-Business Suite" target type for Smart Clone flows. | The database APPS schema credentials must be entered manually with Smart Clone flows. | |
| EBS | Summary | A summary of all of the diagnostic tests that have been executed, in the following groups: Successful, Failed, With Warning, Aborted, and Total. |
Cloning can be accessed from the following pages:
Oracle Application System Page - from the Cloning link under "Related Links".
Oracle Applications System Administration Maintenance Page - from the icons corresponding to Cloning tasks in the "Maintain" column.
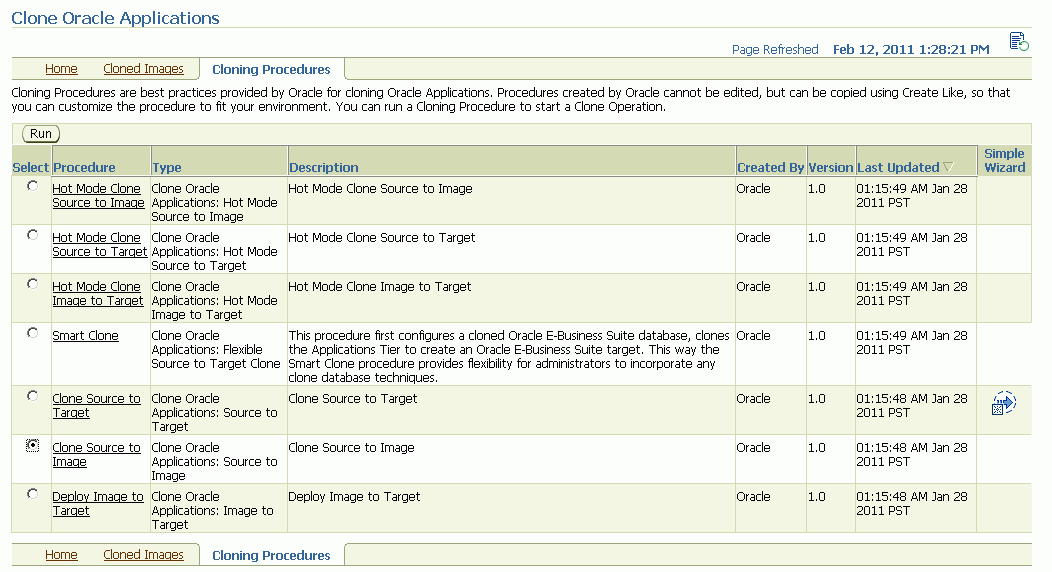
Different types of clone jobs can be performed. Click on Clone Status in the Oracle Application Maintenance page and then on the Cloning Procedures subtab to see these types.
Clone Source to Target: In Source to Target clone job, the source system data is extracted and applied on to a target system. On completion of the clone process, the source and target systems will have the same data and patch set level. The benefit of this procedure is that it creates identical copy of production system.
Clone Source to Image: The second category is Source to Image where the source system data is extracted and stored. The image extracted can be applied to any number of target systems. The benefit of this procedure is that it facilitates periodic backing up of the source system.
Deploy Image to Target: The third category is Image to Target where an image is deployed on to a target system. The benefit of this procedure is that it allows for rapid deployment of standard pre-configured target systems.
Hot Mode Clone Source to Target - This procedure is similar to Clone Source to Target, above, except that the source system does not need to be shut down.
Hot Mode Clone Source to Image - This procedure is similar to Clone Source to Image, above, except that the source system does not need to be shut down.
Hot Mode Clone Image to Target - This procedure is similar to Deploy Image to Target, above.
In addition to the above options, the Smart Clone procedures described in a later chapter can be used to a database target cloned using an external solution as an input.
Note: Smart Clone is supported with Release 11i Oracle E-Business Suite instances only.
In Hot Mode Clone interview flows, only archive log-enabled Release 12 instances are displayed in the List of Values (LOV) as possible sources. If an instance is discovered in OMS when its archive log is not enabled and at a later stage its archive log is enabled, that instance will not be displayed in the LOV of hot mode clone flows until this change is reflected in the OMS.
Note: After you turn on the archive log in OMS, you need to wait for OMS to update the configuration or you should rediscover the database component for the Oracle E-Business Suite target (only the database).
In the Deploy Image to Target flow, only "hot" images are shown in a hot mode flow and only "cold" images are shown in a cold flow. If the cloning procedure is launched from the Clone Images tab in the Cloning home page, based on the type of the image (Hot/Cold), then the Hot Mode Deploy Image to Target or Deploy Image to Target would be launched.
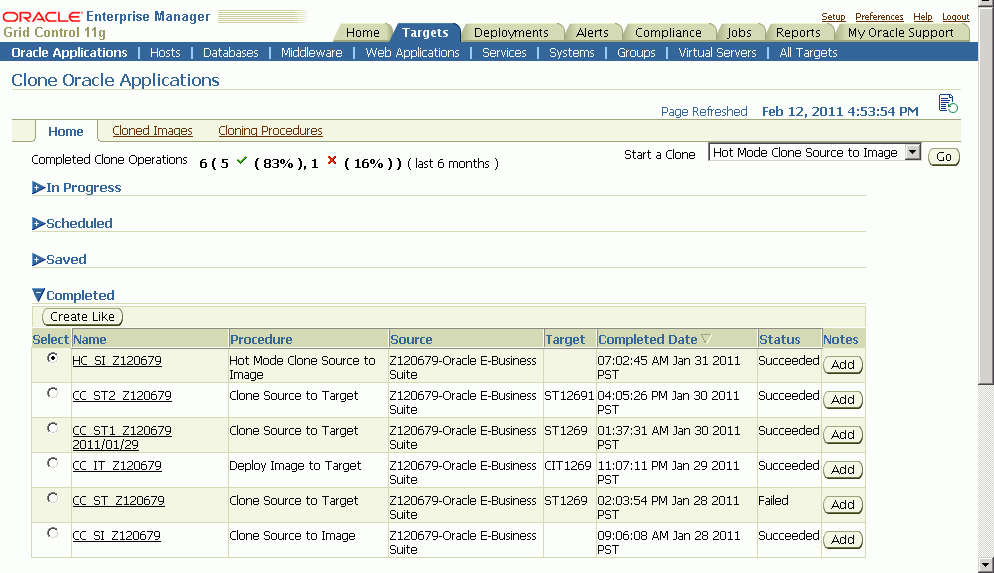
The Clone Status page can be accessed from the Oracle Applications System page or from the Oracle Applications Maintenance page.
The Clone Status page provides an enterprise-wide view of the statuses of clone jobs. This page is divided into the following sections:
In Progress - In this section you can view all the clone jobs that are currently in progress. Even though this section provides a summarized status, you can drill down to find the exact stage of progress of the clone job.
Scheduled - Clone jobs scheduled for a later point in time can be viewed here. You can create a copy of a scheduled clone job here as well.
Saved - Clone job interviews saved midway are listed in this section. You can come back later and complete the interview process in order to start the clone job. You can also create a copy of the clone job.
Note: To delete a saved clone job: Click on Deployment tab. Click on Procedure Completion Status under Deployment Procedure Manager section. Select the clone operation that you wanted to delete. Run it and then click Stop (if not already stopped or succeeded). Select the run and click the Delete button.
Completed - Clone jobs that have been completed successfully or with errors are listed in this section. You can create a copy of a completed clone job to kick start a new clone.
In all the above sections, you can click Add in the "Notes" column to add comments to a specific clone job.
Click on Refresh icon to refresh the data. You may need to click on this icon several times to refresh the data.
Note: Customizations of the seeded cloning procedures are not supported. However, existing cloning procedures may be copied and those copies then edited. See "Custom Clone Procedure" below.
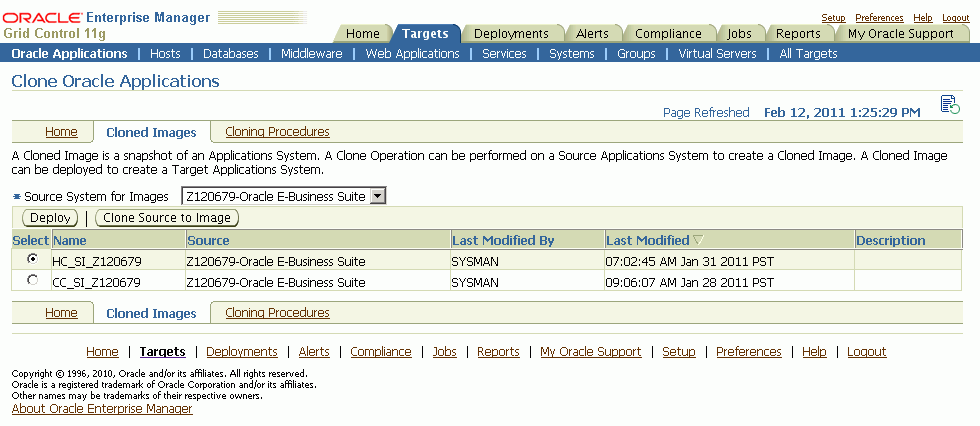
The Image View lists all the images that were created from a source system. From this page you can either deploy the images or create a new image for a source system.
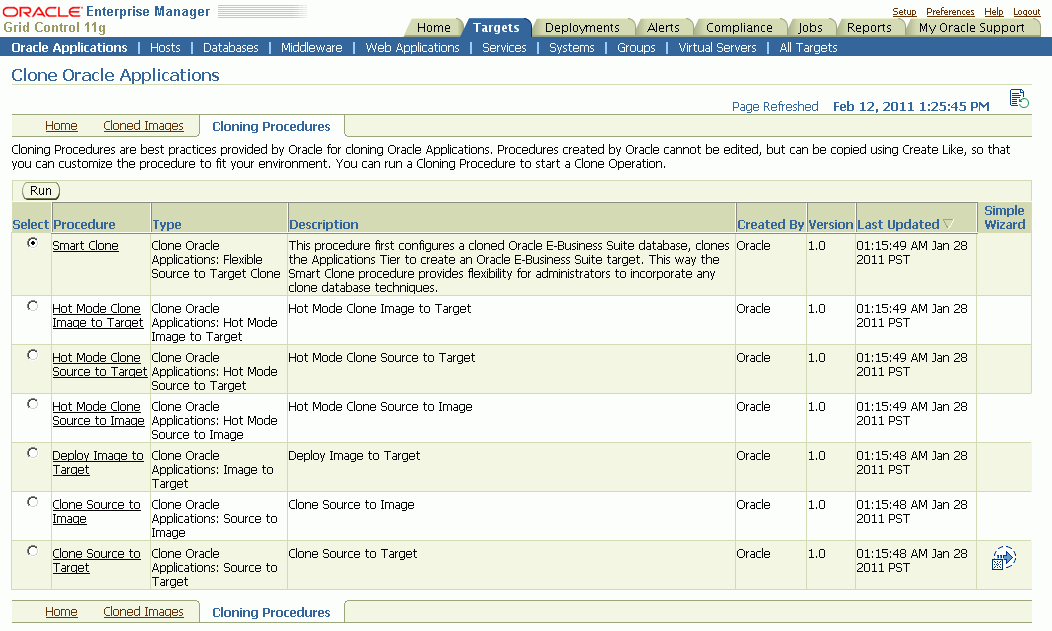
Clone Procedures are best practices provided by Oracle for cloning Oracle Applications. Clone Procedures provide a step-by-step interview process for initiating a clone job. For more information on concepts mentioned here, including configuring a Software Library and Target Systems, see the Enterprise Manager online help.
The Oracle Application Management Pack for Oracle E-Business Suite ships with the following clone procedures:
Clone Source to Target
Advanced Clone: Advanced Clone is a detailed step-by-step interview process that allows users to configure each and every parameter in the clone process. Advanced Clone procedures are covered in a later section.
Simple Clone: Simple clone process skips the long steps provided in Advanced Clone by setting some defaults for some values. This allows you to create a clone job quickly. The Simple Clone option is available only for Source to Target procedure. Simple Clone procedures are covered in a later section.
Clone Source to Image
Deploy Image to Target
Hot Mode Clone Source to Target
Hot Mode Clone Source to Image
Hot Mode Image to Target
Important: You cannot delete or modify the default procedures. However, you can create a custom copy of the default procedure.
Important: Before starting cloning procedures for Release 12 instances ensure that “s_base” Database Context variable is not null and its related path also exists in the “s_db_oh” Database Context variable.
If the s_base value is not in the source context file or not part of the s_db_oh value, then these should be modified in the context file and AutoConfig should be run on the database tier so that the new value will be updated in the database.
To create a custom clone procedure, follow these steps:
Select a default procedure from the Clone Procedure view by clicking on the procedure name.
Click on the Create Like button.
Enter a unique name and fill in the relevant details. Click Save to create a new custom clone job.
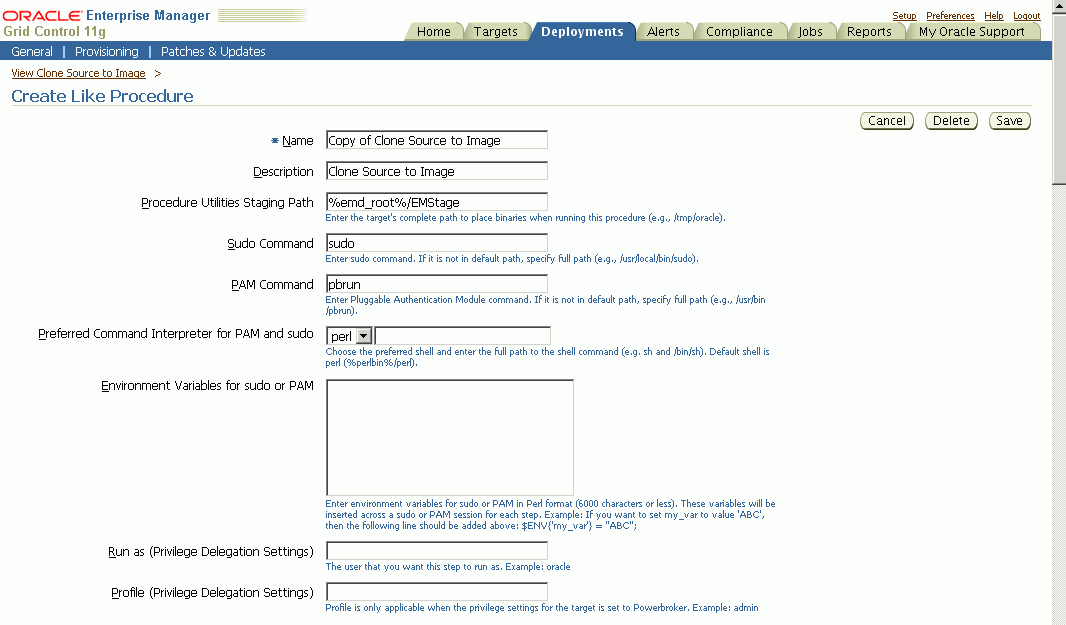
The details that need to be entered are:
Name - Enter a unique name to identify this custom clone job. (Required)
Description - Enter a short description about the clone job.
Staging Area Path - Enter the path where the binaries would be placed for running the procedure.
Sudo Command - Enter the sudo command. (For UNIX platforms only. See the Enterprise Manager online help or the UNIX sudo man page for more information.)
PAM Command - Enter the PAM command. (For UNIX platforms only. See the Enterprise Manager online help for more information.)
Environment Variables for sudo or PAM
Enable Notification - Check this box if you want to be notified about the status of the clone job.
Procedure Status Notification Job Tag - Enter a job tag that will be pre-pended to the notification job name that would be created for this clone job.
Status for which Notification is to be sent - Choose the status for which you need to be notified.
The table at the bottom of the page lists the possible tasks to be performed by clone job in chronological order. You can:
Enable a step
Disable a step
Insert a custom step
Delete a step
Edit a step
For each step you can specify the Run Privilege and the Error Handling Mode. Click Save and the custom clone procedure is created. You can then access this new custom clone job from the Clone Procedure view.
In a Source to Target clone job, the source system data is extracted and applied on to a target system. Upon completion of the clone process, the source and target systems will have the same data and patchset level. The benefit of this procedure is that it creates an identical copy of production system.
The advanced clone can be initiated from the following pages:
Clone Status Page, by selecting "Clone Source to Target" from the "Start a Clone" list.
Clone Procedure View, by selecting "Clone Source to Target" and clicking Run.
To perform an advanced clone procedure
Enter general clone information.
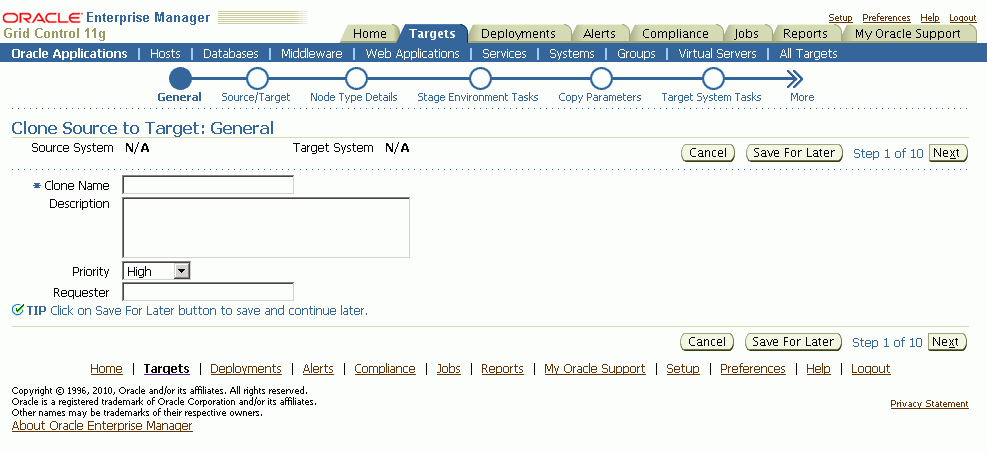
Enter the name of the clone run and a brief description, along with the job priority. Only the Clone Name is required.
Select source and target systems.

Select a source system, enter the target system details, and choose the target port pool. Note that the source database must be running at this point. You have a choice to clone either the entire system, the database tier, or the application tier.
Database Node - Choose this option to clone the complete database node; that is, the database and the database technology stack.
Technology Stack: You can choose this option to clone the database technology stack only.
Database: You can choose this option to clone the database (data tops) only. The database component, in particular, has a dependency on the database technology stack, so it should not be applied without an existing database technology stack on the target.
Application Node - You can choose this option to clone the complete Application Node, that is, the APPL_TOP and the application technology stack.
Technology Stack: Choose this option to clone the application technology stack only.
APPL_TOP: Choose this option to clone the APPL_TOP (appl tops) only. Like the database clone above, cloning only the APPL_TOP requires that an applications technology stack already be in place on the target.
Note: In the Components Selection section for hot clone mode flows (for non-RAC source instances), you can select only the following components
Application System
Database Node
Application Node
The subcomponents selection is disabled.
For cloning the application node only (or application technology stack or $APPL_TOP), you must ensure that whichever database node is to be referenced as the database to be used for the new $APPL_TOP/Application Node is specified during the Clone Automation UI interview process for the application node (or application technology stack or APPL_TOP). This database node must also be up and running at the time of the clone flow submission.
Note: For RAC source instances, the Target Applications System name (Global or Service name) must have 7 or fewer characters. The node number will be appended to this name for the SIDs of the individual nodes that will be displayed in the Specify Database Node Details Page. The character limitation is due to the fact that the SID string must not be more than 8 characters.
For example, for a 3-node RAC system:
Target Applications System Name - GLBNAME
SID for Node1 - GLBNAME1
SID for Node2 - GLBNAME2
SID for Node3 - GLBNAME3
Note: If the source instance has a RAC database, only the entire application system should be selected. Selecting other options and proceeding will result in a validation error.
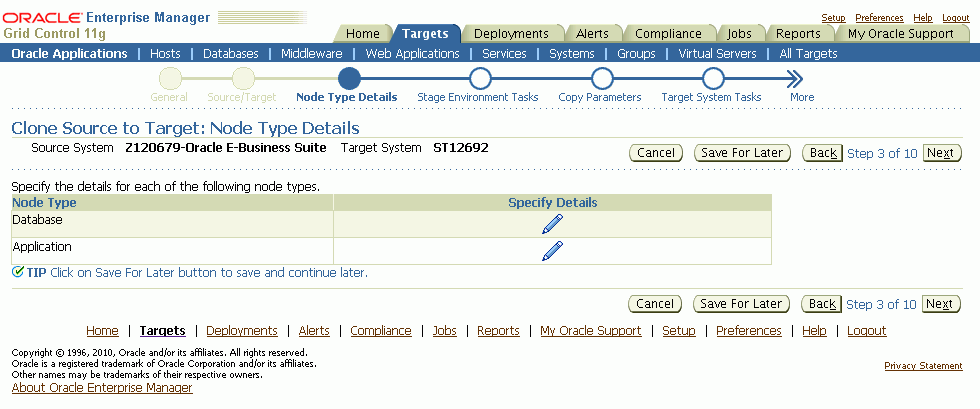
Specify node type details.
During this step you will specify the details for the target database and application nodes.
Note: For RAC instances, you can select any of the source nodes listed in the Source System Nodes list and that node name will be displayed in the "Source Node" column of the Target System Nodes.

Specify database node details. Note that what you have specified for your source system node determines what you can enter for the target system nodes.
Important: If you are cloning a RAC instance for Release 12, you cannot scale up or down.
Specify the following information for the target database.
Target host name
Port - The port value defaults in. You can change this value, but the port value for all target nodes must be the same.
SID - This value defaults in and cannot be changed.
Note: For an individual node for a RAC instance, the SID is the Target Application System name with the node number appended to it.
You have the option to specify further details as well.
Also in this page you have the option to add nodes in addition to the primary one.
You can use the Collapse to Single Instance button to clone a RAC instance to a non-RAC instance.
Note: You can clone a 2-node RAC source instance to a single non-RAC instance. You cannot clone a 2-node RAC instance to a single-node RAC instance.
Note: If you choose Collapse to Single Instance, the page shows the same fields as for a non-RAC target system. The SID for the target system node is the Target Application System name entered earlier.

Note: For RAC target system nodes, ensure that you enter the Cluster InterConnects and Virtual host names correctly.
Specify target database node details such as the mount points for the data files.
Note that in the case where the source application system's database files reside in multiple mount points/directories, it is important that they be mapped to the clone target as well. You can refer to the Database Context file variables “s_dbhome” (1-4) in order to synchronize the target database file mount point configuration with the source.
For example, consider this structure in the Database context file:
<db_sysfiles
oa_var="s_dbhome1">/d10/oracle/VIS/db/apps_st/data_sys</db_sysfiles>
<db_logfiles
oa_var="s_dbhome2">/d10/oracle/VIS/db/apps_st/data_log</db_logfiles>
<db_datfiles
oa_var="s_dbhome3">/d10/oracle/VIS/db/apps_st/data_dat</db_datfiles>
<db_ndxfiles
oa_var="s_dbhome4">/d10/oracle/VIS/db/apps_st/data_ndx</db_ndxfiles>
The Database Files Mount Point(s) inputs would be as follows:
| Mount Point | Value |
|---|---|
| APPL_TOP mount point | /d10/oracle/VIS/apps/apps_st/data_sys |
| Auxiliary mount point 2 | /d10/oracle/VIS/apps/apps_st/data_log |
| Auxiliary mount point 3 | /d10/oracle/VIS/apps/apps_st/data_dat |
| Auxiliary mount point 4 | /d10/oracle/VIS/apps/apps_st/data_ndx |
Important: For RAC target systems, the Port value should be the same for all the database nodes.
Specify application node details. Click the Specify Details icon for the application node.
Specify the target system node details for the application node. In this page you have options to add nodes in addition to the primary one.
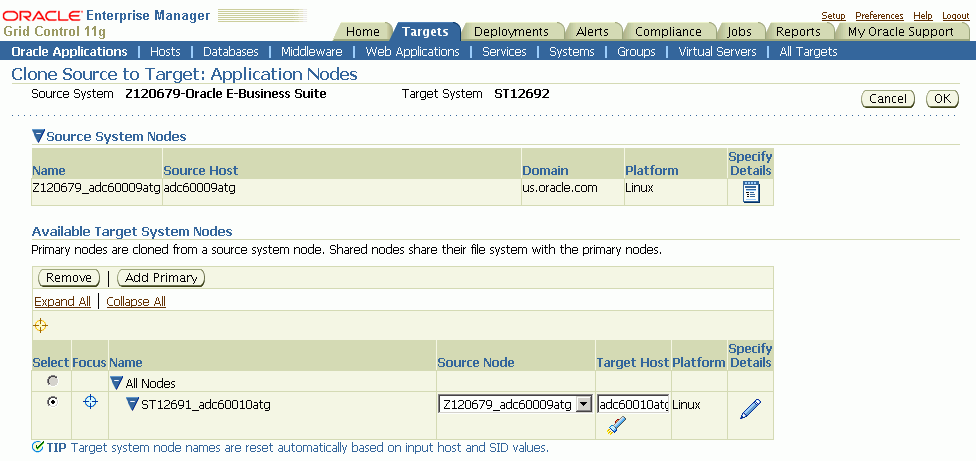
Note: This type of cloning flow does not support multi-node applications tier cloning.
Click the icon corresponding to each application tier node to enter the details. You can specify target application node details such as the COMMON_TOP locations and other details.
Scroll down the page to enter information in the Ports section.
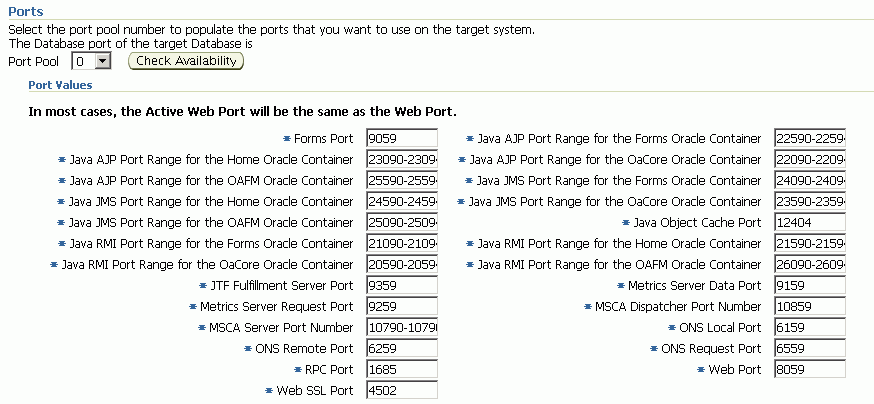
Note: With Release 11i instances, the default Port Pool value shown is '0' and is dependent on the value of "s_port_pool" in the source applications context file. To change the value shown by default, change the value of "s_port_pool" in the source applications context file.
Note: Clarification: The Data Port listed in the Port Values section is not the same as the database listener port which was specified earlier in the Database Node Details. Instead, this "Data Port" refers to the Forms Metrics Server Data Port. This ambiguity is resolved in Oracle E-Business Suite Release 12.0.4.
Configure data scrambling (Optional).
Configuring data scrambling is an optional step. In this step you can specify the data scrambling options required to remove sensitive data from the source system. Also, you can specify where the interim stage environment should be for scrambling. If data scrambling is not enabled, this step will be skipped.
See Data Scrambling for more information.
Note: Data scrambling is not supported for RAC systems.
Click the "Specify Details" icon corresponding to Data Scrambling to select the Policy Set and other details. Click OK to save the details and go to the previous page.
Under "Scrambling Stage", select the "Use the Target System Database as Stage Environment" option if you want the target system database to be used as the interim database where scrambling should be performed. Additionally, if you would like to specify a separate stage environment you can choose the "Specify a Different Stage Environment" option. This option will create a separate interim database where scrambling is performed. The interim database is then cloned to create the target system database.
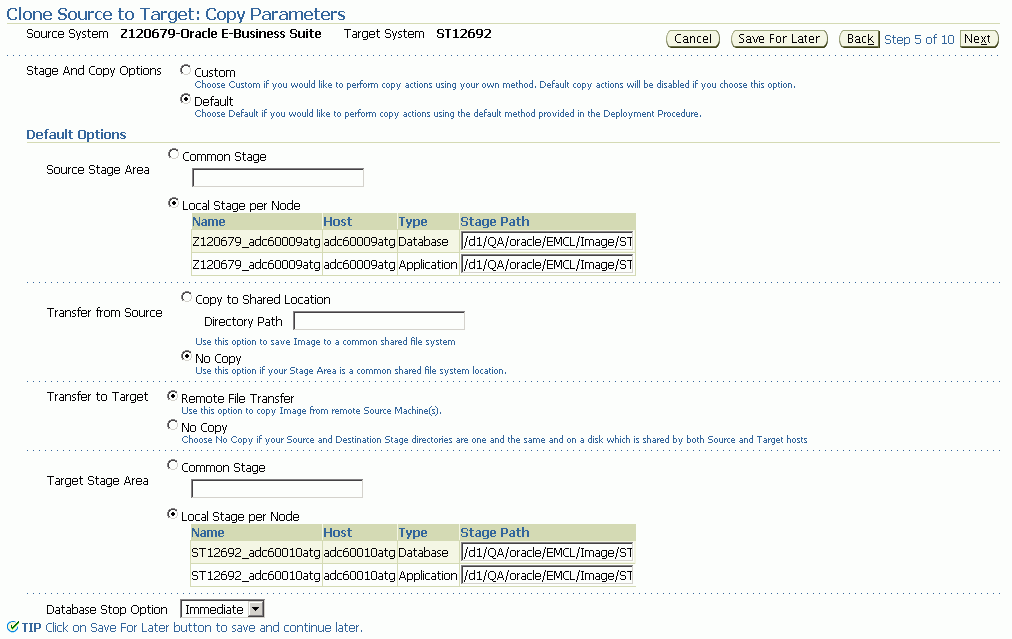
Specify clone staging options (Copy Parameters).
Cloning using the Oracle Application Management Pack for Oracle E-Business Suite requires that the source environment be prepared for the cloning process into a stage area. This step allows you to specify the details for the stage, such as its location and method of transfer to the target system.
Note: The stage directory must be outside $COMMON_TOP/clone (for the source Applications node) or $RDBMS_ORACLE_HOME/appsutil/clone (for the source Database node).
Note: For hot mode cloning, the file mounting options for the stage directory must comply with RMAN recommendations for a Source or Target that has a RAC database on NFS storage.
The following are some definitions for terms used.
Source Stage Area or Target Stage Area
Common Stage: Both Database and Application Nodes are staged in the specified location.
Local Stage per Node: Database and Application Nodes each have separate staging areas.
Transfer from Source
Copy to Shared Location: Allows you to copy the stage area at the location specified in “Source Stage Area” to a shared directory location, specified in "Directory Path" (for example, an NFS mounted location visible across both source and target nodes). Using this option allows the process of creating the stage itself, which is file I/O intensive due to heavy use of zip compression, to occur on a local file system for better performance. Once the I/O intensive operations are complete, the stage area is then copied to the shared file system.
No Copy: Must be selected if the stage location is not shared.
Transfer to Target
Remote File Transfer: Must be specified when the stage area is not shared between source and destination systems.
No Copy: This option is used when the staging area is either shared or when the source and target Oracle E-Business Suite systems are on the same machine.
Some example scenarios are given below. For each scenario specified, the options selected are in this order: Source Stage Area > Transfer from Source > Transfer to Target > Target Stage Area.
User chooses to create a local stage and then copy it to a shared location which is an NFS mounted location visible across both source and target nodes.
Common Stage → Copy to Shared Location → No Copy → Common Stage
OR
Local Stage per Node → Copy to Shared Location → No Copy → Local Stage per Node
For best use of this option, User can set target stage location, specified in “Common stage”or “Local Stage per Node”, to the location same as that of “Copy to Shared Location”, which is an NFS-mounted location visible across both source and target nodes.
User chooses to create the stage at an NFS-mounted location, which is visible across both source and target nodes.
Common Stage → No Copy → No Copy → Common Stage
OR
Local Stage per Node → No Copy → No Copy → Local Stage per Node
Stage location must be an NFS mounted location, which is visible across both source and target nodes, for both “Common Stage” and “Local Stage per Node” options.
User chooses to have the stage created in a location, which is not visible to target nodes. This stage is then transferred over the network via secure agent communications to the target node.
Common Stage → No Copy → Remote File Transfer → Common Stage
OR
Local Stage per Node → No Copy → Remote File Transfer → Local Stage per Node
User chooses to save an image copy to a shared location after having selected the “Clone Source to Target” cloning flow. (Just to store an image backup on the shared location.)
Common Stage → Copy to Shared Location → Remote File Transfer → Common Stage
OR
Local Stage per Node → Copy to Shared Location → Remote File Transfer → Local Stage per Node
Note: The extra copy operation in this flow will affect the performance for this flow.
Specify final system tasks.
Choose the finishing tasks that need to be performed on the target system after the image has been deployed. The selected Product Setup programs are run automatically as part of the clone operation. The Data Purge programs can be scheduled at the end of the clone operation. Similarly, the diagnostic tests for the selected products under the Check List can be executed at the end of the clone operation. (Refer to Monitoring a Clone Operation/Manual Finishing Tasks for the detailed steps).
Enter Custom Properties (Optional).
If you have any custom jobs, then you can enter the custom parameters for these jobs.
Specify source and target authentication information.
Specify the credentials for the clone process to access the source system and to set the credentials for the target system.
Note: The APPS schema password on the target system must be set the same as that on the source system. There is currently no way of changing the APPS schema password on the target during the clone procedure.
Schedule the clone job.
The clone job can either be run immediately after the final review and submission or it may be deferred to some later time.
Review the clone job details.
Review the clone job details and ensure the information is correct. Submit the clone job by clicking Finish.
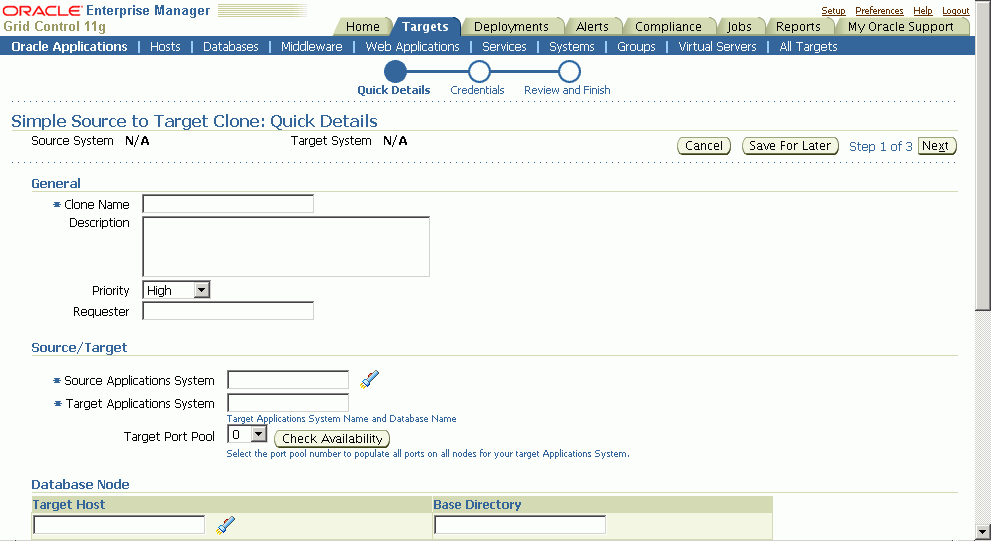
Simple cloning (also referred to as simple clone) is a three-step process (unlike the ten-step process of advanced cloning) to create an exact clone of the source system. Simple clone is very beneficial while creating mirror copies of the source system for high availability.
The simple clone can be initiated from:
Clone Status Page - By selecting "Simple Clone Source to Target" from the "Start a Clone" list.
Clone Procedure View - By clicking the icon under the Simple Wizard column corresponding to “Clone Source to Target” row in the Procedure view.
The following are required in order to perform a Simple Source to Target clone operation.
A shared common stage directory that is accessible from the source and target system machines.
Note: This stage directory must be outside the $COMMON_TOP/clone (for the source applications node) or $RDBMS_ORACLE_HOME/appsutil/clone (for the source database node).
For Release 11i, the source system should have at least one Applications node that supports all of Administration, Concurrent Processing, Forms and Web.
The OS username and group for the database and applications node must be the same on the target system as on the source system.
Follow these steps to perform the Simple Source to Target clone operation
Specify these details:
Clone name and details.
Source and target details.
Node (database and application) information.
Stage directory (this must be a shared directory accessible from the source and target system machines).
Note: This stage directory must be outside the $COMMON_TOP/clone (for the source applications node) or $RDBMS_ORACLE_HOME/appsutil/clone (for the source database node).
Schedule.
Specify the credentials needed for clone job to access the source system. Also to be specified are the target system credentials. A test button is available for testing these credentials.

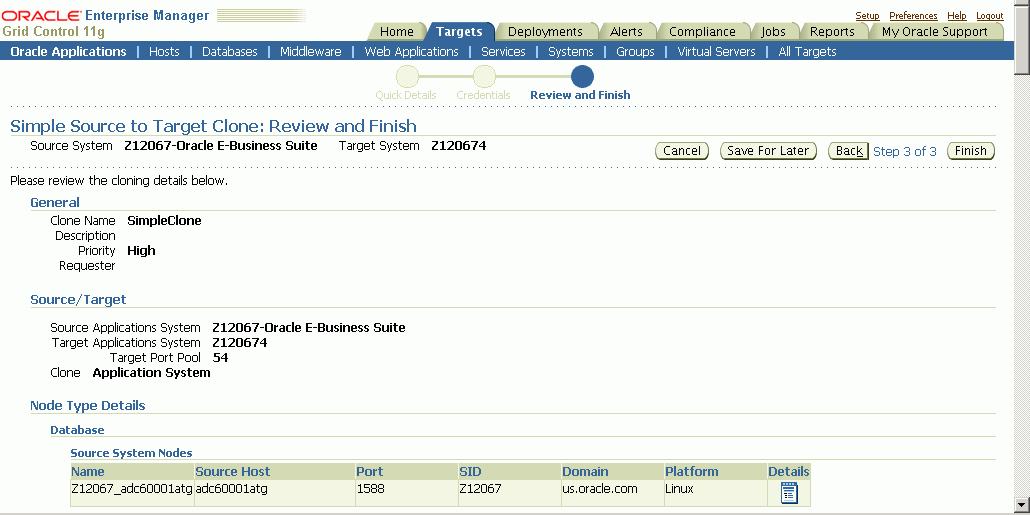
Review the details entered before submitting the clone job.
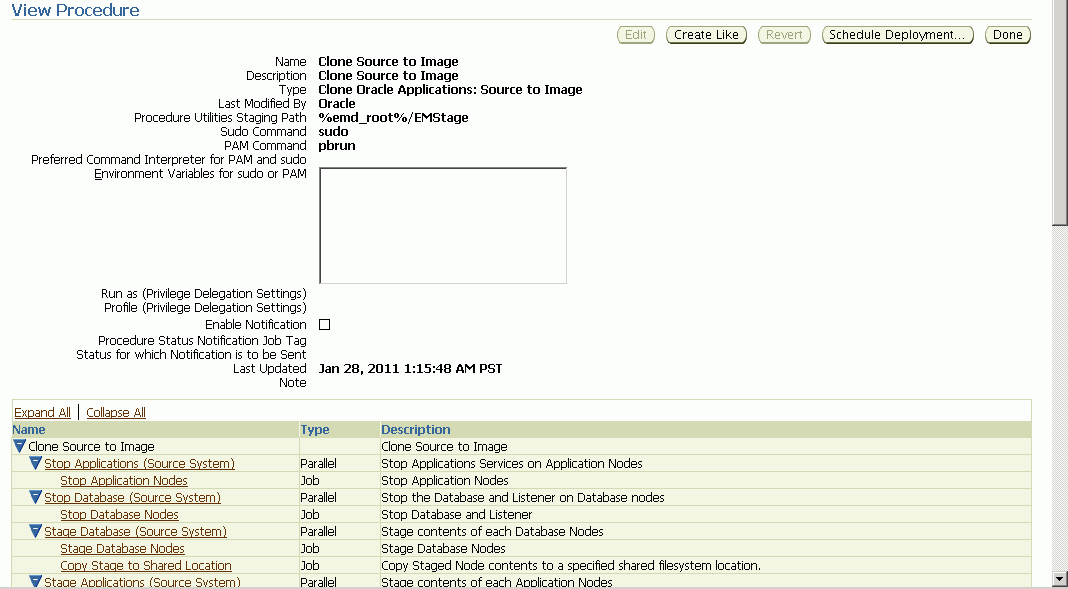
Clone Source to Image can be used to create an image or backup of a source Oracle Applications system. The image is registered with Enterprise Manager and can be later used to create a target system using the Deploy Image to Target flow (See: Deploy Image to Target).
Note: When performing a Source to Image clone operation on a source system with multiple applications nodes that share the file system, select only a single application node to be included in the image.
A Clone Source to Image operation can be invoked from the following places:
From the Clone Oracle Applications home page, select "Clone Source to Image" from the "Start a Clone" list.
From the Cloning Procedures tab, select "Clone Source to Image" and click the Run button.
From the “Cloned Images” tab, click the Clone Source to Image button.
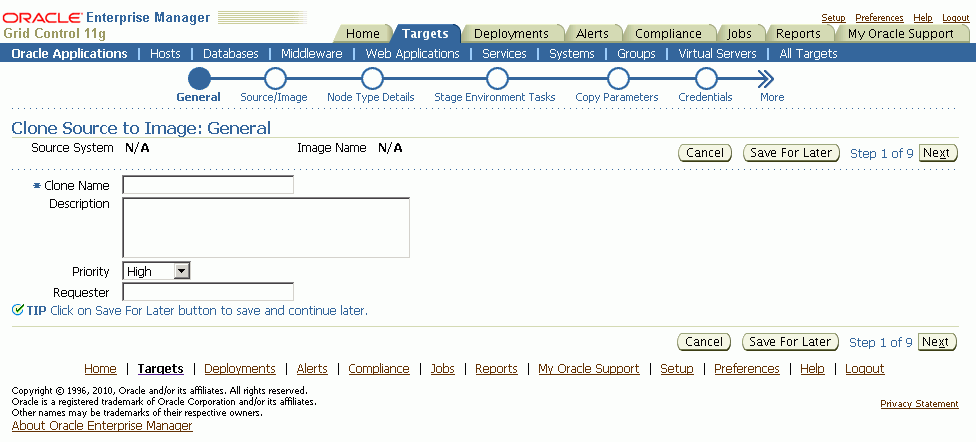
After launching the wizard, pecify the clone operation details in the "General" step.
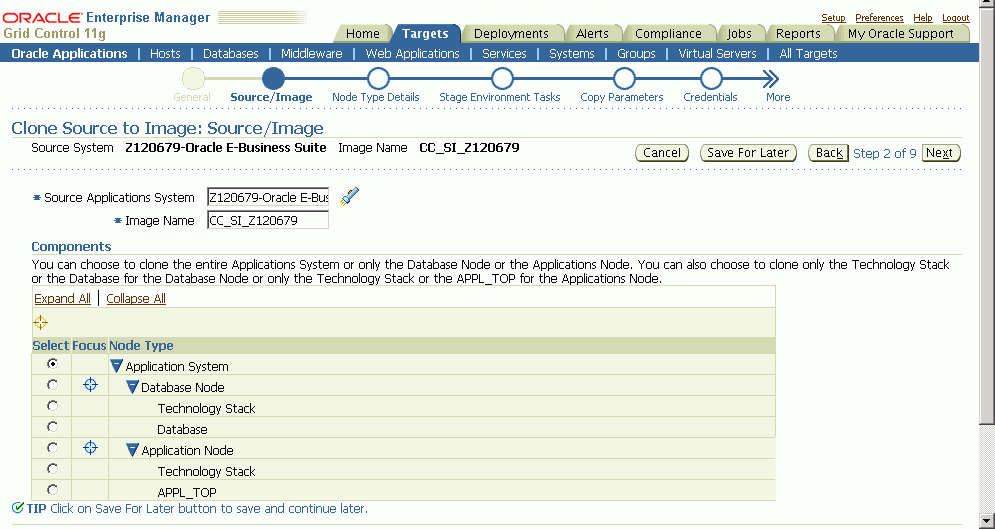
In the “Source/Image” step, select the source Oracle Applications system. Also specify a name for the image and select the component that you would like to be included in the image.
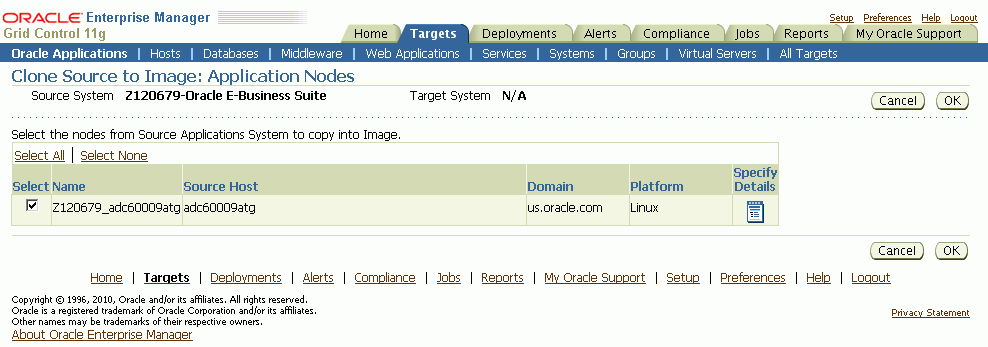
From the "Node Type Details" step, select the nodes to be included in the image for database and application node types.
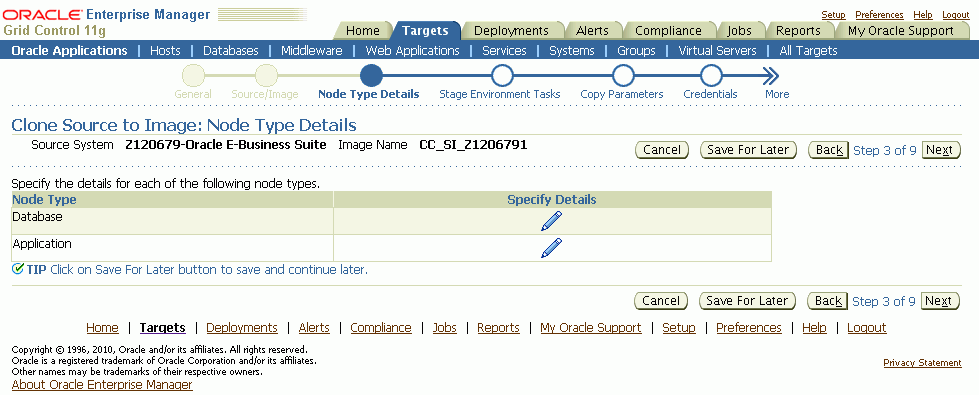
For the database node type, select the database node to be included in the image.

Similarly, for the application node type, select the application nodes to be included in the image.
In the "Stage Environment Tasks" step, specify data scrambling-related information, if required. If data scrambling is not enabled, this step will be skipped (Refer to Data Scrambling on how to enable data scrambling). Click on the "Specify Details" icon for the "Data Scrambling" task in order to specify the related details such as the policy set to be used for scrambling.
If you choose to run data scrambling during a Source to Image operation, you must also specify details for a stage environment database where scrambling will be executed. An interim database will be cloned from the source to the specified stage environment and scrambling executed on this database. Upon completion of scrambling, the interim database is staged and included as part of the final image.
In the "Copy Parameters" step, specify the stage area location and file transfer options for creating the image.
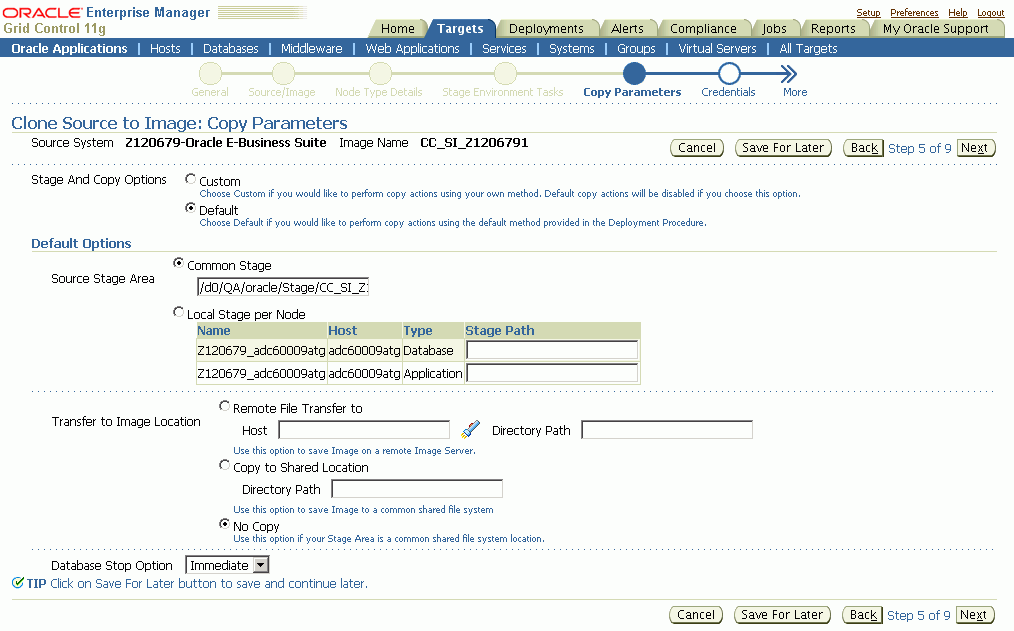
Note: The stage directory must be outside the $COMMON_TOP/clone (for source Applications node) or $RDBMS_ORACLE_HOME/appsutil/clone (for the source database node).
If you would like the image to be staged directly to a shared file system image directory (the image directory must be accessible from the source system nodes and also from the stage environment if scrambling is enabled), you can specify the shared image directory location in the Common Stage location field, and select "No Copy" for "Transfer to Image Location".
Also, if you have enabled scrambling, specify the same shared image directory location in the "Stage Path" field for the Stage Environment Stage Area.
If the image storage file system is not accessible from the source system nodes, you can specify local stage directories for each source system node and select "Remote file transfer to" option for "Transfer to Image Location". Specify a host with access to the image storage file system and the directory path where the image should be stored.
If scrambling is enabled, also specify a Stage Path for the Stage Environment Stage Area.
If you are not using data scrambling, you can specify local stage directories per node and copy to a shared location to store the image (all source system nodes must have access to the shared location) by choosing the “Copy to Shared Location” option for “Transfer to Image Location”.
Note: For instances where the source or target has a RAC database on NFS storage, you should ensured that the file mounting options for the stage directory comply with by RMAN recommendations.
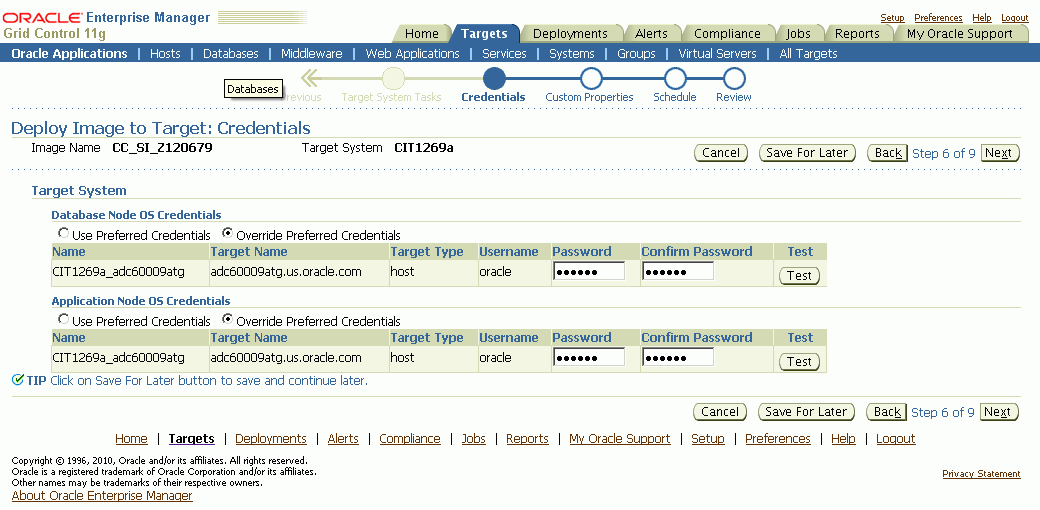
In the “Credentials” step, specify the OS and APPS schema credentials for the source system. Additionally, you may also need to specify OS credentials for the image host. Click the Test button for each credential to ensure that it is valid.
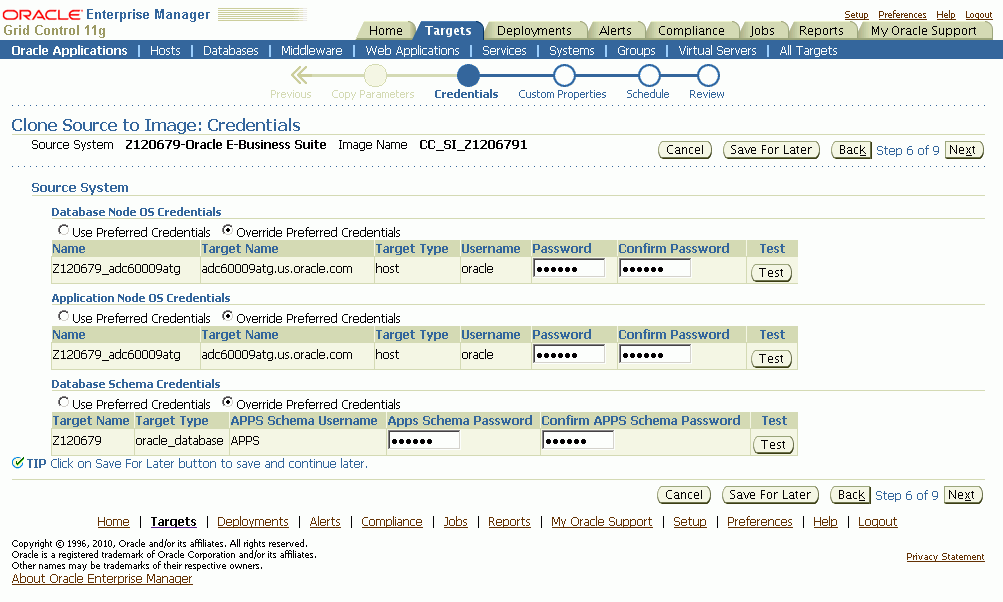
If you are using data scrambling, you need to specify the OS, APPS schema, and the privileged schema credentials for the stage environment database. The privileged schema should have a “RESTRICTED ACCESS” privilege. You can also use the SYSTEM schema as the privileged schema for scrambling.
In the "Schedule" step, specify if you would like the clone operation to execute immediately or at a later time.
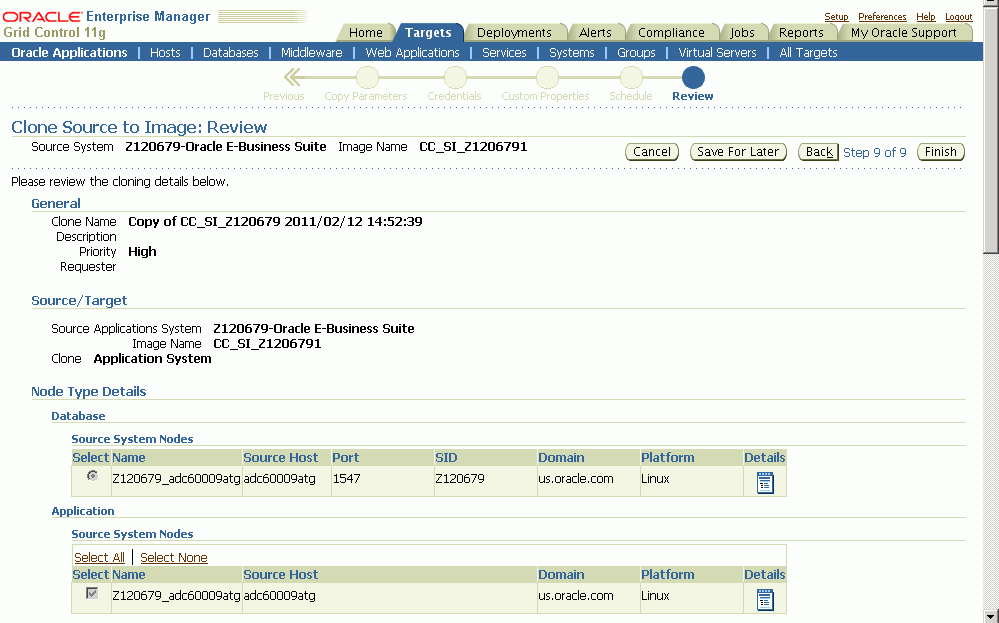
Finally, review the cloning details information and click Finish to submit the clone operation. Alternatively, click the Save For Later button to save the information and submit the operation later.
Deploy Image to Target can be used to create a cloned Oracle Applications system from an image created by a Clone Source to Image operation.
Please read Group Membership for Cloning for important information on group membership.
A Deploy Image to Target operation can be invoked from the following:
From the “Clone Oracle Applications” home page, select “Deploy Image to Target” from the “Start a Clone” list.
From the “Cloning Procedures” view, select “Deploy Image to Target” and click the Run button.
From the “Cloned Image” view, select an image and click the Deploy button.
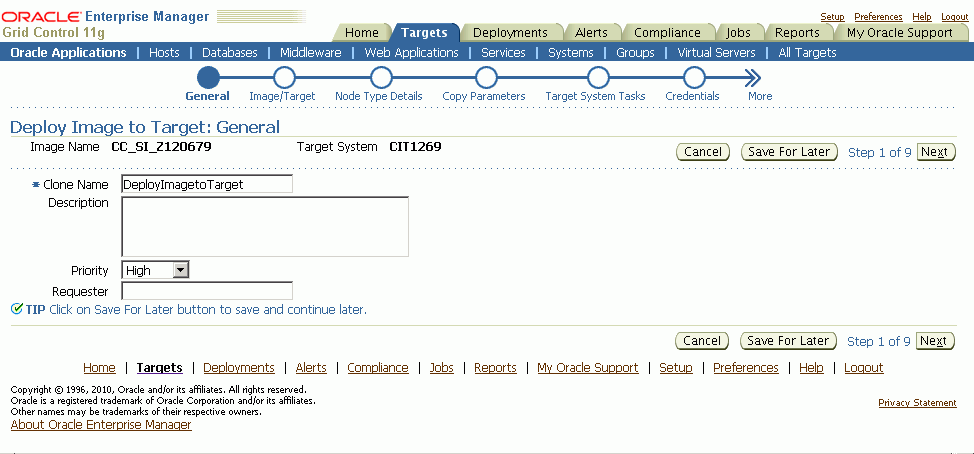
After launching the wizard, specify the clone operation details in the “General” step.
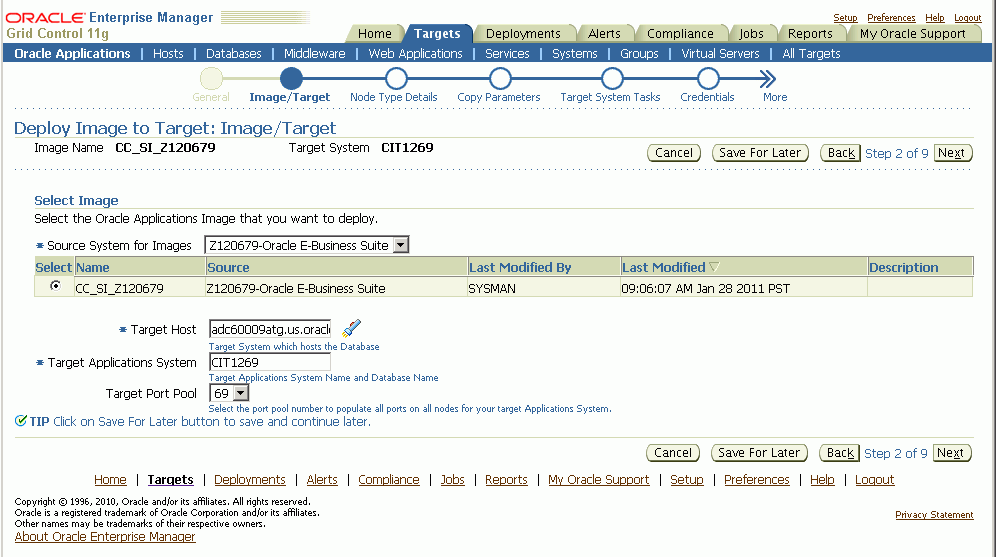
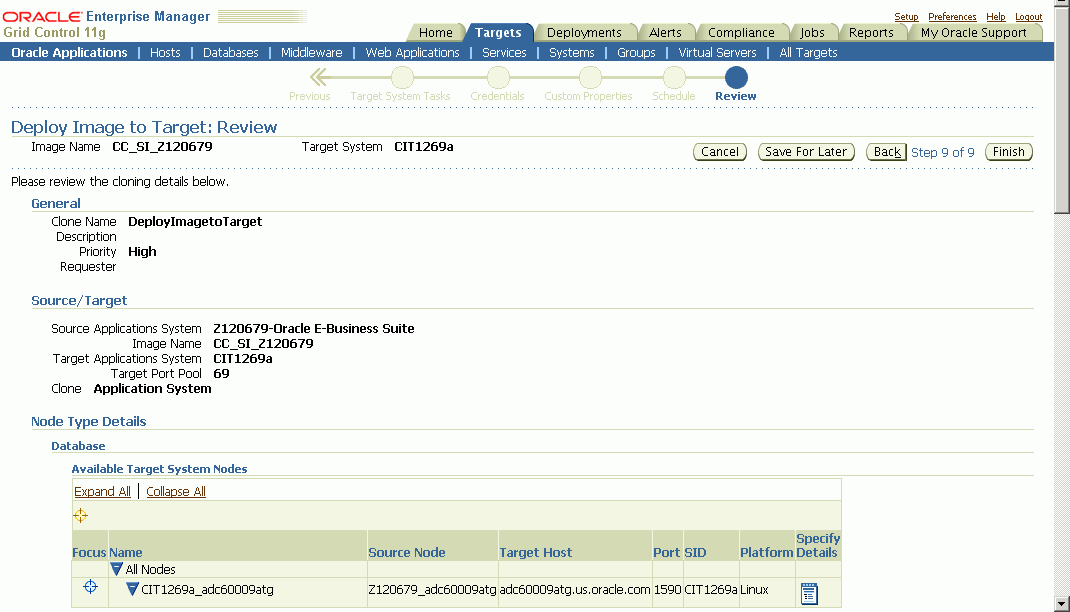
In the “Image/Target” step, select the Image from which you would like to clone. Also specify the target system name and port pool value.
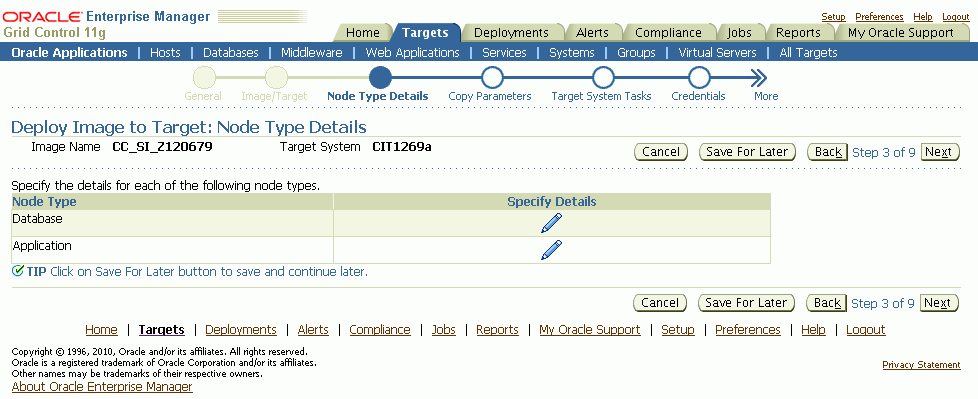
On the “Node Type Details” page, specify the target system details for Database and Application node types.
For the database node type, specify the target system database host.
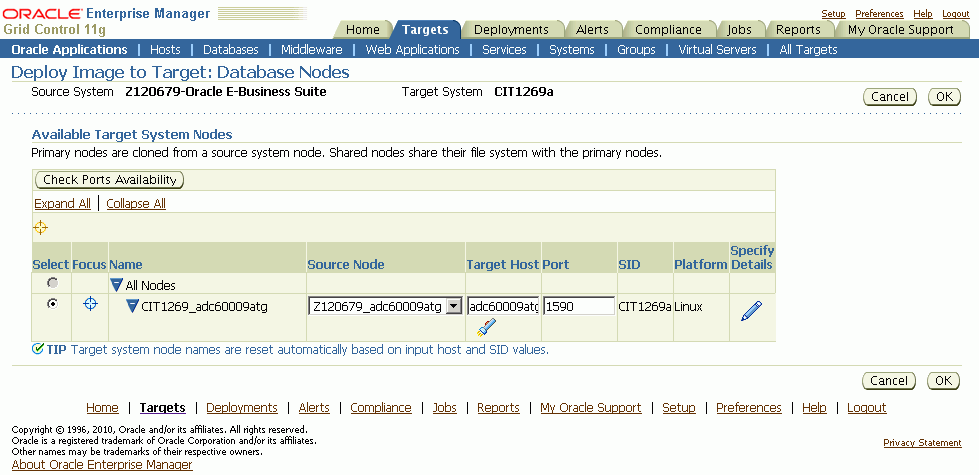
Click on the "Specify Details" icon to provide and review additional details about a particular target system database node.
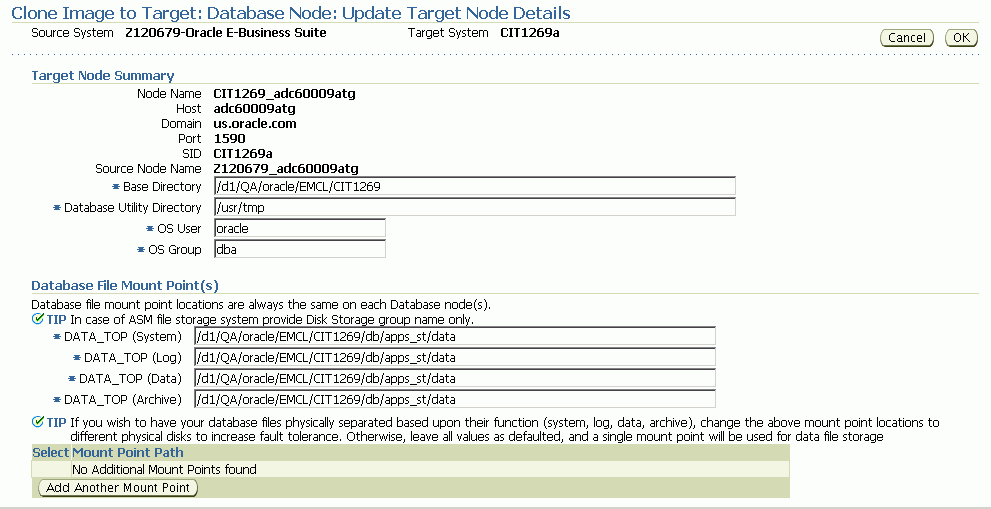
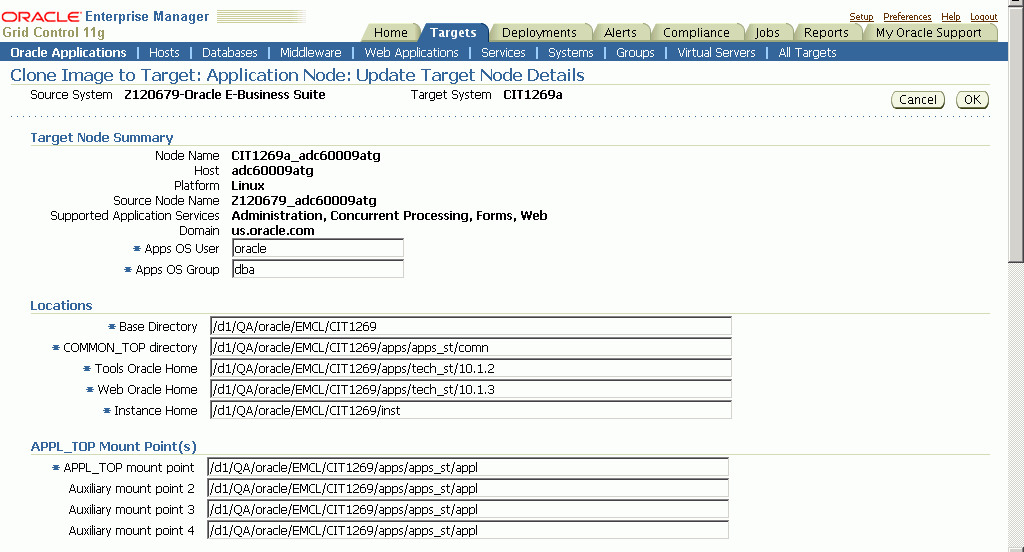
Update details for the application nodes.
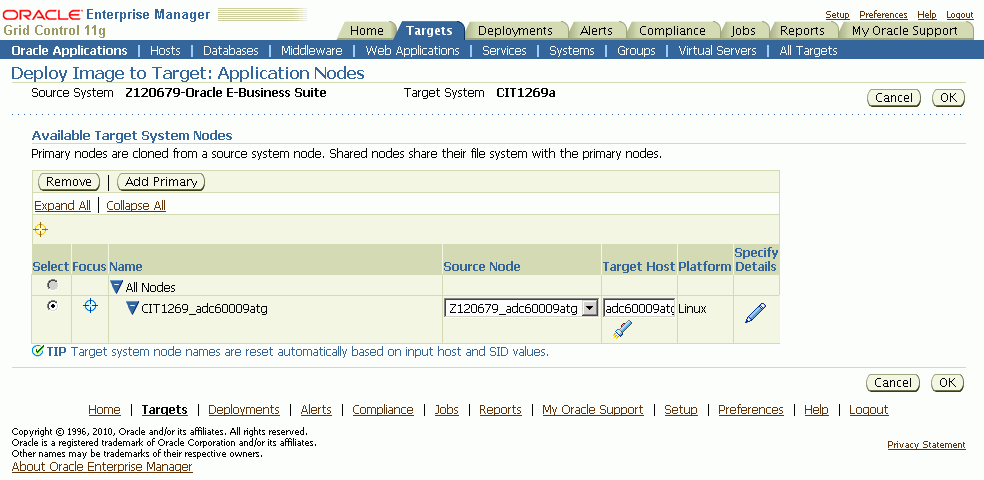
For each application node, click on the "Specify Details" icon to update the node details such as the OS user and group, directory locations, APPL_TOP mount points, services, and ports.
Note: Ensure that you enter the correct OS User name for the Applications tier before submitting your clone request.
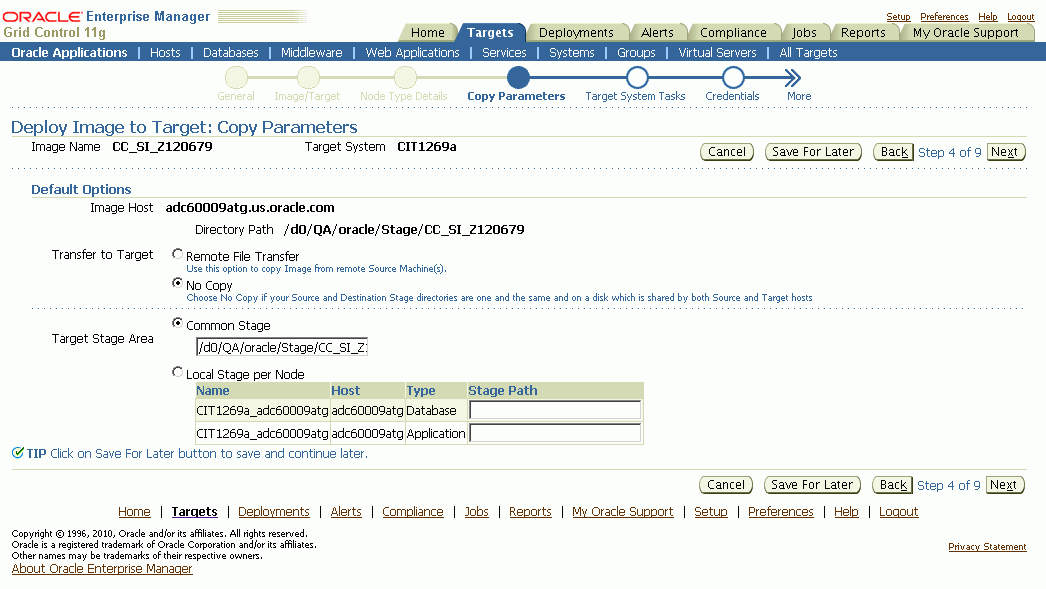
In the "Copy Parameters" step, specify the file transfer mechanism and stage directory for the target system.
Choose "Remote File Transfer" if the image location is not accessible from the target system nodes.
If the image location is accessible from all the target system nodes, select "No Copy" for "Transfer to Target" and specify the "Common Stage" directory as the directory path of the image.
In the Target System Tasks step, select the tasks to be performed on the target system. For each task, specify the details.
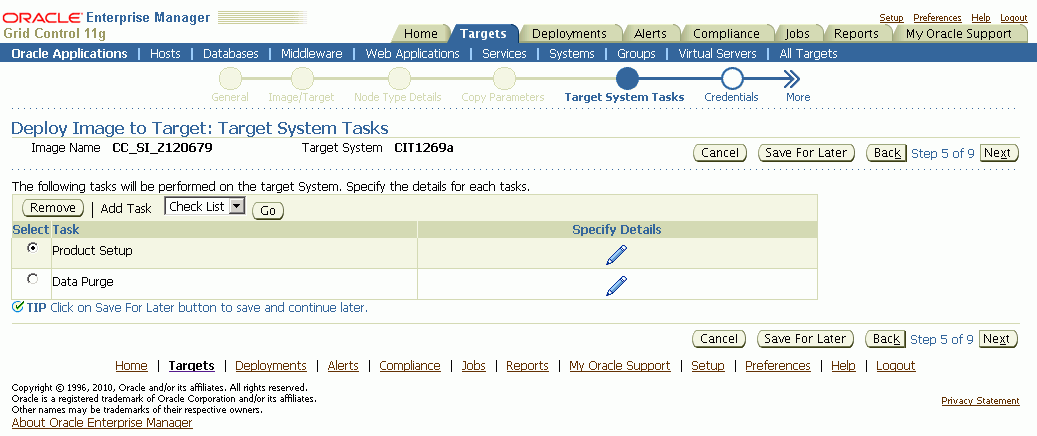
For the Product Setup task, select the product setup programs to be run during the clone operation.
For the Data Purge task, select the purge programs to be scheduled upon completion of the clone operation.
For the check list, select products for which to run diagnostic tests upon completion of the clone operation.
In the "Credentials" step, specify the OS and APPS schema credentials for the target system. You may also need to specify credentials for the machine from which image needs to be transferred. Use the Test button to test the credentials to make sure they are valid.
In the "Schedule" step, specify if you want to execute the clone operation immediately or at a later time.
Finally, review and submit the clone operation.
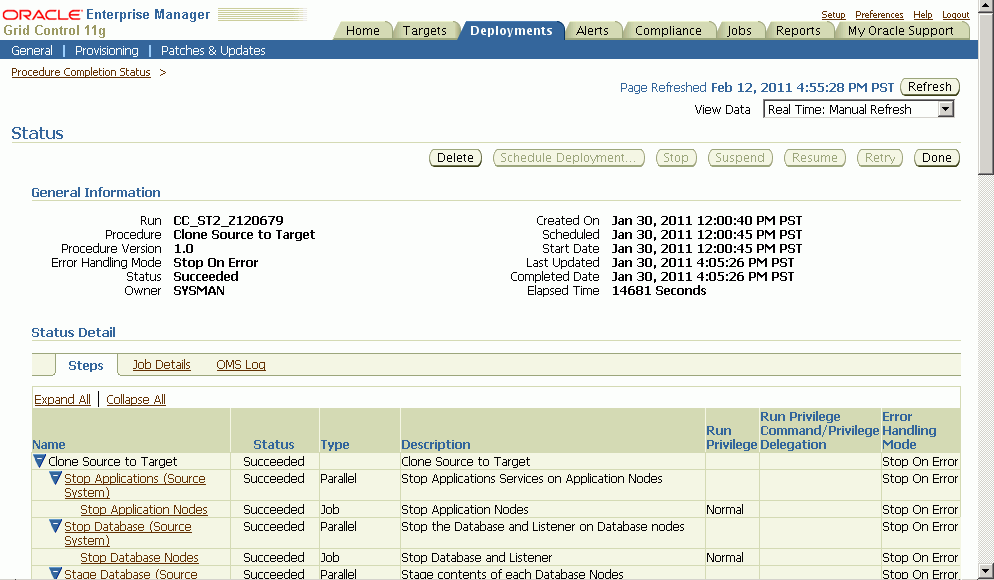
After submitting a clone operation, you will see the operation on the Clone Oracle Applications page. Click on the operation name to view the status details.
On the Status Details page select the view option to monitor the status of the clone operation. You can also switch to the Jobs view to drill into the status and output of each step of the operation.
To perform the “Schedule Data Purge Programs” manual task at the end of the clone operation, do the following:
Click on the step name for the manual task.
On the Step Status page, select the “Status” link to perform the manual task.
On the Initiate Data Purge page, click the “Submit Request” icon to schedule a request for each of the selected data purge concurrent programs.
After completion of this task, click the Back button to go back to the Step Status page. Click the Confirm button to indicate that the “Schedule Data Purge Programs” step has been completed and to move to the next step. Click Done to go back to the Status page.
Follow similar steps to those above to navigate to the Review Checklist page in order to perform the “Run Diagnostics Tests” task. Select the “Diagnose” icon to run diagnostic tests for the selected products.
After completion of this task, click the Back button to go back to the Step Status page and click on the Confirm button to indicate that the “Run Diagnostics Tests” task is completed. At this point your clone operation should be complete.
If you have enabled data scrambling for a Source to Target or Source to Image clone operation, you can also monitor its progress during the scrambling execution. To do this, follow these steps:
On the Clone Oracle Applications page, click on the running clone operation.
On the Status page, click on the “Execute Scrambling” step once it has started running.
On the Step Status page, click on the Status link.
On the Data Scrambling: Run Details page, review the scrambling status details. Click on the Unit ID link to view the details of work completed for each unit. You can also click on Retry to retry a stopped scrambling execution process.
Review the unit details and click on the Back button to go to the previous page.
![]()
Copyright © 2007, 2011, Oracle and/or its affiliates. All rights reserved.