Release 4.0
Part Number E18710-01
Contents
Previous
Next
| Oracle Application Change Management Pack for Oracle E-Business Suite User's Guide Release 4.0 Part Number E18710-01 | Contents | Previous | Next |
Patch Manager allows you to deploy patches across Oracle E-Business Suite instances from a single console. You can create a patch run definition and run it multiple times on multiple instances and you can copy a patch procedure and modify it to suit your business needs. Also, you can easily access details on patch runs, correct errors if necessary, and continue the patch runs.
Patch Manager
Automates the deployment patches across multiple Oracle E-Business Suite instances.
Utilizes most common Oracle E-Business Suite Applications DBA (AD) Utilities.
Utilizes patching best practices and reduces downtime.
Integrates with Customization Manager to deploy custom packages.
Supports downloading patches directly from My Oracle Support for deployment.
Supports deployment of patches that were previously downloaded to a central location on the Oracle Management Server.
Supports National Language Support (NLS) patches.
Provides a complete history of all patch deployments.
Provides a customizable patch deployment procedure.
Leverages Oracle Enterprise Manager infrastructure for distributed processing.
With Patch Manager, you can
View the readme of a patch with just one click.
Schedule deployments based on the target's time zone.
Schedule deployments of patches immediately or in the future.
Perform a complete series of pre/post health checks when deploying patches.
Track and monitor all patching deployments "In Progress", "Scheduled", "Saved" and "Completed" from a centralized console.
Send and receive alert notifications for patch failures and completion.
You can run diagnostic tests on your system in preparation for running Patch Manager procedures. These tests can be accessed from the Diagnostics dashboard, available from the Pack Diagnostics link on the Oracle Applications page. For more information on running diagnostic tests, see: Running Pack Diagnostics Tests, Oracle Application Management Pack for Oracle E-Business Suite User's Guide.
The following tables list tests related to Patch Manager:
| Task | Step | Description | Notes/Expected results/Corrective Measures |
|---|---|---|---|
| EMGC | Check permissions for OMS Stage directory | Determine if a stage directory is defined on the OMS. Determine if the owner of has read/write permissions to that directory. | Expected results are: the OMS Stage Directory Location, with the OMS user with read/write permissions. |
| EMGC | Check Patch Manager Stage directories | Verify if the amp.properties file (located in $ORACLE_HOME/sysman/config on the OMS) has proper definitions for Patch Manager Stage directories | Refer to Running a Patching Procedure for instructions on completing this step. |
| EMGC | CheckMetalinkCredentials | Verify if username/password credentials are entered for My Oracle Support. | Refer to the Oracle Enterprise Manager documentation for instructions on completing this step. |
| EMGC | Summary | A summary of all of the diagnostic tests that have been executed, in the following groups: Successful, Failed, With Warning, Aborted, and Total. | |
| EBS | Check for EBS CPU Count | Verify that the target Oracle E-Business Suite system's CPU Count is greater than zero (0). | If there is not a valid snapshot, contact Oracle Support. |
| EBS | Summary | A summary of all of the diagnostic tests that have been executed, in the following groups: Successful, Failed, With Warning, Aborted, and Total. |
| Task | Step | Description | Notes/Expected results/Corrective Measures |
|---|---|---|---|
| EMGC | CheckPackRole | Verify if the Oracle Enterprise Manager user (that is, the user executing the diagnostic test) has the required role to execute Patch Manager functionality. The role is EBS_PM_ROLE, and must be granted to the Oracle E-Business Suite user in the setup process, via Roles and Administrators. | Create users as required. See: Creating Roles. |
| EMGC | Check if approval is enabled and preferred credentials exist. | Verify if the Change Approval Framework is enabled in the amp.properties file (located in $ORACLE_HOME/sysman/config on the OMS). | If approval is enabled, ensure preferred credentials are set for the target Oracle E-Business Suite system(s). |
| EMGC | Summary | A summary of all of the diagnostic tests that have been executed, in the following groups: Successful, Failed, With Warning, Aborted, and Total. | |
| EBS | Check if EBS Snapshot in OMS Repository is valid | Verify if the Oracle E-Business Suite snapshot in OMS Repository is valid. | A snapshot shows data about a system for a point in time. If the snapshot is invalid, navigate to Targets > Oracle Applications > <target system name>. Expand "Application Nodes". For each node, click on the Report icon and click the Refresh button on the View Configuration page. |
| EBS | Summary | A summary of all of the diagnostic tests that have been executed, in the following groups: Successful, Failed, With Warning, Aborted, and Total. |
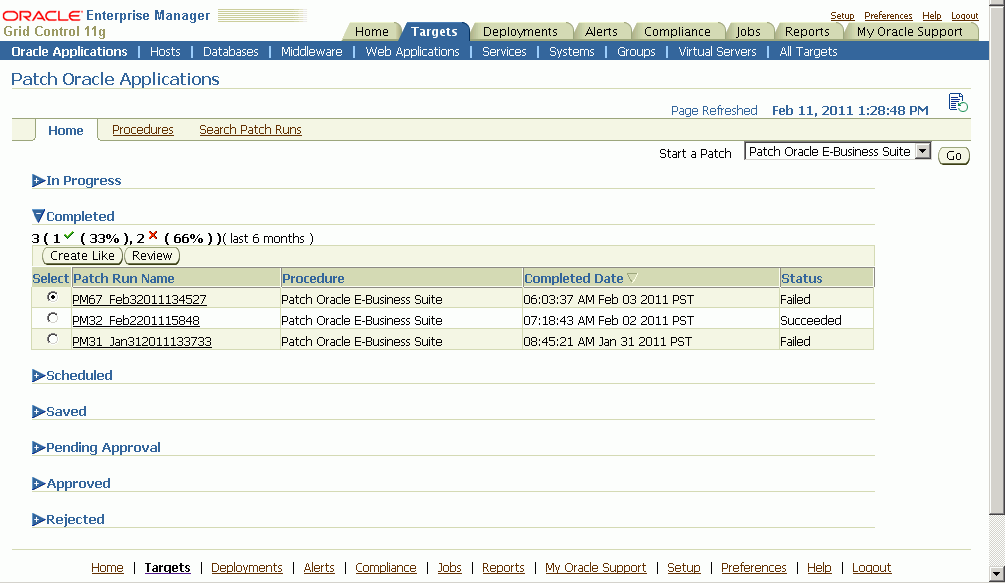
The Patch Manager Home tab lists your patch runs according to their status: Completed, Scheduled, Saved, Pending Approval, Approved, and Rejected.
You can click on a Patch Run name to view its details. See: View a Patch Run.
To start a new patch run, you can select "Patch Oracle E-Business Suite" or your customized patching procedure from the "Start a Patch" list.
To copy an existing patch run, in order to change any aspect of the patch run or to run an identical run due to changes in the patch or target, select the Patch Run you wish to copy and click the Create Like button.
To view the details of an existing patch run, select the patch run in the Patch Manager Home tab and click the Review button.
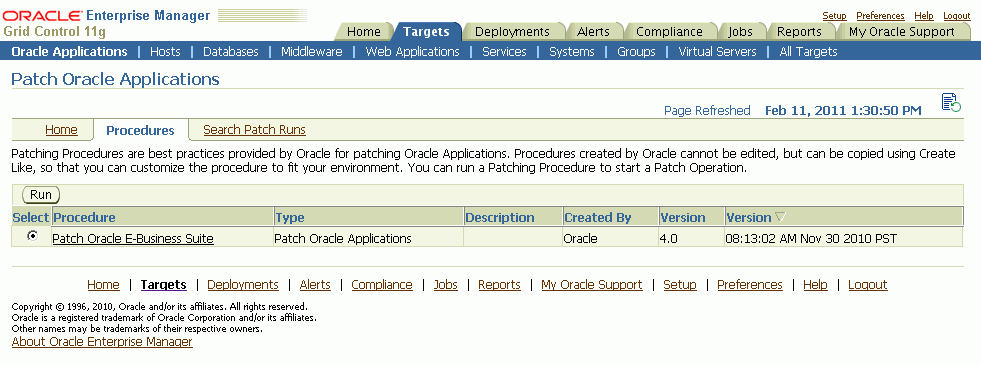
The Procedures tab lists the available patching procedures. You cannot edit procedures created by Oracle, but you can copy them using the Create Like feature (accessed from Procedures Tab by clicking on the name of the procedure and then choosing Create Like), and then customize the copies to fit your environment.
To run a patching procedure, select the procedure from the table and click Run.
Important: During the patching Deployment Procedure the system will try to black out the targets associated with an Oracle E-Business Suite system. In order for the blackout to occur, the user submitting the patch run must have been granted the 'operator' or 'blackout target' target privilege for the Oracle E-Business Suite targets. Below is a list of Oracle E-Business Suite targets that will be blacked out if the system detects this user has the authority to black them out:
Concurrent Processing Service
Forms Based Applications Service
Internal Concurrent Manager
Listener
Oracle Applications Infrastructure Service
Oracle Applications Service
Oracle Applications System
Oracle Concurrent Manager
Oracle E-Business Suite Custom Objects
Oracle E-Business Suite Infrastructure
Oracle E-Business Suite Nodes System
Oracle E-Business Suite Patch Information
Oracle E-Business Suite System
Oracle E-Business Suite Workflow
Oracle Workflow Agent Listener
Oracle Workflow Background Engine
Oracle Workflow Notification Mailer
Self Service Applications Service
Workflow Service
Database Instance
Host
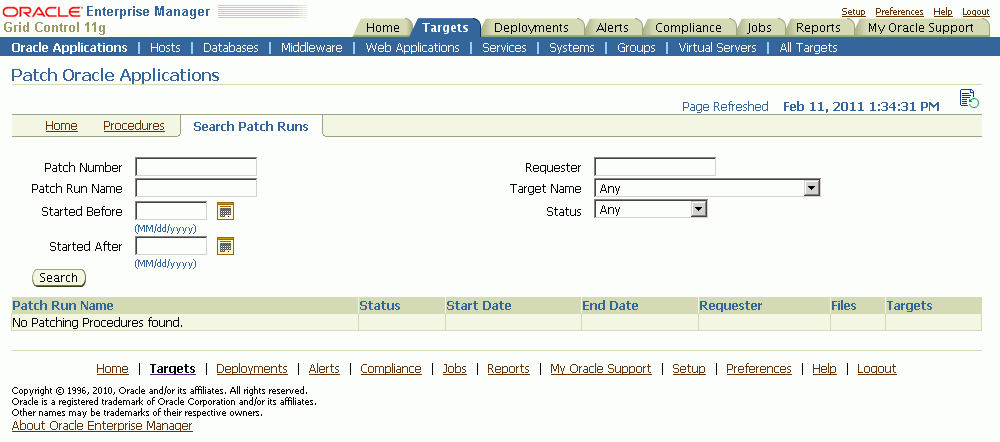
Use the Search Patch Runs tab to search for particular patch runs.
The search criteria are:
Patch Number - Enter the number of a patch applied in the patch run.
Patch Run Name - Enter the name of the patch run entered in the Patch Run Details page.
Started Before - Enter the date before which the patch run was started.
Requester - Enter the user name of the requester.
Target Name - Enter the name of the target in the patch run.
Started After - Enter the date after which the patch run was started.
Status
Patch runs that meet the search criteria are shown in the search table. Click on the patch run name link to view details of the patch run.
Oracle provides you with patching procedures that are best practices for patching Oracle E-Business Suite. Procedures created by Oracle cannot be edited, but they can be copied using the "Create Like" feature so that you can customize the procedure to fit your environment.
To run a patch procedure, or create a patch run, you can do one of the following:
From the Home tab for Patch Manager, choose "Patch Oracle E-Business Suite" or your customized patching procedure from the "Start a Patch" list and click the Go button.
Navigate to the Procedures tab, select a procedure, and click the Run button.
From the Deployments tab, Deployment Procedures link, select a procedure of type "Oracle Applications Patching Procedure". Click Schedule Deployment.
Note that you can also copy an existing patch run. From the Home tab, select the patch run you wish to copy and click the Create Like button.
Note: In the Patch Run interview you can use the Back button to go back to a previous step; however, entered values on the current page will be lost.
Prerequisites
metalinkEnabled=N
omsPatchStageDir=<directory to which you downloaded the patch>
To create a Patch Run
On the Patch Run Details page, enter the details below.
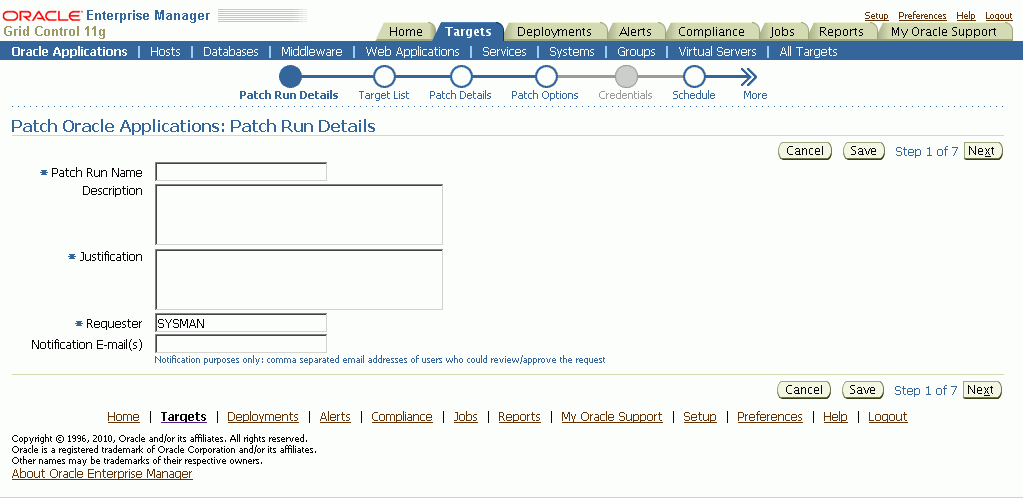
Patch Run Name - Enter a user-friendly name for the patch run. You can search on this name later on.
Description
Justification
Requester - The default value is the user name with which you are signed in. You can change this to another name.
Notification E-mail(s)
On the Target List page, enter the target system(s) to which the patch(es) will be applied.
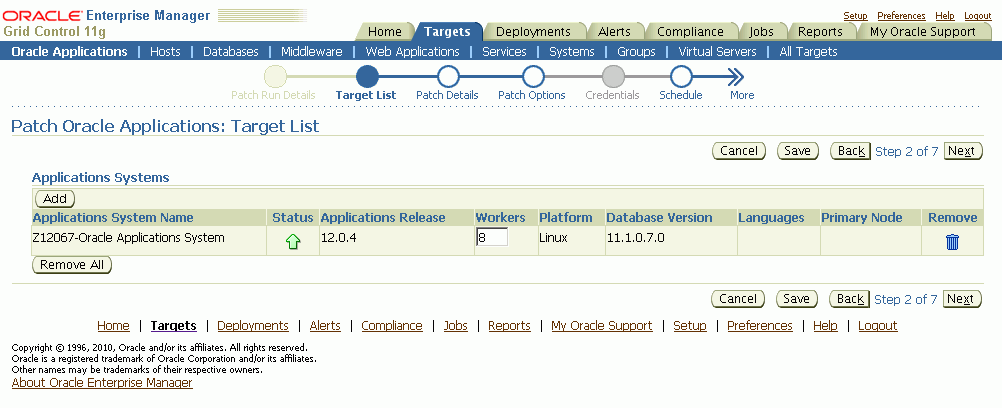
Note: If an Oracle E-Business Suite system has a shared APPL_TOP, a dropdown list is available so you can choose the primary node for the system. The node chosen on this page will determine which node is used to run adpatch, to run any other AD utilities specified, and to stage patches. Make sure you choose the primary node in this case.
To search for available targets, click the Add button under "Applications Systems". The List of Values (LOV) window displays the target names and their release levels. Select the desired targets from this window. Note: All targets selected must be at the same release level.
Once selected, the system name will appear in the Target List with the following:
Applications System Name - The name of the system.
Status - The status of the system (Up or Down).
Applications Release - The release level of the applications system.
Workers - The number of workers available on the system. Note that you can change this value.
Platform - The type of platform on which the applications system is running.
Database Version - The release level of the database for the applications system.
Languages - The languages installed on this system. Note: Newly installed languages may not show up yet if collections haven’t run.
Remove - Click this icon to remove this applications system from the Target List.
You can click the Remove All button to remove all applications systems from the Target List.
In the Patch Details page, select the details for the patch(es) to be applied.
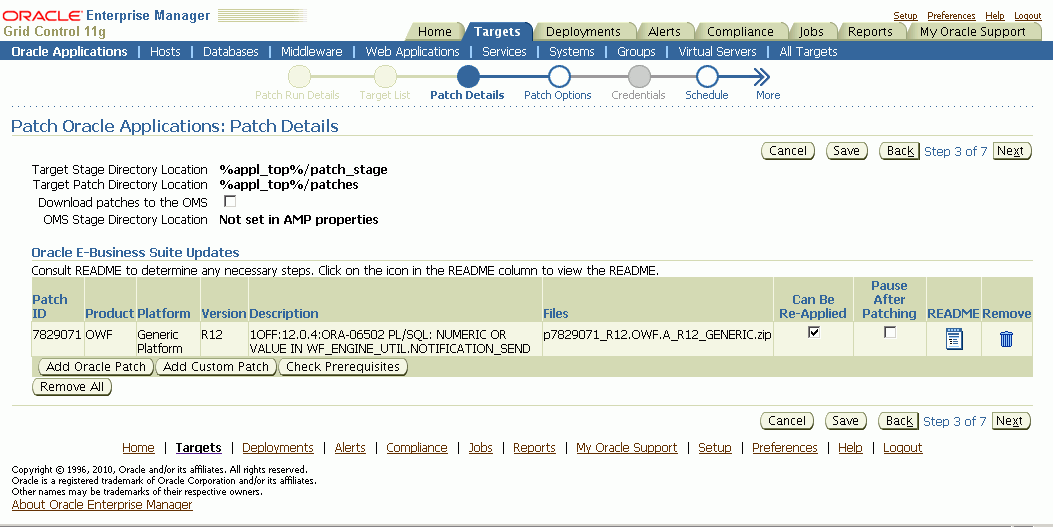
The following are shown on the Patch Details page:
Target Stage Directory Location - The directory to which zipped patches are downloaded.
Target Patch Directory Location - The directory to which patches are unzipped, and from where the patches are applied.
If the target's stage directory location is set in the amp.properties file, that will be shown here. In the amp.properties file (in the $ORACLE_HOME/sysman/config directory), the following properties can be set to specify the target's stage directory and the target's patch directory, respectively.
targetPatchStageDir=%appl_top%/patch_stage
targetPatchDir=%appl_top%/patches
Use the option "Download patches to the OMS" if you want to download the patch(es) to the OMS first.
Important: You must have at least 'view' target privilege on the agent(s) of the target hosts. For example, say you are patching an Oracle E-Business Suite system that contains 3 middle tiers. You must have the 'view' privilege (or greater) on the agents of these 3 middle tiers.
The OMS Stage Directory Location is another property in the same amp.properties file as above, and can be used to specify the OMS's stage directory. If specified in the amp.properties file, this directory will be the default for the OMS Stage Directory Location field.
omsPatchStageDir=/tmpNote: If you want to have the "Download patches to the OMS" option checked by default, you can set the property 'downloadPatchToOMS' to 'true' in the amp.properties file. For example:
downloadPatchToOMS=trueEnter the Software Updates you wish to apply. Use the Add Oracle Patch to add a patch from Oracle, and use Add Custom Patch to add a custom patch created through Customization Manager.
Important: Before you deploy a custom patch in Patch Manager, you should run the Instance Comparison Report to compare the technology stack properties of the package with those of the instance to which the package is being deployed. Patch Manager does not stop the deployment of a patch if the technology stack properties are not compatible, so you should make your best judgement based on the Instance Comparison Reports.
To add an Oracle patch:
Select Add Oracle Patch.
In the Search and Select window, Patch Oracle E-Business Suite, if you are downloading a patch or patches from My Oracle Support, you can search based on the following criteria:
Patch Number
Platform - "Any" returns patches for all platforms, or Generic if patch is not port-specific.
If you are searching for a patch for a specific platform, your search results will return a Generic-platform patch if no platform-specific patch exists.
Language - "All installed languages" will return the base (Generic or platform-specific) patch plus any language patches (if they exist) for every language installed on the selected targets. Choosing a specific language from the drop-down list will return its language patch if it exists plus the base patch.
You can also select Simple Search to search simply on the Patch Number.
The search results will include the following for each patch found:
Patch Number
Platform
Version
Language
Description
Superseded Patch
If you plan to deploy patches from an OMS location, the Search window will provide a List of Values based on the patches located in the directory specified for the 'omsPatchStageDir' property in the amp.properties file.
Choose the desired patches and click Select to return to main window.
Note: You must retrieve the desired patch through the Search and Select: Add Oracle Patch window and provide the stage and patch directory location in this step, even if you have already downloaded the patch to the stage location (the process will not re-download the patch, however).
To add a custom patch:
Select Add Custom Patch.
In the Search and Select window, you can search based on the following criteria:
Patch Number
Patch Name
Description
Created By
Version
Language
The search results will include the following for each patch found:
Patch Number
Patch Name
Version
Language
Description
Created By
Choose the desired patches and click Select to return to main window. A listing of patches is given.
A Merge Patches check box appears at the top of the table if more than one patch has been selected.
Note: You should merge AD patches separately from non-AD patches.
The following appears for each patch in the table.
Patch ID - The patch number.
Product - The short name of the owning product.
Platform - The platform for the patch.
Version - The version to which the patch is valid.
Description - The description of the patch.
Files - The files to be downloaded for the patch.
Password - A password is necessary for downloading controlled-release patches. Passwords expire after 21 days, so for scheduled deployments further in the future make sure you have already downloaded the patch and staged it.
Order - The order the patches should be applied. Will only be displayed when you have more then one patch selected and don’t have merge patches check box checked.
Can Be Re-applied - You can check this box if the patch can be re-applied with no ill effects. In the case of testing, it might be necessary to apply the same patch repeatedly, in which case this box should be checked.
Pause After Patching - Check this box if you will need to perform post-patching steps (such as running a script) immediately after this patch is applied. This option does not appear when the Merge Patches check box is checked.
Note that this option causes the Deployment Procedure job to halt with the status of "Failure" so that the job is paused for post-patching steps. Once you have performed your required tasks, select the Retry button within the EM Console.
README - Click on this icon to review the README file for the patch.
Techstack Report - Only applicable to custom patches. This report is described in the section on Instance Comparison Reports in Creating a Report.
Remove - If you want to remove this patch from the list, click this icon.
Finally, you can check for prerequisites for your patches using the Check Prerequisites button.
Specify Patch Options.
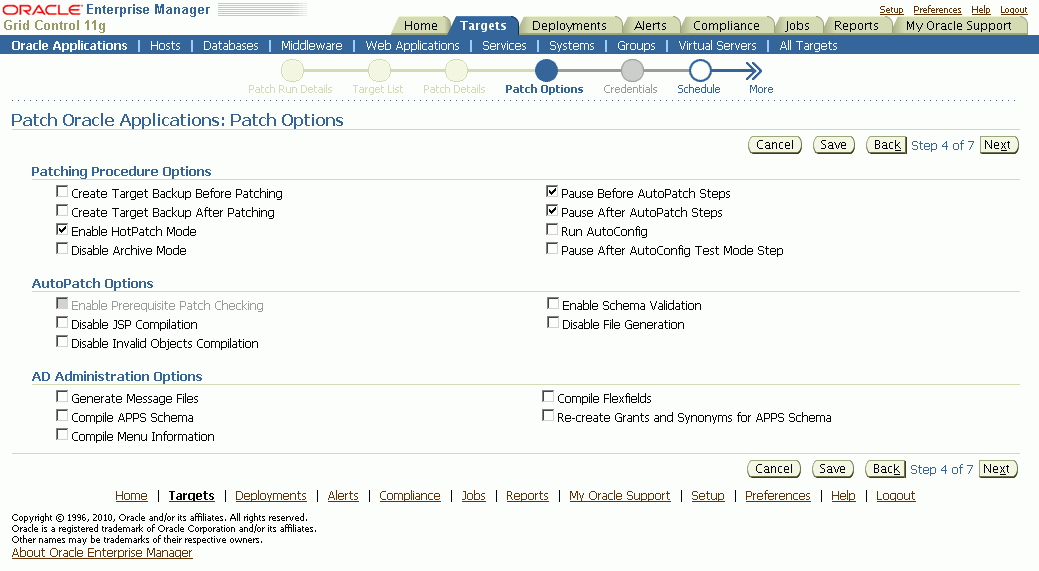
Specify details for how the patch should be applied.
For more information on many of these options, see: Oracle E-Business Suite Patching Procedures and Oracle E-Business Suite Maintenance Utilities.
Patching Procedure Options include the following:
Create Target Backup Before Patching - Adds a pause after system is prepared for backup allowing for a manual backup.
Create Target Backup After Patching - Adds a pause after patch is applied and database is brought back down to allow for a manual backup.
Enable HotPatch Mode - Patch will be applied without shutting down the applications or database, disabling archive mode, or enabling maintenance mode.
In HotPatch mode, AutoPatch applies a patch regardless of whether the Oracle E-Business Suite system is in maintenance mode. Maintenance mode controls the system downtime period by managing user login sessions.
Note: In HotPatch mode, if the patch application fails, the process will still perform/execute the blackout steps in the "Patch Oracle E-Business Suite" procedure. The blackout notifies other Enterprise Manager administrators that a maintenance procedure is being performed on the environment.
Disable Archive Mode - Issues an 'alter database noarchivelog' command.
Pause Before AutoPatch Steps - Adds a pause before AutoPatch (adpatch) is run to allow for any necessary manual preparation.
AutoPatch (adpatch) is the Oracle Applications DBA (AD) tool that applies patches to an Oracle E-Business Suite system.
Pause After AutoPatch Steps - Adds a pause immediately after patch is applied to allow for any necessary manual activities.
Note: This option is not the same as the "Pause After Patching" option in the Patch Details page (Step 3). The "Pause after Patching" step, performed at the individual patch level, causes the Deployment Procedure job to halt so that manual steps can be done immediately after that patch is applied. The "Pause After AutoPatch Steps" option introduces a manual step into the Deployment Procedure which causes the Deployment Procedure to pause. This manual step can be used to do manual work or it can be modified in a custom procedure to run an automated script.
Run AutoConfig - Run AutoConfig, the AD tool that manages configuration changes in an Oracle E-Business Suite system.
Pause After AutoConfig Test Mode Step - Adds a pause after AutoConfig is run in test mode to allow for validation of changes.
AutoPatch Options include the following:
Enable Prerequisite Patch Checking - Prevents you from applying a patch without first applying all required prerequisite patches.
Disable JSP Compilation - Tells adpatch not to automatically compile out-of-date JSP files (nocompilejsp command).
Disable Invalid Objects Compilation - Tells adpatch not to compile invalid objects (nocompiledb command).
Enable Schema Validation - Tells adpatch to connect to all registered Oracle E-Business Suite schemas at the start of the patching process.
Disable File Generation - Tells adpatch not to run commands normally found in generate driver (nogenerateportion command).
AD Administration Options are listed below. These tasks are done to manage database objects (database objects or data in the database related to Oracle E-Business Suite). For example, a patch might add new menu entries or change the setup of a flexfield.
Generate Message Files - Creates new message files after the messages have been loaded into the database. The README should instruct you when this is necessary.
Compile APPS Schema - Compiles the APPS schema.
Compile Menu Information - Compiles menus.
Compile Flexfields - Compiles flexfields.
Recreate Grants and Synonyms for APPS Schema - Recreates grants and synonyms for the APPS schema.
Enter Credentials.
Note: If the change approval feature is turned on for Patch Manager, the system will skip the credentials page altogether in the interview.
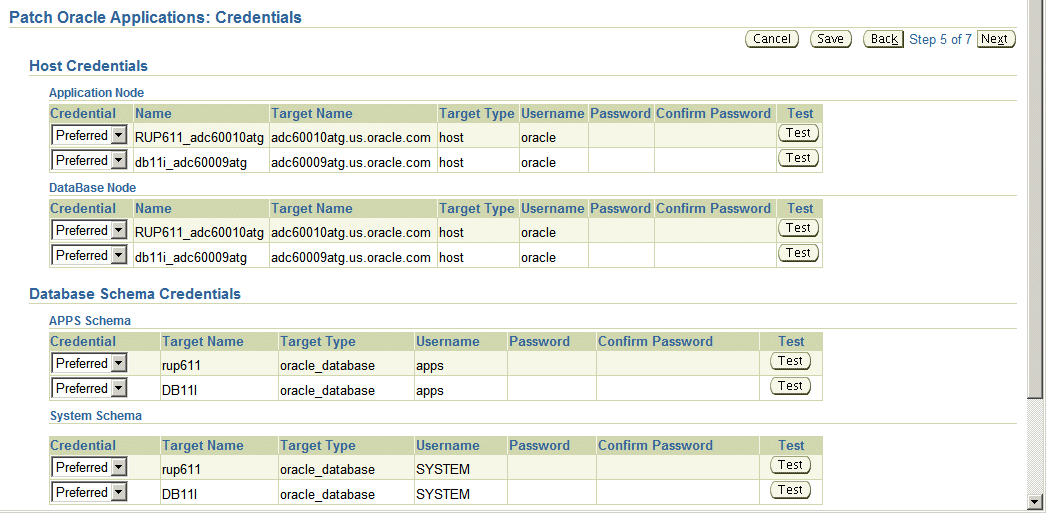
Enter credentials as required on this page. Credentials may be required for the following:
For the host, the application node and database credentials.
For the database schema, the APPS schema and system schema credentials.
You can choose whether to use the Preferred Credentials or to enter in new credentials here. Preferred credentials can be entered by selecting the Preferences global link and selecting "Preferred Credentials". Relevant credentials are listed for "Oracle E-Business Suite".
For each password, you are required to confirm your entry. You can test your entries on this page as well. Note that if the target is down, then the test result will appear as a failure.
For the application node and database node credentials on the host, the following is shown:
Credential - Defaults to "Preferred" if preferred credentials exist. You can choose to use the preferred credentials or override them with entries on this page. If you choose to use the preferred credentials, the Password and Confirm Password fields are disabled. You can still test the credentials from this page. If you choose the Preferred credentials option and they do not exist you cannot go to the next page.
Name - Name of the node.
Target Name - Name of the target.
Target Type - Type of target, for example, "host".
Username - The username with which to connect.
Password - Enter the password.
Confirm Password - Confirm your password entry.
Test - Use the Test button to validate your credentials. Note: This test is the only validation of credentials until the Deployment Procedure runs. Navigating to the next page does not validate in order to provide the ability to schedule a patch for an environment that is currently down.
For the APPS schema and system schema credentials for the database, the following is shown:
Credential - You can choose to use the preferred credentials or override them with entries on this page. If you choose to use the preferred credentials, the Password and Confirm Password fields are disabled. You can still test the credentials from this page.
Target Name - Name of the target.
Target Type - Type of target.
Username - The username with which to connect.
Password - Enter the password.
Confirm Password - Confirm your password entry.
Test - Use the Test button to validate your credentials.
Specify the Schedule for the patch application.
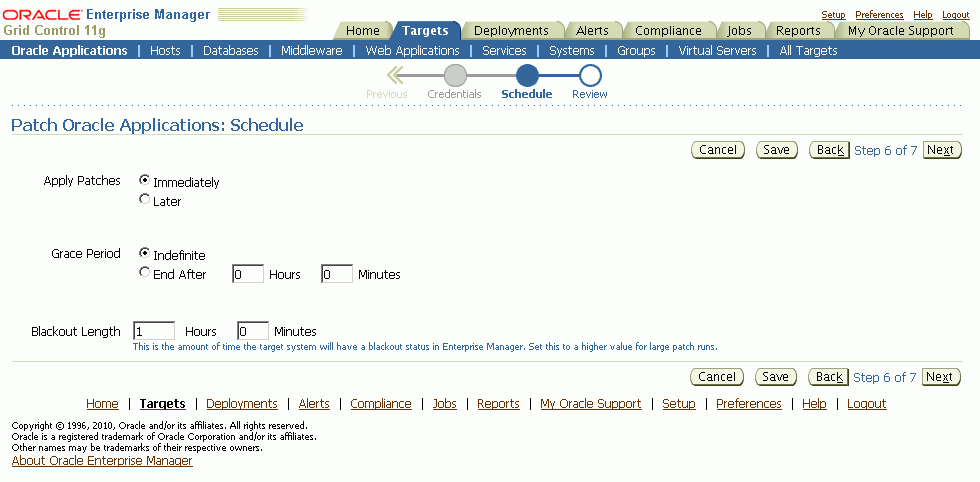
You can choose to apply the patches immediately or at a later date.
If you choose Immediately as the schedule type to have the patches applied immediately.
If you choose Later, you can specify the time and date you wish to have the patches applied. Provide the Time Zone, Date and Time.
You can specify a Grace Period as well. If you choose an Indefinite Grace Period, then if for some reason the patches cannot be applied at the immediate time, the system will try to apply them as soon as possible, and will keep trying indefinitely. If you provide a defined Grace Period by specifying the system to end the Grace Period after your given hours and minutes, the system will not try to apply the patches after that amount of time.
The Blackout Length indicates the amount of time the target system will have a blackout status in Enterprise Manager. Set this length to a higher value for large patch runs.
Review your patch run.
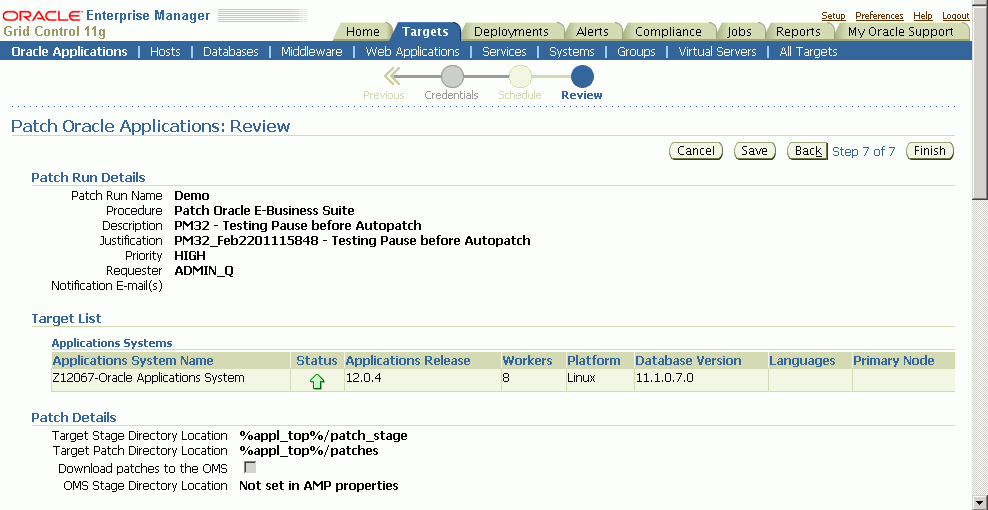
The Review Page lets you review your patch run details, target list, patch details, patching options, credentials, and schedule.
You might want to copy an existing patch run to change some aspect of it or to rerun it due to changes in the patch or target. To do this, select the patch run in the Patch Manager Home tab and click the Create Like button.
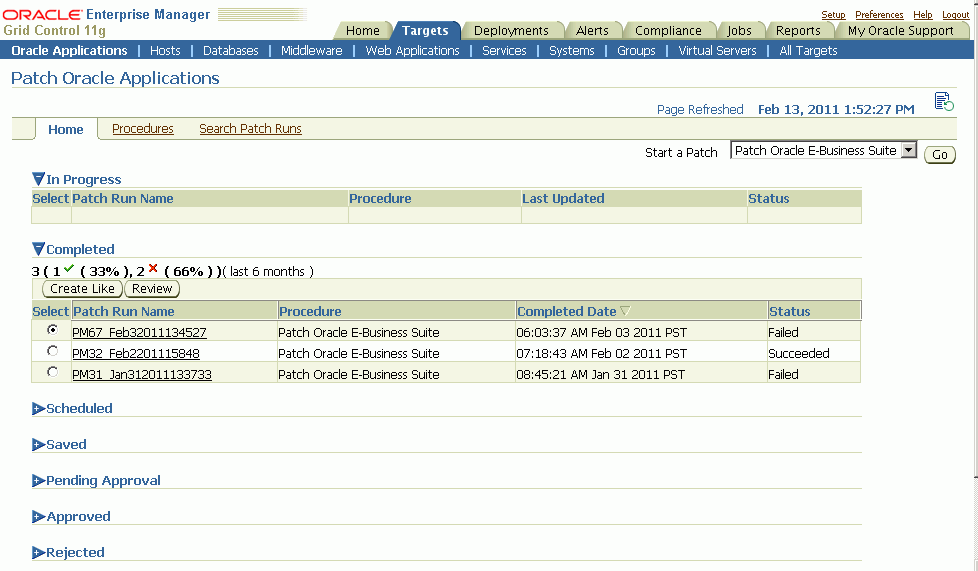
The system will take you through the patch run creation pages as if you were creating a new patch run, but with most values copied from the original patch run. Please note the following:
The Patch Run Name defaults to the original name prefixed with "Copy of" and appended with the date.
The Requester field has a default value of the original requester's user name. Change this value as appropriate.
The new patch run would be scheduled to run immediately by default, because the original run may have been scheduled for a now past date and time.
To view the user-entered details of a patch run, select the patch run in the Patch Manager Home tab and click the Review button.
You can navigate to the details of the deployment of a patch run in one of several ways:
From the Patch Manager Home tab, click on the Patch Run name link for the patch run.
From the search results on the Search Patch Runs tab, click on the Patch Run name link.
From the Deployments tab, click on the Deployment Procedures link, then the Procedure Completion Status Tab. Click on Run name.
The above navigation paths take you to the Status page for the procedure. The Status page is part of the Oracle Deployment Manager. Refer to the Oracle Enterprise Manager online help for more information on Oracle Deployment Manager.
Information on this Status Page includes when the patch run was started and completed and each step in the procedure and its status. You can also drill down in each step to view logging information, errors, and so on.
You can extend Patch Manager procedures using the Deployment Procedure Manager using the steps below. In these steps you create a copy of an existing procedure and extend it in the Deployment Procedure Manager.
From the Patch Manager Procedures tab, click on the name of a procedure.
From the View Procedures page, click the Create Like button.
Rename the copy of the original procedure as desired. You can make other updates here as well.
Save your new procedure.
Upon saving, the Deployment Procedure Manager Procedures tab appears. Your new procedure is listed first. You can select this procedure and click Edit to add steps, choose notifications, or make other changes. For example, you might want to add steps to a copy of the shipped Patch Oracle E-Business Suite procedure to automate the following steps: Pre-Patch Application Tier Backup, Post-Patch Database Tier Backup, or Post-Patch Application Tier Backup.
For more information on the Provisioning Manager and the Deployment Procedure Manager in Oracle Enterprise Manager, see the following:
Oracle Enterprise Manager Concepts
Oracle Enterprise Manager Grid Control Quick Start Guide
Oracle Enterprise Manager online help
This section describes logging, health checks, and troubleshooting features within Patch Manager.
To view the AD Patch Log for a patch run, follow these steps:
Navigate to your patch run using any method in "View a Patch Run".
Click on the Patch Run Name.
Click on the adpatch step (Apply Patch).
Click on Job Status.
Expand the bottom task.
Click on Step: Execute command as normal user.
Navigate to your patch run using any method in "View a Patch Run".
Click on the Patch Run Name.
Click on the adpatch step (Apply Patch).
Select the check box for the failed target.
Click Update and Retry.
Change the parameter "restart_workers" to YES and click Retry.
Note: These steps are also listed in the AD Patch Log when you have a failed worker.
Navigate to your patch run using any method in "View a Patch Run".
Click on the Patch Run Name.
Click on the Job Details tab.
Click on Job Name.
Click on the Step Name that failed.
The resulting page displays the output log with any errors encountered. Note that this page only lists job failures. You can also review the Oracle Management Server (OMS) and drill down into any deployment procedure step.
Patch Manager validates these servers shutting down and starting up: listener, Forms server, Apache web services, and Internal Concurrent Manager.
![]()
Copyright © 2010, 2011, Oracle and/or its affiliates. All rights reserved.