Oracle® Enterprise Manager
System Monitoring Plug-in Installation Guide for Apache Tomcat
Release 11.1.0.1.0
E11142-03
February 2012
This document is the installation guide for the System Monitoring Plug-In for Non-Oracle Middleware for Apache Tomcat. You can find the following information in this document:
-
A brief description of the System Monitoring Plug-In for Non-Oracle Middleware for Apache Tomcat
-
Apache Tomcat versions and Enterprise Manager versions that the plug-in supports
-
Prerequisites for installing the plug-in
-
Step-by-step instructions to download, install, upgrade, and undeploy the plug-in
-
Instructions to add Apache Tomcat application servers for monitoring
Description
Apache Tomcat is an open source application server that implements the Java Servlet and Java Server Pages (JSP) specifications, providing an environment for Java code to run in. The System Monitoring Plug-In for Non-Oracle Middleware for Apache Tomcat extends Oracle Enterprise Manager Grid Control (Grid Control) to add support for managing it.
Management Features
By deploying the plug-in within your Grid Control environment, you can use management features, such as availability and performance metrics, reports, and alerts.
Metrics
Metrics are units of measurement used to determine the health of a target. To find a complete list of all the metrics for a target, click All Metrics in the Related Links section of the target home page. From the All Metrics page, you can view all the metric categories for the target and then drill down to any particular metric for additional information.
After adding the target to Enterprise Manager, you can then customize the monitoring configuration of the target; for instance, you can modify metric threshold values, change metric collection schedules, and disable collection for some metrics.
To view a list of metrics captured for this target, see Enterprise Manager System Monitoring Plug-In Metric Reference Manual for Non-Oracle Middleware Management. The document can be found at the following location:
http://www.oracle.com/technetwork/oem/grid-control/documentation/index.html
Reports
Several predefined, performance-based reports are provided for Apache Tomcat. Such reports include:
-
Apache Tomcat Load - Charts of total load on all global request processors
-
All Applications Load- Applications load charts at server level
-
Apache Tomcat Thread Pools- Thread pools active threads and total thread charts
-
Datasources- Datasources active connections and idle connections charts
-
Global Request Processors Load And Performance- Global request processor load and performance charts
-
Memory Utilization- Resource utilization charts
-
Top 10 Applications Based On Total Sessions- Top 10 applications based on sessions created during the last 24 hours
-
Top 10 Servlets Based On Total Requests- Top 10 servlets by number of requests on each servlet during the last 24 hours
Additionally, custom reports can also be generated based on data stored in the Management Repository.
Alerts
You can configure Enterprise Manager to send alerts notifying you of problems with the target. To receive alerts on the console, specify warning and/or critical threshold levels for those metrics of importance to you.
To edit a threshold:
-
Choose Metric and Policy Settings on any target home page.
-
From the Metric Thresholds page, you can either modify warning and/or critical thresholds directly from the table.
Alternatively, click the Edit icon (pencil) to access the Edit Advanced Settings page.
An alert is triggered when one of the following conditions is true:
-
A metric threshold is reached
-
The availability of a monitored service changes
-
A metric-specific condition occurs
Other Management Features
Enterprise Manager allows you to monitor the response time data generated by actual end-users as they access and navigate your Web site. You can gather end-user performance data and monitor the performance of the pages within your Web application.
Web servers, such as OracleAS Web Cache, Oracle HTTP Server, and Apache HTTP Server collect the end-user performance data and store it in the log file. Enterprise Manager processes this data and uploads it to the Management Repository. You can then view and analyze this data within the Grid Control Console.
Versions Supported
This plug-in supports the following versions of products:
-
The following releases of Oracle Management Service and Oracle Management Agent:
Enterprise Manager 11g Grid Control Release 1 (11.1.0.1) or higher (Oracle Management Service and Oracle Management Agent)
OR
Enterprise Manager 10g Grid Control Release 2 (10.2.0.1) or higher, and Oracle Management Agent 10g Release 2 (10.2.0.3) or higher.
-
Apache Tomcat 6.0.x, 5.5.x, 5.0.3 through 5.0.30.
Prerequisites
The following prerequisites must be met before you can deploy the plug-in:
-
Apache Tomcat is installed.
-
Apache Tomcat is running on JDK 1.5. Therefore, remote JMX monitoring must be enabled when you start Apache Tomcat.
You can enable JMX by adding
-Dcom.sun.management.jmxremote.portto the following startup scripts:For UNIX and Linux:
catalina.sh
For Microsoft Windows:
catalina.bat
For more information about remote monitoring and management, refer to the following link:
http://download.oracle.com/javase/1.5.0/docs/guide/management/agent.html -
The following are installed:
Enterprise Manager 11g Grid Control Release 1 (11.1.0.1) or higher (Oracle Management Service and Oracle Management Agent)
OR
Enterprise Manager 10g Grid Control Release 2 (10.2.0.1) or higher, and Oracle Management Agent 10g Release 2 (10.2.0.3) or higher.
You can install the Management Agent on the same computer as Apache Tomcat (referred to as local Agent monitoring) or on a different computer (referred to as remote Agent monitoring). The way you configure the local or remote Management Agent is the same.
If you are using a remote Management Agent, then ensure that the Management Agent has access to the computer on which Apache Tomcat instance is running and the JMX port on which it is listening.
-
For monitoring an Apache Tomcat target, do not use a Management Agent that is already monitoring one of the following:
-
BEA WebLogic Managed Server
-
IBM WebSphere Application Server
-
JBoss Application Server
This is because different target types use different JMX versions, which could lead to metric collection errors for Apache Tomcat.
The following is an example of such a metric collection error for Apache Tomcat:
oracle.sysman.emSDK.emd.fetchlet.FetchletException:
oracle.sysman.emSDK.emd.fetchlet_FetchletException:
java.lang.SecurityException: sealing violation: package javax.management is sealed
-
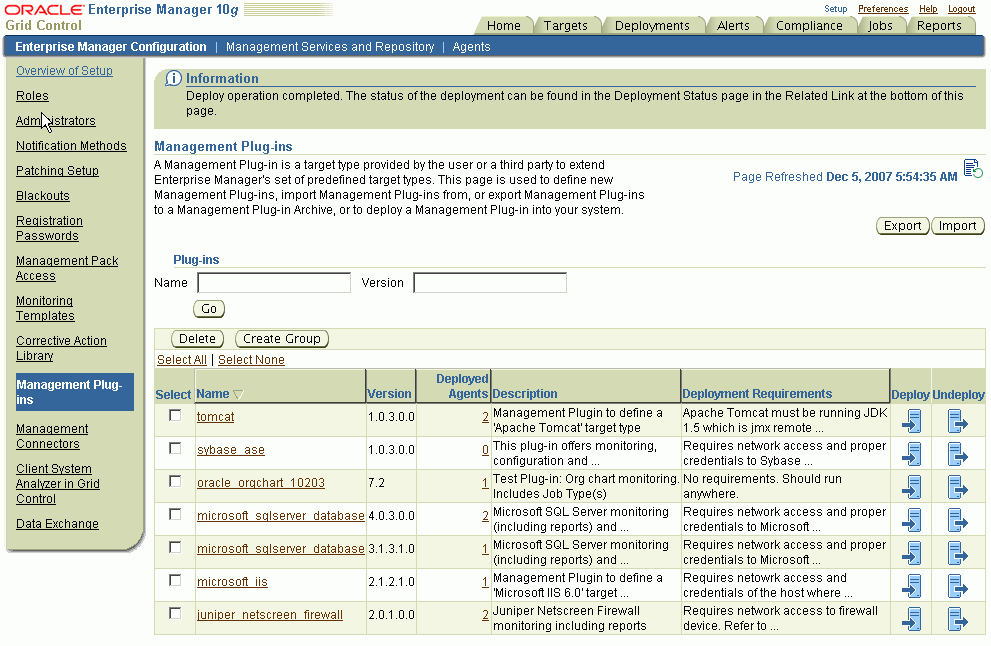
Deploying the Plug-in
After you ensure that the prerequisites are met, follow these steps to deploy the management plug-in:
-
Download the Apache Tomcat plug-in archive file to your computer.
-
Log in to Enterprise Manager Grid Control as a Super Administrator.
-
On the Grid Control Home page, from the upper-right corner of the page, click Setup.
-
On the Setup Page, from the left panel, click Management Plug-ins.
The Management Plug-ins page appears.
-
On the Management Plug-ins page, click Import.
-
On the Import Management Plug-ins page, in the Select Management Plug-in Archive section, click Browse and select the plug-in archive.
-
Click List Archive.
-
Select the plug-in and click OK.
-
On the Management Plug-ins page, from the table, find the name of the Apache Tomcat target, and click the icon in the Deploy column.
The Deploy Management Plug-in wizard appears.
-
On the Deploy Management Plug-in: Select Targets page, click Add Agents and select one or more Management Agents to which you want to deploy the plug-in.
The wizard reappears and displays the Management Agents you selected.
-
Click Next, then click Finish.
If you see an error message stating that the preferred credential is not set up, go to the Preferences page and add the preferred credentials for the Agent target type. To access the Preferences page, from the top-right corner of the Grid Control console, select Preferences.
If there are no errors, then you will see the following screen:
Adding Instances for Monitoring
After successfully deploying the plug-in, follow these steps to add the plug-in target to Grid Control for central monitoring and management:
-
Login to Enterprise Manager Grid Control.
-
Click the Targets tab, and then the All Targets subtab.
The All Targets page appears.
-
On the All Targets page, from the Search list, select Agent and click Go.
-
From the list Agents displayed in the table, identify the Agent where the Apache Tomcat plug-in is deployed.
-
Click the name of the identified Agent.
The Agent Home page appears.
-
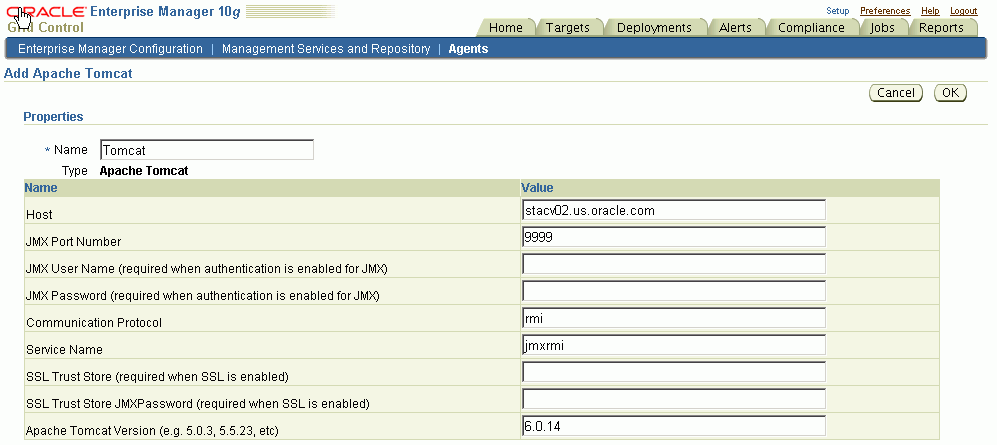
On the Agent Home page, in the Monitored Targets section, from the Add list, select the Apache Tomcat target type and then click Go.
The Add Apache Tomcat page appears.
-
On the Add Apache Tomcat page, provide the following information for the properties:
-
Host— Host of the Apache Tomcat instance. This property is always required.
-
JMX Port Number — Remote JMX port. This property is always required.
-
JMX User Name — Required when authentication is enabled for JMX.
-
JMX Password — Required when authentication is enabled for JMX.
-
Communication Protocol — Communication protocol used by remote JMX client. Do not change the default value specified unless the remote JMX implementation has changed.
-
Service Name— JMX service name. Do not change the default value specified unless the remote JMX implementation has changed.
-
SSL Trust Store—Required when SSL is enabled for Apache Tomcat.
-
SSL Trust Store JMX Password— Required when SSL is enabled for Apache Tomcat.
-
Apache Tomcat Version—Version of Apache Tomcat, e.g. 5.0.3, 5.5.23, etc. This property is always required, and is used to determine the specific performance metrics to be monitored and/or collected.
Note:
You must not change the default values of Communication Protocol and Service Name unless the remote JMX implementation has changed.After deploying and configuring the plug-in to monitor one or more targets in the environment, you can customize the monitoring settings of the plug-in. This alters the collection intervals and threshold settings of the metrics to meet specific needs of your environment. If you decide to disable one or more metric collections, this could impact the reports that the metric is a part of.
-
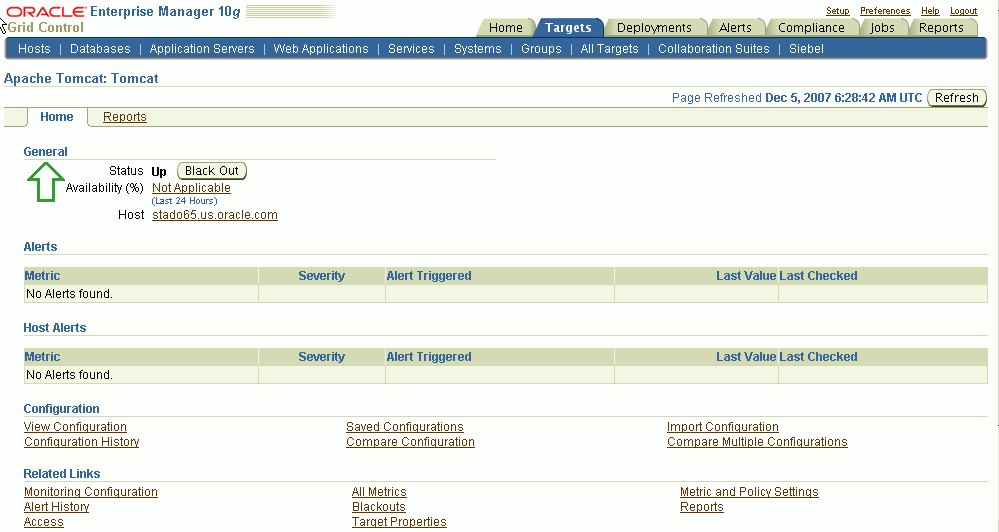
Verifying and Validating the Plug-in
After waiting for a few minutes for the plug-in to start collecting data, use the following steps to verify and validate that Grid Control is properly monitoring the plug-in target:
-
On the Agent home page, from the Monitored Targets table, click the Apache Tomcat target link.
The Apache Tomcat home page appears.
-
Verify that no metric collection errors are reported in the Alerts section.
-
Ensure that reports can be seen and no errors are reported by selecting the Reports property page.
Undeploying the Plug-in
Follow these steps to undeploy the plug-in from a Management Agent:
-
Log in to Enterprise Manager Grid Control as a Super Administrator.
-
Select the Targets tab, and then the All Targets subtab.
-
Select Apache Tomcat Plug-in target and click Remove. You must do this step for all targets of the plug-in.
-
Make sure that the preferred credentials are set on the Management Agents where the plug-in is deployed. To access the Preferences page, from the top-right corner of the Grid Control console, select Preferences.
-
On the Grid Control Home page, from the upper-right corner of the page. click Setup.
-
On the Setup Page, from the left panel, click Management Plug-ins.
The Management Plug-ins page appears.
-
On the Management Plug-ins page, from the Undeploy column of the table, click the icon for Apache Tomcat.
The Undeploy Management Plug-in page appears.
-
Check all the Agents that are currently deployed with the Apache Tomcat Plug-in and click OK.
You must undeploy the plug-in from every Management Agent in the system to completely remove it from the enterprise.
-
On the Management Plug-ins page, select the Apache Tomcat Plug-in and click Delete.
Documentation Accessibility
For information about Oracle's commitment to accessibility, visit the Oracle Accessibility Program website at http://www.oracle.com/pls/topic/lookup?ctx=acc&id=docacc.
Oracle customers have access to electronic support through My Oracle Support. For information, visit http://www.oracle.com/pls/topic/lookup?ctx=acc&id=info or visit http://www.oracle.com/pls/topic/lookup?ctx=acc&id=trs if you are hearing impaired.
System Monitoring Plug-in Installation Guide for Apache Tomcat, Release 11.1.0.1.0
E11142-03
Copyright © 2012, Oracle and/or its affiliates. All rights reserved.
This software and related documentation are provided under a license agreement containing restrictions on use and disclosure and are protected by intellectual property laws. Except as expressly permitted in your license agreement or allowed by law, you may not use, copy, reproduce, translate, broadcast, modify, license, transmit, distribute, exhibit, perform, publish, or display any part, in any form, or by any means. Reverse engineering, disassembly, or decompilation of this software, unless required by law for interoperability, is prohibited.
The information contained herein is subject to change without notice and is not warranted to be error-free. If you find any errors, please report them to us in writing.
If this is software or related documentation that is delivered to the U.S. Government or anyone licensing it on behalf of the U.S. Government, the following notice is applicable:
U.S. GOVERNMENT RIGHTS Programs, software, databases, and related documentation and technical data delivered to U.S. Government customers are "commercial computer software" or "commercial technical data" pursuant to the applicable Federal Acquisition Regulation and agency-specific supplemental regulations. As such, the use, duplication, disclosure, modification, and adaptation shall be subject to the restrictions and license terms set forth in the applicable Government contract, and, to the extent applicable by the terms of the Government contract, the additional rights set forth in FAR 52.227-19, Commercial Computer Software License (December 2007). Oracle America, Inc., 500 Oracle Parkway, Redwood City, CA 94065.
This software or hardware is developed for general use in a variety of information management applications. It is not developed or intended for use in any inherently dangerous applications, including applications that may create a risk of personal injury. If you use this software or hardware in dangerous applications, then you shall be responsible to take all appropriate fail-safe, backup, redundancy, and other measures to ensure its safe use. Oracle Corporation and its affiliates disclaim any liability for any damages caused by use of this software or hardware in dangerous applications.
Oracle and Java are registered trademarks of Oracle and/or its affiliates. Other names may be trademarks of their respective owners.
Intel and Intel Xeon are trademarks or registered trademarks of Intel Corporation. All SPARC trademarks are used under license and are trademarks or registered trademarks of SPARC International, Inc. AMD, Opteron, the AMD logo, and the AMD Opteron logo are trademarks or registered trademarks of Advanced Micro Devices. UNIX is a registered trademark of The Open Group.
This software or hardware and documentation may provide access to or information on content, products, and services from third parties. Oracle Corporation and its affiliates are not responsible for and expressly disclaim all warranties of any kind with respect to third-party content, products, and services. Oracle Corporation and its affiliates will not be responsible for any loss, costs, or damages incurred due to your access to or use of third-party content, products, or services.