2 Installing and Registering the Connector
The HP ServiceCenter Connector is not installed as part of the Enterprise Manager base installation, so you need to manually install it as described in this chapter. The following topics are dicsussed:
-
Installing the Connector
-
Uninstalling the Connector
-
Registering the Connector
Installing the Connector
To install the connector, you first remove the Remedy Connector, then add the new HP ServiceCenter Connector as explained in the following sections.
Removing the Remedy Connector
Enterprise Manager limits the number of ticketing connectors to one. This constraint applies only to the connectors of the type 'ticket'. Consequently, you need to remove the Remedy connector, which is part of the base Oracle Management Server (OMS) installation, before proceeding with the installation.
To remove the Remedy connector, follow these steps:
-
Log in to the Oracle Enterprise Manager console. Specify user credentials with Super Administrator privileges. Specify the password and click Login.
-
In the Grid Home page, click Setup.
-
In the Setup Options page, select Management Connectors.
The installed Management Connectors are displayed.
-
Select the Remedy connector and click Delete. Confirm that you want to delete the connector.
Note:
Follow the same procedure to delete any Ticket connector previously installed, if applicable.
Adding the New HP ServiceCenter Connector
To add the new connector, follow these steps:
-
Download the HP ServiceCenter Connector from OTN.
-
Run the following command to extract the connector:
emctl extract_jar connector <jarfile> <connectorTypeName> <oracleHome>
Note:
This extraction must be performed on all OMS instances, since all OMS instances need local access to the files.For example:
C:\OracleHomes\oms10g\bin\emctl extract_jar connector "C:\OracleHomes\oms10g\sysman\connector\HP_Service_Center.jar" "HP ServiceCenter Connector" "C:\OracleHomes\oms10g"
Running the command create a new connector subdirectory called HP_ServiceCenter_Connector in the
<OracleHomes>...sysman\connectordirectory. -
Initiate registration as follows:
-
Register the connector to Enterprise Manager, which you only need to do once. For this registration procedure, see Section 2.3, "Registering the Connector".
-
Register the ticket templates to Enterprise Manager. For this registration procedure, see Section 3.4.1, "Registering Ticket Templates".
Steps a and b both require the
emctl.batcommand line utility, which is located in the<OracleHomes>\oms10g\bindirectory. This utility is also used for other features, such as starting and stopping the OMS service. -
Uninstalling the Connector
To uninstall the HP ServiceCenter Connector, select it in the Management Connectors page, then click Delete.
Registering the Connector
From the Oracle Management Server (OMS) host command window, run the following emctl command:
emctl register_connector connector "<connectorType.xml>" <server> <port> <databaseSid> <username> <password> "<oraclehome>"
For example:
C:\OracleHomes\oms10g\bin\emctl register_connector connector "C:\OracleHomes\oms10g\sysman\connector\HP_ServiceCenter_Connector\HP_ServiceCenterDeploy_Connector.xml" localhost 1521 emrep SYSMAN password "C:\OraclHomes\oms10g"
| Parameter | Description |
|---|---|
|
|
Fully- qualified name of the connector deployment file. The file is ServiceCenter_Connector.xml, which resides in the Connector home directory. |
|
Server |
Host name of the Enterprise Manager repository. |
|
|
Listener port of the repository. |
|
|
Repository database instance ID. |
|
|
Specify |
|
|
Password for |
|
|
OMS Oracle home located at "<oraclehome>\oms10g". Double quotes are recommended. |
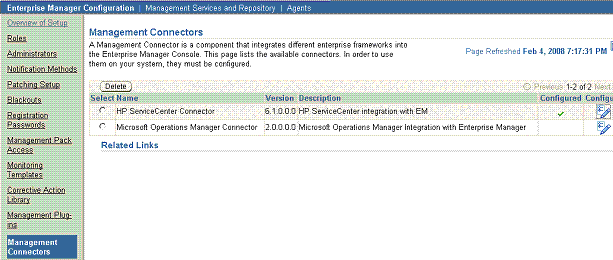
The new HP ServiceCenter connector should now appear in the Management Connector Page of the Enterprise Manager Grid Control Console as shown in Figure 2-1.
For information about registering ticket templates, see Section 3.4.1, "Registering Ticket Templates".
