Configuring the Connector
This chapter explains how to perform tasks directly or indirectly related to configuring the connector, and also discusses the post-configuration task of navigating between the Enterprise Manager and HP Service Manager consoles. The following topics are discussed:
-
Working with Ticket Templates
-
Configuring the Connector
-
Configuring the HP Service Manager Web Console
-
Testing the Connector
-
Navigating Between Enterprise Manager and HP Service Manager
Working with Ticket Templates
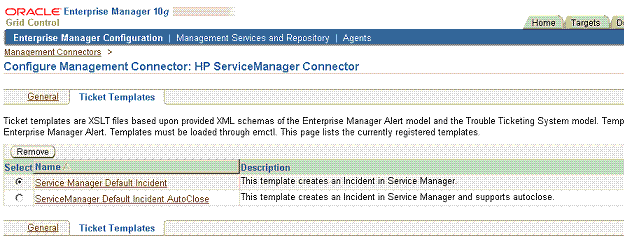
The following sections provide information about registering, removing, replacing, and adding ticket templates. Use the Configure Management Connector Ticket Templates page (Figure 3–1) to perform any of the tasks mentioned in the following sections.
Registering Ticket Templates
You need to register ticket templates before they are recognized in Enterprise Manager. For Auto Ticketing, a notification method is created for each registered ticket template, and a ticket is created and updated based on the ticket template associated with the selected notification method. For manual ticketing, registered ticket templates are available for selection.
The files in the base directory are configured specifically for Service Manager and must not be modified. Only a person trained to modify XSL files for the connector framework should modify the templates. For more information about modifying ticket templates, see Section 4.3, "Customizing Ticket Templates" .
The templates are the out-of-box ticket templates shipped with the connector. By default, all out-of-box ticket templates are registered. The templates assume defaults that may not be applicable to your instance of Service Manager, although they are designed to work with a default installation of HP Service Manager.
From the Oracle Management Server (OMS) host command window, run the following emctl command from the $ORACLE_HOME/bin directory for each applicable ticket template:
emctl register_ticket_template connector <ticketTemplate.xml> <server> <port> <database sid> <username> <password> <connectorTypeName> <connectorName> <templateName> <description>
The template in Example 3–1 creates an Incident in Service Manager and supports AutoClose.
C:\OracleHomes\oms10g\BIN\emctl register_ticket_template connector "C:\OracleHomes\oms10g\sysman\connector\HP_Service_Manager_Connector\templates\Service_Manager_Default_Incident_AutoClose.xsl" <Host Server Name> 1521 emrep SYSMAN <password> "HP Service Manager Connector" "HP Service Manager Connector" "Service Manager Default Incident AutoClose" "This template creates an Incident in Service Manager and supports autoclose."
emctl Parameters for Ticket Registration
Table 3–1 provides descriptions for each emctl parameter for ticket registration.
Table 3-1 emctl register_ticket_template Parameters
| Parameter | Description |
|---|---|
|
|
Fully-qualified name of the ticket template file. The file resides in the Connector home directory. Oracle recommends that you use intuitive names since there may be notification methods created with the same names, and you may have to choose one of them when you use the Auto Ticketing feature. Use xsl as the file extension since the format is XSLT; for example, ServiceCenter_Default_Incident.xsl. If the file is in a different directory, provide the complete path for the file. |
|
|
Host name of the Enterprise Manager repository. |
|
|
Listener port of the repository. |
|
|
Repository database instance ID. |
|
|
Specify |
|
|
Password for |
|
|
Connector type name. For example, " |
|
|
Connector name. This should be the same as the connector type name. For example, " |
|
|
Intuitive name for the ticket template to be displayed in Enterprise Manager. It is recommended that this name be the same as the file name, replacing the underscore in the file name with spaces. |
|
|
Short description for the ticket template. This description is also displayed in Enterprise Manager. |
To verify that the templates are registered properly, navigate to the Ticket Templates tab on the Configure Management Connector: HP Service Manager Connector page. The registered templates must be visible in the list as shown in Figure 3–1.
Viewing Template Code
Click a template name to view the code for the template.
The ticket templates are in XSLT format. A basic knowledge of XSLT is required to understand the code.
Removing Templates
To remove a template, perform the following steps:
Important:
If the template you delete has a notification rule associated with it, the notification fails.-
Select the template and click Remove.
-
At the prompt, confirm the removal.
-
Before you exit the page, click OK for the deletion to occur.
Note:
Unless you click OK before you exit, the template is not deleted. Next time you go to the Ticket Template page, the templates reappear.Although the ticket template is removed from the Enterprise Manager repository, it is still available in OMS in the Connector home directory. You can re-register the ticket template later if required.
Replacing Templates
To replace an existing ticket template, do the following in the sequence indicated:
-
Delete the ticket template.
-
Register the new template using
emctl.
Adding New Templates
To add templates, you should define new templates and register them using emctl.
See Also:
Section 4.3, "Customizing Ticket Templates"Avoiding Notification Failures
Notification is blocked for processing if the notification device is down because of problems. For instance, notification is blocked if the Service Manager server is down, the Service Manager configuration on Enterprise Manager is incorrect, or the ticket is removed in Service Manager.
The ticketing connector attempts to contact the service desk several times in a predefined interval. After that, it skips the current ticketing notification.
Configuring the Connector
To configure the connector:
-
As Super Administrator, from Enterprise Manager Grid Control, click Setup.
The Overview of Setup page appears.
-
Click Management Connectors in the left pane.
The Management Connectors page appears. The row for the ticketing connector should appear in this page as shown in Figure 2–1.
-
Click the Configure icon for the connector that you just registered.
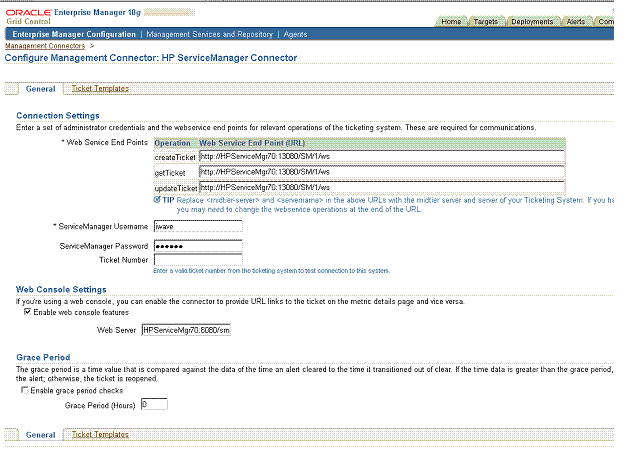
The General tab of the Configure Management Connector page appears (Figure 3-2).
-
Configure the connection settings:
-
Web Service End Points
Specify the appropriate server or IP address of the server hosting the Service Manager 7.10 Web services. Provide the server address in the format:
http://<server>:<port>/sc62server/PWS... where <port> is the default installation port. This may vary with your installation.
These end points to
CreateTroubleTicket,UpdateTroubleTicket,andGetTroubleTicketWeb services are exposed by HP Service Manager Help Desk. The CreateTroubleTicket and UpdateTroubleTicket operations are used during manual and automated ticketing.The GetTroubleTicket operation is only used on this window by testing the Ticket Number retrieval process. For more information about testing the ticket retrieval process, see Section 3.4, "Testing the Connector".
-
Service Manager Username
Specify the user name for HTTP basic authentication supported by the HP Service Manager web services. This user name must have the appropriate privileges/roles in the Service Manager to create, update, and query tickets in the HP Service Manager. All incident tickets created through the connector are generated with this user account.
-
Service Manager Password
Specify the password associated with the supplied HP Service Manager user.
-
Ticket Number
Specify this to verify the Web service end point information. See Section 3.4, "Testing the Connector" for more information.
-
-
(Optional) Configure the web console settings.
Web console settings are required if you want the Connector to provide links from Enterprise Manager to the HP Service Manager application user interface. These are the User Interface navigational links from Enterprise Manager to the HP Service Manager application user interface.
-
Enable web console features
Check to launch the HP Service Manager Incident Ticket page within the context from Enterprise Manager. If this is not checked, the HP Service Manager Web console cannot be launched in context of the ticket from the Enterprise Manager console.
-
Web Server
HP Service Manager host name. Provide the system name and port details of the Web server that hosts the HP Service Manager Application User Interface (not the details of Web services or the database server). Enter the Web Server address in the format:
<Servername or IP Address>:<Port>
See:
To install the middle tier, see the HP Service Manager 7 Web Tier Installation Guide.To configure the Web console, see Section 3.3, "Configuring the HP Service Manager Web Console".
-
-
(Optional) Configure the grace period.
If you configure this option, Enterprise Manager alerts that have generated an incident will update or reopen the incident if an alert is triggered. The alert occurs again within the grace period time specified. This setting applies to all alerts processed by HP Service Manager Connector.
See Section 1.5, "Grace Period" for conceptual information about the grace period.
-
Click OK.
The Management Connectors page reappears. The ticketing connector row should have a checkmark in the Configured column.
-
In the Configure Management Connector page, go to the Ticket Templates tab (Figure 3–1) and ensure that the ticket templates are successfully loaded.
If you choose HTTPS as the protocol to establish a connection between the HP Service Manager and Enterprise Manager, see Appendix A, "Enabling SSL for HTTPS".
Note:
Oracle recommends that you use HTTPS as the protocol for the communication between Enterprise Manager and the HP Service Manager Web Service server.Use HTTP only if a secure connection is not required and the data can be transferred in clear text between the two systems without compromising security.
Configuring the HP Service Manager Web Console
Verify the configuration of the web.xml file in the WEB-INF folder of the Tomcat web tier context root by doing the following:
-
Make sure the
serverHostparameter value is changed from local host to the fully-qualified name of the web tier server. -
See the Generated Web Tiers URLs section of the help for the Service Manager client.
-
Make sure the
querySecurityparameter is set to false as follows:<init-param> <param-name>querySecurity</param-name> <param-value>false</param-value>
Note:
Based upon how the Enterprise Manager Connector Framework works, the hash information normally required in the URL whenquerySecurityis set to true cannot be present. This requires that the URL security be turned off.Your security team needs to evaluate if the risks outweigh the need for the URL to be embedded into the Enterprise Manager alert. Service Manager still requires user authentication when hashing is turned off to access the web console enforcing authorization to the operation requested.
Testing the Connector
To test the connector, do the following:
-
In the Management Connectors page (Figure 2–1), select the HP Service Manager connector and click Configure.
-
Enter a valid ticket (Incident in Service Manager) into the Ticket field and click OK.
This executes the web service operation getTicket call to validate the incident. If Enterprise Manager cannot properly retrieve the incident, it returns an error and returns to the Management Connectors page.
Navigating Between Enterprise Manager and HP Service Manager
After you have configured the connector, you will want to access alerts from the Enterprise Manager and HP Service Manager consoles. The following sections explain how to switch from one console to the other.
Navigating from Enterprise Manager to HP Service Manager
-
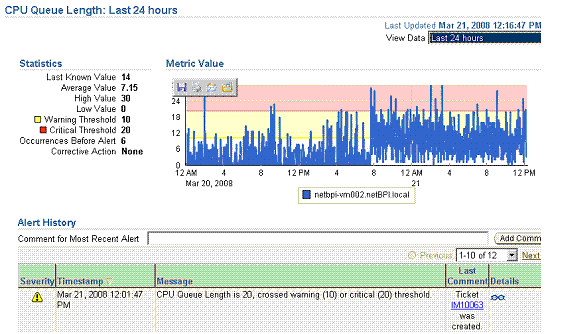
In the Enterprise Manager console, click the alert message to go to the metric details page for the alert.
-
In the Alert History table, locate the ticket ID link in the Last Comment column shown in Figure 3-3.
-
If not found, click the icon in the Details column to get more information about the alert.
-
On the page that appears, locate the ticket ID in the Alert Details table.
-
Click the ticket ID link. You are forwarded to the HP Service Manager Web console login page.
-
Provide valid HP Service Manager account details.
The ticket page associated with this alert is displayed.
Note:
If you do not use the HP Service Manager Web console, uncheck the "Enable web console features" option discussed in Section 3.2, "Configuring the Connector" so that the ticket ID is shown in plain text. Otherwise, it is displayed as a link that does not work.Navigating from HP Service Manager to Enterprise Manager
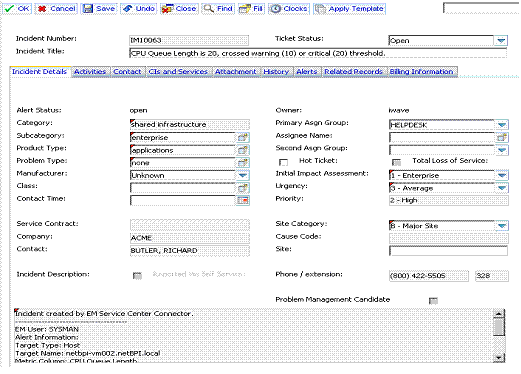
From a ticket page, click the link in the Description field to the Alert Details page in the ticket message body (Figure 3-4). This forwards you to the Enterprise Manager console login page. After you provide the Enterprise Manager user name and password, you are forwarded to the alert related to this ticket.
Note:
- The Enterprise Manager user whose name you specify should at least have
Viewprivileges on the target on which the alert was raised. -
On the HP Service Manager console, if the URL appears as text, you need to cut and paste the URL into the browser.


