| Oracle® Database Lite Getting Started Guide Release 10.3 Part Number E12080-02 |
|
|
View PDF |
| Oracle® Database Lite Getting Started Guide Release 10.3 Part Number E12080-02 |
|
|
View PDF |
As a user, there are three tasks that you normally perform—software distribution, application deployment, and data synchronization. This chapter uses the installed samples in Oracle Database Lite to demonstrate—quickly—how to perform these three functions on the Windows 32, Web-based, and Windows Mobile platforms for an Oracle Lite Mobile client. The following sections describe how to install the sample applications on an Oracle Lite Mobile client, start Oracle Database Lite, and then distribute, deploy, and sync your application on separate platforms.
As Step 8 in Section 4.3.1.2, "Installation of Mobile Server" notes, you should choose to install the sample applications while you are installing the Mobile Server. However, if you did not install them, you can install them with the demoinstaller command as described in Section 5.2.5, "Installing Sample Applications".
Before you can execute any of the sample applications, verify that the Oracle Database, Oracle Database Lite and its Job Scheduler is started. To start Oracle Database Lite, execute runmobileserver on the Mobile Server host. Start the Job Scheduler, as follows:
Start a browser with the URL http://<Mobile Server>/webtogo. Note that the Mobile Server host name that you provide is not the back-end database, but is the host where the Mobile Server and the middle-tier application server was installed.
Also, the URL assumes that you are using the default port of 80. If there was a port conflict and you had to change the port number, use the URL http://<Mobile Server>:<port_number>/webtogo. For more information on modifying port numbers, see Step 4 of Section 4.3.1.2, "Installation of Mobile Server".
Logon as the administrator. The default administrator username/password is administrator/admin.
On the Mobile Workspace screen, click Mobile Manager. This brings up the list of Mobile Servers available.
Click on the Mobile Server with which you wish to connect. These are listed by host name and port number.
On the Mobile Server screen, verify that the Job Scheduler is running. This is indicated by a green check under the Status column in the Components section at the bottom of the page.
If the Job Scheduler is not running, select the button next to it and click the Start button.
Exit the Mobile Manager by closing the window.
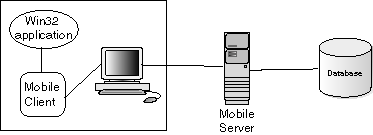
When you have a Windows 32 (Win32) machine that is set up to interact with Mobile Server, you have an environment similar to Figure 6-1:
Figure 6-1 Windows 32 Interacting With Mobile Server

Figure 6-1 demonstrates how the Mobile Server accesses the Mobile Server Repository, which exists in a back-end database. The Oracle Lite Mobile client and client applications are on the Win32 machine. The Mobile client database synchronizes with the Mobile Server.
To install and use the sample application on your Windows 32 machine, verify that you have the correct environment, retrieve the sample from the Mobile Server and install it on your Win32 machine, as follows:
Download the Oracle Lite Mobile Client from the Mobile Server
Synchronize the Win32 Sample Application Data to the Database
The sample application for the Win32 environment is the transportation demo.
Note:
This section demonstrates how to install, deploy and use the transport demo. However, if you want to see how to build the transport demo, see Chapter 11, "Tutorial for Building Mobile Applications for Win32" in the Oracle Database Lite Developer's Guide.The Win32 sample application requires Microsoft Windows 2003/XP and that you install Microsoft .NET Framework 1.1. For directions on how to install the .NET Framework, see the following:
http://msdn.microsoft.com/netframework/technologyinfo/howtoget/
To download the Mobile client, do the following:
Open the Mobile Client Setup through the Mobile Server, as follows:
In a browser on your Win32 machine, point the browser to the Mobile Server using the URL http://<Mobile Server>/webtogo/.
On the upper right corner, click Setup.
Click Oracle Lite Win32.
The Save As dialog box appears. The file name field displays the executable setup file for the selected platform. Save the executable to a local directory on your Win32 machine.
You install the Mobile client on your Win32 device by performing the following steps:
Navigate to the local directory on your Win32 machine and double-click the Mobile client setup.exe.
On the Logon to Server screen, enter the username and password JUNE/JUNE and click OK. The Mobile client is now installed.
Navigate to the \bin directory where you installed the Mobile client—such as c:\mobileclient\bin—and launch the Mobile Sync application by double-clicking msync.exe.
On the Mobile Sync dialog box, verify that the correct information is filled in as follows:
Username and Password of JUNE/JUNE.
Check Save Password.
Enter the host name for the Mobile Server.
Click Apply. Click Sync.
When the sync completes, the Sync Result Dialog appears. Click OK.
On the Oracle Lite Software Update window, click Install to install the Transport Demo (Transport_WIN32) on your system.
Select the directory where you would like to install the demo and click OK.
The Win32 sample application is the transport application, which tracks delivery of packages for a trucking delivery service. To start the application, perform the following:
Launch the transport demo application on your client by navigating to the directory where you installed the demo and double-click on transport.exe.
Enter username and password of JUNE/JUNE when prompted to logon to the sample application. Click OK.
The Win32 sample application—the transport application—enables you to add package delivery information for a truck delivery service.
On the Transport Demo screen, you can create or view a package. Click Create Package.
On the Create Package screen, fill in the following information about the package and the truck on which it is to be delivered:
Name of the package: Oracle Lite CD
Package weight: 5
Truck number: 1
The route taken to deliver package: Santa Clara Route
Package priority: HIGH
Click Next.
On the next screen, fill in the package delivery location, as follows:
Street: 500 Oracle Parkway
City: Redwood Shores
State: CA
Click Save.
The "Package created successfully" dialog box displays. Click OK.
Click the Exit button, which is the icon with a red sphere, to return to the main screen.
On the Transport Demo screen, click View Packages to see the data you just entered.
Click the Exit button to return to the main screen of the transport demo.
After you have updated all of the records that you want on your client, you can synchronize the application data to the Mobile Server, which updates the database. To synchronize the data to the database, click the mSync button, which is the icon of a database with dual arrows.
You can check to see if the transport applications data was synchronized with the database by viewing the tables used by the sample—the Packages, Trucks and Routes tables—in the repository in the MASTER schema with username/password of MASTER/MASTER.
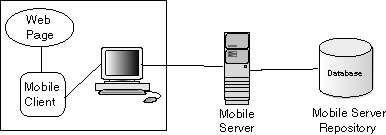
When you have a Web-based application that is set up to interact with Mobile Server, you have an environment similar to Figure 6-2:
Figure 6-2 Web-Based Application Interacting With Mobile Server

To install and use the Web-based Mobile client, verify that you have the correct environment, retrieve the sample from the Mobile Server and install it on your machine, as follows:
Note:
You cannot access the Mobile Server from a Web application that is local to the Mobile Server; that is, you must access the Mobile Server from a machine that is remote to the host where Mobile Server is installed. Direct access is not supported.The Web sample application tracks your music. This sample application is also used as the base application for a tutorial on how to build Web-based applications. See Chapter 9, "Tutorial for Building Mobile Web Applications" in the Oracle Database Lite Developer's Guide for a full description.
To download the Mobile client, do the following:
Open the Mobile Client Setup through the Mobile Server, as follows:
In a browser on your remote machine, point the browser to the Mobile Server using the URL http://<Mobile Server>/webtogo/.
On the upper right corner, click Setup.
Click Oracle Lite WEB.
The Save As dialog box appears. The file name field displays the executable setup file for the selected platform. Save the executable to a local directory on your machine—which is remote from the Mobile Server host.
You install the Web Mobile client by performing the following steps:
Navigate to the local directory where you installed the Mobile client and double-click the Mobile client setup.exe.
On the Logon to Server screen, enter the username and password JOHN/JOHN and click OK.
If you are prompted for a port number, there is a conflict with the default port. Enter an unused port number and click OK. Use this port number when accessing the Web logon page through a URL.
The Web Mobile client sample is now installed.
The Web logon page should appear in your browser. Alternatively, you can launch it through a Web browser with URL http://localhost/webtogo/index.html.
Enter the username and password of JOHN/JOHN. Click Logon.
A confirmation and client initialization screen appears. Click Next to synchronize the new Web client with the Mobile Server.
After installation, the client is restarted and the Web Workspace appears.
There are several sample applications that you can try; however, this section talks about using Sample3,which tracks music.
Select the Applications tab. This shows the available samples that you can execute.
Click Sample3, which launches the application.
Add or change data in the Sample3 application by adding musical record details, commit the changes, and close the application window.
Select the Sync tab to synchronize the modified data with the Mobile Server.
You can check to see if the data was synchronized with the database by viewing the Records, Tracks, and Titles tables in the back-end database.
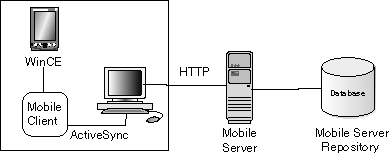
When you have a WinCE (Windows Mobile) application that is set up to interact with Mobile Server, you have an environment similar to Figure 6-3:
Figure 6-3 Windows Mobile Application Interacting With Mobile Server

To install and use the Mobile client for your Windows Mobile device, verify that you have the correct environment, retrieve the sample from the Mobile Server and install it on your machine, as follows:
Section 6.5.1, "Verify the Software and Hardware Requirements for the WinCE Demo"
Section 6.5.2, "Download the Mobile Client from the Mobile Server"
Section 6.5.4, "Enter and View Data in the WinCE Sample Application"
Section 6.5.5, "Synchronize the WinCE Application Data to the Database"
The WinCE sample application is the transport application.
Note:
This section demonstrates how to install, deploy and use the transport demo. However, if you want to see how to build the transport demo, see Chapter 12, "Tutorial for Building Mobile Applications for Windows CE" in the Oracle Database Lite Developer's Guide.The WinCE sample application requires the following:
Software requirements: ActiveSync 3.8 or higher and Microsoft .NET Compact Framework 1.0. For information on how to install Microsoft .NET Compact Framework, see the following:
http://msdn.microsoft.com/mobility/downloads/default.aspx/
Hardware requirements: Hardware as appropriate for the WinCE device used.
To download the Mobile client, do the following:
Open the Mobile client setup through the Mobile Server, as follows:
In a browser on your Windows machine that supports the Windows Mobile device, open and point a browser to the Mobile Server host, which is remote to your machine, using the URL http://<Mobile Server>/webtogo/.
On the upper right corner, click Setup.
Click on the sample that corresponds to the Windows Mobile device that you have. For example, the ARM example is Oracle Lite PPC50 ARMV4I;US.
The Save As dialog box appears. The file name field displays the executable setup file for the selected platform. Save the executable to a local directory on your machine.
You install the Mobile Client on your Windows Mobile (WinCE) device by performing the following steps:
Navigate to the local directory on the Windows machine that supports the Windows Mobile device and double-click the Mobile Client setup.exe.
On the Logon to Server screen, enter the username and password JUNE/JUNE and click OK.
The WinCE Mobile Client is now registered with ActiveSync.
Launch the ActiveSync Launcher on the Windows machine. You will be asked if you would like to install Oracle Lite using the default application directory. Click Yes. this installs the Mobile Client libraries into the \ORACE directory on the Windows CE device.
On the Windows Mobile device, navigate to the \ORACE directory where you installed the Mobile Client and launch the Mobile Sync application by double-clicking msync.exe.
On the Mobile Sync dialog box, enter the following:
Username and Password of JUNE/JUNE.
Check Save Password.
Enter the host name for the Mobile Server.
Click Apply. Click Sync.
Note:
The Mobile client device clock must be accurate for the time zone set on the device before attempting to synchronize. An inaccurate time may result in the following exception during synchronization:CNS: 9026 "Wrong username or password. Please enter correct value and reSync."When the synchronization completes, the Sync Result Dialog appears. Click OK.
On the Oracle Lite Software Update window, click Install to install the Transport Demo (Transport_PPC) on your system.
Select the directory where you would like to install the demo and click OK.
The WinCE sample application—the transport demo—enables you to add package delivery information for a truck delivery service.
Launch the transport demo application on your client. Find the Transport demo in the program list under Start->Programs or through Explorer.
On the Transport Demo screen, you can create or view a package. Click Create Package.
On the Create Package screen, fill in the following information about the package and the truck on which it is to be delivered:
Name of the package: Oracle Lite CD
Package weight: 5
Truck number: 1
The route taken to deliver package: Santa Clara Route
Package priority: HIGH
Click Next.
On the next screen, fill in the package delivery location, as follows:
Street: 500 Oracle Parkway
City: Redwood Shores
State: CA
Click Save.
The "Package created successfully" dialog box displays. Click OK.
Click the OK button in the upper right-hand corner to return to the main screen.
On the Transport Demo screen, click View Packages to see the data you just entered.
Click the Exit button—which is the icon with a red sphere—to return to the main screen.
After you have updated all of the records that you want on your client, you can synchronize the data to the Mobile Server, which updates the database. To synchronize the data to the database, click the mSync button, which is the icon of a database with dual arrows, to synchronize the modified data with the Mobile Server.
You can check to see if the transport applications data was synchronized with the database by viewing the tables used by the sample—the Packages, Trucks and Routes tables—in the repository in the MASTER schema with username/password of MASTER/MASTER.