| Oracle® Retail Warehouse Management System UI User Guide Release 15.0 E66766-01 |
|


 Previous |
 Next |
| Oracle® Retail Warehouse Management System UI User Guide Release 15.0 E66766-01 |
|
Previous |
Next |
The Inventory Management module provides you with detailed views and reports of the current inventory situation. Inventory can be maintained by container and locations can be marked for cycle counts.
Business Process
Inventory can be looked at in a variety of ways. You can view inventory by:
Item: Look up where an item is stored. You can mark locations for cycle count.
Location: Look up which items are stored in a location. You can mark the location for cycle count.
Purchase order: Look up items that are associated with a purchase order and their current locations. You can mark locations for cycle count.
Vendor: Look up containers that are associated with a vendor and the current locations of the containers.
Container: Look up items by container and the current location of the container. You can view the child containers of a parent container or the parent container of a child container.
Summaries: Look up container and unit totals by a variety of search criteria, then select how you want to view the details.
Containers and the items within them can be maintained. You can add and delete containers in inventory, add and delete the items within a container, or split an item between containers.
Items may be transferred from one item ID to another. Inventory is adjusted automatically to account for the loss of inventory under the previous item ID and the gain in inventory under the new item ID.
As new items are received from the host system, you can apply the appropriate item class to each new item. The items inherit the defaults, processes, and equipment classes of the item class to which they are assigned.
Paper picks can be confirmed or the pick directives may be purged from RWMS. This pertains to unit pick, pick to belt, and pick to pallet activities.
You can look up the locations that are marked for cycle counts. The locations may have been manually marked (MM) or system selected (SS). Units of measure and their conversion factors can also be viewed.
This chapter contains the following topics:
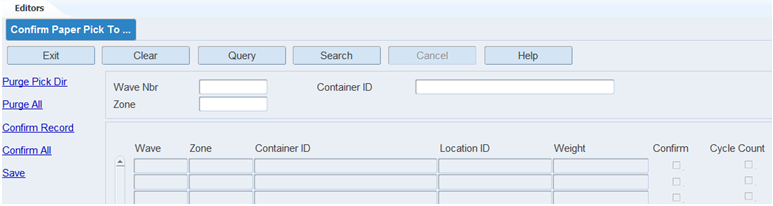
The Confirm Paper Pick to Belt Editor allows you to view, confirm, or purge paper picks to belt. The editor shows these picks at the wave and zone level.
To confirm paper pick to belt, navigate to Inventory Management > Confirm Paper Pick to Belt. The Confirm Paper Pick to Belt window opens.
Display all Container Pick Directives
Click Search.
Display a Subset of Container Pick Directives
If any container pick directives are currently displayed, click Clear.
Click Query.
In the Wave Nbr field, enter the wave number, or click the LOV button and select the wave.
In the Zone field, enter the ID of the zone, or click the LOV button and select the zone.
In the Container field, enter the ID of the container, or click the LOV button and select the container.
Click Search. The container pick directives that match the search criteria appear.
Confirm Container Pick Directives
On the Confirm Paper Pick to Belt window, select the Confirm check box next to each container pick directive that you want to confirm.
Click Confirm Record. The selected container pick directives are confirmed.
|
Note: To confirm all the container pick directives that are currently displayed, click Confirm All. |
Click Save to save the changes.
Purge Container Pick Directives
On the Confirm Paper Pick to Belt window, select the Confirm check box next to each container pick directive that you want to purge.
Click Purge Pick Dir. The selected container pick directives are purged. Confirming of the pick directives implies processing of the paper picks.
|
Note: To purge all the container pick directives that are currently displayed, click Purge All. |
When prompted to confirm the purge, click Yes.
Exit the Confirm Paper Pick to Belt Window
Click Exit to close the window.
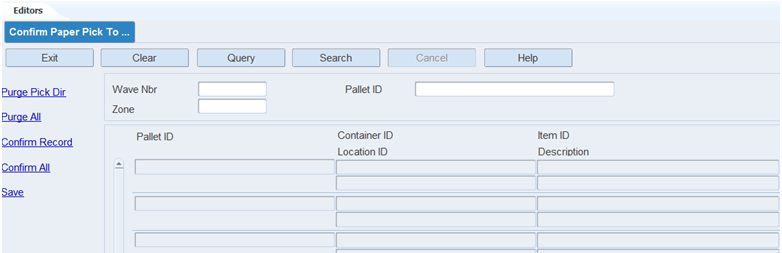
The Confirm Paper Pick to Pallet Editor allows you to view, confirm, or purge paper pallet pick directives by wave and zone.
To confirm paper pick to pallet, navigate to Inventory Management > Confirm Paper Pick to Pallet. The Confirm Paper Pick to Pallet window opens.
Display all Pallet Pick Directives
Click Search.
Display a Subset of Pallet Pick Directives
If any pallet pick directives are currently displayed, click Clear.
Click Search.
In the Wave Nbr field, enter the wave number, or click the LOV button and select the wave.
In the Zone field, enter the ID of the zone, or click the LOV button and select the zone.
In the Pallet ID field, enter the ID of the pallet, or click the LOV button and select the pallet.
Click Search. The pallet pick directives that match the search criteria appear.
Confirm Pallet Pick Directives
On the Confirm Paper Pick to Pallet window, select the pallet pick directive that you want to confirm.
Click Confirm Record. The pick quantity is updated to equal the requested quantity.
|
Note: To confirm all the pallet pick directives that are currently displayed, click Confirm All. |
Click Save to save the changes.
Purge Pallet Pick Directives
On the Confirm Paper Pick to Pallet window, select the pallet pick directive that you want to purge.
Click Purge Pick Dir. The selected pallet pick directive is purged.
|
Note: To purge all the pallet pick directives that are currently displayed, click Purge All. |
When prompted to confirm the purge, click Yes.
Exit the Confirm Paper Pick to Pallet Window
Click Exit to close the window.
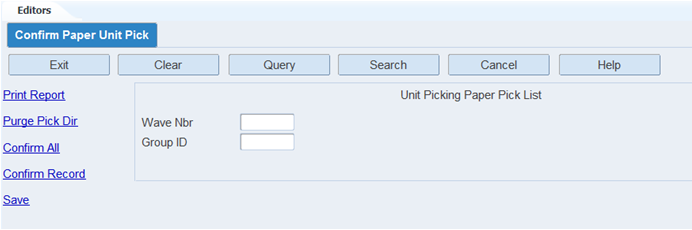
The Confirm Paper Unit Pick Editor allows you to view unit, confirm, or purge paper unit pick directives by wave and group. You can also generate the Paper Pick Directives report.
To confirm paper unit picks, navigate to Inventory Management > Confirm Paper Unit Pick. The Confirm Paper Pick window opens.
Display Unit Pick Directives
If any unit pick directives are currently displayed, click Clear.
Click Query.
In the Wave Nbr field, enter the wave number, or click the LOV button and select the wave.
In the Group ID field, enter the group ID, or click the LOV button and select the group.
Click Search. The unit pick directives that match the search criteria appear.
Confirm Unit Pick Directives
On the Confirm Paper Pick window, select the unit pick directive that you want to confirm.
Click Confirm Record. The pick quantity is updated to equal the requested quantity.
|
Note: To confirm all unit pick directives that are currently displayed, click Confirm All. |
Click Save to save the changes.
Purge Unit Pick Directives
On the Confirm Paper Pick window, select the unit pick directive that you want to purge.
Click Purge Pick Dir.
When prompted to confirm the purge, click Yes.
Exit the Confirm Paper Pick Window
Click Exit to close the window.
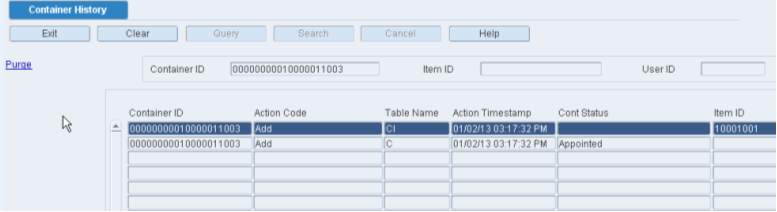
The Container History Editor allows you to monitor the status history of containers as they move through the distribution center. Each time an activity is recorded in RWMS, a historical record is added to the container history table. Records are purged from the table by a regularly scheduled batch program; however, you can manually request that records older than a specified date be purged.
To view container history, navigate to Inventory Management > Container History. The Container History window opens.
Display all Historical Records
|
Note: Due to the large volume of records that might be retrieved, it is recommended that you enter criteria in order to restrict the results. |
Click Search.
Display a Subset of Historical Records
If any records are currently displayed, click Clear.
Click Query.
Enter criteria in one or more of the fields.
Click Search. The historical records that match the criteria appear.
Purge Historical Records
On the Container History window, click Purge. The Purge window opens.
In the Purge Date field, enter an action date. All records with an action date equal to or less than the selected action date are included in the purge request.
Click Save to enter the purge request and close the Purge Data window.
Exit the Container History Window
Click Exit to close the window.
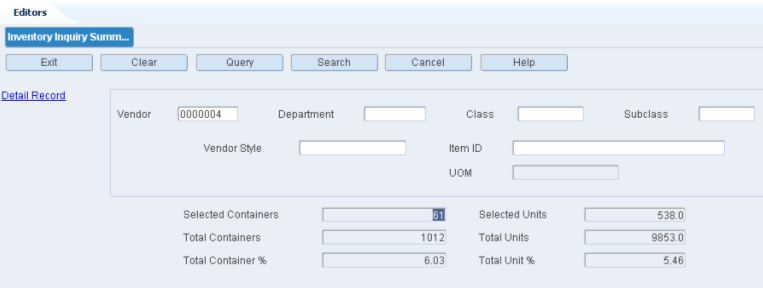
The Inventory Inquiry Summary window allows you to view a summary of inventory by a variety of criteria. The summary includes the number of containers and units that match the query criteria, the total number of containers and units in the distribution center, and what percentage of the totals that the selected containers and items make up.
You can access the Inventory Inquiry Summary Detail window in order to view a breakdown of the totals by selected criteria. You would select the check box next to each category to be included in the details.
To view inventory summaries, navigate to Inventory Management > Inventory Inquiry Summary. The Inventory Inquiry Summary window opens.
Query the Inventory
Click Query.
Enter criteria in the one or more of the fields, or click the desired LOV buttons and select the criteria.
Click Search. The inventory totals and percentages are calculated by container and unit for the selected criteria.
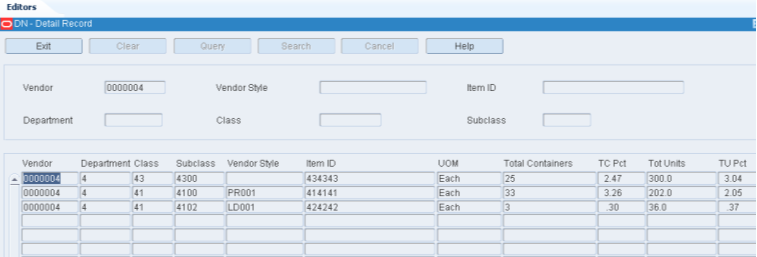
View Inventory Details
On the Inventory Inquiry Summary window, click Detail Record. The Detail Record window opens.
Select the check box next to each category that you want to view in detail.
Click Search. The details appear for the selected categories.
Exit the Inventory Inquiry Summary Windows
Click Exit to close the windows.
The Inventory Inquiry by Item window allows you to view the inventory for an item at the container and location level. You can view container details such as destination, receipt date, putaway date, and dimensions by clicking the Detail Link.
You can mark one or all of the storage locations containing the item for cycle count.
From this window, you can access the Inventory Inquiry by Location window in order to view inventory details for a selected location.
To view inventory by item, navigate to Inventory Management > Inventory Inquiry by Item. The Inventory Inquiry by Item window opens.
Display Inventory by Item
If inventory for an item is currently displayed, click Clear.
Click Query.
In either the Item ID or Vendor Style field, enter the ID of the item or style, or click the LOV button and select the item or style.
Click Search. The inventory for the selected item or style opens.
Mark a Location for Cycle Count
|
Note: The option to mark a location for cycle count is not available to all users. If the privilege value of the user is less than the value set by the system control parameter mm_sec_level_gu, the following error message displays: Insufficient privileges to perform the operation. |
On the Inventory Inquiry by Item window, select the storage location that you want to mark for cycle count.
Click Mark Record. An 'MM' opens in the Cycle Count field. The 'MM' indicates that the location was manually marked for cycle count.
Mark All Locations for Cycle Count
|
Note: Mark all locations means marking all locations where the item exists. |
On the Inventory Inquiry by Item window, click Mark Grp Rec. An 'MM' opens in the Cycle Count field for each storage location where the item exists. The 'MM' indicates that the location was manually marked for cycle count.
Exit the Inventory Inquiry by Item Window
Click Exit to close the window.
The Inventory Inquiry by Location window allows you to view the inventory in a location at the item and container level. You can view container details such as destination, receipt date, putaway date, and dimensions by clicking the Detail link.
The location may be marked for cycle count if it is a storage location. You can view inventory at the next or previous location (in alphabetical or numerical order) by clicking Next Record or Previous Record.
To view inventory by location, navigate to Inventory Management > Inventory Inquiry by Location. The Inventory Inquiry by Location window opens.
|
Note: You can also access this window from the Inventory Inquiry by Item and Inventory Inquiry by Order windows. |
Display Inventory by Location
If inventory for a location is currently displayed, click Clear.
Click Query.
In the Location ID field, enter the ID of a location, or click the LOV button and select the location.
|
Note: The Location ID field is mandatory and Item ID field is optional. |
Click Search. The inventory for the selected location displays.
View Inventory at Other Locations
To view inventory at the next location (in alphabetical or numerical order), click Next Record.
To view inventory at the previous location (in alphabetical or numerical order), click Previous Record.
Mark the Location for Cycle Count
|
Note: The option to mark a location for cycle count is not available to all users. If the privilege level of the user is less than the value of the system control parameter mm_sec_level_gu, the following error message displays: Insufficient privileges to perform the operation. |
On the Inventory Inquiry by Location window, click Mark Record. An 'MM' opens in the Cycle Count field. The 'MM' indicates that the location was manually marked for cycle count.
Exit the Inventory Inquiry by Location Window
Click Exit to close the window.
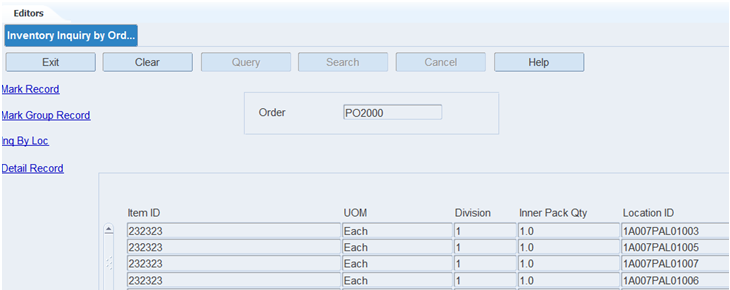
The Inventory Inquiry by Order window allows you to view the inventory by purchase order at the item and location level. You can view container details such as destination, receipt date, putaway date, and dimensions by clicking the Detail Link.
You can mark one or all of the storage locations containing the PO/items for cycle count.
From this window, you can access the Inventory Inquiry by Location window in order to view inventory details for a selected location.
To view inventory by purchase order, navigate to Inventory Management > Inventory Inquiry by Order. The Inventory Inquiry by Order window opens.
Display Inventory by Purchase Order
If inventory for a purchase order is currently displayed, click Clear.
Click Query.
In the Order field, enter the purchase order number, or click the LOV button and select the purchase order.
Click Search. The inventory for the selected purchase order opens.
Mark a Location for Cycle Count
|
Note: The option to mark a location for cycle count is not available to all users. If the privilege level of the user is less than the value of the system control parameter mm_sec_level_gu, the following error message displays: Insufficient privileges to perform the operation. |
On the Inventory Inquiry by Order window, select the storage location that you want to mark for cycle count.
Click Mark Record. An 'MM' opens in the Cycle Count field. The 'MM' indicates that the location was manually marked for cycle count.
Mark all Locations for Cycle Count
On the Inventory Inquiry by Order window, click Mark Grp Rec. An 'MM' opens in the Cycle Count field for each storage location. The 'MM' indicates that the location was manually marked for cycle count.
Exit the Inventory Inquiry by Order Window
ClickExit to close the window.
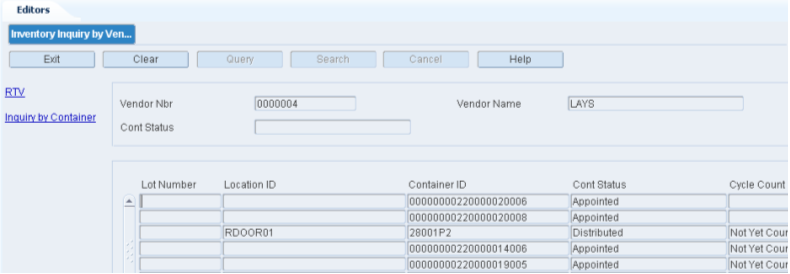
The Inventory Inquiry by Vendor window allows you to view the inventory by Vendor number at the location and container level. You can view container details such as destination, receipt date, putaway date, and dimensions by clicking the Inquiry by Location Link. You can mark containers for return to vendor if the container status is Inventory (I), Distributed (D), or Troubled (T).
To view inventory by vendor or the status of a container, navigate to Inventory Management > Inventory Inquiry by Vendor. The Inventory Inquiry by Vendor window opens.
Display Inventory by Vendor or Container Status
If inventory for a vendor is currently displayed, click Clear.
Click Query.
To search for inventory by vendor number, enter the vendor number in the Vendor Nbr field, or click the LOV button and select the vendor. To search for inventory by container status, enter the abbreviation for the container status in the Cont Status field. To search for inventory by vendor number and container status, enter criteria in both fields.
Click Search. The inventory for the selected item opens.
Mark a Location for Cycle Count
|
Note: The option to mark a location for cycle count is not available to all users. If the privilege level of the user is less than the value of the system control parametermm_sec_level_gu, the following error message displays: Insufficient privileges to perform the operation. |
On the Inventory Inquiry by Vendor window, select the storage location that you want to mark for cycle count.
Click Mark Record. An 'MM' opens in the Cycle Count field. The 'MM' indicates that the location was manually marked for cycle count.
Mark All Locations for Cycle Count
On the Inventory Inquiry by Vendor window, click Mark Grp Rec. An MM opens in the Cycle Count field for each storage location. The MM indicates that the location was manually marked for cycle count.
Exit the Inventory Inquiry by Vendor Window
Click Exit to close the window.
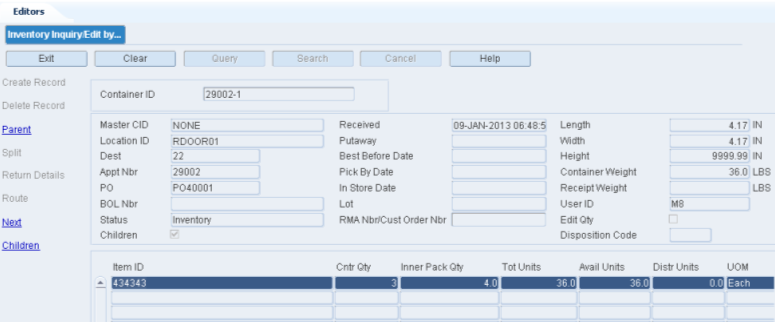
The Inventory Inquiry/Edit by Container window allows you to view and edit inventory at container level. You can view the child containers associated with a parent container and the parent container of a child container.
There are three blocks in this window:
Query block: Identify the container that you want to retrieve.
Container block: Displays container details. You can edit the type, dimensions, weight, best before date, master container ID, and location ID of a container. You can add or delete a container. You can view return details if applicable.
Item block: Displays item details. You add an item, adjust the unit quantity, or delete an item from the container. You can split an item between containers.
To view inventory by container, navigate to Inventory Management > Inventory Inquiry/Edit by Container. The Inventory Inquiry/Edit by Container window opens.
|
Note: You can also access this window from the following windows: Inventory Inquiry by Item, Inventory Inquiry by Location, Inventory Inquiry by Order, Inventory Inquiry by Vendor, WIP Audit Outbound, and Stock Order Inquiry window. |
Display Inventory by Container
If inventory for a container is currently displayed, click Clear.
Click Query.
In the Container ID field, enter the container ID, or click the LOV button and select the container.
Click Search. The inventory for the selected container displays.
|
Note: There are three blocks in this window. From top to bottom, they are referred to as the Query block, Container block, and Item block. |
Display Child Containers
|
Note: If the Children check box is selected, then the current container has one or more child containers. |
On the Inventory Inquiry/Edit by Container window, click Children. The child containers appear on the Children window.
Select the child container that you want to view in detail.
Click Details. The details of the selected child container appear in the Inventory Inquiry/Edit by Container window.
Display a Parent Container
|
Note: If a container ID appears in the Master CID field, then the current container has a parent container. |
On the Inventory Inquiry/Edit by Container window, click Parent. The details of the parent container appear in the Inventory Inquiry/Edit by Container window.
View Returns by Container/Item
|
Note: If the status of a container is Non-saleable (N), you can view the returns that may be associated with an item in the container. |
On the Inventory Inquiry/Edit by Container window, click Next to move the cursor to the Container block.
Click Return Details. The returns appear in the Return Details window.
Click Exit to close the Return Details window.
Exit the Inventory Inquiry/Edit by Container Window
Click Exit to close the window.
To maintain inventory by container, navigate to Inventory Management > Inventory Inquiry/Edit by Container. The Inventory Inquiry/Edit by Container window opens.
|
Note: You can also access this window from the following windows: Inventory Inquiry by Item, Inventory Inquiry by Location, Inventory Inquiry by Order, Inventory Inquiry by Vendor, WIP Audit Outbound, and Stock Order Inquiry window. |
Display Inventory by Container
If inventory for a container is currently displayed, click Clear.
Click Query.
In the Container ID field, enter the container ID, or click the LOV button and select the container.
Click Search. The inventory for the selected container displays.
|
Note: There are three blocks in this window. From top to bottom, they are referred to as the Query block, Container block, and Item block. |
Edit a Container
On the Inventory Inquiry/Edit by Container window, click Next to move the cursor to the Container block.
Double-click any field in the Container block. The Modify window opens.
Edit the enabled fields as necessary.
Click Save to save any changes and close the Modify window.
Edit an Item in a Container
On the Inventory Inquiry/Edit by Container window, click Next to move the cursor to the Item block.
Double-click any field in the Item block. The Modify window opens.
Edit the container quantity and unit quantity as necessary.
Click Save to save the changes.
When prompted to select a reason for the adjustment, select the reason and click OK.
Split an Item between Containers
On the Inventory Inquiry/Edit by Container window, click Next to move the cursor to the Item block.
Select the item that you want to split.
Click Split. The Split window opens.
In the Container field, enter the ID of a new or existing container.
In the Unit Qty field, enter the number of items to be placed in the container.
Click Save to save the changes and clear the fields.
Add any additional splits as necessary.
When done, click Exit to close the Split window.
Add a Container
On the Inventory Inquiry/Edit by Container window, click Next to move the cursor to the Container block.
|
Note: The cursor may also be in the Query block. |
Click Create Record. The Create Record window opens.
In the Master CID field, enter the ID of the master, or parent, container if applicable.
In the Type field, enter the type of container, or click the LOV button and select the type.
If there is no master container, enter the location ID for the container in the Location ID field.
Edit the default dimensions as necessary.
In the Container Weight field, enter the weight of the empty container.
If the container holds a perishable item, enter the best before date in the Best Before Date field.
Click Save to save the changes and close the Create Record window.
Add an Item to a Container
On the Inventory Inquiry/Edit by Container window, click Next to move the cursor to the Item block.
Click Create Record. The Create Record window opens.
In the Item ID field, enter the item ID of the item in the container.
In the Cntr Qty field, enter the number of child containers.
In the Unit Qty field, enter the number of units.
Click Save to save the changes.
When prompted to select a reason for the adjustment, select the reason and click OK.
Delete a Container
On the Inventory Inquiry/Edit by Container window, click Next to move the cursor to the Container block.
Click Delete Record.
When prompted to delete the record, click Yes.
When prompted to select a reason for the adjustment, select the reason and click OK.
Delete an Item from a Container
On the Inventory Inquiry/Edit by Container window, click Next to move the cursor to the Item block.
Click Delete Record.
When prompted to delete the record, click Yes.
Exit the Inventory Inquiry/Edit by Container Window
Click Exit to close the window.
The Item ID Transfer window allows you to change the item ID of an item. Inventory is automatically adjusted. The inventory under the previous item ID is reduced to zero. The inventory under the new number is increased by the number of units that were previously credited to the old item ID.
To transfer item IDs, navigate to Inventory Management > Item ID Transfer. The Item ID Transfer window opens.
Transfer an Item ID
In the Item ID field, enter the ID of the item whose ID must be changed.
Click Search. Additional information about the item opens.
In the New Item ID field, enter the new item ID to be assigned to the item.
Click Apply.
When prompted to confirm the item ID transfer, click Yes.
Exit the Item ID Transfer Window
Click Exit to close the window.
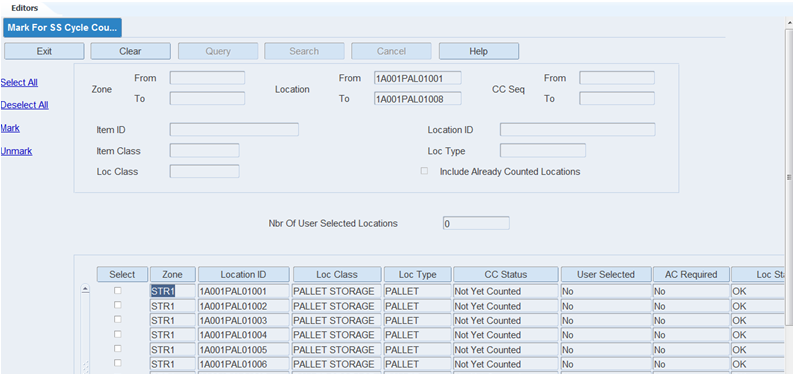
You can manage the Cycle Count process within the warehouse to more closely to match specific needs using the Mark for SS Cycle Count Editor. The Mark for SS Cycle Count Editor allows you to mark specific locations for Cycle Count in addition to system generated cycle counts and manually marked locations. These selected locations are then designated as System Selected (SS) and the User Selected parameter is set to Y.
This editor also shows locations that have been marked for Audit Count. An Audit count is generated when the difference between the system count and actual count falls outside of the following settings:
Item CC Tolerance Percentage - This item master setting determines whether an inventory adjustment is allowed immediately or an Audit Count must be performed. If the difference between the original system quantity and the cycle count quantity is within the tolerance percentage then inventory adjustment is allowed immediately and if the difference exceeds the tolerance percentage then the CC Min Tolerance Qty is selected.
Item CC Min Tolerance Qty - This item master setting determines whether an inventory adjustment is allowed immediately or an Audit Count must be performed. If the difference between the system count and cycle count exceeded the cycle count tolerance percent, then RWMS checks to see if the difference between the system count and cycle count is equal to or less than the minimum tolerance unit quantity. If the difference is equal to or less than the minimum unit quantity then RWMS immediately posts an inventory adjustment. If the difference exceeds the minimum unit quantity then RWMS marks that location for an Audit Count and not make an inventory adjustment until the Audit Count is completed.
If the Item CC Tolerance Percentage and Item CC Min Tolerance QTY is not set in the item master, RWMS looks to see if the def_cc_tolerance_pct and def_cc_min_tol_qty are set in the SCP table to determine when to assign an Audit Count. The item and global parameters also work in the same way but the item parameters when defined take priority over the global settings.
Navigate to Inventory Management > Mark for SS Cycle Count Editor. The Mark for SS Cycle Count Editor opens.
Display All Locations
Click Search.
Display a Subset of Locations
If any locations are currently displayed, click Clear.
Click Query.
Enter the search criteria in any of the following fields:
Zone range: In the From and To fields, enter the zone IDs, or click the LOV buttons and select the zones. For proper query results, enter values in both From and To fields.
Location range: In the From and To fields, enter the location IDs, or click the LOV buttons and select the locations. For proper query results, enter values in both From and To fields.
CC Seq range: In the From and To fields, enter the CC sequence numbers, or click the LOV buttons and select the values. For proper query results, enter values in both From and To fields.
Enter the following criteria in conjunction with the range criteria to refine your search: Item ID, Location ID, Item Class, Location Type, Location Class.
Check the Include Already Counted Locations field to include locations that are already counted in the current cycle.
|
Note: If you enter values in more than one search criteria, then only the locations that match all the criteria are listed on the window. |
Click Search. The details of the specified locations are displayed.
Sort Locations
Click the column heading once to sort rows in descending order. Click the column heading again to sort the rows in ascending order.
Mark Locations
Select the Select check box for the location to be marked for SS cycle count.
Click the Select All link to select all the records.
Click the Deselect All link to clear all of the selected records.
|
Note: You cannot select locations that are manually marked and those marked as SS by schedule cycle count batch. |
Click the Mark link to mark the location.
|
Note: The Total Nbr of Location Marked field gets incremented when a location is marked to display the total number of locations marked for SS cycle count. |
Unmark Locations
Select the Select check box for the location to be unmarked for SS cycle count:
Click the Select All link to select all the records.
Click the Deselect All link to clear all of the selected records.
Click the Unmark link to clear the location.
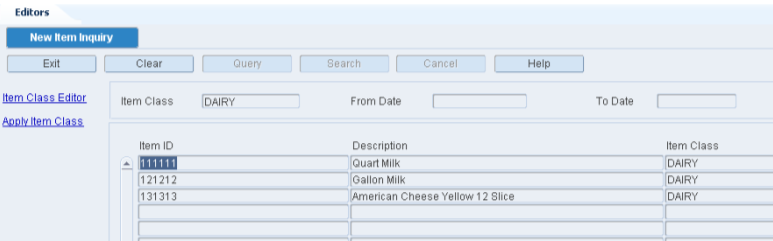
The New Item Inquiry allows you to view any new items that were received from the host system. When an item is received, an item class is automatically applied to the item if the item's attributes and characteristics match the build rules of an existing item class. If it matches more than one item class, then you must apply the appropriate item class to the item. If the item does not match any item class, the Default item class is applied to the item until you choose a more appropriate item class. The item inherits the characteristics, attributes, processes, and equipment classes of the item class.
You can access:
The Item Class Editor window in order to view the details of any item classes or
The Apply Item Class window in order to apply an item class to the item
To view new items, navigate to Inventory Management > New Item Inquiry. The New Item Inquiry window opens.
Display All New Items
Click Search.
Display a Subset of New Items
If any new items are currently displayed, click Clear.
Click Query.
To display new items by item class, enter the ID of the item class in the Item Class field, or click the LOV button and select the item class. To display new items by creation date, enter the range of dates in the From Date and To Date fields, or click the Calendar icon and select the dates.
|
Note: To search for new items on a specific date, enter the same date in both date fields. |
Click Search. The new items that match the search criteria appear.
Exit the New Item Query Window
Click Exit to close the window.
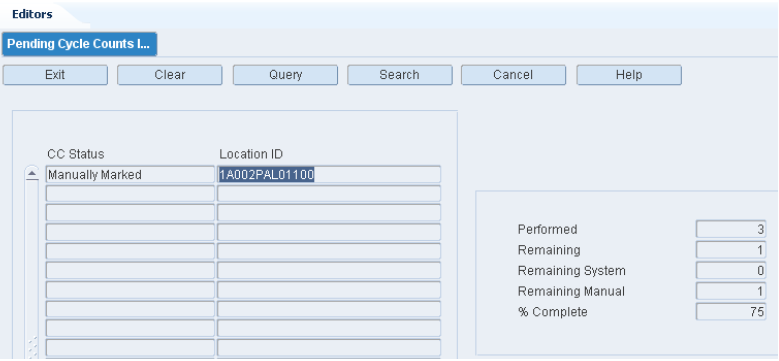
The Pending Cycle Count Inquiry allows you to view which locations are marked for cycle counts. Locations may have been manually marked (MM) or system selected (SS) for cycle counts.
Summary information is also provided, such as the number of cycle counts performed and the number pending. Of the remaining cycle counts, the number of cycle counts that were manually marked and system marked is provided. The percentage of completed cycle counts is calculated for you.
To view pending cycle counts, navigate to Inventory Management > Pending Cycle Counts Inquiry. The pending cycle counts and summary details appear in the Pending Cycle Counts Inquiry window.
Exit the Pending Cycle Count Inquiry Window
Click Exit to close the window.
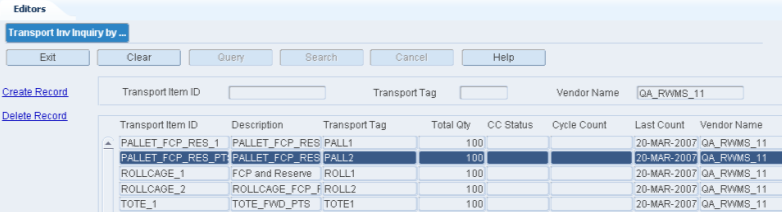
This window allows you to view the current transport asset inventory by item. This editor allows you to add or delete inventory of an existing transport item asset.
To transport inventory by item, navigate to Inventory Management > Transport Inventory Inquiry Item. The Transport Inventory Inquiry by Item window opens.
|
Note: Asset item must be set up on the Transport Asset Editor prior to creating inventory. |
View an Item
If an item is currently displayed, click Clear.
Click Query.
To search for an item by:
Transport Item ID: In the Transport Item ID field, enter the ID of the item, or button and select the item.
Transport: In the Transport field, enter the Transport's ID, or click the LOV button and select the item.
Vendor Name: In the Vendor Name field, enter the name of the vendor, or click the LOV button and select the item.
Asset Type: In the Asset Type field, enter the type in the field, or click the LOV button and select the item.
Click Search. The details for the selected item appear.
Create an Item
|
Note: Asset item must be set up on the Transport Asset Editor prior to creating inventory. |
To create a transport asset item:
Click Create Record. The Create Record window opens.
Enter the Transportation Item ID.
Enter the Description.
|
Note: This is populated once the transport item ID is entered. |
Enter the Quantity.
Click Save.
Click Exit. The Transport Inventory Inquiry by Item window reopens.
Modify an Item
To modify a transport asset item:
Search for an item and double-click it to open the Modify window. The Modify window opens.
Enter the Cycle Count number.
|
Note: If value is entered in the Cycle Count field, saved and is later disapproved, the Cycle Count field is cleared and the Adjustment Qty is set back to 0. There is no adjustment made. |
The Adjustment Qty is calculated based on the difference of the field Quantity and the Cycle Count.
Click Approve. The List of Inv. Adj. Reason Codes window opens.
|
Note: You can also click Save without clicking Approve. In this case, the Adjustment Qty field is updated on the window and there will be no Inv Adjustment Reason Code window opened thus no adjustment is made. The Cycle Count field reflects the quantity that was entered and the window closes. Once the approve is done, then the adjustment is made and the Adjustment Qty will go back to 0. |
Select a reason.
Click OK. The Transport Inventory Inquiry by Item window reopens.
Delete an Item
To delete a transport asset item:
Select a transport asset item.
Click Delete Record.
Exit the Transport Inventory Inquiry by Item Window
Click Exit to close the window.