| Oracle® BPEL Process Manager Developer's Guide 10g (10.1.3.1.0) Part Number B28981-03 |
|
|
View PDF |
| Oracle® BPEL Process Manager Developer's Guide 10g (10.1.3.1.0) Part Number B28981-03 |
|
|
View PDF |
Oracle BPEL Portlets consist of Oracle BPEL Control report portlets and Oracle BPEL Worklist Application portlets. This chapter describes how to deploy the Oracle BPEL Portlets and configure the Oracle Application Server Portal (OracleAS Portal) to provide access to data from these portlets.
This chapter contains the following topics:
Step 1: Installing and Configuring the Required Oracle Application Server Components
Step 4: Defining Portlet Parameters and Accessing Portlet Data Sources
OracleAS Portal is a component of Oracle Application Server used for the development, deployment, administration, and configuration of enterprise class portals. OracleAS Portal enables you to present information from multiple, unrelated data sources in a single organized view. This view, a portal page, can contain one or more components called portlets that can each get their content from different data sources.
A portlet parameter provides a configurable way of passing a value to a portlet. Using portlet parameters, the information displayed in a portlet can be specific to a particular page or user. Portlet parameters are created by the portlet developer and exposed to the page designer through the user interface. After adding a portlet to a page, page designers can assign values to the public portlet parameters to make the information displayed in the portlet specific to the page.
Web providers enable you to deploy portlets to OracleAS Portal. They may reside on the same application server as OracleAS Portal, on a remote application server, or anywhere on the network. Web providers use open standards, such as XML, SOAP, HTTP, or J2EE for deployment, definition, and communication with OracleAS Portal.
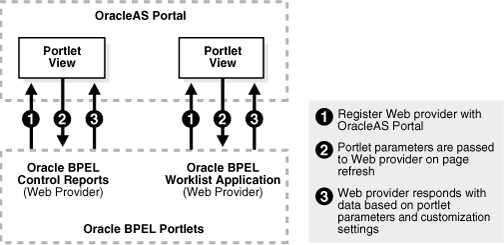
Figure 21-1 provides an overview of this integration.
Figure 21-1 Oracle Application Server Portal and BPEL Process Integration Overview
You can configure OracleAS Portal to access the following portlets:
Oracle BPEL Control reports portlets
Enables you to access instance state, instance execution time, performance, activity sensor, fault sensor, and process time distribution reports that describe the behavior of instances of a selected BPEL process. Oracle BPEL Control reports enable you to:
Receive an overall view of business process instance performance
Analyze data for the BPEL process instances and make critical decisions
Analyze data of the activities that constitute a business process
Identify and debug faults and take appropriate corrective actions
See Also:
The following documentation for additional descriptions of these report types:Oracle BPEL Worklist Application portlets
Enables you to access Oracle BPEL Worklist Application, a Web interface that enables users to access and act on tasks assigned to them. The tasks displayed depend on the user's profile, and the actions allowed depend on the user's privileges. The Oracle BPEL Worklist Application is layered on top of the BPEL worklist service.
See Also:
The following documentation for descriptions of Oracle BPEL Worklist Application portlets and for additional details about Oracle BPEL Worklist Application:Note:
If you install the identity service demo user community and run the workflow service samples shipped with Oracle BPEL Process Manager, you can display data about these users in the Oracle BPEL Worklist Application portlets.See Also:
Oracle BPEL Process Manager Administrator's Guide for details about the demo user communityOracleAS Portal uses Oracle Internet Directory, an LDAP-compliant directory that provides a single repository and administration environment for user accounts. Oracle BPEL Worklist Application also requires the use of Oracle Internet Directory; Oracle BPEL Control does not require this component. Therefore, to use both of these Oracle BPEL Portlets, you must install the following installation types to use OracleAS Portal:
Install the Identity Management and Metadata Repository installation type of Oracle Application Server Infrastructure 10g Release 2 (10.1.2.0.2).
Install Portal and Wireless middle tier 10g Release 2 (10.1.2.0.2).
Install BPEL Process Manager for OracleAS Middle Tier 10.1.3.1.0.
Notes:
OracleAS Portal cannot be configured for use with the BPEL Process Manager for Developers installation type. This is because BPEL Process Manager for Developers does not use Oracle Internet Directory (required by OracleAS Portal).
You must use the 10.1.2.0.2 Portal and Wireless middle tier install type with Oracle BPEL Process Manager 10.1.3.1.0. This middle tier version enables you to view Oracle BPEL Worklist Application portlets from both 10.1.2.0.2 and 10.1.3.1.0.
See Also:
The service configuration chapter of Oracle BPEL Process Manager Administrator's Guide for instructions on configuring Oracle Internet Directory 10.1.2.0.2 with Oracle BPEL Process Manager 10.1.3.1.0Multiple realms are supported in 10.1.3.1.0 through customization of the SOA_Oracle_Home\bpel\system\services\config\is_config.xml file. The is_config.xml file must contain a configuration (realm) that corresponds to the Oracle Internet Directory instance of the portal where the portlets are to be used. Since is_config.xml can be configured to support multiple realms, the wf_client_config.xml file must specify the realm name from is_config.xml that corresponds to the portal Oracle Internet Directory instance.
Use a text editor to open the wf_client_config.xml file located in the same directory as is_config.xml.
Change jazn.com to the realm value you specified in is_config.xml. This value is used for authenticating users coming from OracleAS Portal. For example, if the configuration name for the portal Oracle Internet Directory instance is specified by realm name portalOID in is_config.xml, then the portal realm mapping information in wf_client_config.xml is as follows:
<!-- specifies the mapping for portal realm to is_config realm -->
 <portal>
 <realmMapping>portalOID</realmMapping>
</portal>
See Also:
"Multirealm Support"You must install Oracle BPEL Process Manager and deploy the Oracle BPEL Portlets .ear file. Use one of the following methods to deploy the .ear file:
Follow these procedures to deploy the portlets with the dcmctl utility.
Change directories to the following location:
SOA_Oracle_Home\dcm\bin
Enter the following command to deploy Oracle BPEL Portlets:
dcmctl deployApplication -f SOA_Oracle_Home\bpel\system\services\lib\BPELPortlet.ear -a
BPELPortlet -co OC4J_BPEL -pa orabpel
When deployment completes successfully, a message similar to the following appears:
Application:    bpelportlet
Component Name: OC4J_BPEL
Component Type: OC4J
Instance:       mark.my-pc.us.oracle.com
See Also:
Oracle Application Server Administrator's Guide for additional information about thedcmctl utilityFollow these procedures to deploy the portlets with Oracle Enterprise Manager 10g Application Server Control Console.
Go to the following URL:
http://hostname:port/em
where:
hostname is the name of the host on which Oracle BPEL Process Manager is installed.
port is the number of the Oracle HTTP Server port. The following sources also identify the port number used to access the Oracle Enterprise Manager 10g Application Server Control Console:
The bpelsetupinfo.txt file in the install subdirectory of the Oracle home for your installation
The SOA_Oracle_Home\bpel\utilities\ant-orabpel.properties file.
The following command:
prompt> SOA_Oracle_Home\opmn\bin\opmnctl status -l
Note:
On Windows platforms, you can also start Oracle Enterprise Manager 10g Application Server Control Console from the Start Menu.Enter the following login details when prompted:
| Field | Value |
|---|---|
| Username | Enter oc4jadmin |
| Password | Enter the password you specified during installation for the oc4jadmin user. |
The Oracle Application Server home page appears.
Select the OC4J instance in which Oracle BPEL Process Manager is deployed.
Click the Applications tab.
Click Deploy EAR file.
The Deploy Application window appears.
Enter the following details:
| Field | Description |
|---|---|
| Archive Location | Select the SOA_Oracle_Home\bpel\system\services\lib\BPELPortlet.ear file. |
| Application Name | Enter BPELPortlet |
| Parent Application | Select orabpel |
Click Next.
Enter the following details:
| Field | Description |
|---|---|
| Application Name | Enter BPELPortlet |
| Parent Application | Select orabpel |
| Context Root | Enter BPELPortlet |
Click Next.
The Deployment Settings window appears.
Go to the task Select security provider.
Select Oracle Identity Management from the drop-down list.
The Oracle Internet Directory host and port information automatically appears if the orabpel parent application is configured with Oracle Internet Directory as the security provider.
Click Deploy.
Messages display indicating that deployment is in progress. When complete, the following message appears:
Application "BPELPortlet" was successfully deployed.
Web providers provide portlet data to OracleAS Portal. You must first register the Oracle BPEL Process Manager Web provider with the specific OracleAS Portal instance. This enables you to use the Oracle BPEL Control report portlets and Oracle BPEL Worklist Application portlets in OracleAS Portal pages.
Once you have registered these Web providers, you can access the data provided by the portlets.
Go to the 10.1.2.0.2 OracleAS Portal home page. For example:
http://hostname:port_number/pls/portal
where hostname is the host on which the 10.1.2.0.2 Portal and Wireless middle tier is installed and port_number is typically 7777. If you are unsure, see the setupinfo.txt file in the SOA_Oracle_Home\install directory for your Portal and Wireless installation. You can also access OracleAS Portal from a link on the Oracle Application Server Welcome page.
Log in to the OracleAS Portal instance using the portal user name and ias_admin password. This is the same password that you specified during Portal and Wireless middle tier installation and BPEL Process Manager for OracleAS Middle Tier installation.
Select the Administrator tab, then the Portlets subtab to access the Portal Builder window to register the provider.
Click Register a Provider in the Remote Providers section.
Enter the following details on the Provider Information page:
| Field | Description |
|---|---|
| Name | Enter a unique and recognizable name. |
| Display Name | Enter a name to display on the portlet page header. |
| Timeout | Enter the amount of time a page takes to render if the portlet is not responding. |
| Timeout Message | Enter message to display when a timeout occurs. |
| Implementation Style | Ensure that Web is selected. |
Click Next.
Enter appropriate details on the General Properties page. For the URL of the Web provider, ensure that you enter the following details for Oracle BPEL Process Manager:
http://bpel_host:bpel_port/BPELPortlet/providers
where bpel_host is the host on which Oracle BPEL Process Manager is installed and bpel_port is the port. For BPEL Process Manager for OracleAS Middle Tier installations, the port is typically 7777 or 7778. If you are unsure of the port, see the SOA_Oracle_Home\install\bpelsetupinfo.txt file that was created after BPEL Process Manager for OracleAS Middle Tier installation.
Select Once Per User Session from the Login Frequency list.
Click Next.
Enter your user or group name in the Grantee field of the Control Access page, click Add, and then click Finish. If you are not sure about the user or group name, click the appropriate browse icon.
If provider registration was successful, you receive a success message.
Click OK.
Click Builder, then Build to display the Portal Builder page.
Go to the Page Groups section of the Portal Builder page.
Select the group from the Page Group list. If a page group does not exist, create one.
Click Create a Page and follow the steps that appear.
The new page appears with the display name header you entered when creating the page.
Click the + icon (second icon from the left) to add an instance of the portlet to the page.
The Add Portlets To Region page appears.
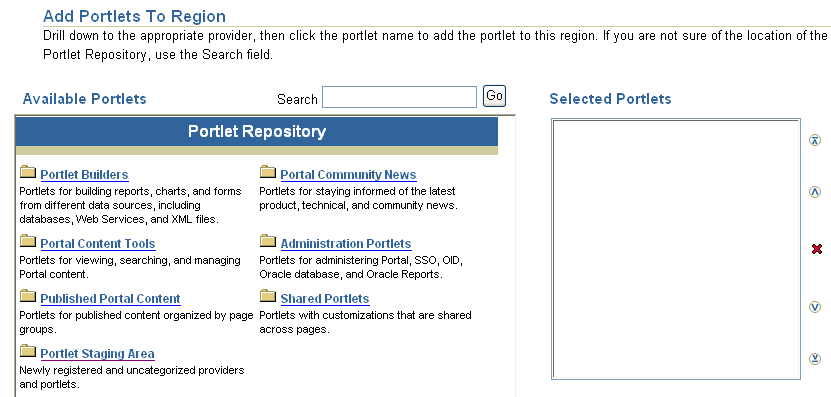
Click Portlet Staging Area in the Portlet Repository section.
Click the portlet you previously created in the Available Portlets section.
This displays the Oracle BPEL Portlets in the Available Portlets section.
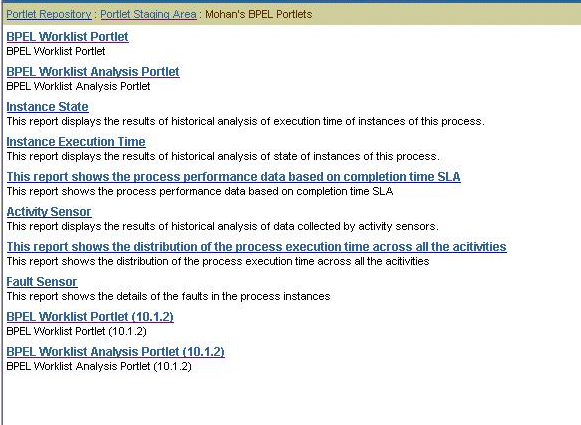
Note:
The following portlet link titles in the Available Portlets section apply to these report types:The portlet link entitled This report shows the process performance data based on completion time SLA applies to performance reports.
The portlet link entitled This report shows the distribution of the process execution time across all the activities applies to process time distribution reports.
You can always change these titles when editing the portlet.
Click the portlets you want.
The selected portlets are added to the Selected Portlets section.
Click OK.
See "Step 4: Defining Portlet Parameters and Accessing Portlet Data Sources" for information on setting portlet properties.
See Also:
See Oracle Application Server Portal User's Guide for additional details about using OracleAS PortalWhen you access a portlet for the first time, some default settings already appear for Oracle BPEL Worklist Application. No default settings appear for Oracle BPEL Control reports. For example, if you selected Instance Execution Time in Step 19, the page appears with the following message.

Click the Edit Defaults icon (first icon on the left above the message) to set the parameter values of the Oracle BPEL Control reports portlets or change the default settings for Oracle BPEL Worklist Application portlets.
See the following section based on your portlet selection in Step 1.
| If You Selected... | Go to Section... |
|---|---|
| Instance State
Instance Execution Time Performance Activity Sensor Process Time Distribution Fault Sensor |
"Defining Oracle BPEL Control Report Portlet Parameters and Accessing Portlet Data Sources" |
| BPEL Worklist Portlet | "Defining Oracle BPEL Worklist Application Portlet Parameters and Accessing Portlet Data Sources" |
Report portlets provide access to Oracle BPEL Control reports that describe the behavior of the instances of a selected BPEL process.
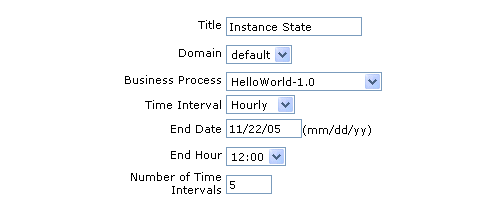
Each of the report portlets must be associated with a specific time period. Table 21-1 describes the parameter values to specify for each report type. This window provides a method for specifying the same parameter values across all report type portlets in a given page.
Enter the following parameter values.
Table 21-1 Oracle BPEL Control Report Portlet Parameters
| Parameter | Description |
|---|---|
| Title | Enter a report title name or accept the default name. The title that appears by default is based upon the type of report you selected in Step 1. |
| Domain | Select the domain in which the BPEL process is deployed. |
| Business Process | Select the BPEL process for which to create reports of its instances. |
| Time Interval | Select Daily, Hourly, or Weekly as the time interval for generating data. |
| End Date | Enter the date at which to stop generating report data. |
| End Hour | Enter the time at which to stop generating report data. |
| Number of Time Intervals | Enter the time period for creating reports. This is the number of days, weeks, or hours (according to the Time Interval list selection) starting from the end date going backwards in time to determine the start date. |
For example, if you enter 7/29/05 as the end date, 22:00 as the end hour, Weekly as the time interval, and 3 as the number of time intervals, the report is created for the three weeks between 7/08/05 at 10 PM and 7/29/05 at 10 PM.
Click Apply to apply your values and click OK to create portlet data.
See the following sections based on the portlet type you selected:
| Portlet | See Section... |
|---|---|
| Instance State | "Instance State" |
| Instance Execution Time | "Instance Execution Time" |
| Performance | "Performance" |
| Activity Sensor | "Activity Sensor" |
| Process Time Distribution | "Process Time Distribution" |
| Fault Sensor | "Fault Sensor" |
The instance state report portlet shown in Figure 21-2 provides details about the number of faulted, completed, and currently running instances of the BPEL process for the selected time period.
Note:
You can edit parameter settings by clicking the Edit icon (first icon on the left above the portlet title bar).The instance execution time report portlet shown in Figure 21-3 provides details about the maximum, minimum, and average execution times aggregated across all closed instances of the business process during the selected time period.
The performance report portlet shown in Figure 21-4 provides aggregated information about the percentage of BPEL process instances that meet the service level agreement (SLA) value associated with a specific BPEL process.
See Also:
"Creating Performance Reports" for a description of the SLA parameter and how to set itThe activity sensor report portlet shown in Figure 21-5 provides details about the activity sensors associated with the BPEL process over a selected time period. This enables you to analyze activity trends. Activity sensor reports show the activity name, sensor name, activity type, aggregated values of the minimum, maximum, and average execution time of the activity, and the number of occurrences of the activity. This report shows activity information only if activity sensors are defined for the BPEL process.
Process time distribution reports enable you to view the distribution of execution times across the activities of BPEL process instances. For example, you may have two activities, one for each loan application company returning a loan offer. You can see which activity is taking the longest amount of time to process the loan offer. You do not need to create sensors in activities to use this report. This report enables you to identify which activities are taking the most time to process.
The fault sensor report portal shown in Figure 21-6 provides details about the data collected by fault sensors associated with a specific BPEL process over the specified time period. This enables you to analyze trends in faults. The report shows the date and time of the fault occurrence, the fault message, the activity in which the fault occurred, and a link to the faulted instance. This report shows activity information only if fault sensors are defined for the BPEL process. For this example, no fault sensor data was found.
These portlets integrate Oracle BPEL Worklist Application with OracleAS Portal. There are two types of portlets:
Listing portlet
Analysis portlet
Details about the parameter values to specify for these portlets are provided below.
See Also:
Chapter 16, "Worklist Application" for additional details about Oracle BPEL Worklist ApplicationThe listing portlet displays a list of tasks that satisfy the data filtering criterion. This portlet provides considerable flexibility in terms of which tasks to display and how to display them.
Figure 21-7 BPEL Worklist Portlet Filter and Display Customization Options
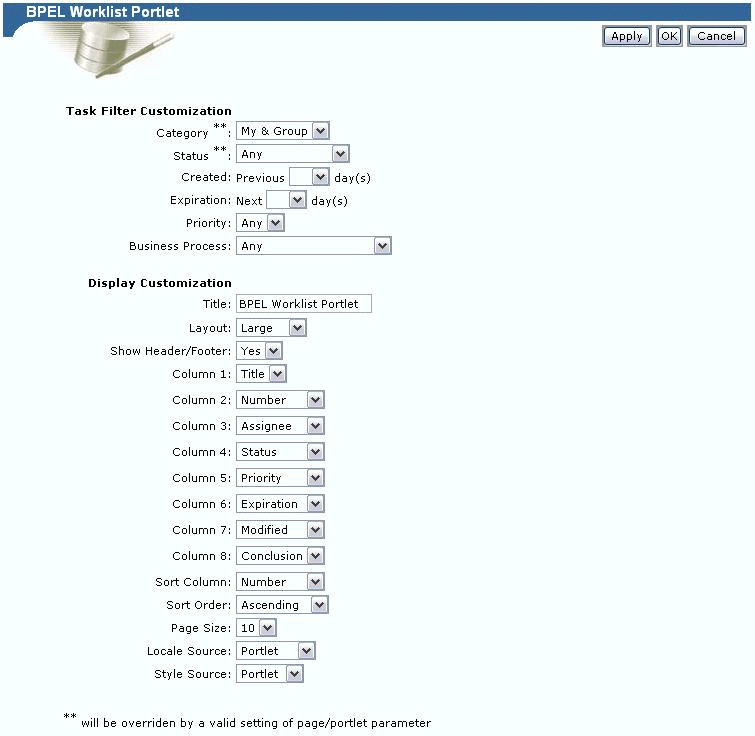
The listing portlet exposes two portlet parameters: Task Category and Task Status. The values for these can be set from the page. If no value is set, then the default values of My & Group and Any are used. Figure 21-8 shows the Page Parameter Properties page where these default values are set. See "Step 5: Mapping Portlet Parameters with Page Parameters" for instructions on editing this page.
The portlet task filter and display customization options shown in Figure 21-7 are described in Table 21-2. The first part provides data filter customization options and the second part provides display customization options.
Enter the following parameter values.
Table 21-2 BPEL Worklist Portlet Task Filter and Display Customization Options
| Parameter | Description |
|---|---|
| Task Filter Customization | |
|
Select one of the following:
|
|
Select the status state: Assigned, Completed, Errored, Expired, Withdrawn, Suspended, and Any. |
|
Select the previous x days: (leave blank (that is, no restriction), 1 day, 7 days, 14 days, and 30 days). |
|
Select the next x days: (leave blank (that is, no restriction), 1 day, 7 days, 14 days, and 30 days). |
|
Select from Any or 1 through 5, where 1 is the highest priority. |
|
Select one of the deployed business processes or Any. |
| Display Customization | |
|
Select the portlet title. |
|
Select the size of the portlet as a ratio of the maximum size (Small, Medium, Large, or Full). |
|
Set this flag to Yes (default option) if the header (category and user name) and footer (page generation time) are to be displayed. |
|
Select the columns to display and the order in which to display them. There can be up to eight columns: Title, Number, Assignee, Status, Priority, Expiration, Last Modified, Created, Conclusion, Last Modifier, Creator, Acquirer, Task Key, and Business Process. Note that the first column is always Title. |
|
Select the order in which to sort and display the following columns: Title, Number, Priority, Expiration, Conclusion, Last Modified, and Last Modifier. |
|
Select Ascending or Descending. |
|
Select 5, 10, 20, or 50 |
|
Select the locale for the portlet based on the specified source: Portlet (resolved from the browser and set language portlet) or Directory Service. |
|
Select the style (background color, font color, and font style) for the portlet based on the specified source: Portlet (based on page style used in the portal page) or Default (Oracle BPEL Control or Oracle BPEL Worklist Application style). |
Click Apply to apply your values and click OK to create portlet data.
Figure 21-9 shows the task listing portlet for 10.1.2.0.2 and Figure 21-10 shows the task listing portlet for 10.1.3. The category of tasks and the current user name displays at the top. The table displays the columns chosen in the Display Customization options described in Table 21-2. The actual set of tasks that display depends on the Task Filter Customization options chosen in Table 21-2. The title column contains a link for clicking down into the worklist application for the task details. Paging information and the last page refreshed time are displayed at the bottom.
Figure 21-11 shows the 10.1.2.0.2 worklist application that you access by clicking a task entry under the Title column in Figure 21-9. The worklist application recognizes that the user is clicking down from the portlet and sets the header information and home link accordingly. The search option is skipped and the home link points back to the portal page. All other behavior is the same as if the user had logged into the worklist application. If you click a 10.1.3 task entry under the Title column in Figure 21-10, a similar worklist application appears.
Figure 21-12 shows the analysis listing portlet. The analysis portlet provides a status breakdown chart based on the category of tasks chosen and other filter options. It also provides the ability to group the results based on the assignee, business process, or the creator of tasks. The Listing Portlet exposes a portlet parameter for Task Category. The value for this can be set from the page. If no value is set, then the default value of My & Group is used. Figure 21-8 shows the Page Parameter Properties page where this default value is set. See "Step 5: Mapping Portlet Parameters with Page Parameters" for instructions on editing this page.
Figure 21-12 BPEL Worklist Analysis Portlet Filter and Display Customization Options
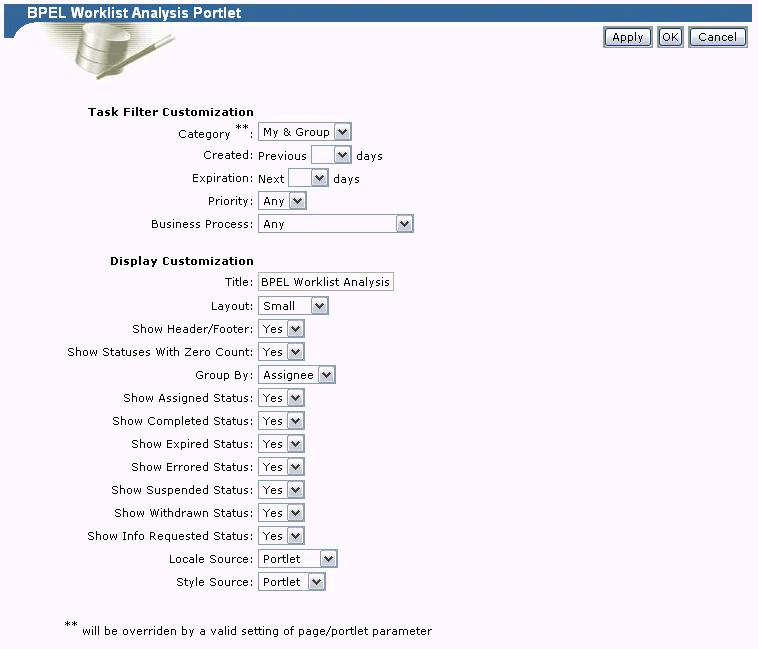
Table 21-3 shows the analysis portlet task filter and display customization options. The first part provides data filter customization options and the second part provides display customization options.
Enter the following parameter values.
Table 21-3 BPEL Worklist Analysis Portlet Filter and Display Customization Options
| Parameter | Description |
|---|---|
| Task Filter Customization | |
|
Select one of the following:
|
|
Select the previous x days: (leave blank (that is, no restriction), 1 day, 7 days, 14 days, and 30 days). |
|
Select the next x days: (leave blank (that is, no restriction), 1 day, 7 days, 14 days, and 30 days). |
|
Select from Any or 1 through 5, where 1 is the highest priority. |
|
Select one of the deployed business processes or Any. |
| Display Customization | |
|
Select the portlet title. |
|
Select the size of the portlet as a ratio of the maximum size (Small, Medium, Large, or Full). |
|
Set this flag to Yes (default option) if the header (category and user name) and footer (page generation time) are to be displayed. |
|
Select Yes to compact the portlet by skipping statuses for which there are no qualifying tasks |
|
Select to group by Assignee, Business Process, Creator, or All (status summary of all tasks). |
|
Select only those statuses you want to see: Assigned, Completed, Expired, Errored, Suspended, Withdrawn, and Requested. |
|
Select the locale for the portlet based on the specified source: Portlet (resolved from the browser and set language portlet) or Directory Service. |
|
Select the style (background color, font color, and font style) for the portlet based on the specified source: Portlet (based on page style used in the portal page) or Default (Oracle BPEL Control or Oracle BPEL Worklist Application style). |
Click OK.
Figure 21-13 shows the analysis portlet for 10.1.2.0.2 and Figure 21-14 shows the analysis portlet for 10.1.3. The category of tasks and the current user name display at the top. The table displays the group by column, the corresponding statuses, and count. If there are multiple assignees (reportee category, for example), the status breakdown is repeated for each assignee. If the business process is chosen as the Group By column, the status breakdown is repeated for each deployed business process. The last page refreshed time displays at the bottom.
Time-related properties of the portlets are also exposed as parameters and can be mapped to page parameters. This enables you to override the parameter values you set:
In Step 1 of "Defining Oracle BPEL Control Report Portlet Parameters and Accessing Portlet Data Sources"
In Step 1 of "Listing Portlet Customization" and Step 1 of "Analysis Portlet Customization"
Click Page: Properties at the top of a report portlet. For this example, the Instance State report of the Oracle BPEL Control reports portlets is shown.
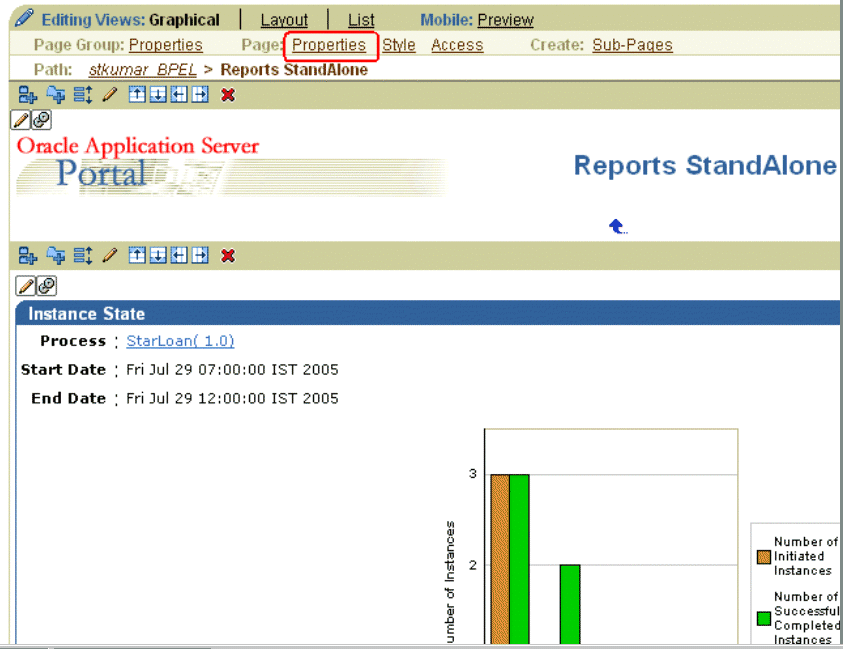
The Edit page appears.
Click the Parameters tab.
If the Parameters tab does not display, return to the portlet reports page shown in Step 1 to enable it.
Click Page Group: Properties at the top of the report portlet.
Click the Configure tab.
The Edit Page Group page appears.
Click Edit in the Parameters and Events section.

Select Enable Parameters and Events.
Click OK.
Return to the Edit page shown in Step 1.
Click the Page: Properties tab.
Click the Parameters tab on the Edit page.
Add the page parameters and map the page parameters to the portlet parameters.
For Oracle BPEL Control reports portlets, the following page parameter properties are available:
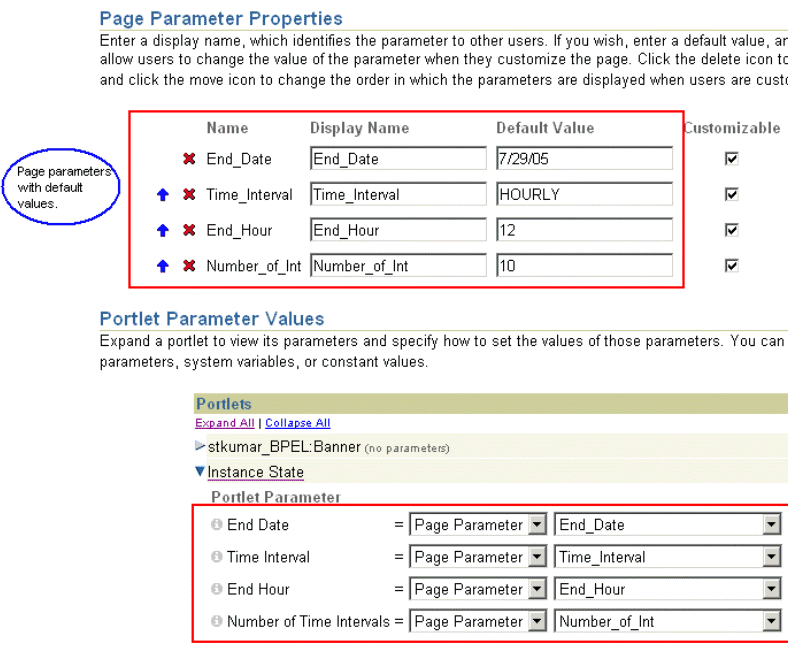
For Oracle BPEL Worklist Application portlets, the following page parameter properties are available:
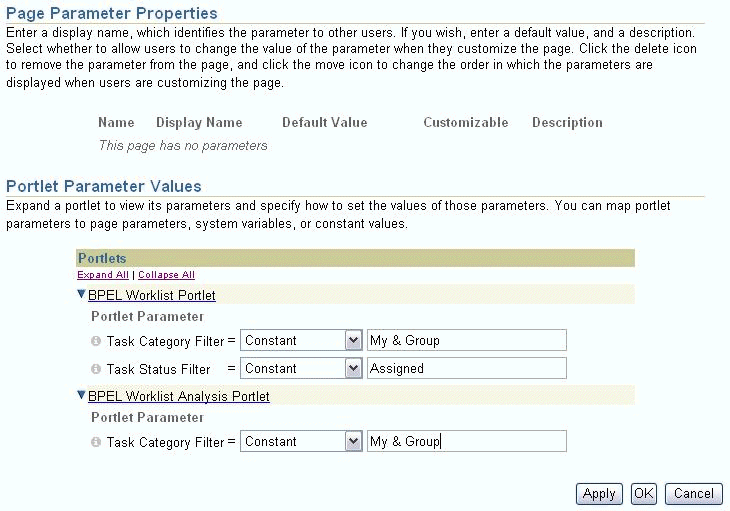
When you save these changes, the portlet picks up the property values from the page parameters instead of the ones set during the edit process.