| Oracle® WebCenter Framework Tutorial 10g (10.1.3.2.0) Part Number B31072-02 |
|
|
View PDF |
| Oracle® WebCenter Framework Tutorial 10g (10.1.3.2.0) Part Number B31072-02 |
|
|
View PDF |
In this lesson you'll learn how to secure the pages of a WebCenter application using Oracle ADF security. Figure 8-1 shows you what the tutorial application will look like at the end of the lesson.
Figure 8-1 Your Pages at the End of Lesson 8
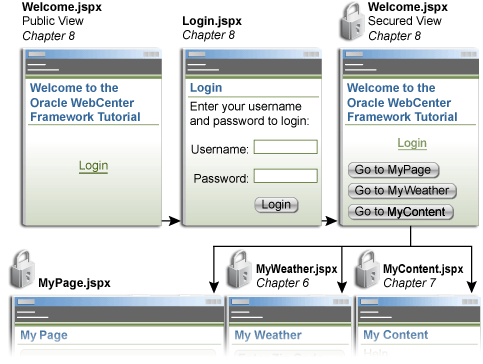
In this chapter you'll authenticate users against the lightweight XML resource provider system-jazn-data.xml supplied with the embedded OC4J. Before starting these exercises, you'll need to add the following user data to this file:
| Role Name | Users | Description |
|---|---|---|
| page-viewer | Singh | This user may view secured pages. |
| page-personalizer | Cho | This user may personalize portlets on a secured page. |
| page-customizer | Harvey | This user may customize secured pages. |
| restricted-user | King | This user may not view secured pages. |
| users | Singh, Cho, King, Harvey, JtaAdmin, oc4jadmin | The users role maintains a list of every valid user. |
Do one of the following:
Copy the sample system-jazn-data.xml to the JDeveloper locations described in Chapter 2 Copying the Sample system-jazn-data.xml File. The sample contains all the user data required to complete this chapter.
Add the user data from scratch, following instructions in Appendix A, "How to Set Up the Tutorial Identity Store".
Use this method if you are already building secure applications with JDeveloper and have populated system-jazn-data.xml with user data of your own.
Once you've completed this preliminary step, you're ready to move on to the actual authentication work for your application.
In this step you'll create a login page that accepts user credentials and allows access to secured pages (Figure 8-2). Even non-authenticated users will be able to see this page.
In the Applications Navigator, right-click ViewController, and select New.
In the categories pane, under Web Tier, click JSP.
We've chosen to implement the login page as a standard JSP rather than a JavaServer Faces (JSF) page to bypass the complexity of the Faces Page Lifecycle. In other applications the login page may require more advanced features such as skinning or portlets and you can find more information about Faces-based login pages in the Oracle WebCenter Framework Developer's Guide.
Under Items, click JSP, and then OK.
Click Next to skip the Welcome page.
In the File Name field, enter: Login.jspx
For Type, select JSP Document (*.jspx).
This creates an XML representation of a JSP page (.jspx). You could create the login page as a JSP page in other applications, if you wish.
Click Next, and then Next again to skip the error page options.
Make no selection on the Tag Libraries page. If necessary, use the double arrows on the Tag Libraries page to remove any libraries from the Selected Libraries pane.
Click Next.
Click Finish to display Login.jspx.
Click the Source tab.
Let's add some code to the body tags that will display a login form.
Replace the empty body tags <body></body> with the code shown in Example 8-1.
Example 8-1 Login Form Code
<body>
     <h1>Login</h1>
     <p>Enter your user name and password to log in:</p>
     <form action='j_security_check' method='post'>
        <table align="center">
          <tr> <td>Name:</td>
            <td> <input type='text' name='j_username'></input> </td>
          </tr>
          <tr>
            <td>Password:</td>
            <td> <input type='password' name='j_password' size='8'></input> </td>
          </tr>
          <tr> <td></td>
            <td> <input type='submit' value='Login'></input> </td>
          </tr>
        </table>
        <br></br>
      </form>
  </body>
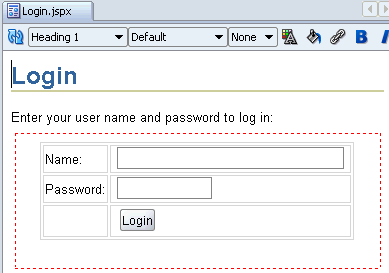
Click the Design tab to view the login form (Figure 8-4).
The login page uses the standard J2EE security container login method j_security_check to validate user credentials. This security check method appears on the <form> element. The form itself contains two input fields, one to accept the user name and the other for the password. Values entered into these fields get assigned to the container's login bean attributes j_username and j_password, respectively.
| Login Form | Name/Value |
|---|---|
| Form Action | j_security_check |
| Name (Text Field) | j_username |
| Password (Text Field) | j_password |
| Login (Submit Button) | submit |
Now, let's apply a style sheet to the login page. From the Components Palette pulldown menu, choose CSS.
Drag JDeveloper, and drop it on the page.
The login page refreshes with the new style sheet applied as shown in Figure 8-4.
Figure 8-4 Login.jspx With JDeveloper Style Sheet
Let's run Login.jspx to see the page in a browser.
Click the Save All icon in the JDeveloper toolbar.
Right-click Login.jspx, and select Run.
When the page appears in your browser you should see the login form shown in Figure 8-5.
Close the browser, and return to JDeveloper.
Now let's set Oracle ADF Security options for the tutorial application.
In this step you'll use the Oracle ADF Security Wizard to configure authentication settings for the tutorial application. The options that you select are recorded in web.xml or orion-application.xml. Here's a quick overview of what you'll do:
Choose the lightweight XML resource provider for user authentication.
Specify the protocol for authentication as Form-Based.
Grant authenticated users (ValidUsers) access to the adfAuthentication servlet.
You'll find more information in Oracle WebCenter Framework Developer's Guide.
Let's start the ADF Security Wizard now:
In the Applications Navigator, select ViewController.
From the Tools menu, choose ADF Security Wizard.
The ADF Security wizard will guide you through the configuration process.
Click Next to skip the Welcome page.
Select Enforce Authorization as shown in Figure 8-6.
This option configures ADF Security functionality by configuring the adfAuthentication servlet used for authentication and other servlets and filters required to enforce authorization policies (the filters enforce for the checking of the current user's permissions for the requested page).
Figure 8-6 ADF Security Wizard - Enabling Authentication
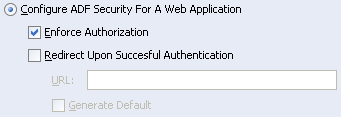
If you want users logging into your application to see a particular page after authentication, you would choose Redirect After Successful Authentication and name the required page. However, you're not going to configure the tutorial application like this. Instead, you'll use the default behavior, which sends authenticated users back to the page they tried to access prior to authentication.
Click Next to move on to the next page of the wizard.
Choose Lightweight XML Provider (Figure 8-7).
Figure 8-7 ADF Security Wizard - Choosing a JAAS Provider

Oracle ADF Security authenticates users against a given resource provider. For this tutorial you'll use the lightweight resource provider system-jazn-data.xml that you set up at the beginning of the lesson.
Click Next to display the next page of the wizard.
Set JAAS Mode to doAsPrivileged (Figure 8-8).
Oracle ADF Security requires this option to be set.
Figure 8-8 ADF Security Wizard - Configuring XML Settings

The default realm is jazn.com. Note that for this release, Oracle ADF security only reads permissions at the system-level (JAZN file) and not at the application-level.
Click Next.
On the Login page, choose Form-Based Authentication as shown in Figure 8-9. This specifies that the tutorial application will use a form to facilitate authentication.
There is no need to generate default pages for the login form and login error message (login.html and error.html) because you'll be using the login form in Login.jspx.
For Login Page, enter: Login.jspx
For Error Page, you can also enter: Login.jspx
Figure 8-9 ADF Security Wizard - Configuring Form-Based Authentication

Although it's fairly simple to create a separate error page, for this tutorial you'll use the same page. If you do want to create an error page (say, LoginError.jspx), create a page that is identical to Login.jspx and add an error message that indicates authentication failure.
Click Next to display the final page of the wizard - Resources (Figure 8-10).
This page defines resources within your application that should be secured, and specifies which J2EE security roles can access each resource.
Figure 8-10 ADF Security Wizard - Securing the adfAuthentication Servlet
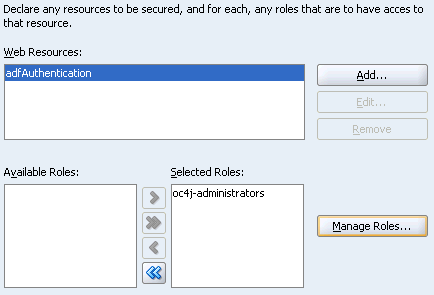
The adfAuthentication resource (the authentication servlet) is defined for you. This servlet acts as a known endpoint for a login URL. As the servlet itself is secured by a J2EE security constraint, it causes a redirect to the login page when a user attempts to access it without a current active session.
You cannot edit or delete this resource, but you can specify the set of roles that may access this resource.
To allow any valid user access to the adfAuthentication resource, you'll need to create a J2EE role, which you'll name ValidUsers, and grant access to this role. Let's do that now.
Click Manage Roles.
Click Add, and enter the name ValidUsers (Figure 8-11).
Later on, you'll map this J2EE role to an identity store role named users (defined in system-jazn-data.xml, the resource provider that you set up at the beginning of the lesson). The users role maintains a list of every valid user.
From a security perspective, allocating permissions to this role effectively defines an authenticated Public resource. That is, it would be available to all users without needing a specific permission to be defined.
Figure 8-11 ADF Security Wizard - Adding a J2EE Security Role
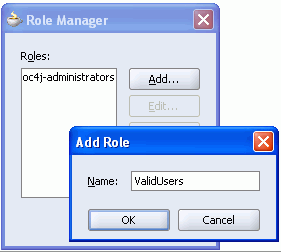
Click OK.
Click Close.
The ValidUsers role should appear in the list of Available Roles.
Click the double arrow (Add All) to move everything in the Available Roles list to the Selected Roles list (Figure 8-12).
Figure 8-12 ADF Security Wizard - Granting Access to the adfAuthentication Resource
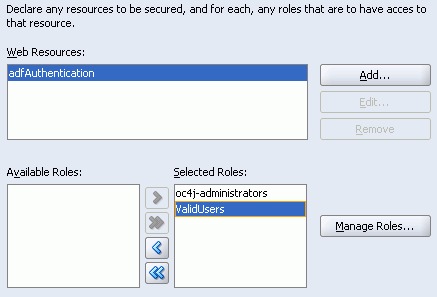
This completes the ADF Security wizard settings.
Click Next, and then Finish.
Click the Save All icon in the JDeveloper toolbar.
Before going on to the next step of this tutorial, take a look at the changes you've just made to web.xml and orion-application.xml. You'll find these files in the Applications Navigator, under:
ViewController, Web Content, WEB-INF, web.xml
ViewController, Application Sources, META-INF, orion-application.xml
Double-click the file name to display the file in the XML Editor.
Tip:
You can expand any tab to fill the JDeveloper window by double-clicking the tab. Double-clicking again, toggles the feature off.One way to review file changes is through the History Tool. If you click the History tab, you'll see the additions highlighted down the right-hand side. You can click change highlights individually or use the Go to Next Difference icon to scroll through the additions one by one. You'll find more information about these entries in the Security Chapter of the Oracle WebCenter Framework Developer's Guide.
Now let's create a welcome page for the tutorial application.
In this step you'll create a welcome page, which will serve as the starting page for the tutorial application. When non-authenticated users display the welcome page, they'll see a simple login link that directs them to a login page for authentication. This is the public view of the page (Figure 8-13).
Figure 8-13 Your Welcome Page - Public View

Authenticated users will see different information on the welcome page. After logging in, authenticated users get redirected back to the welcome page, but this time they'll see links to secured pages and a logout link as shown in Figure 8-14.
Let's create the welcome page now:
In the Applications Navigator, right-click ViewController, and select New.
In the categories pane, under Web Tier, click JSF to create a Java Server Faces page.
Under Items, click JSF JSP and click OK.
Click Next to skip the Welcome page.
In the File Name field, enter: Welcome.jspx
For Type, make sure JSP Document (*.jspx) is selected and then click Next.
You'll be adding some back end logic to this page, so you'll need managed bean. Click the radio button Automatically Expose UI Components in a New Managed Bean.
You can keep the defaults provided for Name, Class, and Package.
Click Next.
Ensure that the following libraries are in the Selected Libraries pane:
ADF Faces Components 10_1_3_2_0
ADF Faces HTML 10_1_3_2_0
ADF Portlet Components 10_1_3_2_0
Customizable Components Core 10_1_3_2
JSF Core 1.0
JSF HTML 1.0
Click Next.
Earlier, we applied the JDeveloper style sheet to the login page. Let's apply the JDeveloper style sheet to the welcome page too. Click Add, double-click the css folder, and then choose jdeveloper.css.
Click Finish.
An empty page named Welcome.jspx displays in Design view.
Let's use an ADF Faces PanelPage component to present content on the welcome page:
From the Components Palette pulldown, choose ADF Faces Core.
Select the PanelPage option, and then drag and drop it on to the page. Use the Structure window to verify that the PanelPage component gets placed inside the h:form tag, as shown in Figure 8-15.
Figure 8-15 Welcome.jspx - ADF Faces panelPage Component
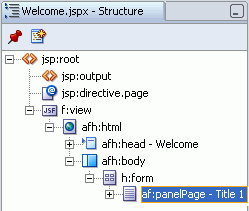
In the Structure window, double-click af:panelPage - Title1 to display the PanelPage Properties dialog.
For the Title, enter: Welcome to the Oracle WebCenter Framework Tutorial
Click OK.
Now your welcome page should look something like Figure 8-16. You don't need to set any other af:panelPage properties for this tutorial.
Figure 8-16 Welcome.jspx with New panelPage Title
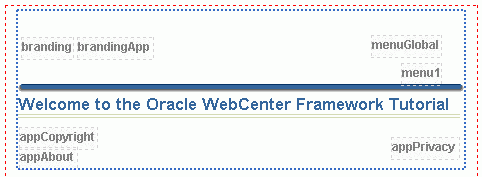
Now lets's add some Login/Logout links to the area named menuGlobal—one of the PanelPage facets.
You'll use an af:goLink, another ADF Faces Core component, for the login link:
From the Component Palette pulldown, choose ADF Faces Core.
Select the GoLink option, and then drag and drop it on top of the area named menuGlobal in the top right-hand corner. Use the Structure window to verify that it is placed inside the menuGlobal facet as shown in Figure 8-17.
Figure 8-17 Welcome.jspx - ADF Faces GoLink Component
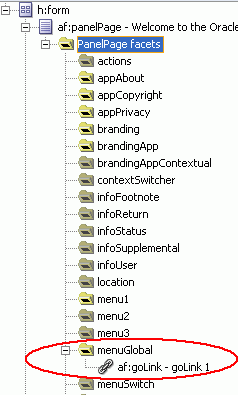
In the Structure window, double-click af:goLink - goLink1 to display its Properties dialog.
For the link Text, enter: Login
In the Destination field, enter:
/adfAuthentication?success_url=faces/Welcome.jspx
The adfAuthentication servlet will prompt users to login. The parameter success_url specifies which page to display after a successful login, which for this tutorial will be the Welcome page.
Click OK.
You should see a Login hyperlink like the one in Figure 8-18.
Figure 8-18 Login Link on the Welcome Page
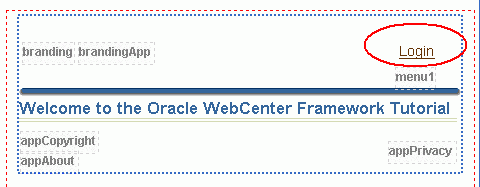
The page content you see now (Figure 8-18) is the public view of the Welcome page. A little bit later on you'll add some page navigation buttons but you'll add some code that will hide them from unauthenticated users.
Similarly, you'll need to add some code that will hide the Login link from authenticated users. Clearly, there is no need to display a login link to users who are already logged in! So let's add a backing bean that determines whether the current user is authenticated and bind it to the login link.
First, double-click Welcome.java to open the file in the Editor.
You'll find this file under ViewController, Application Sources, view.backing.
Add some code that determines whether or not the current user is logged in, see highlighted code shown in Figure 8-19.
You can copy and paste the bold code shown here to the appropriate section of Welcome.java:
package view.backing;

import javax.faces.component.html.HtmlForm;

import oracle.adf.share.ADFContext;
import oracle.adf.view.faces.component.core.layout.CorePanelPage;
import ...

public class Welcome {
 ...
 private CoreGoLink goLink1;
 private boolean authenticated;
 ...

 public CoreGoLink getGoLink1()
  {return goLink1;
  }
 public boolean isAuthenticated()
  {
  authenticated=ADFContext.getCurrent().getSecurityContext().isAuthenticated();
  return authenticated;
  }
}
The boolean property of the backing bean is TRUE if the current user is logged in and FALSE if he is not. You can use this property to show/hide the links on the Welcome page based on whether the user is logged in.
Before moving on, let's check that the updates to Welcome.java compile correctly. Right-click Welcome.java, and choose Make.
You should see a Successful compilation message in the Messages Log window.
Now bind this code to the Login link. Remember, we want to display the Login link to unauthenticated users only:
In the Applications Navigator, double-click Welcome.jspx to display the page in the Visual Editor.
In the Structure window, double-click af:goLink - Login to open the GoLink Properties dialog.
Click the Advanced Properties tab, and select the Rendered property.
Click the Bind to Data icon in the toolbar (see Figure 8-20).
Figure 8-20 Command Button Rendered Property
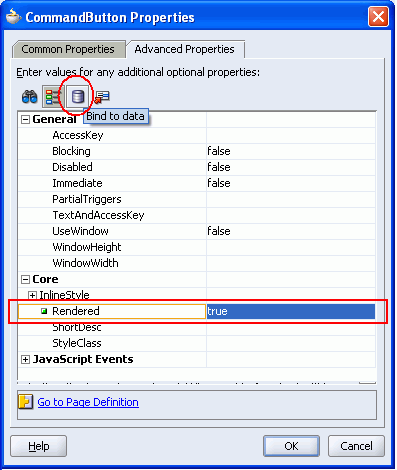
Expand JSF Managed Beans and drill into the backing bean for the Welcome page backing_Welcome. You should see the authenticated attribute listed here.
Double-click authenticated. The expression #{backing_Welcome.authenticated} should appear in the Expression field.
We want to display a Login link to users who are not authenticated. The Authenticated property will be TRUE if the user is logged in, so you must negate the expression to show the link only when the user is not logged in. Add the ! operator to the expression like this: #{!backing_Welcome.authenticated}
Click OK.
The Rendered property should now display the expression #{!backing_Welcome.authenticated}.
Click OK again to close the GoLink Properties dialog.
Now let's add a logout link that's displayed only to authenticated users:
From the Component Palette pull-down, choose ADF Faces Core.
Select the GoLink option, and then drag and drop it below the Login link (inside the menuGlobal facet). You can use the Structure window to verify this.
In the Structure window, double-click af:goLink - goLink 1 to open the GoLink Properties dialog.
For the link Text, enter: Logout
In the Destination field, enter:
/adfAuthentication?logout=true&end_url=faces/Welcome.jspx
The adfAuthentication servlet will prompt users to log out and the parameter end_url specifies which page to display once the user is logged out.
Now let's hide the Logout link from unauthenticated users. Click the Advanced Properties tab, and select the Rendered property.
Click the Bind to Data icon in the toolbar.
To display this link to authenticated users, enter into the expression field:
#{backing_Welcome.authenticated}
Click OK.
Click OK again to close the properties dialog.
You should see a Logout hyperlink on the Welcome page (Figure 8-21).
Finally, let's add some command buttons to the Welcome page that allow authenticated users to navigate to the pages in your tutorial (MyPage.jspx, MyWeather.jspx, and MyContent.jspx).
Let's use an ADF Faces panelGroup component to accommodate the page navigation buttons. With this component you can arrange the content horizontally or vertically.
From the Component Palette pulldown, choose ADF Faces Core.
Select the PanelGroup option, and then drag and drop it on top of the af:panelPage component. Again, use the Structure window to verify that it is placed inside the af:panelPage tag as shown in Figure 8-22.
Figure 8-22 Welcome.jspx - ADF Faces PanelGroup Component
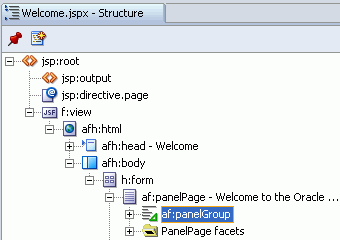
In the Structure window, double-click af:panelGroup to display its Properties dialog.
For Layout, choose horizontal.
Click OK.
You should see an empty panel under the page title (Figure 8-23).
Figure 8-23 Welcome.jspx - Empty panelGroup Component
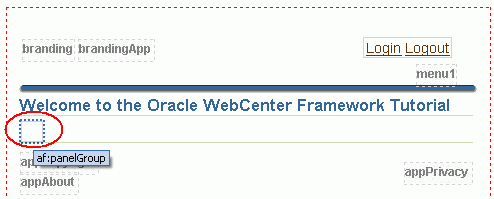
Before you can add a command button that navigates from Welcome.jspx and to MyPage.jspx, you'll need to create a JSF navigation rule between the two pages. Then you may drop an ADF command button onto the page, and add some button code that ensures the button displays to authorized users only.
First, let's define the navigation rule between Welcome.jspx and MyPage.jspx. You do this in the configuration file faces-config.xml. In the Applications Navigator, double-click faces-config.xml (under ViewController, Web Content, WEB-INF).
Click the Diagram tab.
Drag Welcome.jspx from the Applications Navigator to the empty diagram, and then do the same for MyPage.jspx (Figure 8-24).
Notice that the Component Palette automatically displays the JSF Navigation Modeler components.
From the Component Palette, choose JSF Navigation Case to activate it. You'll use this component to add a navigation rule.
On the diagram, click the icon for the source page (Welcome.jspx) and then click the icon for the destination page (MyPage.jspx).
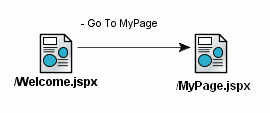
JDeveloper draws the navigation rule on the diagram as a solid line ending with an arrow between the two pages,
By default, the link outcome says -success. Click this text, and change it to something more explanatory, like Go To MyPage (Figure 8-25).
Figure 8-25 JSF Navigation Diagram With Rule
Now let's follow similar steps to create a navigation rule from MyPage.jspx to Welcome.jspx. First, choose JSF Navigation Case from the Component Palette. Next, click MyPage.jspx (on the diagram) followed by Welcome.jspx. Finally, click the default -success text and change it to Go To Welcome Page (Figure 8-26).
Figure 8-26 JSF Navigation Diagram With Two Rules

Now that navigation rules exist between the two pages, you can add a Command button on the Welcome page for user navigation to MyPage.
In the Applications Navigator, double-click Welcome.jspx to display it in the Visual Editor.
Choose ADF Faces Core from the Component Palette pulldown menu.
Select the CommandButton option, and then drag and drop it on top of af:panelGroup. You can use the Structure window to verify this.
Right-click the new button (commandButton 1), and then choose Properties.
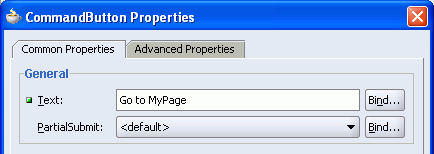
For the button Text, enter Go To MyPage as shown in Figure 8-27, and click OK.
Figure 8-27 Welcome Page.jspx - Configuring Page Navigation Button
You define what the button actually does through the button's Action property. You'll need to display the Property Inspector to do this, so select View, Property Inspector from the JDeveloper menu.
In the Property Inspector, select Action, and then choose Go To MyPage from the drop down list.
Now, let's hide the button from unauthenticated users—just like you did for the Logout link. In addition, we'll add some code that will hide the button if the logged-in user is not authorized to view MyPage.jspx. This time we'll use the Property Inspector to enter the expression.
Select the Rendered property. In the Property Inspector, this property is located under the Core section.
Now click the Bind to data icon in the Inspector's toolbar.
Enter the expression: #{backing_Welcome.authenticated && bindings.permissionInfo['MyPagePageDef'].allowsView}
Check there are no extra spaces at the beginning or end of this expression.
Click OK.
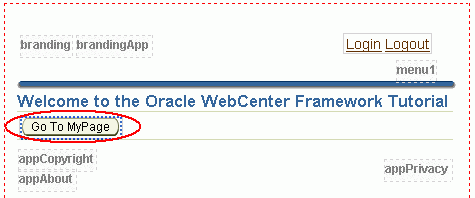
In JDeveloper, your Welcome page should look like Figure 8-28.
Figure 8-28 MyPage Navigation Button on Welcome Page
Now add two more buttons to the Welcome page that will enable authorized user navigation to MyWeather.jspx and MyContent.jspx. Repeat step 21 very carefully.
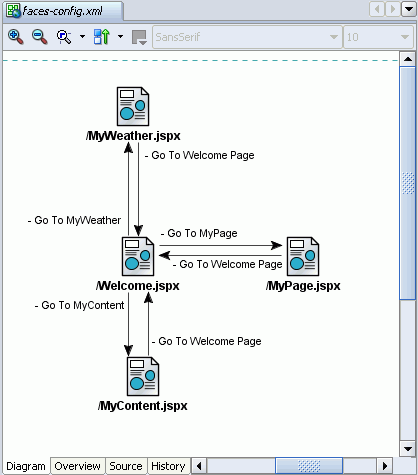
First, add MyWeather.jspx and MyContent.jspx to the navigation diagram. When complete, check that your navigation diagram looks similar to Figure 8-29.
Figure 8-29 Completed JSF Navigation Diagram
Now, add two more navigation buttons to Welcome.jspx, and set the button Text, Action, and Rendered properties.
When you edit the Text, Action, and Rendered properties for these navigation buttons, remember to substitute the appropriate page names (as shown in Table 8-1) and check for extra spaces at the beginning/end of the Rendered expression.
Table 8-1 Command Button Properties
| Button Text | Action | Rendered |
|---|---|---|
|
Go To MyWeather |
Go To MyWeather |
#{backing_Welcome.authenticated && bindings.permissionInfo['MyWeatherPageDef'].allowsView} |
|
Go To MyContent |
Go To MyContent |
#{backing_Welcome.authenticated && bindings.permissionInfo['MyContentPageDef'].allowsView} |
Your Welcome page should look something like Figure 8-30.
Click the Save All icon in the JDeveloper toolbar.
Let's run the Welcome page to see whether the links and buttons you've just added display as expected.
Right-click Welcome.jspx, and choose Run.
In the browser, you should see the Welcome page with a Login link as shown in Figure 8-31. Without authentication, the logout link and page navigation buttons should not display.
If your page does not look like this, check the Rendered expression for any links or buttons which do not display as expected.
Close the browser, and return to JDeveloper.
In the next step you'll authorize access privileges for each page in your application (Welcome.jspx, MyPage.jspx, MyWeather.jspx, and MyContent.jspx).
In this step you'll secure (restrict access to) the pages in this tutorial application: Welcome.jspx, MyPage.jspx, MyWeather.jspx, MyContent.jpsx. You'll restrict page access to the role members defined in the identity store (see Prerequisites) and dictate the actions that role members can perform on the page. Secured pages also need logout links, so you'll add logout links at the top of each page too.
Let's start with the Welcome page. This page already has a logout link, but you still need to authorize access to the page and grant permissable actions. This configuration takes place in the page's definition file (WelcomePageDef.xml). Let's get started.
Right-click Welcome.jspx in the Applications Navigator.
Choose Go to Page Definition.
If the Page Definition doesn't exist yet, click Yes to create one for Welcome.jspx.
In the Structure window, right-click WelcomePageDef, and choose Edit Authorization.
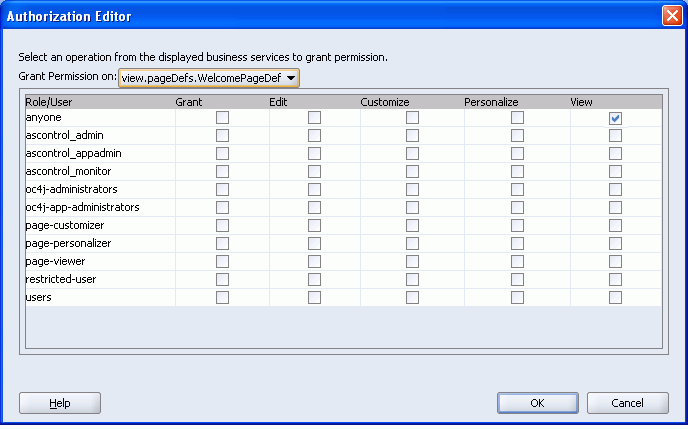
The Authorization Editor should list the identity store roles shown in Figure 8-32. If these roles do not display, check you've copied the file system-jazn-data.xml from the embedded OC4J directory JDEVHOME\jdev\system\oracle.j2ee.10.1.3.xx.xx\embedded-oc4j\config to the directory JDEVHOME\j2ee\home\config. This is one of the Prerequisites for this chapter.
The Authorization Editor also enables you to choose which page actions each role may perform:
Grant - Users may administer (grant/revoke) page permissions.
Edit - Users may edit content displayed on the page. The Edit action is not applicable for this release.
Customize - Users may modify the page. If a user is not granted this permission, he will not be able to modify the page.
Personalize - Users may personalize portlets on the page. If a user is not granted this permission, links or buttons that put page portlets into personalization mode are not displayed.
View - Users may view the page. If a user is not granted this permission he will see an authorization error.
Anyone can view Welcome.jspx. Select the View check box against the anyone role, as shown in Figure 8-32.
Figure 8-32 Welcome.jspx - Authorization Editor
Click OK.
Changes made through the Authorization Editor are saved in the embedded OC4J's system-jazn-data.xml file, for immediate testing, and simultaneously saved to app-jazn-data.xml in the application's .adf/META-INF directory. The app-jazn-data.xml file packages application specific security policies along with the application itself, to facilitate the deployment of secure WebCenter applications. You'll learn more about app-jazn-data.xml in Chapter 9, "Deploying Your WebCenter Application".
Let's secure MyPage.jspx next. First you'll add a logout link, and then you'll edit page authorization details. Instead of creating a new Logout link from scratch, copy the logout link you created for the Welcome page.
In the Applications Navigator, select Welcome.jspx.
In the Structure window, right-click af:goLink - Logout, and choose Copy.
In the Applications Navigator, select MyPage.jspx.
In the Structure window, select h:form, right-click, and select Paste.
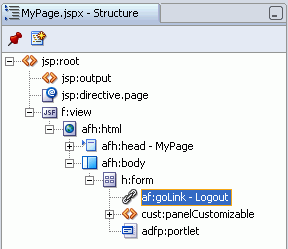
af:goLink - Logout is placed at the bottom of the page by default. Drag it above cust:panelCustomizable to move it to the top of the page (Figure 8-33).
Figure 8-33 MyPage.jspx - Logout Link in Structure Window
Now let's authorize access to this page and specify permissable actions on a role by role basis. As before, this configuration takes place in the page's definition file (MyPagePageDef.xml).
Right-click MyPage.jspx in the Applications Navigator.
Choose Go to Page Definition.
In the Structure window, right-click MyPagePageDef, and choose Edit Authorization.
Use the Authorization Editor to grant user permissions on MyPage.jspx. Select the checkboxes shown in Figure 8-34.
Figure 8-34 MyPage.jspx - Authorization Editor
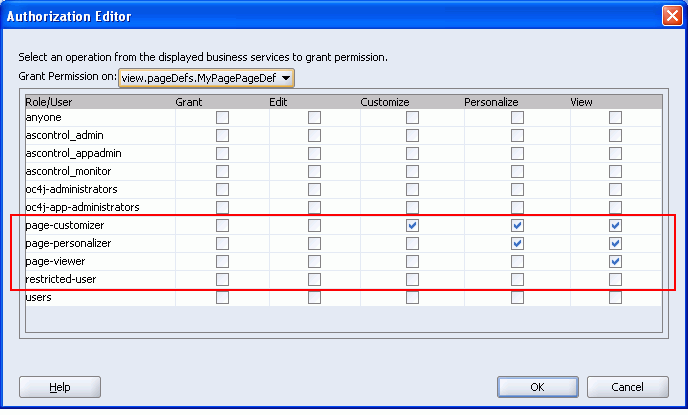
Let's take a closer look at these settings. When a user assigned with the page-customizer role logs in to the tutorial application (such as Harvey), that user may view, personalize, and customize aspects of MyPage.jspx, but may not edit page content or grant page permissions to any other users. Logged-in users with the page-viewer role (such as Singh) are more restricted; those users can view MyPage.jspx but no other page actions are allowed.
Notice that users with the restricted-user role (such as King) are not authorized to view the page at all.
Click OK to save these selections.
Now that MyPage.jspx is secure, repeat exactly the same steps for MyWeather and MyContent.
To secure MyWeather and MyContent, repeat steps 8 through 14.
After you copy and paste the Logout links, remember to move them to the top of your pages (under the h:form).
Click the Save All icon in the JDeveloper toolbar.
All the pages in your application are now secure.
There is one more step to secure your tutorial application. You need to map the J2EE security role you defined using the Oracle ADF Security wizard (ValidUsers) to an identity store role defined in your system-jazn-data.xml file (users).
| J2EE Security Role | Identity Store Role |
|---|---|
| ValidUsers | users |
First, you'll create the configuration file where such security role mappings are stored; that is, the tutorial application's OC4J deployment descriptor file (orion-web.xml). Let's create the file now.
In the Applications Navigator, right-click ViewController, and select New.
Select All Technologies from the pull-down list at the top.
In the panel on the left, expand General, and then select Deployment Descriptors as shown in Figure 8-35. The panel on the right lists the different types of deployment descriptors that are available. Projects require different deployment descriptors depending on the technologies the project uses and on the type of the target application server.
This tutorial application will be deployed on the preconfigured OC4J server.
Figure 8-35 Deployment Descriptor Selection
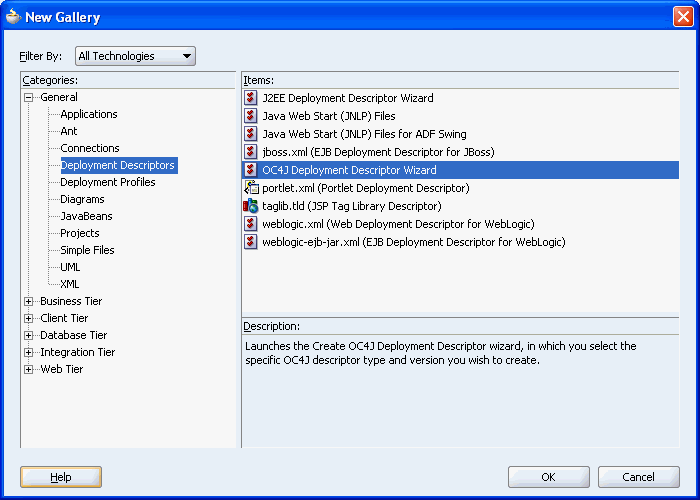
Select OC4J Deployment Descriptor Wizard, and then click OK (Figure 8-35).
This brings up the OC4J Deployment Descriptor wizard. This wizard lets you select the specific deployment descriptor type and version you require, and then generates the .xml file. For this tutorial you need to select orion-web.xml 10.0 as the deployment descriptor. Later on you'll use this .xml file to package the tutorial application before deployment to the application server.
Click Next to move beyond the Welcome page.
Select orion-web.xml (located at the bottom of the list), and then click Next.
The file name will be greyed out if the file already exists.
Select 10.0, and then click Finish.
After you click Finish, orion-web.xml displays in the Applications Navigator, under ViewController, Web Content, WEB-INF.
Right-click orion-web.xml, and select Properties to set some additional deployment options.
Select Security Role Mappings from the panel on the left.
This displays a panel on the right where you'll add the following security role mapping:
| J2EE Security Role | Identity Store Role |
|---|---|
| ValidUsers | users |
Create the security role mapping as follows:
Click Add.
This displays a window, as shown in Figure 8-36, where you'll enter the J2EE security role name—ValidUsers.
Figure 8-36 Deployment Descriptor - Creating J2EE Security Role Mapping
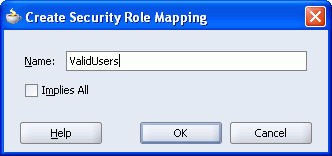
For Name, enter the J2EE security role name: ValidUsers
Click OK.
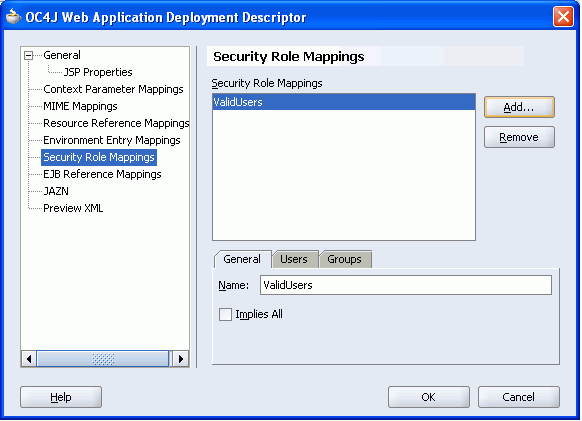
The role name you just entered gets displayed in the mappings panel and also on the General tab as shown in Figure 8-37. If you must edit the role name you can do so by editing the Name property on the General tab.
Figure 8-37 Deployment Descriptor - New J2EE Security Role Mapping
Click the Groups tab.
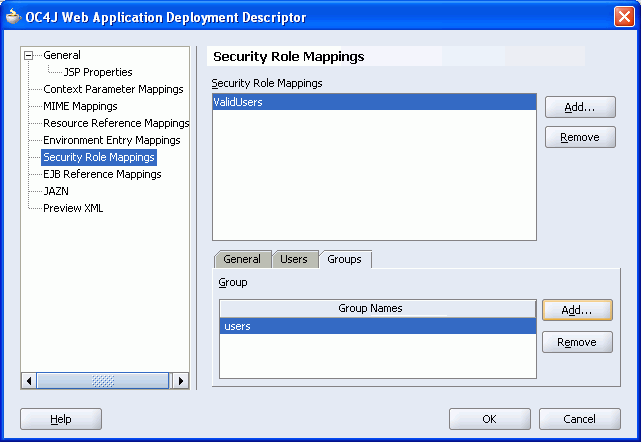
Notice that the J2EE security role ValidUsers is highlighted in the mappings panel. This means that you're about to map a group of users to this J2EE security role (Figure 8-38).
Figure 8-38 Deployment Descriptor - Security Role Mappings Groups Tab
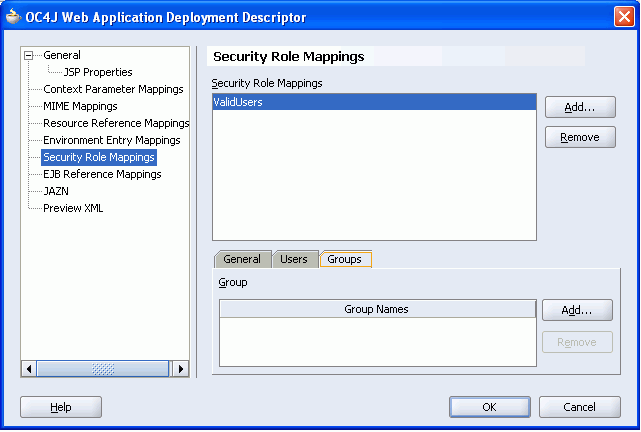
Click the Add button to the right of the Group Names panel.
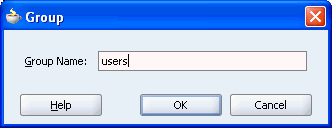
For Group Name, enter: users (Figure 8-39).
This the default identity store role which maintains a list of every valid user: Singh, Cho, Harvey, JtaAdmin, and oc4jadmin. For details, see Appendix A, "How to Set Up the Tutorial Identity Store".
Figure 8-39 Deployment Descriptor - Mapping Group of Users to the J2EE Security Role
Click OK.
In this step you mapped the J2EE security role ValidUsers to the identity store role users (Figure 8-40).
Figure 8-40 Deployment Descriptor - J2EE Security Role Mapped to the users Role
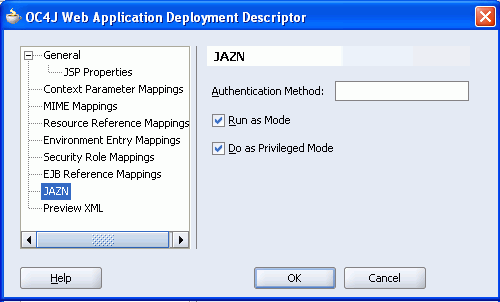
Choose JAZN in the panel on the left, and select Run as Mode and Do as Privileged Mode as shown in Figure 8-41.
Figure 8-41 Deployment Descriptor - JAZN Settings
Click OK to save changes to the OC4J deployment descriptor.
Click the Save All icon in the JDeveloper toolbar.
If you take a look at the source code for the configuration file orion-web.xml, you should see security-role-mapping entries and a jazn-web-app entry as follows:
<security-role-mapping name="ValidUsers" impliesAll="false">
    <group name="users"></group>
 </security-role-mapping>
<jazn-web-app runas-mode="true" doasprivileged-mode="true"/>
This completes the OC4J Web application deployment descriptor configuration. Now you're ready to run the application and see the new security features in action.
In this final step you'll run the tutorial application and take a look at the security features that you've introduced. Here's a quick summary of what you're going to do:
Display the welcome page (Welcome.jspx) and test that the login link displays the login page (Login.jspx).
Use the Login page to enter valid user credentials and check that the correct page gets displayed (Welcome.jspx). Logged in users shouldn't see a login link on the Welcome page—instead, they should see a logout link and, providing they have the necessary page permissions, buttons that navigate to MyPage, MyContent, and MyWeather.
Login with different user credentials (Singh, Cho, Harvey, and King) and see which page actions each user is allowed to perform.
Try accessing a secure page directly, without prior authorization, and check that you're redirected to the Login page.
Enter invalid user credentials and check that the correct error page gets displayed.
Let's run the tutorial application and see these security features in action.
First, let's login as user Singh. This user was assigned view privileges on MyPage, MyWeather, and MyContent.
In the Applications Navigator, right-click Welcome.jspx, and choose Run.
In your Browser, you should see a Welcome page with a Login link as shown in Figure 8-42. Earlier on, you configured this link to display the login page Login.jspx.
Click Login.
You should be directed to Login.jspx which contains an entry form for user credentials as shown in Figure 8-43.
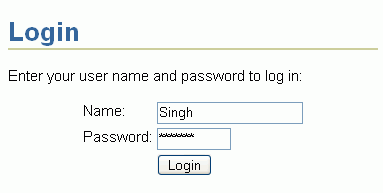
Enter login credentials for the user Singh. Both name and password are case-sensitive, so take care when typing them in. For Name enter Singh, and for Password enter welcome.
Figure 8-43 Login Page - Login Credentials for User Singh
Click Login.
If authentication is successful, you should see Welcome.jspx with a Logout link at the top of the page, as shown in Figure 8-44. Remember, you defined Welcome.jspx as the success URL when you configured the Login link on the Welcome page.
As user Singh, you should also see several command buttons. Click the button that says Go To MyPage.
As user Singh you have privileges to view this page but you should not be able to personalize or customize anything on the page. To verify this, take a look at the Actions menu for MyJavaPortlet.
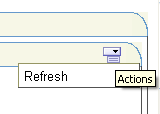
Click the Actions icon in the portlet banner to reveal the available options. As you are logged in as Singh (with view privileges) only the Refresh option should be available, as shown in Figure 8-45.
Figure 8-45 Portlet Actions Available to User Singh
Click Logout.
You should get directed back to the Welcome page.
Next, you'll login as user Cho. This user was assigned the page-personalizer role with both view and personalize privileges on MyPage, MyWeather, and MyContent.
Display the Welcome page, and click Login.
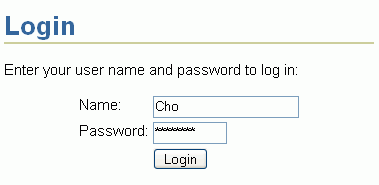
Enter login credentials for the user Cho remembering that both fields are case-sensitive. For Name enter Cho, and for Password enter welcome (Figure 8-46).
Figure 8-46 Login Page - Login Credentials for User Cho
Click Login.
If authentication is successful, you should see the Welcome page with a Logout link at the top of the page and all three page navigation buttons.
Click Go To MyPage.
As user Cho you have privileges to both view and personalize portlets but you should not be able to customize the page or portlets in any way. To verify this, take a look at the Actions menu for MyJavaPortlet.
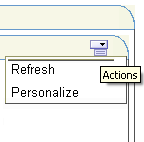
Click the Actions icon in the portlet banner to reveal the available options. As you are logged in as Cho you should see two options: Refresh and Personalize, as shown in Figure 8-47.
Figure 8-47 Portlet Actions Available to User Cho
Click Personalize.
Change the Portlet Title, for example, enter: Cho's Java Portlet
This title is only displayed when Cho is the logged on user. No other user will see this title.
Click OK to see the personalizations for user Cho.
Click Logout.
Now login as user Harvey. This user was assigned the page-customizer role with view, personalize, and customize privileges on MyPage, MyWeather, and MyContent.
Display the Welcome page, and click Login.
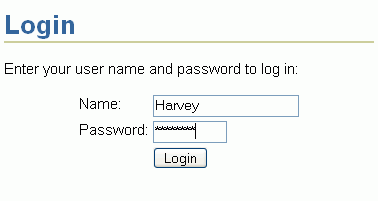
Enter login credentials for the user Harvey remembering that both fields are case-sensitive. For Name, enter Harvey and for Password enter welcome (Figure 8-48).
Figure 8-48 Login Page - Login Credentials for User Harvey
Click Login.
If authentication is successful, you should see Welcome.jspx with a Logout link at the top of the page and several page navigation buttons as before.
Click Go To MyPage.
As user Harvey you have privileges to view, personalize portlets, and customize this page. To verify this, take a look at the Actions menu for MyJavaPortlet.
Click the Actions icon in the portlet banner to reveal the available options. As you are logged in as Harvey you should see five options: Move, Maximize, Refresh, Customize, and Personalize, as shown in Figure 8-49.
Figure 8-49 Portlet Actions Available to User Harvey
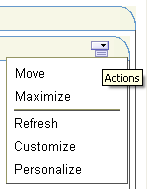
You can, as user Harvey, customize or move any content on this page and when you do so you'll modify the page for all users. This differs from personalizations which are only applicable to the user who is making the changes. Notice that as user Harvey, you do not see the portlet title personalizations made earlier by user Cho.
Click Logout.
Finally, let's login as user King. This user was assigned the restricted-user role and may access public content only. This user may not view any of the secured pages (MyPage, MyWeather, or MyContent).
Display the Welcome page, and click Login.
Enter login credentials for the user Harvey remembering that both fields are case-sensitive. For Name, enter King, and for Password enter welcome (Figure 8-50).
Figure 8-50 Login Page - Login Credentials for User King
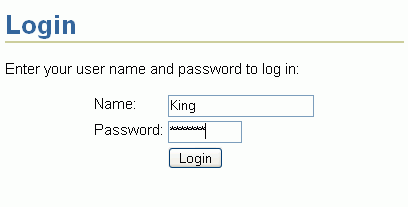
Click Login.
If authentication is successful, you should see Welcome.jspx but you wont' see any page navigation buttons as user King is not authorized to view MyPage, MyWeather, or MyContent.
Click Logout.
Earlier, you defined a security constraint that enforces login authentication for secured pages. So, if an unauthenticated user tries to access a secured page he should be redirected to the login page for authentication. Let's test this now.
In the Applications Navigator, right-click MyPage.jspx, and choose Run.
When the Browser opens to display the page the target URL looks something like this: http://123.4.56.789:8988/MySample-ViewController-context-root/faces/MyPage.jspx
Because this is a secured page, you should be presented with the login form.
Enter valid login credentials such as Harvey/welcome, and click Login.
As user Harvey is authorized to view MyPage, you should see MyPage in your browser.
Click Logout.
Try to access MyPage again. In your browser, enter the same URL used in Step 1.
Now login as user King who is not authorized to view MyPage. Enter King/welcome, and click Login.
This time, you should see an "Unauthorized" message.
As part of the tutorial application's login configuration you chose a login error page. Try entering some invalid user credentials to see what happens. You should be directed back to an empty login page.
In the Applications Navigator, right-click Welcome.jspx, and choose Run.
When the Welcome page appears in a browser window, click Login.
Enter some invalid user credentials or just leave both fields blank and see what happens when you click Login.
This time you won't see the Welcome page. As an unauthenticated user, you'll be directed back to a blank login form.
When you apply access restrictions to a page you automatically restrict access to any data controls on the page. Let's take a look at the data controls you placed on MyContent.jpsx.
In the Applications Navigator, right-click MyContent.jspx, and choose Run.
Enter valid login credentials such as Harvey/welcome, and click Login.
MyContent.jspx should be displayed in your browser but this time you won't have access to file system content (Figure 8-51).
Figure 8-51 File System Data Controls - Access Denied
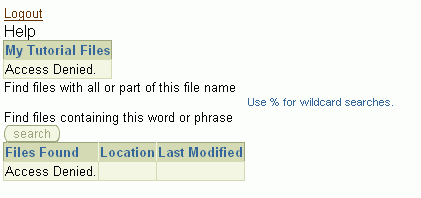
To authorize access, you must grant permissions through the data control's executables and bindings. Let's do that now.
Right-click MyContent.jspx in the Applications Navigator, and select Go To Page Definition.
In the Structure window, expand executables and bindings (Figure 8-52).
To make data control content accessible you must grant permissions through the control's executable (methodIterator) and bindings (methodAction and attributeValues). So, if we want to see the help link on MyContent.jpsx we'll need to edit authorization settings for getURIIter (methodIterator), getURI (methodAction), and getURI_returnURI (attributeValues).
Similarly, if we want to see the table of files, we'll need to edit authorization settings for getItemsIter (methodIterator), getItems (methodAction), and getItems1 (attributeValues). And, we'd need to do the same for the tree and search form data controls too.
Figure 8-52 Data Control Executables and Bindings in MyContentPageDef.xml
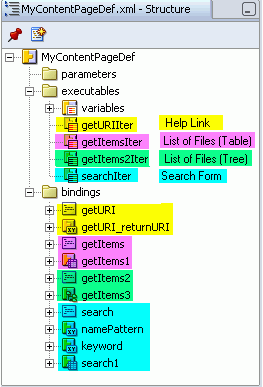
Let's work through all the steps for the table data control to see how this is done.
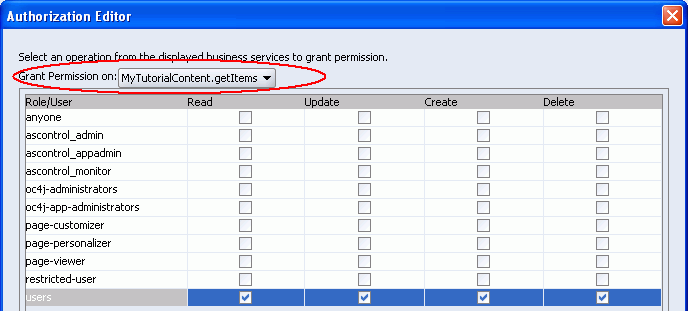
First, edit authorizations for the table data control executable getItemsIter:
Under executables, right-click getItemsIter, and select Edit Authorization.
Let's grant full permissions to any logged-in user. To do this, check all the boxes for the users role as shown in Figure 8-53.
Figure 8-53 Authorization Editor for Data Control Executables
Click OK.
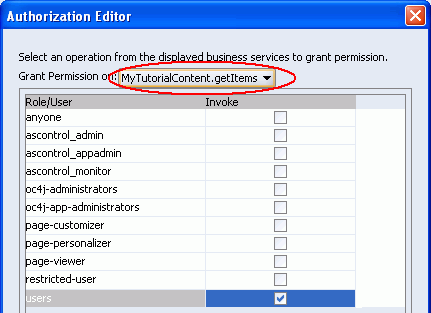
Now edit authorizations for the methodAction binding of table data control getItems:
Under bindings, right-click getItems, and select Edit Authorization.
To grant permission to any logged-in user, check the boxes for the users role as shown in Figure 8-54.
Figure 8-54 Authorization Editor for Data Control methodAction Bindings
Click OK.
And finally, edit authorizations for each attributeValues binding of table data control getItems1:
Right-click getItems1, and select Edit Authorization.
To grant full permissions to the first attribute MyTutorialContent.getItems.name, check all the boxes for the users role as shown in Figure 8-55.
Figure 8-55 Authorization Editor for Data Control attributeValues Bindings
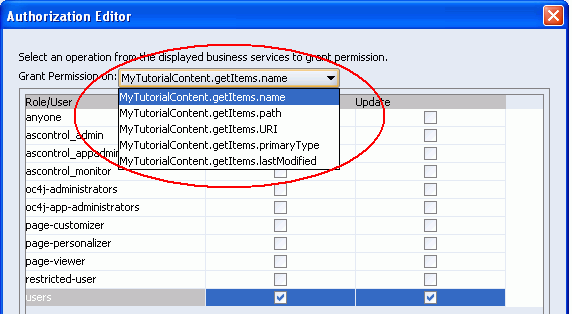
Repeat for every attribute listed in the Grant Permissions box. For example, expand the Grant Permissions box, choose MyTutorialContent.getItems.path, check all the boxes, and repeat.
Click OK.
Before running the page again, stop the embedded OC4J Server. Choose Run, Terminate, Embedded OC4J Server from the main menu.
Run MyContent.jspx again, and login with valid credentials such as Harvey/welcome.
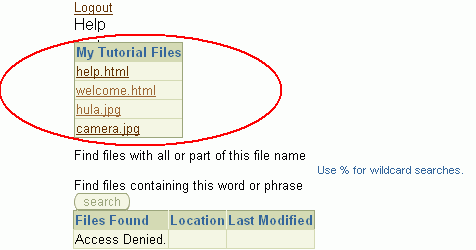
This time you should see files listed in the table data control as shown in Figure 8-56.
Figure 8-56 Access Authorized to Table Data Control
If you want, you can enable access to the other data controls on MyContent.jspx by repeating steps 5 through 7.
Congratulations! You've completed the lesson and secured your first WebCenter application. In the final lesson you'll learn about deployment and how to use Enterprise Manager (a browser-based tool that enables administrators to deploy, configure, and manage WebCenter applications).