| Oracle® Retail POS Suite Implementation Guide, Volume 2 – Extension Solutions Release 14.1 E54476-02 |
|


 Previous |
 Next |
| Oracle® Retail POS Suite Implementation Guide, Volume 2 – Extension Solutions Release 14.1 E54476-02 |
|
Previous |
Next |
This chapter describes how to add a feature to Back Office or Central Office using a specific example based on extending a search page within the application's web-based UI. The example is a simple extension of an existing search criteria page to allow it to search on additional criteria.
|
Note: See the Oracle Retail POS Suite Security Guide for more information about specific security features and implementation guidelines for the POS Suite products. |
Before you attempt to develop new Back Office or Central Office code, set up your development environment as described in Chapter 3. Verify that you can successfully build and deploy an ear file.
This section explores the extension of transaction search features through the creation of a new criteria page. The changes required to implement this functionality interact with the user interface and the internals of the Central Office system. This example takes you through the process of implementing a new search criteria page, under the assumption that you have been asked to develop a page that enables a user to screen transactions according to new criteria.
|
Note: Paths in this chapter are assumed to start from your local source code tree, checked out from the source code control system. |
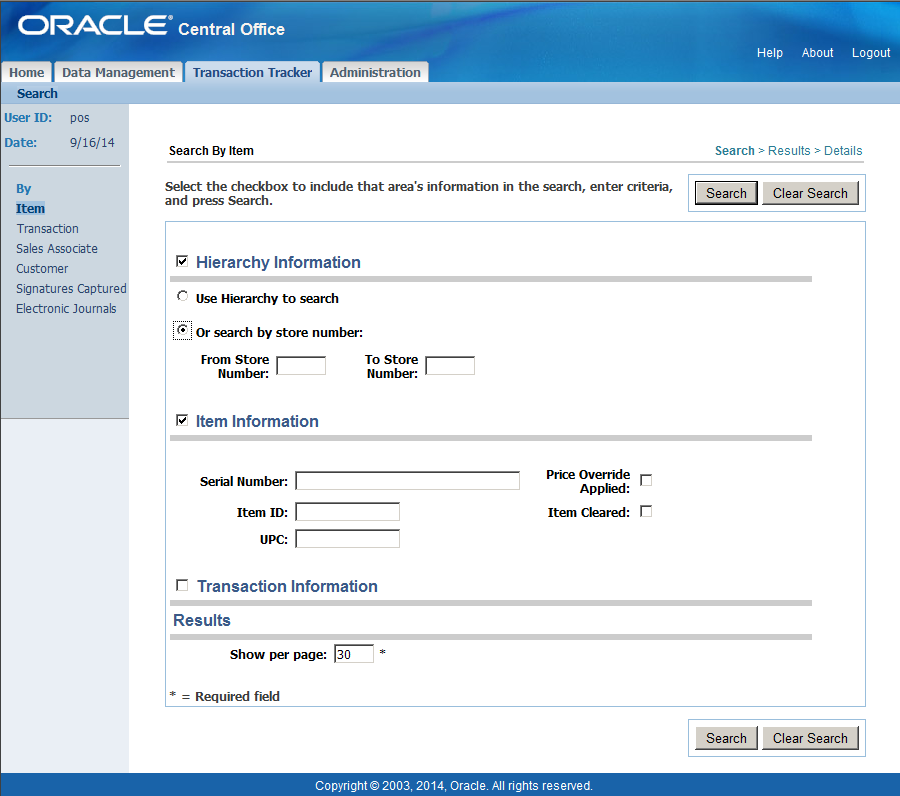
As an example of how to extend Central Office, this chapter refers to a new search criteria page called Item Quantity. This new page is an addition to the Transaction Tracker tab. The existing interface offers a side navigation bar with options to search by Item, Transaction, Sales Associate, Customer, and others. Item Quantity is a new option on this side navigation bar; it looks much like the Item page but enables the user to set a quantity value and search for transactions whose quantity of any item compares appropriately to a chosen quantity (for example, greater than, greater than or equal to, less than, and so on).
This example shows how:
A new user interface can be created.
Search criteria is collected from the end user.
Data is handed off from one layer of the interface to another.
SQL queries are handled and modified.
The following procedures offer general steps followed by specific examples.
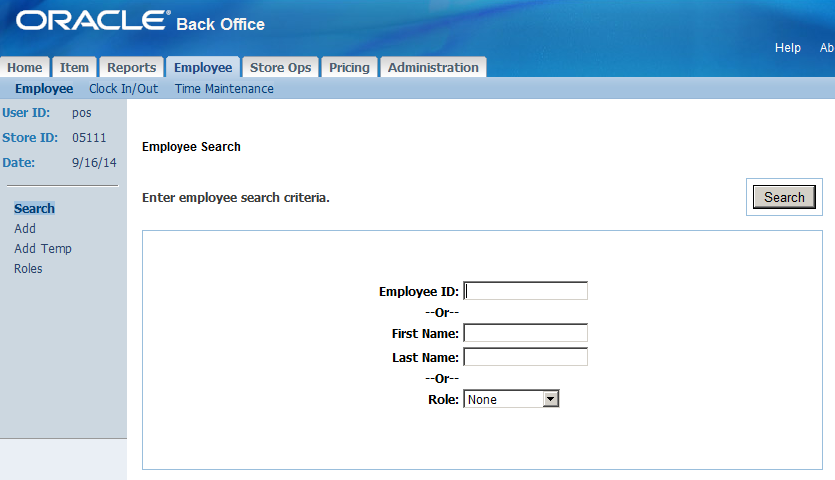
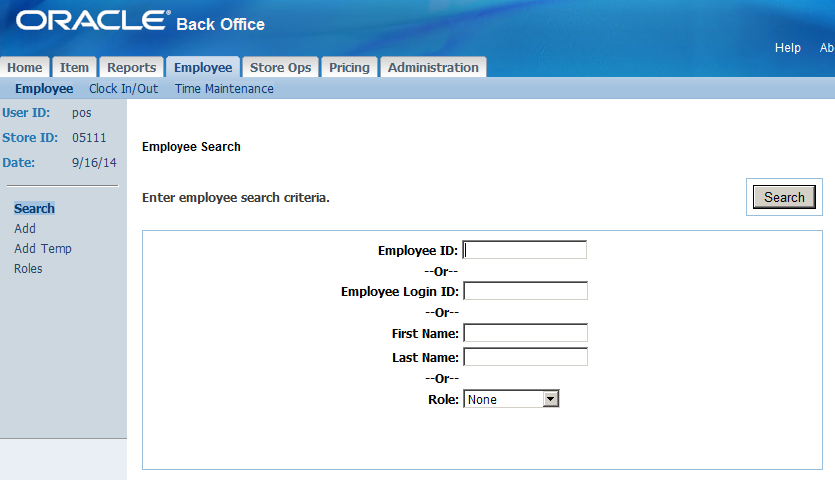
The existing employee search page allows the operator to search for employees by their employee ID, or by first and last name, or by role. This example will add the ability to search for employees by their login ID.
This example shows how:
A user interface can be modified
Search criteria is collected from the end user
Data is handed off from one layer of the interface to another
SQL queries are handled and modified
The following procedures offer general steps followed by specific examples.
To add a new search criteria page, you must create a new JSP file for the page, edit workflow and Struts/Tiles configuration files to register the page, and add appropriate classes to handle the page.
Create a new JSP file and edit the file content. You can start with a copy of an existing criteria page and add input fields for the new data you intend to factor into your search. Plan your string usage to reference property files for internationalization purposes.
To create ItemQuantityCriteria.jsp, make a copy of <source_directory>\webapp\transaction-webapp\web\centralizedElectronicJournal\ItemCriteria.jsp. Establish input fields to collect store numbers, item numbers, item quantity, and the item quantity limit operator (the operator that determines how to compare a transaction's item quantities with the item quantity criteria).
Add references to any new strings to appropriate properties files.
For example, to add Item Quantity Information and Item Quantity column labels, edit the <source_directory>\webapp\i18n-webapp\src\ui\oracle\retail\stores\webmodules\i18n\en\transaction.properties file to add the following entries:
transaction.centej.itemquantitycrit.header=Item Quantity Information
transaction.centej.itemquantitycrit.label.itemquantity=Item Quantity
To add the new JSP page to the side navigation bar in the Transaction Tracker tab, you configure the sideNav tile. Using Struts/Tiles conventions, edit the <source_directory>\webapp\transaction-webapp\WEB-INF\360\tiles-transaction_tracker.xml file, making the following edits:
Add an entry to the <putList name="sideNav"> tag to add your new page name to the list of options on the side navigation bar.
Set the security role for this new option by adding an element tag in the appropriate location in the <putList name="sideNavRoles"> tag. You can use the element <add value="BLANK"/> if no role has yet been defined.
Add a destination URL to be activated when your new page name is clicked.
The following code sample shows where to add tags:
Example 8-1 transaction_tracker.xml: SideNav Option List and Roles
<putList name="sideNav">
            <add value="By"/>
            <add value="Item"/>
    ...add your new tag here...
    <add value="Transaction"/>
            <add value="Sales Associate"/>
            <add value="Customer"/>
        </putList>
        <putList name="sideNavRoles">
            <add value="BLANK"/>
            <add value="search_by_item"/>
    ...add your new tag here...
    <add value="search_by_trans"/>
            <add value="search_by_assoc"/>
            <add value="search_by_cust"/>
        </putList>
        <putList name="sideNavURLs">
            <add value="BLANK"/>
            <add value="centralizedElectronicJournal/ejItemSearch.do"/>
    ...add your new tag here...
    <add value="centralizedElectronicJournal/ejTransactionSearch.do"/>
            <add value="centralizedElectronicJournal/ejSalesAssociateSearch.do"/>
            <add value="centralizedElectronicJournal/ejCustomerSearch.do"/>
        </putList>
Finally, add a set of definition tags to define your JSP page's title, help URL, and body layout. The following code sample offers an example:
Example 8-2 Example Definition Tags for tiles-transaction_tracker.xml
<definition name="centralizedElectronicJournal.ejItemQuantitySearch" extends="ejournal">
        <put name="sideNavIndex" value="Item Quantity"/>
        <put name="title" value="Search By Item Quantity"/>
        <put name="helpURL" value="centralizedElectronicJournal/help.do#searchbyitem"/>
        <put name="body" value="centralizedElectronicJournal.ejItemQuantitySearch.layout"/>
    </definition>

<!-- the following definition defines the layout for the JSP's body, as called out above --!>

<definition name="centralizedElectronicJournal.ejItemQuantitySearch.layout" extends="ejournal.search.layout">
        <put name="resetSearchURL" value="/centralizedElectronicJournal/ejItemQuantitySearch.do"/>
        <put name="searchTitle" value="Search By Item Quantity"/>
        <put name="searchAction" value="/centralizedElectronicJournal/searchTransactionByItemQuantity.do"/>
        <put name="expandSections" value="itemQuantityCriteria"/>
        <put name="searchCriteria1" value="/centralizedElectronicJournal/ItemQuantityCriteria.jsp"/>
        <put name="searchCriteria2" value="/centralizedElectronicJournal/transactionCriteria.jsp"/>
        <put name="searchCriteria3" value="/centralizedElectronicJournal/resultsCriteria.jsp"/>
    </definition>
The user interface changes require that you update the JSP page to add the additional search criteria. You also need to ensure any strings you use are properly externalized for future localization. Depending on what kind of form is used you may have additional work to perform. A review of the Struts action mapping used for employee searches will reveal what changes are required to any action form in use. Finally, the action used to search will also need to be modified.
Modification of the JSP file is fairly straightforward. Taking the existing JSP structure into consideration, insert the new search criteria between the Employee ID field and the First and Last Name fields.
Adding the search criteria requires that you insert the appropriate HTML and JSP tags to the <source_directory>\webapp\employee-webapp\web\employee\employeeSearch.jsp file. You can identify where the changes need to be placed by looking for the message tag that displays the employee.employeeForm.employeeFirstName.label message. The code in the following example presents the required changes to the employee search page.
Example 8-3 EmployeeSearch.jsp Modifications
<tr> <td align="right" class="fieldname">--<bean:message key="prompt.or"/>--</td> <td align="right"> </td> </tr> <tr> <td align="right" class="fieldname"><bean:message key="employee.employeeForm.employeeLoginId.label"/>: </td> <td align="left"> <html:text styleClass="data" property="searchEmployeeLoginId" size="20" maxlength="10" tabindex="2"/> </td> </tr> <tr> <td align="right" class="fieldname">--<bean:message key="prompt.or"/>--</td> <td align="right"> </td> </tr> <tr> <td align="right" class="fieldname"><bean:message key="employee.employeeForm.employeeFirstName.label"/>: </td> <td align="left"> <html:text styleClass="data" property="searchEmployeeFirstName" size="20" maxlength="16" tabindex="3"/></td> </tr>
The text in bold in this example is the new text that was added to the employeeSearch.jsp page. It introduces a new label and new text box to collect the new search criteria.
|
Note: The tab index values were incremented for all of the remaining input fields. |
The modified screen is presented in Figure 8-3.
It is very important that all user-visible strings be externalized for localization. Check to see if the label text is already defined or if you need to create it. If it exists, it is likely already in the <source_directory>\webapp\i18n-webapp\src\ui\oracle\retail\stores\webmodules\i18n\en\employee.properties file. A quick examination of this file reveals that the label text already exists and there is nothing to add.
The Struts action mapping defines the important details you need to know about the code that executes the employee search when the search screen submits its data. The following example contains the XML fragment that defines the action. It comes from the struts-employee_actions.xml file that is included in the application's struts-config.xml file.
Example 8-4 Action Definition from struts-employee_actions.xml
<action path="/employee/searchEmployee"
    type="oracle.retail.stores.webmodules.employee.ui.SearchEmployeeAction"
    name="employeeForm"
    scope="request"
    input="/employee/searchEmployeeView.do"
    validate="true">
    <forward name="success" path="employee.searchEmployeeViewDetails"/>
    <forward name="showEmployeeList" path="employee.searchEmployeeView"/>
    <forward name="failure" path="employee.searchEmployeeView"/>
</action>
You may need to modify the action form this action uses to transfer the data from the modified JSP to the action class. The XML fragment indicates that the form is valid for a single request and is named employeeForm.
The definition of the action form is contained in another XML file, struts-employee_forms.xml. It is presented in the following example.
Example 8-5 Action Form Definition from struts-employee_forms.xml
<form-bean name="employeeForm" type="org.apache.struts.validator.DynaValidatorForm">
    <form-property name="searchEmployeeId" type="java.lang.String"/>
    <form-property name="searchEmployeeLoginId" type="java.lang.String"/>
    <form-property name="searchEmployeeFirstName" type="java.lang.String"/>
    <form-property name="searchEmployeeLastName" type="java.lang.String"/>
    <form-property name="employeeName" type="java.lang.String"/>
    <form-property name="employeeFormattedName" type="java.lang.String"/>
    <form-property name="employeeFirstName" type="java.lang.String"/>
    <form-property name="employeeMiddleName" type="java.lang.String"/>
    <form-property name="employeeLastName" type="java.lang.String"/>
    <form-property name="employeeId" type="java.lang.String"/>
    <form-property name="employeeAlternateId" type="java.lang.String"/>
    <form-property name="employeeLoginId" type="java.lang.String"/>
    <form-property name="employeeRole" type="java.lang.String"/>
    <form-property name="employeeStatus" type="java.lang.String"/>
    <form-property name="socialSecurityNumber" type="java.lang.String"/>
    <form-property name="employeeStatusCode" type="java.lang.String"/>
    <form-property name="workGroupId" type="java.lang.String"/>
    <form-property name="employeeLocale" type="java.lang.String"/>
    <form-property name="groupID" type="java.lang.String"/>
    <form-property name="employeeValidity" type="java.lang.String"/>
    <form-property name="employeeType" type="java.lang.String"/>
    <form-property name="employeeActualStatusCode" type="java.lang.String"/>
    <form-property name="errorMessage" type="java.lang.String"/>
    <form-property name="employeeStoreId" type="java.lang.String"/>
    <form-property name="employeeRoleName" type="java.lang.String"/>
</form-bean>
The definition reveals that the employee search screen is using a DynaValidatorForm provided by Struts. All of the form properties are defined here in the XML. The line in bold was added to introduce our new search criteria. Validation of the entered data should be addressed by proper configuration of the Struts validator. Examples of how to validate form data using the Struts DynaValidatorForm can be found in the struts-employee_validator.xml file provided with the source code and the Struts documentation.
With the new search criteria added to the action form, we can now turn our attention to modifying the action class that actually performs the search from the user interface. The action class used is located at <source_directory>\webapp\employee-webapp\src\ui\oracle\retail\stores\webmodules\employee\ui\SearchEmployeeAction.java. The action class execute() method is broken into three sections using an if-then-else statement. The following example provides a portion of the updates required to enable the action to search for employees based on their login ID.
Example 8-6 Modifications to SearchEmployeeAction.java
public class SearchEmployeeAction extends Action
{
        public ActionForward execute(...) throws Exception
    {
...
        String employeeLoginId = "";
...
        try
        {
...
            employeeLoginId = dynaActionForm
                .get("searchEmployeeLoginId").toString();
...
            if (!employeeId.equals(""))...
            else if (!employeeLoginId.equals(""))
            {
                EmployeeDTO employeeDTO = employeeManager
                    .getEmployeeByLoginID(employeeLoginId);
                -- similar code to the first if condition to prepare
                -- the necessary data for display to the user since
                -- this type of search will match only a one employee
            }
            else if (employeeId.equals("")
                && !(employeeFirstName.equals("")
                && employeeLastName.equals("")))...
            else...
        }
...
    }
}
As the only differences between the search by employee ID and search by employee login ID are how the employee is found, the code in the first two if blocks are almost identical and could be refactored to share implementations. For the purposes of this example that repeated code and possible refactoring has been omitted. The important difference is the call to the employeeManager.getEmployeeByLoginID() method.
Configure action mapping in one of the struts configuration files so that Struts knows how to handle your new JSP page.
The following example shows how the Item Quantity page could be configured. The file is <source_directory>\webapp\transaction-webapp\WEB-INF\360\struts-transaction_tracker_actions.xml. The code sets up the system to request an item quantity search and forwards results to standard result routines, automatically displaying the transaction details (through showDetails.do) if only one result is returned, and otherwise displaying a standard transaction list.
Example 8-7 Struts Action Configuration for Item Quantity
<action path="/centralizedElectronicJournal/ejItemQuantitySearch"
        type="oracle.retail.stores.webmodules.transaction.ui.StartSearchAction">
        <forward name="success" path="centralizedElectronicJournal.ejItemQuantitySearch"/>
</action>

<action path="/centralizedElectronicJournal/searchTransactionByItemQuantity"
        type="oracle.retail.stores.webmodules.transaction.ui.SearchTransactionByItemQuantityAction"
        name="searchTransactionForm"
        scope="request"
        input="/centralizedElectronicJournal/ejItemQuantitySearch.do">
    <forward name="oneResult" path="/centralizedElectronicJournal/showDetails.do"/>
    <forward name="multipleResults" path="centralizedElectronicJournal.ejTransactionSearchResults"/>
</action>
Since you have added new search fields for the Item Quantity and Item Quantity Operator, you must add code for handling these fields and their validation to the <source_directory>\webapp\transaction-webapp\src\ui\oracle\retail\stores\webmodules\transaction\ui\SearchTransactionForm.java file.
Add the instance fields for any fields you have added to the criteria page, and use the same names as the input field names you defined in your JSP page, so that the fields can be automatically populated via retrospection. Note an additional static constant for the search based on line item quantity.
Example 8-8 New Instance Fields
    private String itemQuantityLimitOperator;
    private int itemQuantityLimit;

    public static final String ITEM_QUANTITY_LIMIT_OPERATOR =
      "itemQuantityLimitOperator";

    public static final String ITEM_QUANTITY_LIMIT =
      "itemQuantityLimit";
    public static final String SEARCH_BY_ITEM_QUANTITY_CRITERIA =
      "searchByItemQuantityCriteria";
    private Boolean searchByItemQuantityCriteria;
Define corresponding getter and setter methods for the instance fields.
Example 8-9 Getter and Setter Methods for New Instance Fields
    public Boolean getSearchByItemQuantityCriteria()
    {
        return searchByItemQuantityCriteria;
    }

    public void setSearchByItemQuantityCriteria(Boolean
                                     searchByItemQuantityCriteria)
    {
        this.searchByItemQuantityCriteria =
                                searchByItemQuantityCriteria;
    }

    public String getItemQuantityLimitOperator()
    {
        return itemQuantityLimitOperator;
    }

    public void setItemQuantityLimitOperator(String
                                   itemQuantityLimitOperator)
    {
          this.itemQuantityLimitOperator = itemQuantityLimitOperator;
    }

    public int getItemQuantityLimit()
    {
        return itemQuantityLimit;
    }

    public void setItemQuantityLimit(int itemQuantityLimit)
    {
          this.itemQuantityLimit = itemQuantityLimit;
    }
Add the validation for the item quantity limit value to check that the input was a valid number and was greater than zero. To do this add the following code in the validate method and then provide the method implementation. The method implementation uses an error message key to look up the actual error message description.
Store any error messages for validation in the <source_directory>\webapp\i18n-webapp\src\ui\oracle\retail\stores\webmodules\i18n\transaction.properties file.
In the item quantity example, you might store an error message description as follows:
error.ejournal.search.itemquantity.itemquantitylimitvalue=Item quantity limit value must be a valid number and greater than zero.
Create a Struts action class to act as a controller for the JSP you created.
For Item Quantity, create an action class using the filename SearchTransactionByItemQuantityAction.java, in the directory <source_directory>\webapp\transaction-webapp\src\ui\oracle\retail\stores\webmodules\transaction\ui\.
You can start by copying and modifying SearchTransactionByItemAction.java.
Add code to the base search class, SearchTransactionAction.java, to establish a get method for the new criteria:
Add a line to call a new method.
Example 8-12 Call a New Method to Get Item Quantity Criteria
searchCriteria = new SearchCriteria(getTransactionCriteria(searchTransactionForm,
request.getParameterValues("transactionType")),
getTenderCriteria(searchTransactionForm),
getSalesAssociateCriteria(searchTransactionForm),
getLineItemCriteria(searchTransactionForm),getLineItemQuantityCriteria(searchTransactionForm),getCustomerCriteria(searchTransactionForm),
getSignatureCaptureCriteria(searchTransactionForm));
Add the method implementation.
Example 8-13 getLineItemQuantityCriteria Method Implementation
    /**
     *    Returns a LineItemQuantityCriteria object based on values
     *    from a SearchTransactionForm.
     *
     */
    protected LineItemQuantityCriteria
    getLineItemQuantityCriteria(SearchTransactionForm form)
    {
        if ( form.getSearchByItemQuantityCriteria().booleanValue() )
        {
            criteria = new LineItemQuantityCriteria();

            if ( StringUtils.isNotEmpty(form.getItemNumber()) )
            {
                criteria.setItemNumber(form.getItemNumber());
            }


            if ( StringUtils.isNotEmpty(form.getItemQuantityLimitOperator()) )
            {
                criteria.setItemQuantityLimitOperator(form.getItemQuantityLimitOperator());
            }

            if (form.getItemQuantityLimit() > 0)
            {
                criteria.setItemQuantityLimit(form.getItemQuantityLimit());
            }
        }

        return criteria;
    }
The Employee Manager session bean already contained the required method to search for employees by their login ID. The business interface for the employee manager is located in the file <source_directory>\webapp\employee-webapp\src\app\oracle\retail\stores\webmodules\employee\app\EmployeeManagerIfc.java. It contains the declarations of the methods available to the user interface. The method to find an employee by their login ID is presented in Example 8-14.
Example 8-14 EmployeeManagerIfc.java
    /**
     * Finds the employee with the specified Login ID.
     * @param loginID the ID of the employee to find.
     * @return A DTO containing the employee data.
     * @throws EmployeeNotFoundException if the employee cannot be
     * found
     */
    EmployeeDTO getEmployeeByLoginID(String loginID)
        throws EmployeeNotFoundException, RemoteException;
The bean implementation is located in <source_directory>\webapp\employee-webapp\src\app\oracle\retail\stores\webmodules\employee\app\ejb\EmployeeManagerBean.java As a façade it simply delegates the call to the Employee Service bean in the Commerce Services layer.
Verify that the application manager appropriately calls for information from Commerce Services. In the Item Quantity search criteria example, the <source_directory>\webapp\transaction-webapp\src\app\oracle\retail\stores\webmodules\transaction\app\ejb\EJournalManagerBean.java class is used. This class already contains the necessary method implementation for a getTransactions() method.
The Employee Service bean in the Commerce Services layer is another façade that prevents direct access to the entity beans. The implementation obtains an instance of the EmployeeLocalHome and invokes the findByLoginID() method. Examination of the Employee entity bean will reveal that it is directly querying the database to find the user with the corresponding login ID.
Use the following to add business logic to commerce services.
You must create a new class in the Commerce Services layer to handle the creation of the new ItemQuantityCriteria object type, adding instance fields for the fields you added. The class should provide the following:
Variables for required criteria fields
Boolean flags to indicate (to the data layer) whether a given attribute should be included in a query
Getter and setter methods for the new fields
Use() and reset() methods
The new criteria you have added must be included in the class that processes search criteria. For transactions, this class is <source_directory>\commerceservices\transaction\src\oracle\retail\stores\commerceservices\transaction\SearchCriteria.java.
To make LineItemQuantityCriteria work, add it to the variable declarations and the constructors and add new getter and setter methods, as shown in the highlighted portions of Example 8-15:
Example 8-15 SearchCriteria.java
public class SearchCriteria implements Serializable
{
    private TransactionCriteria transactionCriteria;
    private TenderCriteria tenderCriteria;
    private SalesAssociateCriteria salesAssociateCriteria;
    private LineItemCriteria lineItemCriteria;
    private LineItemQuantityCriteria lineItemQuantityCriteria;    private CustomerCriteria customerCriteria;
    private SignatureCaptureCriteria signatureCaptureCriteria;

    public SearchCriteria()
    {
        this(null, null, null, null, null,null);
    }

    public SearchCriteria(TransactionCriteria transactionCriteria,
                          TenderCriteria tenderCriteria,
                          SalesAssociateCriteria
                          salesAssociateCriteria,
                          LineItemCriteria lineItemCriteria,
                          LineItemQuantityCriteria lineItemQuantityCriteria,
                          CustomerCriteria customerCriteria)

    {
        this(transactionCriteria,
             tenderCriteria,
             salesAssociateCriteria,
             lineItemCriteria,
             lineItemQuantityCriteria,
             customerCriteria,
             null);
    }


public SearchCriteria(TransactionCriteria transactionCriteria,
                          TenderCriteria tenderCriteria,
                          SalesAssociateCriteria
                          salesAssociateCriteria,
                          LineItemCriteria lineItemCriteria,
                          LineItemQuantityCriteria
                          lineItemQuantityCriteria,
                          CustomerCriteria customerCriteria,
                          SignatureCaptureCriteria
                          signatureCaptureCriteria)

    {
        setTransactionCriteria(transactionCriteria);
        setTenderCriteria(tenderCriteria);
        setSalesAssociateCriteria(salesAssociateCriteria);
        setLineItemCriteria(lineItemCriteria);
      setLineItemQuantityCriteria(lineItemQuantityCriteria);
        setCustomerCriteria(customerCriteria);
        setSignatureCaptureCriteria(signatureCaptureCriteria);
    }

...

    public LineItemQuantityCriteria getLineItemQuantityCriteria()
    {
        return lineItemQuantityCriteria;
    }

    public void
             setLineItemQuantityCriteria(LineItemQuantityCriteria
                                         lineItemQuantityCriteria)
    {
        this.lineItemQuantityCriteria = lineItemQuantityCriteria;
    }
The service bean creates the SQL code that pulls data from the database. Add code to the appropriate ServiceBean.java file to append new criteria to the From clause and the Where clause.
To make the Line Item Quantity Criteria work, edit the <source_directory>\commerceservices\transaction\src\com\oracle\retail\stores\commerceservices\transaction\ejb\TransactionServiceBean.java file as follows:
Add a method call to append to the From clause.
query.append(addToFromClause(searchCriteria.getLineItemQuantityCriteria()));
Add the method implementation for the addToFromClause() method.
Example 8-16 addToFromClause() Method
    /** LineItemQuantityCriteria Criteria
    *
    */
   private String addToFromClause(LineItemQuantityCriteria
                                  criteria)
   {
           StringBuffer buffer = new StringBuffer();
       if (criteria != null && criteria.use())
       {
           buffer.append(" JOIN TR_LTM_RTL_TRN ON TR_LTM_RTL_TRN.ID_STR_RT = TR_TRN.ID_STR_RT AND TR_LTM_RTL_TRN.ID_WS = TR_TRN.ID_WS AND TR_LTM_RTL_TRN.DC_DY_BSN = TR_TRN.DC_DY_BSN AND TR_LTM_RTL_TRN.AI_TRN = TR_TRN.AI_TRN ");
           buffer.append(" JOIN TR_LTM_SLS_RTN ON TR_TRN.ID_STR_RT = TR_LTM_SLS_RTN.ID_STR_RT AND TR_TRN.ID_WS = TR_LTM_SLS_RTN.ID_WS AND TR_TRN.DC_DY_BSN = TR_LTM_SLS_RTN.DC_DY_BSN AND TR_TRN.AI_TRN = TR_LTM_SLS_RTN.AI_TRN ");
           buffer.append(" JOIN AS_ITM ON TR_LTM_SLS_RTN.ID_ITM  = AS_ITM.ID_ITM ");
           buffer.append(" JOIN AS_ITM_STK ON AS_ITM.ID_ITM = AS_ITM_STK.ID_ITM ");
           buffer.append(" JOIN ID_IDN_PS ON AS_ITM.ID_ITM = ID_IDN_PS.ID_ITM  ");
       }
       return buffer.toString();
   }
Add a method call to append to the Where clause.
query.append(addToWhereClause(searchCriteria.getLineItemQuantityCriteria()));
Add the method implementation for the addToWhereClause() method.
Example 8-17 addToWhereClause() Method
  addToWhereClause(searchCriteria.getLineItemQuantityCriteria())
  as below.

    /**
    *
    */

   private String addToWhereClause(LineItemQuantityCriteria
                                   criteria)
   {

       StringBuffer query = new StringBuffer("");
       if (criteria != null && criteria.use())
       {
           if ((criteria.getItemNumber() != null && criteria.getItemNumber().length() > 0))
           {
              query.append(" AND TR_LTM_SLS_RTN.ID_ITM_POS="+criteria.getItemNumber());
           }

           if (criteria.isSearchByItemQuantity())
           {
               query.append(" AND TR_LTM_SLS_RTN.QU_ITM_LM_RTN_SLS"+criteria.getItemQuantityLimitOperator()+"?");
           }
       }
       return query.toString();
   }
Add a call to a method to bind the variables in the SQL query.
n = setBindVariables(ps, n, searchCriteria.getLineItemQuantityCriteria());
Add the method implementation for the setBindVariables() method.
Example 8-18 setBindVariables() method
setBindVariables(ps, n,
      searchCriteria.getLineItemQuantityCriteria()) as below.


    /**
    *
    */
   private int setBindVariables(PreparedStatement statement,
                                int index,
                                LineItemQuantityCriteria criteria)
                               throws SQLException
   {
       if (criteria != null && criteria.use())
       {
           if (criteria.isSearchByItemQuantity())
           {
               if (getLogger().isDebugEnabled())
            bindVariables.add(criteria.getItemQuantityLimit()+"");
               statement.setInt(index++,
                       criteria.getItemQuantityLimit());
           }
       }
       return index;
   }