|
|
The following sections describe how to configure BEA Tuxedo ATMI on a Windows Server 2003 system:
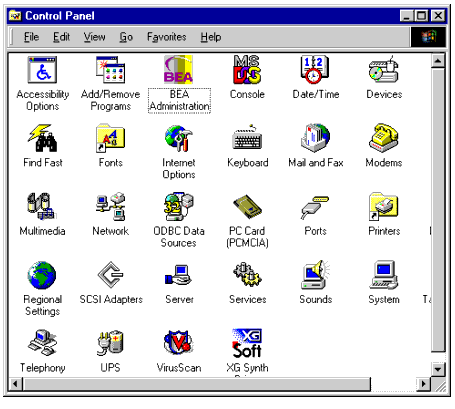
In addition to the BEA Tuxedo Administration Console, the BEA Tuxedo 7.1 or later software for Windows provides a BEA Administration program and two Windows services (Tlisten and BEA procMGR) for configuring the BEA Tuxedo system on a Windows Server 2003 system. Only if the installation included BEA Tuxedo server components will these additional administration tools be installed on the Windows Server 2003 system.
| Note: | The BEA Tuxedo Administration Console offers extensive online help: instructions for all the administrative tasks that can be performed through the console, plus reference information for all configuration tool folders. For information about how to use the BEA Tuxedo Administration Console, see BEA Tuxedo Administration Console Online Help. |
With BEA Tuxedo release 7.1 or later software installed on your Windows Server 2003 system, perform the following steps to access the BEA Administration program:
You can use the BEA Administration window to perform the following tasks:
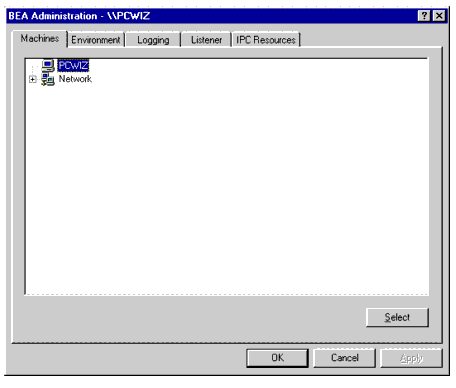
The Machines page of the BEA Administration window enables you, as the BEA Tuxedo system administrator, to access any machine (where you have login privileges) on the Microsoft Windows Network running Microsoft Windows Server 2003. You can then set environment variables remotely; determine the location of BEA Tuxedo event logging; add, remove, stop, or start tlisten services; and tune IPC resources.
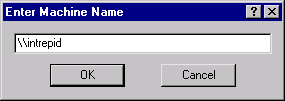
To access a remote machine, locate and click the machine's icon on the network tree. If you know the name of a remote machine, but do not know its work group, perform the following steps to select it:
At this point, all subsequent actions performed on other pages (Environment, Logging, Listener, and IPC Resources) in the BEA Administration window will take place on the selected machine (intrepid in this example).
The Environment page enables you to view, set, or modify BEA Tuxedo environment variables on your Windows Server 2003 system.
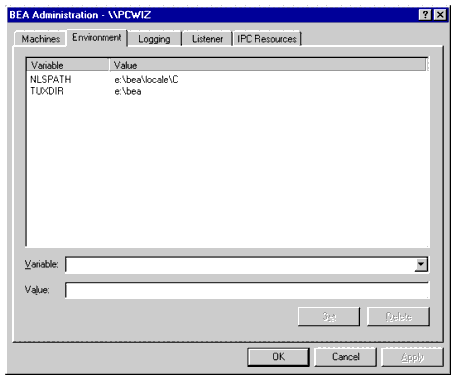
To add, modify, or delete environment variables using the Environment page, follow these steps.
The Logging page enables you to direct BEA Tuxedo system messages to the Event Log on your Windows Server 2003 system, to the traditional user log (ULOG) disk file, or both.
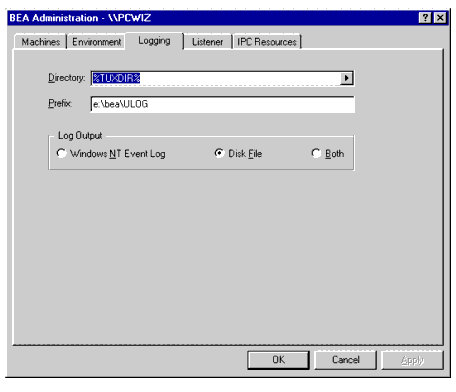
You may select the Event Log option, the traditional user log (ULOG) Disk File option, or both. No setup is required for the Event Log.
If you want to set up the traditional user log (ULOG) messages, perform the following steps to select a storage directory:
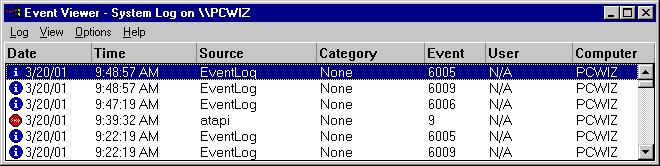
ULOG messages to be stored.ULOG, and the default file name is ULOG.mmddyy, where mmddyy is the month, day and year that the log file was created.To view Windows Server 2003 Event Log entries, follow these steps:
 Programs Administrative Tools Event Viewer to display a list of all the events that have occurred since the application booted.
This window provides the following information:
A ULOG is a text file. You can use any text editor to open a ULOG and view its contents.
The Listener page enables you to view, create, or modify Tlisten services on your Windows Server 2003 system.
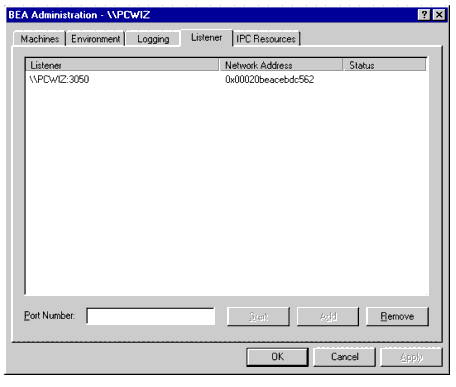
During the BEA Tuxedo installation, the installer program installed a Tlisten service on your Windows Server 2003 system. Each time you boot your system, the Tlisten service starts a tlisten process on port 3050 of your machine. The password associated with the tlisten process is the one you entered during the installation.
A tlisten process must be started on each machine of a networked BEA Tuxedo application before the BEA Tuxedo system and application servers can boot. You use the tlisten process to perform administrative actions across multiple machines. To learn more about tlisten processes, see tlisten
(1)in BEA Tuxedo Command Reference.
To add, remove, stop, or start Tlisten services using the Listener page, follow these steps.
tlisten process for each BEA Tuxedo application running on your machine.)
Besides viewing and controlling Tlisten services using the Listener page, you can click Start Programs Administrative Tools Services to launch the Services window and then view and control Tlisten services via the Services window.
The IPC Resources page enables you to configure the interprocess communication (IPC) resources on your Windows Server 2003 system to maximize BEA Tuxedo performance.
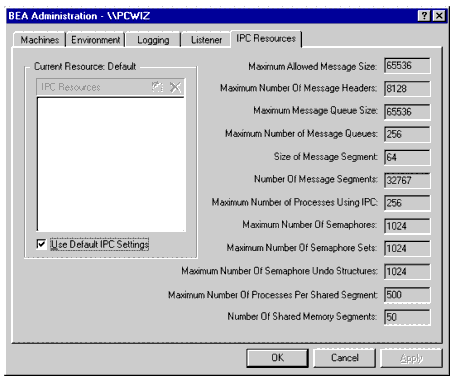
During the BEA Tuxedo installation, the installer program installed a BEA ProcMGR service on your Windows Server 2003 system. Each time you boot your system, the BEA ProcMGR service configures the IPC resources on your machine to whatever values you set on the IPC Resources page. The values shown in the preceding display are the default IPC values set by the installer program.
On most machines, BEA ProcMGR runs as installed; however, you can use the IPC Resources page to tune the IPC resources and maximize performance. To determine the minimum IPC Resource values required for a BEA Tuxedo application, see the following table and Checking IPC Requirements in Installing the BEA Tuxedo System. The following table maps the names of the IPC Resources on a Windows Server 2003 system to the traditional names on a UNIX system.
To modify IPC Resource values using the IPC Resources page, follow these steps:
Programs Administrative Tools Services to launch the Services window and then stop and restart the BEA ProcMGR via the Services window.
When interpreting the Maximum Number of Processes Using IPC parameter on the IPC Resources page, keep the following information in mind:
MAXDISPATCHTHREADS in the target application's configuration (UBBCONFIG) file, where 1 represents the main dispatcher thread.
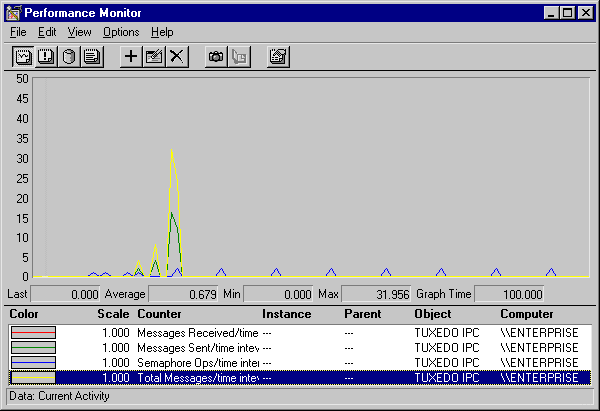
You can view the performance of a running BEA Tuxedo application on the Windows Server 2003 Performance Monitor. Choose Start Programs Administration Tools Performance Monitor to launch the Performance Monitor window.
The Windows Server 2003 Registry is the repository for all hardware, software, and application configuration settings for the Windows Server 2003 system. During the BEA Tuxedo installation, the installer program writes general installation information as well as IPC Resource values to the Registry. The structure of the Registry relevant to BEA Tuxedo is as follows.
HKEY_LOCAL_MACHINE\Software\BEA Systems\Tuxedo\9.1\...
To view this structure, choose Start Run to launch the Run dialog box, enter regEdt32, and click OK to launch the Registry Editor window.
The Developer key stores product information, including the major and minor version numbers of the release, and user and company names.
The Environment key stores the locations referenced by the BEA Tuxedo environment variables set on your Windows Server 2003 system. It also stores other values such as IPC resource settings.
The Security key holds the access permissions for BEA Tuxedo processes and services. The following permissions are mandatory:
BEA recommends that the Administrator have full control permissions.


|