Administration Console Online Help

Previous Next Open TOC in new window
Content starts here

Create scoped security roles

Before you begin

Create users and groups. See Manage users and groups.


A scoped role applies to a specific instance of a WebLogic resource (such as a method on an EJB or a branch of a JNDI tree). See Manage security roles.

If two roles conflict, the role of a narrower scope overrides the role of the broader scope. For example, a scoped role for an EJB resource overrides a global role or a scoped role for the enterprise application that contains the EJB.

To create a scoped role for a WebLogic resource:

  1. Access the Security: Roles page for the resource:

    Each resource provides its own Security: Roles page, and you can access it through any of several navigational paths.

    1. In the left pane of the Administration Console, select Security Realms.
    2. On the Summary of Security Realms page, select the name of the realm that you want to secure the resource (for example, myrealm).
    3. On the Settings page, select the Roles and Policies tab. Then select the Roles subtab.

      The Roles page organizes all of the domain's resources and corresponding roles in a hierarchical tree control.

    4. On the Roles page, in the Roles table, expand the nodes in the Names column until you find the resource that you want to secure.

      For information on finding resources in the Names column, see the description of the Name column display.

    5. In the Names column, expand the resource's node and select the name of the Roles sub-node.

      Note: For a stand-alone Web application, you can create a role to be used by any policy within the entire Web application, or you can create a role that can be used to secure only a specific URL pattern. To create a role for a URL pattern, select the name of the URL Patterns and Roles sub-node. For a Web application module within an enterprise application, you can create roles only for specific URL patterns.

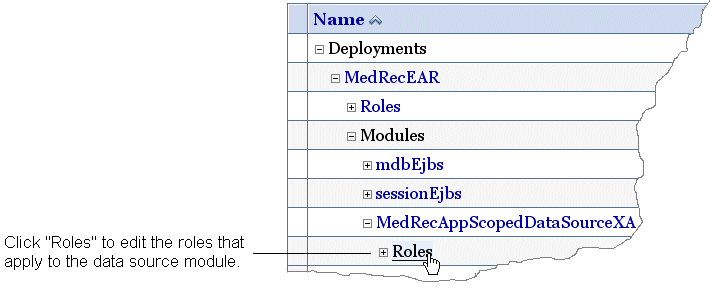
      For example, to add roles to the MedRecAppScopedDataSourceXA resource, click its Roles sub-node (see figure below).

      The Administration Console displays the resource's Security: Roles page.

  2. Create the scoped role:
    1. On the resource's Security: Roles page, click New.

      The Administration Console displays the Create a Role page.

    2. If you are creating a role for a URL pattern in a Web application, in the URL Pattern field enter a string that represents the path to the Web application resource. See Configuration Options.
    3. In the Name field, enter a name for the role. See Configuration Options.
    4. If you have configured more than one role mapper for the realm, from the Provider Name list select the role mapper you want to use for this resource.

      Role mapping is the process whereby principals (users or groups) are dynamically mapped to security roles at runtime. The role mapper provider is responsible for saving your role definition in its repository. See Configure Role Mapping providers.

    5. Click OK to save your changes.

      The Administration Console displays the new role in the Scoped Roles table.

  3. Create a role condition, which specifies who is in the scoped role under which set of conditions:
    1. In the resource's Roles table, in the Role Name column, select the new role.

      The Administration Console displays the Role Conditions page.

    2. In the Role Conditions section, click Add Conditions.
    3. On the Choose a Predicate page, in the Predicate List, select a condition.

      Oracle recommends that you use the Group condition whenever possible. This condition grants the security role to all members of the specified group (that is, multiple users).

      For a description of all conditions in the Predicate List, see Security Role Conditions.

    4. The next steps depend on the condition that you chose:
      • If you selected Group or User, click Next, enter a user or group name in the argument field, and click Add. The names you add must match groups or users in the security realm active for this WebLogic domain.
      • If you selected a boolean predicate (Server is in development mode , Allow access to everyone, or Deny access to everyone) there are no arguments to enter. Click Finish and go to step 4.
      • If you selected a context predicate, such as Context element's name equals a numeric constant, click Next and enter the context name and an appropriate value. It is your responsibility to ensure that the context name and/or value exists at runtime.
      • If you selected a time-constrained predicate, such as Access occurs between specified hours, click Next and provide values for the Edit Arguments fields.
    5. Click Finish.
  4. (Optional) Create additional role expressions.
  5. (Optional) The WebLogic Security Service evaluates expressions in the order they appear in the list. To change the order, select the check box next to a condition and click the Move Up or Move Down button.
  6. (Optional) Use other buttons in the Scoped Role Conditions section to specify relationships between the conditions:
    • Select And/Or between expressions to switch the and / or statements.
    • Click Combine or Uncombine to merge or unmerge selected expressions. See Combine Conditions.
    • Click Negate to make a condition negative; for example, NOT Group Operators excludes the Operators group from the role.
  7. Click Save.

After you finish

Create a security policy that determines which roles can access this resource. See Create policies for resource instances


Back to Top