10 Integration With Oracle Identity Management
This section contains the following sections:
-
Section 10.1, "Overview of Oracle Access Manager Integration"
-
Section 10.6, "Changing the Login Form for the Administration Console Application"
-
Section 10.9, "Configuring WebCenter and BPEL Authentication"
10.1 Overview of Oracle Access Manager Integration
Oracle Access Manager (OAM) is the recommended single sign-on solution for Oracle Fusion Middleware 11g Release 1. For more information on installing and configuring an OAM installation, see Enterprise Deployment Guide for Oracle Identity Management. This chapter explains the procedure for configuring the WebCenter installation with an existing OAM installation and the underlying directory service. Oracle recommends using either Oracle Internet Directory (OID) or Oracle Virtual Directory (OVD) or both of these directory services.
10.2 Prerequisites for Oracle Access Manager
The setup for Oracle Access Manager (OAM) assumes an existing OAM installation complete with Access Managers and a policy protecting the Policy Manager. For more information on installing and configuring an OAM installation, see the Enterprise Deployment Guide for Oracle Identity Management. This setup includes a directory service such as Oracle Internet Directory (OID) either as a stand-alone or as part of an Oracle Virtual Directory (OVD) configuration. This chapter will provide the necessary steps for configuring your WebCenter installation with either OID or OVD.
In addition, the OAM installation should have its own Web server configured with WebGate. This section also provides the steps for using the OAM Web server as a delegated authentication server.
10.3 Using the OAM Configuration Tool
The OAM Configuration Tool (oamcfg) starts a series of scripts and setup the required policies. It requires various parameters as inputs. Specifically, it will create the following:
-
A Form Authentication scheme in OAM
-
Policies to enable authentication in WLS
-
A Web Gate entry in OAM to enable OHS Webgates (from your WebTier) to protect your configured application
-
A Host Identifier, depending on the scenario chosen (a default host identifier would be used, if not provided)
-
Policies to protect and unprotect application specific URLs.
This section covers the following topics:
-
Section 10.3.1, "Collecting the Information for the OAM Configuration Tool"
-
Section 10.3.3, "Verifying Successful Creation of the Policy Domain and Access Gate"
10.3.1 Collecting the Information for the OAM Configuration Tool
The following information should be collected or prepared prior to running the OAM Configuration tool:
-
Password: Create a secure password. This will be used as the password for the WebGate installation created later.
-
LDAP Host: host name of the Directory Server or Load Balancer address in the case of an HA/EDG configuration.
-
LDAP Port: port of the Directory Server.
-
LDAP USER DN: DN of the LDAP admin user. This will be a value such as "cn=orcladmin."
-
LDAP password: password of the LDAP admin user
-
oam_aa_host: host name of an Oracle Access Manager
-
oam_aa_port: port of the Oracle Access Manager
10.3.2 Running the OAM Configuration Tool
The OAM Configuration Tool resides in the ORACLE_HOME/modules/oracle.oamprovider_11.1.1/ directory (ORACLE_HOME will depend on which machine you are running this). The tool can be run from any machine with the required installation files. In this case, we run it from SOAHOST1.
The OAM Configuration Tool should be run as follows (all on a single command line):
ORACLE_BASE/product/fmw/jrockit_160_05_R27.6.2-20/bin java -jar oamcfgtool.jar mode=CREATE
app_domain="WebCenter_EDG"
protected_uris="$URI_LIST"
public_uris="$PUBLIC_URI_LIST"
app_agent_password=<Password_to_be_provisioned_for_App_Agent>
ldap_host=OID.MYCOMPANY.COM
ldap_port=389
ldap_userdn="cn=orcladmin"
ldap_userpassword=<Password_of_LDAP_Admin_User>
oam_aaa_host=OAMHOST1
oam_aaa_port=OAMPORT1
The $URI_LIST and $PUBLIC_URI_LIST variables in the above command depend on the topology:
-
WebCenter only:
$URI_LIST="/webcenter/adfAuthentication,/owc_wiki/user/login.jz,/owc_wiki/adfAuthentication,/integration/worklistapp,/workflow/sdpmessagingsca-ui-worklist/faces/adf.task-flow,/workflow/WebCenterWorklistDetail/faces/adf.task-flow,/workflow/sdpmessagingsca-ui-worklist,/rss/rssservlet,/owc_discussions/login!withRedirect.jspa,/owc_discussions/login!default.jspa,/owc_discussions/login.jspa,/owc_discussions/admin,/em,/console"
$PUBLIC_URI_LIST="/webcenter,/owc_wiki,/owc_discussions,/rss,/workflow"
-
WebCenter and SOA:
$URI_LIST="/webcenter/adfAuthentication,/owc_wiki/user/login.jz,/owc_wiki/adfAuthentication,/integration/worklistapp,/workflow/sdpmessagingsca-ui-worklist/faces/adf.task-flow,/workflow/WebCenterWorklistDetail/faces/adf.task-flow,/workflow/sdpmessagingsca-ui-worklist,/rss/rssservlet,/owc_discussions/login!withRedirect.jspa,/owc_discussions/login!default.jspa,/owc_discussions/login.jspa,/owc_discussions/admin,/em,/console, /DefaultToDoTaskFlow,/b2b,/sdpmessaging/userprefs-ui"
$PUBLIC_URI_LIST="/webcenter,/owc_wiki,/owc_discussions,/rss,/workflow"
Note:
If SOA is installed later or other additional URLs need to be protected, the OAM configuration tool should be executed again using the sameapp_domain and including all the URLs that would be protected (not just the new ones).If your command ran successfully, you should see the following output:
Successfully connected to LDAP
Processed input parameters
Intialized Global Configuration
10.3.3 Verifying Successful Creation of the Policy Domain and Access Gate
To verify the policy domain, complete these steps:
-
Log on to the Oracle Access Manager:
http://OAMADMINHOST:<port>/access/oblix/ -
Click Policy Manager.
-
Click the My Policy Domains link on the left panel, you will see a list of all policy domains, among which the domain you just created will be listed. It will have the suffix _PD (for example,
WebCenter_EDG_PD). In the third column (URL prefixes, you will also see the URIs you specified during the creation of this domain). -
Click the link to the policy domain you just created. you will land in the General area of this domain.
-
Click the Resources tab, you will see the URIs you specified. You can also click other tabs to view other settings.
Verifying the Access Gate Configuration
To verify the access gate configuration, complete these steps:
-
Click the Access System Console link on the top right hand side (this acts like a toggle; after you click it, it becomes the Policy Manager link).
-
Click the Access System Configuration tab.
-
Click the AccessGate Configuration link on the left panel.
-
Enter 'SOA_EDG' as the search criterion (or any other substring you may have used as the
app_domainname in Section 10.3.2, "Running the OAM Configuration Tool"), and click Go. -
Once the access gate for the domain you just created shows up (this will have the suffix _AG (for example,
WebCenter_EDG_AG), click it, you will see the details of the access gate which you just created.
10.3.4 Updating the Host Identifier
The OAM Configuration Tool uses the value of the app_domain parameter to create a host identifier for the policy domain. This host identifier must be updated with all the host name variations for the host so that the configuration works correctly. Follow the steps below to update the host identifier created by the OAM Configuration Tool:
-
Navigate to the Access System Console by specifying the following URL in your web browser:
http://hostname:port/access/oblix
where
hostnamerefers to the host where WebPass Oracle HTTP Server instance is running andportrefers to the HTTP port of the Oracle HTTP Server instance. -
When prompted for a username and password, log in as an administrator. Click OK.
-
On the Access System main page, click the Access System Console link.
-
On the Access System Console page, click the Access System Configuration tab.
-
On the Access System Configuration page, click Host Identifiers at the bottom left.
-
On the List all host identifiers page, click on the host identifier created by the OAM Configuration Tool. For example, select
WebCenter_EDG. -
On the Host Identifier Details page, click Modify.
-
On the Modifying host identifier page, add all the possible host name variations for the host. Click the plus and minus symbols to add or delete fields as necessary. The Preferred HTTP Host value used in the Access System Configuration must be added as one of the host name variations. For example:
wcedg_wd,webhost1.mycompany.com:7777,admin.mycompany.com:7777. -
Select the check box next to Update Cache and then click Save.
A message box with the following message is displayed: "Updating the cache at this point will flush all the caches in the system. Are you sure?".
Click OK to finish saving the configuration changes.
-
Verify the changes on the Host Identifier Details page.
10.3.5 Updating the WebGate Profile
The OAM Configuration Tool populates the Preferred_HTTP_Host and hostname attributes for the WebGate profile that is created with the value of the app_domain parameter. Both these attributes must be updated with the proper values for the configuration to work correctly. Follow the steps below to update the WebGate profile created by the OAM CFG Tool.
-
Navigate to the Access System Console by specifying the following URL in your web browser:
http://hostname:port/access/oblix
where
hostnamerefers to the host where WebPass Oracle HTTP Server instance is running andportrefers to the HTTP port of the Oracle HTTP Server instance. -
On the Access System main page, click the Access System Console link, then log in as an administrator.
-
On the Access System Console main page, click the Access System Configuration link to display the AccessGates Search page.
-
Enter the proper search criteria and click Go to display a list of AccessGates.
-
Select the AccessGate created by the OAM Configuration Tool. For example: WebCenter_EDG_AG).
-
On the AccessGate Details page, select Modify to display the Modify AccessGate page.
-
On the Modify AccessGate page, update:
-
Hostname: Update the hostname with the name of the computer where WebGate is running, for example:
webhost1.mycompany.com. -
Preferred HTTP Host: Update the Preferred_HTTP_Host with one of the hostname variations specified in the previous section, for example:
admin.mycompany.com:7777.
-
-
Click Save. A message box with the "Are you sure you want to commit these changes?" message is displayed.
-
Click OK to finish updating the configuration.
-
Verify the values displayed on the Details for AccessGate page to confirm that the updates were successful.
10.3.6 Configuring Delegated Form Authentication
To configure the form authentication to redirect to the WebGate that was installed with the OAM installation, complete these steps:
-
Open the Access System Console.
-
In the Access System Configuration screen , select Authentication Management from the left-hand bar.
-
Select OraDefaultFormAuthNScheme.
-
Click Modify.
-
In the Challenge Redirect field, enter the host and port of the IDM installation; for example:
http://sso.mycompany.com.
A WebGate should already be installed in the IDM installation. Refer to the EDG for IDM for details.
10.4 Installing and Configuring WebGate
WebGate needs to be installed on each of the WEBHOSTn machines in order to secure the web tier:
-
Launch the WebGate installer (see Section 1.5.5, "What to Install" for information on where to obtain it) using the following command:
./Oracle_Access_Manager10_1_4_3_0_linux_OHS11g_WebGate –gui
-
The Welcome screen is displayed. Click Next.
-
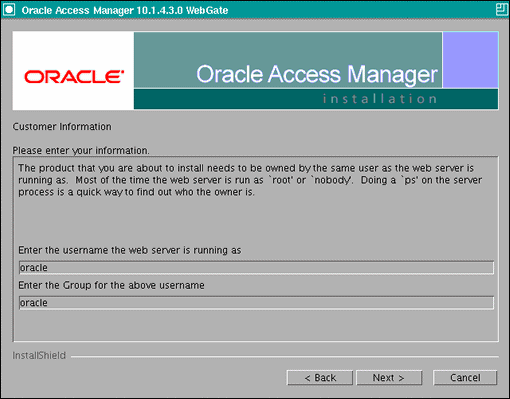
In the Customer Information screen (Figure 10-1), enter the user name and user group that the web server is running as. Click Next to continue.
-
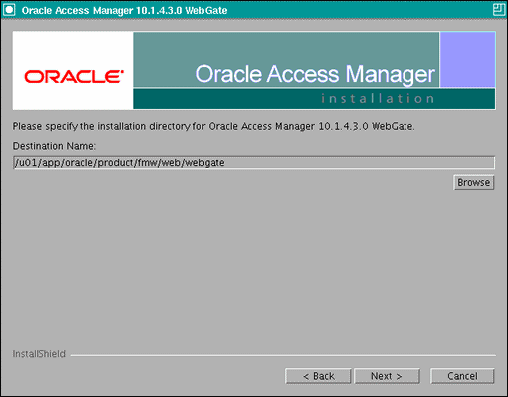
In the installation target screen (Figure 10-2), specify the directory where WebGate should be installed. Click Next to continue.
-
In the installation summary screen, click Next.
-
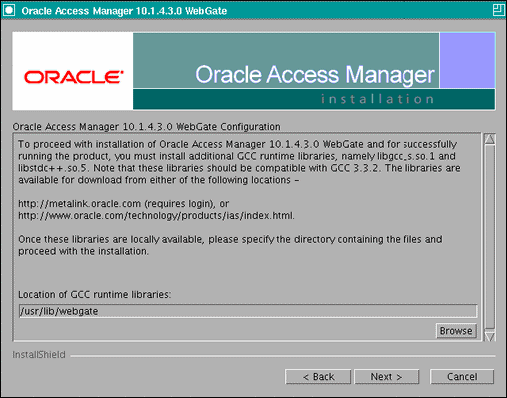
Download the required GCC runtime libraries for WebGate as instructed in the WebGate configuration screen (Figure 10-3), and use Browse to point to their location on the local computer. Click Next to continue.
-
The installer now creates the required artifacts. After that is completed, click Next to continue.
-
In the transport security mode screen (Figure 10-4), select "Open Mode: No Encryption" and click Next to continue.
Figure 10-4 Transport Security Mode Screen
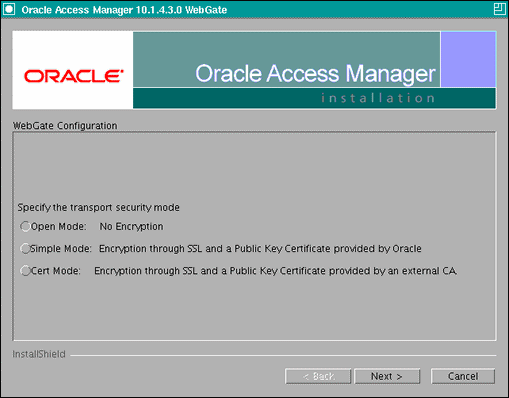
Description of "Figure 10-4 Transport Security Mode Screen"
-
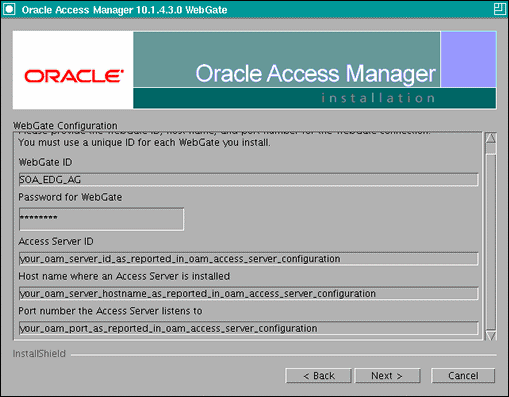
In the WebGate configuration screen, provide the details of the Access Server that will be used. You must provide the following information:
-
WebGate ID, as provided when the OAM configuration tool was executed
-
Password for WebGate
-
Access Server ID, as reported by the OAM Access Server configuration
-
Access Server host name, as reported by the OAM Access Server configuration
-
Access Server port number, as reported by the OAM Access Server configuration
Note:
The Access Server ID, host name, and port are all required.You can obtain these details from your Oracle Access Manager administrator. Click Next to continue.
Figure 10-5 Access Server Configuration Screen
Description of "Figure 10-5 Access Server Configuration Screen"
-
-
In the Configure Web Server screen, click Yes to automatically update the web server. Click Next to continue.
-
In the next Configure Web Server screen, specify the full path of the directory containing the
httpd.conffile. This file is located in the following directory:ORACLE_BASE/admin/<OHS_Instance>/config/OHS/<OHS_ComponentName>
For example:
/u01/app/oracle/admin/ohs_instance2/config/OHS/ohs2/httpd.conf
Click Next to continue.
-
In the next Configure Web Server page, a message informs you that the Web server configuration has been modified for WebGate. Click Yes to confirm.
-
Stop and start your Web server for the configuration updates to take effect. Click Next to continue.
-
In the next Configure Web Server screen, the following message is displayed: "If the web server is set up in SSL mode, then the httpd.conf file needs to be configured with the SSL related parameters. To manually tune your SSL configuration, please follow the instructions that come up". Click Next to continue.
-
In the next Configure Web Server screen, a message with the location of the document that has information on the rest of the product setup and Web server configuration is displayed. Choose No and click Next to continue.
-
The final Configure Web Server screen appears with a message to manually launch a browser and open the HTML document for further information on configuring your Web server. Click Next to continue.
-
The Oracle COREid Readme screen appears. Review the information on the screen and click Next to continue.
-
A message appears (along with the details of the installation) informing you that the installation was successful.
10.5 Setting Up the WebLogic Authenticators
This section covers the following topics:
10.5.1 Setting Up the OID Authenticator
This section covers the following topics:
10.5.1.1 Back Up Configuration Files
To be safe, first back up the relevant configuration files:
/u01/app/oracle/fmw_webcenter/user_projects/domains/wcedg/config/config.xml
/u01/app/oracle/fmw_webcenter/user_projects/domains/wcedg/config/fmwconfig/jps-config.xml
/u01/app/oracle/fmw_webcenter/user_projects/domains/wcedg/config/fmwconfig/system-jazn-data.xml
Also back up the boot.properties file for the Admin Server.
10.5.1.2 Identity Store
To configure the identity store to use LDAP, set the proper authenticator using the WebLogic Server Console:
-
Log in to the WebLogic Server Console.
-
Click the Security Realms link on the left navigational bar.
-
Click the myrealm default realm entry to configure it.
-
Open the Providers tab within the realm.
-
Observe that there is a
DefaultAuthenticatorprovider configured for the realm. -
Click the New button to add a new provider.
-
Enter a name for the provider, such as "OIDAuthenticator" for a provider that will authenticate the user to the Oracle Internet Directory.
-
Select the "OracleInternetDirectoryAuthenticator" type from the list of authenticators.
-
Click OK.
-
In the Providers screen, click the newly created OIDAuthenticator.
-
Set the control flag to "SUFFICIENT." This indicates that if a user can be authenticated successfully by this authenticator, then it is should accept that authentication and should not continue to invoke any additional authenticators. If the authentication fails, it will fall through to the next authenticator in the chain. Make sure all subsequent authenticators also have their control flag set to SUFFICIENT; in particular, check the DefaultAuthenticator and set that to SUFFICIENT.
-
Click Save to save this setting.
-
Open the Provider Specific tab to enter the details for the LDAP server.
-
Enter the details specific to your LDAP server. Click Save when you are done.
10.5.2 Setting Up the OAM ID Asserter
To set up the OAM ID Asserter, complete these steps:
-
Log into Weblogic Console, if not already logged in.
-
Navigate to
SecurityRealms\<Default Realm Name>\Providers. -
Click New and Select "OAM Identity Asserter" from the dropdown menu.
-
Name the asserter (for example, "OAM ID Asserter") and click Save.
-
Click the newly added asserter to see the configuration screen for OAM Identity Asserter.
-
Set the control flag to 'REQUIRED' and click Save.
-
Open the Provider Specific tab to configure the following required settings:
-
Primary Access Server: provide OAM server endpoint information in HOST:PORT format.
-
Access Gate Name: name of the access gate (for example,
WebCenter_EDG_AG). -
Access Gate Password: password for the access gate (optional).
-
-
Save the settings.
10.6 Changing the Login Form for the Administration Console Application
Change the web.xml file for the console application to direct logins to the "/" URL. To accomplish this, complete steps steps:
-
Make a backup of your
ORACLE_BASE/fmw/wlserver_10.3/server/lib/consoleapp/webapp/WEB-INF/web.xmlfile:SOAHOST1>cp ORACLE_BASE/fmw/wlserver_10.3/server/lib/consoleapp/webapp/WEB-INF/web.xml ORACLE_BASE/fmw/wlserver_10.3/server/lib/consoleapp/webapp/WEB-INF/web.xml.backup -
Edit the web.xml file and change the
form-login-pageURL to "/".Specifically, change:
login-config>
    <auth-method>CLIENT-CERT,FORM</auth-method>
    <form-login-config>
      <form-login-page>/login/LoginForm.jsp</form-login-page>
      <form-error-page>/login/LoginError.jsp</form-error-page>
    </form-login-config>
  </login-config>
to:
<login-config> <auth-method>CLIENT-CERT,FORM</auth-method> <form-login-config> <form-login-page>/</form-login-page> <form-error-page>/login/LoginError.jsp</form-error-page> </form-login-config> </login-config> -
To enable Admin Server failover with the same SSO behavior, repeat the above steps for the installation in SOAHOST2.
-
Restart the Administration Server.
10.7 Moving the WebLogic Administrator to LDAP
Once LDAP has been configured, all users (including administrative users) should be LDAP users. This needs to be configured by the LDAP administrator. An Administration group should be created with the necessary users. For information about the required steps, see section 8.5 of the Enterprise Deployment Guide for Oracle Identity Management. Use 'WC Administrators' for the group name and 'weblogic_wc' for the admin username.
Once this group is created, you must update the role definition for the WLS Global Admin role in WebLogic Server:
-
Access the WLS Admin Console.
-
Navigate to the location that defines the Admin role by selecting Security Realms, then
<myrealm>, then Roles and Policies, then Global Roles, then Roles, and then Admin View Role Condition. -
By default, you will see that the Administrators group in OID defines who has the Admin role in WebLogic Server.
-
You can change this by clicking "Add Conditions" to add a different group name, and then delete the "Administrators" group to leave the new one you have selected.
-
After making this change, any members of the new group specified, will be authorized to administer WLS.
10.8 Configuring WebCenter Applications
This section covers the following topics:
-
Section 10.8.2, "Configuring the WebCenter Administrator Role"
-
Section 10.8.4, "Configuring Discussion Server and Wiki for OAM"
-
Section 10.8.5, "Updating the Authentication Method for the Console Application"
10.8.1 Configuring System Properties
There is a system property that tells WebCenter and ADF that the application is configured in SSO mode and some special handling is required. The following system property is required in this mode:
| Property | Value | Comment |
|---|---|---|
|
oracle.webcenter.spaces.osso |
true |
This flag tells WebCenter that SSO is being used, so no login form should be displayed on the default landing page. Instead, it will render a login link that the user can click to invoke the SSO authentication. |
To set this property, edit the setDomainEnv.sh script which is located in your <adminserver_domain_home>/bin directory. Add the property to the EXTRA_JAVA_PROPERTIES variable, as follows:
EXTRA_JAVA_PROPERTIES="-Dweblogic.security.SSL.ignoreHostnameVerification=true -Doracle.mds.bypassCustRestrict=true -Djps.update.subject.dynamic=true -Doracle.webcenter.spaces.osso=true -noverify ${EXTRA_JAVA_PROPERTIES}"
After making this change, restart the following servers:
-
WebCenter's Administration Server
-
All the domain's managed servers
-
WebTier OHS
10.8.2 Configuring the WebCenter Administrator Role
After Oracle Internet Directory is configured as primary authenticator in WebCenter, the "weblogic" user should not be used as the WebCenter administrator. Create a user in Oracle Internet Directory and make that user the WebCenter administrator, either using WLST or Fusion Middleware Control:
-
Section 10.8.2.1, "Granting the WebCenter Spaces Administrator Role Using WLST"
-
Section 10.8.2.2, "Granting the WebCenter Spaces Administrator Role Using Fusion Middleware Control"
10.8.2.1 Granting the WebCenter Spaces Administrator Role Using WLST
To grant the WebCenter Administrator role using WLST:
-
Start WLST.
-
Connect to the WebCenter Spaces Administration Server for the target domain with the following command:
connect('<user_name>','<password>, '<host_id:port>')Where:
-
<user_name>is the name of the user account with which to access the Administration Server (for example,weblogic) -
<password>is the password with which to access the Administration Server -
<host_id>is the host ID of the Administration Server -
<port>is the port number of the Administration Server (for example,7001).
-
-
Grant the WebCenter Spaces administrator application role to the user in Oracle Internet Directory using the
grantAppRolecommand as shown below:grantAppRole(appStripe="webcenter", appRoleName="s8bba98ff_4cbb_40b8_beee_296c916a23ed#-#Administrator", principalClass="weblogic.security.principal.WLSUserImpl", principalName="<wc_admin>")where
<wc_admin>is the name of the administrator account to create. -
To test the new account, log in to WebCenter Spaces using the new account name.
The Administration link should appear, and you should be able to perform all administrator operations.
10.8.2.2 Granting the WebCenter Spaces Administrator Role Using Fusion Middleware Control
This section describes how to grant the WebCenter Spaces administrator role to a user account other than the default "weblogic" account.
To grant the WebCenter Spaces Administrator role using Fusion Middleware Control:
-
Log into Fusion Middleware Control and select the WebLogic domain for WebCenter Spaces.
-
From the WebLogic Domain menu, select Security, and then Application Roles.
The Application Roles page displays.
-
Search for the Administration application role by selecting the Application name for WebCenter Spaces (
WLS_Spaces/webcenter), and providing the following internal identifier used by WebCenter Spaces as the Role Name:s8bba98ff_4cbb_40b8_beee_296c916a23ed#-#Administrator
The search should return
s8bba98ff_4cbb_40b8_beee_296c916a23ed#-#Administrator, which is the administrator role identifier. -
Click the administrator role name (
s8bba98ff_4cbb_40b8_beee_296c916a23ed#-#Administrator) in the Role Name column.The Edit Application Role page displays.
-
Click Add User.
The Add User pop-up displays.
-
Use the Search function to search for the user to assign the Administrator role to.
-
Use the arrow keys to move the user from the Available Users column to the Selected Users column, and click OK.
-
On the Edit Application Role page, click OK.
-
Restart the
WLS_Spacesmanaged server.When you log in to WebCenter Spaces, the Administration link should appear and you should be able to perform all administrator operations.
10.8.3 Policy and Credential Store Migration
Ensure that a jpsroot has been configured on OID for WebCenter. It should be machine-specific. See the Enterprise Deployment Guide for Oracle Identity Management for additional details.
cd MW_HOME/wc/common/bin
./wlst.sh
connect('weblogic',-password-, 'SOAHOST1.mycompany.com:7001')
reassociateSecurityStore(domain="wcedg_Domain",admin="cn=orcladmin", password="-provide orcladmin passwd-",
ldapurl="ldap://LDAPHOST:LDAPPORT",servertype="OID",jpsroot="cn=jpsroot_webcenter_Configuring Discussion Server and Wiki for OAMwchost1")
10.8.4 Configuring Discussion Server and Wiki for OAM
This section covers the following topics:
10.8.4.1 Setting Up Discussion Server to Use LDAP as the ID Store
To set up the discussion server to use LDAP as the ID store, complete these steps:
-
First, find the
jive_startup.xmlfile in your WebCenter installation (it can be found in$MW_HOME/user_projects/domains/wcedg_domain/config/fmwconfig/servers/WLS_Services/owc_discussions_11.1.1.1.0). -
Create a backup of this file, and then change the line with the content:
<setup>true</setup>
to:
<setup>false</setup>
-
Save the file and then connect to the Discussions Server URL (
http://SOAHOST1:9003/owc_discussions). -
Under Database Settings, choose JNDI Datasource, and click Continue.
-
Under Datasource Settings, give jdbc/OWC_DiscussionsDS, and click Continue.
-
For User, Group and Authentication Systems, choose LDAP and click Continue.
-
Under LDAP User System, use the form to fill in appropriate LDAP values, and click Continue. Typically, the LDAP Host, Port, BaseDN, and Admin DN must be set. All the rest can be left to their defaults or changed according to your setup.
-
Under Other Settings, check the details and make correction where appropriate. Click b when you are done.
-
Under LDAP User Data Storage Mode, specify the LDAP user name to be the Discussions Server administrator (typically
orcladmin).
Setting Up Discussions Server to Use OAM as SSO Provider
To set up Discussions Server to use OAM as SSO provider, complete these steps:
-
Set the AuthFactory class:
-
Log in to the administration UI at
http://<host>:<port>/owc_discussions/admin(the port here is still the port of the WLS_Services managed server). -
Go to the System Properties page.
-
Add or modify the following system property:
Name: AuthFactory.className
Value: oracle.jive.sso.OracleSSOAuthFactory
Note:
If you do not enter the correct value for the AuthFactory.className property, the owc_discussions will not start after you redeploy the SSO version of the application and a Class Not Found error will be written to the log file. To fix an incorrect property value, you must update the jiveproperty table in the database schema using the following command:SQL>update jiveproperty set propvalue='oracle.jive.sso.OracleSSOAuthFactory' where name='AuthFactory.className';
-
-
Deploy the SSO-enabled owc_discussions application:
-
Go to Administrator console of your WebLogic server.
-
Log in with your administrator user password (for example,
weblogic/weblogic). -
Go to Deployments.
-
Select owc_discussions stop and delete.
-
Go to the install page and specify the target directory for the SSO-enabled owc_discussions application. This directory is typically
MW_HOME/wc/discussionserver. -
Choose
application owc_discussions_sso.earand deploy with all default options, except the name of the application, which you should set toowc_discussions.
-
-
Restart the WLS_Services managed server.
You can now access the discussion server's administration console through the OHS port at http://WEBHOSTn:7777/owc_discussions/admin/, and be presented with the WebGate login form.
Repeat the above steps for all Discussions installations in the cluster.
Creating a Discussions Server Connection for WebCenter From the EM
As an extra step, create a Discussions Server connection for WebCenter from the EM:
-
Log on to an EM instance, register your WebCenter domain.
-
Log on to this WebCenter domain.
-
From the WebCenter Spaces "WebCenter" dropdown menu, select Settings, and then Service Configuration.
-
Click Discussions and Announcements, and then on Add.
-
In the Add Discussion and Announcement Connection screen, enter the name (DFConnection), service URL (
http://<host>:<port>/owc_discussions) and administrator user name. -
Click OK to save the settings.
-
Restart the WLS_Spaces managed server.
Now, once you log in to WebCenter, you will be SSO'ed to the discussion server as well.
10.8.4.2 Configuring Wiki
The wiki page functionality is supported as a portlet that you can embed in a web page (which also enables the SSO functionality). Since it does not require or support an identity store, there is no need to set up the OID.
When configuring wiki for OAM, the following file needs to be updated on each node:
ORACLE_BASE/admin/wcedg/WLS_ServicesN/wcedg/stage/owc_wiki/11.1.1.1.0/owc_wiki/WEB-INF/classes/application_config.script
There is a line in this file that defaults as follows:
logout_url: /adfAuthentication?logout=true&end_url=/user/login.jz
This needs to be modified to the following:
logout_url: /user/login.jz
After updating the file, the WLS_Services managed server must be restarted. This ensures that logout from owc_wiki works properly when configured for OAM SSO.
Adding a Wiki Page to WebCenter
To add a wiki page to a WebCenter Group Space, complete these steps:
-
Log in to WebCenter Spaces, navigate to a group space.
-
Add a page, choose "Web Page" as the style.
-
Once the page is created, click the Edit icon (pencil) on the top-right corner. In the Component Properties dialog, enter the following URL to the Source field:
http://<host>:<OHS port>/owc_wiki/page/show.jz?inline=1&scope=#{communityContext.communityName}Note that it is the OHS port that is used, so that this will go through the WebGate which will facilitate SSO.
-
Upon completion of specifying the component properties, you will see the wiki page contents.
-
Save the changes.
10.8.5 Updating the Authentication Method for the Console Application
The auth-method needs to be updated in the web.xml file for the console application. The web.xml file is located under the MW_HOME/wlserver_10.3/server/lib/consoleapp/webapp/WEB-INF directory.
-
Open the web.xml file in an editor.
-
Change the auth-method from:
<login-config>
   <auth-method>CLIENT-CERT,FORM</auth-method>
   <form-login-config>
     <form-login-page>/login/LoginForm.jsp</form-login-page>
     <form-error-page>/login/LoginError.jsp</form-error-page>
   </form-login-config>
 </login-config>
to:
<login-config> <auth-method>CLIENT-CERT</auth-method> </login-config> -
Stop and start the Admin Server
10.9 Configuring WebCenter and BPEL Authentication
This section covers the following topics:
10.9.1 Set Authenticator
Ensure that the SOA domain is using the same authenticators as the WebCenter domain and has been configured for OAM Authentication.
10.9.2 Set Role Members for BPMWorkflowAdmin Application Role in soa-infra
When associating the domain with a identity store that does not contain the user "weblogic", you must assign some other valid user into the application role BPMWorkflowAdmin. To assign the role to a valid user, the following may be done:
-
Create a user in OID, in this case named WCAdmin, who will be assigned the role.
-
Assign the role. This can be done using wlst from the SOA Oracle home:
For example:
cd $ORACLE_HOME/common/bin/
wlst.sh

connect('weblogic','weblogic', 'SOAADMINHOST:7001')
revokeAppRole(appStripe="soa-infra", appRoleName="BPMWorkflowAdmin", principalClass="oracle.security.jps.service.policystore.ApplicationRole", principalName="SOAAdmin")
grantAppRole(appStripe="soa-infra", appRoleName="BPMWorkflowAdmin", principalClass="weblogic.security.principal.WLSUserImpl", principalName="WCAdmin")
10.10 Backing Up the Installation
After you have verified that the extended domain is working, back up the installation. This is a quick backup for the express purpose of immediate restore in case of problems in the further steps. The backup destination is the local disk. This backup can be discarded once the enterprise deployment setup is complete. At this point, the regular deployment-specific backup and recovery process can be initiated. The Oracle Fusion Middleware Administrator's Guide provides further details. For information on describing the Oracle HTTP Server data that must be backed up and restored, refer to the "Backup and Recovery Recommendations for Oracle HTTP Server" section in this guide. For information on how to recover components, see "Recovery of Components" and "Recovery After Loss of Component" sections in the guide. For recommendations specific to recovering from the loss of a host, see the "Recovering Oracle HTTP Server to a Different Host" in the guide. Also refer to the Oracle Database Backup and Recovery Guide for information on database backup.
To back up the installation a this point, complete these steps:
-
Back up the web tier:
-
Shut down the instance using
opmnctl.ORACLE_BASE/admin/<instance_name>/bin/opmnctl stopall
-
Back up the Middleware Home on the web tier using the following command (as root):
tar -cvpf BACKUP_LOCATION/web.tar $MW_HOME
-
Back up the Instance Home on the web tier using the following command (as root):
tar -cvpf BACKUP_LOCATION/web_instance.tar $ORACLE_INSTANCE
-
Start the instance using
opmnctl:ORACLE_BASE/admin/<instance_name>/bin/opmnctl startall
-
-
Back up the AdminServer domain directory. Perform a backup to save your domain configuration. The configuration files all exist under the
ORACLE_BASE/ admin/<domain_name>directory.SOAHOST1> tar -cvpf edgdomainback.tar ORACLE_BASE/admin/<domain_name>
