| Oracle® Fusion Middleware Tutorial for Running and Building an Application with Oracle SOA Suite 11g Release 1 (11.1.1) Part Number E10275-02 |
|
|
View PDF |
| Oracle® Fusion Middleware Tutorial for Running and Building an Application with Oracle SOA Suite 11g Release 1 (11.1.1) Part Number E10275-02 |
|
|
View PDF |
In this chapter, you provide functionality for updated orders. You create a mediator service component to publish business event OrderUpdateEvent and send the order ID for the order to the OrderProcessor BPEL process. You create a second mediator service component to subscribe to the business event, send the order ID to the StoreFrontService service, and wait for the StoreFrontService service to respond with updated order information.
This chapter contains the following sections:
Section 8.1, "Task 1: Copy Schema File Needed for Business Event"
Section 8.3, "Task 3: Create a Routing Rule to Initiate the Business Event"
Section 8.5, "Task 5: Create a Routing Rule to Send Order Updates to the StoreFrontService service"
Section 8.6, "Task 6: Redeploy the OrderBookingComposite Composite"
Section 8.7, "Task 7: Initiate a Test Instance for the OrderBookingComposite Composite"
To obtain the schema:
Copy OrderProcessor.xsd from directory DEMO_DOWNLOAD_HOME\CompositeServices\OrderBookingComposite\xsd to MY_FOD_HOME\CompositeServices\OrderBookingComposite\xsd. This schema file contains the additional updateOrderStatus schema element to create the business event.
In the Application Navigator, click the Refresh icon.
To create business event OrderUpdateEvent and create a mediator to publish the business event:
Drag a Mediator service component into the SOA Composite Editor. This service component enables you to subscribe to the business event.
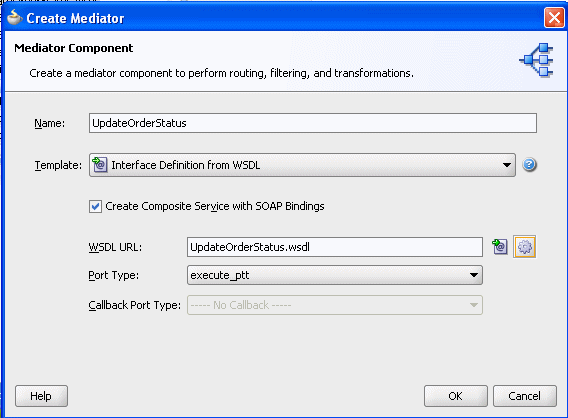
From Template, select Interface Definition from WSDL.
Select the Create Composite Service with SOAP Bindings.
From the WSDL URL field, generate a WSDL file:
Click the Generate WSDL from schema(s) icon.
From the Create WSDL dialog, in the URL field, click the browse for schema file icon.
In the Type Chooser dialog, expand Project Schema Files > OrderProcessor.xsd and select updateOrderStatus.
Click OK.
Back in the Create WSDL dialog, in the Namespace field, enter http://www.globalcompany.example.com/ns/OrderBookingService.
Click OK and return to the Create Mediator dialog.
Back in the Create Mediator dialog, click OK to create the mediator with the settings.
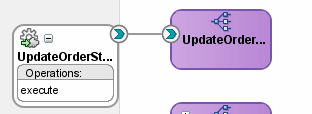
The UpdateOrderStatus_ep SOAP service and the UpdateOrderStatus mediator display in the SOA Composite Editor composite.
To create a routing rule to initiate the business event:
Double-click the UpdateOrderStatus mediator.
In the Routing Rules section of the Mediator Editor, from the Create dropdown list, select static routing rule to create a routing rule to initiate the business event.

In the Target Type message dialog, click Event.
In the Event Chooser dialog, click the Create new event definition file (edl) icon. It is the second icon to the right of the field.
In the Event Definition name field, enter OrderEventsDefinition.
In the Namespace field, enter http://www.globalcompany.example.com/ns/OrderBookingService.
Create business event OrderUpdateEvent:
From the Events table, click the Add an Event icon to add an event.
The Add an Event dialog appears.
Enter and select the following values:
| Element | Value |
|---|---|
| Element |
|
| Name | OrderUpdateEvent |
Click OK to display the Event Definition dialog.
Click OK to save settings.
The Event Chooser dialog displays with the OrderUpdateEvent event.
Click OK in the Event Chooser dialog.
The Routing Rules updates with a routing rule to initiate business event OrderUpdateEvent.
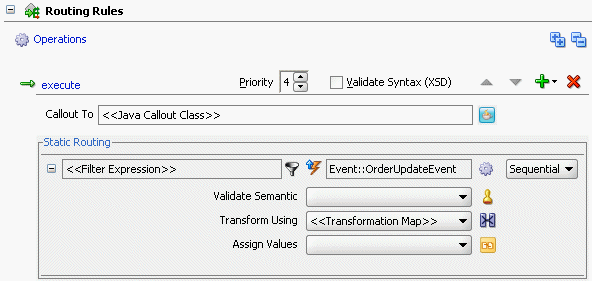
Modify the transformation used for the UpdateOrderStatus mediator service components, so that any service subscribing to this event receives input from the OrderUpdateEvent business event:
Click the transformation icon next to the Transform Using field.
In the Request Transformation Map dialog, select Create New Mapper File and leave the default file entry as updateOrderStatus_To_OrderUpdateEvent.xsl, and then click OK.
The Data Mapper displays.
On the Source:UpdateOrderStatus.wsdl (left) side, click and drag tns:orderId to orderId on the XSLT File: OrderProcessor.xsd (right) side.
On the Source:UpdateOrderStatus.wsdl (left) side, click and drag tns:orderStatus to orderStatus on the XSLT File: OrderProcessor.xsd (right) side. The namepace in your environment may vary.
The Data Mapper dialog should look like the following now.

Select Save All from the File main menu to save your work.
Click X in the updateOrderStatus_To_OrderUpdateEvent.xsl tab to close the Data Mapper.
With the UpdateOrderStatus.mplan tab back in focus, in the Routing Rules section, you should see file updateOrderStatus_To_OrderUpdateEvent.xsl in the Transform Using field.
Click X in the UpdateOrderStatus.mplan tab to close Mediator Editor.
To create a mediator to subscribe to the OrderUpdateEvent business event and initiate the StoreFrontService service:
Drag a Mediator service component into the SOA Composite Editor. This service component enables you to subscribe to the business event.
In the Name field, enter OrderUpdateEventMediator.
From the Templates list, select Subscribe to Events.
The window refreshes to display an events table.
Click the Subscribe to a new event icon to display the Event Chooser dialog.
With the OrderUpdateEvent event selected, click OK.
You are returned to the Create Mediator dialog.
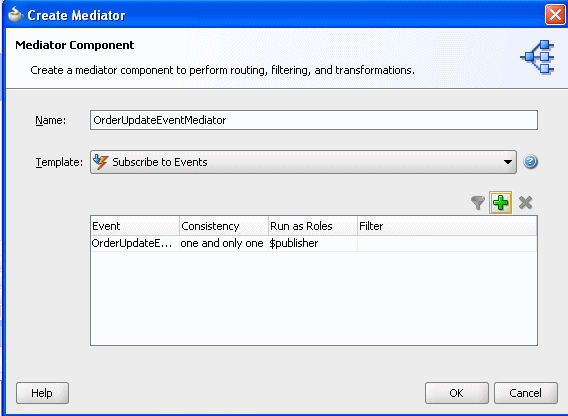
In the Create Mediator dialog, click OK.
The OrderUpdateEventMediator mediator displays in the SOA Composite Editor. The icon on the left side that indicates that mediator is configured for an event subscription.
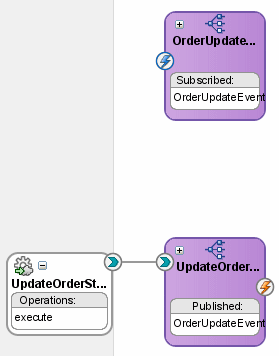
To create routing rules to send the order ID to the StoreFrontService service, and wait for the StoreFrontService service to respond with updated order information.
Double-click the OrderUpdateEventMediator mediator.
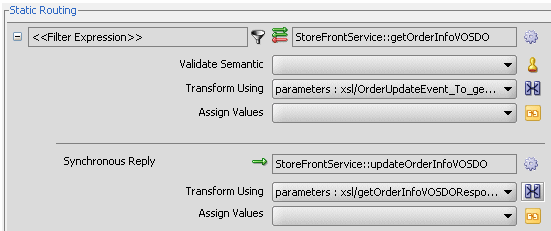
In the Routing Rules section of the Mediator Editor, from the Create dropdown list, select static routing rule to create a routing rule to initiate the business event.
In the Target Type message dialog, click Service.
In the Target Services dialog, expand References > StoreFrontService and select getOrderInfoVOSDO and then click OK.
Modify the parameter transformation so that the StoreFrontService service receives the order ID information from the mediator:
Click the transformation icon next to the Transform Using field.
In the Request Transformation Map dialog, select Create New Mapper File and leave the default file entry as OrderUpdateEvent_To_getOrderInfoVOSDO.xsl, and then click OK.
The Data Mapper displays.
On the Source:OrderProcessor.xsd (left) side, click and drag orderId to types:orderId on the StoreFrontService.wsdl (right) side.
The Data Mapper dialog should look like the following now.

Select Save All from the File main menu to save your work.
Click X in the OrderUpdateEvent_To_getOrderInfoVOSDO.xsl tab to close the Data Mapper.
With the OrderUpdateEventMediator.mplan tab back in focus, in the Routing Rules section, you should see file OrderUpdateEvent_To_getOrderInfoVOSDO.xsl in the Transform Using field.
In the Synchronous Reply section of the Mediator Editor, click the Browse for target service operations icon:

In the Target Type message dialog, click Service.
In the Target Services dialog, expand References > StoreFrontService and select updateOrderInfoVOSDO and then click OK.
Modify the parameter transformation so that the StoreFrontService service receives the proper information from the mediator:
Click the transformation icon next to the Transform Using field.
In the Request Transformation Map dialog, select Create New Mapper File and leave the default file entry as getOrderInfoVOSDOResponse_To_updateOrderInfoVOSDO.xsl, and then click OK.
The Data Mapper displays.
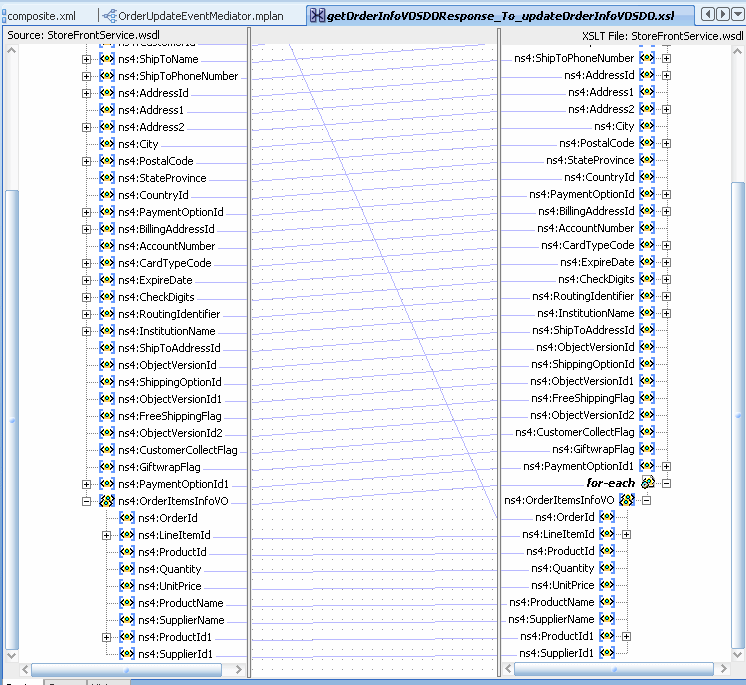
On the Source (left) side, click and drag types:getOrderInfoVOSDOResponse > types:result to types:updateOrderInfoVOSDO > types:orderInfoVO1 on the XSLT File right side.
The Auto Map Preferences dialog prompts to perform automatic mapping of the node.
Deselect option Match Elements Considering their Ancestor names.
Leave the default settings for the other options, and then click OK.
On the Source:StoreFrontService.wsdl side, expand types:results > ns4:OrderItemsInfoVO.
On the XSLT File:StoreFrontService.wsdl side, expand types:orderInfoVO1 > for-each > ns4:OrderItemsInfoVO. The namespace number values (for example, ns1, ns2) can vary.
In the Data Mapper, you can now see how the data is transformed for an updated order.
Select Save All from the File main menu to save your work.
Click X in the getOrderInfoVOSDOResponse.xsl tab to close the Data Mapper.
With the OrderUpdateEventMediator.mplan tab back in focus, in the Routing Rules section, you should see file getOrderInfoVOSDOResponse_To_updateOrderInfoVOSDO.xsl in the Transform Using field.
Click X in the OrderUpdateEventMediator.mplan tab to close Mediator Editor.
To redeploy the OrderBookingComposite composite:
In the Application Navigator, right-click OrderBookingComposite and select Deploy > OrderBookingComposite > to MyAppServerConnection.
The SOA Deployment Configuration Dialog displays.
Select Overwrite any existing composite with the same revision ID to overwrite the composite you previously deployed.
When prompted with the Authorization Request dialog, enter weblogic in the Username field and the password in the Password field.
In SOA - Log, a series of validations display, followed by:
BUILD SUCCESSFUL
Total time: nn seconds
Initiate a test instance of the OrderBookingComposite composite, as you have done previously. See Section 5.7.6, "Task 6: Initiate a Test Instance for the OrderBookingComposite Composite" for further information on creating a test instance. For this test instance, make the following adjustments:
From the Test dropdown list, select UpdateOrderStatus_ep as the test service.
In the Inputs Arguments section, enter the following values:
In the orderID field, enter an ID under 1000.
In the orderStatus field, enter any value.