5 Configuring Trading Partners
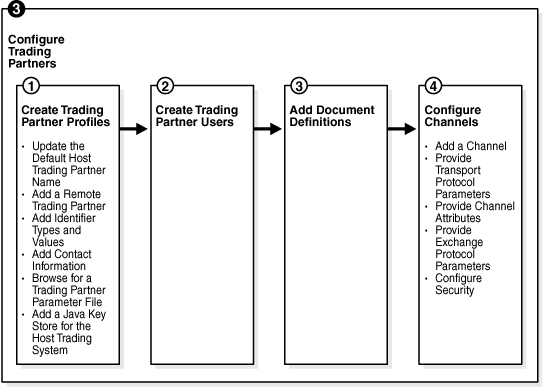
The third step in the Oracle B2B process flow, shown in Figure 5-1, is to configure the trading partners.
Configuring a trading partner includes creating a trading partner profile (providing values for identifiers, contact information, trading partner parameters, and Key Store information); adding trading partner users; adding document definitions and assigning sender and receiver roles, and configuring channel details, including security.
This chapter contains the following topics:
5.1 Introduction to Trading Partners
In Oracle B2B, a transaction involves two trading partners, the host trading partner and a remote trading partner. The host trading partner is the organization where Oracle B2B is installed. The remote trading partner is the organization with whom the host trading partner conducts an e-business transaction. A trading partner can have host (back-end) applications, databases, or customers to involve in the transaction. Either the initiator of a transaction or the responder can be the host or the remote trading partner.
The host trading partner organization configures all the trading partners, host and remote. By using the trading partner users created for each remote trading partner by the host trading partner, remote partners can access their own data in Oracle B2B. Figure 5-2 shows the steps to configure a trading partner.
5.2 Creating Trading Partner Profiles
Oracle B2B supplies a default host trading partner name, MyCompany, which you update to reflect your enterprise. After you create one or more remote trading partners, use the cloning feature to create new trading partners that participate in similar transactions. Cloning copies the source trading partner's document definitions and delivery channels (except MLLP channels), but does not copy identifiers, contacts, and users. Renaming the delivery channel in the newly created trading partner is recommended.
After you create and configure a trading partner, the information is saved as a trading partner profile in Oracle Metadata Repository. Partner data can be exported to a ZIP file by using the Export button on the Profile tab.
To create a trading partner profile, do the following:
- Task 1 Update the Default Host Trading Partner Name
-
Do this the first time you set up Oracle B2B.
-
Click the Partners link.
-
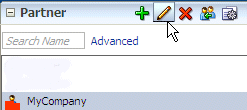
Click MyCompany.
-
Click Edit.
Description of the illustration bb_mycompany1.gif
-
Provide the host trading partner name and optional icon file, and click OK.
The optional icon file must be a 16 x 16-pixel PNG file.
The host trading partner name appears in the Partner list.
-
- Task 2 Add a Remote Trading Partner
-
Do this for each remote trading partner.
-
Click the Partners link.
-
Click Add.

Description of the illustration bb_add_partner.gif
-
Provide a partner name and click OK.
The remote trading partner name appears in the Partner list.
-
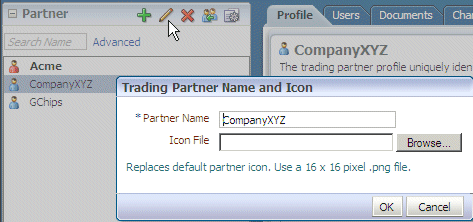
(Optional) Click Edit to add a 16 x16-pixel PNG file as an icon for the remote trading partner, and click OK.
Description of the illustration bb_icon.gif
A variation on this task is to use the clone feature. If you have already created a trading partner that is similar to a trading partner you want to create, click the Clone icon, as shown in Figure 5-3, and provide the trading partner information that is not cloned: identifiers, contacts, and users. The Clone trading partner feature does not clone the MLLP delivery channel for a remote trading partner. The MLLP delivery channel must be created manually.
Figure 5-3 Cloning a Remote Trading Partner

Description of "Figure 5-3 Cloning a Remote Trading Partner"
Note:
Use the Delete icon to delete a remote trading partner. However, you cannot delete a remote trading partner that is part of a deployed trading partner agreement. You must first delete the agreement. -
- Task 3 Add Identifier Types and Values
-
Identifier types enable Oracle B2B to identify a trading partner at run time. In general, the identification process is to identify the partner, then the document, and then the partner-document pair identifies the agreement. Oracle B2B provides each trading partner with a default identifier type, Name, whose value is the name of the trading partner.
Add identifier types and values for both the host and remote trading partners. See Chapter 9, "Creating Types," for more information.
-
Click the Partners link.
-
Click the Profile tab.
-
Select a trading partner.
-
In the Identifiers area, click Add.
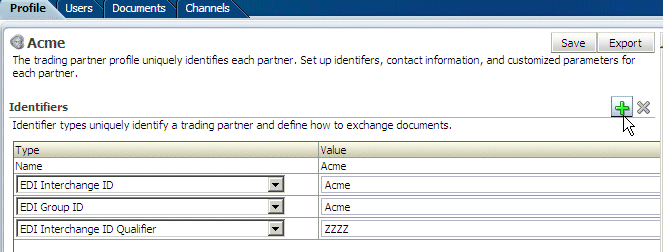
Description of the illustration bb_identifiers.gif
-
From the Type list, select an identifier type.
For descriptions of the identifier types, see Table 9-1, "Identifier Types Defined in Oracle B2B".
-
Click Save.
-
- Task 4 Add Contact Information
-
To add optional contact information for a trading partner, use the preseeded types. Or, you can create the contact type on the Administration > Types page. See "Creating Custom Contact Information Types" for more information.
-
Click the Partners link.
-
Click the Profile tab.
-
In the Contact Information area, click Add.
-
Select from the list under Type and enter a value.

Description of the illustration bb_contacts.gif
-
Click Save.
-
- Task 5 Add a Trading Partner Parameter and Value
-
Before adding an optional trading partner parameter and value for a trading partner, you must create the parameter on the Administration > Types page. See Chapter 9, "Creating Types," for more information.
-
Click the Partners link.
-
Click the Profile tab.
-
In the Parameters area, click Add.

Description of the illustration bb_add_params.gif
-
Select a parameter and click OK.
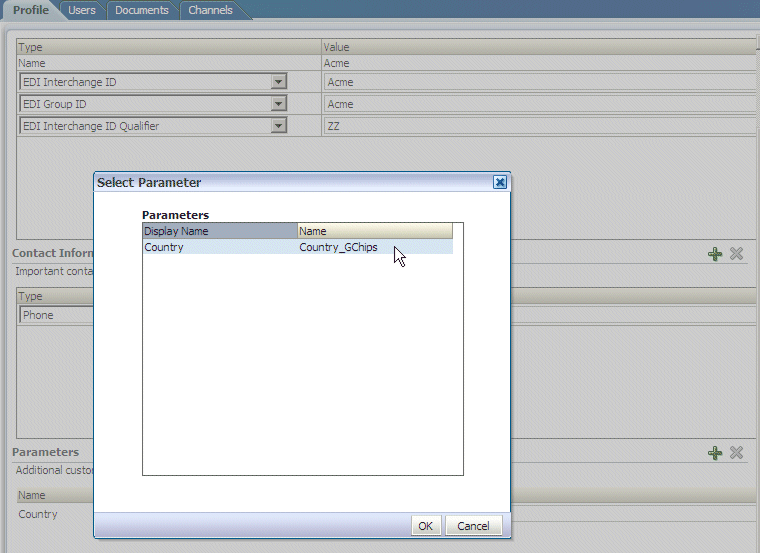
Description of the illustration bb_add_params2.gif
-
Click Save.
You can also update values for a specific trading partner on this page.
-
- Task 6 Provide Key Store Information for the Host Trading Partner
-
Add an optional Key Store password and location for host trading partner security. If a digital signature, encryption, or SSL are enabled, you must specify a Key Store location. See Task 5, "Configure Security" for where you specify digital signatures and encryption, and Table 5-3, "Channel Details and Associated Protocols" for descriptions of security parameters.
You can choose any Key Store for Oracle B2B. If you are using SSL, using the same Key Store for both B2B and Oracle WebLogic Server SSL configuration is recommended to avoid SSL-related problems when exchanging messages with trading partners.
-
Click the Partners link.
-
Click the Profile tab.
-
Select the host trading partner.
-
In the Key Store section, provide a password and location.

Description of the illustration bb_keystore1.gif
-
Click Save.
-
5.3 Adding Trading Partner Users
The host trading partner administrator (the default login username-password combination) can add additional host and remote trading partner users. These users can log in to Oracle B2B and access their own trading partner data only.
The following roles are available:
-
Administrator role—Provides access to all Oracle B2B functionality
-
Monitor role—Provides access to reporting functionality only (use of the Reports link)
Users with the administrator role can access all B2B functions for their trading partner data only. No data for other trading partners is displayed. Users with the monitor role can access report functionality for their trading partner data only. No other links and no data for other trading partners are displayed.
To add users, do the following:
- Task 1 Create a New User in the Identity Store
-
A user must exist in the Identity Store before you can provision the user in Oracle B2B. Although there are many tools that you can use to create users, one way is to use the Security Realms function in Oracle WebLogic Server Administration Console, as shown in Figure 5-4.
Figure 5-4 Oracle WebLogic Server Administration Console—Security Realms
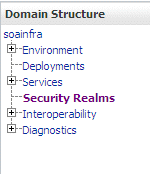
Description of "Figure 5-4 Oracle WebLogic Server Administration Console—Security Realms"
Then, within the myrealm settings, the Users and Groups tab displays a table of all users in your realm. Click New to add a user and user password, as shown in Figure 5-5.
Figure 5-5 Oracle WebLogic Server Administration Console—Adding a New User
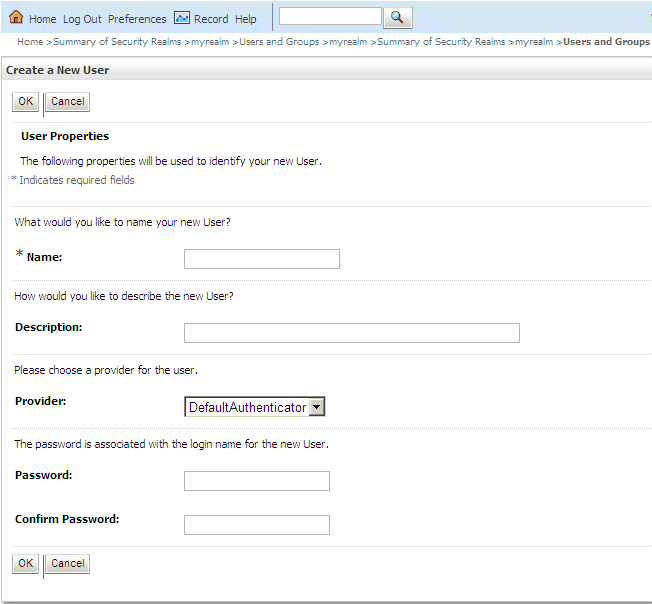
Description of "Figure 5-5 Oracle WebLogic Server Administration Console—Adding a New User"
- Task 2 Add a User in the Oracle B2B Interface
-
-
Click the Partners link.
-
Click the Users tab.
-
Select a trading partner.
-
Click Add.
-
Provide the user name created in Task 1 and click Search.
Enter the user name exactly is it was created.
-
Select the Monitor or Administrator role and click OK.
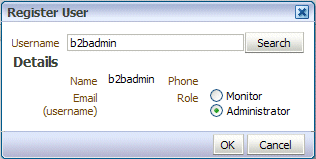
Description of the illustration bb_user_register.gif
-
5.4 Adding Document Definitions
The Oracle B2B host administrator creates all document definitions, which are automatically assigned to the host trading partner. The host administrator can assign any document definition to a remote trading partner. For both the host and remote trading partners, the sender and receiver for each document must be identified.
For information on updating a document definition after you have added it, see "Changing Document Definitions".
Note:
Document definitions that are automatically associated with the host trading partner must be deleted from the host trading partner profile (and also from the remote trading partner profile) before you can delete a document definition (from Administration > Document).Consider the scenario in which Acme (buyer) sends a purchase order to GlobalChips. As part of this transaction, Acme also receives an acknowledgment that GlobalChips (seller) received the purchase order. Therefore, this EDIFACT transaction uses two document definitions, one for the purchase order and one for the functional acknowledgment. GlobalChips receives the purchase order and also sends the acknowledgment.
For information on creating a document definition—required before you can you can add it to the trading partner profile—see Chapter 4, "Creating Document Definitions."
To add document definitions, do the following:
- Task 1 Add Document Definitions
-
Add document definitions to both host and remote trading partner profiles. You can also change document type parameters and document version parameters for the remote trading partner on this page. See Chapter 7, "Using Document Protocols," for more information.
-
Click the Partners link.
-
Click the Documents tab.
-
Select a trading partner.
-
Click Add.
-
Expand the nodes, select a document definition, and click Add.
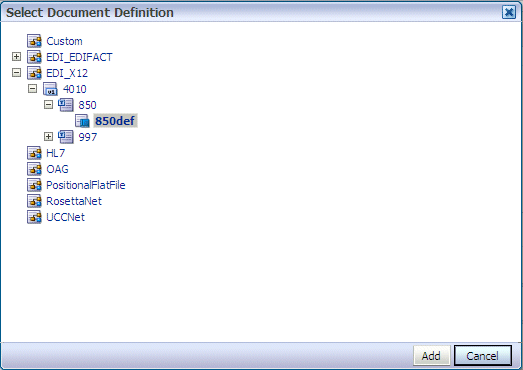
Description of the illustration b2b_docdefs3.gif
-
For each document listed, identify if the selected partner is the sender or receiver or both.

Description of the illustration b2b_docdefs1.gif
-
Click Save.
-
5.5 Configuring Channels
A channel defines how a message is delivered. It specifies trading partner security characteristics, the transport protocol, the exchange protocol, any exchange protocol override elements, and, if defined, support for digital envelopes, encryption credentials, digital signatures, signing credentials, and validation.
When you configure an external delivery channel for the host trading partner, it is available for all remote trading partners when you create agreements. This avoids having to create a delivery channel multiple times, once for each remote trading partner. When you configure an external delivery channel for a remote trading partner, it is available for only that remote trading partner when you create agreements. When you configure an internal delivery channel for the host trading partner—for inbound messages to Oracle B2B using the AQ, File, or JMS transports— the channel is available for only the host trading partner when you create inbound agreements.
Table 5-1 lists the channels available in Oracle B2B.
Table 5-1 Channels Available in Oracle B2B
| Protocol | Description |
|---|---|
|
Applicability Statement 2, version 1.1—specification for using EDI over the Internet. AS2 provides S/MIME support over HTTP or HTTPS. AS2 also works with non-EDI document types such as |
|
|
Minimum Lower Layer Protocol (MLLP) is a minimalistic OSI-session layer framing protocol. MLLP (and the TCP transport protocol) are available for remote trading partners only. It is used with HL7 or Custom documents. With MLLP, the same channel can be used for sending or receiving messages, and can be configured as either the server or the client. MLLP connections can be permanent or transient: Features of a permanent connection:
Features of a transient connection:
See "About MLLP" for more information. |
|
|
Electronic business Extensible Markup Language (ebXML) Messaging Service (ebMS)—specification used to exchange XML documents. ebMS is built on a SOAP Web services message format. Oracle B2B supports ebMS 1.0 and 2.0 and uses the HTTP, HTTPS, and Email transport protocols and the SOAP packaging protocol. The ebMS protocol supports correlation between documents. Oracle B2B also supports XMLDSig, XML Encrypt, and gZip-based compression for large documents. |
|
|
RosettaNet 2.0 does not include the proprietary aspects of RosettaNet 1.1, and adds support for multiple transfer protocols, hub-based routing, attachments, payload encryption, and more. |
|
|
Implementation guidelines for creating software applications that provide for the reliable transport of PIPs in XML-format business documents between trading partners. Guidelines are provided for transport, routing, packaging, security, signals, and trading partner agreements. RosettaNet specifies the envelope or container format that remains constant when exchanging business documents (the payloads), whereas the document exchange choreography and the XML schemas vary based on which PIP and document type are used. The RosettaNet envelope format is also independent of the specific transfer protocol you use. |
|
|
Applicability Statement 1—specification for using EDI over SMTP. AS1 also works with non-EDI document types such as XML and TXT files. |
|
|
Transport by which messages are sent to or received from a file in a local file system. |
|
|
Transport by which messages are sent to or received from Oracle AQ single or multiconsumer queues. |
|
|
Transport by which messages are sent to or received from a file at a remote FTP server. |
|
|
Transport by which messages are sent to or received from a file at a remote SFTP server. |
|
|
Transport by which messages are sent to or received from a JMS queue or topic. |
|
|
Transport by which messages are sent to or received from a Web server. |
|
|
Transport by which messages are sent to or received from an e-mail server. |
To configure a channel for a trading partner, do the following:
- Task 1 Add a Channel
-
Add a channel for the responder in a B2B transaction.
-
Click the Partners link.
-
Click the Channels tab.
-
Select a trading partner.
-
Click Add.
-
Enter a channel name.
-
Select a protocol, as described in Table 5-1.
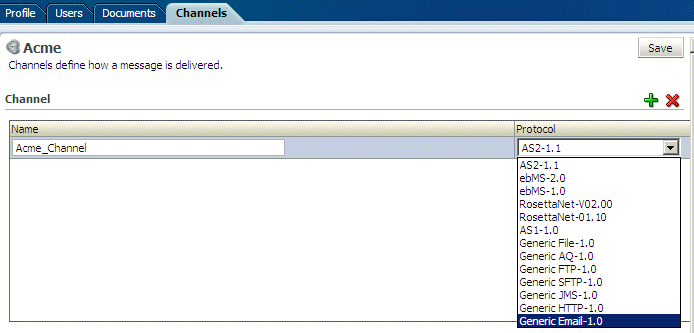
Description of the illustration bb_chan_protocols.gif
-
Click Save.
Based on the delivery channel protocol you selected in Step 6, the applicable protocol is displayed in the Transport Protocol field, as shown in Table 5-2.
Table 5-2 Delivery Channels and Transport Protocols
Channel Protocol Selected... Transport Protocol Displayed... AS2-1.1
ebMS-2.0, ebMS-1.0
RosettaNet-V02.00, RosettaNet-01.00
Generic HTTP-1.0
HTTP
AS1-1.0
Generic Email-1.0
Email
MLLP-1.0
TCP
Generic File-1.0
File
Generic AQ-1.0
AQ
Generic FTP-1.0
FTP
Generic SFTP-1.0
SFTP
Generic JMS-1.0
JMS
-
- Task 2 Provide Transport Protocol Parameters
-
-
Click the Transport Protocol Parameters tab.
-
Provide transport protocol parameters, depending on the channel/transport protocols selected in Task 1.
Table 5-3 describes the transport protocol parameters (listed in alphabetical order within the transport protocol parameters category) and the protocols to which the parameters apply.
-
Figure 5-6 shows the HTTP transport protocol parameters.
Figure 5-6 HTTP Transport Protocol Parameters
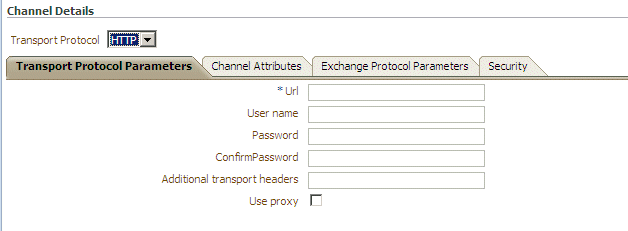
Description of "Figure 5-6 HTTP Transport Protocol Parameters"
-
Figure 5-7 shows the Email transport protocol parameters.
Figure 5-7 Email Transport Protocol Parameters

Description of "Figure 5-7 Email Transport Protocol Parameters"
-
Figure 5-8 shows the MLLP transport protocol parameters.
Figure 5-8 MLLP Transport Protocol Parameters

Description of "Figure 5-8 MLLP Transport Protocol Parameters"
-
Figure 5-9 shows the File transport protocol parameters.
Figure 5-9 File Transport Protocol Parameters
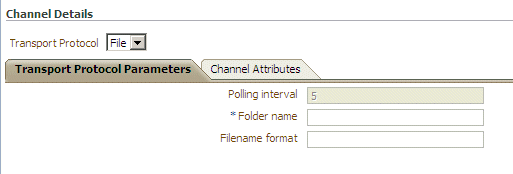
Description of "Figure 5-9 File Transport Protocol Parameters"
-
Figure 5-10 shows the AQ transport protocol parameters.
Figure 5-10 AQ Transport Protocol Parameters

Description of "Figure 5-10 AQ Transport Protocol Parameters"
-
Figure 5-11 shows the FTP transport protocol parameters.
Figure 5-11 FTP Transport Protocol Parameters

Description of "Figure 5-11 FTP Transport Protocol Parameters"
-
Figure 5-12 shows the SFTP transport protocol parameters.
Figure 5-12 SFTP Transport Protocol Parameters

Description of "Figure 5-12 SFTP Transport Protocol Parameters"
-
Figure 5-13 shows the JMS transport protocol parameters.
Figure 5-13 JMS Transport Protocol Parameters

Description of "Figure 5-13 JMS Transport Protocol Parameters"
-
-
Click Save.
-
- Task 3 Provide Channel Attributes
-
-
Provide channel attributes, depending on the channel/transport protocols selected in Task 1.
Table 5-3 describes the channel attributes (listed in alphabetical order within the channel attributes category) and the protocols to which the attributes apply.
-
Figure 5-14 shows the HTTP channel attributes.
Note:
For Generic HTTP-1.0, the Ack Mode, Response Mode, and Compressed attributes shown in Figure 5-14 are not available. -
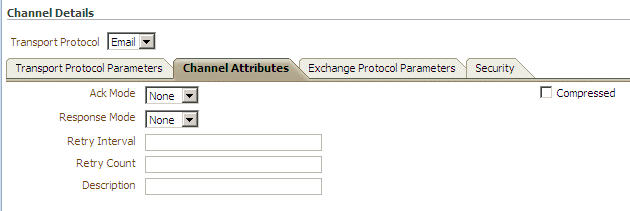
Figure 5-15 shows the Email channel attributes.
Note:
For Generic Email-1.0, the Ack Mode, Response Mode, and Compressed attributes shown in Figure 5-15 are not available. -
Figure 5-16 shows the MLLP channel attributes
-
Figure 5-17 shows the File, AQ, FTP, SFTP, and JMS channel attributes.
Figure 5-17 Channel Attributes for Generic File, AQ, FTP, SFTP, and JMS

Description of "Figure 5-17 Channel Attributes for Generic File, AQ, FTP, SFTP, and JMS"
-
-
Click Save.
- Task 4 Provide Exchange Protocol Parameters
-
-
Click the Exchange Protocol Parameters tab.
-
Provide exchange protocol parameters, depending on the channel/transport protocols selected in Task 1.
Table 5-3 describes the exchange protocol parameters (listed in alphabetical order within the exchange protocol parameters category) and the protocols to which the parameters apply.
-
Figure 5-18 shows HTTP - AS2-1.1 exchange protocol parameters.
Figure 5-18 Exchange Protocol Parameters for HTTP - AS2-1.1

Description of "Figure 5-18 Exchange Protocol Parameters for HTTP - AS2-1.1"
-
Figure 5-19 shows HTTP - ebMS-2.0 exchange protocol parameters.
Figure 5-19 Exchange Protocol Parameters for HTTP - ebMS-2.0

Description of "Figure 5-19 Exchange Protocol Parameters for HTTP - ebMS-2.0"
-
Figure 5-20 shows HTTP - ebMS-1.0 exchange protocol parameters.
Figure 5-20 Exchange Protocol Parameters for HTTP - ebMS-1.0

Description of "Figure 5-20 Exchange Protocol Parameters for HTTP - ebMS-1.0"
-
Figure 5-21 shows the TCP - MLLP-1.0 exchange protocol parameters.
Figure 5-21 Exchange Protocol Parameters for TCP - MLLP-1.0

Description of "Figure 5-21 Exchange Protocol Parameters for TCP - MLLP-1.0"
-
Figure 5-22 shows the Email - AS1-1.0 exchange protocol parameters.
Figure 5-22 Exchange Protocol Parameters for Email - AS1-1.0

Description of "Figure 5-22 Exchange Protocol Parameters for Email - AS1-1.0"
-
-
Click Save.
-
- Task 5 Configure Security
-
-
Click the Security tab.
-
Provide security parameters, depending on the channel/transport protocols selected in Task 1.
Table 5-3 describes the security parameters (listed in alphabetical order within the security category) and the protocols to which the parameters apply.
The Digital Signature and Encryption lists are populated with the available certificates when the Key Store location is provided for the host trading partner. See Task 6, "Provide Key Store Information for the Host Trading Partner" for more information.
Note:
Message encryption using an AES setting is preferable, where available. See the security parameters in Table 5-3.Security parameters do not apply to the MLLP channel.
-
Figure 5-23 shows the security parameters for the AS2-1.1, ebMS-2.0, ebMS-1.0, RosettaNet-V02.00, and AS1-1.0 protocols.
Figure 5-23 Security Parameters for the AS2-1.1, ebMS-2.0, ebMS-1.0, RosettaNet-V02.00, and AS1-1.0 Protocols

Description of "Figure 5-23 Security Parameters for the AS2-1.1, ebMS-2.0, ebMS-1.0, RosettaNet-V02.00, and AS1-1.0 Protocols"
-
Figure 5-24 shows the security parameters for RosettaNet-01.10. For RosettaNet-01.10, the Message Encrypted parameter is not available.
Figure 5-24 Security Parameters for RosettaNet-01.10

Description of "Figure 5-24 Security Parameters for RosettaNet-01.10"
Note:
No security parameters are specified for the Generic protocols—Generic File-1.0, Generic AQ-1.0, Generic FTP-1.0, Generic SFTP-1.0, Generic JMS-1.0, Generic HTTP-1.0, and Generic Email-1.0.
-
-
Click Save.
-
5.5.1 About MLLP
A permanent MLLP (server/client) delivery channel is bidirectional, that is, it can be used for sending and receiving messages. Other delivery channels are not bidirectional. An MLLP delivery channel is configured for the remote trading partner only. This channel can be either a server or a client channel, used to send or receive messages. You must configure both servers (sender and receiver) MLLP (server/client) channels either in permanent mode or in transient channel mode. A recommended configuration is for the sender to configure the MLLP client delivery channel and for the receiver to configure the MLLP server channel.
For example, Acme can have the server/client MLLP permanent channel and GlobalChips can have the server/client MLLP permanent channel. MLLP channels configured in permanent-transient and transient-permanent modes are not valid. Because MLLP is a bidirectional channel, you do not create an MLLP listening channel. You can use the same MLLP delivery channel for sending and receiving messages.
5.6 Adding Channel Details
Channel details include transport protocol parameters, channel attributes, exchange protocol parameters, and security specifications. Table 5-3 describes these details.
Table 5-3 Channel Details and Associated Protocols
| Protocol/Parameter | Description | Protocol Used With |
|---|---|---|
|
Transport Protocol Parameters |
A transport protocol defines the properties specific to a given use of a protocol endpoint. The transport is responsible for message delivery using the selected transport protocol, mode (synchronous or asynchronous), server, and protocol endpoint address (trading partner address, such as a URI) |
- |
|
Additional transport headers |
The custom HTTP headers used to send messages to a trading partner |
AS2 (optional) Generic HTTP (optional) |
|
Channel mask |
To enable SSL for FTP, enter one of the following:
The default is None (no SSL). |
Generic FTP (optional) |
|
Cipher suites |
Provide the preferred cipher for encryption. |
Generic FTP (optional) |
|
Connection factory |
The JNDI location or Java class name for the connection factory, as in |
Generic JMS (optional) |
|
Connection Mode |
Select from Client or Server. |
MLLP-1.0 (required; for remote trading partners only) |
|
Consumer |
The client that receives the message. |
Generic AQ (optional) |
|
Content type |
The content type of the payload being sent over e-mail. The default content type is |
AS1 (optional) Generic Email (optional) |
|
Control port |
Provide a value to change the default FTP port value (21) |
Generic FTP (optional) |
|
Data port |
The static port used for an active FTP connection |
Generic FTP (optional) |
|
Data source |
The JNDI name of the database data source |
Generic AQ (optional) |
|
Destination name |
The JMS destination name |
Generic JMS (optional) |
|
Email ID |
The destination e-mail |
AS1 (required) Generic Email (required) |
|
Email Server |
Select IMAP or POP3. |
AS1 (required) Generic Email (required) |
|
Encoding |
The encoding to be used for the file transfer |
Generic FTP (optional) |
|
Filename format |
The following file name formats can be used: %FROM_PARTY% %TO_PARTY% %DOCTYPE_NAME% %DOCTYPE_REVISION% %MSG_ID% %TIMESTAMP% The following file name format can be used for ebMS documents only: %ACTIONNAME% These file name formats can be used in any combination; for example, %TO_PARTY%_%DOCTYPE_NAME%_%DOCTYPE_REVISION%.dat produces something like |
Generic File (optional) Generic FTP (optional) Generic SFTP (optional) |
|
Folder |
An absolute directory path is recommended. |
AS1 (optional) Generic Email (optional) |
|
Folder name |
An absolute directory path is recommended. |
Generic File (required) Generic FTP (required) |
|
Host name |
The trading partner's transport or e-mail server exchanging messages. For the MLLP 1.0 protocol, if the connection mode is set to Server, then the host name must be the B2B server. If the connection mode is set to Client, then the host name must be the remote B2B server (MLLP server). |
AS1 (required) Generic AQ (optional) Generic FTP (required) MLLP-1.0 (required; for remote trading partners only) Generic SFTP (required) Generic Email (required) |
|
Is Map Payload Alone |
Indicates that the JMS map message contains only the payload |
Generic JMS (optional) |
|
Is topic |
Select to indicate that JMS is communicating with a topic (not a queue). |
Generic JMS (optional) |
|
Message type |
Select a JMS message type: BYTES, TEXT, or MAP. |
Generic JMS (optional) |
|
Pass phrase and Confirm pass phrase |
If you enter a private key file location, and if the private key file is pass-phrase protected, then enter the pass phrase. |
Generic SFTP (optional) |
|
Password and Confirm Password |
To use password authentication, provide a Key Store password, which is used for HTTP basic authentication. |
AS1 (optional) AS2 (optional) Generic AQ (optional) ebMS-2.0 (optional) ebMS-1.0 (optional) Generic FTP (optional) Generic HTTP (optional) Generic SFTP (optional) Generic JMS (optional) Generic Email (optional) RosettaNet-V02.00 (optional) RosettaNet-01.10 (optional) |
|
Path |
The absolute directory path where messages are sent from or received. |
Generic SFTP (required) |
|
Permanent Connection |
When set to false (the default value), a message is sent on a new connection and the connection is closed after the ACK is received. As a receiver of the message, the connection is closed after the ACK is sent back to the trading partner. When set to true, a cached connection is used to exchange all the messages. |
MLLP-1.0 (optional; for remote trading partners only) |
|
Polling interval |
The time interval in milliseconds during which Oracle B2B polls the server for inbound messages. |
AS1 (optional) Generic File (not available) Generic AQ (optional) Generic FTP (not available) MLLP-1.0 (optional; for remote trading partners only) Generic SFTP (not available) Generic JMS (optional) Generic Email (not available) |
|
Port number (or Port) |
AQ runs on default port 1521. SFTP runs on default port 22, which can be changed to another port. FTP runs on default port 21, which is not displayed. See the description of Control Port for how to change this port number. For the MLLP 1.0 protocol, if the connection mode is set to Server, then the port must be a valid TCP port number. If the connection mode is set to Client, then the port must be the same as the port used on the MLLP server. |
Generic AQ (optional) MLLP-1.0 (required; for remote trading partners only) Generic SFTP (required) |
|
Private key |
To use public key authentication, provide the private key file location. You may also need to provide a pass phrase if the private key file is pass-phrase protected. |
Generic SFTP (optional) |
|
Queue name |
The AQ queue name |
Generic AQ (optional) |
|
Recipient |
The AQ recipient |
Generic AQ (optional) |
|
Send as attachment |
If enabled, the message (payload) is sent as an e-mail attachment instead of the typical delivery in which the payload is the message body. |
AS1 (optional) Generic Email (optional) |
|
Sequence |
If enabled, all inbound MLLP messages are sequenced. This feature is in preview mode for this release. |
MLLP-1.0 (optional; for remote trading partners only) |
|
SID |
System ID to identify an Oracle database |
Generic AQ (optional) |
|
Subject |
The subject header of the e-mail message |
AS1 (optional) Generic Email (optional) |
|
Subscriber ID |
The JMS subscriber ID is required if JMS is communicating with a topic. |
Generic JMS |
|
Timeout |
Defines how long a transient MLLP connection keeps the socket open for the acknowledgment message. The default timeout value is 300 seconds. This parameter applies only to a transient MLLP connection (not to a permanent connection). |
MLLP-1.0 (optional; for remote trading partners only) |
|
URL |
The HTTP or HTTPS endpoint URL of the trading partner. |
AS2 (required) ebMS-2.0 (required) ebMS-1.0 (required) Generic HTTP (required) RosettaNet-V02.00 (required) RosettaNet-01.10 (required) |
|
User name |
The user name to connect to the target server, used for HTTP basic authentication. |
AS1 (optional AS2 (optional) Generic AQ (optional) ebMS-2.0 (optional) ebMS-1.0 (optional) Generic FTP (required) Generic HTTP (optional) Generic SFTP (required) Generic JMS (optional) Generic Email (optional) RosettaNet-V02.00 (optional) RosettaNet-01.10 (optional) |
|
Use proxy |
Select a proxy server if used. |
Generic FTP (optional) AS2 (optional) ebMS-2.0 (optional) ebMS-1.0 (optional) Generic HTTP (optional) RosettaNet-V02.00 (optional) RosettaNet-01.10 (optional) Generic SFTP (optional) |
|
Channel Attributes |
The channel is the communication interface between the host trading partner's host application and its installation |
- |
|
Ack Mode |
Select Sync, Async, or None, for the mode in which the trading partner receives messages. Select None for all generic exchanges. |
AS1 (optional) AS2 (optional) ebMS-2.0 (optional) ebMS-1.0 (optional) RosettaNet-V02.00 (optional) RosettaNet-01.10 (optional) |
|
Compressed |
Select for message compression. |
AS1 (optional) AS2 (optional) |
|
Description |
Optional |
AS1 (optional) AS2 (optional) ebMS-2.0 (optional) ebMS-1.0 (optional) Generic File (optional) Generic AQ (optional) Generic FTP (optional) Generic HTTP (optional) RosettaNet-V02.00 (optional) RosettaNet-01.10 (optional) Generic SFTP (optional) Generic JMS (optional) Generic Email (optional) |
|
Enable/Disable Channel |
The channel is the communication interface between the host trading partner's host application and its installation. |
Generic Email (Required) MLLP-1.0 (required; for remote trading partners only) |
|
Internal Caution: While the B2B interface permits you to select invalid protocols when Internal is selected, do not select any protocols other than the generic protocols. |
Select this option if the channel is internal to the host trading partner's enterprise. |
If this option is checked, then only the generic protocols are valid: Generic File (optional) Generic AQ (optional) Generic FTP (optional) Generic HTTP (optional) Generic SFTP (optional) Generic JMS (optional) Generic Email (optional) If this option is not checked, all protocols are valid: AS1 (optional) AS2 (optional) ebMS-2.0 (optional) ebMS-1.0 (optional) Generic File (optional) Generic AQ (optional) Generic FTP (optional) Generic HTTP (optional) RosettaNet-V02.00 (optional) RosettaNet-01.10 (optional) Generic SFTP (optional) Generic JMS (optional) Generic Email (optional) |
|
Response Mode |
Select Sync, Async, or None. |
AS1 (required) AS2 (optional) ebMS-2.0 (optional) ebMS-1.0 (optional) RosettaNet-V02.00 (optional) RosettaNet-01.10 (optional) |
|
Retry Count |
The number of times that Oracle B2B retries to send the message. |
AS1 (optional) AS2 (optional) ebMS-2.0 (optional) ebMS-1.0 (optional) Generic File (optional) Generic AQ (optional) Generic FTP (optional) Generic HTTP (optional) MLLP-1.0 (optional; for remote trading partners only) RosettaNet-V02.00 (optional) RosettaNet-01.10 (optional) Generic SFTP (optional) Generic JMS (optional) Generic Email (optional) |
|
Retry Interval |
The time interval in seconds during which Oracle B2B attempts to resend the message. A time interval of 2 minutes increments the HH:MM:SS timestamp as follows: If the sent timestamp is 3:42:58, then 42 seconds is incremented by 2 minutes and the retry is sent at 3:44:00. The seconds are dropped in the retry increment. Subsequent retries are at 2 minute intervals. For protocols with acknowledgments, B2B waits for the acknowledgment (formerly called the Time to Acknowledge parameter). If it is not received, the retry interval setting causes B2B to retry. |
AS1 (optional) AS2 (optional) ebMS-2.0 (optional) ebMS-1.0 (optional) Generic File (optional) Generic AQ (optional) Generic FTP (optional) Generic HTTP (optional) MLLP-1.0 (optional; for remote trading partners only) RosettaNet-V02.00 (optional) RosettaNet-01.10 (optional) Generic SFTP (optional) Generic JMS (optional) Generic Email (optional) |
|
Exchange Protocol Parameters |
The exchange protocol defines the headers, acknowledgments, and packaging that puts the headers and payload together (the message exchange mechanism). The exchange protocol also defines signing, encryption, and compression. |
- |
|
Carriage Return Character |
This value can be only one character. The carriage return character does not appear in the wire message payload. The default value is 0x0D (hexadecimal). |
MLLP-1.0 (optional; for remote trading partners only) |
|
Custom Immediate ACK File |
Browse for a file with a customized acknowledgment. |
MLLP-1.0 (optional; for remote trading partners only) |
|
Discard HL7 ACK |
Stops the incoming acknowledgment at the transport level if the selected code is in MSA.2. An entry is made for the wire message report. |
MLLP-1.0 (optional; for remote trading partners only) |
|
Duplicate Elimination |
If enabled, a duplicate elimination header is added for an outbound message. This flag does not apply to the inbound message flow. |
ebMS-2.0 (optional) ebMS-1.0 (optional) |
|
End Block Character |
This value can be only one character. The end block character does not appear in the wire message payload. The default value is 0x1C (hexadecimal). |
MLLP-1.0 (optional; for remote trading partners only) |
|
Identify TP by Delivery Channel |
The trading partner is identified using the delivery channel. |
MLLP-1.0 (optional; for remote trading partners only) |
|
Immediate ACK |
An immediate acknowledgment is generated and transmitted in the TCP transport layer instead of the document layer. It is an alternative to the functional acknowledgment. It is available when the turnaround time of a functional acknowledgment is undesirable (for example, for some business-critical health care applications), because the functional acknowledgment captures translation and validation errors. Oracle B2B can send an immediate acknowledgment in the following modes:
|
MLLP-1.0 (optional; for remote trading partners only) |
|
Map ACK Control ID |
Select to enable the mapping of the message header of the business message to the message header of the immediate acknowledgment. |
MLLP-1.0 (optional; for remote trading partners only) |
|
Map Trigger Event |
Sends an immediate acknowledgment with a trigger event. |
MLLP-1.0 (optional; for remote trading partners only) |
|
Message Order Semantics |
A placeholder for CPP/CPA; not involved during run time. |
ebMS-2.0 (optional) |
|
Persist Duration |
A placeholder for CPP/CPA; not involved during run time. |
ebMS-2.0 (optional) |
|
Receipt Delivery Option |
This parameter is used to configure a URL to which MDN has to be sent back in the case of an asynchronous mode. |
AS2 (optional) |
|
Send Party Type and Value |
If enabled, the send party type and value from the message header are sent to the back-end application. |
ebMS-2.0 (optional) ebMS-1.0 (optional) |
|
Signed and Compressed |
If selected, the message is first signed, and then compressed. |
AS1 (optional) |
|
Start Block Character |
This value can be only one character. The start block character does not appear in the wire message payload. The default value is 0X08 (hexadecimal). |
MLLP-1.0 (optional; for remote trading partners only) |
|
Security Parameters |
- |
- |
|
Ack Signed |
Select this option to ensure that the responder acknowledges receipt of the messages; nothing needs to be provided. |
AS1 (optional) AS2 (optional) ebMS-2.0 (optional) ebMS-1.0 (optional) RosettaNet-V02.00 (optional) RosettaNet-01.10 (optional) |
|
Digital Signature |
To use a digital signature certificate, the Key Store must have the corresponding private key. If Message Signed is selected, then select one of the following for AS1 and AS2: SMIME 3.0 with MD5 - RSA SMIME 3.0 with SHA1 - RSA If Message Signed is selected, then select one of the following for ebMS-2.0 and ebMS-1.0: XMLDSIG with SHA1 - RSA XMLDSIG with SHA1 - DSA If Message Signed is selected, then select one of the following for RosettaNet-V02.00: SMIME 3.0 with MD5 - RSA SMIME 3.0 with SHA1 - RSA SMIME 2.0 with MD5 - RSA SMIME 2.0 with SHA1 - RSA XMLDSIG with SHA1 - RSA XMLDSIG with SHA1 - DSA If Message Signed is selected, then select one of the following for RosettaNet-01.10: SMIME 3.0 with MD5 - RSA SMIME 3.0 with SHA1 - RSA SMIME 2.0 with MD5 - RSA SMIME 2.0 with SHA1 - RSA |
AS1 AS2 ebMS-2.0 ebMS-1.0 RosettaNet-V02.00 RosettaNet-01.10 |
|
Encryption |
To use an encryption certificate, no private key entry is needed. If Message Encrypted is selected, then select one of the following for AS1 and AS2: SMIME 3.0 with DES SMIME 3.0 with 3DES SMIME 3.0 with RC2 - 40 SMIME 3.0 with RC2 - 64 SMIME 3.0 with RC2 - 128 If Message Encrypted is selected, then select one of the following for ebMS-2.0 and ebMS-1.0: XMLENC with 3DES - RSA-v1.5 XMLENC with AES-128 RSA-OAEP XMLENC with AES-192 RSA-OAEP XMLENC with AES-256 RSA-OAEP |
AS1 AS2 ebMS-2.0 ebMS-1.0 RosettaNet-V02.00 (optional) |
|
Message Encrypted |
Select this option to enable message encryption. This option requires you to select an encryption schema in the Encryption field. |
AS1 (optional) AS2 (optional) ebMS-2.0 (optional) ebMS-1.0 (optional) RosettaNet-V02.00 (optional) |
|
Message Signed |
Select this option to provide a digital signature in the Digital Signature field. |
AS1 (optional) AS2 (optional) ebMS-2.0 (optional) ebMS-1.0 (optional) RosettaNet-V02.00 (optional) RosettaNet-01.10 (optional) |
5.7 Using the Auto Create Agreement Feature
In the Partner area, shown in Figure 5-25, you can use the Auto Create Agreement icon to create an agreement for a remote trading partner.
Figure 5-25 The Auto Create Agreement Feature
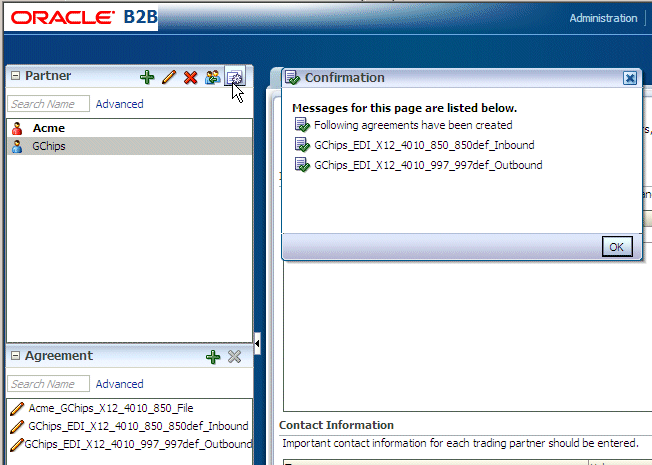
Description of "Figure 5-25 The Auto Create Agreement Feature"
This feature creates one agreement for each document definition associated with the selected remote trading partner. You can further customize the agreement on the Agreement tab. See Chapter 6, "Creating and Deploying Trading Partner Agreements," for more information about the Agreement tab.
5.8 Using Identifiers for Trading Partner Lookup
Identifiers available in design-time data are used to look up trading partners. Identifiers do not need to be part of a deployed, active agreement. The appropriate document and exchange identifiers are used for lookup; for example:
-
For the AS2-1.1 exchange protocol, the AS2 identifier is used.
-
For the EDI X12 document protocol, the Sender Group ID and Sender Interchange ID are used.

